نصائح لتصوير الشلالات

تقليص
X
 
  • تصفية - فلترة
  • الوقت
  • عرض
إلغاء تحديد الكل
مشاركات جديدة

  • نصائح لتصوير الشلالات

    نصائحي المفضلة لتصوير الشلالات

    My Favorite Tips for Photographing Waterfalls


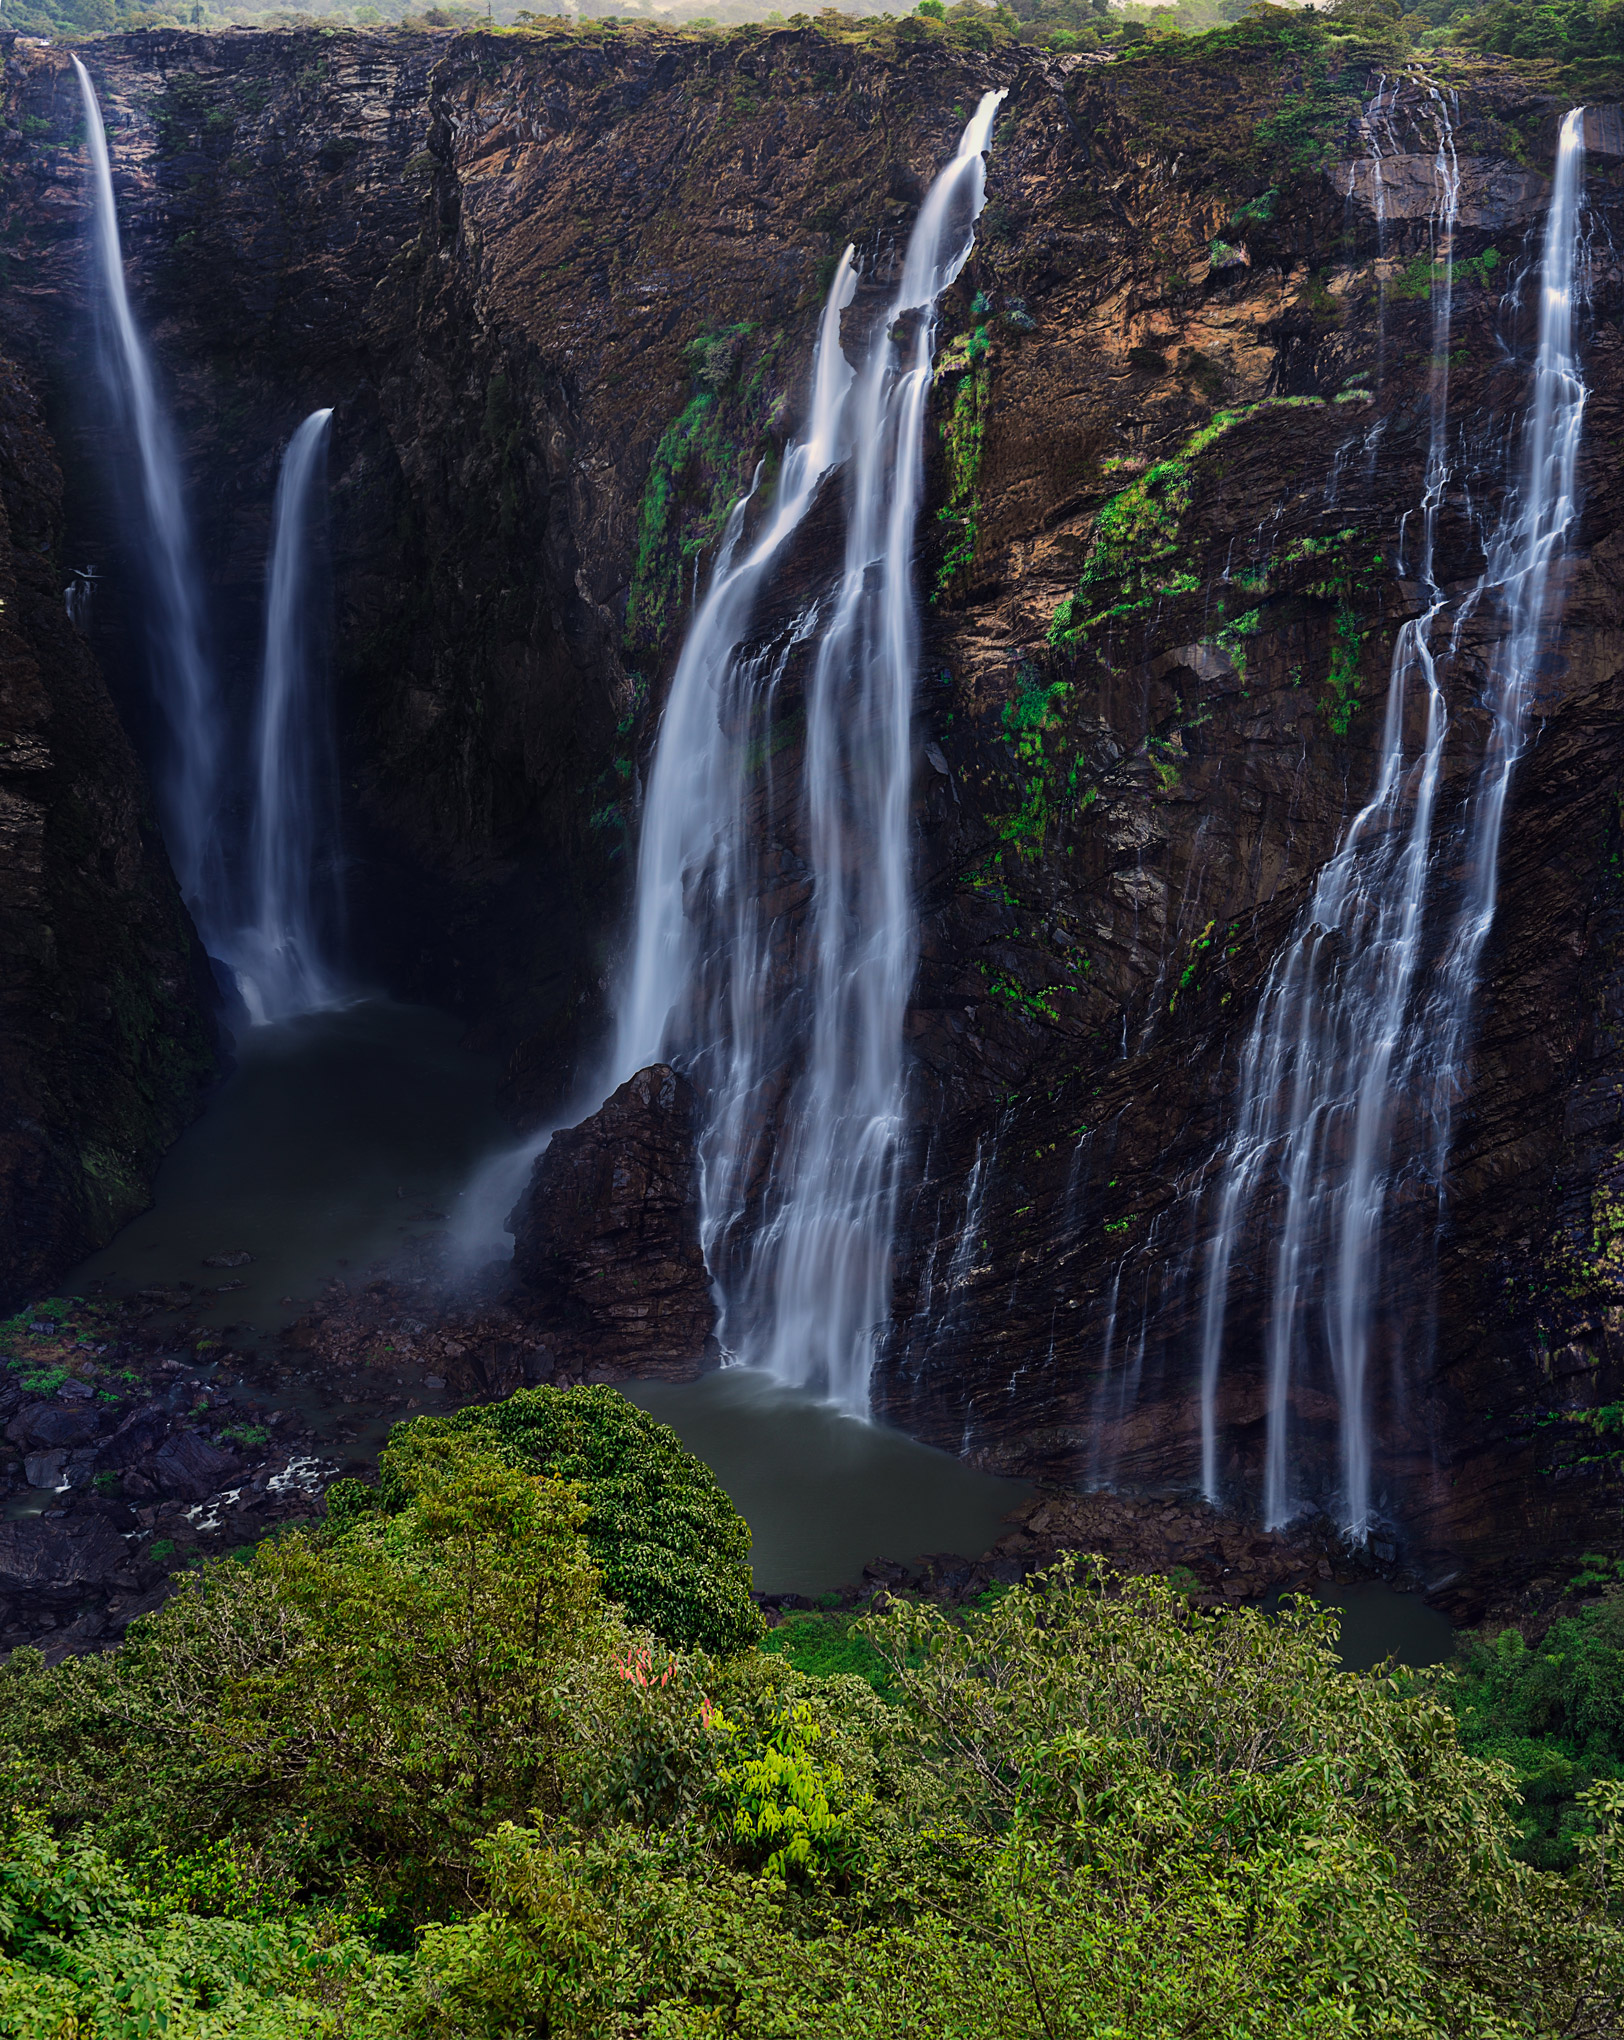
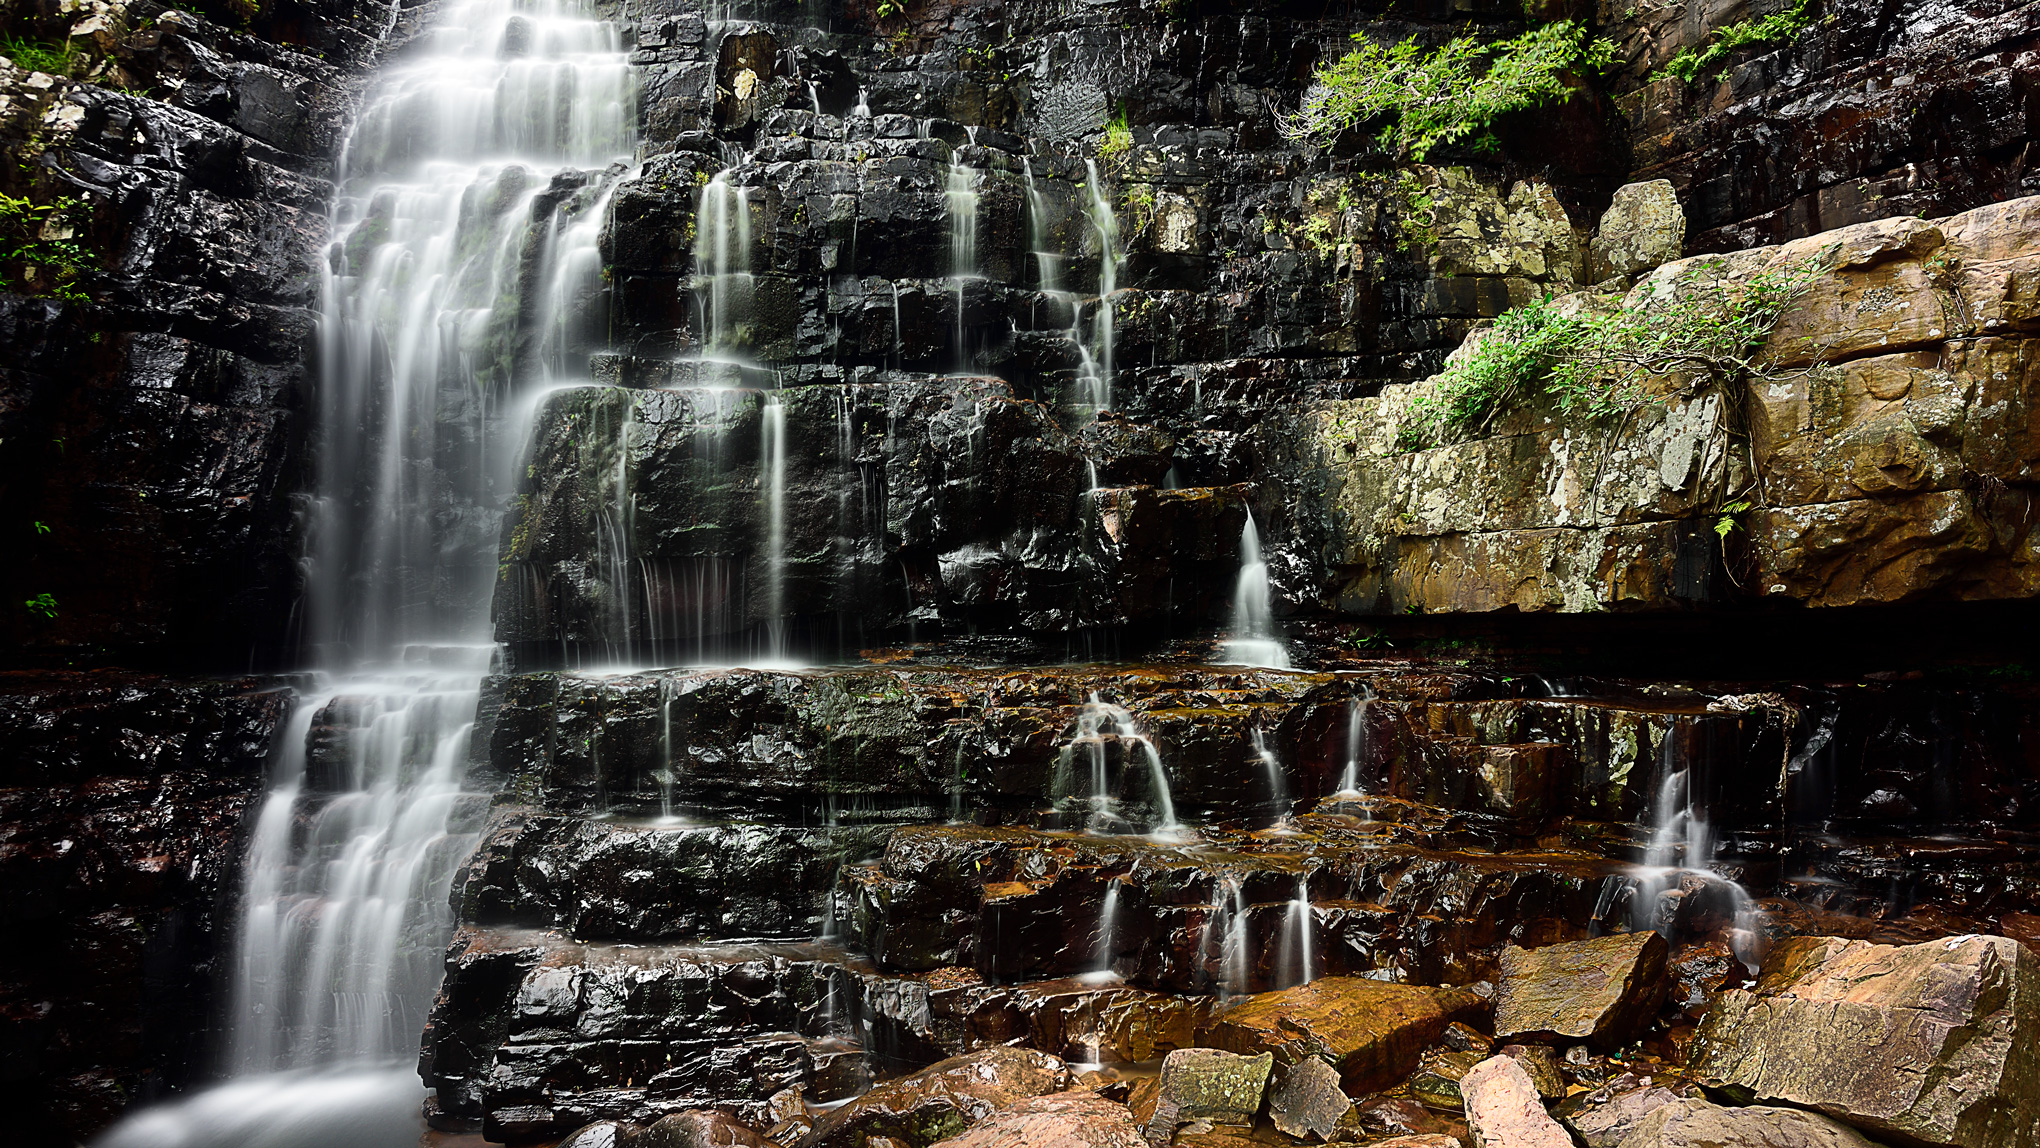
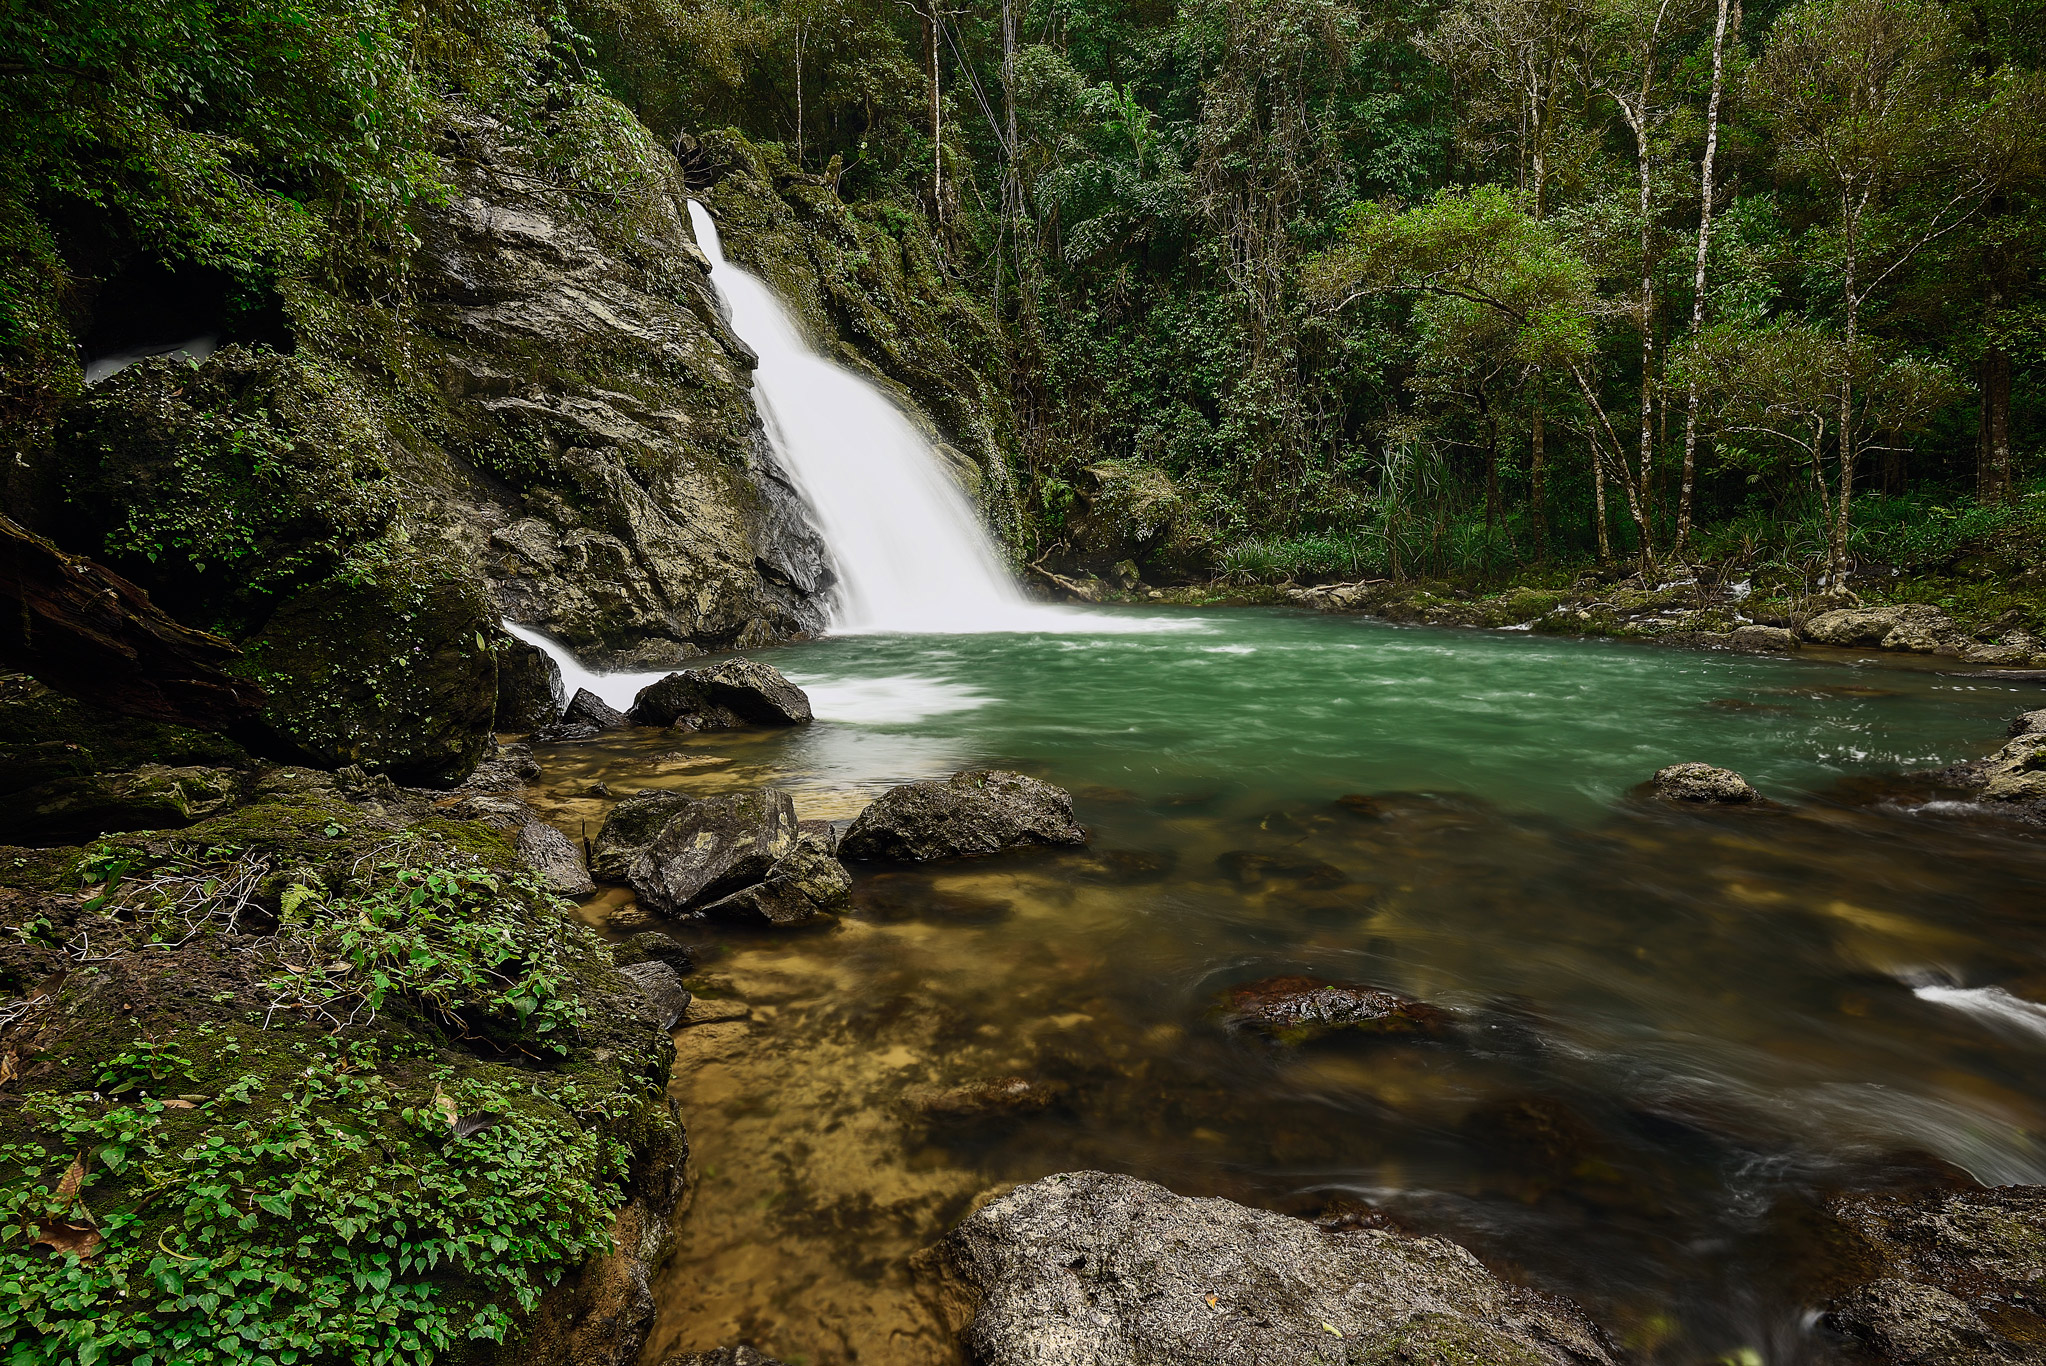
    من الصعب العثور على ملف صور للمناظر الطبيعية دون صورة شلال. مع أن بعض الشلالات قد لا تبدو رائعةً في الواقع، إلا أنها غالبًا ما تُقدم صورًا رائعة، خاصةً عند التقاطها بتعريض طويل أو سرعة غالق بطيئة. في هذه المقالة، سأشارك بعض النصائح والحيل التي أحبها كثيرًا في تصوير الشلالات.


    It is hard to find a landscape portfolio without a waterfall photograph. Even though some waterfalls might not appear great in person, they often make great photographs, especially when shot with a long exposure or slow shutter speed. In this article, I will share some of the tips and tricks that I like the most for waterfall photography

  • #2
    جدول المحتويات
    استثمر في حامل ثلاثي جيد
    احمِ معداتك
    استخدام تعريضات متعددة لتصوير الشلالات
    تجميع التركيز البؤري
    ضبابية الحركة
    تجميع التعريض
    تجنب التعريضات الطويلة جدًا
    اهتم بالسماء
    استخدم عدسات التكبير/التصغير
    الخلاصة

    Table of Contents

    تعليق


    • #3


      استثمر في حامل ثلاثي جيد

      نادرًا ما يكون تصوير الشلالات ممكنًا بدون حامل ثلاثي متين. سمعتُ أن البعض يقترح استخدام حوامل ثلاثية صغيرة مثل GorillaPods لسهولة الحركة في الميدان، أو حتى تجربة التصوير اليدوي مع تثبيت الصورة، لكنني لا أتفق مع هذه الأساليب. غالبًا ما يتطلب تصوير الشلالات وضعًا مبتكرًا للحامل الثلاثي - بما في ذلك وضع بعض الأرجل في منتصف الماء في كثير من الحالات - لذا فإن المتانة والارتفاع الأقصى أمران مهمان.

      ينبغي عليك أيضًا التفكير في اختيار حامل ثلاثي منخفض. يمكن للحامل الثلاثي القادر على الوصول تقريبًا إلى مستوى الأرض أن يجعل الجسم الصغير في المقدمة يبدو مهمًا. عند تصوير الشلالات، يصبح تضمين انعكاس الشلال أو استخدام التموجات كخلفية أمرًا ممكنًا مع حامل ثلاثي يمكنه التصوير عند مستوى الأرض. من المفيد، ولكنه ليس ضروريًا، أن يكون الحامل الثلاثي مزودًا بعمود مركزي قابل للإزالة، أو بدون عمود مركزي على الإطلاق.

      من المهم أيضًا اختيار رأس حامل ثلاثي عالي الجودة. قد تلتقط الصور من زاوية غير مناسبة عند استخدام الحوامل الثلاثية، خاصةً إذا كان الحامل في الماء ولا ترغب في تبليل قدميك. أجد أن تعديل رأس الحامل الثلاثي المزود بمسننات أو حتى رأس جيمبال أسهل في هذه الحالات مقارنةً برأس الحامل الكروي. مع ذلك، الأهم هو اختيار رأس ثابت.

      يسمح لك الحامل الثلاثي الثابت باستخدام تعريضات أطول، مما يُخفي الشلال مع الحفاظ على وضوح المحيط.

      Invest in a Good Tripod


      Photographs of waterfalls are seldom possible without a sturdy tripod. I have heard some suggest the use of miniature tripods like GorillaPods to be more mobile in the field, or even try handheld shooting with image stabilization, but I disagree with those approaches. Waterfall photography often requires very creative positioning of your tripod – including with some of the legs partway underwater in many cases – so sturdiness and maximum height are important.

      You should also consider choosing a tripod that can go low. A tripod capable of getting almost to ground level can make a small foreground object appear significant. When it comes to photographing waterfalls, sometimes including the reflection of the waterfall or using ripples as a foreground becomes possible with a tripod that can shoot at ground level. It helps, but isn’t essential, if your tripod has a removable center column, or no center column at all.

      Of similar importance is a quality tripod head. You may be composing from an awkward angle when photographing tripods, especially if the tripod is in the water and you don’t want your feet to get wet. I find that a geared tripod head or even a gimbal head can be easier to adjust in these situations compared to a ballhead. However, the most important thing is just to get a tripod head that’s stable.
      A stable tripod allows you to use longer exposures, blurring the waterfall while leaving the surroundings sharp

      تعليق


      • #4

        احمِ معداتك
        عادةً ما تكون الرطوبة حول الشلالات مرتفعة جدًا. كما يمكن للشلالات أن ترشّ قطرات الماء على معداتك، وكما ذكرنا، قد تضطر إلى غمر حامل الكاميرا الثلاثي في ​​الماء للحصول على التركيبة المطلوبة.

        وبالتالي، ستتعرض معداتك لضرر بالغ قبل الانتهاء من التصوير. ما لم تكن عدستك مقاومة تمامًا للعوامل الجوية، ستتسرب الرطوبة إلى نظامك. بعد كل جلسة تصوير، أفكّك أرجل الحامل الثلاثي تمامًا، وأغسلها بالماء الساخن وأمسحها جيدًا. بعد التأكد من عدم وجود رطوبة أو رمل داخل الأرجل، أعيد تركيبها.

        وبالمثل، يُنصح بشدة في تصوير الشلالات باستخدام فلتر كاميرا حديث بطبقة مقاومة للماء. قد يكون هذا فلترًا مستقطبًا، أو حتى فلترًا للأشعة فوق البنفسجية - وأنا لست من مُحبي فلاتر الأشعة فوق البنفسجية عادةً، ولكن في هذه الحالة، أنصح باستخدامها. يُفضّل بعض المصورين أيضًا استخدام فلاتر الكثافة المحايدة لتصوير الشلالات، مع أنني أجد غالبًا أنه في بيئات الغابات المظلمة، يكفي الجمع بين حساسية ISO الأساسية وفتحة عدسة ضيقة (f/11 تقريبًا) للسماح بتشويش الماء في التعريضات الطويلة دون استخدام فلتر الكثافة المحايدة.

        إذا كنت تستخدم عدسة تتحرك للداخل والخارج أثناء التكبير/التصغير أو التركيز، أنصح بمسحها بمنشفة أو قطعة قماش جافة قبل إعادة تكبير/تركيز العدسة. وإلا، فقد تتراكم الرطوبة داخل العدسة، مما قد يتطلب صيانةً لتجنب تلفها مع مرور الوقت

        Protect Your Gear


        The humidity around a waterfall is usually very high. Waterfalls can also spray water droplets on your gear, and, as mentioned, you might have to submerge your tripod in water for the composition you want.

        Thus, your gear will take a huge beating before you finish your shoot. Unless your lens is completely weather-sealed, you will have moisture get into your system. After every shoot, I dismantle my tripod legs completely, wash them with hot water and wipe them clean. After making sure that there is no moisture or sand inside the legs, I reassemble them.

        Likewise, waterfall photography is one genre where I highly recommend a modern camera filter with a water-repellant coat. This could be a polarizer, or even a UV filter – and I’m normally not a fan of UV filters, but this is one situation where I’d consider them. Some photographers also like using neutral-density filters for waterfall photography, although I often find that in dark forest environments, the combination of base ISO and a narrow aperture (f/11 or so) is enough to allow long exposures to blur the water without an ND filter.

        If you’re using a lens that moves in and out while zooming or focusing, I recommend wiping down the lens with a dry towel or cloth before zooming/focusing it back. Otherwise, you can end up with moisture inside the lens, which may require servicing in order to avoid deterioration over time.

        تعليق


        • #5

          استخدام التعريضات المتعددة للشلالات
          العديد من صور الشلالات الاحترافية لا تُصوّر لقطات فردية، بل تُدمج صورًا متعددة. سأستعرض أدناه بعض أسباب استخدام التعريضات المتعددة.

          1. تجميع التركيزات
          غالبًا ما يُركز المبتدئون على الموضوع مع إغفال أجزاء أخرى من الصورة. في حالة تصوير الشلال، قد يعني هذا أنك ركّزت التركيز التلقائي على الشلال نفسه، ولكن لديك عنصر قريب في المقدمة غير واضح المعالم. ألقِ نظرة على الصورة أدناه:
          Using Multiple Exposures for Waterfalls


          Many professional waterfall photographs are not single shots, but rather multi-image blends. I’ll go through a few reasons to use multiple exposures below.
          1. Focus Stacking


          Beginners often pay strong attention to the subject while overlooking other parts of the photo. In the case of waterfall photograph, this may mean that you’ve autofocused on the waterfall itself, but have some nearby element in the foreground that is severely out of focus. Take a look at the image below:
          Focus stacking can be essential if you have a nearby
          foreground.

          أثناء تصوير المشهد أعلاه، كان الشلال على بُعد حوالي خمسين قدمًا مني. من ناحية أخرى، كانت رقعة الخضرة على اليسار في المقدمة على بُعد بضعة أقدام فقط مني. حتى مع فتحة عدسة ضيقة f/16، كانت المقدمة ستكون غير واضحة المعالم وضبابية.

          لذلك، استخدمتُ تعريضات متعددة. في الصورة أعلاه، التقطتُ ثلاث صور بفتحة عدسة f/8. واحدة للمقدمة المباشرة على اليسار، وأخرى للمنطقة الصخرية الوسطى، والأخيرة للموضوع. ثم جمعتها في مرحلة ما بعد المعالجة باستخدام تقنية تكديس التركيز المذكورة هنا.

          While I was photographing the scene above, the waterfall was about fifty feet away from me. On the other hand, the patch of greenery on the left in the foreground was just a couple of feet away from me. Even at a narrow aperture of f/16, the foreground would have been out of focus and blurry.

          Therefore, I used multiple exposures. For the picture above, I took three shots at f/8. One for the immediate foreground on the left, one for the rocky mid-ground, and the last one for the subject. I then stacked them in post-processing using the focus stacking technique discussed here.

          تعليق


          • #6
            ٢. ضبابية الحركة
            يُعدّ تصوير الشلالات مرادفًا تقريبًا للقطات ذات التعريض الطويل. ولكن قد تواجه بعض هذه اللقطات بعض المشاكل عند تصوير بعض الشلالات. ألقِ نظرة على الصورة أدناه.
            2. Motion Blur


            Waterfall photography is almost synonymous with long-exposure shots. But long-exposure shots do possess certain problems when shooting some waterfalls. Take a look at the picture below.

            تعليق


            • #7

              اللقطة أعلاه كانت بتعريض طويل لمدة خمس ثوانٍ. تمكنتُ من الحصول على ضبابية الحركة في الشلال، وبدت الصخور حادة.

              لكن النباتات في الصورة ليست بنفس حدة الصخور، وهو أمر واضح عند تكبير الصورة أو تكبيرها بنسبة 100%. يعود ذلك إلى وجود نسيم هواء ثابت جعل الشجيرات ترفرف أثناء التصوير، مما تسبب في ضبابية الحركة.

              في مثل هذه الحالات، عادةً ما ألتقط صورة أخرى بتعريض أسرع لتجميد حركة النباتات، ثم أدمجها لاحقًا في برنامج فوتوشوب باستخدام أقنعة الطبقات.

              تأكد من عدم تحريك إعداد الكاميرا عند التقاط الصور لدمج ضبابية الحركة. كلما كانت التراكيب أقرب، كان من الأسهل محاذاتها أثناء المعالجة اللاحقة.
              The shot above was a five-second long exposure. I was able to get the motion blur in the cascade and the rocks appear sharp.

              But the plants in the photo aren’t as sharp as the rocks, which is clear when I display the image large or zoom in to 100%. That’s because there was a steady breeze that made the shrubs flutter during the shoot, causing motion blur.

              In such cases, I generally take another shot at a faster exposure to freeze the motion in the plants, and later I merge them in Photoshop using layer masks.

              Make sure not to move the camera setup when you take photographs for motion blur blending. The closer the compositions, the easier it will be to align them during post-processing.

              تعليق


              • #8
                . تدريج التعريض

                يكمُن التحدي الأكبر في تصوير الشلالات في الحفاظ على تفاصيل الظلال دون إفساد الإضاءة الساطعة باستخدام التعريض الطويل. في معظم الأحيان، يتدفق الماء فوق الصخور الداكنة، مما يجعل من المستحيل الحصول على النطاق الديناميكي الكامل في لقطة واحدة. انظر إلى الصورة أدناه.
                3. Exposure Bracketing


                The biggest challenge in shooting waterfalls is to retain detail in the shadows without blowing out the highlights with a long exposure. Most of the time, water will be flowing over dark rocks, making it impossible to get the entire dynamic range in one shot. Take a look at the picture below.

                تعليق


                • #9
                  الصورة أعلاه كانت بتعريض مدته ثلاث ثوانٍ. عندما عدّلتُ الإضاءة للحصول على تفاصيل الصخور، تحوّل الشلال إلى بقعة بيضاء. لو عدّلتُ الإضاءة للشلال، لضاعت معظم التفاصيل في الظلال أو لضاع تأثير "الشلال اللبني".

                  يمكنك زيادة النطاق الديناميكي إما باستخدام HDR تقليدي أو AHDR باستخدام طريقة حساب متوسط ​​الصورة. كبديل، في بعض الحالات، يمكنك الاكتفاء بصورة واحدة طالما أنك تستخدم ISO أساسيًا. في هذه الحالة، تأكد من تعريض الصورة بحيث تقع أكثر مناطق الشلال سطوعًا داخل الحافة اليمنى للمدرج التكراري (أي التعريض لليمين).

                  إذا اخترت طريقة دمج HDR التقليدية، أنصحك باستخدام أقنعة السطوع لدمج صورك معًا، بدلًا من برنامج معالجة HDR الافتراضي في Photoshop.

                  The shot above was a three-second exposure. When I metered to get the details in the rocks, the waterfall became a white blotch. Had I exposed for the waterfall, most of the details in the shadows would have been lost or the ‘milky cascade’ effect would have been lost.

                  You can increase your dynamic range either by using a traditional HDR or an AHDR using the image averaging method. Alternatively, in some cases, you can get away with a single image so long as you’re using base ISO. In that case, make sure to expose the photo so that the brightest areas of the waterfall land just inside the right-hand edge of the histogram (AKA exposing to the right).

                  If you go with the traditional HDR blending method, I recommend using luminosity masks to blend your images together, rather than the default HDR-processing software in Photoshop.

                  تعليق


                  • #10
                    تجنب التعريضات الطويلة جدًا
                    من الشائع في تصوير الشلالات استخدام أطول تعريض ممكن، مثل ١٥ ثانية أو ٣٠ ثانية أو أكثر. مع ذلك، قد يؤدي ذلك إلى ظهور ضباب اصطناعي في الماء، حيث تختفي كل تفاصيل الصورة وحركتها.

                    ألقِ نظرة على الصورة أدناه.
                    Avoid Extremely Long Exposures


                    It’s popular in waterfall photography to use the longest possible exposure, such as 15 seconds, 30 seconds, or more. However, this can lead to an artificial “fog” appearance in the water, where all semblance of detail and motion are gone.

                    Take a look at the image below.

                    تعليق


                    • #11
                      Half a second exposure is enough to get smooth wate

                      تعليق


                      • #12
                        على عكس ما قد تظن، التقطتُ الصورة أعلاه بسرعة غالق نصف ثانية. يمكنك رؤية اتجاه تدفق الماء بوضوح، مع وفرة من التفاصيل والقوام المثيرة للاهتمام.

                        يمكنك حتى تجربة سرعات غالق أعلى لتجميد قطرات الماء في الهواء. أفضّل عادةً نطاق 1/4 إلى 2 ثانية للحصول على توازن جيد بين النعومة والقوام، على الأقل في صوري الخاصة. مع ذلك، رأيتُ أيضًا بعض صور الشلالات ذات التعريض الأسرع بمظهر فريد، مثل هذه الصورة من سبنسر:

                        Contrary to what you may think, I took the image above at 1/2 second shutter speed. You can see that there is a clear sense of the direction of the flow of water, with plenty of interesting details and textures.

                        You can even experiment with faster shutter speeds to deliberately freeze water droplets in midair. I tend to prefer the 1/4 to 2 second range to get a good balance of smoothness and texture, at least in my own photos. However, I’ve seen some faster-exposure pictures of waterfalls with a unique look, too, like this one from Spencer:

                        تعليق


                        • #13
                          ................

                          اضغط على الصورة لعرض أكبر. 

الإسم:	Waterfall-Landscape-Photo.jpg 
مشاهدات:	5 
الحجم:	61.9 كيلوبايت 
الهوية:	256002

                          تعليق


                          • #14
                            انتبه للسماء
                            أُفضّل غالبًا عدم تصوير السماء عند تصوير الشلالات، لأنها عرضة لفرط التعريض. مع ذلك، من المستحيل تجنّب السماء دائمًا. في اللقطات التي لا مفرّ من تصوير السماء فيها، انتبه جيدًا لمدى سطوعها. ستحتاج على الأرجح إلى استخدام HDR أو AHDR للحفاظ على بعض هذه التفاصيل.


                            Take Care of the Sky


                            I often prefer to leave out the sky when shooting waterfalls, because it’s prone to overexposure. Still, it is impossible to avoid the sky all the time. In shots where including the sky is inevitable, pay careful attention to how bright it is. You will quite likely need to use HDR or AHDR to retain some of those details.

                            تعليق


                            • #15

                              استخدم عدسات الزووم

                              يُعتقد أن العدسات الأساسية هي الأكثر دقة. مع أن هذا صحيح في بعض الحالات، إلا أن العدسات الأساسية تُسبب بعض الصعوبات عند تصوير الشلالات. فنظرًا لوجود نهر عميق أسفل الشلال مباشرةً، لا تتوفر لك مرونة "التكبير بقدميك" كما هو الحال في ظروف تصوير المناظر الطبيعية الأخرى.

                              لقد قطعت عدسات الزووم شوطًا كبيرًا في تحسين دقة الصورة ووضوحها. أنصح باستخدام عدسة تتراوح أطوالها البؤرية بين 15 و30 مم لتصوير الشلالات. إلا إذا كنت تُصوّر شلالًا من مسافة بعيدة، فإن هذه الأطوال البؤرية ذات الزوايا الواسعة والواسعة جدًا تُعطي أفضل النتائج.

                              Use Zoom Lenses


                              A common belief is that prime lenses are the sharpest. Although this is true in some cases, primes also cause some challenges when shooting waterfalls. Since there’s usually a deep river right beneath the waterfall, you don’t have as much flexibility to “zoom with your feet” as in other landscape photography situations.

                              Zoom lenses have also come a long way in terms of sharpness and image rendition. I recommend one containing focal lengths between 15mm to 30mm for waterfall photography. Unless you’re photographing a waterfall in the distance, those wide- and ultra-wide-angle focal lengths tend to work best.

                              تعليق

                              يعمل...