حسن تدفق العين عن طريق إنشاء مخارج الزاوية Improve Eye Flow by Creating Corner Exits

تقليص
X
 
  • تصفية - فلترة
  • الوقت
  • عرض
إلغاء تحديد الكل
مشاركات جديدة

  • حسن تدفق العين عن طريق إنشاء مخارج الزاوية Improve Eye Flow by Creating Corner Exits

    تحسين تدفق العين عن طريق إنشاء مخارج الزاوية
    Improving Eye Flow by Creating Corner Exits

    عندما كنت أعمل في الحياة المؤسسية، اكتسبت قدرًا كبيرًا من الخبرة في إنشاء وإدارة الإعلانات، والتي عادةً ما تكون مطبوعة. عندما قمنا بتصميم الإعلانات، أصبح من طبيعتنا أن نفكر باستمرار في المفاهيم الأساسية مثل العمق البصري، والعناصر المهيمنة، وتوازن الإعلانات. كان الهدف هو تحقيق تدفق جيد للعين في إعلاناتنا. منذ أن تركت حياتي المهنية، حاولت تطبيق ما تعلمته عن تصميم الإعلانات في التصوير الفوتوغرافي الخاص بي. تتناول هذه المقالة شيئًا نادرًا ما يتم مناقشته في مواقع التصوير الفوتوغرافي: إنشاء مخارج زاوية في صورنا لتحسين تدفق عين الصورة.

    في الثقافة الغربية نقرأ من الأعلى إلى الأسفل، ومن اليسار إلى اليمين. لذلك، تعلمنا في وقت مبكر أن الإعلان الجيد يجب أن يكون له نقطة خروج منطقية وممتعة، والتي هي في الثقافة الغربية الزاوية اليمنى السفلية. ولهذا السبب ستجد غالبًا شعارات الشركات موجودة في هذا الجزء من الإعلان المطبوع.

    كاميرا نيكون D600 + 16.0-35.0 مم f/4.0 @ ISO 800، 1/250، f/13.0

    نيكون D600 + 16.0-35.0 مم f/4.0 @ ISO 800، 1/250، f/13.0[/caption]


    Back in the day when I was working in corporate life, I gained quite a bit of experience creating and managing advertising, usually print based. When we designed ads, it became second nature for us to constantly think about fundamental concepts like visual depth, dominating elements, and ad balance. The goal was to achieve good eye flow in our ads. Since leaving corporate life I’ve tried to apply what I learned about advertising design to my photography. This article deals with something seldom discussed on photography sites: creating corner exits in our images to improve image eye flow.

    In Western culture we read from top to bottom, left to right. So, early on we were taught that good advertising should have a logical and pleasing exit point, which in Western culture is the lower right corner. That’s why you’ll often find corporate logos situated in that portion of a print ad.
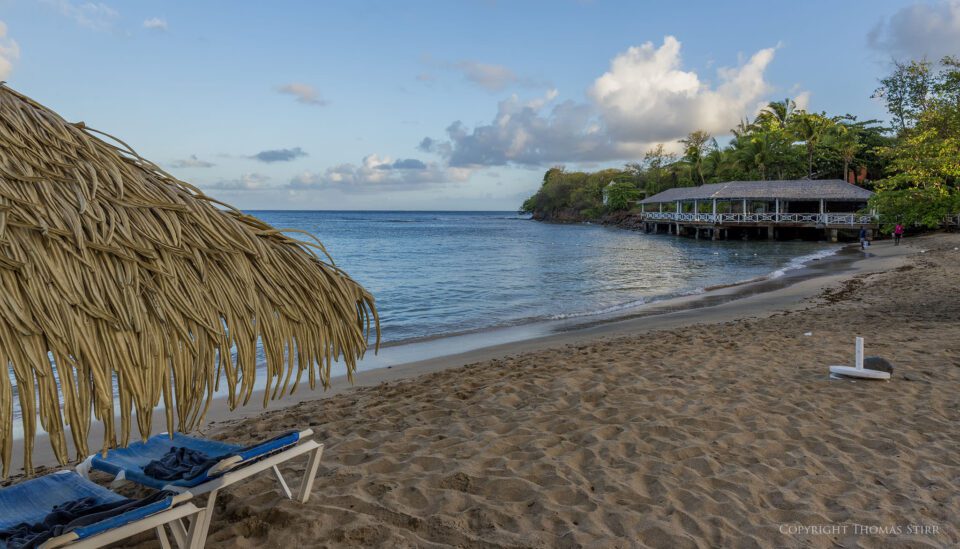
    NIKON D600 + 16.0-35.0 mm f/4.0 @ ISO 800, 1/250, f/13.0
    NIKON D600 + 16.0-35.0 mm f/4.0 @ ISO 800, 1/250, f/13.0[/caption]

  • #2
    من الواضح أنني لن أجبر موضوعًا ما على الامتثال لـ "قاعدة" الزاوية اليمنى السفلية. ولكن، عندما يكون لدي خيار التأطير، سأختار عادةً تدفق الصورة من اليسار إلى اليمين كما هو موضح في الصورة أعلاه.

    قد يبدو هذا غريبًا، ولكن بالنسبة للعديد من الصور، فإن الشيء الوحيد الذي أركز عليه أكثر قبل أن أضغط على الغالق هو الحصول على تكوين الزاوية اليمنى السفلية بالطريقة التي أريدها تمامًا. أجد أن هذا هو الحال غالبًا عندما أقوم بالتصوير الفوتوغرافي في الشوارع. فيما يلي صورتان حديثتان توضحان هذه النقطة.

    NIKON 1 V2 + 1 NIKKOR VR مقاس 10-30 مم f/3.5-5.6 عند ISO 160، 10/5000، f/5.6

    نيكون 1 V2 + 1 NIKKOR VR مقاس 10-30 مم f/3.5-5.6 @ ISO 160، 1/500، f/5.6[/caption]


    Obviously, I wouldn’t force fit a subject to comply with a lower right hand corner “rule”. But, when I have a choice of framing, I will usually choose a left to right image flow as illustrated in the image above.

    This may seem strange, but for many images the one thing I am most focused on just before I press the shutter is getting the composition of the bottom right corner just the way I want it. I find this is often the case when I’m doing street photography. Here are two recent images that illustrate this point.
    NIKON 1 V2 + 1 NIKKOR VR 10-30mm f/3.5-5.6 @ ISO 160, 10/5000, f/5.6
    NIKON 1 V2 + 1 NIKKOR VR 10-30mm f/3.5-5.6 @ ISO 160, 1/500, f/5.6[/caption]

    تعليق


    • #3
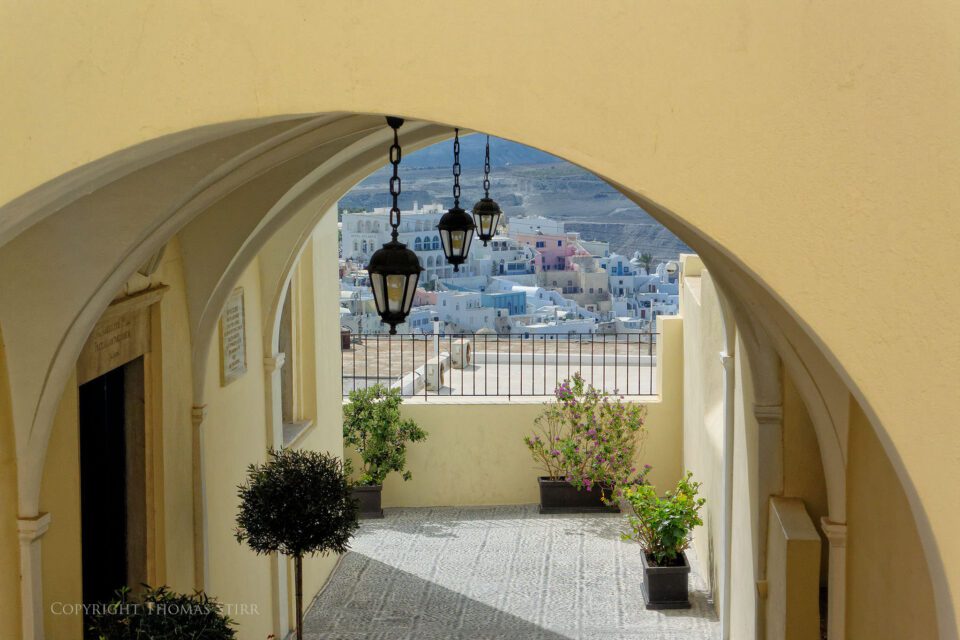
      في الصورة أعلاه، أردت أن يخرج تدفق القوس بسلاسة شديدة ودقة من الزاوية اليمنى السفلية. في نظري، أعطى هذا الصورة بأكملها إحساسًا بالنظام والتوازن والهدوء. نقطة الخروج "تنهي" الصورة.

      NIKON 1 V2 + 1 NIKKOR VR مقاس 30-110 مم f/3.8-5.6 عند ISO 160، 10/600، f/5.6

      نيكون 1 V2 + 1 NIKKOR VR مقاس 30-110 مم f/3.8-5.6 @ ISO 160، 1/60، f/5.6[/caption]

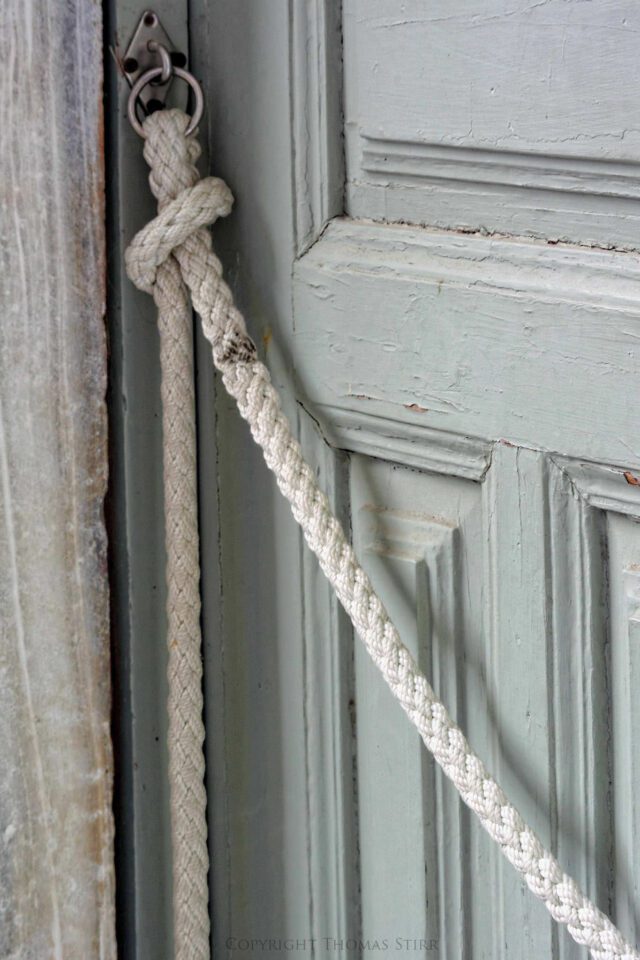
      وينطبق الشيء نفسه على الحبل في هذه الصورة الفوتوغرافية في الشارع. من وجهة نظري، عدم الحصول على مخرج الزاوية الصحيح قد يؤدي إلى الإضرار بالتأثير العام للصورة. إذا كان ذلك ممكنًا، فأنا أحب التقاط الصور، لذا لا أحتاج إلى قص المنشور على الإطلاق. هذه هي طريقتي المفضلة في التصوير، وهي أيضًا سبب تفضيلي للتصوير باستخدام عدسات التكبير. في بعض الأحيان، لا أستطيع ببساطة التقاط صورة كما أريد تمامًا، ويلزم إجراء بعض الاقتصاص وإجراء تعديلات أخرى. دعونا نلقي نظرة على بضع صور.

      كاميرا NIKON 1 V2 + 10.0-30.0 مم f/3.5-5.6 عند ISO 160، 1/60، f/6.3

      نيكون 1 V2 + 10.0-30.0 مم f/3.5-5.6 @ ISO 160، 1/60، f/6.3[/caption]

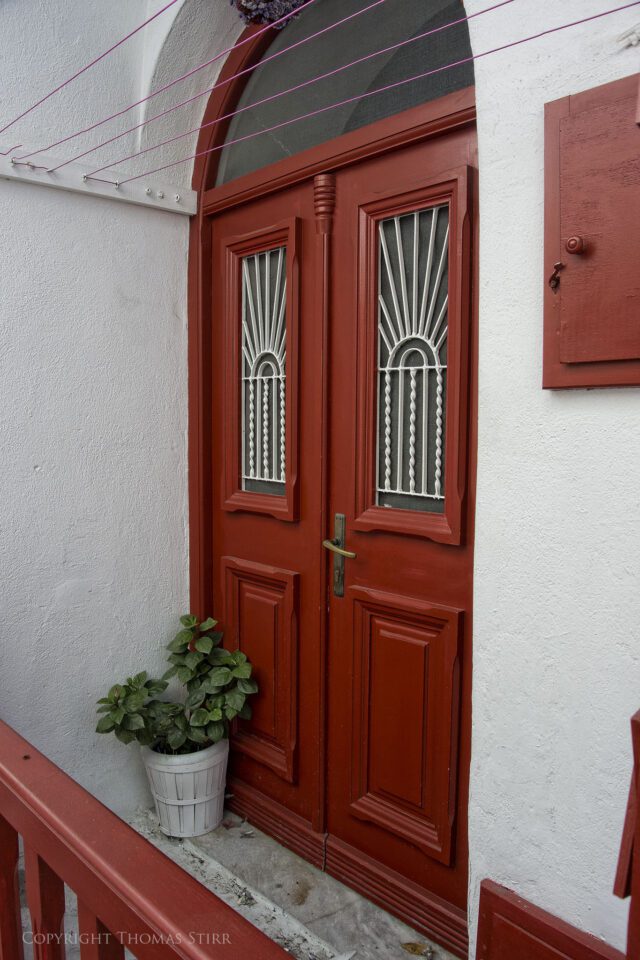
      كما لاحظت، تحتوي الصورة أعلاه على نقاط خروج زاوية في الزاويتين اليمنى العلوية والسفلية. لم أتمكن من مواءمتها بدقة مع الصورة الأصلية الملتقطة، لذلك اضطررت إلى قص الصورة قليلاً في الأعلى والجانب الأيمن وفي الأسفل لتحقيق الإطار المطلوب. وجود نقطتي الخروج هاتين يزيل التنافر البصري من الصورة، خاصة بالنظر إلى عدد الخطوط المتوازية.

      كاميرا NIKON 1 V2 + 10.0-30.0 مم f/3.5-5.6 عند ISO 3200، 1/30، f/5.0

      نيكون 1 V2 + 10.0-30.0 مم f/3.5-5.6 @ ISO 3200، 1/30، f/5.0[/caption]


      In the image above I wanted the flow of the arch to exit very smoothly and precisely out of the bottom, right hand corner. To my eye this gave the entire image a sense of order, balance and calm. The exit point “finishes” the image.
      NIKON 1 V2 + 1 NIKKOR VR 30-110mm f/3.8-5.6 @ ISO 160, 10/600, f/5.6
      NIKON 1 V2 + 1 NIKKOR VR 30-110mm f/3.8-5.6 @ ISO 160, 1/60, f/5.6[/caption]

      The same thing holds true for the rope in this street photography image. From my perspective, not getting the correct corner exit would have damaged the overall impact of the image. If possible, I like to capture images so I don’t need to crop in post at all. This is my preferred method of shooting, and also why I prefer shooting with zoom lenses. Sometimes I simply can’t capture an image exactly as I want and some cropping and other adjustments are needed. Let’s have a look at a couple of images.
      NIKON 1 V2 + 10.0-30.0 mm f/3.5-5.6 @ ISO 160, 1/60, f/6.3
      NIKON 1 V2 + 10.0-30.0 mm f/3.5-5.6 @ ISO 160, 1/60, f/6.3[/caption]

      As you have noticed, the image above has corner exit points on both the upper and lower right hand corners. I wasn’t able to get these precisely aligned with the original image capture, so I had to slightly crop the image on the top, right hand side and on the bottom to achieve the desired framing. Having these two exit points removes visual dissonance from the image, especially given the number of parallel lines.
      NIKON 1 V2 + 10.0-30.0 mm f/3.5-5.6 @ ISO 3200, 1/30, f/5.0
      NIKON 1 V2 + 10.0-30.0 mm f/3.5-5.6 @ ISO 3200, 1/30, f/5.0[/caption]

      تعليق


      • #4

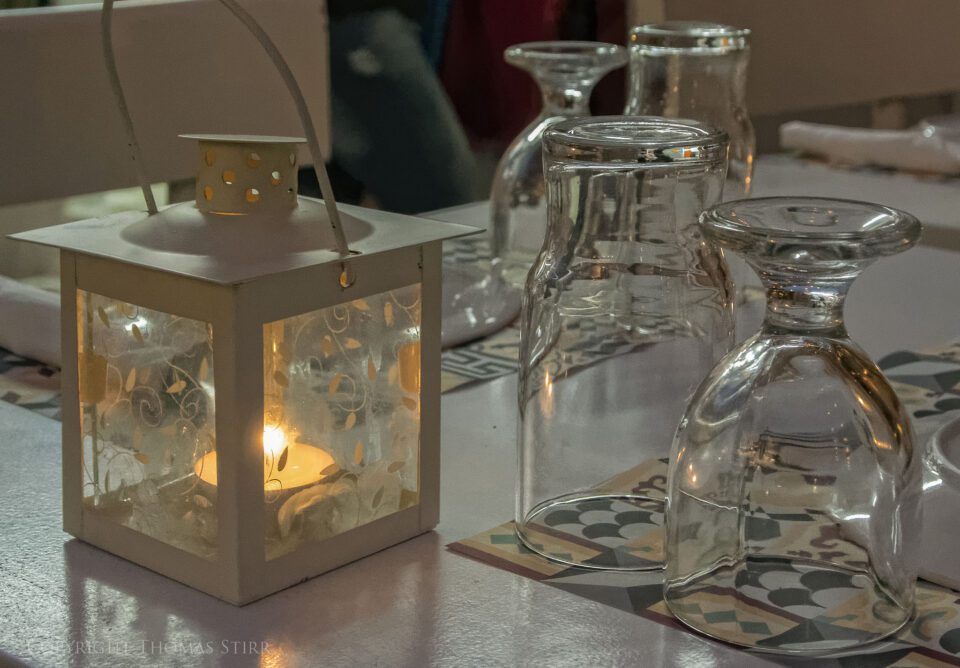
        لقد أمضيت بعض الوقت في محاولة الحصول على زاوية التصوير الصحيحة لهذه الصورة بحيث تشكل النظارات شكلًا نصف دائري و"تتدفق" نحو الزاوية اليمنى السفلية من الصورة. لسوء الحظ، كان لدى حامل الشمعة زوايا خلفية مشتتة للانتباه بسبب الزاوية الواسعة التي كنت أصور بها. ونتيجة لذلك، اضطررت إلى استخدام تعديل المنظور لتحويله إلى اليمين في المنشور، مما استلزم بعض عمليات اقتصاص الصورة. مع المحاصيل النهائية، قمت بمحاذاة الشريط العنابي الداكن في تحديد الموقع حتى يتمكن من الخروج من الركن الأيمن السفلي من الصورة.


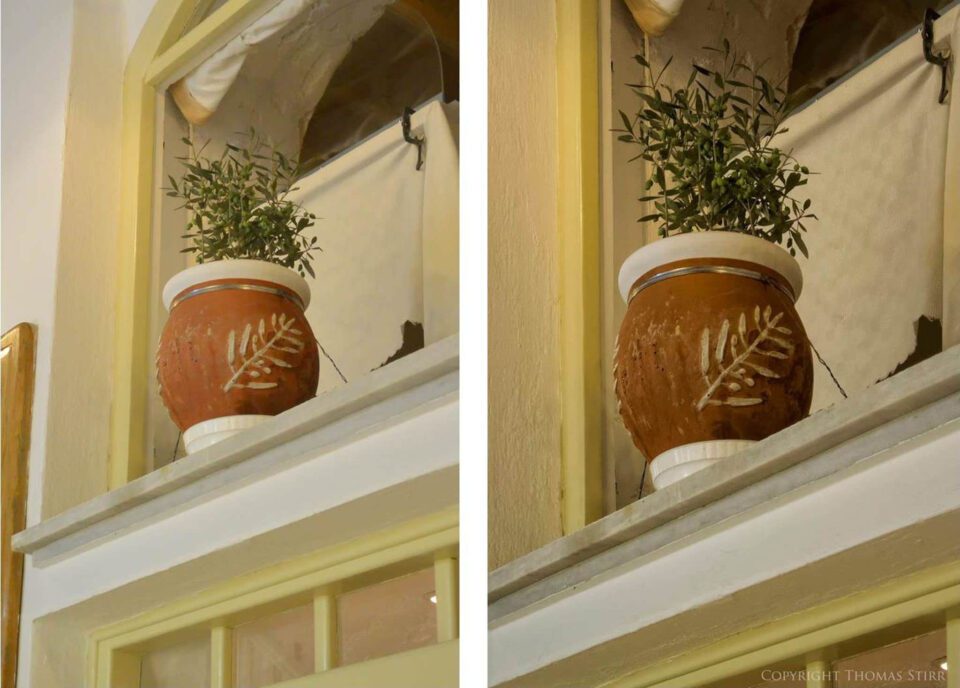
        في بعض الأحيان، تتطلب الصورة ذات المظهر البسيط القليل من العمل في النشر كما تظهر المقارنة "قبل وبعد" أعلاه. كان هذا الوعاء على حافة نافذة الطابق الثاني ولم أتمكن من الاقتراب منه أو تغيير زاوية التصوير.

        يمكنك أن ترى أنني أجريت عددًا من التعديلات على الصورة. أولاً، قمت بإجراء بعض تعديلات التحكم في المنظور لجعله مربعًا وتقليل التشتيت البصري الناتج عن جميع الزوايا المتنافسة. ثم قمت بالاقتصاص على الجانب الأيسر لإزالة الألوان الفاتحة والداكنة المشتتة للانتباه، وترك إطارًا عاديًا بلون واحد على هذا الجانب. وبما أن الصورة تتدفق بشكل طبيعي من اليمين إلى اليسار، فقد قمت بقص الجزء السفلي لإنشاء نقطة خروج في الزاوية اليسرى السفلية. في الربع السفلي الأيمن من الصورة الأصلية، ستلاحظ وجود ظل صغير مشتت للانتباه على الحافة اليمنى للنافذة الداخلية. كان لا بد من اقتصاص هذا. ثم تم إجراء القص النهائي في الجزء العلوي من الصورة لإنشاء نقطة خروج زاوية للستارة. والنتيجة النهائية هي صورة أكثر توازنا وإرضاء.


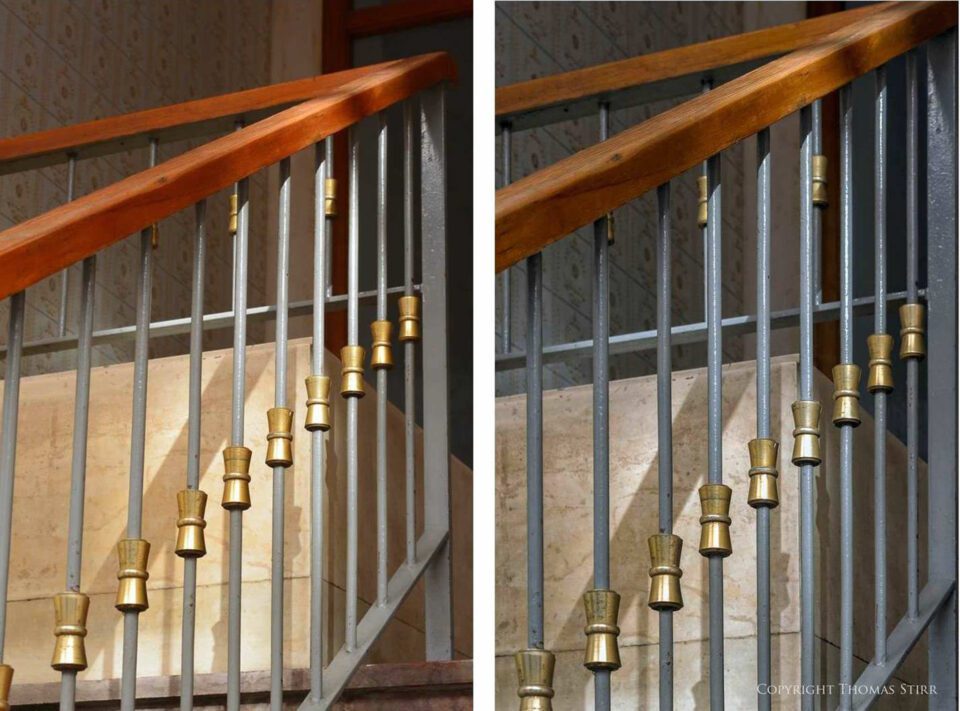
        الصورة أعلاه أثارت اهتمامي حقًا عندما قمت بتصوير الإطار الأصلي. أحببت تكرار التفاصيل النحاسية على المغازل والزوايا القوية التي خلقتها الدرابزين. وكما يوضح "قبل وبعد"، كانت هناك حاجة إلى درجة معقولة من العمل لتحويل الصورة الأصلية إلى الرؤية في ذهني. أولاً، قمت بتعديل الإبرازات واللون العام والنغمة للحصول على مظهر أكثر سلاسة ورتابة للمساعدة في إبراز تكرار التفاصيل النحاسية. ثم قمت بعدد من تعديلات المنظور لتصحيح جميع الزوايا المشتتة للانتباه. بعد ذلك، قمت بقص الجانب الأيمن من المنشور العمودي بشكل محكم حتى تتمكن من تأطير هذا الجانب من الصورة. ثم قمت بقص الخطوط الأفقية المشتتة في أسفل الصورة. أنشأ المحصول النهائي في الأعلى نقطة خروج زاوية.

        كاميرا NIKON 1 V2 + 10.0-30.0 مم f/3.5-5.6 عند ISO 3200، 4/10، f/5.0

        نيكون 1 V2 + 10.0-30.0 مم f/3.5-5.6 @ ISO 3200، 1/4، f/5.0[/caption]


        I spent some time trying to get the right shooting angle for this image so that the glasses would form a semi-circle type of shape and be ‘flowing’ towards the bottom right corner of the image. Unfortunately, the candle holder had distracting back-pointing angles caused by the wide angle with which I was shooting. As a result I had to use a perspective adjustment to shift it to the right in post, which then necessitated some image cropping. With my final crops, I aligned the dark burgundy stripe in the placemat so it could exit out of the bottom right hand corner of the image.


        Sometimes even a simple looking image takes a bit of work in post as the ‘before and after’ comparison above shows. This pot was up on a second floor window sill and I could not get any closer, or change my shooting angle.

        You can see I made a number of adjustments with the image. First, I made some perspective control adjustments to make it square and reduce the visual distraction caused by all of the competing angles. Then I cropped in on the left side to remove the distracting light and dark colours, leaving a plain, single colour framing on that side. Since the image naturally flows right to left I cropped the bottom in order to create an exit point on the lower left corner. In the bottom right hand quadrant of the original image you’ll notice a small, distracting shadow on the right hand edge of a window inset. This needed to be cropped out. Then the final crop at the top of the image was done to create a corner exit point for the curtain. The final result is a more balanced and pleasing image.


        The image above really intrigued me when I shot the original frame. I loved the repetition of the brass details on the spindles and the strong angles created by the handrails. As the ‘before and after’ illustrates, a reasonable degree of work was needed to transform the original image into the vision in my mind. First, I adjusted the highlights and overall colour and tone to get a smoother, more monotone look to help accentuate the repetition of the brass details. Then I did a number of perspective adjustments to correct all of the distracting angles. Next, I cropped in tight to right side of the vertical post so it could frame that side of the image. Then I cropped out the distracting horizontal lines at the bottom of the image. The final crop at the top created a corner exit point.
        NIKON 1 V2 + 10.0-30.0 mm f/3.5-5.6 @ ISO 3200, 4/10, f/5.0
        NIKON 1 V2 + 10.0-30.0 mm f/3.5-5.6 @ ISO 3200, 1/4, f/5.0[/caption]

        تعليق


        • #5

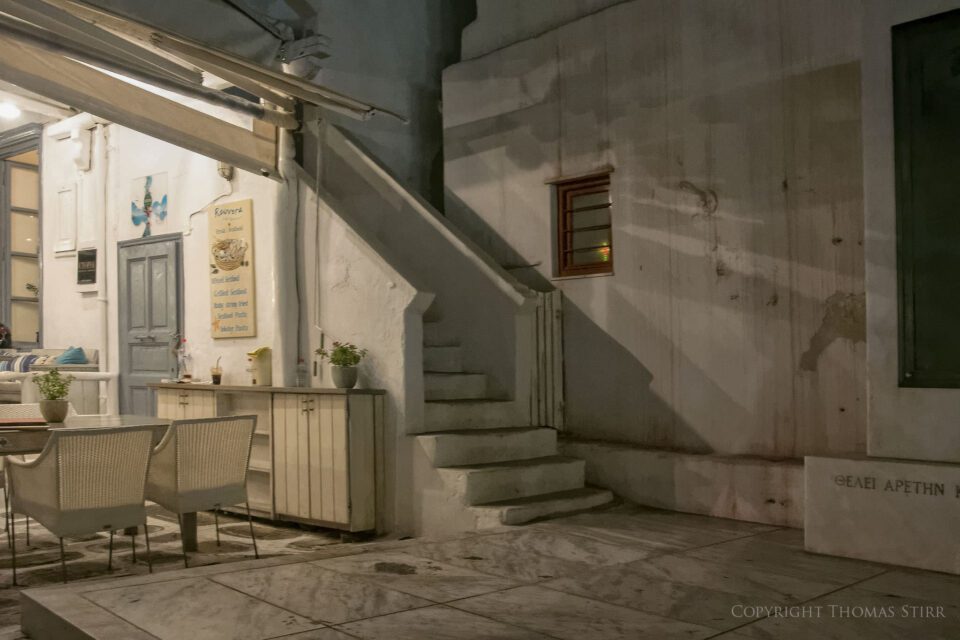
          يمكن للإضاءة في بعض الصور أن تخلق نقطة خروج طبيعية إذا بحثنا عنها. في الصورة أعلاه يمكننا أن نرى أن الجزء الأيسر من الصورة هو الأكثر سطوعًا ويحتوي على قدر جيد من التباين. من المحتمل أن يلفت هذا انتباهنا الأولي، وسرعان ما يتبعه الدرج، ثم الظلال على الحائط. بعد النظر في البداية إلى منطقة المطبخ، فإن زاوية الدرج وظلال الجدار ستدفع نظرنا بعيدًا إلى اليمين وبعيدًا عن الصورة. لقد أحببت التدفق الطبيعي للإضاءة في هذه الصورة والتقطتها بسرعة غالق بطيئة جدًا (ربع ثانية) مقابل حكمي الأفضل. على الرغم من أن الصورة بها ضبابية طفيفة، إلا أنني ما زلت أحب الإضاءة فيها وكيف أنها توجه تدفق العين في الصورة.


          The lighting in some images can create a natural exit point if we look for it. In the image above we can see that that left hand portion of the image is the brightest and has a good amount of contrast. This would likely draw our initial attention, quickly followed by the stairs, and then the shadows on the wall. After initially looking at the kitchen area, the angle of the stairs and the wall shadows would then push our gaze away to the right and off the image. I loved the natural flow of the lighting in this image and took it at a very slow shutter speed (1/4 second hand-held) against my better judgement. Even though the image has a slight blur I still love the lighting in it and how it directs image eye flow.

          تعليق


          • #6

            الكلمات الأخيرة

            قد لا يكون إنشاء مخارج زاوية لتحسين تدفق العين تقنية تنطبق على نسبة عالية من صورك. قد يكون لديك بعض الصور التي، لأي سبب من الأسباب، لا تبدو صحيحة، ولكنك تشعر أنها لا تزال لديها بعض الإمكانات. أعطهم نظرة أخرى. إذا كان بإمكانك إعادة صياغتها لإنشاء بعض مخارج الزوايا، فقد يكون هذا هو الحل الذي كنت تبحث عنه.

            المادة وجميع الصور حقوق الطبع والنشر 2014، توماس ستير. كل الحقوق محفوظة. لا يُسمح بأي استخدام أو إعادة إنتاج أو نسخ بما في ذلك المحتوى الإلكتروني دون موافقة كتابية.


            Final Words


            Creating corner exits to improve eye flow may not be a technique that will apply to a high percentage of your images. You may have a few photos that, for whatever reason, just don’t seem right, but you feel they still have some potential. Give them another look. If you can rework them to create some corner exits, that may be the solution you’ve been seeking.

            Article and all images Copyright 2014, Thomas Stirr. All rights reserved. No use, reproduction or duplication including electronic is allowed without written consent.

            تعليق

            يعمل...
            X