تصوير الماكرو عالي التكبير High Magnification Macro Photography

تقليص
X
 
  • تصفية - فلترة
  • الوقت
  • عرض
إلغاء تحديد الكل
مشاركات جديدة

  • تصوير الماكرو عالي التكبير High Magnification Macro Photography

    التصوير الفوتوغرافي الماكرو عالي التكبير بميزانية محدودة
    High Magnification Macro Photography on a Budget

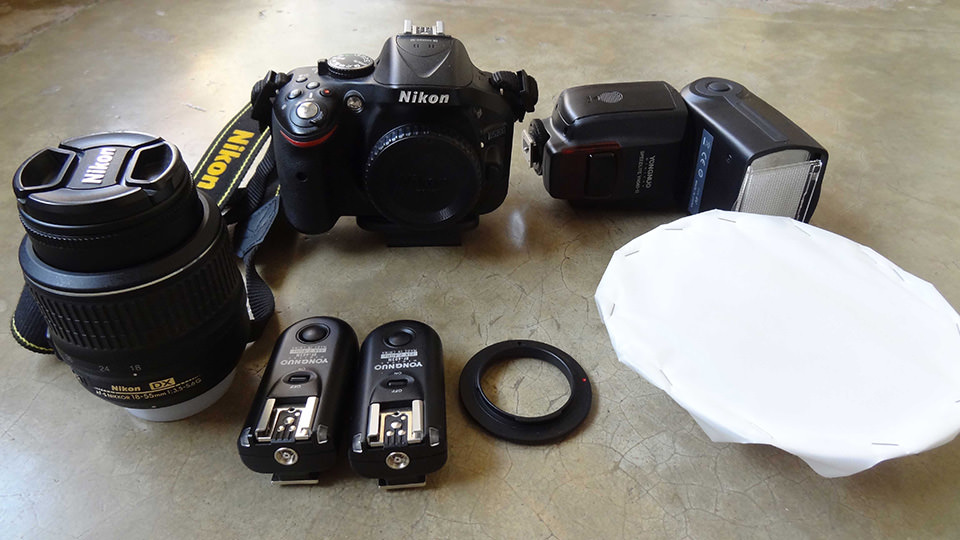
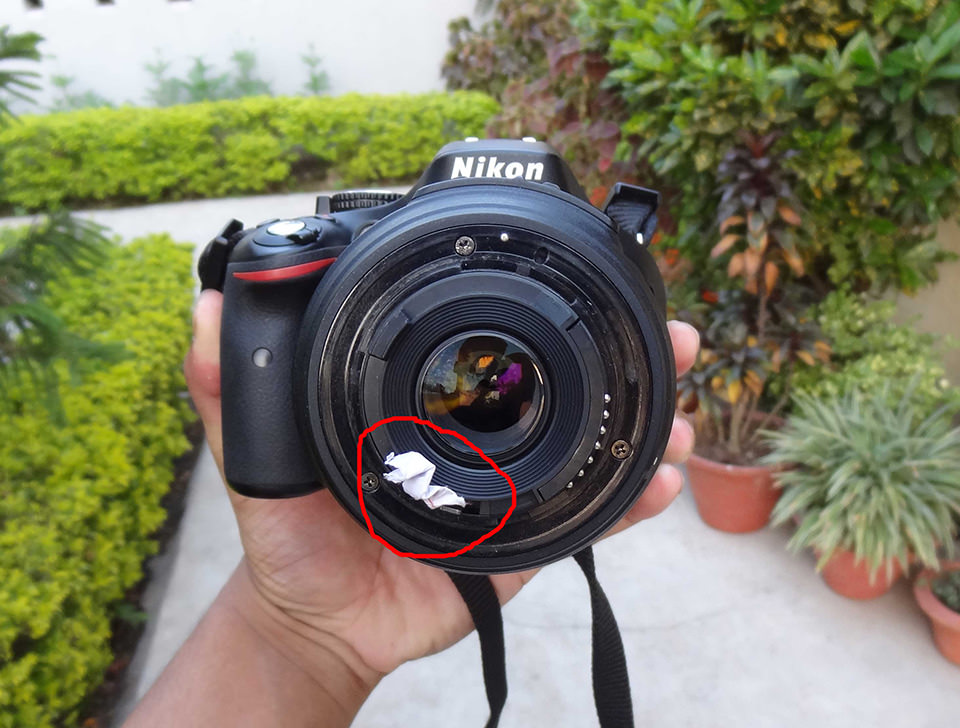
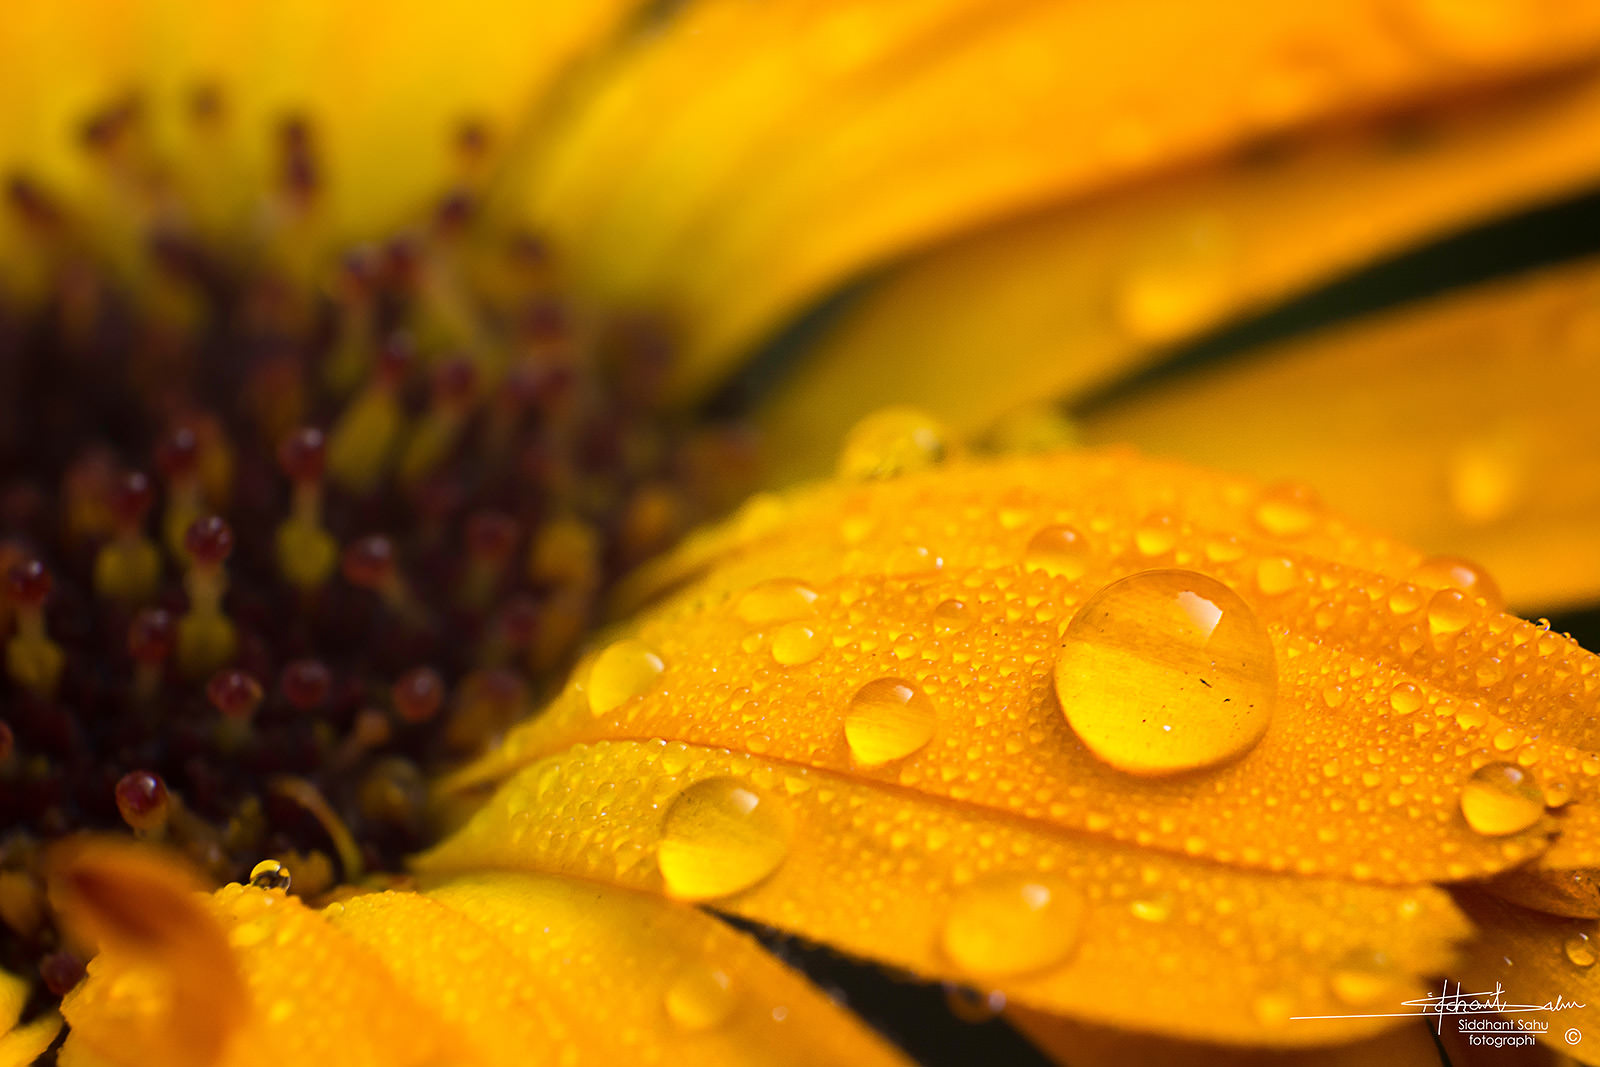
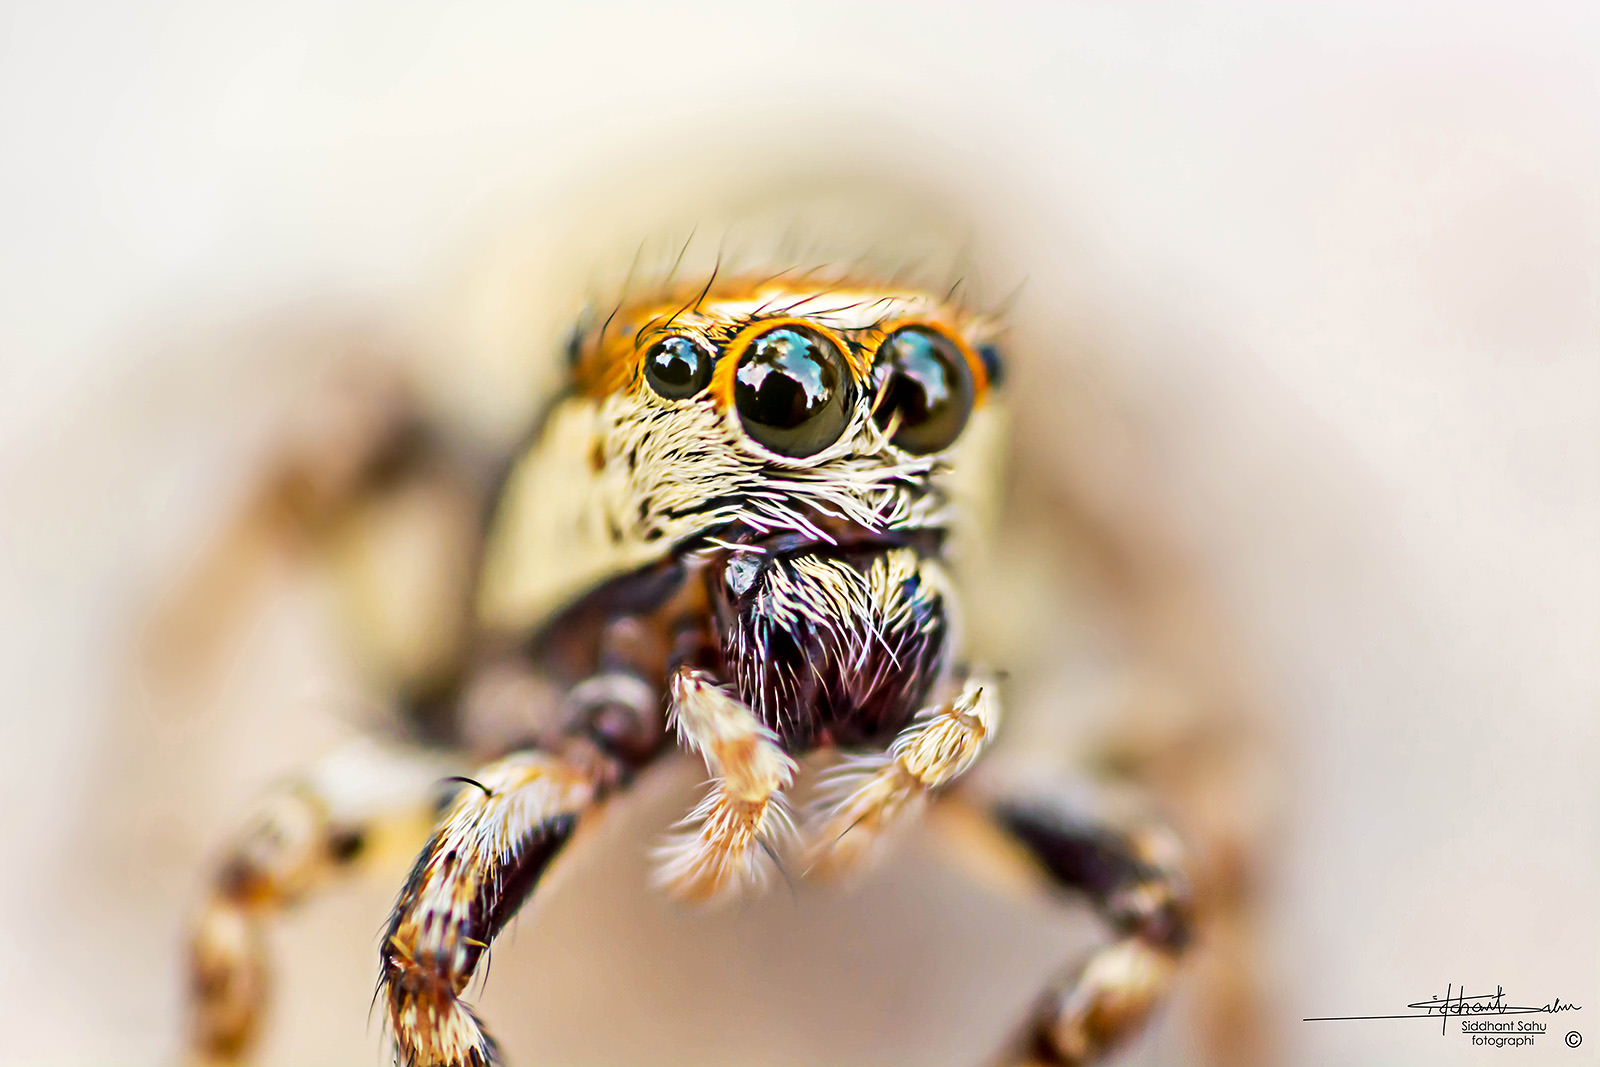
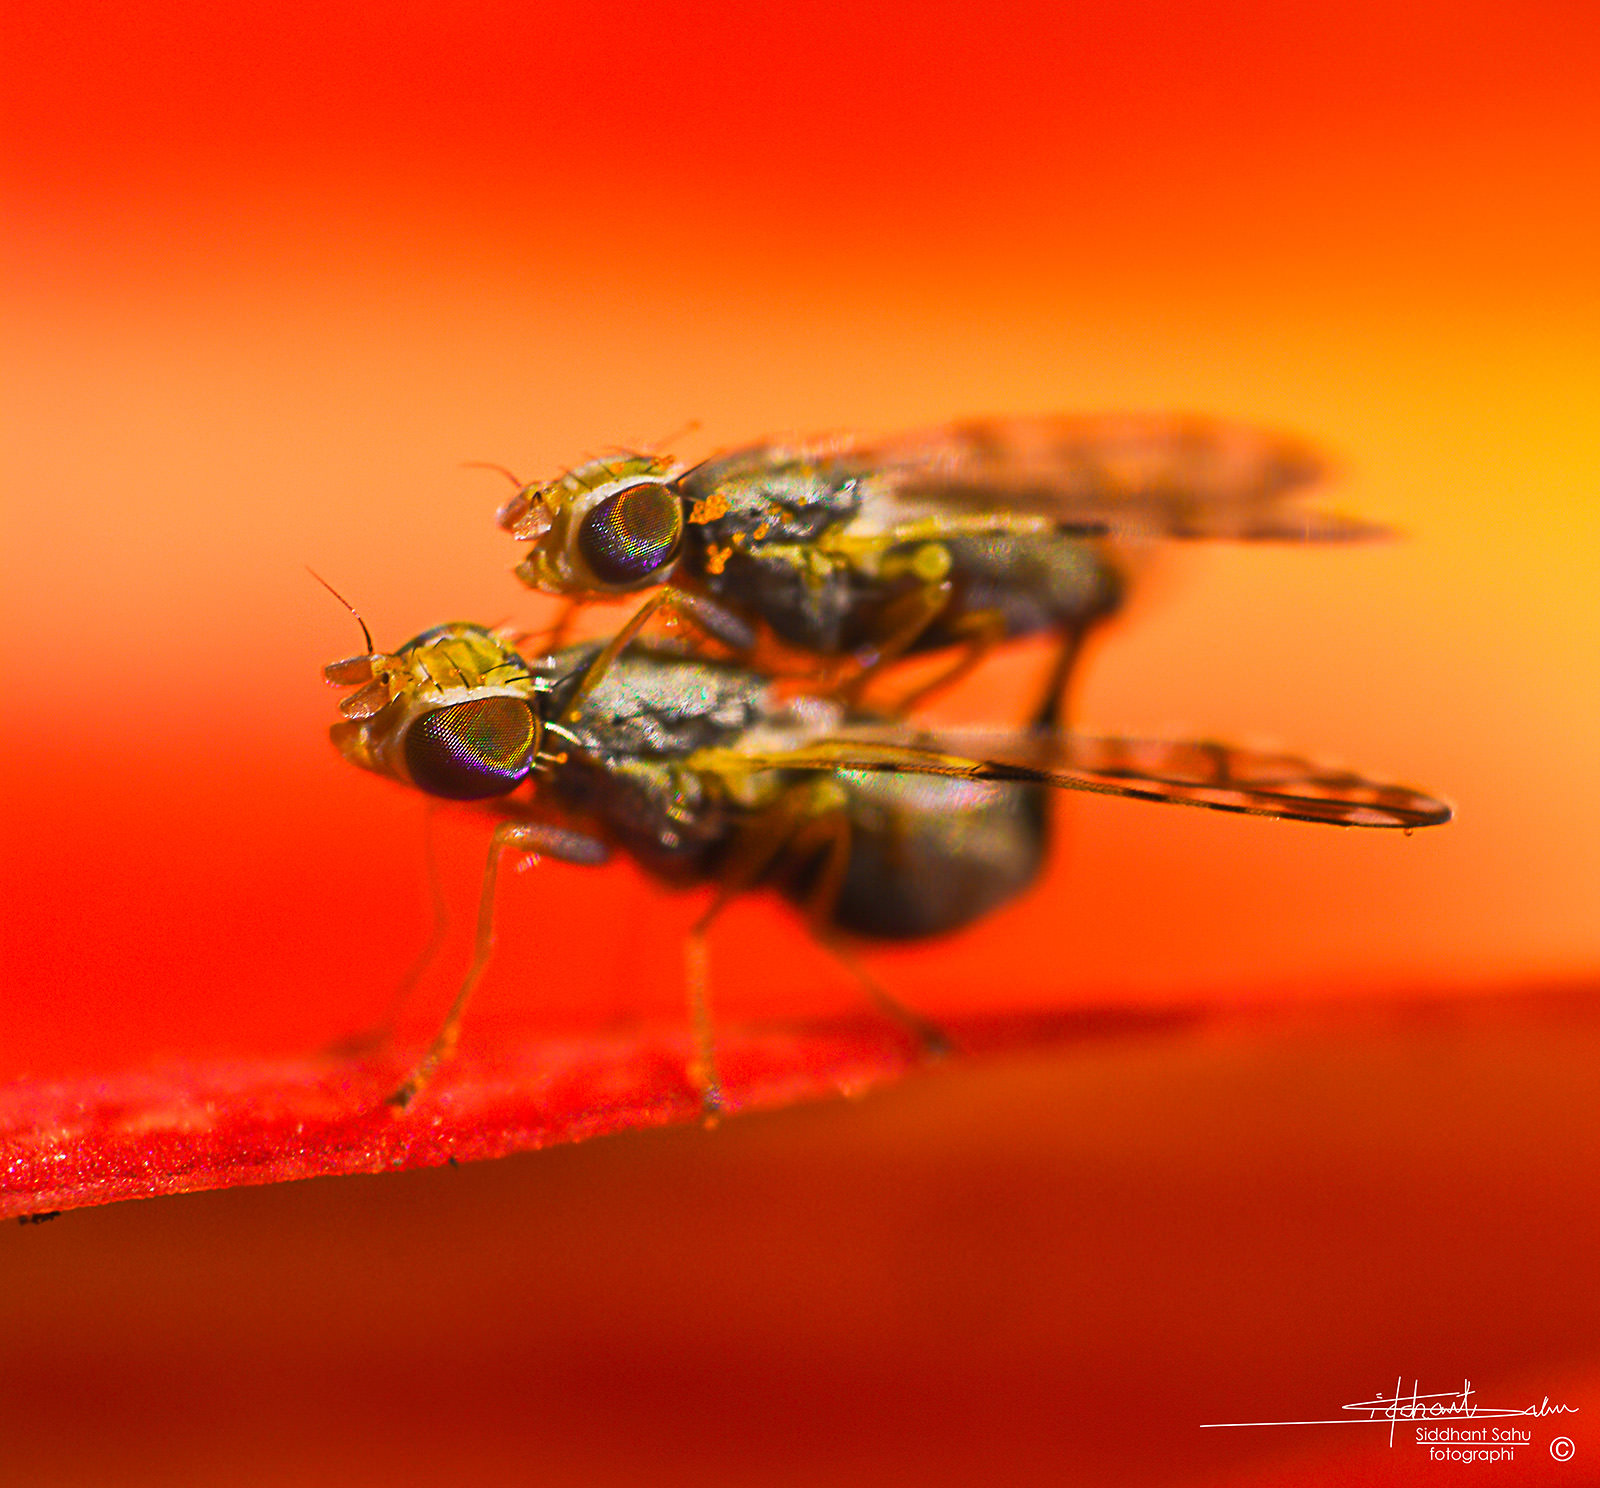
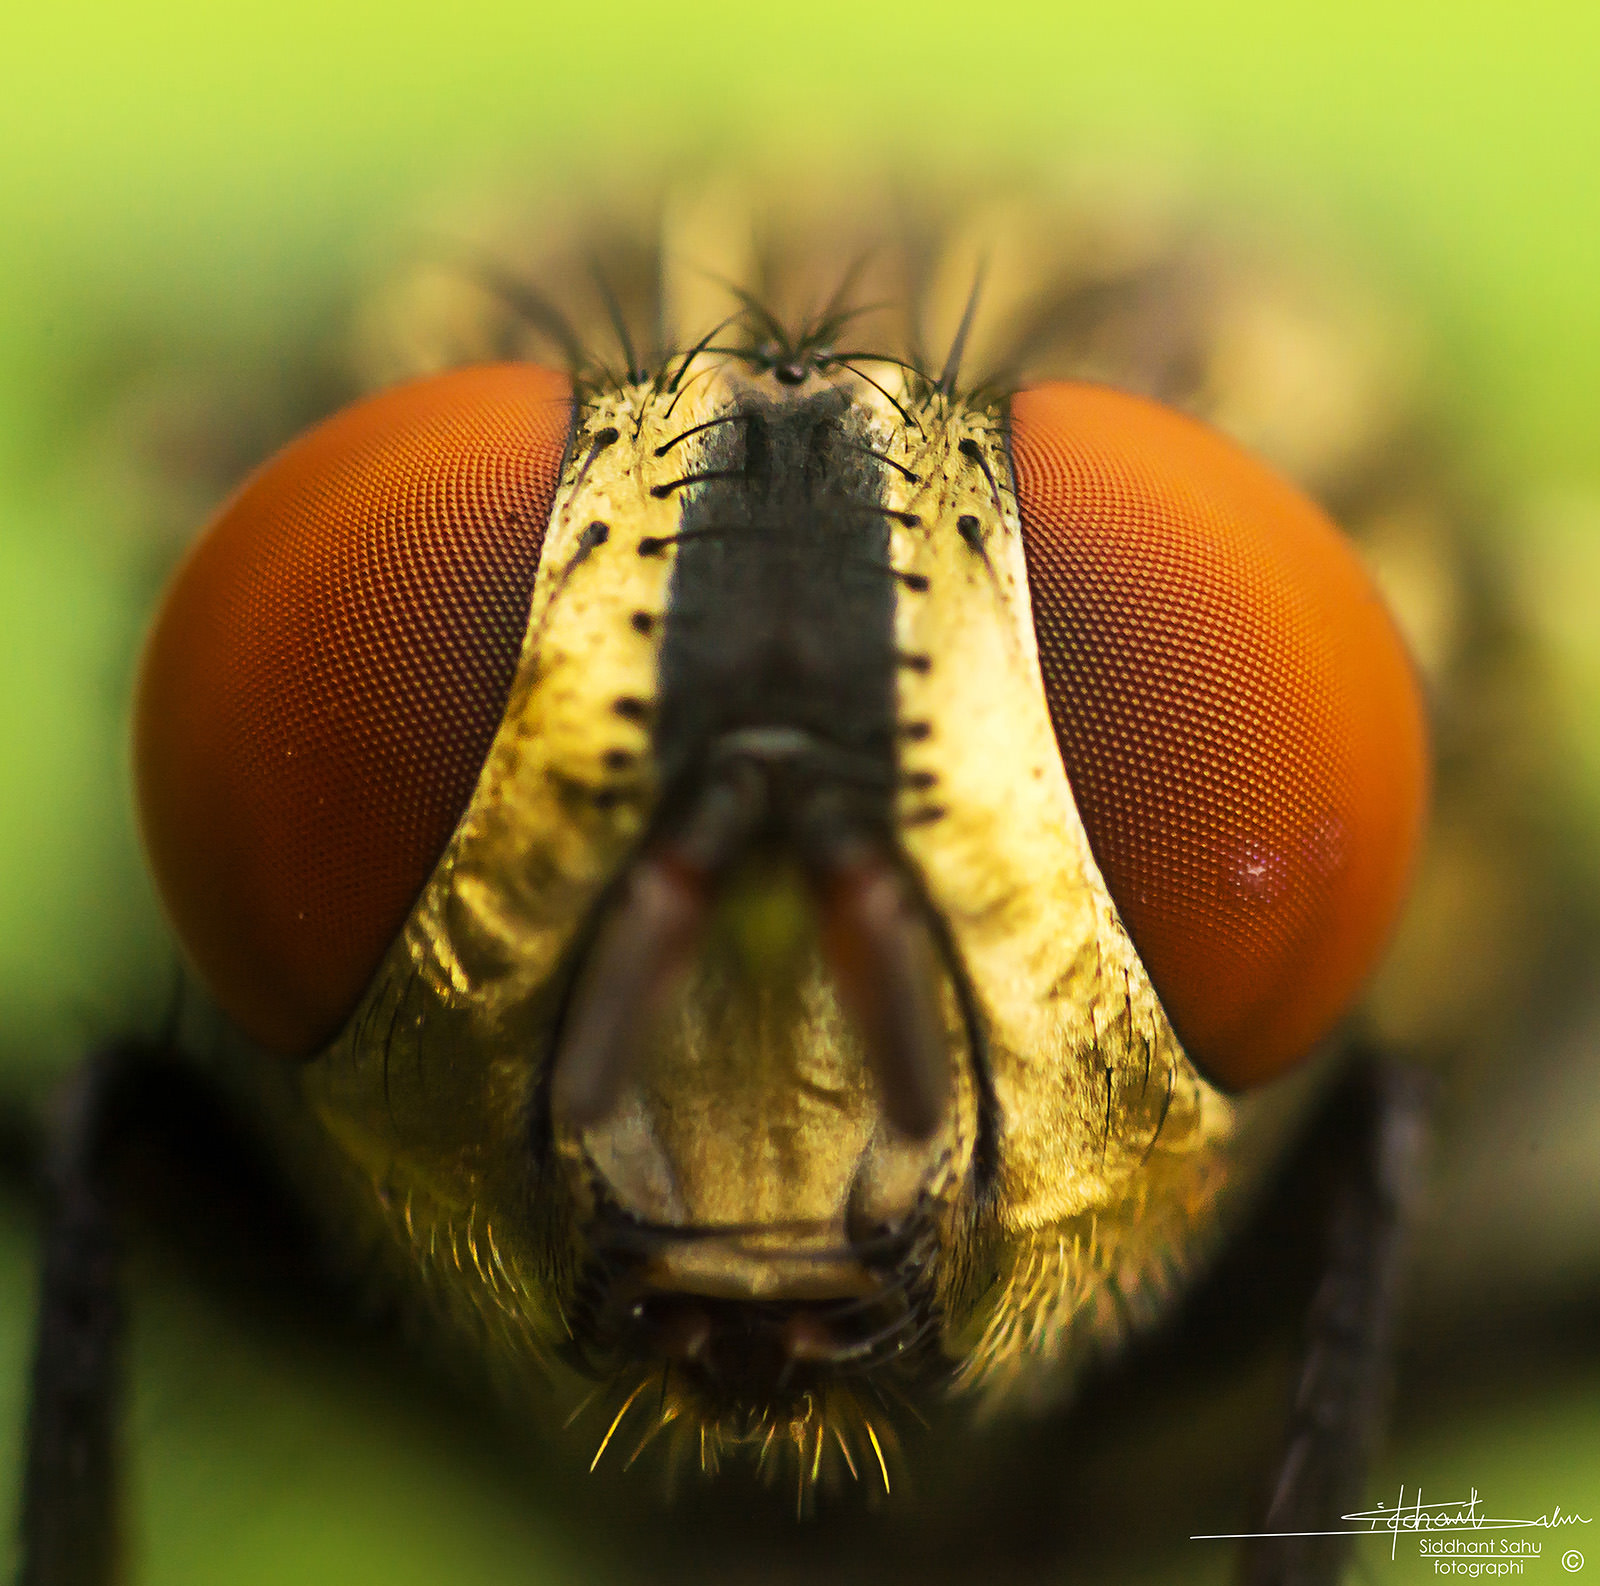
    مرحبًا يا جماعة، اسمي سيدهانت ساهو، عمري 16 عامًا، مصور فوتوغرافي طموح من الهند. لقد قمت بالتقاط صور ماكرو لمدة عام تقريبًا الآن، وسأحاول تلخيص كل ما تعلمته على طول طريقي في هذه المقالة القصيرة. أعتقد أن التصوير الفوتوغرافي الماكرو لديه القدرة على الدخول إلى عالم جديد تمامًا من المخلوقات الصغيرة. في الواقع، باستخدام قطعة متواضعة من المعدات، يمكنك التقاط صور ماكرو عالية التكبير. من الجيد تحديد سلوك الحشرات ومدى اقترابك من بعضها، ولكن مرة أخرى، هذه حيوانات برية ولا توجد طريقة للتنبؤ بكيفية سلوكها بالضبط، يمكن أن يكون كل موضوع مختلفًا، ويمكن أن تكون كل خلفية مختلفة. ولكن مع التصوير الرقمي، لا توجد عقوبة لالتقاط آلاف وآلاف الصور، وفي نهاية المطاف، في يوم من الأيام، من بين تلك الآلاف من الصور، ستكون هناك صورة واحدة قابلة للاستخدام بدرجة كافية. أي شخص قادر على القيام بذلك، فأنت لست بحاجة إلى أعظم عدسة أو أحدث كاميرا متوفرة. يعد التصوير الفوتوغرافي الماكرو أمرًا مرهقًا جسديًا ويمثل تحديًا ويتطلب الكثير من الصبر ويستغرق وقتًا طويلاً، ولكن يمكنك الحصول على نتائج مذهلة باستخدام قطعة لا بأس بها من المعدات.


    Hey folks, my name is Siddhant Sahu, I am a 16 years old aspiring photographer from India. I have been shooting macro photographs for about a year now and I would try to encapsulate all I have learnt along my way in this short article. I believe that macro photography has the power of entering in a whole new world of tiny creatures. In fact with only modest piece of equipment you can shoot high magnification macro photographs. It’s good to mark the behavior of insects and how close you can approach some of them, but then again these are wild animals and there is no way to predict how exactly they will behave, each subject can be different, each background can be different. But with digital photography there is no penalty to shoot thousands and thousands of photos, and eventually someday among those thousands photos one particular would be usable enough. Anyone is capable of doing this, you don’t need the greatest lens or the newest camera out there. Macro photography is physically exhausting, challenging and requires a lot of patience and time consuming but you can get amazing results with fair piece of equipment.


  • #2
    جدول المحتويات

    الترس الذي أستخدمه
    البعد البؤري في تصوير الماكرو
    إعدادات كاميرا
    المعالجة اللاحقة


    Table of Contents

    تعليق


    • #3
      المعدات التي أستخدمها


      نيكون D5200نيكون 18-55 ملم f/3.5-5.6G DX عدة عدساتYongnuo YN560 II SpeedlightYongnuo RF-603N فلاش مشغلات فلاش محلية الصنع ناشر فلاش نيكون 52 ملم فلتر عكسي

      أولاً، نحتاج إلى تثبيت الحلقة العكسية على خيط مرشح العدسة ثم بعد ذلك نعلقها على جسم الكاميرا نفسه. نظرًا لأننا نقوم بإصلاح العدسة بشكل معكوس، فإننا نفقد الاتصال الإلكتروني من الجسم، لذلك نحتاج إلى ضبط فتحة العدسة وتركيزها يدويًا. يجب عليك ضبط الفتحة يدويًا بأصابعك أثناء التصوير. نظرًا لأن العدسة مثبتة في الخلف، فإن عمق المجال سيصبح أيضًا أقل عمقًا - كلما كنت أوسع، كلما كان عمق المجال أقل عمقًا. مع مثل هذا الإعداد عند الفتحة الأوسع، يكون عمق المجال أقل من ملليمتر حرفيًا! هناك طرق مختلفة لإبقاء ذراع الفتحة في مكانه على عدسات نيكون، ولكن طريقتي الشخصية تستخدم استخدام قطعة من الورق للحفاظ على الفتحة أضيق، كما هو موضح أدناه:


      ليس الإعداد الأفضل المظهر، لكنه يعمل!

      التالي هو توصيل مشغل الفلاش بمصباح السرعة الخاص بك وجهاز الإرسال الموجود على الحذاء الساخن للكاميرا. يعمل ناشر الفلاش محلي الصنع المصنوع من أي نوع من المواد الشفافة بشكل رائع وهذا ما أستخدمه، ولكن يمكنك العثور على الكثير من ناشرات الفلاش الجاهزة التي تحقق نفس النتيجة. هناك العديد من الأدلة حول كيفية صنع ناشرات الفلاش التي يمكنك العثور عليها عبر الإنترنت. يساعد الفلاش بالتأكيد في تجميد الحركة في التصوير الفوتوغرافي الماكرو وهو جانب مهم يجب مراعاته. الخطوة التالية هي تحديد ما إذا كنت تريد حمل الكاميرا والفلاش يدويًا كما أفعل، أو تثبيتهما على حامل وحامل ثلاثي القوائم للحصول على مزيد من الاستقرار. أوصي بهذا الأخير، حيث يمكنك التحكم في الإعداد بشكل أفضل.


      The Gear I Use

      1. Nikon D5200
      2. Nikon 18-55mm f/3.5-5.6G DX kit lens
      3. Yongnuo YN560 II Speedlight
      4. Yongnuo RF-603N Flash Triggers
      5. Homemade flash diffuser
      6. Nikon 52mm Filter Reverse Ring

      First, we need to attach the reversal ring onto the filter thread of the lens and then after that attach it to the camera body itself. Since we are fixing the lens reversed, we lose electronic connection from the body, so we need to adjust our aperture and focus it manually. You have to manually adjust the aperture with your fingers while shooting. As the lens is reverse-mounted, depth of field is also going to get shallower – the wider you are, the shallower the depth of field. With such a setup at the widest aperture, depth of field is literally less than a millimeter! There are different ways to keep the aperture lever in place on Nikon lenses, but my personal method employs using a piece of paper to keep the aperture narrower, as shown below:


      Not the best looking setup, but it works!

      Next is connecting the flash trigger to your speedlight and a transmitter on the camera hot shoe. A homemade flash diffuser from any type of translucent material works great and that’s what I use, but you can find plenty of ready diffusers that achieve the same result. There are many guides on making DIY flash diffusers that you can find online. Flash definitely helps in freezing motion in macro photography and is an important aspect to consider. The next step is to decide on whether you want to hand-hold your camera and the flash like I do, or mount those on a bracket and tripod to get more stability. I would recommend the latter, since you can control your setup better.

      تعليق


      • #4

        البعد البؤري في الماكرو

        ونظرًا لحقيقة أن العدسة معكوسة، فإن البعد البؤري سيعمل أيضًا بطريقة عكسية. وهذا يعني أن البعد البؤري الأقصر على العدسة سيمنحك تكبيرًا أكبر من البعد البؤري الأطول. بالنسبة إلى لقطات الزهور، يمكن استخدام طول بؤري معكوس مقاس 55 مم، بينما إذا كنت بحاجة إلى تكبير أعلى، فيجب أن تفكر في استخدام أطوال بؤرية أقصر - حوالي 24 مم للحشرات والعناكب والذباب والبق وجميع الأشياء. عندما تنظر من خلال عدسة الكاميرا إلى هذه الأطوال البؤرية أو تستخدم العرض المباشر على الكاميرا، فإن مثل هذه التكبيرات العالية ستبدو رائعة ومثيرة حقًا! وأيضًا، كلما كان البعد البؤري أقصر، كلما كنت بحاجة إلى الاقتراب فعليًا من موضوعك!


        Focal Length in Macro


        Due to the fact that the lens in reversed, focal length is also going to be working in reversed manner. This means that shorter focal length on the lens will give you more magnification than longer focal length. For flower shots, a 55mm reversed focal length can be used, whereas if you need higher magnification, you should consider using shorter focal lengths – around 24mm for insects, spiders, flies, bugs and all. When you look through the viewfinder at these focal lengths or use live view on the camera, such high magnifications will look really cool and exciting! Also, the shorter the focal length, the closer you need to physically get to your subject!


        تعليق


        • #5
          إعدادات الكاميرا

          ستختلف إعدادات الكاميرا لديك اعتمادًا على ما تفعله، ولكن هناك بعض النقاط التي يجب وضعها في الاعتبار. مع إيقاف الفتحة بشكل معتدل بالفعل لمزيد من عمق المجال، يجب أن تكون سرعة الغالق حوالي 1/120 - 1/60 من الثانية لتقليل اهتزاز الكاميرا ويجب أن تكون أقل من سرعة مزامنة الفلاش (1/200 ثانية)، أو جزء من سوف تكون صورتك مظلمة. نظرًا لأننا نقوم بالتصوير عن قرب، فإن كل جزء من الحركة سيتم تضخيمه بدرجة كبيرة، لذا انتبه إلى اهتزاز الكاميرا والرياح والعوامل الأخرى التي قد تؤدي إلى ضبابية صورك. قد تكون فكرة جيدة أن تقوم بضبط ISO الخاص بك للحفاظ على سرعة الغالق لديك سريعة بما يكفي ومحاولة أن تكون مستقرة قدر الإمكان، خاصة إذا كنت تمسك الكاميرا بيدك. بالنسبة لضوء السرعة، أستخدم قوة 1/128 أو 1/64 أو 1/32، وليس أكثر من ذلك، فقط لإضافة المزيد من الضوء وتجميد الحركة ومنع الصور من أن تبدو "براقة" للغاية. لقد انتهيت الآن تقريبًا - ابحث عن بعض الحشرات أو الذباب في حديقتك والاحتمالات لا حصر لها! وأخيرًا، قم بالتصوير في الصباح الباكر، بينما لا تزال الحشرات نصف نائمة والضوء ناعم وجميل.


          Camera Settings


          Your camera settings will differ depending on what you are doing, but there are some points to keep in mind. With your aperture already moderately stopped down for more depth of field, shutter speed should be around 1/120 – 1/60 of a second to minimize camera shake and should be less than your flash sync speed (1/200s), or part of your image will be dark. Because we are shooting macro, every bit of movement would get highly magnified, so pay attention to camera shake, wind and other factors that could introduce blur to your images. It might be a good idea to adjust your ISO to keep your shutter speed fast enough and try to be as stable as you can, specially if you are hand-holding your camera. For the speedlight, I use power of 1/128, 1/64 or 1/32, not more than that, just to add a little more light, freeze the motion and to prevent images from looking too “flashy”. Now you are pretty much done – go find some bugs or flies in your garden and the possibilities are endless! Oh and lastly, shoot early in the morning, while the bugs are still half asleep and the light is soft and beautiful.


          تعليق


          • #6
            المعالجة البعدية

            تعد المعالجة اللاحقة مهمة جدًا لأي نوع من أنواع التصوير الفوتوغرافي، لذا لا توقف عمليتك بعد التقاط الصور فحسب. على الرغم من أنك لن تتعامل مع عمليات التحرير الثقيلة في التصوير الفوتوغرافي الماكرو، إلا أنه لا تزال هناك بعض الخطوات التي يجب عليك اتخاذها للتأكد من أن صورك تبدو جيدة. يمكنك البدء باستيراد صورك إلى Photoshop أو Lightroom أو أي برنامج آخر للمعالجة اللاحقة واتباع الخطوات البسيطة التالية:


            ضبط التعريض الضوئي: أميل إلى التقاط صور ماكرو ذات تعريض خافت قليلاً بنحو 1 أو 2 توقف فقط حتى أتمكن من الحصول على سرعات غالق أعلى. تذكر أن تجميد الحركة أكثر أهمية من الحصول على التعريض الضوئي الأمثل، حيث يمكنك التعافي قليلاً عند التصوير بصيغة RAW. إذا كانت ظروف الإضاءة جيدة، فلا تقلل من التعريض الضوئي - وبدلاً من ذلك، حاول "التصوير على يمين" الرسم البياني للحصول على تعريض ضوئي مثالي للحصول على صور خالية من الضوضاء. ولكن إذا كانت سرعة الغالق لديك تعاني بشدة، فلا تشعر بالسوء بشأن التعريض لليسار لمواكبة سرعة الغالق. التباين: ما عليك سوى ضبط المنحنيات وإنشاء رسم بياني على شكل S قليلاً في RGB، أو فقط قم بزيادة اللون الأبيض واللون الأبيض قيم داكنة. الاقتصاص: قم بقص صورتك حسب رغبتك للحصول على تكوين أفضل، ولكن احذر من الاقتصاص أكثر من اللازم، وإلا ستفقد الكثير من الدقة. الحدة: أقوم بحفظ الصور بالحجم الكامل دون تطبيق زيادة الوضوح، كما أقوم فقط بزيادة وضوح الصور عند تحميلها بحجم أصغر. الإصدارات إلى Facebook أو Google+ أو موقع الويب الخاص بي أو أي استخدام آخر للويب. اطلع على هذه المقالة الممتازة التي كتبها نسيم حول الطريقة الصحيحة لتغيير حجم الصور في Lightroom، ثم راجع المقالة الثانية حول تقنيات التوضيح المناسبة في Lightroom

            هذا هو في الأساس! نأمل أن يساعدك هذا الدليل في الحصول على بعض اللقطات المذهلة دون إنفاق الكثير من المال.


            Post Processing


            Post processing is very important for any kind of photography, so don’t just stop your process after capturing images. Although you wouldn’t be dealing with heavy editing in macro photography, there are still some steps you should take to ensure that your images look good. You can start by importing your photos to Photoshop, Lightroom or any other post-processing software and following these simple steps:

            • Adjust Exposure: I tend to shoot macro photos a bit underexposed by around 1 or 2 stops just to be able to yield higher shutter speeds. Remember, freezing motion in more important than getting optimal exposure, since you can recover quite a bit when shooting RAW. If light conditions are good, don’t underexpose – instead, try to “shoot to the right” of the histogram to get optimal exposure in order to yield noise-free images. But if your shutter speed suffers badly, don’t feel bad about exposing to the left to keep up with the shutter speed.
            • Contrast: Just grab the curves adjustment and create a slightly S shaped graph in RGB, or just increase the whites and the darks values.
            • Cropping: Crop your image to your liking for better composition, but be weary of cropping too much, or you will lose a lot of resolution.
            • Sharpening: I save full size images without applying aggressive sharpening and only sharpen images when uploading smaller versions to Facebook, Google+, my website or any other web use. See this excellent article by Nasim on proper way to resize images in Lightroom, then see the second article on proper sharpening techniques in Lightroom

            That’s essentially it! Hope this guide helps you with getting some amazing shots without spending a lot of money.


            تعليق

            يعمل...
            X