الضوءالداكن والفاقع Hard light and and soft light

تقليص
X
 
  • تصفية - فلترة
  • الوقت
  • عرض
إلغاء تحديد الكل
مشاركات جديدة

  • الضوءالداكن والفاقع Hard light and and soft light

    استكشاف الضوء الناعم والضوء الصلب في التصوير الفوتوغرافي
    Exploring Soft Light and Hard Light in Photography

    الضوء هو أساس كل التصوير الفوتوغرافي، ونوعية الضوء في صورتك يمكن أن تصنع الصورة أو تفسدها. يعد فهم خصائص الضوء وكيفية تفاعله مع موضوعك أمرًا ضروريًا لالتقاط صور فوتوغرافية آسرة. في هذه المقالة، سوف أتعمق في عالم الضوء الناعم والقوي، سواء بالنسبة للتصوير الفوتوغرافي بالفلاش أو الضوء الطبيعي. سأستكشف أيضًا معدّلات الإضاءة المختلفة التي يمكن استخدامها لإنشاء تأثيرات محددة ومناقشة متى قد يكون أحد أنواع الإضاءة مفضلاً على الآخر، اعتمادًا على سياق اللقطة وحالتها المزاجية.


    Light is the basis of all photography, and the quality of light in your photo can make or break the image. Understanding the characteristics of light and how it interacts with your subject is essential for capturing captivating photographs. In this article, I will delve into the realm of soft and hard light, both for flash photography and natural light. I’ll also explore various light modifiers that can be used to create specific effects and discuss when one type of lighting may be preferable to the other, depending on the context and mood of the shot.

  • #2
    فهم الضوء الناعم والصلب

    قبل أن نتعمق في تفاصيل كيفية إلقاء الضوء الناعم أو القوي، دعونا أولاً نحدد ما يعنيه الضوء الناعم والصلب في سياق التصوير الفوتوغرافي.

    ضوء خافت

    يتميز الضوء الناعم بظلال منتشرة، مع انتقالات تدريجية بين مناطق الضوء والظل. إنها تنتج إضاءة لطيفة يمكنها تنعيم الأنسجة وإبراز التفاصيل. غالبًا ما يرتبط الضوء الناعم بمصادر ضوء أكبر أو معدّلات تنشر الضوء على مساحة أوسع، مما يؤدي إلى توزيع أكثر توازناً للإضاءة. تتضمن أمثلة الضوء الناعم وميضًا منتشرًا أو يومًا ملبدًا بالغيوم.

    ضوء الثابت

    من ناحية أخرى، يخلق الضوء القوي ظلالًا قوية ومحددة جيدًا ذات حواف قاسية. فهو ينتج تأثيرًا أكثر دراماتيكية وتباينًا، مما يعزز الأبعاد الثلاثة للموضوع. غالبًا ما يكون الضوء القوي نتيجة لمصادر ضوء أصغر أو ضوء مباشر، مما يخلق حزم إضاءة أكثر تركيزًا.


    مثال على الضوء الناعم (يسار) مقابل الضوء الصلب (يمين)


    Understanding Soft and Hard Light


    Before we dive into the specifics of how to cast soft or hard light, let’s first establish what soft and hard light mean in the context of photography.
    Soft Light


    Soft light is characterized by diffused shadows, with gradual transitions between highlights and shadow areas. It produces a gentle illumination that can smooth out textures and bring out details. Soft light is often associated with larger light sources or modifiers that spread the light over a wider area, resulting in a more even distribution of illumination. Examples of soft light include a diffused flash or overcast day.
    Hard Light


    Hard light, on the other hand, creates strong, well-defined shadows with harsh edges. It produces a more dramatic and contrasty effect, enhancing the three dimensionality of a subject. Hard light is often the result of smaller light sources or direct light, which creates more focused beams of illumination.

    An example of soft light (left) versus hard light (right)
    تعليق


    • #3
      التفضيلات الجمالية

      يعتمد الاختيار بين الضوء الناعم والقوي في النهاية على الجمالية التي تريدها وسياق الصورة، ويجب أن يكون اختيارًا واعيًا من قبل المصور. يحمل الضوء الناعم والصلب تأثيرات عاطفية مختلفة.

      يعمل الضوء الناعم على إضفاء مظهر جميل على الموضوع من خلال تقليل العيوب وإنشاء مظهر لطيف وممتع. غالبًا ما يتم تفضيله في تصوير الماكرو والصور الشخصية وتصوير المنتجات، حيث تكون الإضاءة أكثر نعومة واتساقًا مطلوبة.

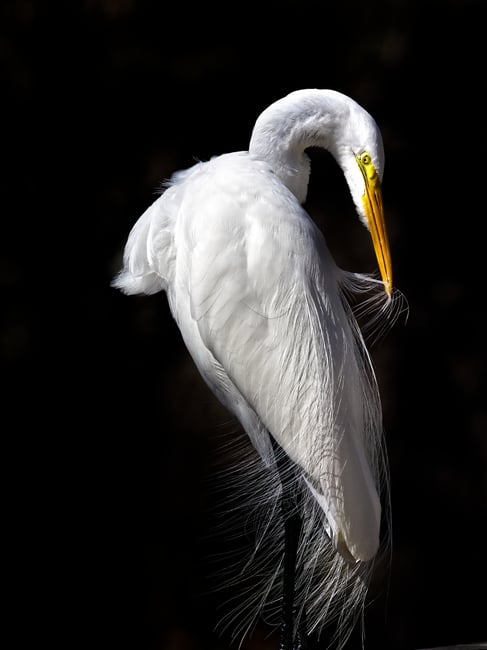
      يعد الضوء القوي مناسبًا تمامًا لخلق إحساس بالدراما، والتأكيد على الأنسجة وإضافة تأثير جريء على الصور. يمكن أن يكون مثاليًا للمناظر الطبيعية الدرامية والصور الشخصية المتقلبة، أو في أي وقت تريد فيه التركيز على الظلال القاسية للمشهد.

      التصوير الفوتوغرافي هو شكل من أشكال الفن، لذلك لا توجد قاعدة محددة عندما يكون أحد أنواع الإضاءة أفضل من الآخر. ومع ذلك، أسعى جاهداً لأكون متعمدًا في قرارات الإضاءة الخاصة بي. حتى في الضوء الطبيعي، سأبحث عن الأهداف التي تحقق أقصى استفادة من أي ضوء متاح.


      Aesthetic Preferences


      The choice between soft and hard light ultimately depends on the aesthetic you desire and the context of the photograph, and it should be a conscious choice by the photographer. Soft and hard light carry different emotional impacts.

      Soft light flatters the subject by minimizing imperfections and creating a gentle, pleasing look. It is often favored in macro, portrait, and product photography, where a softer, more uniform illumination is desired.

      Hard light is well-suited for creating a sense of drama, emphasizing textures and adding a bold impact to images. It can be ideal for dramatic landscapes and moody portraits, or any time that you want to emphasize the harsh shadows of a scene.

      Photography is an art form, so there’s no set rule when one lighting type is better than the other. However, I strive to be intentional with my lighting decisions. Even in natural light, I will look for subjects that make the most of whatever light is available.
      OM-1 + OLYMPUS M.300mm F4 @ 300mm, ISO 200, 1/1600, f/7.1

      تعليق


      • #4
        أمثلة على الإضاءة المحيطة الناعمة

        1. الأيام الملبدة بالغيوم

        يعمل الغطاء السحابي كموزع طبيعي، مما يخلق ظروف إضاءة ناعمة ومتساوية دون ظلال قاسية. بعض المصورين لا يحبون الأيام الملبدة بالغيوم لأن الضوء يكون أكثر قتامة، ولكن ذلك يعتمد في الواقع على الموضوع. أنا حقًا أحب السماء الملبدة بالغيوم جزئيًا لأي شيء بدءًا من تصوير الحياة البرية وحتى تصوير البورتريه.

        2. بعض المساحات الداخلية

        في الداخل، اعتمادا على الأضواء، يمكن أن توفر الإضاءة الناعمة. تكون الإضاءة المحيطة الداخلية أكثر نعومة عندما تكون هناك نوافذ كبيرة أو متعددة. تساعد الجدران الملونة الأكثر إشراقًا على ارتداد الضوء حول الغرفة لإضاءة الجسم من زوايا أكثر.

        3. الظل

        في الأيام المشمسة تمامًا، هناك خدعة شائعة بين مصوري الصور الشخصية وهي وضع هدفهم في الظل. كما أنه مناسب لتصوير الحياة البرية، إذا وجدت أن ضوء الشمس العاري قاسٍ للغاية. ابحث عن بقع الظل والحيوانات التي تبرد فيها!

        4. نور الصباح والمساء

        خلال الساعة الذهبية، تنتج الزاوية السفلية للشمس ضوءًا أكثر نعومة ودفئًا. على الرغم من أنني أفترض أنه من المثير للجدل ما إذا كان ينبغي اعتبار الساعة الذهبية ضوءًا ناعمًا أو قويًا - فالأمر يعتمد على مدى صفاء الجو في ذلك اليوم. لكن بشكل عام، ستكون الشمس أكثر انتشارًا عندما تكون منخفضة في الأفق.

        E-M1 وعدسة LUMIX G VARIO 100-300/F4-5.6 عند 183 مم، ISO 1600، 1/1250، f/5.6


        Soft Ambient Light Examples

        1. Overcast Days


        Cloud cover acts as a natural diffuser, creating soft, even lighting conditions without harsh shadows. Some photographers don’t like overcast days because the light is more dull, but it really depends upon the subject. I really like a partly cloudy sky for anything from wildlife photography to portraiture.
        2. Some Indoor Spaces


        Indoors, depending on the lights, can offer soft lighting. Indoor ambient light is softest when there are big or multiple windows. Brighter colored walls help light bounce around a room to illuminate a subject from more angles.
        3. Shade


        On totally sunny days, a popular trick among portrait photographers is to bring their subject into the shade. It also works for wildlife photography, if you find the bare sunlight to be too harsh. Look for patches of shade and animals cooling down in them!
        4. Morning and Evening Light


        During golden hour, the sun’s lower angle produces a softer and warmer light. Though I suppose it is debatable whether golden hour should be considered soft or hard light – it depends upon how clear the atmosphere is that day. But in general, the sun will be more diffused when it’s lower on the horizon.
        E-M1 and LUMIX G VARIO 100-300/F4-5.6 lens @ 183mm, ISO 1600, 1/1250, f/5.6

        تعليق


        • #5
          أمثلة على الإضاءة المحيطة الصعبة

          1. ضوء الشمس من خلال النوافذ

          يمكن لأشعة الشمس المباشرة المتدفقة عبر النوافذ أن تخلق ضوءًا قويًا في الداخل، مما يؤدي إلى إلقاء ظلال محددة وإبراز الأنسجة.

          2. ضوء الشمس في منتصف النهار

          عندما تكون الشمس فوق رأسك مباشرة، فإنها تخلق ضوءًا قويًا بظلال قوية ومتناقضة. يمكن أن تكون حالة الإضاءة هذه صعبة، ولكن يمكن أيضًا تسخيرها بشكل إبداعي للحصول على صور مثيرة وعالية التباين.


          Hard Ambient Light Examples

          1. Sunlight Through Windows


          The direct sunlight streaming through windows can create hard light indoors, casting defined shadows and highlighting textures.
          2. Midday Sunlight


          When the sun is directly overhead, it creates hard light with strong, contrasting shadows. This lighting condition can be challenging, but it can also be creatively harnessed for high-contrast and dramatic images.
          NIKON D780 + Tamron 45mm f/1.8 @ ISO 100, 1/500, f/8.0

          تعليق


          • #6
            التصوير الفوتوغرافي بالفلاش: إنشاء ضوء ناعم

            يتيح التصوير الفوتوغرافي بالفلاش (أو الضوء الاصطناعي بشكل عام) للمصورين التحكم الكامل في ظروف الإضاءة. وهذا يجعل الفلاش أداة متعددة الاستخدامات ومناسبة لالتقاط الحالة المزاجية المناسبة في صورتك.

            بشكل افتراضي، يلقي الفلاش العاري ضوءًا قاسيًا، لأن الضوء يأتي من مصدر صغير. بالنسبة للعديد من الصور، سيكون الأمر قاسيًا للغاية، وغالبًا ما يستخدم المصورون أدوات لتخفيف الضوء. فيما يلي بعض الخيارات الأساسية:

            1. المظلات

            تم تصميم معدّلات الإضاءة الشائعة هذه لتكبير مصدر الضوء، والذي، بحكم تعريفه، يخلق ضوءًا أكثر نعومة. (ترجع نعومة الضوء في الصورة إلى مدى كبر مصدر الضوء وقربه بالنسبة لحجم الهدف.) يمكن إطلاق الفلاش من خلال مظلة، أو يمكن استخدام المظلة لعكس الفلاش مرة أخرى إلى الصورة. موضوع. وفي كلتا الحالتين، تجعل المظلة الضوء يأتي من منطقة أكبر، مما يلقي ضوءًا أكثر ليونة.

            2. سوفت بوكس

            يتم تثبيت صندوق softbox أمام الفلاش لنشر مصدر الضوء. يمكن أن تأتي بأحجام عديدة. القاعدة الأساسية هي أن الناشر الأكبر ضروري للموضوعات الأكبر حجمًا. بالنسبة للتصوير الفوتوغرافي الماكرو، حتى صندوق الضوء الصغير الذي يتم وضعه بالقرب من هدفك يمكن أن يعطي ضوءًا ناعمًا للغاية.

            3. لوحات الانتشار

            يتم وضع هذه الألواح الشفافة أمام الفلاش، مما يؤدي إلى تشتيت الضوء وتخفيفه. إنها رائعة لالتقاط الصور الشخصية عندما يكون الصندوق الناعم صغيرًا جدًا.

            4. عاكسات

            من خلال إعادة توجيه الفلاش وارتداده عن سطح ما، مثل الجدار أو السقف، يمكن للمصورين الحصول على ضوء أكثر نعومة وطبيعية المظهر. هذه خدعة شائعة في التصوير الفوتوغرافي للأحداث الداخلية - وهي توجيه الفلاش نحو السقف، حيث ينعكس بهدوء.


            Flash Photography: Creating Soft Light


            Flash photography (or artificial light in general) allows photographers to have full control over the lighting conditions. This makes flash a versatile tool suitable for capturing the right mood in your photo.

            By default, a bare flash casts harsh light, because the light comes from a small source. For many photos, it will be too harsh, and photographers often use tools to soften the light. Here are some of the primary options:
            1. Umbrellas


            These popular light modifiers are designed to enlarge the light source, which, by definition, creates softer light. (The softness of the light in a photo is down to how large and close that light source is relative to the size of the subject.) A flash can fire through an umbrella, or the umbrella can be used to reflect the flash back to the subject. Either way, the umbrella makes the light come from a larger area, casting softer light.
            2. Softbox


            A softbox attaches in front of a flash to spread out the light source. They can come in many sizes. A rule of thumb is that a larger diffuser is necessary for larger subjects. For macro photography, even a small softbox placed close to your subject can give very soft light.
            3. Diffusion Panels


            These translucent panels are placed in front of the flash, scattering and softening the light. They’re great for portraiture when a softbox would be too small.
            4. Reflectors


            By redirecting and bouncing the flash off a surface, such as a wall or ceiling, photographers can achieve a softer and more natural-looking light. This is a common trick with indoor event photography – namely, pointing the flash toward the ceiling, where it reflects softly.
            DC-G9 + OLYMPUS M.60mm F2.8 Macro @ 60mm, ISO 200, 1/250, f/11.0

            تعليق


            • #7
              التصوير الفوتوغرافي بالفلاش: إنشاء ضوء قوي

              1. فلاش العارية

              يؤدي استخدام الفلاش بدون أي معدلات إلى الحصول على مصدر ضوء صغير ومكثف، مما ينتج عنه ظلال قوية ومظهر أكثر دراماتيكية. في بعض الأحيان يكون له مكانه، ولكني سأكون حذرًا عند استخدام الفلاش العاري!

              2. ناشر صغير

              في بعض الأحيان قد ترغب في إنشاء ضوء أقوى والتلاعب بالظلال، ولكن الفلاش العاري يكون قاسيًا للغاية. يمكن أن يعمل الناشر الصغير كأداة وسطية تسمح لك باللعب بالظلال والضوء القاسي إلى حد ما، مع إخضاعه بشكل معتدل.

              3. سنوتس

              تعمل تقنية Snoots على تقييد انتشار الضوء، مما ينتج عنه شعاعًا أكثر تركيزًا ويخلق ظلالًا مميزة للحصول على تأثير إضاءة أقوى. إنها مفيدة بشكل خاص إذا كنت تريد إلقاء نظرة مثيرة على الأضواء.

              DC-G9 + OLYMPUS M.60mm F2.8 Macro عند 60 مم، ISO 250، 1/250، f/11.0


              Flash Photography: Creating Hard Light

              1. Bare Flash


              Using the flash without any modifiers results in a small, intense light source, producing strong shadows and a more dramatic look. It sometimes has its place, but I would be careful with a bare flash!
              2. Small Diffuser


              Sometimes you might want to create harder light and play with shadows, but a bare flash is just too harsh. A small diffuser can function as a middle ground tool that allows you to play with shadows and fairly harsh light, while being mildly subdued.
              3. Snoots


              Snoots restrict the light’s spread, producing a more focused beam and creating distinct shadows for a harder lighting effect. They are particularly helpful if you want a dramatic spotlight look.
              DC-G9 + OLYMPUS M.60mm F2.8 Macro @ 60mm, ISO 250, 1/250, f/11.0

              تعليق


              • #8
                خاتمة

                في النهاية، يعود اختيار استخدام الضوء الناعم أو القوي إلى المصور – والهدف. حتى عندما تعمل بالضوء الطبيعي، يكون لديك مستوى معين من التحكم في الضوء. على سبيل المثال، إذا كنت تريد أن تجعل الضوء أكثر ليونة، فيمكنك الانتظار حتى تمر سحابة أمام الشمس أو البحث عن الحياة البرية في الظل.

                نظرًا لأن نمط الإضاءة هو اختيار شخصي، فلن أخبر المصور متى يستخدم واحدًا دون الآخر. وبدلاً من ذلك، أشجع المصورين على أن يكونوا متعمدين في الإضاءة الخاصة بهم. يحمل كل من الضوء الناعم والصلب حالات مزاجية مختلفة، وعلى الأرجح ستفضل صورتك بطريقة أو بأخرى. آمل أن تكون بعض المبادئ وتقنيات الإضاءة المذكورة أعلاه مفيدة في رحلة التصوير الفوتوغرافي لشخص ما!


                Conclusion


                In the end, the choice of utilizing soft or hard light comes down to the photographer – and the subject. Even when you’re working with natural light, you have some level of control over the light. For example, if you want to make the light softer, you can wait for a cloud to pass in front of the sun or look for wildlife in the shade.

                Because the style of lighting is a subjective choice, I wouldn’t tell a photographer when to use one over the other. Rather, I encourage photographers to be intentional with their lighting. Soft and hard light both carry different moods, and most likely, you will prefer your photo one way or the other. I hope some of the above principles and lighting techniques are helpful in someone’s photography journey!

                تعليق

                يعمل...
                X