الاختيار من بين الصور المتشابهة How to Choose Between Similar Versions of a Photo

تقليص
X
 
  • تصفية - فلترة
  • الوقت
  • عرض
إلغاء تحديد الكل
مشاركات جديدة

  • الاختيار من بين الصور المتشابهة How to Choose Between Similar Versions of a Photo

    كيفية الاختيار بين الاصدارا المتشابهة من الصورة
    How to Choose Between Similar Versions of a Photo


    من الأمور الصعبة في التصوير الفوتوغرافي الاختيار بين أشكال مختلفة لنفس الصورة. إذا كنت سعيدًا بشكل خاص بالتقاط الصور، فقد ينتهي بك الأمر مع العديد من الصور المشابهة على محرك الأقراص الثابتة لديك دون وجود صورة "أفضل" واضحة بينها. على الرغم من أنه يمكنك فقط اختيار إحدى هذه الصور بشكل عشوائي، إلا أنني أعتقد أنه من الأفضل التفكير في قرارك والاختيار بينها بعناية. من المؤكد أن الأشياء الصغيرة مهمة في التصوير الفوتوغرافي، ويمكن أن تكون هذه فرصة ذهبية لوضع أسلوبك الشخصي موضع التنفيذ.


    Something tough about photography is choosing between similar variations of the same photo. If you’re especially shutter-happy, you might end up with many similar photos on your hard drive without a clear “best” image among them. Although you could just pick one of these photos at random, I think that it’s much better to put some thought into your decision and choose between them carefully. The small things definitely matter in photography, and this can be a golden opportunity to put your personal style into practice.

  • #2
    عملية الذبح

    لن يكون هناك دائمًا اختلافات كافية بين الصورتين لتحديد الصورة التي تختارها. إذا قمت بالتركيب على حامل ثلاثي الأرجل، ولم يكن هناك أي شيء يتحرك في الصورة، فيمكنك التقاط تسلسل مطابق حقًا لجميع المقاصد والأغراض.

    ومع ذلك، في أغلب الأحيان، سيكون هناك شيء قد تغير بين صورك. قبل القيام بأي شيء آخر، حدد ماهية هذه التغييرات. قد يكون صغيرًا مثل قطعة من العشب تحركت بفعل الريح في صورة المناظر الطبيعية، أو موضع مختلف قليلاً لجناح طائر في صورة الحياة البرية. هذه الاختلافات الطفيفة تستحق التركيز عليها. إن نسخة الصورة التي تناسبك بشكل أفضل هي انعكاس لعينك الفنية الفريدة كمصور.

    لا أعتقد أنك بحاجة إلى التعامل مع هذا بطريقة منهجية أو تحليلية - يمكنك التعامل معه بنفس السهولة من خلال الشعور. ولكن إذا كنت تواجه صعوبة في الاختيار بين الإصدارات المختلفة للصورة، فإن اتباع الخطوات أدناه يمكن أن يقودك في الاتجاه الصحيح.


    The Culling Process


    There won’t always be enough differences between two photos to really matter which one you choose. If you set up on a tripod, and nothing in the photo is moving, you could take a sequence that really is identical for all intents and purposes.

    However, more often than not, something will have changed between your photos. Before doing anything else, identify what those changes are. It might be as small as a blade of grass that shifted in the wind in your landscape photo, or a slightly different position of a bird’s wing in your wildlife photo. These minor differences are worth focusing on. The version of a photo that works better for you is a reflection of your unique, artistic eye as a photographer.

    I don’t think that you need to approach this in a methodical or analytical way – you could just as easily approach it by feel. But if you struggle to pick between different versions of the image, following the steps below can lead you in the right direction.

    تعليق


    • #3
      الخطوة الأولى: التحقق جيدًا من الجودة الفنية لكل صورة. إذا كانت الصور متشابهة بالفعل، فأعتقد أنه من المنطقي إزالة أي منها يحتوي على مشكلات فنية. يعود هذا عادةً إلى أشياء مثل فقدان التركيز أو ضبابية الحركة. الخطوة الثانية: فكر في الرسالة العاطفية التي تحاول نقلها ومدى توافق كل صورة معها. على سبيل المثال، إذا كانت الرسالة العاطفية عبارة عن شروق الشمس المشرق والمبهج، فإن الصورة التي تكون فيها الشمس أعلى في الأفق يمكن أن تكون أكثر فعالية من الناحية العاطفية من صورة مماثلة لا تكاد تظهر فيها. الخطوة الثالثة: امسح الصور ضوئيًا بحثًا عن أي شيء لا تريده لا أحب. على سبيل المثال، إذا كانت لديك عدة صور على الخط الساحلي بأنماط أمواج مختلفة، فتحقق مما إذا كانت هناك أي أمواج مشتتة للانتباه في إحدى الصور. على العكس من ذلك، إذا كان هناك أي عناصر فريدة في إحدى الصور التي تستمتع بها حقًا، فيرجى تدوينها هنا. الخطوة الرابعة: قم بإعادة النظر في الصور المتبقية ومعرفة ما إذا كان أي منها يتردد في ذهنك أكثر من غيرها، حتى لو لم تتمكن من تحديد العنصر بشكل واعي سبب. قم بالتمرير خلال الصور بسرعات مختلفة لقياس ردود أفعالك الأولية والثانوية تجاه كل صورة (وكرر العملية في يوم لاحق). إذا كنت لا تزال غير متأكد، فراجع الخطوات السابقة وفكر في كيفية تأثير إيجابيات وسلبيات كل شكل على رسالة الصورة.
      ​​​​​​​
      • Step one: Double check the technical quality of each image. If the images are already similar, I think it makes sense to eliminate any that have technical issues. This usually comes down to things like missed focus or motion blur.
      • Step two: Think about the emotional message you’re trying to convey and how well each image matches it. For example, if the emotional message is a bright, cheerful sunrise, an image where the sun is higher on the horizon could be more emotionally effective than a similar image where it’s barely peeking out.
      • Step three: Scan the photos for anything that you don’t like. For example, if you have several photos at a coastline with different wave patterns, see if there are any distracting waves in one of the photos. Conversely, if there are any unique elements in one of the photos that you really enjoy, take note here.
      • Step four: Revisit the remaining photos and see if any resonate with you more than the others, even if you can’t consciously identify the reason. Scroll through the photos at different speeds to gauge your initial and secondary reactions to each photo (and repeat the process on a later day). If you’re still not sure, revisit the previous steps and think about how the pros and cons of each variation affect the photo’s message.

      تعليق


      • #4
        المثال الأول:

        لنبدأ بالنظر إلى مثال حيث تكون الصورتان متشابهتين إلى حد كبير، ولكنهما بالكاد متطابقتان. من بين هاتين الصورتين، الصورة الثانية هي التي أعرضها كجزء من محفظتي.

        نيكون D800E + 24 مم f/1.4 @ 24 مم، ISO 100، 1/2، f/16.0 NIKON D800E + 24 مم f/1.4 @ 24 مم، ISO 100، 6/10، f/16.0

        كلتا الصورتين متشابهتان، لكني أفضل الصورة الثانية بشدة. والسبب هو أن الرسالة العاطفية تكون أكثر فعالية في الصورة الثانية (بالعودة إلى "الخطوة الثانية" من العملية). هذا مشهد مكثف وعالي التباين، وكتلة الجليد الأكثر حدة تعمل بشكل أفضل مع تلك الرسالة من كتلة مستديرة من الجليد. هناك أسباب أخرى تجعلني أحب الصورة الثانية بشكل أفضل أيضًا، ولكن ليس هناك ما هو أعظم من الحالة المزاجية المختلفة التي تنقلها كل كتلة من الجليد.


        Example One:

        Let’s start by looking at an example where the two photos are pretty similar, but hardly identical. Of these two images, the second is the one I display as part of my portfolio.
        NIKON D800E + 24mm f/1.4 @ 24mm, ISO 100, 1/2, f/16.0NIKON D800E + 24mm f/1.4 @ 24mm, ISO 100, 6/10, f/16.0
        Both of these photos are similar, but I strongly prefer the second one. The reason is that the emotional message is more effective in the second image (going back to “step two” of the process). This is an intense, high-contrast scene, and a sharper block of ice works better with that message than a rounded block of ice. There are other reasons why I like the second photo better, too, but none are greater than the different moods conveyed by each block of ice.

        تعليق


        • #5

          المثال الثاني:

          بعد ذلك، دعونا نلقي نظرة على مثال حيث جعلت أوجه التشابه من الصعب الاختيار بين الصورتين. ومع ذلك، أفضّل الخيار الثاني مرة أخرى.

          Canon EOS 80D + EF-S18-55mm f/4-5.6 IS STM @ 18 مم، ISO 100، 1/320، f/9.0 Canon EOS 80D + EF-S18-55mm f/4-5.6 IS STM @ 21 مم، ايزو 100، 1/250، f/9.0

          لرؤية الاختلافات بشكل أكثر وضوحًا، أوصي بالنقر على الصور أعلاه والتمرير بينها. التغيير الأكثر وضوحًا هو أنه في الصورة الثانية، قمت بالنسخ الاحتياطي قليلاً بحيث يشغل النبات الموجود في المقدمة مساحة أقل قليلاً. أعتقد أن هذا أمر جيد، لأنني لا أريد أن يفوق سطوع الجبل؛ إنهما موضوعان على نفس القدر من الأهمية بالنسبة لعيني.

          ولكن هناك اختلافات أخرى أكثر دقة أيضًا. على سبيل المثال، الجبل والنبات كلاهما أقرب قليلاً إلى المركز في الصورة الثانية، لذلك لا تحتاج عين المشاهد إلى القفز بينهما. وما جذبني في النهاية إلى الصورة الثانية هو أن الريح اشتدت، وألقت المزيد من الرمال في الهواء وأضافت عنصرًا شرسًا إلى وسط المناظر الطبيعية. وهذا يكمل مزاج السماء العاصفة في السماء، وأعتقد أنه يجعل الصورة الثانية أكثر فعالية من الأولى.


          Example Two:

          Next, let’s look at an example where the similarities made it tough to pick between the two images. Nevertheless, I prefer the second one again.
          Canon EOS 80D + EF-S18-55mm f/4-5.6 IS STM @ 18mm, ISO 100, 1/320, f/9.0Canon EOS 80D + EF-S18-55mm f/4-5.6 IS STM @ 21mm, ISO 100, 1/250, f/9.0
          To see the differences more clearly, I recommend clicking the images above and scrolling between them. The most obvious change is that, in the second photo, I backed up a bit so that the plant in the foreground takes up a little less space. I think this is a good thing, because I don’t want it to outshine the mountain; they’re equally important subjects to my eye.

          But there are other, subtler differences as well. For example, the mountain and plant are both a little closer to the center in the second image, so the viewer’s eye doesn’t need to jump as far between them. And – what ultimately won me over to the second image – the wind picked up, throwing more sand in the air and adding a fierce element to the middleground of the landscape. This complements the mood of the stormy sky overhead, and I think it makes the second photo more effective than the first.

          تعليق


          • #6

            المثال الثالث:

            هذه المرة، سأعرض زوجًا من الصور المتشابهة جدًا حيث كان من الصعب جدًا اختيار الصورة المفضلة. كما كان من قبل، استقريت على الصورة الثانية، لكن الأمر كان أصعب هذه المرة.

            DJI Mavic Pro 2 @ 28 مم، ISO 100، 1/120، f/4.0 DJI Mavic Pro 2 @ 28 مم، ISO 100، 1/120، f/4.0

            هنا، الصور متشابهة جدًا لدرجة أنه قد يكون من الصعب رؤية الاختلافات دون النقر فوقها. ومع ذلك، وبعد دراسة متأنية، وصلت إلى الصورة الثانية باعتبارها المفضلة لدي. السبب بسيط للغاية، حيث يسمح نمط الموجة الموجود أسفل الصورة بإظهار المزيد من أجزاء الجزيرة. في الصورة الأولى، نفس منطقة الأمواج تمثل مصدر إلهاء أكبر؛ إنه يجذب الانتباه البصري ولكنه لا يتدفق بشكل جيد إلى بقية الصورة. من المؤكد أن الفرق دقيق، ولكن في كثير من الأحيان، تكون الاختلافات الدقيقة هي التي تهم عند اختيار صورك.


            Example Three:

            This time, I’ll show a pair of very similar images where it was quite difficult to choose a favorite. Like before, I settled on the second photo, but it was even harder this time.
            DJI Mavic Pro 2 @ 28mm, ISO 100, 1/120, f/4.0DJI Mavic Pro 2 @ 28mm, ISO 100, 1/120, f/4.0
            Here, the photos are so similar that it can be hard to see the differences without clicking between them. Still, after careful consideration, I landed on the second image as my preference. The reason is pretty simple – the wave pattern at the bottom of the photo allows for more of the island to be shown. In the first photo, the same area of waves is more of a distraction; it draws visual attention but doesn’t flow as nicely into the rest of the photo. The difference is definitely subtle, but often, it’s the subtle differences that matter when culling your photos.

            تعليق


            • #7


              دراسة الحالة

              أود أن أنهي هذه المقالة بدراسة حالة مفصلة. عندما زرت يلوستون مؤخرًا، كان المشهد الأكثر دراماتيكية الذي رأيته هو جبل رورينغ المغطى بفتحات البخار. لقد كان عرضًا رائعًا في ذلك اليوم - لقد قمت بزيارته في الماضي ولم أر الكثير من "الزئير" على الإطلاق.

              لقد التقطت سبع صور مختلفة لجبل Roaring حيث لفتت المناظر الطبيعية انتباهي بطرق مختلفة. ظهرت الصور متشابهة، ولكن ليس متطابقة، مما ترك الأمر لي لأقرر أفضلها. أعتذر إذا أصبح هذا رتيبًا بعض الشيء، ولكن من أجل الاكتمال، سأعرض جميع الإصدارات السبعة أدناه:

              Case Study


              I’d like to end this article with a detailed case study. When I visited Yellowstone recently, the most dramatic landscape I saw was Roaring Mountain covered with vents of steam. It put on quite a show that day – I’ve visited in the past and didn’t see much “roar” at all.

              I took seven different photos of Roaring Mountain as the landscape caught my eye in different ways. The photos turned out similarly, but not identically, leaving it up to me to decide on the best one. Apologies if this gets a little monotonous, but for the sake of completeness, I’ll show all seven versions below:
              Photo #1Photo #2


              Photo #3 #4

              Photo #4

              Photo #
              Photo #6Photo #7


              تعليق


              • #8
                كانت الخطوة الأولى في اختيار هذه الصور السبع هي التحقق من الجودة الفنية. لقد التقطت كل هذه الصور بيدي في يوم غائم. تراوحت سرعات الغالق الخاصة بي من 1/200 إلى 1/250 ثانية، وهو ما كان على حافة المقبول (نظرًا لعدسة مقاس 90 مم بدون تثبيت الصورة). عادةً ما يكون ضبابية الحركة المحمولة هي الأكثر أهمية في زوايا الصورة، لذا قمت بفحص الزوايا قبل أي شيء آخر. وبالفعل كانت إحدى هذه الصور خارج نطاق الحدة المقبولة. تم حذف الصورة رقم 4 من المنافسة – وهنا تتم مقارنتها بصورة أكثر وضوحًا كمرجع.

                الصورة رقم 4 (اقتصاص 100%)الصورة رقم 7 للمقارنة (اقتصاص 100%)


                Step one of culling these
                seven photos was to check technical quality. I shot all of these images handheld on a cloudy day. My shutter speeds ranged from 1/200 to 1/250 second, which was on the edge of acceptable (given a 90mm lens without image stabilization). Handheld motion blur is usually the most significant in the corners of a photo, so I checked the corners before anything else. And indeed, one of these pictures was outside the range of acceptable sharpness. Photo #4 was eliminated from contention – here it is compared to a sharper image for reference.
                Photo #4 (100% crop)Photo #7 for comparison (100% crop)

                تعليق


                • #9


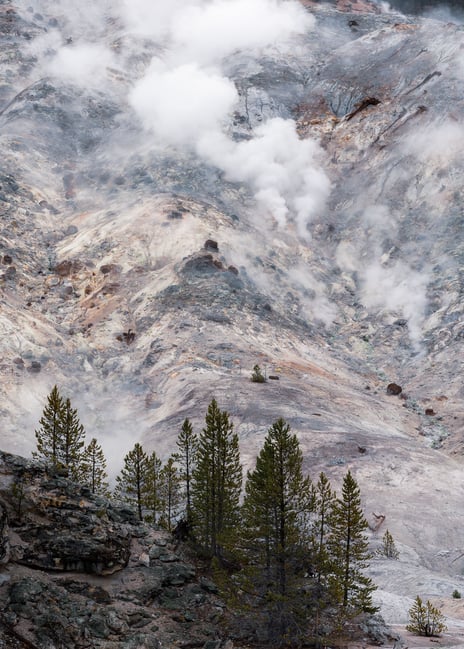
                  كانت الخطوة الثانية هي تحديد هدفي أو رسالتي العاطفية من الصورة. كنت أعرف أنني أريد أن أنقل "مداخن الدخان" المحددة جيدًا (في الواقع فتحات البخار) التي ترتفع من الأرض، مما يعطي انطباعًا بوجود حريق في الغابة - مع جعل المشاهد يتوقف عند إدراك أنه لا توجد أشجار على جانب التل يمكن أن اشتعل.

                  لذا، فإن أفضل صورة هنا تحتاج إلى فتحات بخار محددة جيدًا بدلاً من مجرد سحابة أو ضباب منخفض. الصورة رقم 6، وخاصة الصورة رقم 5، لم تفي بهذه الرسالة، لذلك قمت بإزالتهما من المجموعة. قارن، على سبيل المثال، الصورة رقم 5 مع الصورة رقم 1 أدناه:

                  الصورة رقم 5 – فتحات البخار الضعيفة الصورة رقم 1 – فتحات البخار القوية


                  Step two was to define my goal, or emotional message, with the photo. I knew that I wanted to convey the well-defined “smoke stacks” (actually steam vents) rising from the ground, giving the impression of a forest fire – yet making the viewer pause upon realizing that there are no trees on the hillside that could catch fire.

                  So, the best photo here would need to have well-defined steam vents rather than just a low-lying cloud or fog. Photo #6, and especially photo #5, did not fulfill this message, so I eliminated both of them from the set. Compare, for example, photo #5 versus photo #1 below:
                  Photo #5 – Weak steam ventsPhoto #1 – Strong steam vents

                  تعليق


                  • #10

                    بحلول الخطوة الثالثة، أصبح لدي الآن أربع صور بجودة صورة جيدة ورسالة عاطفية فعالة. في هذه المرحلة، حان الوقت لمسح كل صورة على حدة بحثًا عن الأشياء التي لم تعجبني أو التي أزعجتني بطريقة ما. في هذه الحالة، الشيء الذي لم يعجبني في الصورة رقم 7 هو المساحة الكبيرة الفارغة في أعلى يسار الصورة. كان البخار كثيفًا جدًا في هذا الجزء من الإطار. وبما أنني أردت أن أنقل شعورًا بالتعقيد في صوري من هذا المشهد الطبيعي، فقد أدركت أنني أريد صورة ذات مساحة أكثر إيجابية. تم حذف مساحة كبيرة من المساحة السلبية، لذلك تم حذف الصورة رقم 7.


                    By step three, I now had four photos with good image quality and an effective emotional message. At this point, it was time to scan each photo individually for things that I didn’t like or that bothered me in some way. In this case, something that I didn’t like about photo #7 was the large, empty area at the top left of the image. The steam was just too thick in that part of the frame. Since I wanted to convey a feeling of complexity in my photos from this landscape, I knew that I wanted an image with more positive space. A large area of negative space took away from that, so photo #7 was eliminated.
                    الصورة رقم 7 - تعجبني فتحات التهوية المحددة جيدًا والاتجاه القطري للبخار هنا، لكن هذه المنطقة الفارغة لا تساعد في التكوين
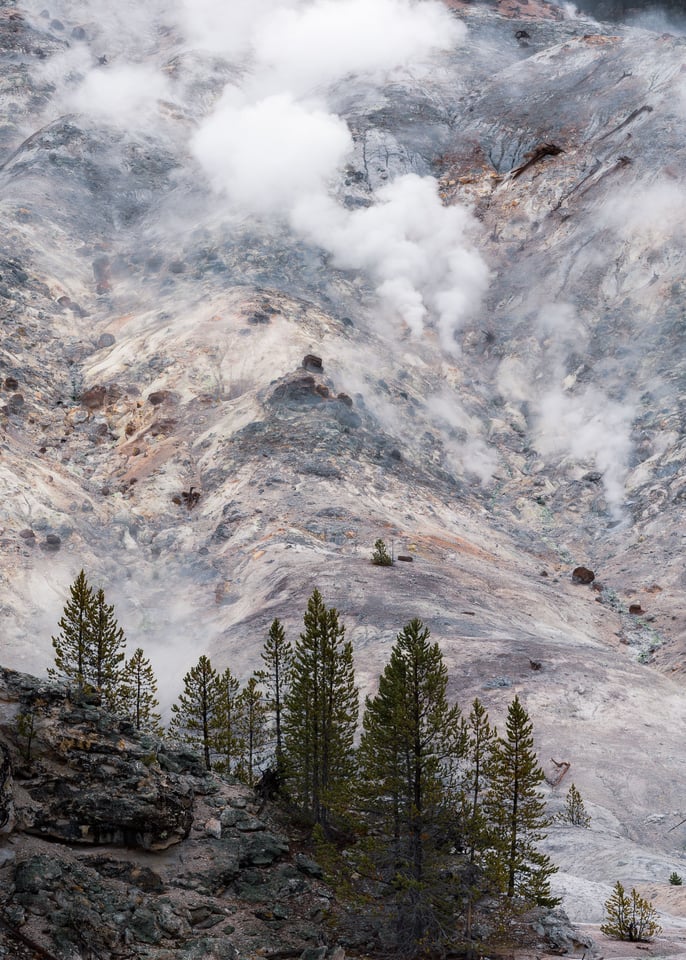
                    ​Photo #7 – I like the well-defined vents and diagonal direction of the steam here, but this empty area doesn’t help the composition

                    تعليق


                    • #11
                      Step four was the most difficult. I liked all three remaining photos a lot, and there wasn’t much left to differentiate them. This is usually the point that I’ll just scroll through all the remaining photos at different speeds and see if something draws me toward one of them, consciously or subconsciously. For your reference, here are the three remaining images again, which happened to be the first three that I captured of the scene:
                      Photo #1Photo #2


                      Photo #3
                      I liked different things about each photo. For photo #1, I liked the tighter pattern of steam and how it revealed more details of the surrounding mountain. For photo #2, I liked how the cloud of steam at the top followed the contours of the mountain in the middle. And for photo #3, I liked that the diagonal direction of the steam added some tension to the image.

                      This final phase of choosing between similar, effective image is perhaps the most important. It’s where personal style comes into play the most. Everyone can eliminate photos that have technical issues, and it’s not too hard to eliminate a photo with a muddy emotional message. But choosing between similar photos that all work well is where the art of photography really comes into play.

                      As I looked at these three images more, photo #1 is the one that I gravitated toward the most. I expect that different photographers with their own personal styles would have different preferences among these three photos, or maybe even prefer one that I eliminated earlier. There’s nothing wrong with that, but photo #1 ultimately resonated with me in a way the others didn’t.

                      In photo #1, the mirrored pillars of steam curve upward in a beautiful way, acting as a good anchor point and primary subject for the photo. The dance of the steam just felt exactly right – deliberate and harmonious. Meanwhile, the clouds of steam as a whole were smaller than in photos #2 and #3, allowing the contrast (and positive space) of the mountain to shine through. The longer that I looked at photo #1, the more emotional connection that I felt. It closely matched the way that this complex, yet harmonious landscape made me feel at the time that I was taking these photos.


                      كانت الخطوة الرابعة هي الأصعب. أعجبتني الصور الثلاث المتبقية كثيرًا، ولم يتبق الكثير للتمييز بينها. عادة ما تكون هذه هي النقطة التي أقوم فيها بالتمرير عبر جميع الصور المتبقية بسرعات مختلفة ومعرفة ما إذا كان هناك شيء يجذبني نحو إحداها، بوعي أو بغير وعي. كمرجع لك، إليك الصور الثلاث المتبقية مرة أخرى، والتي تصادف أنها الصور الثلاث الأولى التي التقطتها للمشهد:
                      ​الصورة رقم 1​الصورة رقم 2

                      ​​​​​​​
                      ​الصورة رقم 3
                      أعجبتني أشياء مختلفة في كل صورة. بالنسبة للصورة رقم 1، أعجبني نمط البخار الأكثر إحكامًا وكيف كشف المزيد من التفاصيل عن الجبل المحيط. في الصورة رقم 2، أعجبتني كيف أن سحابة البخار في الأعلى تتبع خطوط الجبل في المنتصف. وبالنسبة للصورة رقم 3، أحببت أن الاتجاه القطري للبخار أضاف بعض التوتر إلى الصورة.

                      ربما تكون هذه المرحلة الأخيرة من الاختيار بين الصور المتشابهة والفعالة هي الأكثر أهمية. إنه المكان الذي يلعب فيه الأسلوب الشخصي أكثر من غيره. يمكن للجميع إزالة الصور التي تحتوي على مشكلات فنية، وليس من الصعب جدًا إزالة صورة تحتوي على رسالة عاطفية مشوشة. لكن الاختيار بين الصور المتشابهة التي تعمل بشكل جيد هو المكان الذي يلعب فيه فن التصوير الفوتوغرافي دورًا حقيقيًا.

                      عندما نظرت إلى هذه الصور الثلاث أكثر، كانت الصورة رقم 1 هي الصورة التي انجذبت إليها أكثر من غيرها. أتوقع أن المصورين المختلفين الذين لديهم أنماطهم الشخصية سيكون لديهم تفضيلات مختلفة بين هذه الصور الثلاث، أو ربما يفضلون الصورة التي قمت بإزالتها سابقًا. لا حرج في ذلك، لكن الصورة رقم 1 كان لها صدى في ذهني في النهاية بطريقة لم يفعلها الآخرون.

                      في الصورة رقم 1، تنحني أعمدة البخار المعكوسة للأعلى بطريقة جميلة، لتكون بمثابة نقطة ربط جيدة وموضوعًا أساسيًا للصورة. لقد بدت رقصة البخار صحيحة تمامًا – مدروسة ومتناغمة. وفي الوقت نفسه، كانت سحب البخار ككل أصغر مما كانت عليه في الصورتين رقم 2 ورقم 3، مما سمح للتباين (والمساحة الإيجابية) للجبل بالتألق. كلما نظرت إلى الصورة رقم 1 لفترة أطول، شعرت بالارتباط العاطفي أكثر. لقد تطابق بشكل وثيق مع الطريقة التي جعلني أشعر بها هذا المشهد المعقد والمتناغم في الوقت الذي كنت ألتقط فيه هذه الصور.

                      تعليق


                      • #12
                        لذلك، تم حذف الصورتين رقم 2 و3، وأصبحت الصورة رقم 1 هي صورتي المنشورة لهذا المشهد الطبيعي.


                        So, photos #2 and #3 were eliminated, and photo #1 became my published image of this landscape.
                        Hasselblad CFV 100C/907X + XCD 90mm f/2.5 V @ ISO 64, 1/200, f/8.0ع


                        تعليق


                        • #13

                          خاتمة

                          أحد أصعب الأجزاء في مرحلة ما بعد المعالجة لصورك الفوتوغرافية هو الاختيار بين صورتين أو أكثر من الصور المتشابهة التي التقطتها. ولكنه أيضًا جزء من التصوير الفوتوغرافي حيث يتألق الإبداع والأسلوب الشخصي. لا توجد إجابة صحيحة؛ سيرى الجميع ذلك بشكل مختلف وسيكون لديهم تفضيلاتهم الخاصة. وهذا هو بالضبط سبب أهمية اختيارك. إنه انعكاس واضح لكيفية رؤيتك الشخصية للعالم.

                          لا تقع في فخ التفكير أنه لمجرد أن الصور متشابهة، فلا يهم أي منها تختار - فهو مهم جدًا! تضاف الأشياء الصغيرة إلى الفن، والاختيار بين الإصدارات المتشابهة من الصورة هو المثال المثالي. آمل أن يكون هذا المقال قد أعطاك بعض الإلهام لالتقاط صورك المشابهة بعناية أكبر.


                          Conclusion


                          One of the trickiest parts of post-processing your photography is choosing between two or more similar photos that you took. But it’s also a part of photography where creativity and personal style get to shine. There is no right answer; everyone will see it differently and have their own preferences. And that’s precisely why your choice is so important. It’s a distinct reflection of how you personally see the world.

                          Don’t fall into the trap of thinking that just because the photos are similar, it doesn’t matter which one you choose – it matters a great deal! The little things add up in art, and choosing between similar versions of a photo is the perfect example. I hope this article gave you some inspiration to cull through your similar photos more carefully.

                          تعليق

                          يعمل...
                          X