اختيار التعرض الابداعي Choosing a Creative Exposure

تقليص
X
 
  • تصفية - فلترة
  • الوقت
  • عرض
إلغاء تحديد الكل
مشاركات جديدة

  • اختيار التعرض الابداعي Choosing a Creative Exposure

    اختيار التعرض الإبداعي – دليل المبتدئين
    Choosing a Creative Exposure – A Beginner’s Guide

    هناك العديد من مجموعات الفتحة وسرعة الغالق وISO التي ستعرض الصورة بشكل صحيح. مع كل هذه التركيبات، أي منها هو الصحيح؟ إذا تركت الكاميرا في وضع البرنامج الكامل، فستختار الكاميرا مجموعة لك. ومع ذلك، فإن السماح لكاميرتك بالتحكم الكامل ليس هو السبب وراء شراء كاميرا DSLR باهظة الثمن أو كاميرا بدون مرآة! إن تعلم كيفية ضبط الإعدادات والأوضاع على الكاميرا قبل النقر فوق الغالق سيمنحك اليد العليا. سينتهي بك الأمر إلى التقاط الصور بطريقة إبداعية، وليس عن طريق الصدفة. تابع القراءة لتعرف كيف تؤثر فتحة العدسة وسرعة الغالق وISO على شكل الصورة ومظهرها وكيفية اختيار أفضل إعدادات الكاميرا للتحكم الإبداعي في صورك.

    There are many combinations of aperture, shutter speed, and ISO that will correctly expose an image. With all those combinations, which one is the right one? If you leave your camera in full program mode, your camera will pick a combination for you. However, letting your camera have complete control is not why you bought an expensive DSLR or mirrorless camera! Learning how to adjust the settings and modes on your camera before you click the shutter will give you the upper hand. You will end up capturing images creatively, rather than by chance. Read on to find out how aperture, shutter speed, and ISO affect the look and feel of a photograph and how to choose the best camera settings to take creative control of your images.

  • #2

    جدول المحتويات

    مقدمة
    فتحة العدسة
    سرعة الغالق
    ISO
    جمع كل ذلك معًا
    Auto ISO
    التفوق على جهاز القياس الخاص بك -
    تعويض التعريض الضوئي
    الخاتمة


    Table of Contents

    تعليق


    • #3
      1 المقدمة

      في مقالتي الأخيرة عن مثلث التعريض، تحدثت عن فتحة العدسة وسرعة الغالق وISO وكيفية عملهم معًا. قبل أن أتحدث عن كيفية اختيار التعرض الإبداعي، دعونا نناقش كيفية تأثير فتحة العدسة وسرعة الغالق وISO بصريًا على مظهر الصورة. لمزيد من المعلومات الفنية حول فتحة العدسة، وسرعة الغالق، وISO، قم بإلقاء نظرة على مقالات "أساسيات التصوير الفوتوغرافي" الممتازة لنسيم على الموقع. راجع أيضًا مقالتنا الأكثر تفصيلاً حول التعرض ككل.

      1) Introduction


      In my last article on the Exposure Triangle, I talked about what aperture, shutter speed, and ISO are and how they work together. Before I talk about how to choose a creative exposure, let’s discuss how aperture, shutter speed, and ISO visually affect the look of an image. For more technical information on aperture, shutter speed, and ISO, take a look at Nasim’s excellent “Photography Basics” articles on the site. Also check out our more detailed article on exposure as a whole.

      تعليق


      • #4
        2) الفتحة

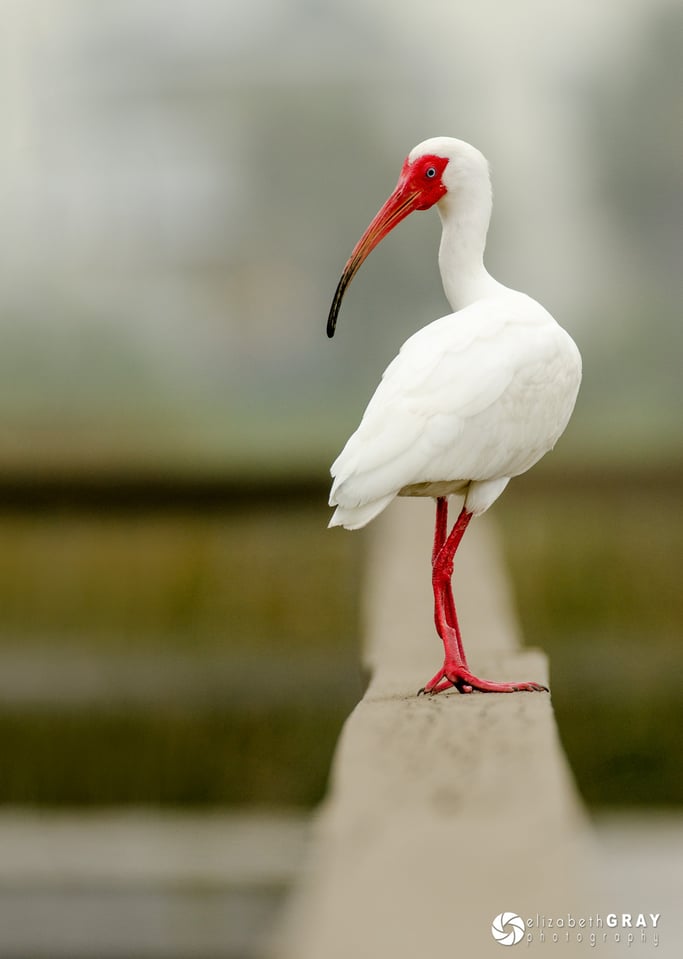
        من بين متغيرات التعريض الثلاثة، الفتحة هي التي تتحكم في عمق المجال في الصورة. وهذا يعني أن مقدار المشهد الذي أمامك وخلفه الذي ركزت عليه حاد بشكل مقبول. كلما اتسعت فتحة العدسة، كان عمق المجال أضيق وقلت مساحة المشهد الذي يتم التركيز عليه. يعمل عمق المجال الضيق بشكل جيد لعزل موضوع ما. غالبًا ما يستخدم مصورو الصور الشخصية هذه التقنية لفصل موضوعهم عن الخلفية المزدحمة.

        في هاتين الصورتين الأوليين، تمكنت من عزل الأهداف الرئيسية باستخدام فتحة واسعة (نسبة إلى البعد البؤري للعدسة). لاحظ كيف أصبحت الخلفيات غير واضحة تمامًا.


        2) Aperture


        Out of the three exposure variables, aperture is the one that controls the depth of field in an image. That is, how much of the scene in front of, and behind what you focused on is acceptably sharp. The wider the aperture, the narrower the depth of field and the less of the scene that is in focus. A narrow depth of field works well to isolate a subject. Portrait photographers often use this technique to separate their subject from a busy background.

        In these first two images, I was able to isolate the main subjects using a wide aperture (relative to the focal length of the lens). Notice how the backgrounds are completely blurred out.
        NIKON D7000 + 200-400mm f/4 @ 400mm, ISO 200, 1/400, f/5.0NIKON D7000 + 200-400mm f/4 @ 460mm, ISO 400, 1/1000, f/6.3

        تعليق


        • #5
          في هذه الصور الثلاث التالية، استخدمت التركيز الانتقائي لجذب انتباهك إلى الموضوع مع ترك بعض التفاصيل في الخلفيات. وهذا يساعد على إعطاء إحساس بالسياق للصور.


          In these next three images, I used selective focus to draw your eye to the subject while still leaving some details in the backgrounds. This helps to give a sense of context to the images.
          NIKON D500 + 17-55mm f/2.8 @ 32mm, ISO 200, 1/2500, f/3.2NIKON D500 + 17-55mm f/2.8 @ 50mm, ISO 500, 1/200, f/3.2X100T @ 23mm, ISO 500, 1/100, f/2.0

          تعليق


          • #6
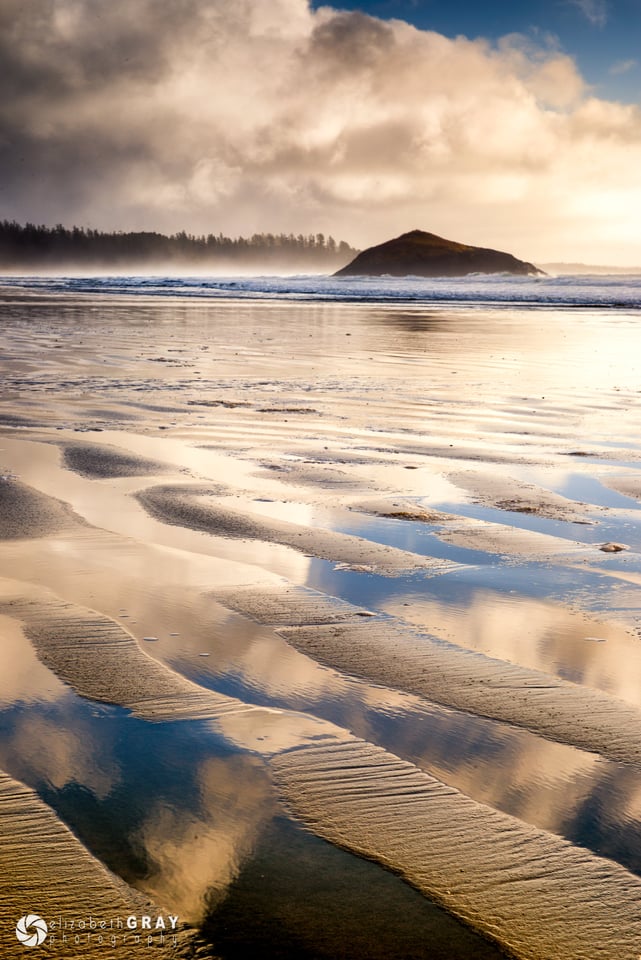
            ستمنحك الفتحة الضيقة عمقًا أكبر بكثير للمجال. غالبًا ما يستخدم مصورو المناظر الطبيعية فتحة عدسة صغيرة لإنشاء صور يتم التركيز عليها من المقدمة إلى الخلفية.

            وهنا بعض الأمثلة. لاحظ كيف تكون الكائنات الموجودة في المقدمة حادة وكذلك الكائنات الموجودة في المسافة.


            A narrow aperture will give you a much greater depth of field. Landscape photographers often use a small aperture to create images that are in focus from foreground to background.

            Here are some examples. Notice how objects in the foreground are sharp as well as objects in the distance.
            NIKON D7100 + 70-200mm f/2.8 @ 70mm, ISO 200, 1/250, f/11.0NIKON D800 + 24-70mm f/2.8 @ 62mm, ISO 200, 6/1, f/22.0NIKON D800 + 24-70mm f/2.8 @ 66mm, ISO 100, 1/60, f/16.0

            تعليق


            • #7
              ربما تكون قد سمعت بعض المصورين يتحدثون عن النقطة الجميلة للعدسة. النقطة الجميلة هي الفتحة التي تنتج الصور الأكثر وضوحًا. ومع ذلك، لا تخلط بين الحدة وعمق المجال. عندما تقوم بالتصوير مفتوحًا على مصراعيه (بفتحة العدسة الأكبر)، قد تلاحظ أن زوايا الصورة قد تبدو ضبابية تمامًا وربما أكثر قتامة مقارنة بالمركز. وذلك لأن معظم العدسات لم يتم تحسينها لإنتاج صور واضحة للغاية عند الفتحات الأوسع. بالإضافة إلى ذلك، لديك جميع أنواع الانحرافات البصرية التي تظهر في الصور، مثل الانحراف اللوني وانحناء المجال والتظليل، والعديد منها نتيجة للانحراف الكروي الذي نراه في البصريات. دون الدخول في التفاصيل الجوهرية، يؤدي كل هذا إلى فقدان بعض الحدة تجاه حواف الصورة. على الجانب الآخر، إذا أوقفت العدسة في فتحة صغيرة جدًا، يمكنك أيضًا رؤية فقدان الوضوح حول حواف الصورة، ولكن هذه المرة بسبب الحيود. إذا وجدت نفسك في موقف لا تحتاج فيه إلى عزل موضوعك، أو تريد عمقًا كبيرًا للمجال، فاختر النقطة المثالية للعدسة. عادة ما تحدث البقعة الحلوة على مسافة 1-2 توقف فوق الفتحة الأوسع للعدسة. تختلف كل عدسة عن الأخرى، ولكن النقطة المثالية غالبًا ما تكون في حدود f/5.6 إلى f/8، خاصة في عدسات التكبير النموذجية. إذا كنت تريد حقًا الدخول في التفاصيل حول الفتحة الأكثر وضوحًا التي يجب عليك اختيارها، فإنني أوصي بقراءة مقالة Spencer الممتازة حول كيفية اختيار الفتحة الأكثر وضوحًا.

              هذه الصور الثلاث التالية ليس لها الكثير من العمق. المسافة من أقرب كائن إلى أبعد شيء صغيرة. نظرًا لأنني لم أكن بحاجة إلى عمق مجال كبير، ولأنني لم أكن أحاول عزل جزء من الصورة بعمق مجال ضحل، فقد اخترت فتحات حول النقطة الجميلة في عدستي.


              You may have heard some photographers talk about the sweet spot of a lens. The sweet spot is the aperture that produces the sharpest images. Do not confuse sharpness with depth of field, though. When you shoot wide open (at the largest aperture) you may notice that the corners of the image might appear quite blurry and potentially even much darker compared to the center. That’s because most lenses are not optimized to yield extremely sharp images at their widest apertures. In addition, you have all kinds of optical aberrations that show up in images, such as chromatic aberration, field curvature and vignetting, many of them as a result of spherical aberration we see in optics. Without getting into the nitty-gritty, all this causes some loss of sharpness towards the edges of an image. On the other end, if you stop the lens down to too small of an aperture, you can also see a loss of sharpness around the edges of an image, but this time due to diffraction. If you find yourself in a situation where you do not need to isolate your subject, or want a large depth of field, then choose the sweet spot of the lens. The sweet spot usually occurs 1-2 stops above the widest aperture of the lens. Every lens is different, but the sweet spot is often in the neighborhood of f/5.6 to f/8, especially on typical zoom lenses. If you really want to get into the details about what the sharpest aperture you should be picking is, I would recommend to read Spencer’s excellent how to choose the sharpest aperture article.

              These next three images do not have much depth to them. The distance from the closest object to the farthest is small. Since I didn’t need a large depth of field, and because I wasn’t trying to isolate part of the image with a shallow depth of field, I chose apertures around the sweet spot of my lens.
              NIKON D500 + 17-55mm f/2.8 @ 55mm, ISO 200, 1/2000, f/6.3NIKON D500 + 17-55mm f/2.8 @ 55mm, ISO 200, 1/320, f/9.0NIKON D500 + 17-55mm f/2.8 @ 30mm, ISO 200, 1/200, f/6.3

              تعليق


              • #8

                التوقف بعيدًا عن النطاق الموصى به عند بدء الحيود (عادة أعلى من f/8-f/11) يمكن أن يعمل في صالحك أحيانًا. إذا قمت بتضمين كائن ساطع في صورتك أثناء استخدام فتحة صغيرة، فسوف تقوم بإنشاء انفجار نجمي. على الرغم من أنه لا يناسب ذوق الجميع، إلا أن الانفجار النجمي يمكن أن يضيف عنصرًا رسوميًا مثيرًا للاهتمام إلى الصورة. كن حذرًا إذا قمت بتضمين الشمس في صورتك. يمكن أن يؤذي عينيك وربما حتى الأجزاء الداخلية من الكاميرا إذا لم تكن حذرًا.


                Stopping down far beyond the recommended range when diffraction kicks in (typically above f/8-f/11) can sometimes work in your favor. If you include a bright object in your image while using a small aperture, you will create a starburst. Although not to everyone’s taste, a starburst can add an interesting graphic element to a photo. Take care if you include the sun in your image, though. It can hurt your eyes and potentially even the internals of your camera if you are not careful.
                X100T @ 19mm, ISO 200, 1/250, f/14.0X100T @ 19mm, ISO 1600, 1/15, f/5.6X100T @ 19mm, ISO 640, 1/100, f/16.0

                تعليق


                • #9


                  3) سرعة الغالق

                  سرعة الغالق هي ما يتحكم في الشعور بالحركة في الصورة. اعتمادًا على سرعة الغالق التي تحددها، يمكنك إما تجميد الأهداف المتحركة أو تعتيم حركتها. قد لا تعتقد أن التقاط صورة ضبابية أمر جيد، ولكنه يمكن أن يضيف مظهرًا وإحساسًا فنيًا للغاية إلى الصورة.

                  ستؤدي سرعات الغالق السريعة جدًا إلى تجميد الحركة. ما مدى سرعة سرعة الغالق التي تحتاجها؟ حسنًا، هذا يعتمد على ما تحاول تجميده. عندما أقوم بتصوير الطيور أثناء الطيران، أحاول استخدام سرعة غالق لا تقل عن 1/1000 من الثانية. ومع ذلك، غالبًا ما أقوم بالتصوير بمعدل 1/2000 ثانية أو أعلى إذا كان الضوء ساطعًا. ستساعد سرعات الغالق السريعة مثل هذه على ضمان التقاط الريش وقطرات الماء بلا حراك.


                  3) Shutter Speed


                  Shutter speed is what controls the feeling of motion in an image. Depending on the shutter speed you select, you can either freeze moving subjects or blur their motion. You may not think that taking a blurry photo is a good thing, but it can add a very artistic look and feel to an image.

                  Very fast shutter speeds will freeze action. How fast a shutter speed do you need? Well, that depends on what you are trying to freeze. When I’m photographing birds in flight, I try and use a shutter speed of at least 1/1000 of a second. However, I will often shoot at 1/2000s or higher if the light is bright. Fast shutter speeds like these will help ensure that feathers and water drops are captured motionless.
                  NIKON D7100 + 80-400mm f/4.5-5.6 @ 400mm, ISO 400, 1/3200, f/7.1NIKON D800 + 200-400mm f/4 @ 400mm, ISO 800, 1/1250, f/8.0NIKON D7000 + 200-400mm f/4 @ 390mm, ISO 200, 1/1000, f/5.6

                  تعليق


                  • #10
                    فيما يلي ثلاث صور أخرى اخترت فيها سرعات غالق سريعة لتجميد الحركة.


                    Here are three more images where I have chosen fast shutter speeds to freeze the action.
                    X100T @ 23mm, ISO 200, 1/3000, f/2.5NIKON D500 + 17-55mm f/2.8 @ 35mm, ISO 400, 1/800, f/4.0NIKON D7000 + 70-200mm f/2.8 @ 140mm, ISO 400, 1/1600, f/2.8

                    تعليق


                    • #11
                      من ناحية أخرى، توفر سرعات الغالق البطيئة إحساسًا ضمنيًا بالحركة من خلال تشويش الهدف المتحرك أو الخلفية. في كل من هذه الصور الأربع التالية، لاحظ كيف أن الخلفية حادة، ولكن الموضوع غير واضح. في الصورة الثانية والثالثة، تكون سرعة الغالق طويلة جدًا بحيث يبدو الأشخاص الموجودون في الصور أشباحًا. بالنسبة للصورة الأولى، كنت أحمل الكاميرا بيدي. أخذت الثلاثة الأخيرة على حامل ثلاثي الأرجل. مع سرعات الغالق البطيئة، تعد تقنية الكاميرا أمرًا بالغ الأهمية. ستحتاج غالبًا إلى حامل ثلاثي الأرجل لمنع أي ضبابية غير مقصودة.


                      Slow shutter speeds, on the other hand, give more of an implied sense of motion by blurring the moving subject or the background. In each of these next four images, notice how the background is sharp, but the subject is blurred. In the second and third photograph, the shutter speed is so long that the people in the pictures appear ghosted. For the first image, I was hand-holding my camera. I took the last three on a tripod. With slow shutter speeds, camera technique is paramount. You will often need a tripod to prevent any unintentional blur.
                      NIKON D500 + 17-55mm f/2.8 @ 17mm, ISO 200, 1/25, f/5.0X100T @ 19mm, ISO 400, 1/1, f/11.0NIKON D500 + 17-55mm f/2.8 @ 55mm, ISO 200, 8/1, f/16.0NIKON D800 + 80-400mm f/4.5-5.6 @ 120mm, ISO 100, 1/1, f/22.0

                      تعليق


                      • #12
                        يعد التحريك تقنية تستخدم أيضًا سرعة غالق بطيئة. في هذه التقنية، تقوم بتحريك الكاميرا في الوقت المناسب لحركة الهدف. في هاتين الصورتين، قمت بتعيين سرعة غالق بطيئة نسبيًا وقمت بتحريك الكاميرا في الوقت المناسب مع الهدف. ولهذا السبب تبدو السيارة والدراجة النارية حادتين، لكن الخلفية الثابتة غير واضحة. هذه التقنية تتطلب الكثير من الممارسة والصبر! للبدء، حاول التدرب على السيارات أو الطيور الكبيرة لتحسين أسلوبك.


                        Panning is a technique that also uses a slow shutter speed. For this technique, you move the camera in time to the subject’s motion. In these two images, I set a relatively slow shutter speed and panned the camera in time with the subject. That is why the car and motorcycle are sharp, but the stationary background is blurred. This technique takes lots of practice and patience! To start, try practicing on cars or large birds to fine tune your technique.
                        NIKON D500 + 17-55mm f/2.8 @ 17mm, ISO 100, 1/25, f/9.0NIKON D7000 + 24-70mm f/2.8 @ 42mm, ISO 200, 1/25, f/20.0

                        تعليق


                        • #13
                          في هذه الصورة الأخيرة، كنت أقوم بالتحريك باستخدام رأس الكاميرا ولكنني كنت أستخدم سرعة غالق سريعة نسبيًا تبلغ 1/500 ثانية. لاحظ كيف أن رأس الطائر حاد نسبيًا، لكن لا يزال بإمكانك الشعور بالحركة مع الأجنحة غير الواضحة ورذاذ الماء.

                          كاميرا نيكون D800 + 200-400 مم f/4 @ 550 مم، ISO 400، 1/500، f/9.0

                          سواء كنت تقوم بتجميد الحركة أو تعتيمها، فسوف تحتاج إلى تجربة سرعات غالق مختلفة. لا توجد صيغة محددة للسرعة التي ستعطي تأثيرًا معينًا. سوف يحدد موضوعك وسرعته ما هو الأفضل. جمال التكنولوجيا الرقمية هو أنها ستسمح لك بالتجربة. إذا لم تعطي 1/60 المظهر الذي تريده، فجرّب 1/30 أو 1/15.


                          In this last image, I was panning with the bufflehead but was using a relatively fast shutter speed of 1/500s. Notice how the birds head is comparatively sharp, but you still get a sense of movement with the blurred wings and water splashes.
                          NIKON D800 + 200-400mm f/4 @ 550mm, ISO 400, 1/500, f/9.0
                          Whether you are freezing motion or blurring it, you will need to experiment with different shutter speeds. There is no formula for what speed will give a particular effect. Your subject and its speed will dictate what works best. The beauty of digital is that it will allow you to experiment. If 1/60s doesn’t give a look you want, try 1/30s or 1/15s.

                          تعليق


                          • #14
                            إن ISO موضوع معقد للغاية، ولن أخوض في التفاصيل هنا. بعبارات بسيطة، فكر في ISO على أنه حساسية المستشعر (على الرغم من أن هذا ليس صحيحًا من الناحية الفنية، ولكنه يجعل من السهل فهمه). كنت أستمع مؤخرًا إلى البودكاست "نصائح من الطابق العلوي". في الحلقة 753 قدم المضيف كريس ماركوارت تشبيهًا رائعًا. يقول أن نتخيل كل بكسل على شكل دلو وفوتونات الضوء على شكل قطرات مطر. إذا كان الدلو ممتلئًا، يكون البيكسل أبيضًا نقيًا. وإذا كان فارغاً فهو أسود خالص. أي شيء بينهما هو ظل رمادي. ويواصل وصف هذا بأنه ISO أصلي. بالنسبة لمعظم الكاميرات، هذا هو ISO 100، ولكن في البعض، قد يصل إلى 200 أو يصل إلى 50. ومن أجل الجدال، لنفترض أن ISO 100 هو ISO الأصلي لكاميرتك.

                            الآن إذا قمت بمضاعفة ISO إلى 200 فإنك تضاعف حساسية المستشعر. يظل الدلو الفارغ أسودًا نقيًا، لكن الأمر لا يتطلب سوى نصف دلو لتمثيل بكسل أبيض نقي.

                            ضاعف قيمة ISO إلى 400، وما عليك الآن سوى ملء الدلو بالكامل حتى يتحول البيكسل إلى اللون الأبيض النقي. وما إلى ذلك وهلم جرا. 800 ISO، 1⁄8 كاملة، 1600 ISO 1⁄1600 كاملة لكي يصبح البكسل أبيضًا نقيًا. لا تزال الدلاء الفارغة تمثل وحدات البكسل السوداء. بالنسبة لمستويات ISO العالية جدًا، ما عليك سوى ملء جزء صغير من المجموعة للحصول على بكسل أبيض. أو بمعنى آخر، تحتاج إلى ضوء أقل بكثير لكشف صورتك.


                            ISO is a very complicated topic, and I’m not going to get into details here. In simple terms, think of ISO as the sensitivity of the sensor (although it is not technically true, but it makes it easy to understand). I was recently listening to the podcast “Tips from the Top Floor”. In episode 753, Chris Marquardt, the host, gave a great analogy. He says to imagine every pixel as a bucket and light photons as raindrops. If a bucket is full, the pixel is pure white. If it is empty, it is pure black. Anything in between is a shade of gray. He goes on to describe this as native ISO. For most cameras, this is ISO 100, but on some, it may be as high as 200 or as low as 50. For the sake of argument, let’s say that ISO 100 is the native ISO of your camera.

                            Now if you double the ISO to 200 you double the sensitivity of the sensor. An empty bucket is still pure black, but it only takes half a bucket to represent a pure white pixel.

                            Double the ISO to 400, and now you only need to fill the bucket 14 full for the pixel to be pure white. And so on. 800 ISO, 18 full, 1600 ISO 11600 full for a pixel to be pure white. Empty buckets still represent black pixels. For very high ISO’s you only need to fill a small fraction of the bucket to get a white pixel. Or in other words, you need much less light to expose your image.

                            تعليق


                            • #15

                              ولكن هناك دائما تكلفة. عند مستويات ISO الأعلى، يكون من الصعب جدًا قياس المطر في الدلاء. عند ISO 100، فكر في قياس العمق بالبوصة. ولكن عند مستويات ISO الأعلى، يصبح من الصعب قياسها بدقة. تخيل أنك تحاول ملء دلو حتى جزء من البوصة فقط؛ تفقد الدقة. يتجلى هذا النقص في الدقة في شكل ضوضاء رقمية. من خلال زيادة ISO الخاص بك، فإنك تحتاج إلى ضوء أقل لكشف صورتك. تتيح لك مستويات ISO الأعلى التصوير بدون فلاش، أو استخدام سرعات غالق أسرع، أو استخدام فتحات أصغر في الإضاءة المنخفضة. ومع ذلك، فإن المقايضة هي زيادة في الضوضاء.

                              إذًا إلى أي مدى يمكنك دفع ISO الخاص بك؟ بالنسبة لي، إنه خيار شخصي. يعتمد ذلك على الكاميرا التي أستخدمها وكيف سأشاهد صوري. عندما أحصل على كاميرا جديدة، أقضي بعض الوقت في اختبار ISO. أنا لا أتحدث عن دراسات علمية عالية التقنية. أنا أتحدث عن الاختبارات الذاتية. ألتقط سلسلة من الصور في ظروف إضاءة مختلفة، وأغير ISO بعد كل لقطة. أحب اختبار ISO الخاص بي في ضوء النهار والظروف المظلمة. أنظر إلى صوري على الكمبيوتر وأقارنها. أقوم أيضًا بطباعة لقطات اختبارية بأحجام مختلفة وأنظر إليها من مسافات مختلفة. لست مهتمًا بالشكل الذي تبدو عليه الصورة عند تكبيرها بنسبة 100% على جهاز الكمبيوتر الخاص بي، لأن هذه ليست الطريقة التي سأنظر إليها بها في النهاية. قد يكون مقدار الضجيج الذي يمكنني تحمله مختلفًا عما يقبله شخص آخر. باستخدام كاميرا Nikon D800، لا أحب التصوير بدرجة أعلى من ISO 1600 عندما يكون هناك الكثير من الظل، أو ISO 3200 إذا كان الضوء ساطعًا وأريد سرعة غالق أسرع. إذا علمت أنني سأقوم بالتحويل إلى اللون الأبيض والأسود، فسوف أغامر بالوصول إلى ISO 6400. ومن ناحية أخرى، فأنا مرتاح جدًا لاستخدام ISO 6400 على جهاز Fuji X100T الخاص بي في أي ظروف إضاءة. مرة أخرى، هذا ما يسعدني؛ قد تشعر بشكل مختلف. المهم هو أن تعرف مقدار الضوضاء التي تشعر بالراحة تجاهها، ومستوى ISO الذي يحدث داخل الكاميرا.


                              But there is always a cost. At higher ISO’s it is much harder to measure the rain in the buckets. At ISO 100, think of measuring the depth in inches. But at higher ISO’s it gets harder to measure accurately. Imagine trying to fill a bucket to only a fraction of an inch; you lose precision. This lack of accuracy manifests itself as digital noise. By increasing your ISO, you require less light to expose your image. Higher ISO’s allow you to shoot without a flash, use faster shutter speeds, or use smaller apertures in low light. However, the trade-off is an increase in noise.

                              So how high can you push your ISO? To me, it is a personal choice. It depends on what camera I’m using and how I will be viewing my photos. Whenever I get a new camera, I spend some time testing the ISO. I’m not talking high-tech scientific studies. I’m talking subjective tests. I take series of pictures in different lighting conditions, changing the ISO after each shot. I like to test my ISO in both daylight and darker conditions. I look at my images on the computer and compare them. I also print out test shots in a couple of sizes and look at them at various distances. I’m not as concerned with what the photograph looks like zoomed into 100% on my computer because that is not how I will be looking at them in the end. The amount of noise that I can tolerate may be different than what someone else accepts. With my Nikon D800, I don’t like to shoot above ISO 1600 when there is a lot of shade, or ISO 3200 if the light is bright and I want a faster shutter speed. If I know that I’m going to be converting to black and white, I will venture as high as ISO 6400. On the other hand, I’m very comfortable using ISO 6400 on my Fuji X100T in any lighting conditions. Again, this is what I am happy with; you may feel differently. What’s important is that you know how much noise you feel comfortable with, and at what ISO level that occurs within your camera.

                              تعليق

                              يعمل...