ناشر الفلاش في التصوير الفوتوغرافي The diffuser in Photography

تقليص
X
 
  • تصفية - فلترة
  • الوقت
  • عرض
إلغاء تحديد الكل
مشاركات جديدة

  • #16
    2. الأمر كله يتعلق بالزوايا

    يتم تحديد الظلال والإبرازات في صورتك من خلال الزاوية التي يضرب فيها الضوء موضوعك، بالنسبة إلى الكاميرا.

    في حالة الحياة البرية، أحاول بشكل عام التأكد من إضاءة وجه الهدف بالكامل. ولكن هناك العديد من الطرق الأخرى لوضع الناشر لتحقيق نتائج مثيرة للاهتمام. على سبيل المثال، يمكنك إنشاء ضوء جانبي مثير عن طريق وضع الناشر على يسار أو يمين الهدف.

    على أية حال، ينطبق نفس المبدأ: ضع الناشر بالقرب من موضوعك! مجرد الخروج من الإطار مثالي. وتأكد من أن الناشر كبير بما يكفي لإضاءة موضوعك بالكامل حتى عند وضعه على مسافة قريبة.


    2. It’s All About the Angles


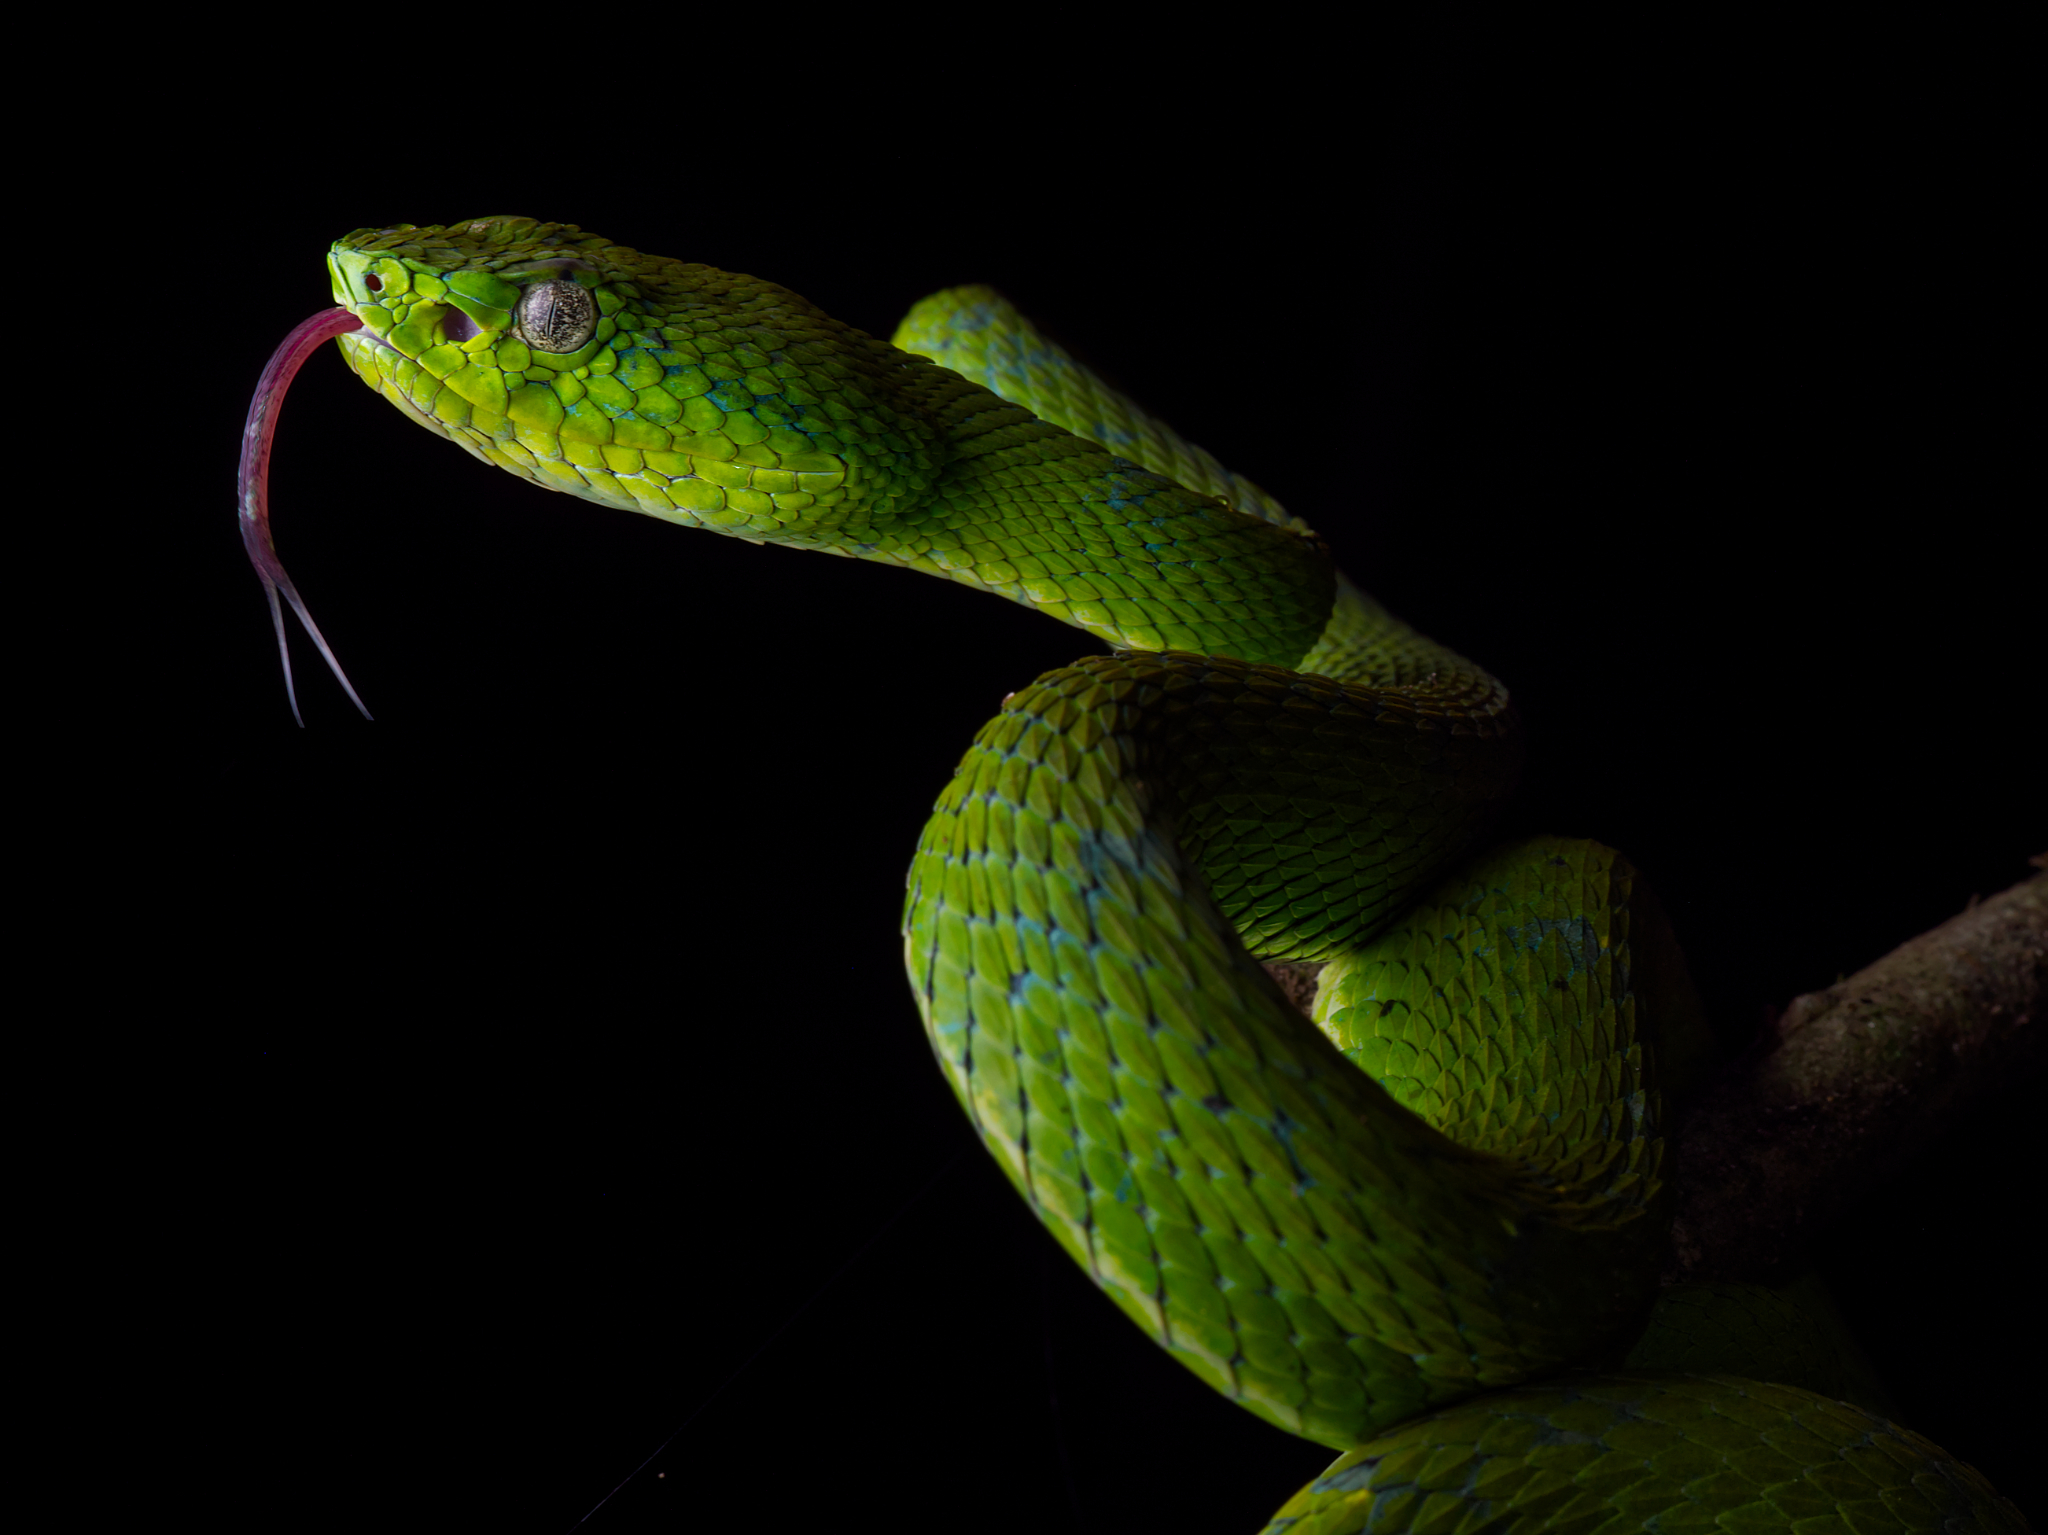
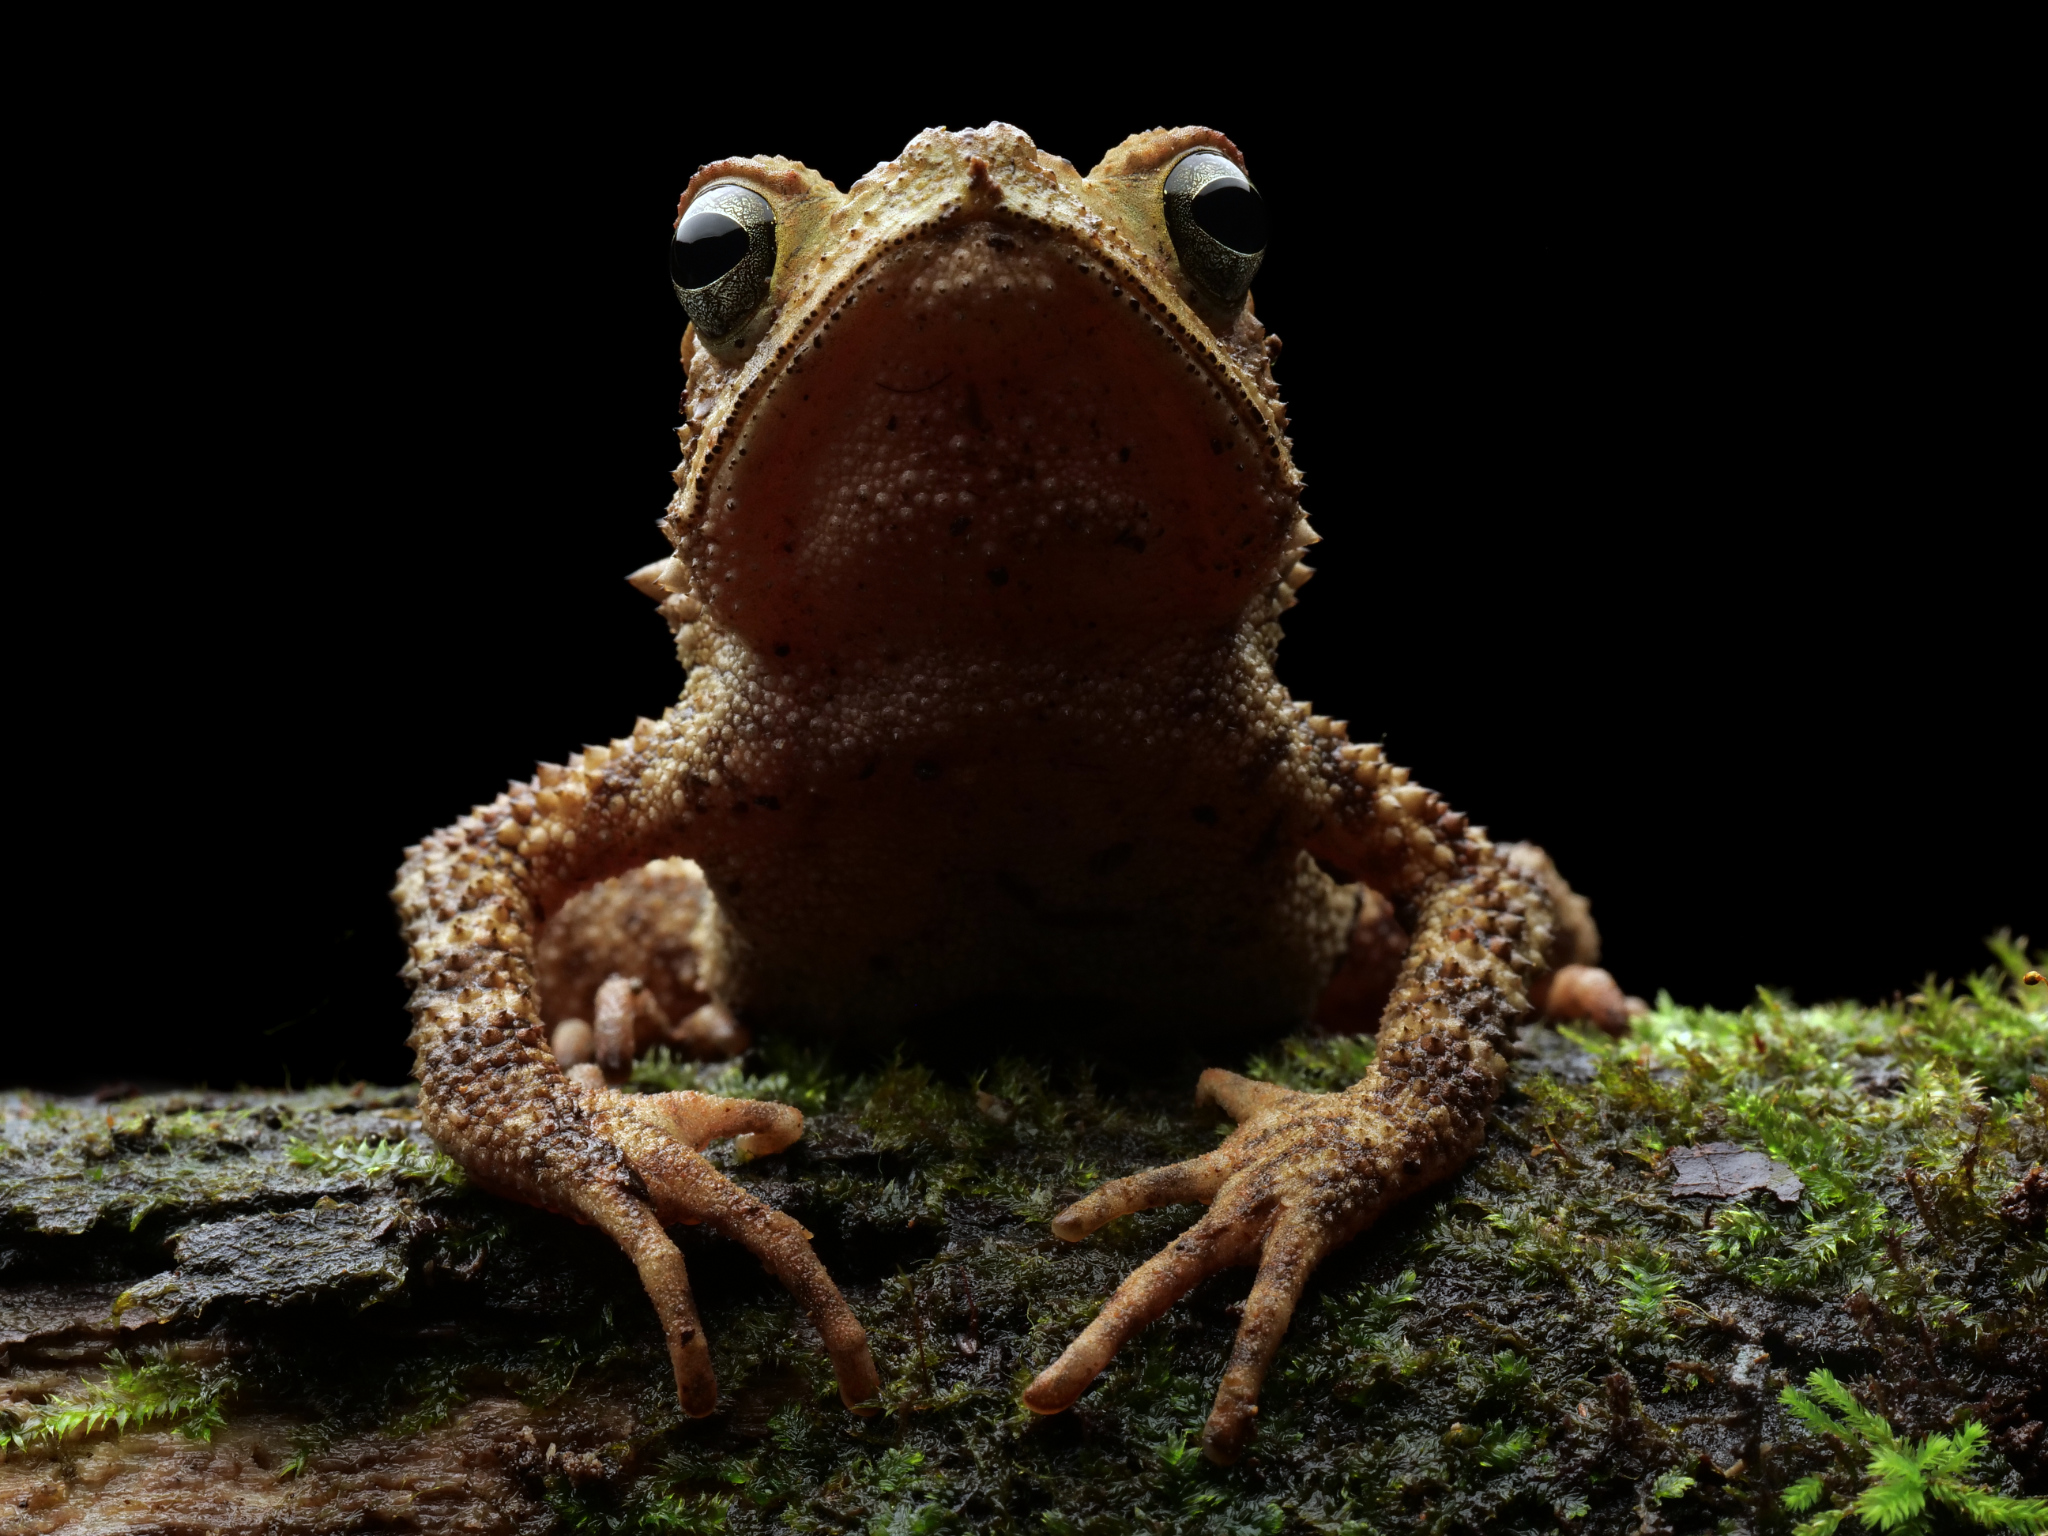
    The shadows and highlights in your photo are dictated by the angle that the light hits your subject, relative to your camera.

    With wildlife, I generally try to make sure the face of the subject is illuminated fully. But there are many other ways to position the diffuser to create interesting results. For example, you can create dramatic sidelight by positioning the diffuser to the left or right of the subject.

    In any event, the same principle applies: Put the diffuser close to your subject! Just out of frame is ideal. And make sure that the diffuser is large enough to illuminate your entire subject even when positioned that close.
    DC-G9 + OLYMPUS M.60mm F2.8 Macro @ 60mm, ISO 250, 1/250, f/11.0

    تعليق


    • #17
      3. ابتعد عن الكاميرا

      إذا لم تكن قد وصلتك الرسالة بعد، فإن وضع الفلاش بعيدًا عن الكاميرا يعد مفيدًا حقًا عندما تحاول تخفيف الضوء باستخدام ناشر.

      باستخدام الفلاش الموجود خارج الكاميرا، يمكنك وضع الناشر بالقرب من هدفك وتجربة زوايا مختلفة. التغييرات الصغيرة في زاوية الضوء يمكن أن يكون لها تأثير كبير على الصورة.

      من السهل إطلاق الفلاشات النموذجية خارج الكاميرا باستخدام كابل فلاش أو مشغل عن بعد. التحدي الأكبر هو تثبيت الفلاش في المكان الصحيح! عادةً ما أحمل الفلاش والناشر بيدي اليسرى، بينما أحمل الكاميرا بيدي اليمنى. يمكن أن يصبح هذا أمرًا صعبًا للغاية، وغالبًا ما أجد نفسي ألعب Twister محاولًا الإمساك بكل عنصر بالزاوية المثالية.

      يمكن أن تكون المواقف والأذرع المضيئة والأصدقاء بمثابة مساعدة كبيرة في هذه المواقف. أفضّل الاحتفاظ بالفلاش (أو أن أطلب من أحد الأصدقاء القيام بذلك) حتى أتمكن من إجراء تعديلات صغيرة بسرعة. لكن ضع في اعتبارك أنني من النوع الذي يحب التقاط صور للثعابين المتعرجة في الليل. إذا كنت تقوم بتصوير هدف ثابت في الاستوديو، فمن المحتمل أن يكون حامل الفلاش هو الحل الأمثل.


      3. Get Off-Camera


      If you haven’t gotten the message yet, putting your flash off-camera is really helpful when you’re trying to soften the light with a diffuser.

      With an off-camera flash, you can position the diffuser closer to your subject and experiment with different angles. Small changes in the angle of light can have a big effect on the photo.

      Typical flashes are easy to fire off-camera with a flash cable or a remote trigger. The bigger challenge is holding the flash in the right place! I generally hold my flash and diffuser in my left hand, while holding the camera in my right. This can become really tricky, and I often find myself playing Twister trying to hold each element at the perfect angle.

      Stands, flash arms, and friends can be a great help in these situations. I prefer to hold the flash (or have a friend do it) so that I can make small adjustments on the fly. But keep in mind that I’m the type of person who likes taking photos of squiggly snakes at night. If you’re shooting a static subject in the studio, a flash stand is probably the way to go.
      DC-G9 + OLYMPUS M.60mm F2.8 Macro @ 60mm, ISO 320, 1/200, f/11.0

      تعليق


      • #18
        4. مقاس واحد لا يناسب الجميع

        من المهم الاحتفاظ بترسانة من تقنيات الإضاءة في صندوق أدواتك. لا يوجد إعداد إضاءة واحد هو الأفضل لكل موقف. كما ذكرت، تتطلب الأهداف الأكبر حجمًا ناشرات أكبر، وإلا فلن تضيء الموضوع بأكمله في المقام الأول. وفي أحيان أخرى، قد تحتاج إلى ضوء أكثر قسوة قليلاً (حتى لو كنت لا تزال تنشره قليلاً) لأن الهدف يتطلب نسيجًا أكثر قليلاً.

        أحتفظ بحوالي خمس تقنيات إضاءة مختلفة بالتناوب اعتمادًا على الموقف الذي أواجهه. إحدى المهارات المهمة هي تقييم المشهد أمامك وتحديد نوع الضوء الذي تريد إلقاءه. يؤدي تبديله إلى إبقاء عملك ديناميكيًا، ويشجع على التحسين!

        4. One Size Does Not Fit All


        It’s important to keep an arsenal of lighting techniques in your toolbox. No single lighting setup is the best for every situation. As I mentioned, larger subjects require larger diffusers, or you won’t illuminate the whole subject in the first place. Other times, you may want slightly harsher light (even if you still diffuse it some) because the subject warrants a bit more texture.

        I keep about five different lighting techniques on rotation depending on the situation I’m facing. An important skill is to evaluate the scene in front of you and determine what type of light you want to cast. Switching it up keeps your work dynamic, and it encourages improvement!
        DC-G9 + OLYMPUS M.60mm F2.8 Macro @ 60mm, ISO 125, 1/200, f/11.0

        تعليق


        • #19
          5. انتبه إلى الأضواء

          نصيحتي الأخيرة هي أن تضع في اعتبارك "الأضواء الساطعة" على موضوعك، وخاصة عيون الموضوع. Catchlights هي انعكاس للفلاش نفسه. إذا كان الناشر الخاص بك ذو شكل غريب أو حواف حادة، فقد يظهر كانعكاسات صغيرة في عيون هدفك.

          ولهذا السبب أتجنب أحيانًا الناشرات ذات الحواف والزوايا الحادة. من المؤكد أنها ستظل تلقي ضوءًا خافتًا، لكنني لا أرغب في إنشاء أضواء مشتتة للانتباه في أعين أهدافي. الزوايا 90 درجة نادرة في الطبيعة، لذا فهي بالتأكيد مؤهلة لتشتيت الانتباه. قد تبدو هذه مشكلة صغيرة، لكنها لا تزال مهمة بالنسبة لي.


          5. Pay Attention to Catchlights


          My last tip is to keep in mind the “catchlights” on your subject, especially the subject’s eyes. Catchlights are the reflection of the flash itself. If your diffuser has a strange shape or sharp edges, it may show up as tiny reflections in your subject’s eyes.

          This is why I sometimes avoid diffusers with sharp edges and corners. Sure, they’ll still cast soft light, but I don’t want to create distracting catchlights in my subjects’ eyes. 90 degree angles are rare in nature, so they definitely qualify as distracting. It may sound like a small issue, but it’s still important to me.
          E-M1 + OLYMPUS M.60mm F2.8 Macro @ 60mm, ISO 640, 1/200, f/11.0

          تعليق


          • #20
            هل يمكنك استخدام عدة فلاشات بدلاً من الناشر؟

            هناك فكرة خاطئة مفادها أن الضوء الناعم يعني غياب الظلال. في بعض الأحيان، يستخدم المصورون فلاشًا إضافيًا (أو يشترون إعداد فلاش مزدوج) معتقدين أنهم سيحصلون على ضوء ناعم بهذه الطريقة.

            على الرغم من أن الفلاش المزدوج يمكنه التخلص من الظلال، إلا أنه لا يزال يلقي أضواء قاسية ذات انعكاسات ساطعة على أهدافك. الأمر نفسه ينطبق على الأضواء الدائرية. هناك فرق بين الظلال الناعمة وعدم وجود الظلال! الناشرون رائعون لأنهم يخففون من انتقالات الضوء/الظل، مع الاحتفاظ ببعض الظلال التي تعطي عمقًا وبعدًا لموضوعك.

            باختصار، حتى لو كان لديك نظام فلاش مزدوج، فأنت بحاجة إلى استخدام الناشرون

            Can You Use Multiple Flashes Instead of a Diffuser?


            There is a common misconception that soft light is the same as an absence of shadows. Sometimes, photographers slap on an additional flash (or buy a dual-flash setup) thinking they’ll get soft light this way.

            Although dual flashes can get rid of shadows, they still cast harsh lights with bright reflections on your subjects. The same goes for ring lights. There’s a difference between soft shadows and no shadows! Diffusers are great because they soften up the highlight/shadow transitions, while retaining some shadows that give your subject depth and dimension.

            In short, even if you have a dual flash system, you need to use diffusers

            تعليق


            • #21

              ما الناشر الذي يجب أن تحصل عليه؟

              يعتمد الناشر المناسب لك على حجم موضوعك. كما ذكرت سابقًا، تتطلب الموضوعات الأكبر حجمًا ناشرات أكبر بكثير. من الناحية المثالية، تريد أن يكون الناشر أكبر بعدة مرات من الموضوع. إذا لم يكن الأمر كذلك، فستحتاج إلى وضع الناشر بعيدًا عن موضوعك (لأنك على الأقل ستضيء الموضوع بأكمله)، مما يجعل الضوء أكثر قوة.

              من المهم أيضًا أن تكون هناك مسافة كافية بين الفلاش نفسه والمادة المنتشرة. بهذه الطريقة، يتم توزيع الفلاش بشكل صحيح عبر منطقة الناشر بأكملها. الطريقة التي يتم بها بيع عدد كبير جدًا من الناشرين عبر الإنترنت تجعل وضع الفلاش على بعد بوصات فقط من المادة المنتشرة، وهو ما لا يكاد يفعل أي شيء. كلما كان الصندوق الناعم أعمق، كلما كان الضوء أكثر انتشارًا.

              وتشمل المعايير الأخرى الراحة (هل يمكن طي الناشر لسهولة الحمل؟) والشكل. كما ذكرت منذ قليل، لدي تفضيل للناشرات المستديرة لتحسين الأضواء على موضوعي.

              فيما يلي عدد قليل من أجهزة النشر التي أوصي بها، مع بعض الإيجابيات والسلبيات.


              What Diffuser Should You Get?


              The right diffuser for you depends on your subject’s size. As I mentioned earlier, larger subjects require much larger diffusers. Ideally, you want the diffuser to be several times larger than the subject. If it’s not, you’ll need to place the diffuser further from your subject (because at least then you’ll illuminate the whole subject), which makes the light harsher.

              It’s also important that there’s enough distance between the flash itself and the diffusing material. That way, the flash is properly dispersed across the entire area of the diffuser. Way too many diffusers sold online have the flash places mere inches away from the diffusing material, which hardly does anything. The deeper the softbox, the more diffused the light will be.

              Other criteria include convenience (can the diffuser be collapsed for easy carrying?) and shape. As I mentioned a moment ago, I have a preference for rounded diffusers in order to improve the catchlights on my subject.

              Here are just a few of the diffusers I recommend, with some pros and cons.

              تعليق


              • #22
                علبة سرعة SMDV مقاس 24 بوصة أنا أحب صندوق softbox الكبير هذا لأنه قابل للطي بسهولة ويتم تعبئته بإحكام في حقيبة الكاميرا. على مدى العامين الماضيين، استخدمت الإصدار 50 سم من هذا الناشر (حوالي 4 بوصات أصغر من هذا القطر) لكنهم توقفوا عن استخدامه للأسف. التصميم المنبثق مناسب للغاية بالنسبة لحجم وفعالية الناشر! هذا الناشر كبير جدًا بحيث لا يمكن استخدامه على الكاميرا. كما أنها مبالغة في التصوير الفوتوغرافي الكلي للغاية للحشرات الصغيرة والزهور. يعد هذا الناشر باهظ الثمن إلى حد ما بسعر 140 دولارًا - على الرغم من أنه ليس سيئًا بسعر البيع الحالي البالغ 99 دولارًا - ولكن بالنظر إلى كل شيء، فأنا أعتبره واحدًا من أفضل القيم لأي معدات تصوير اشتريتها. SMDV 24 inch Speedbox I like this large softbox because it is easily collapsible and packs tightly in a camera bag. For the past couple years, I have used the 50cm version of this diffuser (about 4 inches smaller than this one in diameter) but they’ve sadly discontinued it. The popup design is extremely convenient for the size and effectiveness of the diffuser! This diffuser is so large that it cannot be used on-camera. It’s also overkill for extreme macro photography of small bugs and flowers. This diffuser is fairly expensive at $140 – although not bad at the current sale price of $99 – but considering everything, I consider it one of the best values of any photography gear I’ve bought.

                تعليق


                • #23
                  علبة سرعة SMDV مقاس 24 بوصة

                  أنا أحب صندوق softbox الكبير هذا لأنه قابل للطي بسهولة ويتم تعبئته بإحكام في حقيبة الكاميرا. على مدى العامين الماضيين، استخدمت الإصدار 50 سم من هذا الناشر (حوالي 4 بوصات أصغر من هذا القطر) لكنهم توقفوا عن استخدامه للأسف.

                  التصميم المنبثق مناسب للغاية بالنسبة لحجم وفعالية الناشر! هذا الناشر كبير جدًا بحيث لا يمكن استخدامه على الكاميرا. كما أنها مبالغة في التصوير الفوتوغرافي الكلي للغاية للحشرات الصغيرة والزهور. يعد هذا الناشر باهظ الثمن إلى حد ما بسعر 140 دولارًا - على الرغم من أنه ليس سيئًا بسعر البيع الحالي البالغ 99 دولارًا - ولكن بالنظر إلى كل شيء، فأنا أعتبره واحدًا من أفضل القيم لأي معدات تصوير اشتريتها

                  SMDV 24 inch Speedbox


                  I like this large softbox because it is easily collapsible and packs tightly in a camera bag. For the past couple years, I have used the 50cm version of this diffuser (about 4 inches smaller than this one in diameter) but they’ve sadly discontinued it.

                  The popup design is extremely convenient for the size and effectiveness of the diffuser! This diffuser is so large that it cannot be used on-camera. It’s also overkill for extreme macro photography of small bugs and flowers. This diffuser is fairly expensive at $140 – although not bad at the current sale price of $99 – but considering everything, I consider it one of the best values of any photography gear I’ve bought

                  تعليق


                  • #24
                    الناشرون المنبثقة

                    هناك العديد من التصميمات المشابهة في السوق لناشرات أقراص الفلاش المنبثقة. هذه خيار رخيص رائع. إنها عالمية حيث يمكن وضعها فوق أي رأس فلاش. يتم إطلاق الضوء إلى أعلى وينعكس إلى الخارج. تقوم الأقراص بعمل جيد بشكل مدهش في تشتيت الضوء. كما أنها مريحة جدًا لأنه يمكن استخدامها عند تركيب الفلاش على الكاميرا.

                    Pop-Up Diffusers


                    There are many similar designs on the market for pop-up flash disc diffusers. These are a great cheap option. They are universal in that they can be placed over any flash head. The light is shot upwards and reflected outwards. The discs do a surprisingly good job at dispersing the light. These are also very convenient because they can be used when the flash is mounted on-camera.

                    تعليق


                    • #25
                      سوفت بوكس ​​فيلو 8 × 12 بوصة

                      هذا سوفت بوكس ​​مستطيل. يعجبني أنها كبيرة إلى حد ما، ولكن لا يزال من الممكن استخدامها على الكاميرا. الجانب السلبي هو أن الصناديق الناعمة مثل هذه لا تتمتع بقدر كبير من الصلابة، وغالبًا ما تنهار على نفسها، مما يجعلها صعبة الاستخدام. يعجبني أنه عالمي، لذا يجب أن يناسب أي فلاش لديك.


                      Vello 8 x 12 Inch Softbox


                      This is a rectangular softbox. I like that it is fairly large, but can still be used on-camera. A downside is that softboxes like these don’t have much rigidity, and often collapse on themselves, becoming a pain to use. I like that it’s universal, however, so it should fit whatever flash you have.

                      تعليق


                      • #26


                        مظلة بيضاء

                        يمكن أن تكون المظلة بمثابة ناشر ممتاز. أجد أن المظلات البيضاء متعددة الاستخدامات. يمكنهم ارتداد الضوء من الفلاش إلى الهدف، مما يؤدي إلى إلقاء ضوء منتشر للغاية. أقوم أيضًا أحيانًا بإطلاق الفلاش من خلال المظلة، وهي طريقة أخرى لاستخدامه كناشر. وأخيرًا، يمكن للمظلة أن تكون بمثابة ناشر لأشعة الشمس!

                        عادةً ما يتم استخدام ناشرات المظلات مع حامل للضوء، لكن يمكنك الاستعانة بصديق ليحملها أو يمسكها بنفسك اعتمادًا على زاوية هدفك. إنه مصدر ضوء ضخم إذا جعلته يعمل بشكل صحيح.

                        White Umbrella


                        An umbrella can act as an excellent diffuser. I find white umbrellas to be quite versatile. They can bounce light from a flash back at the subject, casting very diffused light. I also occasionally fire the flash through the umbrella, which is another way to use it as a diffuser. Lastly, an umbrella can actually function as a diffuser for the sun!

                        Usually, umbrella diffusers are used with a light stand, but you can get a friend to hold one or potentially hold it yourself depending upon the angle of your subject. It’s a huge light source if you get it to work right.

                        تعليق


                        • #27
                          الناشرون DIY

                          إذا لم يكن أي من الناشرين الذين يمكنك العثور عليهم عبر الإنترنت يبدو متطابقًا جيدًا، فهناك دائمًا خيار إنشاء الناشر الخاص بك. أجد أن هذا يمكن أن يكون أفضل ضوء، وفي كثير من الأحيان أفضل من البديل المدفوع. أنا أعمل على مقال آخر يشرح كيفية إنشاء موزع جيد ومخصص - سأقوم بنشره في أقرب وقت ممكن!

                          DIY Diffusers


                          If none of the diffusers you can find online seem like a good match, there’s always the option of building your own diffuser. I find that this can be the best light, oftentimes even better than a paid alternative. I’m working on another article that explains how to build a good, custom diffuser – I’ll post it as soon as possible!

                          تعليق


                          • #28
                            خاتمة

                            آمل أن يكون هذا المقال قد أعطاك فهمًا جيدًا لكيفية عمل ناشرات الفلاش، وسبب أهميتها في التصوير الفوتوغرافي بالفلاش، وما هو ناشر الفلاش المناسب لك.

                            إحدى أكبر الخطوات التي قمت بها في التصوير الفوتوغرافي كانت عندما تعلمت كيفية نشر الفلاش بشكل صحيح. أنصحك بشدة بالاستثمار في جهاز توزيع الروائح، أو بناء جهاز خاص بك، إذا لم تكن قد قمت بذلك بالفعل. الفرق يشبه الليل والنهار وسيؤدي إلى تحسين التصوير الفوتوغرافي لديك على الفور.

                            تذكر أن تحصل على ناشر كبير قدر الإمكان (في حدود المعقول)، وضعه في أقرب مكان ممكن من موضوعك. وبهذا، ستتمكن من التقاط بعض الإضاءة الجميلة والناعمة في صورك.


                            Conclusion


                            I hope this article has given you a good understanding of how flash diffusers work, why they are crucial to flash photography, and what diffuser is right for you.

                            One of the biggest steps up in my photography was when I learned how to properly diffuse my flash. I absolutely recommend you invest in a diffuser, or build your own, if you have not already done so. The difference is like night and day and will instantly improve your photography.

                            Remember to get a diffuser that is as big as possible (within reason), and position it as close as possible to your subject. With that, you’ll be able to capture some beautiful, soft light in your photos.

                            تعليق

                            يعمل...
                            X