اكتشاف الغبار على المستشعر ​​​​​​​How to Spot Dust on Your DSLR Sensor

تقليص
X
 
  • تصفية - فلترة
  • الوقت
  • عرض
إلغاء تحديد الكل
مشاركات جديدة

  • اكتشاف الغبار على المستشعر ​​​​​​​How to Spot Dust on Your DSLR Sensor

    اكتشاف الغبار على المستشعر
    How to Spot Dust on Your DSLR Sensor


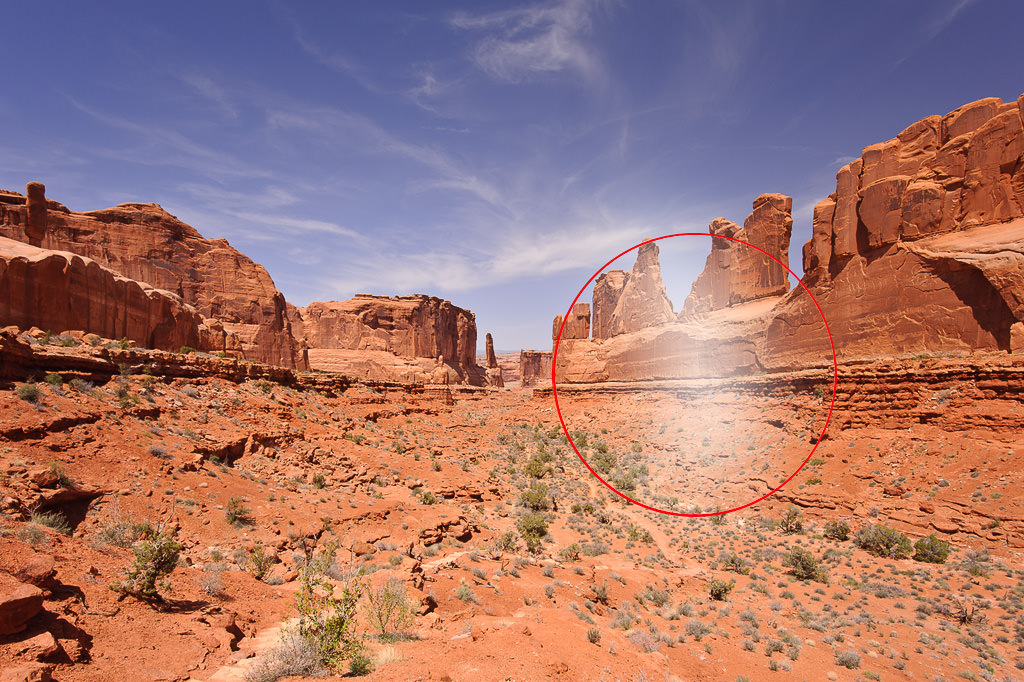
    هل تشعر بالإحباط من رؤية البقع الداكنة الصغيرة في صورك والتي يبدو أنها تظهر في كل صورة؟ إذا كنت تراها باستمرار في نفس الموقع (يمكن أن يختلف حجم البقع وظلامها اعتمادًا على الفتحة)، فمن المرجح أنك تتعامل مع جزيئات الغبار الموجودة على مستشعر الكاميرا. في هذه المقالة القصيرة، سأعرض لك طريقة سريعة وسهلة للتعرف على غبار المستشعر عند التصوير في الخارج

    Are you getting frustrated with seeing small dark spots in your images that seem to show up in every image? If you see them consistently in the same location (the size and darkness of the spots can vary depending on aperture), you are most likely dealing with dust particles on your camera’s sensor. In this short article, I will show you a quick and easy way to identify sensor dust when shooting outdoors

  • #2
    جدول المحتويات
    ما هو غبار المستشعر؟
    الغبار/الأوساخ الموجودة على العدسة
    الغبار الموجود على مستشعر الكاميرا
    كيفية رؤية غبار المستشعر


    Table of Contents

    تعليق


    • #3

      ما هو غبار الاستشعار؟

      إذا كنت تمتلك كاميرا DSLR أو كاميرا بعدسة قابلة للتبديل بدون مرآة، فسيتعين عليك في مرحلة ما التعامل مع غبار المستشعر، سواء أعجبك ذلك أم لا. الغبار هو حقيقة طبيعية في الحياة، وهو موجود في كل مكان حولنا، حتى في منازلنا التي نحاول الحفاظ على نظافتها في جميع الأوقات. يسقط الغبار على كل من العدسة وجسم الكاميرا، وبسبب آلية "التنفس" الخاصة بالعدسة أثناء التكبير/التصغير والتركيز، ينتهي الأمر بجزيئات الغبار الصغيرة إلى داخل جسم الكاميرا. تتنفس جميع العدسات بطريقة أو بأخرى وإلا فلن تتمكن العناصر الداخلية من التحرك لوظائف التركيز التلقائي والتكبير/التصغير. إذا كنت تستخدم أكثر من عدسة واحدة، فقد يتمكن الغبار من الوصول إلى جسم الكاميرا أثناء عملية تغيير العدسات.

      What is sensor dust?


      If you own a DSLR or mirrorless interchangeable lens camera, you will at some point have to deal with sensor dust, whether you like it or not. Dust is a normal fact of life and it is all around us, even at our homes that we try to keep clean at all times. The dust lands on both the lens and the camera body, and, due to the “breathing” mechanism of the lens while zooming in/out and focusing, the small dust particles end up getting sucked into the camera body. All lenses breathe one way or another or else the internal elements would not be able to move for autofocus and zoom functions. If you use more than one lens, the dust might be able to get into the camera body during the process of changing lenses.

      تعليق


      • #4
        بمجرد دخول الغبار إلى جسم الكاميرا، فإنه إما أن يسقط على الجزء السفلي من الكاميرا أو يتحرك حتى يهبط في مكان ما. تستقر بعض جزيئات الغبار على المرآة داخل الكاميرا وقد يعلق بعضها الآخر في مستشعر الكاميرا. لذا، كما ترون، هناك ثلاث مناطق رئيسية قد يستقر فيها الغبار:

        مرآة الكاميرا – عندما ينتهي الغبار على مرآة الكاميرا، فلن تراه في صورك، ولكنك ستشاهد جزيئات الغبار عندما تنظر من خلال عدسة الكاميرا. هذه العدسة مزعجة للغاية ويمكن تنظيفها بسهولة إما باستخدام فرشاة صغيرة أو منفاخ مثل Rocket Blower من جيوتو. الجزء الخارجي للعدسة و/أو الجزء الأمامي و/أو العنصر الخلفي – في حين أن جزيئات الغبار الصغيرة جدًا لن تؤثر على جودة الصورة، إلا أن الجسيمات الأكبر حجمًا وستؤدي الأوساخ/الشحوم إلى تقليل التباين وربما تؤدي إلى انخفاض جودة الصورة. تأكد دائمًا من أن العناصر الأمامية والخلفية نظيفة وخالية من الغبار والأوساخ. مستشعر الكاميرا – أسوأ السيناريوهات، لأن جزيئات الغبار ستظهر في كل صورة، خاصة عند التوقف عند فتحات صغيرة مثل f/10 . تنظيف مستشعر الكاميرا ليس بالأمر السهل وتتطلب العملية أدوات خاصة يجب استخدامها بحذر شديد.

        الأول ليس مشكلة كبيرة – إذا رأيت بعض الغبار داخل عدسة الكاميرا ولكنك لا تراه في صورك، فلا تقلق بشأن ذلك كثيرًا وقم بتنظيف المرآة فقط إذا كان الأمر مزعجًا للغاية بالنسبة لك. أما العاملان الثاني والثالث فهما من يمكن أن يفسدا صورك ويكون لهما تأثير سلبي على جودة الصورة. دعونا نتحدث عن الأوساخ العدسة أولا.


        Once the dust is in the camera body, it will either fall on the bottom of the camera or move around until it lands somewhere. Some dust particles land on the mirror inside the camera and others might end up getting stuck on the camera sensor. So, as you can see, there are three main areas where dust might settle in:
        1. The camera mirror – when dust ends up being on the camera mirror, you will not see it in your images, but you will see dust particles when you look through the viewfinder. This one is just annoying and it can be easily cleaned either with a small brush or a blower like Giotto’s Rocket Blower.
        2. The lens exterior, front and/or its back element – while very small dust particles will not affect image quality, the larger ones and dirt/grease will decrease contrast and might even possibly degrade image quality. Always make sure that both the front and the rear elements are clean and dust/dirt free.
        3. The camera sensor – the worst case scenario, because the dust particles will show up in every image, especially when stopped down to small apertures like f/10. Cleaning the camera sensor is not easy and the process requires special tools that need to be used with extreme care.

        The first one is not a big deal – if you see some dust inside the viewfinder but you do not see it in your images, do not worry about it too much and only clean the mirror if it is too annoying for you. The second and third are the ones that can spoil your images and have a negative effect on affect image quality. Let’s talk about lens dirt first.

        تعليق


        • #5
          الغبار/الأوساخ على العدسة

          كيف يؤثر الغبار والأوساخ والشحوم على الصورة التي تخرج من الكاميرا؟ نادرًا ما يكون الغبار والأوساخ على العنصر الأمامي مرئيًا، إلا إذا كان هناك الكثير منها. وحتى ذلك الحين، لن ترى فعليًا أي نقاط في صورتك، بل ستلاحظ أن صورك "ضبابية" أو "غائمة" قليلاً، وهو ما يسميه المصورون ببساطة "انخفاض التباين". إذا تأثر جزء فقط من العنصر الأمامي، على سبيل المثال، لمس إصبع زيتي العنصر الأمامي، فسوف ترى شيئًا مثل هذا:

          كاميرا نيكون D700 عند 16 مم، ISO 200، 1/200، f/8.0


          Dust/Dirt on the lens


          How does dust, dirt and grease affect the image that comes out of your camera? Dust and dirt on the front element will rarely be visible, unless there is too much of it. Even then, you will not actually see any dots in your image, but rather will notice that your images are a little “hazy” or “cloudy”, which photographers simply call “decreased contrast”. If only a part of the front element is affected, for example an oily finger touched the front element, then you will see something like this:
          NIKON D700 @ 16mm, ISO 200, 1/200, f/8.0

          تعليق


          • #6
            لاحظ المنطقة البيضاء داخل الدائرة – هكذا سيؤثر الزيت/الشحوم على الصورة. في كثير من الحالات، قد ترى تغيرًا في اللون بالإضافة إلى انخفاض التباين.

            ماذا عن الغبار الموجود على العنصر الخلفي؟ ألق نظرة على الصورة التالية:


            هل ترى تلك البقعة المظلمة الكبيرة في الجزء العلوي من الإطار؟ عندما التقطت اللقطة ونظرت إلى عدسة الكاميرا، عرفت على الفور أن العنصر الخلفي للعدسة يحتوي على مواصفات غبار كبيرة، لأنه لا الغبار الموجود على الجزء الأمامي من العدسة ولا على مستشعر الكاميرا يبدو مثل ما ورد أعلاه . لقد قمت بتغيير العدسات في منطقة مليئة بالغبار والرياح (ليس شيئًا جيدًا للقيام به) وانتهى الأمر بسقوط شيء كبير على عنصر العدسة الخلفية قبل تثبيته على الكاميرا. والنتيجة هي دائرة مظلمة كبيرة في الإطار!


            Note the white area inside the circle – that’s how oil/grease would affect the image. In many cases, you might see a color shift in addition to decreased contrast.

            What about dust on the rear element? Take a look at the following image:


            See that large dark spot on the top of the frame? When I took the shot and looked at the viewfinder, I immediately knew that the rear element of the lens had a large dust spec on it, because neither the dust on the front of the lens, nor on the camera sensor looks anything like the above. I changed lenses in a very dusty and windy area (not a good thing to do) and something large ended up landing on the rear lens element before I mounted it on the camera. The result is a large dark circle in the frame!

            تعليق


            • #7
              الغبار على مستشعر الكاميرا

              ماذا عن الغبار الموجود على مستشعر الكاميرا؟ يمكن التعرف بسرعة على الغبار الموجود على مستشعر الكاميرا مما يلي:

              سيتغير حجم جزيئات الغبار وإمكانية رؤيتها عند تغيير فتحة العدسة. عند الفتحات القصوى للعدسات السريعة مثل Nikon 50mm f/1.4G، قد لا تلاحظ حتى جزيئات الغبار في صورك، وهذا لا يعني أنها غير موجودة. وستكون مرئية فقط عند الفتحات الأصغر مثل f/4.0-f/5.6 والأعلى. كلما قمت بزيادة الفتحة إلى رقم أكبر، سيظهر الغبار أكثر قتامة وأكثر وضوحًا وسيصبح حجمه أيضًا أصغر قليلًا. ستظهر جزيئات الغبار دائمًا في نفس الأماكن. لا يمكن أبدًا رؤية غبار المستشعر من خلال عدسة الكاميرا، بل إنه يظهر فقط في الصور. وحتى في هذه الحالة، قد تحتاج إلى تكبير الصورة بنسبة 100% لرؤيتها. يمكن رؤية جزيئات الغبار والشعر الأكبر حجمًا على الفور دون الحاجة إلى تكبير الصورة (انظر مثال الصورة أدناه).

              فيما يلي مثال على غبار المستشعر:


              انتهى الأمر ببقع الغبار الثلاثة هذه على المستشعر الخاص بي بعد يوم طويل من القيادة عبر منطقة مليئة بالأتربة. كما ترون، فإن النقاط واضحة تمامًا وهي أصغر بكثير من المثال السابق للغبار الموجود على عنصر العدسة الخلفية. لقد استخدمت فتحة صغيرة تبلغ f/10 في هذه اللقطة للحصول على تركيز مثالي للطائر، لذلك ظهرت بقع الغبار على الفور.


              Dust on the camera sensor


              What about dust on the camera sensor? Dust on the camera sensor can be quickly identified from the following:
              1. The size and visibility of the dust particles will change as you change lens aperture. At maximum apertures on fast lenses such as Nikon 50mm f/1.4G, you might not even notice the dust particles in your images, which does not mean that they are not there. They will only be visible at smaller apertures such as f/4.0-f/5.6 and higher. As you increase aperture to a larger number, the dust will appear darker and more pronounced and the size of it will also get a little smaller.
              2. Dust particles will always appear in the same spots.
              3. Sensor dust can never be seen through the viewfinder, it only shows up in images. Even then, you might need to zoom in to 100% to see it. Larger dust particles and hair can be visible right away without having to zoom in (see example image below).

              Here is an example of sensor dust:


              Those three sensor dust specks ended up being on my sensor after a long day of driving through a very dusty area. As you can see, the dots are quite obvious and are much smaller than the earlier example of dust on the rear lens element. I used a small aperture of f/10 for this shot to get the bird in perfect focus, so the dust specks showed up right away.

              تعليق


              • #8
                كيف ترى غبار المستشعر

                إذا كانت الكاميرا تحتوي على غبار على مستشعرها، فيمكنك اكتشافه بسرعة عن طريق القيام بما يلي:

                اضبط الكاميرا على وضع أولوية الفتحة. اضبط وضع القياس على المصفوفة/القياس التقييمي. اضبط ISO للكاميرا على أقل رقم مثل ISO 100 أو 200. أوقف تشغيل ISO التلقائي. أوقف التركيز التلقائي واضبط العدسة على التركيز اليدوي. اضبط فتحة العدسة إلى أكبر عدد متاح لعدستك عن طريق تدوير قرص الكاميرا. على سبيل المثال، الحد الأدنى للفتحة في عدسة Nikon مقاس 50 مم f/1.4G هو f/16، لذلك إذا كنت أقوم بالتصوير بهذه العدسة، فسأضبط الفتحة على f/16. وإذا كنت بالخارج، فوجه الكاميرا إلى الأعلى في مكان واضح. السماء الزرقاء والتقاط صورة. إذا كنت في الداخل، فابحث عن ورق أبيض عادي، وقم بالتكبير حتى النهاية بحيث تناسب الورقة الإطار بأكمله، ثم تأكد من أن العدسة خارج نطاق التركيز تمامًا والتقط صورة. إذا كنت أمام جهاز كمبيوتر، فافتح محرر نصوص مثل Notepad وقم بتكبيره إلى الشاشة ثم اقترب من الشاشة قدر الإمكان بحيث يظهر اللون الأبيض فقط في الإطار. تأكد من أن تركيزك بعيدًا (خارج نطاق التركيز تمامًا) - وبهذه الطريقة ستكون جزيئات الغبار فقط مرئية. قم بتكبير الصورة (شاشة LCD الخاصة بالكاميرا الخلفية)، وقم بالتمرير من اليسار إلى اليمين ومن أعلى إلى أسفل في جميع أنحاء الصورة وانظر إذا تمكنت من العثور على أي بقع داكنة. وإذا لم تتمكن من رؤية أي منها، فهذا يعني أن المستشعر الخاص بك نظيف. إذا رأيت بقعًا داكنة كما في المثال أعلاه، فهذا يعني أن المستشعر الخاص بك يحتوي على غبار.


                How to see sensor dust


                If your camera has dust on its sensor, you can quickly spot it by doing the following:
                1. Set your camera on Aperture Priority Mode.
                2. Set your metering mode to Matrix/Evaluative Metering.
                3. Set your camera ISO to the lowest number such as ISO 100 or 200.
                4. Turn off Auto ISO.
                5. Turn off autofocus and set your lens on manual focus.
                6. Set your aperture to the largest number available for your lens by rotating the camera dial. For example, the minimum aperture on the Nikon 50mm f/1.4G is f/16, so if I were shooting with this lens, I would set my aperture to f/16.
                7. If you are outside, point your camera up at the clear blue sky and take a picture. If you are indoors, find plain white paper, zoom in all the way so that the paper fits the whole frame, then make sure that the lens is completely out of focus and take a picture. If you are in front of a computer, open up a text editor such as Notepad, maximize it to the screen and then get as close to the monitor as possible so that only the white color is visible in the frame. Make sure that your focus is way off (completely out of focus) – that way only dust particles will be visible.
                8. Zoom in on the image (rear camera LCD), scroll from left to right and top to bottom all over the image and see if you can find any dark spots.
                9. If you cannot see any, your sensor is clean. If you see dark spots like in the above example, then your sensor has dust on it.

                تعليق


                • #9
                  إليكم لقطة للسماء التقطتها بفتحة f/16 بعد رؤية الغبار في صورتي:

                  كاميرا نيكون D3S مقاس 24 مم، ISO 200، 1/40، f/16.0

                  الدائرة السوداء الكبيرة عبارة عن غبار على الجزء الخلفي من العدسة، بينما النقاط والشعر موجودان على مستشعر الكاميرا. كما يمكنك أن تقول على الأرجح، كان علي أن أقوم ببعض تنظيف المستشعر بعد أن رأيت ما ورد أعلاه. من الواضح أنني لم أفعل ذلك في الموقع، ولكن في بيئة خالية من الغبار بمجرد عودتي إلى المنزل.


                  Here is a shot of the sky that I took at f/16 after seeing dust in my image:
                  NIKON D3S @ 24mm, ISO 200, 1/40, f/16.0
                  The large dark circle is dust on the rear element of the lens, while the dots and hair are both on the camera sensor. As you can probably tell, I had to do some cleaning of the sensor after I saw the above. I obviously did not do it on location, but in a dust-free environment as soon as I got back home.

                  تعليق

                  يعمل...
                  X