حقيبة الكاميرا الخاصة بي (الجزء الثالث)What’s in my Camera Bag? – Nicholas Hess

تقليص
X
 
  • تصفية - فلترة
  • الوقت
  • عرض
إلغاء تحديد الكل
مشاركات جديدة

  • حقيبة الكاميرا الخاصة بي (الجزء الثالث)What’s in my Camera Bag? – Nicholas Hess

    هل سيكون اليوم هو اليوم الذي أرى فيه أسد الجبل؟ أم سأجد بعض المخلوقات المائية لتصويرها بدلاً من ذلك؟ حتى لو كان في ذهني نوع واحد معين، لا أعرف أبدًا على وجه اليقين ما سأراه عندما تطأ قدمي الطبيعة. وبدلاً من ذلك، أحاول أن أكون مستعدًا لتصوير أي موضوع قد أواجهه. ومع ذلك، فإن ذلك يتطلب تخطيطًا دقيقًا باستخدام معدات الكاميرا الخاصة بي. اليوم، دعونا نلقي نظرة على حقيبتي لنرى كيف يمكنني تحقيق أقصى استفادة من الميزانية المحدودة لأكون مستعدًا لأي شيء.

    جدول المحتويات

    نواياي كمصور الحقيبة الكاميرا العدساتPanasonic G Vario 100-300mm f/4-5.6 telephotoOlympus M.zuiko 60mm f/2.8 MacroOlympus M.zuiko 9-18mm (RIP)Laowa 15mm f4.0 زاوية واسعة ماكروLaowa 24mm f/14 2X ماكرو التحقيق في معدات الإضاءة


    ماذا يوجد في حقيبة الكاميرا الخاصة بي؟ - نيكولاس هيس
    What’s in my Camera Bag? Nicholas Hess

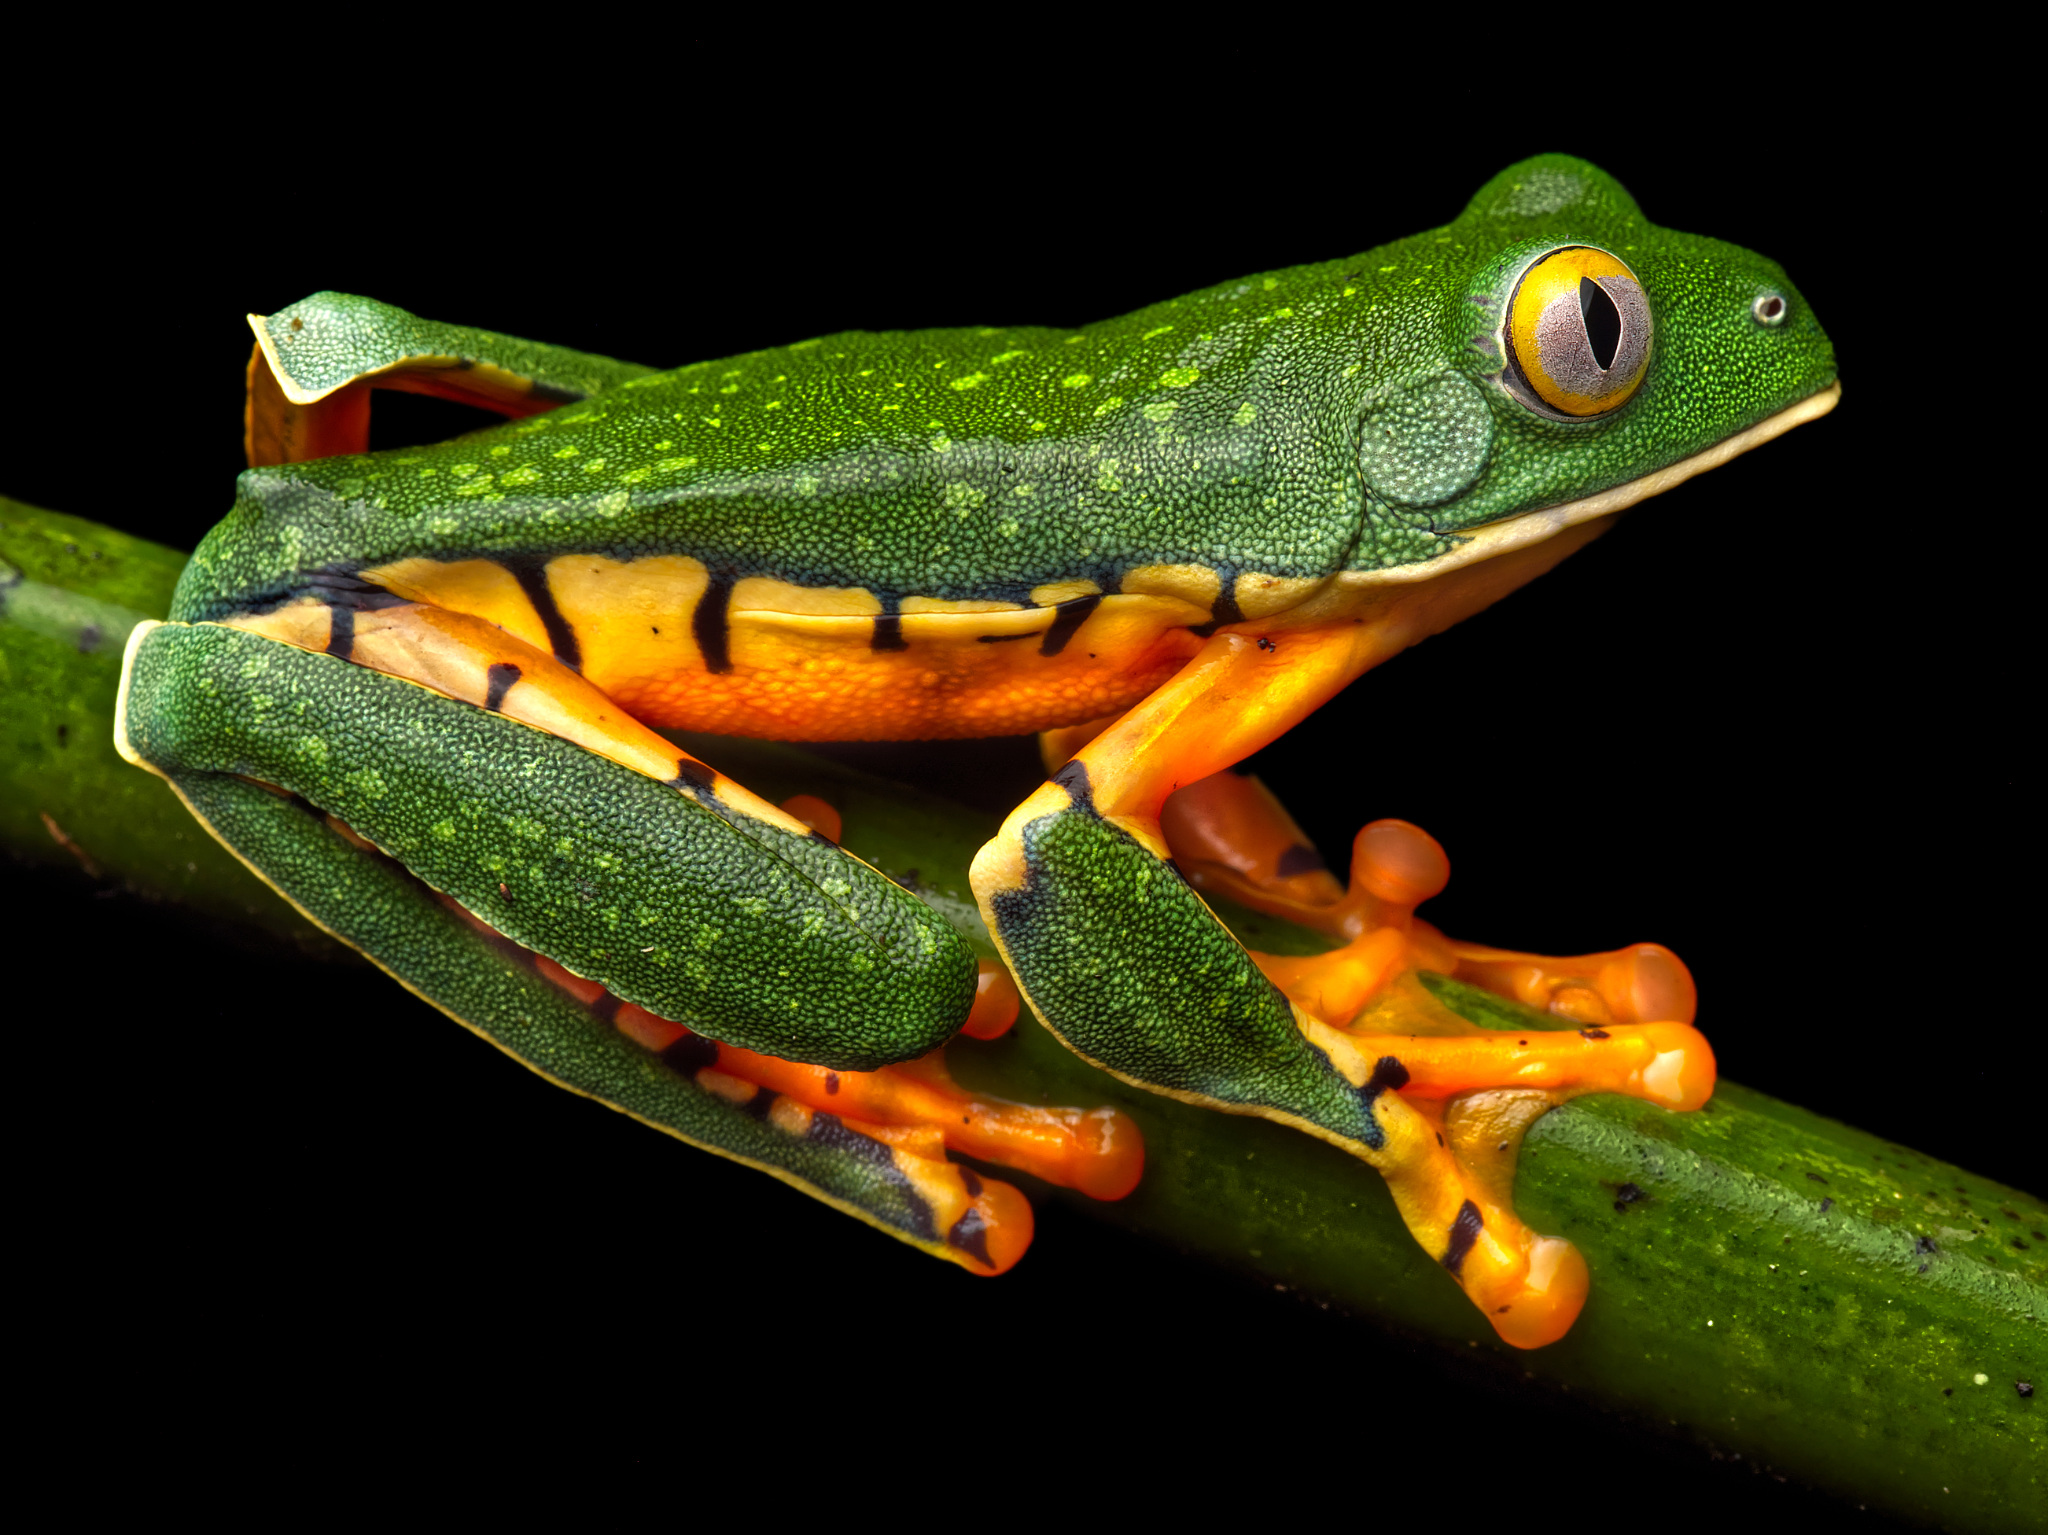
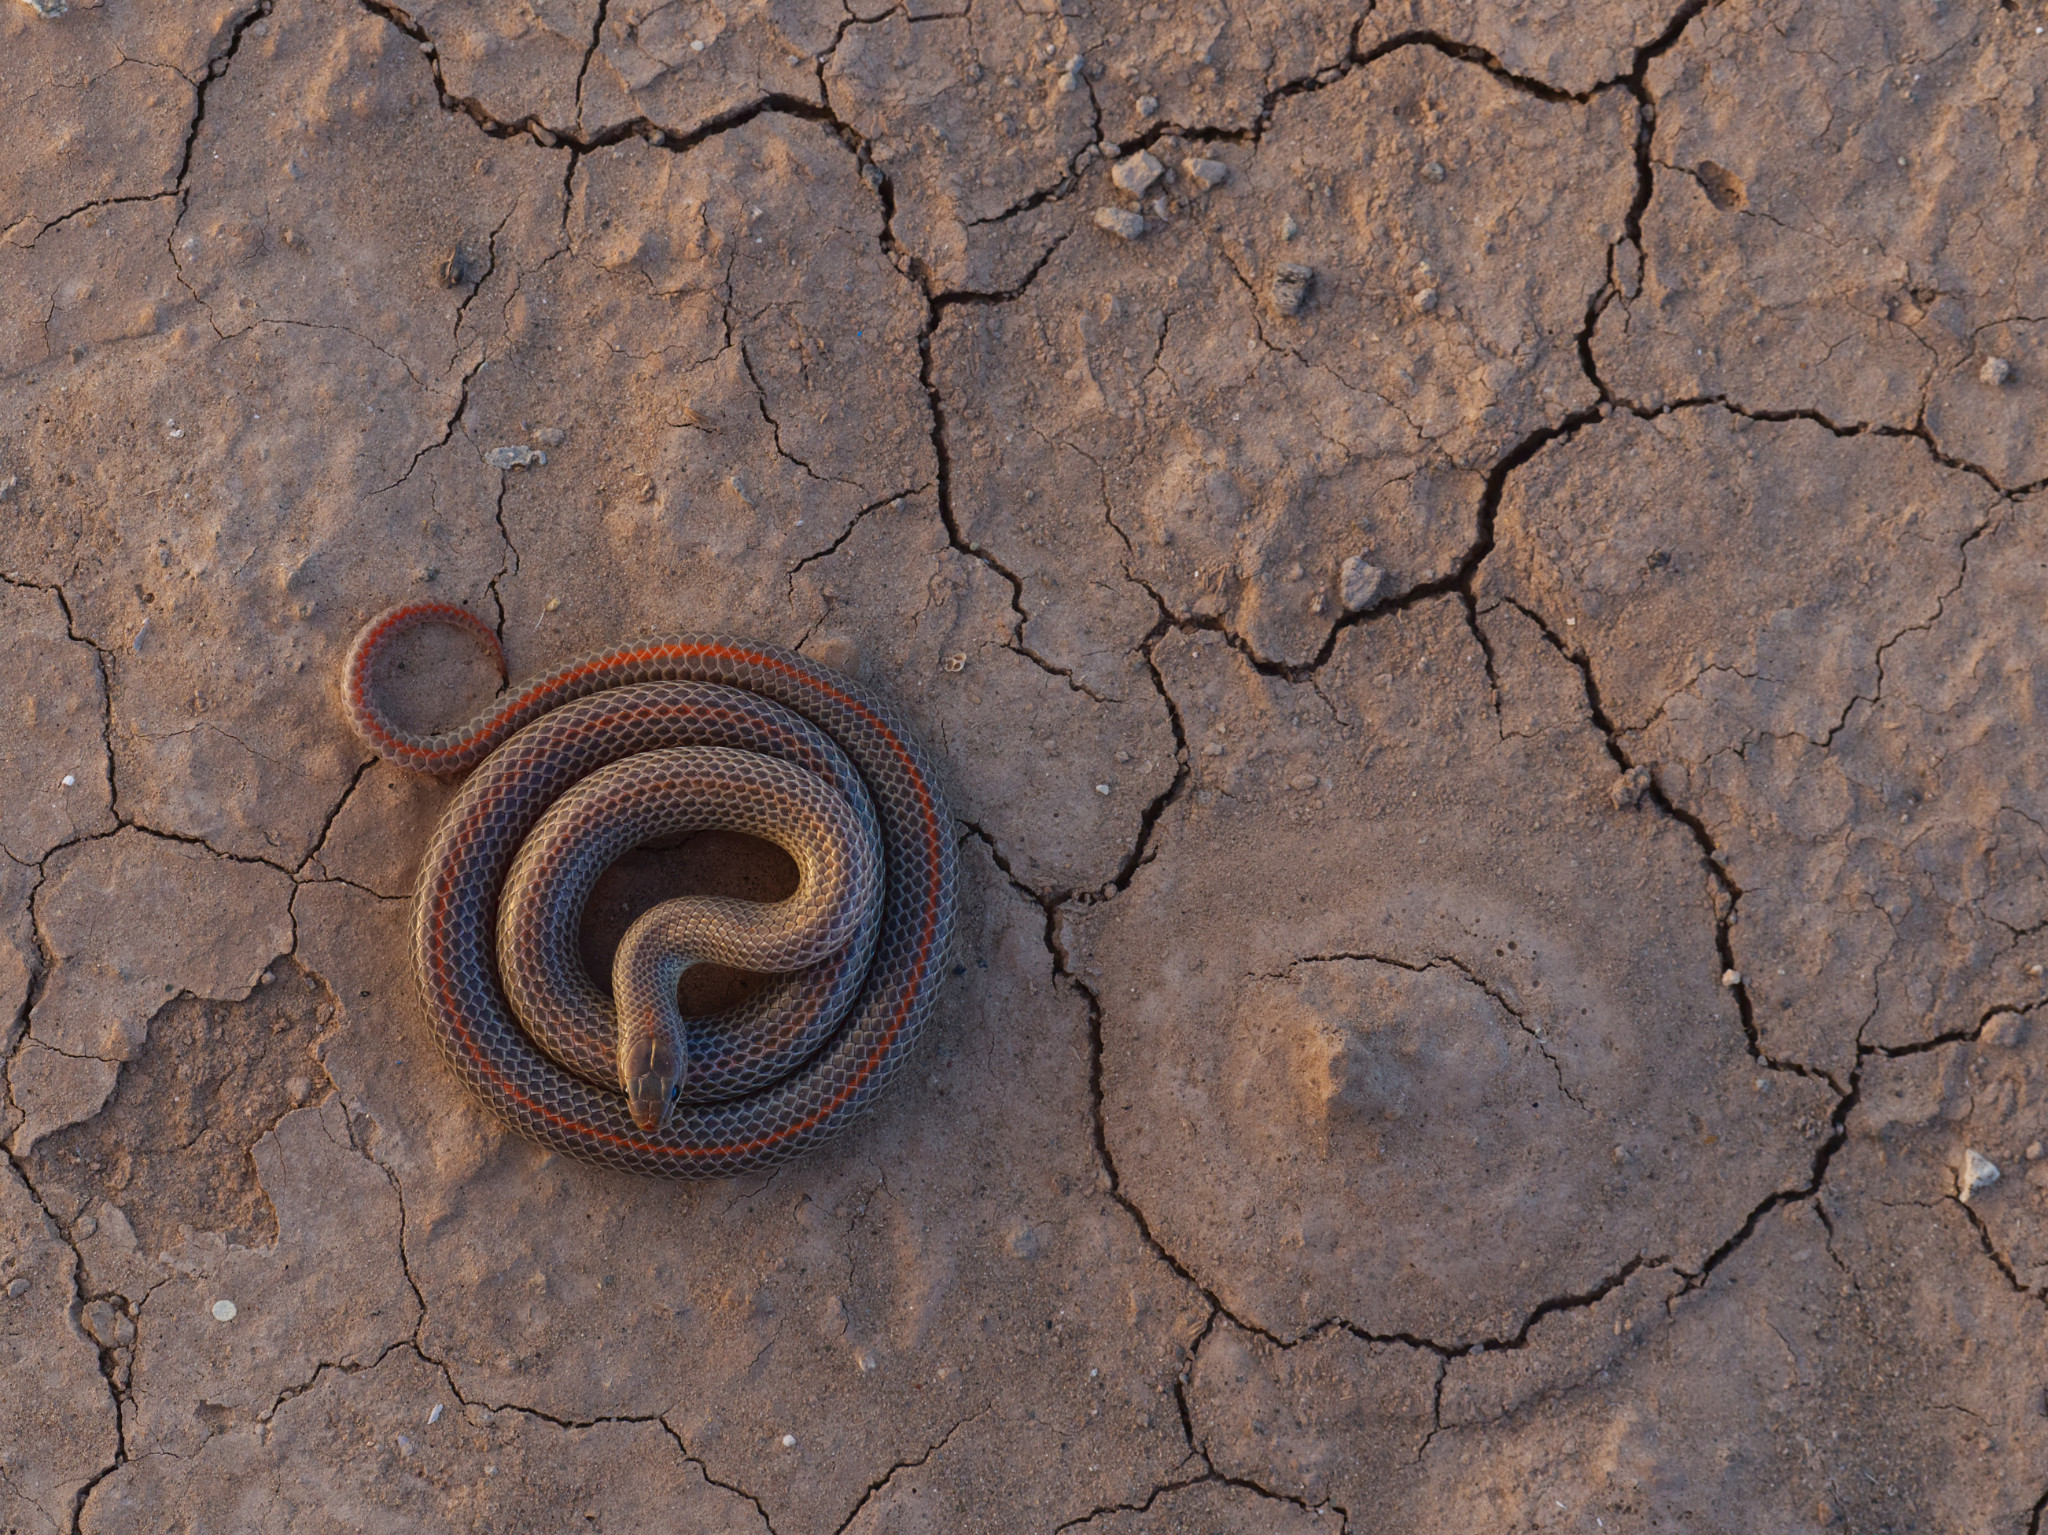
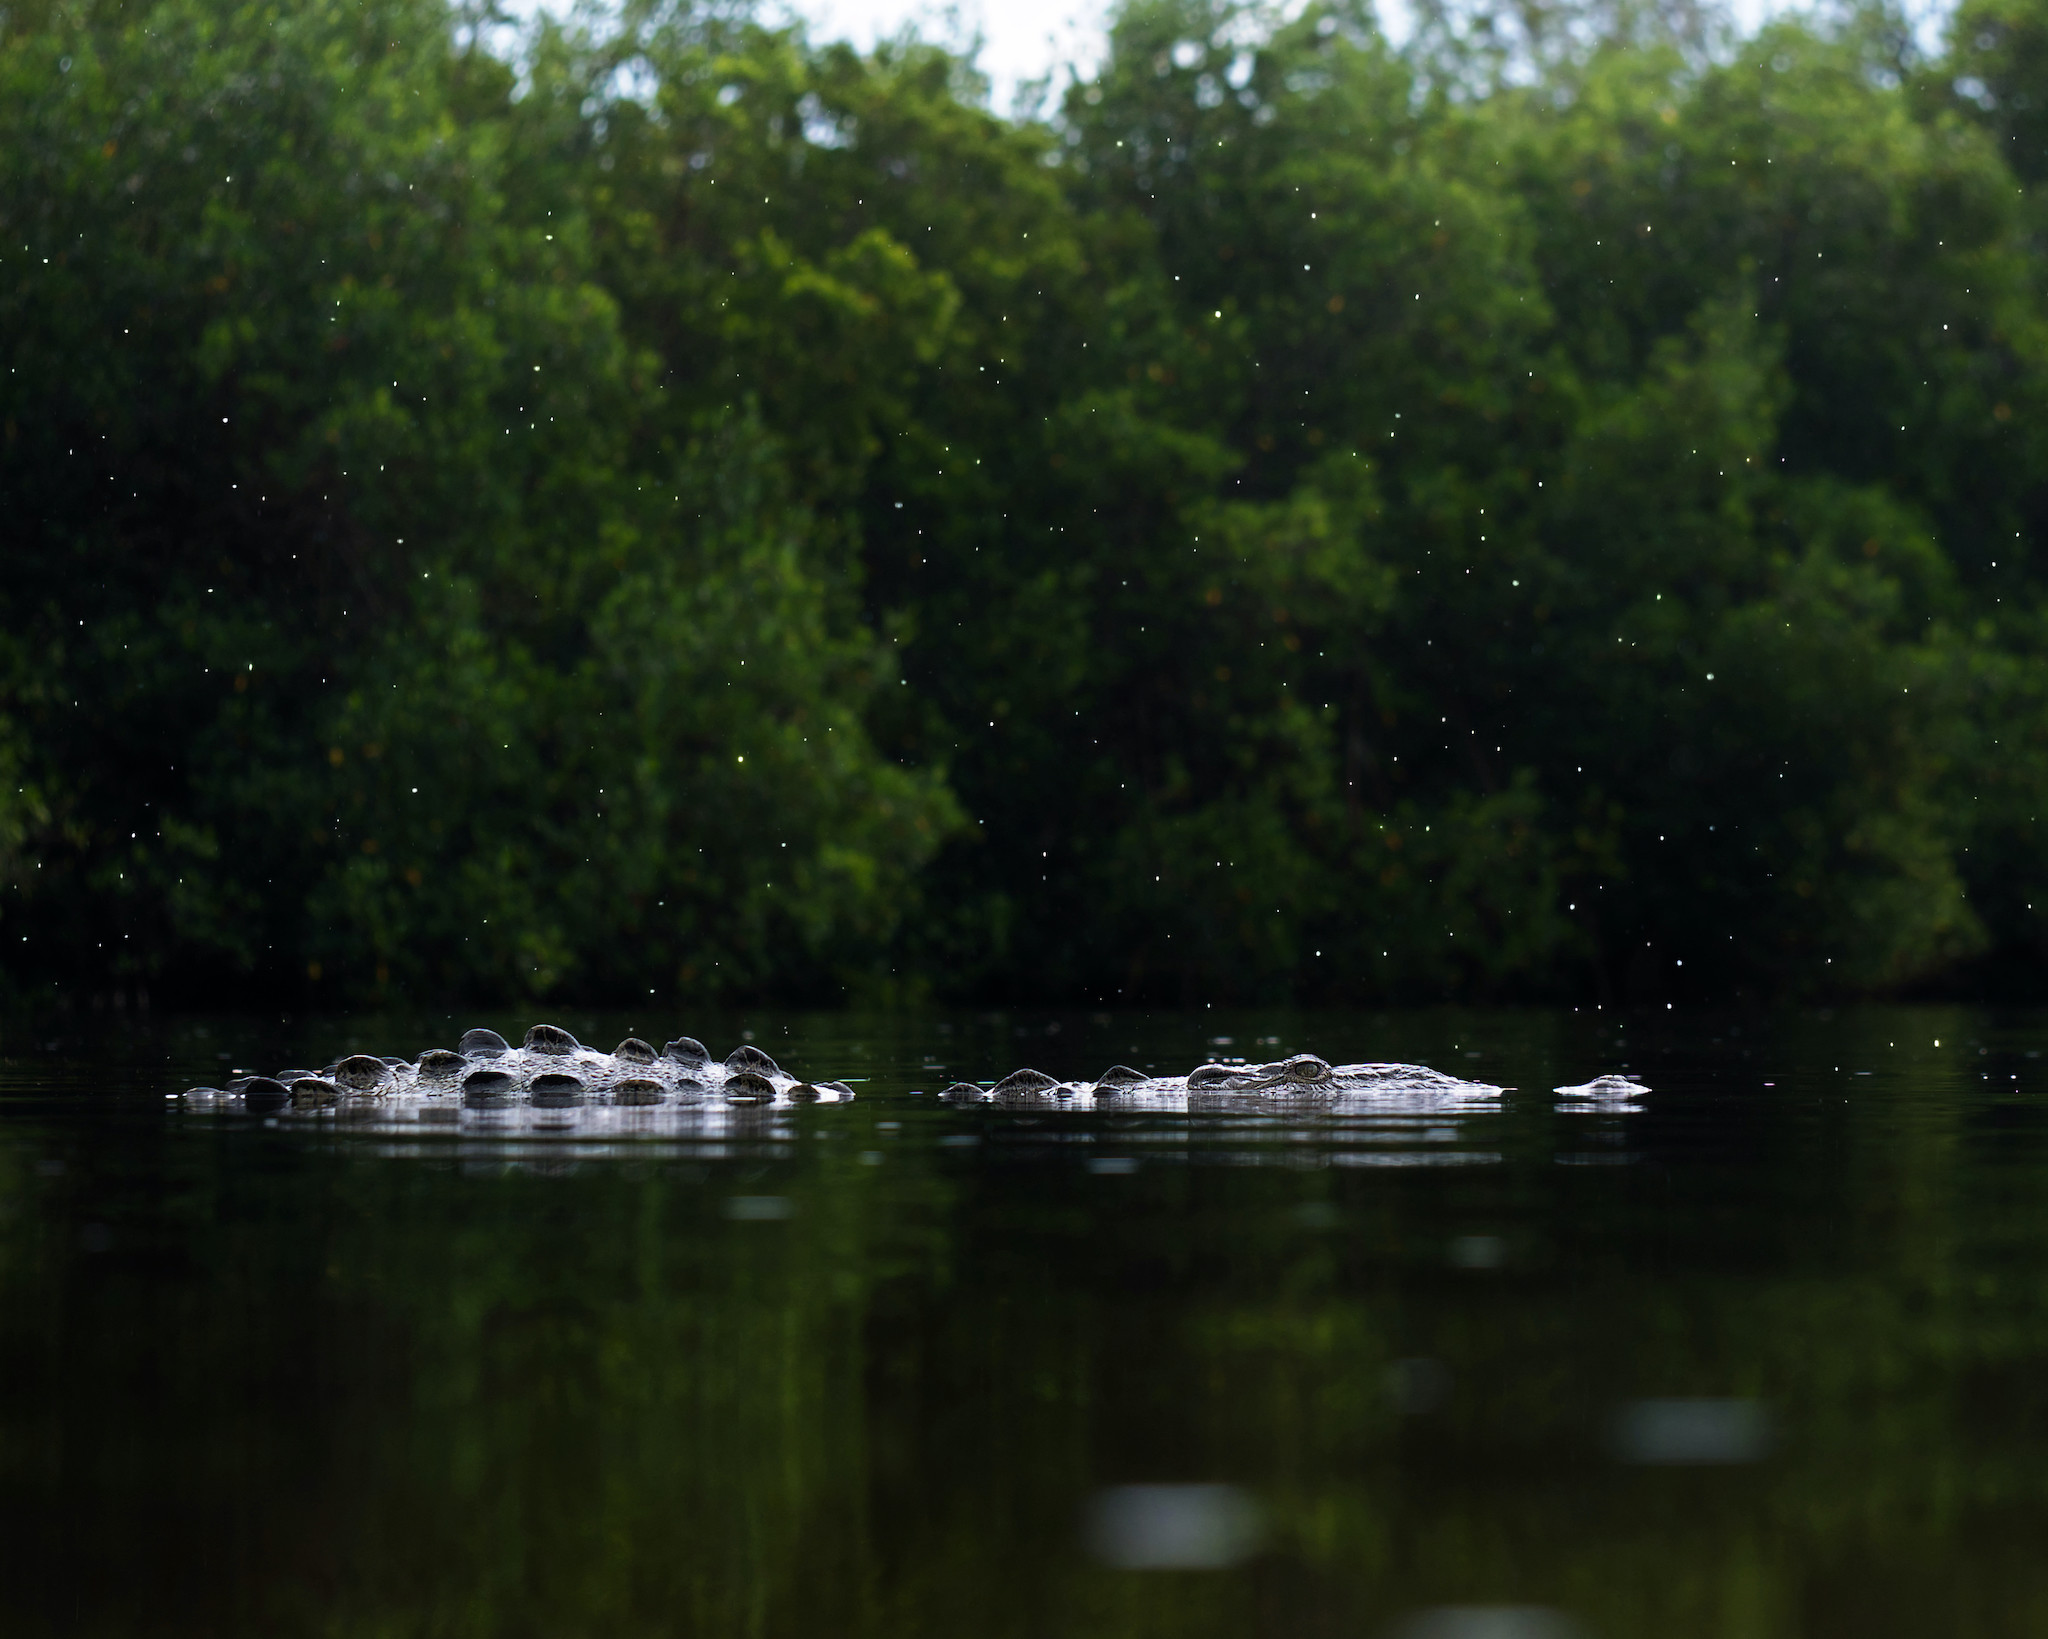
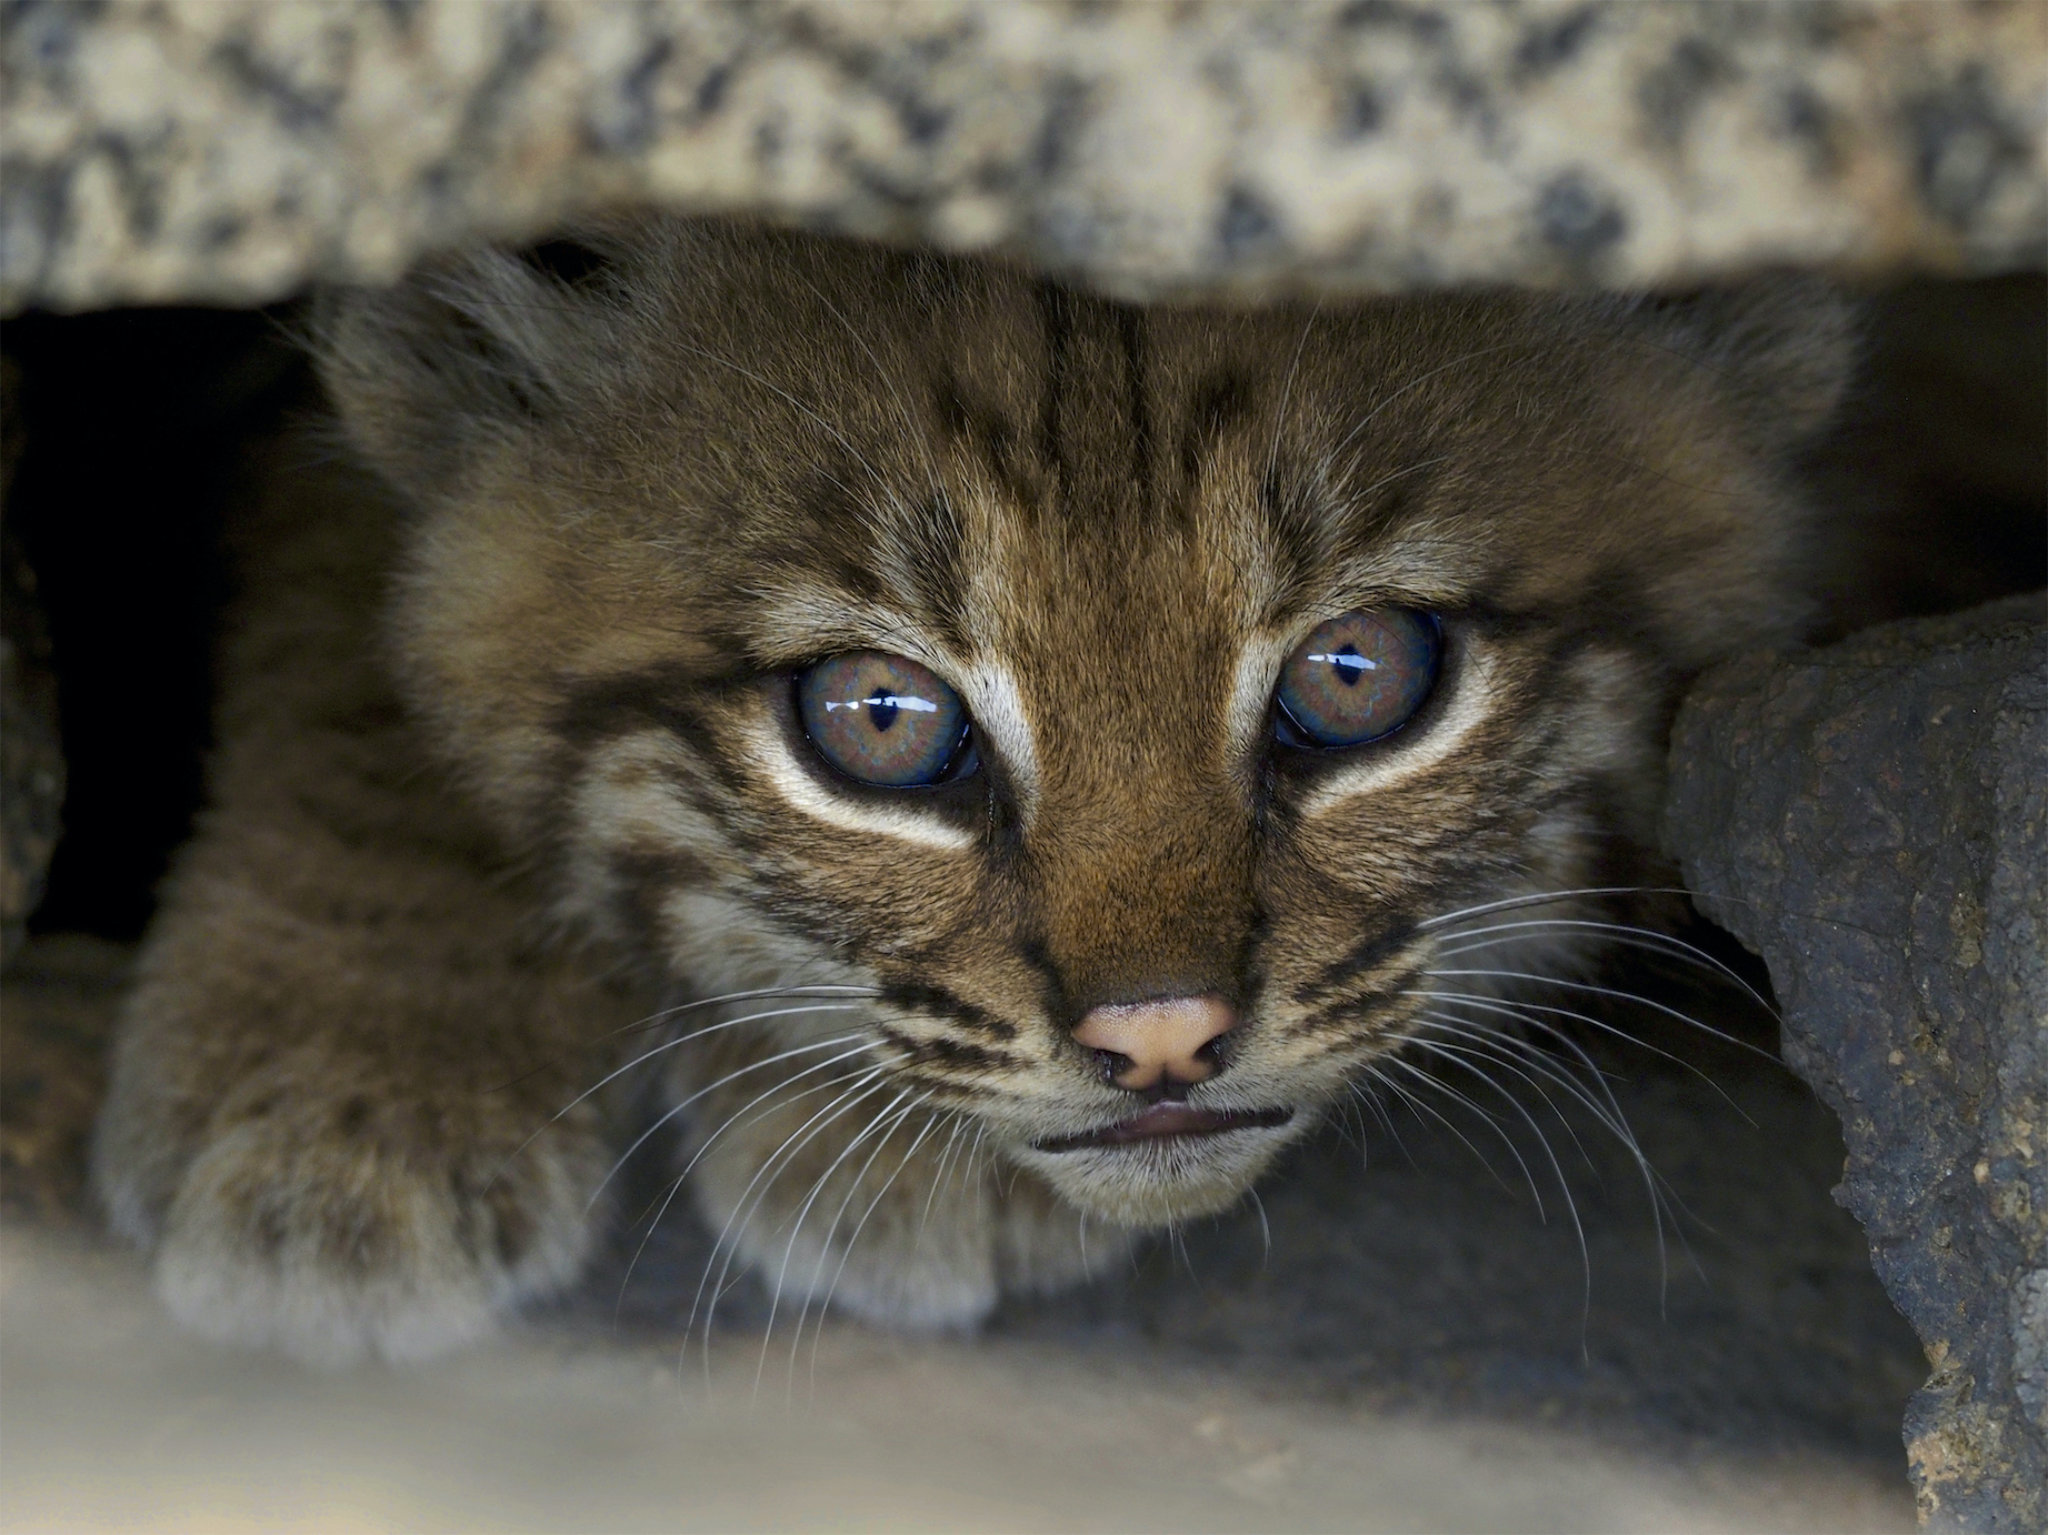
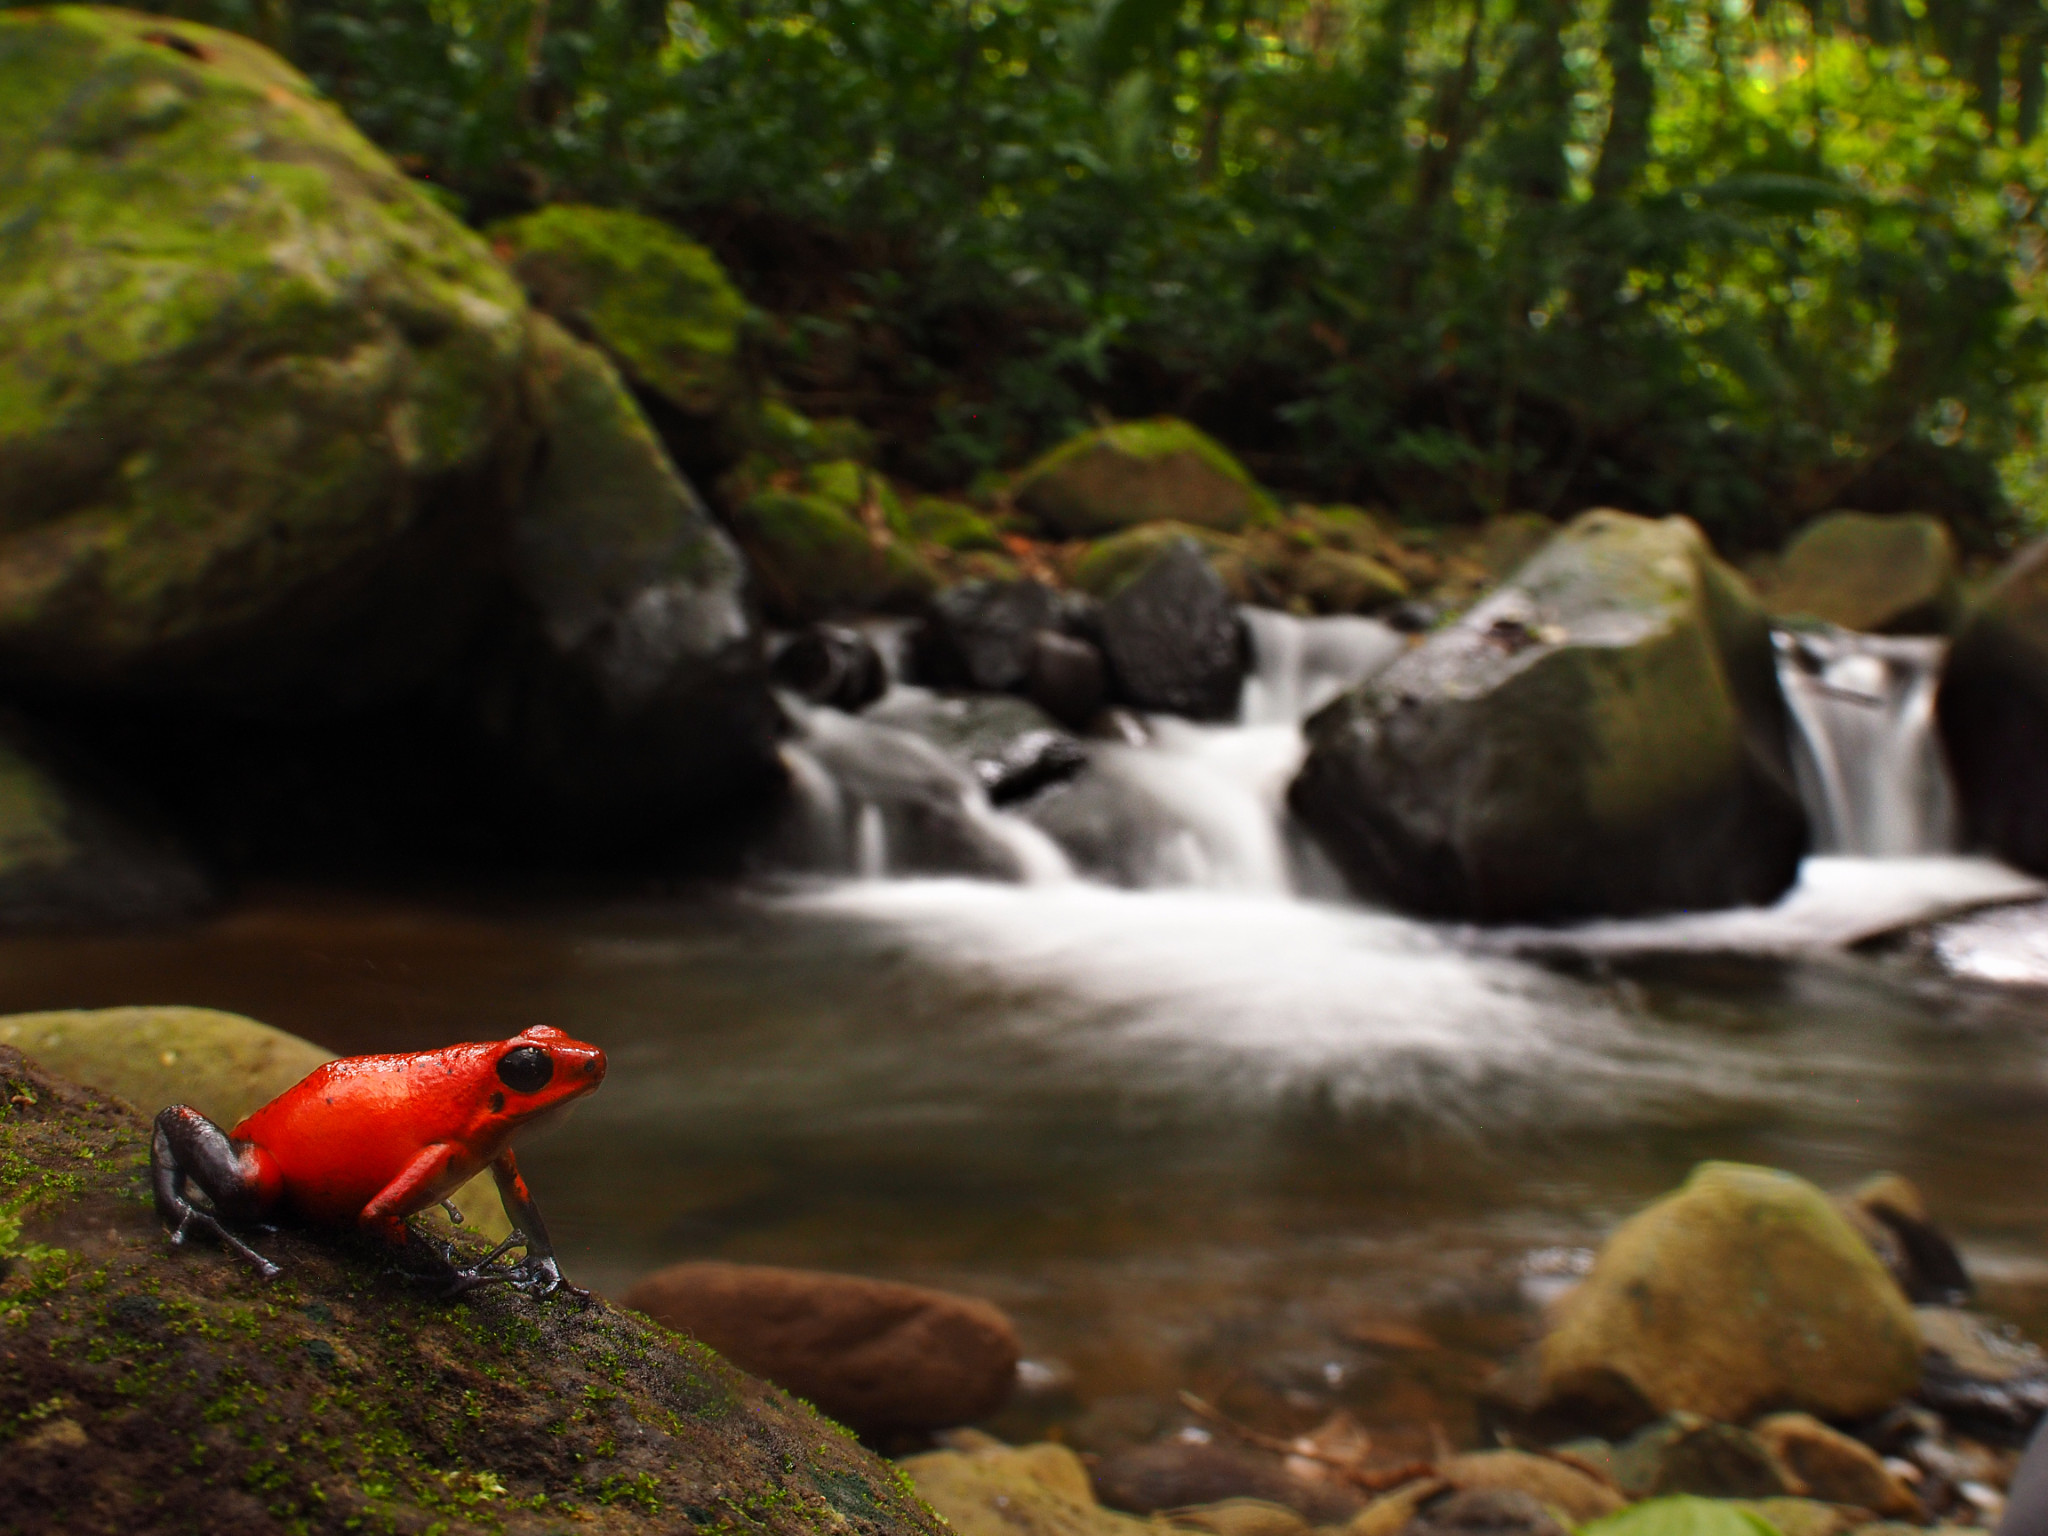
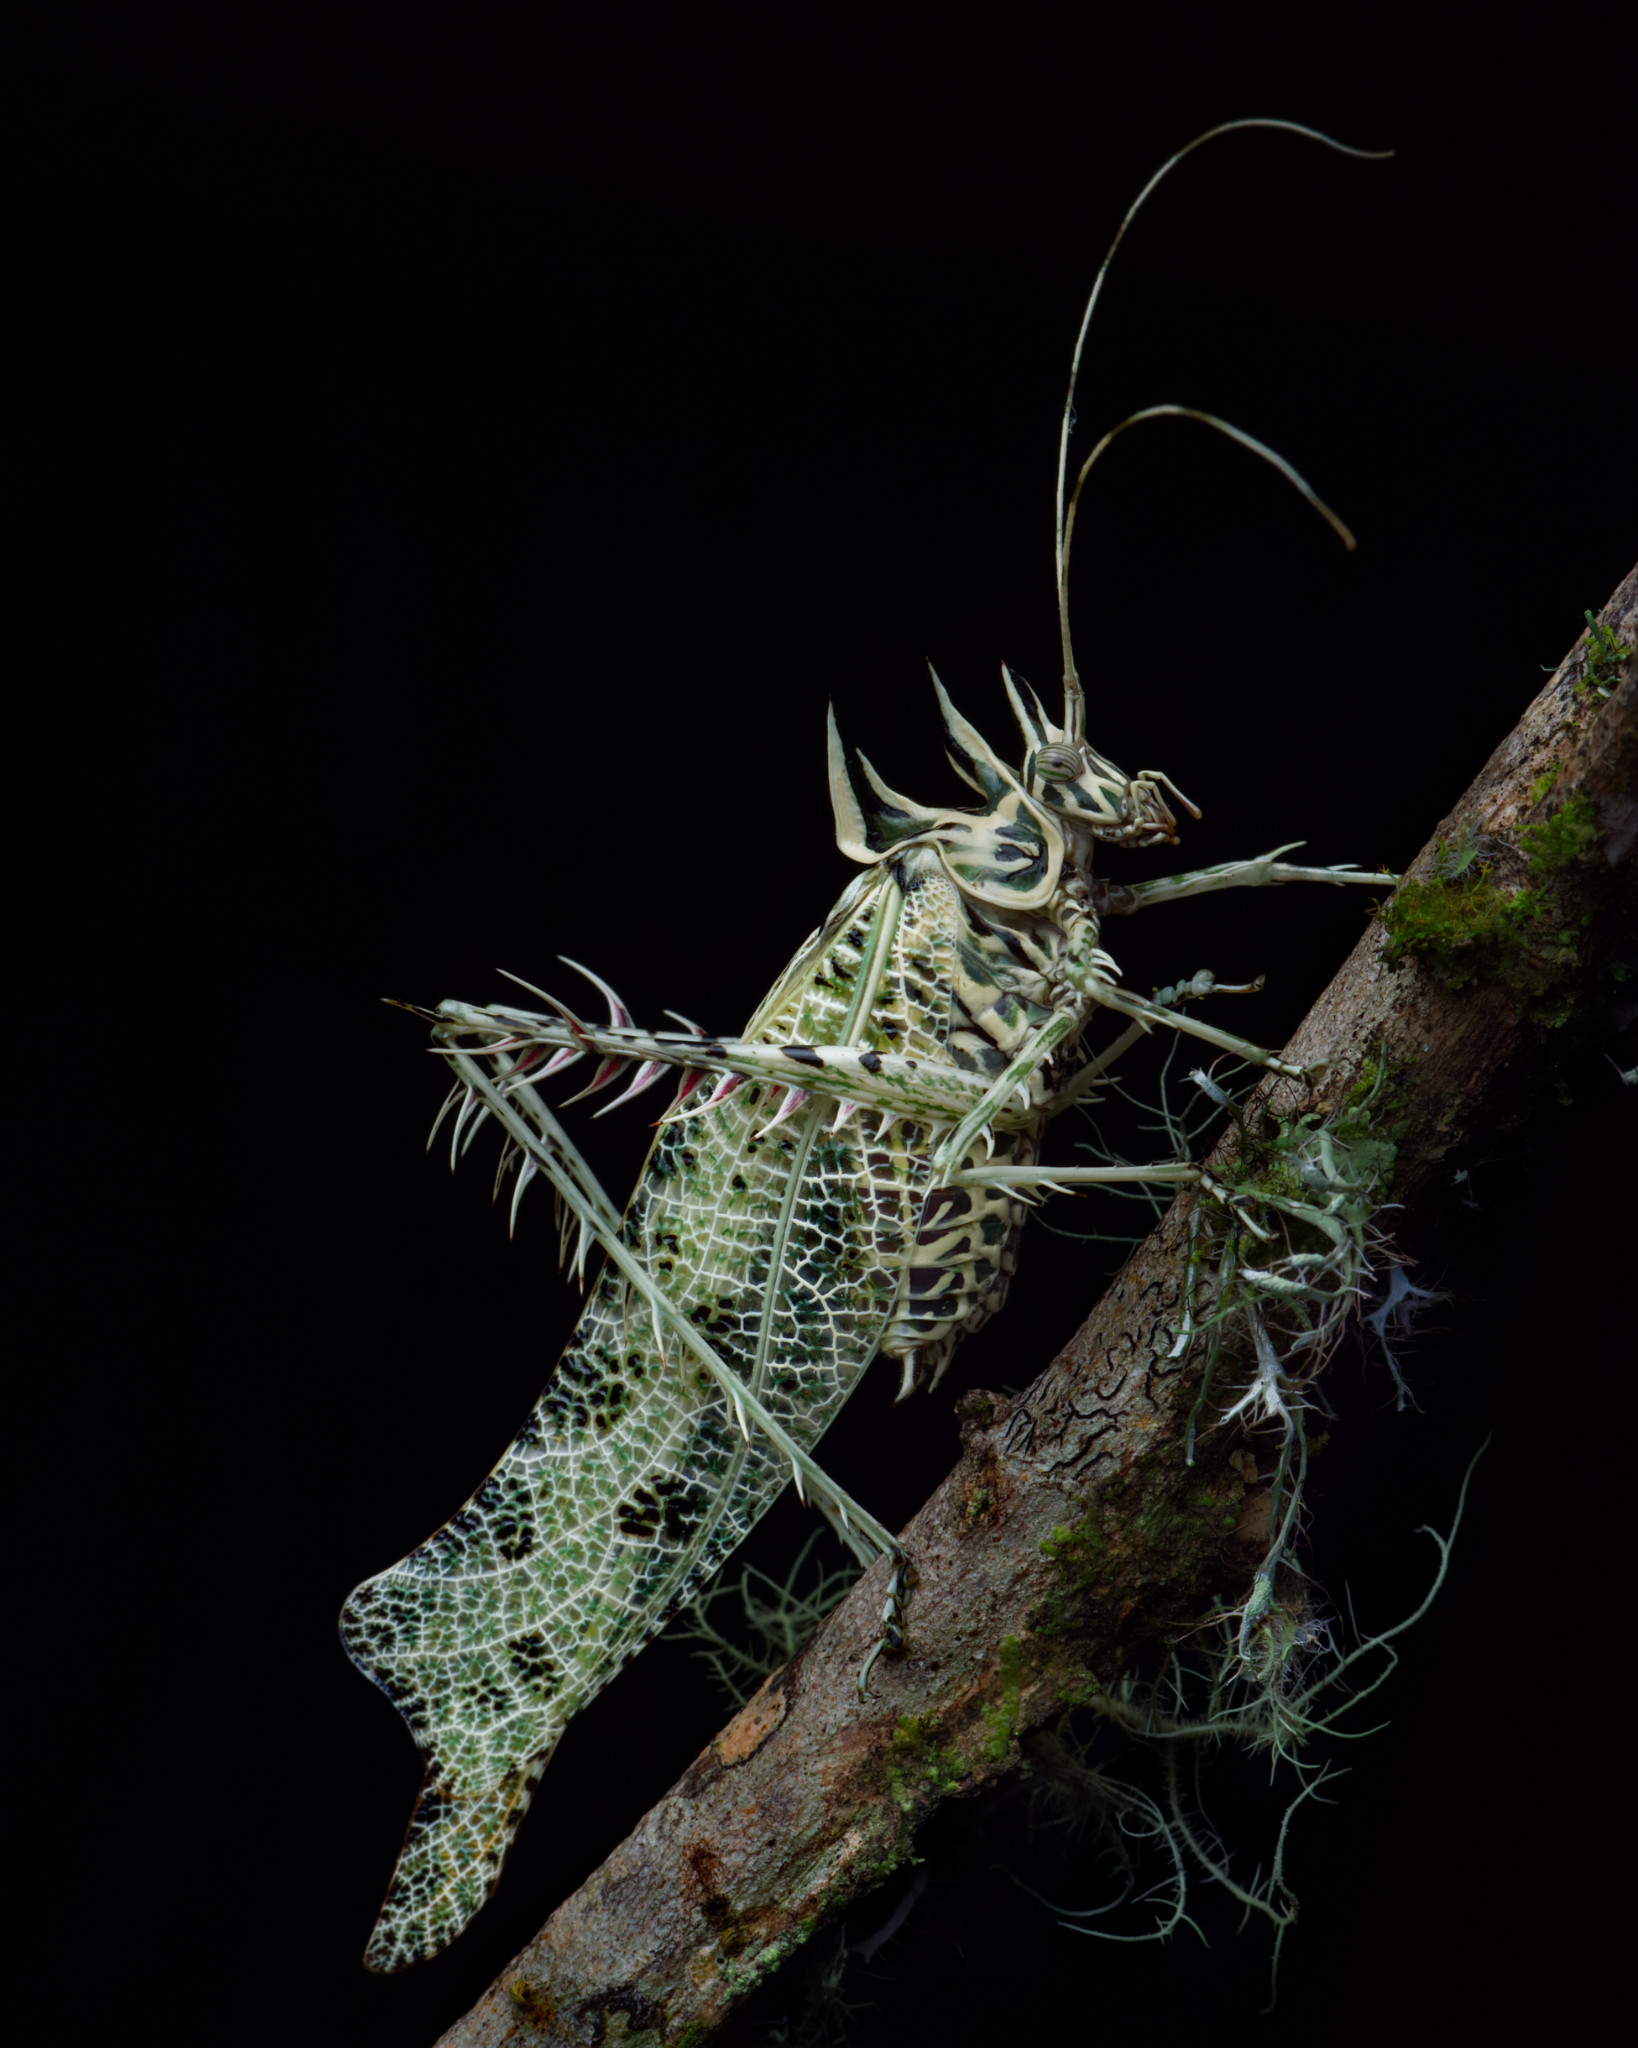
    Will today be the day I see a mountain lion? Or will I find some aquatic creature to photograph instead? Even if I have one particular species in mind, I never know for sure what I’ll see when I set foot into nature. Instead, I try to be prepared to photograph any subject I may encounter. However, that requires careful planning with my camera gear. Today, let’s take a dive into my bag to see how I make the most of a limited budget to make myself ready for anything.

    Table of Contents

  • #2
    My Intentions as a Photographer


    Although I’m a wildlife photographer, my focus usually is not charismatic megafauna – instead, it’s reptiles and amphibians. So, my gear is specialized for images taken at close range, due to my small subjects. That said, I’m happy to photograph any animal I see. And if I don’t see anything, I’ll settle with a landscape.

    Typically when I set out, I have a species or two in mind. Sometimes it’s large vipers, sometimes tiny frogs. Regardless, they usually require putting in several miles on foot to locate, so I try to keep my kit light. And because anything can happen when I’m out, I usually carry my entire kit with me at once.

    I don’t want to make this article much of a review for each of my items, but more to share my thought process behind each piece of equipment and how they fit my needs.
    DC-G9 + OLYMPUS M.60mm F2.8 Macro @ 60mm, ISO 250, 1/250, f/11.0

    نواياي كمصور

    على الرغم من أنني مصور للحياة البرية، إلا أن تركيزي عادةً لا ينصب على الحيوانات الضخمة الجذابة، بل على الزواحف والبرمائيات. لذا، فإن معداتي مخصصة للصور الملتقطة من مسافة قريبة، وذلك نظرًا لصغر حجم الأهداف التي ألتقطها. ومع ذلك، فأنا سعيد بتصوير أي حيوان أراه. وإذا لم أرى أي شيء، سأكتفي بالمناظر الطبيعية.

    عادة، عندما أبدأ، أفكر في نوع أو نوعين. في بعض الأحيان تكون أفاعي كبيرة، وأحيانًا ضفادع صغيرة. بغض النظر، فإنهم عادةً ما يحتاجون إلى قطع عدة أميال سيرًا على الأقدام لتحديد الموقع، لذلك أحاول إبقاء أدواتي خفيفة. ولأن أي شيء يمكن أن يحدث عندما أكون بالخارج، فعادةً ما أحمل معي مجموعتي بأكملها مرة واحدة.

    لا أريد أن أجعل من هذه المقالة مراجعة كبيرة لكل عنصر من عناصري، ولكن أريد أن أشارك عملية تفكيري وراء كل قطعة من المعدات وكيف تناسب احتياجاتي.

    DC-G9 + OLYMPUS M.60mm F2.8 Macro عند 60 مم، ISO 250، 1/250، f/11.0

    تعليق


    • #3
      الحقيبة

      حقيبة الكاميرا الخاصة بي هي Lowepro Flipside Trek BP 350 AW، وهي مناسبة تمامًا لأسلوبي في التصوير الفوتوغرافي. والأهم من ذلك أنها خفيفة الوزن. يوجد أيضًا حزام خصر مريح يزيل الوزن عن كتفي ويسمح لي بالمشي لمسافات طويلة دون عناء مع تحميل 10-20 رطلاً (AKA يصل إلى حوالي 10 كيلوغرامات).

      تسمح لي ميزة الوصول السريع بالوصول إلى جميع معداتي دون خلع حقيبتي. يعد هذا أمرًا أساسيًا عندما أكون تحت ضغط الوقت، أو عندما أكون في مناطق موحلة/رملية ولا أرغب في ترك معداتي.

      تحتوي الحقيبة أيضًا على غطاء للمطر أستخدمه لحماية معداتي من الأمطار الغزيرة. مفيدة للغاية في المناطق الاستوائية!

      وبطبيعة الحال، هناك الكثير والكثير من المساحة. يكفي لجميع عدساتي الخمس، وجسم الكاميرا، والفلاش الخارجي، والسترة، والغداء.

      DC-G9 + OLYMPUS M.60mm F2.8 Macro عند 60 مم، ISO 500، 1/320، f/6.3

      الكاميرا

      الكاميرا التي أصورها حاليًا هي Panasonic Lumix DMC G-9، وهي كاميرا بأربعة أثلاث. يعد Micro Four Thirds تنسيقًا ممتازًا وخفيف الوزن وصغير الحجم. وعلى هذا النحو، فإن معداتي صغيرة، ويمكنني حملها بسهولة.

      إن G-9 ليست أول كاميرا ذات أربعة أثلاث. لقد قمت بالتصوير سابقًا باستخدام G-2 وOMD EM-1. لقد كنت دائمًا مرتاحًا للتصوير باستخدام كاميرات Micro Four Thirds نظرًا لوزنها الخفيف.

      جهاز G-9 الخاص بي مقاوم للعوامل الجوية وقوي إلى حد ما. أشعر بالراحة عند أخذها إلى التضاريس الوعرة والطقس السيئ. لقد شهدت كاميرتي المسكينة كل شيء - السقوط والرمال والطين والمطر (أحيانًا كلها مرة واحدة) ولا تزال تعمل بسلاسة.

      DC-G9 + OLYMPUS M.60mm F2.8 Macro عند 60 مم، ISO 400، 1/1300، f/2.8


      The Bag


      My camera bag is the Lowepro Flipside Trek BP 350 AW, which is perfectly suited for my style of photography. Most importantly, it’s lightweight. There’s also a comfortable waist strap which takes the weight off my shoulders and allows me to hike effortlessly with 10-20 pounds loaded (AKA up to about 10 kilos).

      The quick access feature allows me to reach all my gear without taking off my bag. This is key when I’m under time pressure, or when I’m in muddy/sandy areas and don’t want to set down my equipment.

      The bag also has a rain cover that I use in order to protect my gear from downpours. Super useful in the tropics!

      And of course, there is lots and lots of space. Enough for all five of my lenses, camera body, external flash, jacket, and lunch.
      DC-G9 + OLYMPUS M.60mm F2.8 Macro @ 60mm, ISO 500, 1/320, f/6.3The Camera


      The camera I currently shoot with is the Panasonic Lumix DMC G-9, a micro four thirds camera. Micro four thirds is an excellent lightweight and compact format. As such, my gear is small, and I can carry it with ease.

      The G-9 is not my first micro four thirds camera. Previously, I shot with the G-2 and OMD EM-1. I have always been comfortable shooting with micro four thirds cameras because of how lightweight they are.

      My G-9 is fairly weatherproof and sturdy. I feel comfortable taking it into rugged terrain and bad weather. My poor camera has experienced it all – falls, sand, mud, rain (sometimes all at once) and still runs smoothly.
      DC-G9 + OLYMPUS M.60mm F2.8 Macro @ 60mm, ISO 400, 1/1300, f/2.8

      تعليق


      • #4
        العدسات

        أحمل معي خمس عدسات في الميدان، لكل منها وظيفتها الخاصة.

        1. عدسة باناسونيك جي فاريو 100-300 ملم f/4-5.6 المقربة

        العدسة المثبتة على الكاميرا بشكل افتراضي هي العدسة المقربة مقاس 100-300 مم. بهذه الطريقة أكون مستعدًا دائمًا لأي حياة برية قد لا تستمر لفترة طويلة.

        لقد كنت أحمل هذه العدسة معي (عادةً ما تكون مثبتة على الكاميرا وحول رقبتي) طوال السنوات العشر الماضية تقريبًا. سأكون كاذبًا إذا قلت أنه لم يتدهور. في هذه المرحلة، يوجد قدر كبير من الغبار داخل العدسة، وغالبًا ما يقوم التركيز البؤري التلقائي بالقرب من اللانهاية بالبحث.

        لا أستطيع أن أتحدث بشكل نقدي عن رفيقي الموثوق به؛ لقد تعرض للعوامل الجوية أكثر من أي من معداتي الأخرى، ولا يزال يعمل. وبالنظر إلى البيئات التي أعمل فيها، فهذا ليس بالأمر الهين.

         لقد كنت محظوظًا بما يكفي لتعثر على قطة الوشق هذه. كان من المهم الخروج من هناك بسرعة حتى لا يتم تعطيل العرين بشكل أكبر. لحسن الحظ، كانت جميع إعداداتي جاهزة لذلك تمكنت من التقاط هذه اللقطة السريعة لوجهه قبل أن يتراجع إلى الشق وقبل أن يحين وقت مغادرتي. باناسونيك 100-300 ملم f/4-5.6 @ ISO 640، 1/320، f/6.3

        2. أوليمبوس M.zuiko 60 ملم f/2.8 ماكرو

        عدستي المفضلة، عدسة الماكرو Olympus مقاس 60 مم f/2.8، هي التي أستخدمها عند تصوير الزواحف والبرمائيات. معظم أهدافي صغيرة الحجم، لذا فإن عدسة الماكرو هي الخيار الواضح لالتقاط تفاصيل المخلوقات الصغيرة. إنه محمول وصغير الحجم ويزن 185 جرامًا فقط ولا يتطلب سوى حجرة صغيرة في حقيبة الكاميرا.

        لقد امتلكت هذه العدسة منذ ما يقرب من 10 سنوات أيضًا. على عكس عدسة 100-300 مم الخاصة بي، لم يتدهور أداء عدسة الماكرو هذه على الإطلاق (الضرب على الخشب). إنها العدسة الأكثر وضوحًا وتلتقط باستمرار كل التفاصيل التي أرغب فيها في صوري الكلية. كما أنها مقاومة للطقس على جهاز G-9 الخاص بي، وهو ما يعد بمثابة طمأنينة لطيفة عند التقاط الصور تحت المطر - عندما ينشط الكثير من البرمائيات.

        DC-G9 + OLYMPUS M.60mm F2.8 Macro عند 60 مم، ISO 125، 1/200، f/11.0


        The Lenses


        I carry five lenses with me in the field, each with its own function.
        1. Panasonic G Vario 100-300mm f/4-5.6 telephoto


        The lens that is mounted to my camera by default is my 100-300mm telephoto lens. This way I am always ready for any wildlife that may not stick around long.

        I’ve had this lens with me (usually mounted on the camera and around my neck) for almost the past 10 years. I’d be lying if I said it hasn’t degraded. At this point, there is a considerable amount of dust inside the lens, and the autofocus near infinity often searches.

        I can’t speak too critically of my trusty companion; it has been exposed to the elements more than any of the rest of my gear, and it still works. Considering the environments where I operate, that’s not a small feat.
        I was lucky enough to stumble upon this bobcat kitten. It was important to get out of there quickly to not further disrupt the den. Luckily, I had all my settings ready so I was able to capture this quick shot of its face before it retreated into the crevice and before it was time for me to leave. Panasonic 100-300mm f/4-5.6 @ ISO 640, 1/320, f/6.32. Olympus M.zuiko 60mm f/2.8 macro


        My favorite lens, the Olympus 60mm f/2.8 macro, is my go-to when photographing reptiles and amphibians. Most of my subjects are small, so a macro lens is the obvious choice to capture details of small critters. Portable and compact, it weighs only 185g and requires just a small compartment in my camera bag.

        I’ve owned this lens for close to 10 years as well. Unlike my 100-300mm, this macro lens has not degraded in performance at all (knock on wood). It is my sharpest lens and consistently captures all the details I desire in my macro photos. It’s also weather sealed on my G-9, which is nice reassurance when taking photos in the rain – when a lot of amphibians are active.
        DC-G9 + OLYMPUS M.60mm F2.8 Macro @ 60mm, ISO 125, 1/200, f/11.0

        تعليق


        • #5

          3. أوليمبوس إم زويكو 9-18 ملم (RIP)

          حتى وقت قريب جدًا، كان لهذه العدسة دائمًا مكان في حقيبتي. على الرغم من أنني لا أعتبر نفسي مصورًا للمناظر الطبيعية، إلا أنه في بعض الأحيان يتعين عليّ فقط التقاط صورة للمناظر الطبيعية للأماكن الجميلة التي أزورها.

          بعض أنواع الصور المفضلة لدي هي التي يكون فيها الحيوان أصغر حجمًا في المقدمة، ويتم تضمين الكثير من الموائل في الخلفية. (راجع مقالتي مقدمة عن هواية التصوير الفوتوغرافي للأعشاب للحصول على مزيد من المعلومات حول الأنواع المختلفة من التركيبات التي أستخدمها مع الزواحف والبرمائيات.)

          كانت العدسة المستقيمة مقاس 9-18 مم رائعة لهذه الأنواع من لقطات الرؤية الواسعة. أي حتى ينكسر أحد الكابلات المرنة على الأرجح. الآن أحصل على خطأ في توصيل العدسة على الفور.

          من المحتمل أن أقوم باستبدالها بـ Panasonic 9mm f / 1.7 في وقت ما.

          E-M1 + OLYMPUS M.9-18 مم F4-5.6 عند 9 مم، ISO 1250، 1/500، f/11.0

          4. لاوا 15 ملم f4.0 زاوية واسعة ماكرو

          لفترة من الوقت، كانت عدسة Laowa 15mm f/4 Macro هي العدسة المفضلة لدي. بالتأكيد تم التقاط بعض اللقطات المفضلة لدي بهذه العدسة. ما يجعل Laowa 15mm فريدًا من نوعه هو أنه يتمتع بمجال رؤية واسع إلى حد ما مع توفير إمكانيات ماكرو 1:1. وهذا يوفر منظورات فريدة عند تصوير الحيوانات الصغيرة في بيئات مثيرة للاهتمام.

          لا تأتي هذه العدسة في تركيب بأربعة أثلاث صغيرة، لذا أستخدم محولًا. ويعني عامل الاقتصاص 2x لتنسيق micro four Thirds أن الصور الناتجة تعادل عدسة مقاس 30 مم في إطار كامل. أجد أن هذه العدسة تتكيف بشكل جيد وتظل حادة على الرغم من أنها مصنوعة لأجهزة استشعار أكبر.

          لقد وقعت في حب هذه العدسة لأول مرة لأنني تمكنت من جعل موضوعي ضخمًا في الإطار مع الاستمرار في التقاط الكثير من الخلفية. لقد تغيرت تفضيلاتي قليلاً منذ ذلك الحين، إذ أفضّل الآن مجال رؤية أوسع، مع كون المقايضة موضوعًا أصغر في الإطار.

          يأتي Laowa 15mm مع مراوغاته. إنها عدسة يدوية بالكامل، مما يجعل الأمور أكثر تعقيدًا دائمًا. إنها أيضًا عدسة تحويل، على الرغم من أنني لا أستخدم هذه الإمكانية في الطبيعة. على عكس عدساتي الأخرى ذات الأربعة أثلاث، فإن هذه العدسات ثقيلة. البناء ليس الأكثر ضمانًا. عندما أهزها، أستطيع سماع شيء يطرق ذهابًا وإيابًا.

          E-M1 مع عدسة Laowa 15 مم f/4 ماكرو @ ISO 400، 1.5 ثانية، f/4


          3. Olympus M.zuiko 9-18mm (RIP)


          Until very recently, this lens always had a home in my bag. Although I do not consider myself a landscape photographer, sometimes I just have to take a landscape photo of the beautiful places I visit.

          Some of my favorite types of photos are where the animal is smaller in the foreground, and a lot of habitat is included in the background. (See my article Introduction to the niche hobby of herp photography for much more insight on the different types of compositions I use with reptiles and amphibians.)

          The rectilinear 9-18mm lens was great for these types of wide field of view shots. That is, until one of the flex cables likely broke. Now I get a lens attachment error immediately.

          I’m probably going to replace it with the Panasonic 9mm f/1.7 at some point.
          E-M1 + OLYMPUS M.9-18mm F4-5.6 @ 9mm, ISO 1250, 1/500, f/11.04. Laowa 15mm f4.0 wide angle macro


          For a while, the Laowa 15mm f/4 macro was my favorite lens. Certainly some of my favorite shots have been taken with this lens. What makes the Laowa 15mm so unique is that it has a fairly wide field of view while still providing 1:1 macro capabilities. This makes for unique perspectives when photographing small animals in interesting habitats.

          This lens does not come in a micro four thirds mount, so I use an adapter. The 2x crop factor of the micro four thirds format means the resulting images are equivalent to a 30mm lens on a full frame. I find this lens adapts well and remains sharp despite being made for larger sensors.

          I first fell in love with this lens because I could make my subject huge in the frame while still capturing a lot of background. My preferences have shifted a little since, as now I prefer an even wider field of view, with the tradeoff being a smaller subject in the frame.

          The Laowa 15mm does come with its quirks. It is a fully-manual lens, which always makes things trickier. It is also a shift lens, though I don’t utilize that capability out in nature. Unlike my other micro four thirds lenses, this one is heavy. The build is not the most assuring; when I shake it, I can hear something knocking back and forth.
          E-M1 w/ Laowa 15mm f/4 macro @ ISO 400, 1.5 seconds, f/4

          تعليق


          • #6

            5. لاوا 24 ملم f/14 2X مسبار ماكرو

            لا توجد قطعة أخرى من معداتي تربطني بها علاقة متوترة كهذه. من المؤكد أنه لا يوجد شيء آخر يحصل على العديد من النظرات الغريبة من المارة أكثر من عدسة التحقيق Laowa مقاس 24 مم f/14.

            فقط من خلال الاسم، يمكنك معرفة أنها عدسة غريبة. ولمن لا يعرف هذا هو شكل العدسة:


            نعم، هذا هو جبل العدسة على اليمين. يبلغ طول العدسة نفسها 16 بوصة / 40 سم.

            نظرًا لأنني كنت على دراية بمجموعة عدسات Venus Optics المتخصصة بعد استخدام الماكرو مقاس 15 مم، فقد كانت لدي آمال كبيرة في عدسة المسبار. فكرت على الفور في جميع المناظير الفريدة التي يمكن الحصول عليها باستخدام هذه العدسة، خاصة بالنظر إلى أن طرفها سيكون مقاومًا للماء.

            لذلك، قمت بالاستثمار معتقدًا أن هذه العدسة "المستحيلة" ستعمل كما كانت في ذهني. كما هو الحال مع عدسة الماكرو مقاس 15 مم، كنت بحاجة إلى محول لتثبيتها على الكاميرا الخاصة بي، ولكنها عدسة يدوية بالكامل على أي حال، لذلك لا يثير هذا الأمر سوى القليل من الاهتمام. (أتمنى أن أتمكن من الحصول على منظور كامل مقاس 24 مم، لكن هذا غير ممكن باستخدام الكاميرا ذات عامل الاقتصاص 2x).

            فمن ناحية، تلتقط هذه العدسة صورًا لا تستطيع أي عدسة أخرى التقاطها. لقد التقطت بعض الصور المفضلة لدي بهذه العدسة. كما أنه يوفر نافذة على عالم اللافقاريات المائية. لكنها بالتأكيد تأتي مع مشاكلها.

            أولاً، الفتحة الأوسع هي f/14، مما يعني أنها تسمح بدخول القليل من الضوء إلى المستشعر. وهذا يعني أنه من الضروري استخدام سرعة غالق أطول و/أو حساسية ISO أعلى، مما يجعل من الصعب التقاط صور بجودة رائعة. أيضًا، هناك شيء واحد لم أفكر فيه وهو أنه نظرًا لأنها عدسة ماكرو شديدة (قادرة على التكبير بنسبة 2:1)، والعدسة طويلة جدًا، فإن أصغر حركة للكاميرا كافية لتغيير التركيبة تمامًا وإحداث ضبابية رهيبة في الحركة . وهذا يعني أنه من الضروري دائمًا استخدام شيء ما لتحقيق الاستقرار الكامل للكاميرا، ويجعل تصوير الأهداف المتحركة شبه مستحيل. آخر معلومة مؤسفة حول هذه العدسة هي أنها الأقل حدة بين جميع عدساتي. أنا دقيق للغاية عندما يتعلق الأمر بوضوح صوري، لذلك كانت هذه خيبة أمل أخرى. لكنني أحتفظ بها على أي حال، لأنه لا توجد طريقة أخرى للقيام ببعض الأشياء الفريدة التي يمكنها القيام بها.

            DC-G9 مع عدسة مسبار Laowa مقاس 24 مم f/14 @ ISO 100، 1/250، f/14

            وبذلك تنتهي العدسات الموجودة في حقيبة الكاميرا الخاصة بي، ولكن هناك بعض العناصر الأساسية الأخرى التي أستخدمها بشكل متكرر.


            5. Laowa 24mm f/14 2X macro probe


            No other piece of equipment of mine do I have such a tense relationship with. Certainly no other gets as many weird looks from passersby than the Laowa 24mm f/14 probe lens.

            Just by the name, you can tell it’s a weird lens. For those unfamiliar, this is what the lens looks like:


            Yes, that’s the lens mount on the right. The lens itself is 16 inches / 40 cm long.

            Since I was already familiar with Venus Optics’ niche array of lenses after using their 15mm macro, I had high hopes for the probe lens. Immediately I thought of all the unique perspectives that would be possible with this lens, especially considering the tip would be waterproof.

            So, I made the investment thinking this ‘impossible’ lens would function as it did in my mind. As with the 15mm macro, I needed an adapter to mount it to my camera, but it’s an all-manual lens anyway, so that’s of little concern. (I do wish I could get the full 24mm perspective, but that’s not possible with my 2x crop-factor camera.)

            On one hand, this lens takes photos that no other lens possibly could. I’ve taken some of my very favorite images with this lens. It also provides a window into the world of aquatic invertebrates. But it definitely does come with its issues.

            First, the widest aperture is f/14, meaning it allows little light to hit the sensor. This means a longer shutter speed and/or higher ISO are necessary, making it hard to capture great images quality. Also, one thing I hadn’t considered is that because it is an extreme macro lens (capable of 2:1 magnification), and the lens is so long, the tiniest camera movement is enough to entirely alter the composition and induce terrible motion blur. This means it is always necessary to use something to completely stabilize the camera, and makes photographing moving subjects near impossible. The last unfortunate tidbit about this lens is that it is my least sharp of all my lenses. I am pretty nitpicky when it comes to the clarity of my images, so this was another disappointment. But I keep it anyway, because there’s no other way to do some of the unique things it can do.
            DC-G9 w/ Laowa 24mm f/14 probe lens @ ISO 100, 1/250, f/14
            That wraps up the lenses in my camera bag, but there are a few other key items I use frequently.

            تعليق


            • #7
              معدات الإضاءة

              تبدو معظم أهدافي في أفضل حالاتها عند إضاءتها بالضوء الاصطناعي. عادةً ما أستخدم فلاشًا خارجيًا منتشرًا لأن ذلك يمنح صوري مظهرًا مضاءًا بشكل متساوٍ.

              لقد قمت بتفجير بضع ومضات حتى الآن. أستخدم حاليًا Godox v860ii. لا يتطلب التصوير الفوتوغرافي الخاص بي الفلاش الأكثر تقدمًا في السوق. ما أبحث عنه في لمح البصر هو عمر بطارية جيد ووقت إعادة شحن سريع، حتى لا تفوتني أي لقطات.

              أقوم بتوصيل الفلاش بالكاميرا باستخدام كابل. كثيرًا ما يُسألني لماذا لا أستخدم مشغلًا عن بعد حتى يتم فصل الفلاش تمامًا عن الكاميرا. هناك بعض المزايا الرائعة للكابل. أولا، أنها موثوقة للغاية؛ لم أواجه مطلقًا مشكلات في الكابل أو أي أعطال. بعد ذلك، لا يتطلب الأمر أي بطاريات - وهو ما لا يبدو أمرًا كبيرًا، ولكن عندما تكون في الغابة مع وصول محدود للكهرباء، فإن ذلك يجعل الأمور أسهل بكثير. وأخيرا، فهو بديل أرخص.

              DC-G9 + OLYMPUS M.60mm F2.8 Macro عند 60 مم، ISO 125، 1/250، f/11.0

              أهم أجزاء إعداد الإضاءة الخاص بي هي أجهزة النشر الخاصة بي. إن ما أستخدمه هو SMDV Speedbox-50 الكبير. يعتبر هذا الناشر مثاليًا بالنسبة لي لأنه يمكن طيه ووضعه في حقيبة الكاميرا الخاصة بي بسهولة. يضمن الناشر عدم وجود ظلال قاسية أو نقاط بارزة في اللقطات.

              أود أيضًا أن أربط مظلة للتصوير الفوتوغرافي بقيمة 5 دولارات بالجزء الخارجي من حقيبتي. أقوم أحيانًا بإطلاق فلاشي من خلال المظلة، أو عكس فلاشي فيها، أو استخدامه لتظليل أو عكس أشعة الشمس. أنا أحب تعدد استخدامات مظلتي الصغيرة الرخيصة.

              أحد الجوانب المهمة في التصوير الفوتوغرافي هو أنني أحاول ألا أستخدم دائمًا نفس إعدادات الإضاءة لكل صورة. أفضّل وجود مجموعة متنوعة من طرق الإضاءة تحت حزامي للحفاظ على تنوع محفظتي.


              Lighting Equipment


              Most of my subjects look the best when illuminated by artificial light. I usually use a diffused external flash because that gives my photos a really evenly lit look.

              I’ve blown out a couple flashes by now. At the moment I use a Godox v860ii. My photography does not require the most advanced flash on the market. What I look for in a flash is good battery life and a fast recharge time, so I don’t miss any shots.

              I attach my flash to the camera using a cable. I’m often asked why I don’t just use a remote trigger so that the flash is completely detached from the camera. There are a few nice advantages of the cable. First, it is extremely reliable; I have never ever had triggering issues with the cable, or any malfunctions. Next, it doesn’t require any batteries – which doesn’t sound like a big deal, but when in the jungle with limited access to electricity, it makes things much easier. Lastly, it is a cheaper alternative.
              DC-G9 + OLYMPUS M.60mm F2.8 Macro @ 60mm, ISO 125, 1/250, f/11.0
              The most important parts of my lighting setup are my diffusers. My go-to is a large SMDV Speedbox-50. This diffuser is perfect for me because it collapses and fits into my camera bag with ease. A diffuser ensures there are no harsh shadows or specular highlights in my shots.

              I also like to strap a $5 photography umbrella to the outside of my bag. I sometimes fire my flash through the umbrella, reflect my flash in it, or use it to shade or reflect the sun. I like the versatility of my cheap little umbrella.

              An important aspect of my photography is that I try not to always use the same lighting setup for every photo. I prefer having a diverse range of lighting methods under my belt to keep my portfolio varied.

              تعليق


              • #8
                خاتمة

                هذا كل ما في حقيبتي، بجانب بعض البطاقات والبطاريات الإضافية! أتمنى أن يكون هذا المقال ممتعًا وأعطاك نظرة فاحصة على مجموعة مصور الحياة البرية، وتحديدًا مصور الأعشاب. لا توجد مجموعة مثالية في السوق، ولكن مجموعتي تعمل بشكل جيد لتلبية احتياجاتي وتحقق توازنًا جيدًا بين الوزن والسعر والأداء.


                Conclusion


                That’s all that’s in my bag, beside some extra cards and batteries! I hope this article was enjoyable and gave you a good look into the kit of a wildlife photographer, specifically a herp photographer. There’s no perfect kit out there, but mine works well for my needs and is a good balance of weight, price, and performance.

                تعليق

                يعمل...
                X