الالتقاط التلقائي من نيكون Z: Nikon Z Auto Capture: A Tutorial and Review

تقليص
X
 
  • تصفية - فلترة
  • الوقت
  • عرض
إلغاء تحديد الكل
مشاركات جديدة

  • الالتقاط التلقائي من نيكون Z: Nikon Z Auto Capture: A Tutorial and Review

    الالتقاط التلقائي من نيكون Z: برنامج تعليمي ومراجعة
    Nikon Z Auto Capture: A Tutorial and Review

    تنضم الكاميرات بشكل متزايد إلى هواتفنا وأجهزة الكمبيوتر لدينا كأجهزة حوسبة عالية التقنية. بالنسبة للبعض، قد يكون هذا سببًا للحنين إلى الأيام الخوالي للعجلات المسننة والتروس الدقيقة؛ بالنسبة للآخرين، سببا للفرح. بغض النظر عن المجموعة التي تنتمي إليها، فمن الصعب إنكار متعة الحصول على ميزات جديدة تبث الحياة في الكاميرا الخاصة بك عبر تحديث البرنامج الثابت. هذه هي الطريقة التي حصلت بها كاميرا Nikon Z9 - وZ8 منذ بضعة أيام - على وظيفة مثيرة للغاية عالية التقنية تسمى Auto Capture.

    NIKON Z 9 + NIKKOR Z مقاس 180-600 مم f/5.6-6.3 VR عند 540 مم، ISO 2800، 1/100، f/6.3

    لفترة طويلة، كان يُنظر إلى البرامج الثابتة للكاميرا على أنها شيء غير قابل للتغيير وثابت إلى الأبد. إذا كان لا بد من تغيير شيء ما، كان ذلك فقط عندما ينكسر شيء ما. حتى وقت قريب، نادرًا ما كانت البرامج الثابتة موضوعًا للمناقشات العاطفية والشائعات والتوقعات المفعمة بالأمل.

    لقد تغير ذلك، على الأقل في شركة Nikon، مع الانتقال إلى الكاميرات التي لا تحتوي على مرايا. وفجأة، نرى أن تحديث البرامج الثابتة لا يعني بالضرورة إصلاح الخلل فحسب، بل يمكنه تحسين وظائف الكاميرا بطريقة أساسية للغاية. أصبحت Z9 على وجه الخصوص دليلاً جميلاً على المكان الذي توجد فيه الإرادة، وهناك طريقة. كانت هناك بالفعل ثلاثة تحديثات رئيسية للبرامج الثابتة لهذه الكاميرا، وقد أضاف آخر تحديث (إصدار البرنامج الثابت 4.0 اعتبارًا من يونيو 2023) ميزة الالتقاط التلقائي المثيرة للاهتمام إلى القائمة، وهو موضوع مقال اليوم. تلقى مستخدمو Nikon Z8 نفس خيار البرنامج الثابت في 6 فبراير 2024.

    NIKON Z 9 + NIKKOR Z مقاس 180-600 مم وببؤرة f/5.6-6.3 VR عند 600 مم، ISO 2800، 1/100، f/6.3

    جدول المحتويات

    ماذا يفعل الالتقاط التلقائي؟ كيف يعمل الالتقاط التلقائي (وكيفية ضبط الكاميرا) أين وكيف تضع الكاميرا؟ النتائج والملخص
    Cameras are increasingly joining our phones and computers as high-tech computing devices. For some, this may be a reason to get nostalgic for the good old days of cog wheels and fine gears; for others, a reason to rejoice. Whichever group you belong to, it’s hard to deny the excitement of getting new features that breathe life into your camera via a firmware update. This is how the Nikon Z9 – and, a few days ago, the Z8 – got a very exciting high-tech function called Auto Capture.
    ​NIKON Z 9 + NIKKOR Z 180-600mm f/5.6-6.3 VR @ 540mm, ISO 2800, 1/100, f/6.3
    For a long time, camera firmware was considered to be something unchangeable and set in stone forever. If something had to be changed, it was only when something broke. Until recently, firmware was rarely the subject of passionate discussions, rumors, and hopeful anticipations.

    That changed, at least at Nikon, with the move to mirrorless cameras. Suddenly, we see that updating firmware doesn’t have to mean just fixing a bug, but can improve the functionality of a camera in a very fundamental way. The Z9 in particular has become a beautiful demonstration of where there’s a will, there’s a way. There have already been three major firmware updates for this camera, and the latest one (firmware version 4.0 from June 2023) added an interesting Auto Capture feature to the menu, which is the subject of today’s article. Nikon Z8 users just received the same firmware option on February 6, 2024.
    ​NIKON Z 9 + NIKKOR Z 180-600mm f/5.6-6.3 VR @ 600mm, ISO 2800, 1/100, f/6.3
    Table of Contents

  • #2
    ماذا يفعل الالتقاط التلقائي؟

    يشير اسم "التقاط تلقائي" إلى كاميرا تلتقط الصور بنفسها - وهو مفهوم غريب للغاية لدرجة أنني سأؤكد افتراضك: نعم، هذا ما تفعله بالفعل. في الأساس، كل ما عليك فعله هو إعداد الكاميرا بمعاملات معينة، ثم الاستلقاء على الأرجوحة مع كوب من الموهيتو بينما تقوم الكاميرا بعملها.

    أراك تهز رأسك بالاستياء وتعتقد أن هذا في الواقع انحراف في الروح الفوتوغرافية، وقمة الكسل الفوتوغرافي. وأنا أتفق مع ذلك إلى حد ما. ومع ذلك، هناك عدد من التطبيقات التي يمكن استخدام الالتقاط التلقائي فيها بطريقة مشروعة تمامًا، والتي لن يكون لديك أي فرصة للحصول على اللقطة التي تريدها.

    يمكن اعتبار الالتقاط التلقائي بمثابة مصيدة للكاميرا. كما رأيت في مقابلتي مع فلاديمير تشيك جونيور، فإن استخدام مصيدة الكاميرا يمكن أن يكون وسيلة لتجنب أكبر عقبة في تصوير الحياة البرية: المصور! لن يفلت حضورك ذاته من الحواس الشديدة لدى معظم الحيوانات، خاصة إذا اقتربت منها باستخدام عدسة واسعة الزاوية.

    NIKON Z 9 + NIKKOR Z مقاس 24-120 مم f/4 S @ 24 مم، ISO 5000، 1/160، f/5.6

    يسمح لك الالتقاط التلقائي بتعيين معلمات معينة، وإذا ظهرت هذه المعلمات في المشهد أمامك، فستلتقط الكاميرا الصورة تلقائيًا.

    إن وضع نوع من مصيدة الكاميرا هو ما أعتبره أعظم فائدة للالتقاط التلقائي. انطلاقًا من روح فلسفة روبرت كابا ("إذا لم تكن صورك جيدة بما فيه الكفاية، فأنت لست قريبًا بما فيه الكفاية")، أجد نفسي أقوم بإعداد كاميرا Z9 بالقرب من المكان الذي قد يكون فيه موضوعي لاحقًا، باستخدام الالتقاط التلقائي، والتقاط الصور التي هي أقرب مما يمكنني الحصول عليه بأي طريقة أخرى.


    What Does Auto Capture Do?


    The name “Auto Capture” implies a camera that takes pictures by itself – a concept so bizarre that I’ll confirm your assumption: Yes, this really is what it does. Essentially, all you have to do is set up the camera with certain parameters, then lie down in a hammock with a glass of mojito while the camera does its job.

    I can see you shaking your head disapprovingly and thinking that this is really a perversion of the photographic spirit, and the pinnacle of photographic laziness. I agree with that to a degree. Still, there are a number of applications where Auto Capture can be used quite legitimately, and where you would otherwise have no chance of getting the shot you want.

    Auto Capture can be loosely thought of as a camera trap. As you may have seen in my interview with Vladimír Čech Jr., using a camera trap can be a way to avoid the biggest obstacle in wildlife photography: the photographer! Your very presence will not escape the keen senses of most animals, especially if you get close to them with a wide-angle lens.
    NIKON Z 9 + NIKKOR Z 24-120mm f/4 S @ 24mm, ISO 5000, 1/160, f/5.6
    Auto Capture allows you to set certain parameters, and, if those parameters occur in the scene in front of you, the camera will automatically take a picture.

    Setting a sort of camera trap is what I see as the greatest benefit of Auto Capture. In the spirit of Robert Capa’s philosophy (“If your pictures aren’t good enough, you’re not close enough”), I find myself setting up the Z9 close to where my subject might be later, using Auto Capture, and taking photos that are closer than I could get any other way.

    تعليق


    • #3

      كيف يعمل الالتقاط التلقائي (وكيفية ضبط الكاميرا)

      يعد استخدام الالتقاط التلقائي أسهل بكثير مما كنت أتوقع. لقد فكرت شركة Nikon كثيرًا في تنفيذ ميزة الالتقاط التلقائي، وهي عملية سلسة بشكل مدهش. اسمحوا لي أن أشرح كيف يعمل وكيفية استخدامه بنفسك.

      أولاً، قبل الالتقاط التلقائي، تحتاج إلى معرفة قيم التعريض الضوئي كما تفعل في التصوير الفوتوغرافي العادي. أوصي إما بالوضع اليدوي + ISO التلقائي أو وضع أولوية فتحة العدسة + ISO التلقائي - أيهما يناسبك أكثر. يجب ضبط وضع التركيز التلقائي على AF-C. اضبط معدل التصوير المستمر على قيمة تأخذ في الاعتبار خفة حركة الحيوان. بالنسبة للكسلان، ستكون أقل سرعة إطلاق نار مستمرة كافية؛ بالنسبة للطائر الطنان، سيكون 15 إطارًا في الثانية أفضل! تحتاج أيضًا إلى تحديد ما إذا كنت تريد التقاط صور ثابتة أو فيديو. أعتقد أن معظم قرائنا مهتمون أكثر بالصور الثابتة، لكن الالتقاط التلقائي يعمل مع الفيديو أيضًا.

      الآن بالنسبة للإعدادات الخاصة بالالتقاط التلقائي. ستجد هذه الميزة باعتبارها العنصر الأخير في قائمة تصوير الصور في Nikon. إذا كنت تخطط لاستخدامه بانتظام، أوصي بوضعه في علامة التبويب "قائمتي".

      إليك كيف تبدو الخيارات:

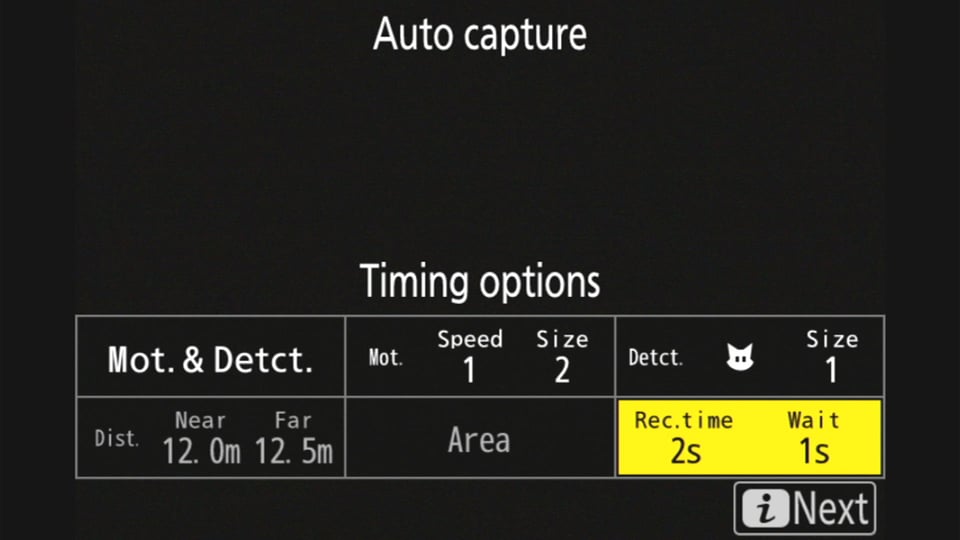
       إعدادات الالتقاط التلقائي للبقع ذات التردد العالي للحيوانات. إذا كنت تنتظر لحظة استثنائية، فمن الأفضل ضبط Rec. وقت إيقاف التشغيل والانتظار حتى 0 ثانية.

      How Auto Capture Works (andHow to Set Your Camera)


      Using Auto Capture is much easier than I expected. Nikon has put a lot of thought into the implementation of Auto Capture, and it’s surprisingly smooth. Let me explain how it works and how to use it yourself.

      First, before Auto Capture, you need to figure out your exposure values as you would for normal photography. I recommend either Manual Mode + Auto ISO or Aperture Priority Mode + Auto ISO – whichever you are more comfortable with. The autofocus mode should be set to AF-C. Set the continuous shooting rate to a value that takes into account the animal’s agility. For a sloth, the lowest continuous shooting speed will suffice; for a hummingbird, 15 FPS would be better! Also, you need to decide whether you want to capture still images or video. I believe that most of our readers are more interested in still photos, but Auto Capture does work for video, too.

      Now for the settings specific to Auto Capture. You’ll find this feature as the last item in Nikon’s Photo Shooting Menu. If you plan to use it regularly, I recommend placing it in the My Menu tab.

      Here’s how the options look:
      My Auto Capture settings for spots with high animal frequency. If you are waiting for an exceptional moment, it is better to set Rec. time to OFF and Wait to 0s.

      تعليق


      • #4

        تظهر هذه النوافذ الستة بمجرد النقر فوق "ابدأ" في قائمة الالتقاط التلقائي. الغرض من معظم المعايير التي تدخلها هو الحد من عدد المشغلات الخاطئة. إذا تركت كل شيء في الإعدادات الافتراضية، فلن ترتكب الكاميرا عادةً أي خطأ، ولكن من المحتمل أن ينتهي بك الأمر إلى مزيد من العمل باستخدام زر الحذف. ومع ذلك، دعونا ننظر إلى كل نافذة بمزيد من التفصيل.

        تحتوي النافذة الأولى في الصف العلوي (معايير الالتقاط) على ثلاثة مربعات اختيار عند النقر فوقها: الحركة، واكتشاف الموضوع، والمسافة. يحدد هذا سبب قيام الكاميرا بالتقاط صورة في المقام الأول. إذا قمت بتحديد الحركة فقط، فسيتم تشغيل الغالق عند أدنى حركة لورقة أو وهج على سطح الماء. ولهذا السبب، من الجيد أيضًا التحقق من اكتشاف الموضوع، والذي سيؤدي إلى تشغيل الغالق فقط عندما تكتشف الكاميرا الهدف المحدد. الخيار الأخير، المسافة، يسمح لك بتقييد الكاميرا لالتقاط الصور فقط عندما يكون الهدف على مسافة معينة.

        تتيح لك النافذة الثانية في الصف العلوي (الحركة) تحديد حجم الموضوع الذي يجب أن تتفاعل الكاميرا معه، بالإضافة إلى سرعة واتجاه الحركة التي ستؤدي إلى التعرض اللاحق. بالنسبة لتصوير الحياة البرية، أوصي بترك جميع الإعدادات على قيمها الافتراضية - المعروفة أيضًا باسم AKA الأكثر حساسية -. فقط إذا كنت غارقًا في مجموعة من الصور، فيجب عليك تشديد الشروط. يمكنك تضييق نطاق الصورة حسب الحجم (بحيث لا يتم تشغيل الكاميرا إلا إذا كان الهدف كبيرًا بدرجة كافية في الصورة) أو حسب الاتجاه (التقاط صورة لموضوعك فقط إذا كان يتحرك من اليسار إلى اليمين، على سبيل المثال).

        NIKON Z 9 + NIKKOR Z مقاس 180-600 مم وببؤرة f/5.6-6.3 VR عند 600 مم، ISO 3200، 1/100، f/6.3

        يتيح لك المربع الثالث الموجود في الصف العلوي (اكتشاف الموضوع) ضبط نوع الموضوع الذي يجب أن تكون الكاميرا حساسة له. ويظل باللون الرمادي ما لم تحدد "الموضوع" في النافذة الأولى. يتيح لك هذا الخيار تضييق نطاق الأهداف التي تكتشفها الكاميرا بحيث تلتقط الصور فقط عندما يكون نوع الهدف الخاص بك موجودًا في الإطار. (بالتفكير في الأمر، لا أعرف كيف أشرح أنه على الرغم من أنني قمت بتعيين اكتشاف الحيوانات بدلاً من وجوه الأشخاص، فقد قمت بتشغيل الغالق مرارًا وتكرارًا بوجهي. ولن أعتبر الأمر شخصيًا.)

        يعد المربع الأول في الصف السفلي (المسافة) طريقة مفيدة للغاية لمنح حدود الكاميرا للعمل داخلها. لن يتم التقاط صورة ما لم يتم اكتشاف الحركة في نطاق المسافة المحدد. ومع ذلك، هناك نوعان من العوائق التي يجب أن تكون على دراية بها. أولاً، لا تستطيع العدسات المُكيَّفة توصيل مسافة الهدف بدقة كافية (أو على الإطلاق). ولهذا السبب، أوصي باستخدام المسافة لعدسات Z فقط. والعقبة الثانية هي أكثر تقييدا. الحد الأدنى للمسافة التي يمكن ضبطها لا يتطابق مع معلمات العدسة المستخدمة. على سبيل المثال، يمكن ضبط عدسة Nikon مقاس 180-600 مم على مسافة لا تقل عن 12 مترًا عند 600 مم، على الرغم من أنها يمكنها التركيز البؤري من مسافة 2.4 متر. لهذا السبب، أوصي بترك خيار المسافة غير نشط للحيوانات الصغيرة


        These six windows appear as soon as you click “Start” in the Auto Capture menu. The purpose of most of the criteria you enter is to limit the number of false triggers. If you leave everything at the default settings, the camera usually won’t make a mistake, but you’ll probably end up with more work with the delete button. Still, let’s look at each window in more detail.

        The first window on the top row (Capture Criteria) has three checkboxes when you click it: Motion, Subject Detection, and Distance. This determines what causes the camera to take a photo in the first place. If you check only Motion, the shutter will be triggered at the slightest movement of a leaf or a glare on the water surface. That’s why it’s a good idea to also check Subject Detection, which will trigger the shutter only when the camera detects the selected subject. The last option, Distance, allows you to limit the camera to take photos only when the subject is at a particular distance.

        The second window on the top row (Motion) allows you to select the size of the subject that the camera should react to, as well as the speed and direction of the movement that will trigger the subsequent exposure. For wildlife photography, I recommend leaving all settings at their default – AKA most sensitive – values. Only if you are inundated with a bunch of photos should you tighten the conditions. You can narrow it down by size (so that the camera only triggers if the subject is large enough in the image) or by direction (to take a photo of your subject only if it’s moving from left to right, for example).
        NIKON Z 9 + NIKKOR Z 180-600mm f/5.6-6.3 VR @ 600mm, ISO 3200, 1/100, f/6.3
        The third box on the top row (Subject Detection) allows you to set the type of subject the camera should be sensitive to. It remains grayed-out unless you check “Subject” in the first window. This option lets you narrow down the subjects that the camera detects so that it only takes photos when your particular type of subject is in the frame. (Come to think of it, I don’t know how to explain that even though I had Animal Detection set rather than People’s Faces, I repeatedly triggered the shutter with my own face. I won’t take it personally.)

        The first box on the bottom row (Distance) is a potentially very handy way to give the camera boundaries to operate within. It won’t take a photo unless motion is detected in that particular distance range. However, there are two hitches to be aware of. First of all, adapted lenses can’t communicate the distance of the subject accurately enough (or at all). For this reason, I recommend using the distance only for Z lenses. The second hitch is even more limiting. The minimum distance that can be set does not match the parameters of the lens used. For example, the Nikon 180-600mm lens can be set to a minimum distance of 12 meters at 600mm, even though it can focus from 2.4 meters. For this reason, I recommend leaving the Distance option inactive for smaller animals

        تعليق


        • #5

          يمكّنك المربع رقم 2 الموجود في الصف السفلي (منطقة الهدف) من ضبط نقاط التركيز الدقيقة التي ستستخدمها الكاميرا لاكتشاف الهدف. يتيح لك هذا تحديد المكان الدقيق الذي ستبحث فيه الكاميرا عن موضوعك والمناطق التي ستتجاهلها. وبهذه الطريقة يمكنك بسهولة إزالة الأوراق أو العشب في المقدمة وزيادة موثوقية التركيز البؤري التلقائي. لاحظ أن هذه الميزة متاحة فقط عند تحديد التركيز البؤري التلقائي للمنطقة.

          أخيرًا، يتيح لك الخيار الأخير في الصف السفلي (خيارات التوقيت) ضبط المدة التي ستسجل فيها الكاميرا الصور أو الفيديو إذا تم استيفاء جميع الشروط المذكورة أعلاه. إذا تركت الكاميرا في وضع إيقاف التشغيل، فستسجل المشهد إلى أجل غير مسمى. وبدلاً من ذلك، إذا قمت بإدخال 3s يدويًا، على سبيل المثال، ستبدأ الكاميرا بتسلسل مدته 3 ثوانٍ (صور أو فيديو) حتى لو طار الطائر بعيدًا بعد الثانية الأولى. يحدد خيار الانتظار بعد التصوير المدة التي يجب أن تنتظرها الكاميرا بعد انتهاء التسلسل السابق قبل بدء التسلسل التالي (بافتراض استمرار استيفاء جميع شروط التسجيل).

          NIKON Z 9 + NIKKOR Z مقاس 24-120 مم f/4 S @ 91 مم، ISO 1800، 1/100، f/5.6

          من بين الخيارات الستة، الخيار الأخير هو ما سيتطلب على الأرجح أكبر قدر من الضبط وإعادة التشكيل. يمكنك ضبط الكاميرا في اتجاه واحد بينما تنتظر تلك اللقطة التي تأتي مرة واحدة في العمر لنمر الثلج، بينما تضبطها في اتجاه آخر عندما تتوقع مرور قطيع من الآلاف من الحيوانات البرية.

          في الواقع، دعونا نتفحص هذين الموقفين عن كثب. بالنسبة لمناسبات "نمر الثلج"، سأضبط الكاميرا لالتقاط أكبر قدر ممكن، مما يعني أنه سيتم ضبط مربع خيارات التوقيت على إيقاف/0، وستكون المعلمات الأخرى أكثر مرونة أيضًا (على سبيل المثال، ربما ينبغي عليك لا تقيده بمسافة أو حجم الموضوع في إطارك). ومن ناحية أخرى، بالنسبة لمثال "قطيع الحيوانات البرية"، سأكون أكثر انتقائية. سيتم ضبط خيارات التوقيت على شيء مثل 1s/3s، وهو ما يعني: "عندما يكون هناك شيء للتصوير، التقط صورًا متواصلة لمدة ثانية واحدة. ثم انتظر ثلاث ثوانٍ، وإذا كان لا يزال هناك شيء لتصويره، فقم بدفعة أخرى مدتها ثانية واحدة.

          NIKON Z 9 + NIKKOR Z مقاس 180-600 مم وببؤرة f/5.6-6.3 VR عند 600 مم، ISO 4000، 1/60، f/6.3

          بعد أن تقوم بضبط المربعات الستة كما تريد، يتم إعداد الكاميرا. لم يتبق شيء لتفعله سوى تأكيد التحديدات باستخدام الزر "i"، ثم بدء الالتقاط التلقائي بالضغط على زر تسجيل الفيديو. منتهي؟ إذا كان الأمر كذلك، فقد حان الوقت لتشعر بالراحة في الأرجوحة الشبكية أثناء الانتظار!

          من المؤكد أن ميزة الالتقاط التلقائي ستكون مفيدة ليس فقط لمصوري الحياة البرية، ولكن أيضًا للرياضة وأنواع التصوير الفوتوغرافي الأخرى. سوف تتطلب مثل هذه المجموعة المتنوعة من المواضيع إعدادات مختلفة. وقد أخذت شركة Nikon ذلك في الاعتبار من خلال السماح لك بحفظ وتسمية واستدعاء ما يصل إلى خمسة منها.

          Box #2 on the bottom row (Target Area) enables you to set the exact focus points that the camera will use to detect the subject. This allows you to determine exactly where the camera will look for your subject and which areas it will ignore. This way you can easily eliminate leaves or grass in the foreground and increase AF reliability. Note that this feature is only available when Auto-area AF is selected.

          Finally, the last option on the bottom row (Timing Options) allows you to set how long the camera will record photos or video if all the above conditions are met. If left OFF, the camera will record the scene indefinitely. Alternatively, if you manually enter 3s, for example, the camera will start a 3-second sequence (photos or video) even if the bird flies away after the first second. The Wait After Shooting option specifies how long the camera should wait after the previous sequence ends before starting the next one (assuming that all the recording conditions continue to be met).
          NIKON Z 9 + NIKKOR Z 24-120mm f/4 S @ 91mm, ISO 1800, 1/100, f/5.6
          Of the six options, the last one is what will probably require the most tuning and reconfiguration. You would have the camera set one way as you wait for that once-in-a-lifetime shot of a snow leopard, while setting it another way when you are expecting a herd of thousands of wildebeest to pass by.

          Actually, let’s examine those two situations a bit more closely. For the “snow leopard” occasions, I would set the camera to shoot as much as possible, meaning that the Timing Options box will be set to OFF/0s, and the other parameters will be looser as well (for example, you probably shouldn’t restrict it by the distance or size of the subject in your frame). On the other hand, for the “wildebeest herd” example, I would be more selective. Timing Options would be set to something like 1s/3s, which means: “When there’s something to shoot, shoot continuous photos for one second. Then wait three seconds, and if there’s still something to shoot, do another one-second burst.”
          NIKON Z 9 + NIKKOR Z 180-600mm f/5.6-6.3 VR @ 600mm, ISO 4000, 1/60, f/6.3
          After you’ve set the six boxes as you want, the camera is set up. There is nothing left to do but confirm the selections with the “i” button, then start Auto Capture by pressing the Video Rec button. Done? If so, it’s time to get comfortable in your hammock while you wait!

          Auto Capture will certainly come in handy not only for wildlife photographers, but also for sports and other genres of action photography. Such a wide variety of subjects will require different settings. Nikon has taken this into account by allowing you to save, name, and recall up to five of them.

          تعليق


          • #6
            أين وكيف تضع الكاميرا؟

            التحدي الحقيقي عند استخدام الالتقاط التلقائي لا يكمن في إعدادات الكاميرا، بل في الجانب الإبداعي. أين يجب أن تضع الكاميرا للحصول على النتائج التي تريدها؟ هذا هو المكان الذي من المفيد أن تكون فيه ليس فقط مصورًا جيدًا، ولكن أيضًا مراقبًا جيدًا.

            تعرف على المكان الذي من المرجح أن يتم العثور فيه على هدفك، ثم ضع الكاميرا وفقًا لذلك. وهذا ينطبق سواء كنت تقوم بتصوير الطيور أو الرياضيين! المواقع المثالية هي تلك التي يمكن فيها تقدير وجود الهدف بدقة كبيرة، حيث لن يكون لديك القدرة على تغيير التركيب بعد ضبطه.

            ومن الأمثلة على ذلك الغصن المكسور فوق الماء الذي ينقض منه طائر الرفراف لاصطياد سمكة. يمكن أن يكون ساقًا من القصب حيث يبحث اليعسوب عن فريسته أو يلتهمها. يمكن أن يكون الخط المكون من ثلاث نقاط حيث تعلم أن لاعب كرة السلة سوف يقفز في لحظة حرجة... الاحتمالات لا حصر لها.

            NIKON Z 9 + NIKKOR Z مقاس 24-120 مم f/4 S @ 110 مم، ISO 1400، 1/100، f/5.6

            أوصي أيضًا بالتفكير في كيفية ترتيب الكاميرا الخاصة بك. على سبيل المثال، إذا قمت بتمويه الكاميرا الخاصة بك، فسوف يقلل ذلك من مقدار الوقت الذي تستغرقه الحيوانات لبدء تجاهلها. انتبه أيضًا إلى الحامل ثلاثي القوائم الخاص بك - أقترح أن تقوم بتمديد الأرجل أكثر من المعتاد، وربما تثقل الحامل ثلاثي القوائم بحقيبة إضافية، حتى لا يتم اصطدامه إذا اصطدم غزال بغطاء العدسة! من المفيد أيضًا أخذ غطاء المطر بعين الاعتبار، خاصةً إذا لم تكن قريبًا بما يكفي من الكاميرا لإدخالها إلى الداخل إذا تغير الطقس.

            كن مستعدًا لحقيقة أنه حتى مع وجود بطارية Nikon Z9 الضخمة، يمكن أن يستنزف وضع الالتقاط التلقائي الطاقة خلال خمس ساعات تقريبًا من التصوير. بالطبع، يعتمد ذلك على عوامل كثيرة، ولكن من الضروري وجود بطاريتين على الأقل يوميًا. إذا كنت تريد إبقاء الكاميرا تعمل لفترة أطول، ففكر في مصدر طاقة خارجي. لاستخدام واحد، ما عليك سوى تنشيط توصيل الطاقة عبر USB في قائمة الإعداد، وتوصيل بنك الطاقة المناسب عبر USB-C.

            NIKON Z 9 + NIKKOR Z مقاس 24-120 مم f/4 S @ 120 مم، ISO 4000، 1/100، f/5.6


            Where and How to Position the Camera?


            The real challenge when using Auto Capture is not in the camera settings, but in the creative side. Where should you position the camera to get the results you want? This is where it pays to be not only a good photographer, but also a good observer.

            Learn where your subject is most likely to be found, and position your camera accordingly. This applies whether you’re photographing birds or athletes! Ideal spots are those where the presence of the subject can be estimated with great accuracy, since you won’t have the ability to change your composition after it’s set.

            An example would be a broken branch over the water from which a kingfisher is swooping down to catch a fish. It could be a stalk of reeds where a dragonfly is seeking or consuming its prey. It could be the three-point line where you know the basketball player will be jumping at a critical moment… The possibilities are endless.
            NIKON Z 9 + NIKKOR Z 24-120mm f/4 S @ 110mm, ISO 1400, 1/100, f/5.6
            I also recommend to put some thought into how you arrange your camera. For example, if you camouflage your camera, it will minimize the amount of time it takes for animals to start ignoring it. Also, pay attention to your tripod – I suggest splaying the legs more than usual, and maybe weighing down the tripod with an extra bag, so that it won’t be knocked over if a deer bumps into the lens hood! A rain cover is also worth considering, especially if you aren’t close enough to your camera to bring it inside if the weather takes a turn.

            Be prepared for the fact that even with the huge battery of the Nikon Z9, Auto Capture mode can drain the power in about five hours of shooting. Of course, it depends on many factors, but at least two batteries per day is a must. If you want to keep the camera running longer, consider an external power supply. To use one, just activate the USB power delivery in the Setup menu, and connect a suitable power bank via USB-C.
            NIKON Z 9 + NIKKOR Z 24-120mm f/4 S @ 120mm, ISO 4000, 1/100, f/5.6

            تعليق


            • #7

              النتائج والملخص

              حاولت في هذه المقالة الإجابة عن ماهية الالتقاط التلقائي ومتى يتم استخدامه وكيفية إعداده بشكل صحيح في القائمة. الشيء الوحيد المتبقي هو انطباعاتي عما إذا كان يعمل بشكل جيد أم لا. سأختصر الأمر: إن حقيقة أنني لم أجربه على هاتفي Z9 إلا بعد مرور ستة أشهر على طرحه هو أمر مؤسف. إنها أداة رائعة وممتازة نفذتها شركة Nikon بشكل جيد، ولم أواجه أية مشكلات معها أثناء الاختبار، باستثناء خيار "المسافة" الذي يعمل بشكل جيد فقط مع عدسات Nikon Z الأصلية (وحتى ذلك الحين، لا يسمح بالحد الأدنى الحقيقي مسافة التركيز لمعظم العدسات المستخدمة).

              في الواقع، كان خيار المسافة هو سبب فشلي الوحيد في الالتقاط التلقائي، وهو ما منعني من استخدامه لعدة أشهر. في ذلك الوقت، كنت أمتلك عدسة واسعة الزاوية مثبتة على كاميرتي، وقمت بتحديد جميع المربعات في نافذة معايير الالتقاط - بما في ذلك المسافة. ونتيجة لذلك، لم أتمكن من التقاط لقطة واحدة لطائر الرفراف الذي كنت أقوم بتصويره. تجاهلت الكاميرا بعناد وجودها على فرع على بعد حوالي 20 سم فقط. لذلك، استكشفت هذا الطريق المسدود بالنسبة لك ويمكنني أن أقول لك: "ليس بهذه الطريقة يا أصدقائي! إنها تحتاج إلى عدسة Z.

              الآن بعد أن قمت بتعطيل المسافة باستخدام العدسات غير Z، وتمكينها فقط باستخدام الزجاج الأصلي، أصبحت النتائج أكثر إرضاءً. لا يهم إذا كنت أستخدم زاوية واسعة أو مقربة - في الواقع، تتفاعل الكاميرا على الفور مع أي طائر يظهر في مجال رؤيتها. بمجرد أن اكتشفت كاميرا Z9 عينًا، ركزت عليها وبدأت على الفور في التقاط مجموعة حادة من الصور.

              NIKON Z 9 + NIKKOR Z مقاس 24-120 مم f/4 S @ 39 مم، ISO 2800، 1/160، f/5.6

              بعد تجربتي الإيجابية الأخيرة مع ميزة الالتقاط التلقائي، بدأ ذهني على الفور يفكر في عشرات الطرق لاستخدامها. سبب آخر يجعلني أتطلع إلى الربيع في أوروبا والصيف في أمريكا الجنوبية.

              Results and Summary


              In this article, I tried to answer what Auto Capture is, when to use it, and how to set it up properly in the menu. The only thing that remains is my impressions of whether it works well or not. I will be brief: The fact that I didn’t even try it out on my Z9 until six months after its introduction is, in retrospect, a shame. It’s an excellent nice tool that Nikon has implemented well, and I didn’t experience any issues with it during my testing, apart from the “Distance” option only working well with native Nikon Z lenses (and even then, not allowing the true minimum focus distance of most lenses to be used).

              In fact, the Distance option was the cause of my only failure with Auto Capture, which is what discouraged me from using it for so many months. At the time, I had an adapted wide-angle lens mounted on my camera, and I had checked all the boxes in the Capture Criteria window – including for distance. As a result, I did not get a single shot of the kingfisher I was photographing. The camera stubbornly ignored its presence on a branch only about 20 cm away. So, I explored this dead end for you and can tell you, “Not that way, my friends! It needs a Z lens.”

              Now that I’m disabling distance with my non-Z lenses, and only enabling it with native glass, the results have been much more pleasing. It doesn’t matter if I’m using a wide-angle or a telephoto – in fact, the camera reacted instantly to any bird that appeared in its field of view. As soon as the Z9 detected an eye, it focused on it and immediately started to shoot a sharp burst of photos.
              NIKON Z 9 + NIKKOR Z 24-120mm f/4 S @ 39mm, ISO 2800, 1/160, f/5.6
              After my recent, positive experiences with Auto Capture, my mind immediately started running through dozens of ways to use it. One more reason for me to look forward to spring in Europe and summer in South America.

              تعليق

              يعمل...
              X