ملحقات الكاميرا الرقمية التي يجب اقتناؤها Must-Have Digital Camera Accessories

تقليص
X
 
  • تصفية - فلترة
  • الوقت
  • عرض
إلغاء تحديد الكل
مشاركات جديدة

  • ملحقات الكاميرا الرقمية التي يجب اقتناؤها Must-Have Digital Camera Accessories

    ملحقات الكاميرا الرقمية التي يجب اقتناؤها
    Must-Have Digital Camera Accessories

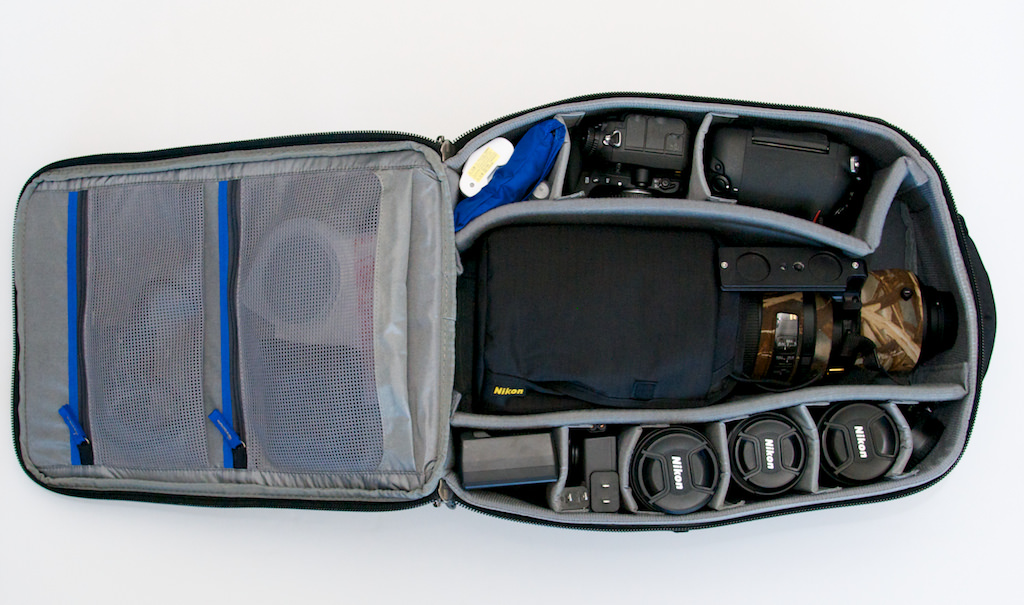
    يمتلك كل مصور مجموعة أدوات من ملحقات الكاميرا التي يتم استخدامها بكثرة في التصوير الفوتوغرافي. في حين أن بعض المصورين لديهم مجموعة كبيرة من الملحقات لكل نوع من المواقف والاحتياجات، فإن آخرين يشترون فقط ما يشعرون أنه ضروري لعملهم في التصوير الفوتوغرافي. في هذه المقالة، سأقدم بعض المعلومات التفصيلية حول الملحقات التي يجب أن تكون في حقيبة كل مصور – أسميها قائمة “يجب اقتناؤها”.


    Every photographer has a toolbox of camera accessories that are heavily used for photography. While some photographers have a large array of accessories for every type of situation and need, others only buy what they feel is necessary for their photography work. In this article, I will provide some detailed information about what accessories should be in every photographer’s bag – I call it a “must-have” list.

  • #2
    يتضمن هذا المقال:

    حقيبة كاميرا موثوقة
    بطارية إضافية
    واقي LCD
    حزام رقبة مبطن لكاميرات DSLR أو بدون مرايا
    مجموعة تنظيف العدسات
    منفاخ صاروخ جيوتو
    حامل ثلاثي قوي
    إطلاق مصراع عن بعد
    مرشح حماية للأشعة فوق البنفسجية/مرشح للعدسة
    مرشح استقطاب
    مرشح كثافة محايدة


    Table of Contents

    تعليق


    • #3
      1. حقيبة كاميرا موثوقة

      بمجرد شراء الكاميرا، فإنك تشتري حقيبة الكاميرا لأنك تريد حماية كاميراتك ونقلها بسهولة بين المواقع. لكن اختيار حقيبة الكاميرا المناسبة ليس بالأمر السهل دائمًا - فهناك العديد من الحقائب المختلفة المتاحة، مما يجعل اتخاذ القرار الصحيح أمرًا محبطًا.


      1. A Reliable Camera Bag


      As soon as you buy a camera, you buy a camera bag because you want to protect your investment and easily transport it between locations. But choosing the right camera bag is not always easy – there are so many different bags out there, that it gets frustratingly difficult to make the right decision.

      تعليق


      • #4

        في كثير من الأحيان، ينتهي الأمر بالأشخاص إلى شراء حقيبة كاميرا صغيرة، ثم استبدالها بأخرى مختلفة في غضون شهرين، مدركين أنهم بحاجة إلى مساحة أكبر للكاميرا والعدسات الخاصة بهم. هذا يحدث دائمًا، وقد حدث لي أيضًا! حصلت على أول كاميرا Nikon D80 DSLR، معتقدًا أنني لن أنفق فلسًا واحدًا أكثر على كاميرا باهظة الثمن بالفعل. لقد اشتريت حقيبة كاميرا صغيرة الحجم تناسب الكاميرا وعدستين واعتقدت أنني على ما يرام.


        Oftentimes, people end up buying a small camera bag, only to replace it in a couple of months with a different one, realizing that they need more room for their camera and lenses. This happens all the time and it also happened to me! I got my first Nikon D80 DSLR, thinking that I wouldn’t spend a penny more on an already expensive camera. I bought a compact camera bag that fits the camera and a couple of lenses and thought that I was good to go.

        تعليق


        • #5

          وفي النهاية، انتهى بي الأمر بشراء عدسة أخرى وملحقات إضافية وكانت حقيبتي صغيرة جدًا بحيث لا تتسع لكل شيء. لذلك اضطررت للذهاب وشراء حقيبة كاميرا أخرى بها مساحة أكبر. بدلاً من إهدار أموالك بهذا الشكل، يجب عليك شراء حقيبة كاميرا جيدة منذ البداية. أنا شخصياً أفضّل حقيبة الظهر، لكن بعض الناس يرتاحون لاستخدام الحقائب ذات الحبال وحقائب الكتف. وهذا ما أفضله شخصيا وأنت يجب عليك تجربته قبل الشراء... يعد متجر الكاميرات المحلي مكانًا رائعًا للبدء.


          Eventually, I ended up buying another lens and extra accessories and my bag was too small to accommodate everything. So I had to go and buy another camera bag with more room. Instead of wasting your money like this, you should buy a good camera bag from the get-go. I personally prefer a backpack, but some people like the convenience of using sling bags and shoulder bags. It is a personal preference and you should try before you buy…a local camera store is a great place to start.
          التعديل الأخير تم بواسطة غدير معروف; الساعة 01-23-2024, 03:59 PM.

          تعليق


          • #6

            أنا شخصياً أحب الحقائب من LowePro وThinkTank. تصنع شركة LowePro الطراز Lowepro ProTactic BP 350 AW II الشهير للغاية، وبالنسبة للسفر الجوي مع الكثير من المعدات، تقترب بعض الحقائب من Think Tank Photo Airport Commuter.

             الجزء الداخلي من ThinkTank Airport Commuter


            I personally like bags from LowePro and ThinkTank. LowePro makes the very popular Lowepro ProTactic BP 350 AW II and for air travel with a lot of gear, few bags come close to the Think Tank Photo Airport Commuter.
            The inside of the ThinkTank Airport Commuter

            تعليق


            • #7


              2. بطارية إضافية

              تعتبر البطارية الإضافية أحد الملحقات التي لا غنى عنها والتي ستكون مفيدة، خاصة عند السفر. إذا لم يكن لديك بطارية إضافية بالفعل، فيجب عليك شراء واحدة قبل رحلتك أو إجازتك القادمة. شيء آخر – البطاريات لا تدوم طويلاً عند التصوير في درجات حرارة باردة، لذا كن مستعدًا لعمر بطارية قصير إذا كنت تقوم بالتصوير في ظروف متجمدة.

              يلزم وجود بطارية إضافية واحدة على الأقل!

              إذا كان بإمكانك شحن بطارياتك يوميًا أثناء الرحلة، فإن معظم الأشخاص يجدون بطاريتين كافيين عند التصوير باستخدام كاميرا DSLR. إذا كان من الممكن أن تقضي بضعة أيام بدون كهرباء أو تقوم بالتصوير بدون مرآة، فستحتاج إلى ثلاثة أيام على الأقل.

              يزداد الأمر سوءًا إذا كنت تريد تصوير مقطع فيديو صغير باستخدام صورك الفوتوغرافية. في هذه الحالة، احصل على أربعة أو خمسة. ضع في اعتبارك أيضًا أنه إذا كنت ستحصل على بطاريات خارجية، فإنها لن تدوم طالما بطاريات OEM (تلك من نفس الشركة التي صنعت الكاميرا الخاصة بك).


              2. Extra Battery


              An extra battery is an indispensable accessory that will come in handy, especially when traveling. If you do not already have an extra battery, you should buy one before your next trip or vacation. One more thing – batteries do not last long when you shoot in cold temperatures, so be prepared for short battery life if you are shooting in freezing conditions.
              At least one extra battery is a must!
              If you can charge your batteries every day on a trip, then most people find two batteries sufficient when shooting with a DSLR. If you might have a few days without electricity or you shoot mirrorless, you’ll want at least three.

              It only gets worse if you want to shoot a bit of video with your photography. In that case, get four or five. Keep in mind also that if you’re going to get third-party batteries, they don’t last as long as OEM batteries (the ones from the same company who made your camera).

              تعليق


              • #8

                3. حامي شاشات الكريستال السائل

                أوصي بشدة بحماية شاشة LCD الخلفية باستخدام واقي شاشة عادي. لن تتمتع الكاميرا ذات شاشة LCD المخدوشة بقيمة إعادة بيع جيدة، لذا فإن أول شيء يجب عليك فعله لإبقائها بعيدًا عن الخدوش. تعمل واقيات شاشات الكريستال السائل بشكل رائع ويمكنك العثور عليها بأي حجم تقريبًا لتناسب شاشة LCD الخاصة بك. بمجرد حمايته، لا تنس إعادة الواقي البلاستيكي إلى مكانه إذا كان لديك واحدًا.


                3. LCD Protector


                I highly recommend protecting the rear LCD with a regular screen protector. A camera with a scratched LCD is not going to have a good resale value, so that’s the first thing you should do to keep it away from scratches. LCD protectors work great and you can find them in almost any size to fit your LCD. Once you protect it, don’t forget to put the plastic protector back in place if you have one.

                تعليق


                • #9


                  4. حزام رقبة مبطن لكاميرات DSLR أو بدون مرآة

                  يمكن أن تكون أحزمة الرقبة التي تأتي مع كاميرات بدون مرآة أو كاميرات DSLR غير مريحة. عندما تحمل كاميرا ثقيلة ومجموعة عدسات على رقبتك، يمكن أن يترك حزام الكاميرا القياسي كدمات مؤلمة على رقبتك، بعد ساعة أو ساعتين فقط من ارتداء الكاميرا.

                  لحسن الحظ، هناك العديد من أحزمة الرقبة الممتازة المتاحة اليوم مثل حزام Op/Tech Pro Loop الذي لا أستطيع العيش بدونه. إنها ناعمة ومريحة للغاية ويمكنها بسهولة حمل حزمة بطارية Nikon D700 + الثقيلة مع عدسة كبيرة مثل Nikon 70-200mm VR II دون أي مشاكل. هناك حزام كاميرا آخر يحظى بشعبية كبيرة وهو حزام BlackRapid Curve Breathe Strap من Black Rapid، لذا تحقق منه أيضًا.


                  4. Padded Neck Strap for Your DSLR or Mirrorless


                  The neck straps that come with mirrorless or DSLR cameras are can be uncomfortable. When you carry a heavy camera and lens combo on your neck, a standard camera strap can leave painful bruises on your neck, after just an hour or two of wearing the camera.

                  Luckily, there are many excellent neck straps available today such as Op/Tech Pro Loop Strap that I cannot live without. It is soft, very comfortable and can easily hold my heavy Nikon D700 + battery pack with a large lens such as Nikon 70-200mm VR II without any problems. Another super-popular camera strap is the BlackRapid Curve Breathe Strap from Black Rapid, so check it out as well.


                  تعليق


                  • #10
                    5. طقم تنظيف العدسات

                    يؤدي الغبار والأوساخ الموجودة أمام عنصر العدسة إلى تقليل تباين العدسة، مما يؤدي إلى ظهور صور غائمة. لذلك، يجب عليك دائمًا الحفاظ على نظافة العناصر الأمامية والخلفية للعدسة في جميع الأوقات. هناك الكثير من العلامات التجارية المختلفة للاختيار من بينها وأي من الحلول البصرية يجب أن يعمل بشكل جيد مثل حل Zeiss هذا.

                    6. منفاخ صاروخ جيوتو

                    يُعد Giottos Rocket Blower معجزة عندما يتعلق الأمر بنفخ الغبار من معدات الكاميرا. لا تكلف سوى عشرين دولارًا، ولكنها أداة واحدة ستحملها معك في حقيبة الكاميرا الخاصة بك في جميع الأوقات!


                    فهو يساعدني في الحفاظ على نظافة عدساتي ويقوم بعمل جيد حقًا في إزالة الغبار من مستشعر الكاميرا أثناء السفر. جربها ولن تندم.

                     سيؤدي الغبار الموجود على المستشعر إلى ظهور بقع قبيحة. يمكن لمنفاخ الصاروخ إزالة معظمها

                    يمكنك أيضًا استخدام المنفاخ الصاروخي لنفخ قطرات الماء بلطف من أجزاء معدات الكاميرا الخاصة بك إذا تعرضت للبلل قليلاً بسبب المطر.


                    5. Lens Cleaning Kit


                    Dust and dirt in front of the lens element reduces lens contrast, resulting in cloudy-looking images. Therefore, you should always keep lens front and back elements clean at all times. There are plenty of different brands to choose from and any of the optical solutions should work fine such as this Zeiss one.
                    6. Giottos Rocket Blower


                    The Giottos Rocket Blower is a miracle when it comes to blowing off dust from your camera gear. It only costs twenty bucks, but this is one tool that you will be carrying with you in your camera bag at all times!


                    It helps me keep my lenses clean and it does a really good job blowing off dust from the camera sensor when I’m traveling. Give it a try and you won’t regret it.
                    Dust on your sensor will cause unsightly spots. A rocket blower can remove most of them
                    You can also use the rocket blower to gently blow away water droplets from parts of your camera gear if it gets a little wet from the rain.

                    تعليق


                    • #11

                      7. ترايبود قوي

                      يعد الحامل ثلاثي القوائم الجيد والمتين أمرًا ضروريًا للتصوير الفوتوغرافي في الإضاءة المنخفضة والليلية والمناظر الطبيعية. لا تشترِ حوامل ثلاثية القوائم بلاستيكية رخيصة يمكن أن تنكسر بسهولة، فأنت لا ترغب في وضع معدات الكاميرا باهظة الثمن على حامل ثلاثي القوائم رديء. تأكد دائمًا من أن الحامل ثلاثي الأرجل الذي تشتريه يمكنه تحمل وزن أكبر بمرتين على الأقل من وزن الكاميرا والعدسة. لقد سمعت الكثير من قصص الرعب عن سقوط كاميرات ذات عدسات قابلة للتبديل باهظة الثمن من حوامل ثلاثية القوائم سيئة!

                      أفضل الحوامل الثلاثية من صنع شركة Gitzo، ولكنها باهظة الثمن (تبدأ من 400 دولار وما فوق). تقوم شركة Manfrotto أيضًا بتصنيع حوامل ثلاثية القوائم جيدة جدًا ويمكنك شراء أرجل الحامل ثلاثي القوائم والرأس بشكل منفصل، أو شراء نظام حامل ثلاثي القوائم. بعض أرخص الحوامل الثلاثية هي من إنتاج شركة Sunpak (سعرها أقل من 100 دولار) ويمكنك العثور عليها حتى في متاجر مثل Best Buy. لقد سمعت أيضًا أن حوامل Slik ثلاثية القوائم جيدة جدًا من حيث القيمة والسعر، مثل Slik 700DX Pro.

                      إذا حصلت على حامل ثلاثي الأرجل، فإنني أوصي بشراء حامل من ألياف الكربون إن أمكن. على الرغم من أنها أغلى ثمناً قليلاً، إلا أنها تمتص الاهتزازات بشكل أفضل والأفضل من ذلك كله، أنها أخف بكثير من الحوامل الثلاثية المصنوعة من الألومنيوم


                      7. Sturdy Tripod


                      A good, sturdy tripod is a must-have for low-light, night and landscape photography. Don’t buy cheap plastic tripods that can easily break – you do not want to put your expensive camera equipment on a crappy tripod. Always make sure that the tripod you are buying can handle at least twice more weight than your camera and lens. I have heard plenty of horror stories about expensive interchangeable lens cameras falling off from crappy tripods!

                      The best tripods are made by Gitzo, but they are expensive (starting from $400 and up). Manfrotto also manufactures very good tripods and you can buy tripod legs and a head separately, or buy a tripod system. Some of the cheapest tripods are by Sunpak (priced under $100) and you can find them even in such stores as Best Buy. I have also heard that the Slik tripods are very good in terms of value and price, such as the Slik 700DX Pro.

                      If you do get a tripod, I recommend getting a carbon fiber one if possible. Although they are a bit more expensive, they absorb vibrations better and best of all, they are much lighter than aluminum tripods

                      تعليق


                      • #12

                        8. إطلاق الغالق عن بعد

                        لا تنس الحصول على أداة تحرير الغالق عن بعد للكاميرا التي لا تحتوي على مرآة أو كاميرا DSLR بالإضافة إلى حامل ثلاثي الأرجل. يتيح لك تحرير الغالق عن بعد التقاط صورة دون الضغط على زر الغالق الموجود في الكاميرا، مما قد يتسبب في اهتزاز الكاميرا.

                        يعد الغالق عن بعد مفيدًا في التصوير الفوتوغرافي للمناظر الطبيعية والماكرو حيث يمكن أن تؤدي الاهتزازات الصادرة عن الكاميرا وإعداد الحامل ثلاثي القوائم إلى ظهور صور غير واضحة بسهولة. سوف يجد رماة الحياة البرية والأحداث استخدامًا أقل لواحد.

                         يعد تحرير الغالق عن بعد مفيدًا في التصوير الفوتوغرافي الماكرو لتقليل اهتزاز الكاميرا. نيكون D7000 + 105 مم f/2.8 @ 105 مم، ISO 100، 2 ثانية، f/3.2 © Spencer Cox

                        تحتوي العديد من الكاميرات الرقمية على أجهزة تحكم عن بعد تعمل بالأشعة تحت الحمراء، وهي خفيفة الوزن للغاية وصغيرة الحجم وأفضل ما في الأمر أنها لاسلكية. يتمتع كل من Nikon وCanon بمجموعة جيدة من إصدارات الغالق عن بعد وأوصي بالحصول على واحدة تدعم وضع "المصباح" (تعريض ضوئي لأكثر من 30 ثانية) مع قفل التعريض الضوئي. فيما يلي بعض الاحتمالات:

                        Canon BR-E1 Wireless RemoteSony RMT-P1BT Wireless RemoteVello RS-O3II مفتاح التحكم عن بعد السلكي: تأكد من تحديد نوع موصل الكاميرا قبل الشراء! إصدار مصراع التحكم عن بعد اللاسلكي Vello FreeWave Plus II: مرة أخرى، تأكد من تحديد توافق الكاميرا قبل الشراء

                        أستخدم إصدار الغالق السلكي Vello RS-O3II لجهاز Panasonic G9 الخاص بي وأجد أنه يعمل بشكل جيد جدًا. كمكافأة، لا أحتاج أبدًا إلى التفكير في البطاريات.


                        8. Remote Shutter Release


                        Don’t forget to grab a remote shutter release for your mirrorless or DSLR camera along with a tripod. A remote shutter release allows you take a picture without pressing the shutter button on the camera, which can cause camera shake.

                        A remote shutter is useful in landscape and macro photography where vibrations from your camera and tripod setup can easily cause blurred photos. Wildlife and event shooters will find less use for one.
                        A remote shutter release is useful in macro photography to mimimize camera shake. NIKON D7000 + 105mm f/2.8 @ 105mm, ISO 100, 2 seconds, f/3.2 © Spencer Cox
                        Many digital cameras have infrared remotes that are very lightweight, compact and best of all—wireless. Both Nikon and Canon have a good selection of remote shutter releases and I recommend getting one that supports “bulb” mode (more than 30 seconds exposure) with an exposure lock. Here are some possibilities:
                        1. Canon BR-E1 Wireless Remote
                        2. Sony RMT-P1BT Wireless Remote
                        3. Vello RS-O3II Wired Remote Switch: Make sure you select your camera connector type before buying!
                        4. Vello FreeWave Plus II Wireless Remote Shutter Release: Again, make sure you select your camera compatibility before buying

                        I use the Vello RS-O3II wired shutter release for my Panasonic G9 and I find it works very well. As a bonus, I don’t ever need to think about batteries.

                        تعليق


                        • #13
                          9. عدسة الأشعة فوق البنفسجية/فلتر الحماية

                          تعود على شراء فلتر حماية العدسة أثناء شراء العدسة. إذا لم يكن لديك واحدة بالفعل، فبالتأكيد قم بشراء واحدة في أقرب وقت ممكن. لا تساعد مرشحات الحماية على حماية العدسة من التلف العرضي فحسب، بل إنها تسهل أيضًا تنظيف العدسات، خاصة عندما يبرز العنصر الأمامي للعدسة في شكل دائري.

                          تعد مرشحات حماية العدسات مفيدة بشكل خاص للعدسات التي لا تحتوي على طبقات الفلور التي تطرد الغبار.

                          تأكد فقط من الحصول على مرشح عالي الجودة مثل مرشح B+W أو Hoya لأن المرشح الرخيص سيقلل بالتأكيد من جودة الصورة.

                          10. مرشح الاستقطاب

                          إذا كنت تفكر في التقاط صور للمناظر الطبيعية والهندسة المعمارية، فإن مرشح الاستقطاب هو ملحق آخر "لا بد منه". لقد كتبت مقالة عن كيفية استخدام مرشح الاستقطاب من قبل وأوصي بشدة بمراجعتها.

                          في الأساس، يمكن لمرشح الاستقطاب أن يقلل الانعكاسات من الأشياء مثل الماء والزجاج ويمكن استخدامه لتغميق السماء وإبراز السحب، مما يجعل المشهد يبدو أكثر حيوية. لا أنصح بإبقائه على عدستك في جميع الأوقات، نظرًا لأن مرشح الاستقطاب يبطئ الكاميرا عن طريق تقليل كمية الضوء التي تمر عبرها.

                           ساعد المستقطب في تقليل الانعكاسات في هذه اللقطة. كاميرا NIKON D750 + 24 مم f/1.4 @ 24 مم، ISO 50، 5 ثوانٍ، f/11.0 © نسيم منصوروف


                          9. Lens UV/Protection Filter

                          Get used to buying a lens protection filter while buying a lens. If you do not already have one, definitely buy one as soon as possible. Not only do protection filters help protect your lens from accidental damage, but they also make it easier to clean lenses, especially when the front element of the lens sticks out in a round form.

                          Lens protection filters are especially useful for lenses that do not have fluorine coatings that repel dust.

                          Just make sure to get a good-quality filter like those from B+W or Hoya because a cheap filter will definitely reduce your image quality.

                          10. Polarizing Filter

                          If you are thinking about taking pictures of landscapes and architecture, a polarizing filter is another “must-have” accessory. I wrote an article on how to use a polarizing filter before and I highly recommend that you check it out.

                          Basically, a polarizing filter can reduce reflections from objects such as water and glass and can be used to darken the sky and bring out the clouds, making the scene look much more vivid. I do not recommend keeping it on your lens at all times, since a polarizing filter slows your camera down by reducing the amount of light that passes through it.

                          A polarizer helped reduce reflections in this shot. NIKON D750 + 24mm f/1.4 @ 24mm, ISO 50, 5 sec, f/11.0 © Nasim Mansurov


                          9. Lens UV/Protection Filter


                          Get used to buying a lens protection filter while buying a lens. If you do not already have one, definitely buy one as soon as possible. Not only do protection filters help protect your lens from accidental damage, but they also make it easier to clean lenses, especially when the front element of the lens sticks out in a round form.

                          Lens protection filters are especially useful for lenses that do not have fluorine coatings that repel dust.

                          Just make sure to get a good-quality filter like those from B+W or Hoya because a cheap filter will definitely reduce your image quality.
                          10. Polarizing Filter


                          If you are thinking about taking pictures of landscapes and architecture, a polarizing filter is another “must-have” accessory. I wrote an article on how to use a polarizing filter before and I highly recommend that you check it out.

                          Basically, a polarizing filter can reduce reflections from objects such as water and glass and can be used to darken the sky and bring out the clouds, making the scene look much more vivid. I do not recommend keeping it on your lens at all times, since a polarizing filter slows your camera down by reducing the amount of light that passes through it.
                          A polarizer helped reduce reflections in this shot. NIKON D750 + 24mm f/1.4 @ 24mm, ISO 50, 5 sec, f/11.0 © Nasim Mansurov

                          تعليق


                          • #14

                            11. مرشح الكثافة المحايدة

                            يعد مرشح الكثافة المحايدة أحد الملحقات الضرورية إذا كنت تخطط لتصوير مقطع فيديو صغير مع صورك الفوتوغرافية. وذلك لأنه إذا كنت بالخارج خلال النهار، فسيكون هناك ببساطة الكثير من الضوء بالنسبة لسرعات الغالق البطيئة المطلوبة للفيديو.

                            ما هو نوع مرشح ND الذي يجب أن تحصل عليه؟ إذا كنت لا تمانع في تقييد فتحة العدسة على f/4 أو أضيق، أجد مرشحًا ذو توقفين مثل Tiffen 49mm ND 0.6 يعمل بشكل جيد. فقط تأكد من حصولك على واحدة تناسب حجم عدستك، نظرًا لأن العدسات المختلفة لها متطلبات مرشح مختلفة.

                            إذا كنت تريد تصوير فيديو بجميع أنواع الفتحات بما في ذلك f/1.8 في ضوء النهار الساطع، أقترح شيئًا مثل مرشح Tiffen مقاس 82 مم المتغير. سيسمح لك هذا بتصوير الفيديو باستخدام الفتحات الأكثر سطوعًا مع السماح بمزيد من الإضاءة للفتحات الضيقة. الجانب السلبي الوحيد للمرشحات المتغيرة هو أنها أكثر تكلفة.


                            11. Neutral Density Filter


                            A neutral density filter is a must-have accessory if you plan to shoot a little video along with your photography. That’s because if you’re outside during the day, then there will simply be too much light for the slow shutter speeds required for video.

                            What sort of ND filter should you get? If you don’t mind restricting your aperture to f/4 or narrower, I find a 2-stop filter like the Tiffen 49mm ND 0.6 to work well. Just make sure to get one for your lens size, since different lenses have different filter requirements.

                            If you want to shoot video at all sorts of apertures including f/1.8 in bright daylight, I suggest something like the Tiffen 82mm Variable filter. This will allow you to shoot video at the brightest apertures and yet let it more light for the narrow ones. The only downside to the variable filters are that they’re more expensive.

                            تعليق

                            يعمل...
                            X