كيفية تغيير ISO على باناسونيك G9 How to Change ISO on the Panasonic G9

تقليص
X
 
  • تصفية - فلترة
  • الوقت
  • عرض
إلغاء تحديد الكل
مشاركات جديدة

  • كيفية تغيير ISO على باناسونيك G9 How to Change ISO on the Panasonic G9

    كيفية تغيير ISO على باناسونيك G9
    How to Change ISO on the Panasonic G9

    تعد كاميرا Panasonic G9 إحدى الكاميرات المفضلة لدي. على عكس سلسلة GH، التي تركز بشكل أكبر على الفيديو، يعد G9 مزيجًا مثاليًا بين ميزات الصور والفيديو. في هذه المقالة، أود مشاركة بعض النصائح حول كيفية وسبب ضبط ISO على Panasonic G9.

    جدول المحتويات

    كيفية تغيير ISOما هي أوضاع ISO وiISO التلقائية؟ ما الوضع الذي يجب عليك استخدامه؟الخلاصة


    The Panasonic G9 is one of my favorite cameras. Unlike the GH series, which are more oriented towards video, the G9 is a perfect blend between photo and video features. In this article, I’d like to share some tips on how and why to set the ISO on the Panasonic G9.

    Table of Contents

  • #2
    كيفية تغيير الايزو

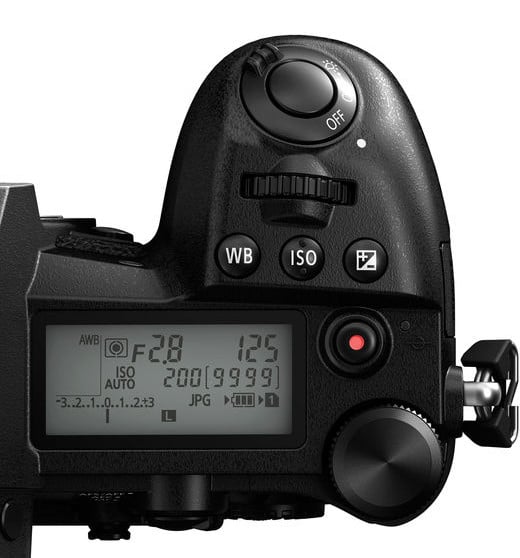
    هناك ثلاثة أوضاع ISO أساسية في Panasonic G9: يدوي، وISO تلقائي، وiISO (AKA ذكي تلقائي). من السهل التبديل بين هذه الأوضاع باستخدام زر ISO الموجود أعلى الكاميرا:


    بالضغط على زر ISO والتمرير باستخدام عجلة التمرير الخلفية، ستتمكن من تغيير ISO يدويًا من 200 إلى 25600. سيؤدي التمرير في اتجاه عقارب الساعة إلى خفض قيم ISO، بينما يؤدي التمرير في اتجاه عقارب الساعة إلى رفعها. بمجرد الانتهاء من ضبط ISO، فقط اضغط على زر ISO مرة أخرى.

    ومع ذلك، من خلال التمرير أكثر في اتجاه عقارب الساعة، سوف تصل إلى وضعي Auto ISO وiISO.


    How to Change the ISO


    There are three basic ISO modes on the Panasonic G9: manual, auto ISO, and iISO (AKA intelligent auto). It’s easy to switch between these modes by using the ISO button located on the top of the camera:


    By pressing the ISO button and scrolling with the rear scroll wheel, you will be able to change your ISO manually from 200 to 25,600. Scrolling clockwise will lower the ISO values, while counterclockwise raises them. Once you are finished setting the ISO, just press the ISO button again.

    However, by scrolling further clockwise, you will get to Auto ISO and iISO modes.

    تعليق


    • #3
      ما هي أوضاع ISO وiISO التلقائية؟

      يقوم وضع ISO التلقائي، حيث يتم عرض "ISO AUTO" على شاشة LCD العلوية، بحساب ISO المطلوب للحصول على تعريض ضوئي صحيح. غالبًا ما أستخدم Auto ISO عندما أكون في الوضع اليدوي، لأنه يتيح لي تحديد فتحة العدسة وسرعة الغالق والسماح للكاميرا بالقيام بالباقي.

      وضع iISO مختلف قليلاً. ولا يمكن استخدامه إلا في وضع أولوية الفتحة. في الواقع، لن يكون متاحًا حتى في أوضاع أولوية الغالق أو الأوضاع اليدوية. في هذا الوضع، يحاول G9 حساب ISO المطلوب للحصول على تعريض ضوئي صحيح، ولكنه يقوم أيضًا بضبط سرعة الغالق لحركة الهدف. إذا اعتقدت الكاميرا أن الهدف يتحرك بسرعة، فسوف تستخدم سرعة غالق أسرع وحساسية ISO أعلى لمحاولة تجميد الهدف.


      What are Auto ISO and iISO Modes?


      The Auto ISO mode, where “ISO AUTO” is displayed in the top LCD, simply calculates the required ISO for a correct exposure. I often use Auto ISO while I’m in manual mode, because it allows me to select an aperture and a shutter speed and let the camera do the rest.

      The iISO mode is a little different. It can only be used in aperture priority mode. In fact, it won’t even be available in shutter priority or manual modes. In this mode, the G9 attempts to calculate the ISO required for a correct exposure, but it also adjusts the shutter speed for subject movement. If the camera thinks the subject is moving quickly, then it will use a faster shutter speed and higher ISO to try and freeze the subject.


      تعليق


      • #4
        ما هو الوضع الذي يجب عليك استخدامه؟

        بالنسبة للتصوير الفوتوغرافي العام، عادةً ما أستخدم وضع ISO التلقائي. وهو يعمل في أي وضع، بما في ذلك الوضع اليدوي، ويتيح لك التركيز على متغيري التعريض الأكثر أهمية: فتحة العدسة وسرعة الغالق.

        ماذا عن وضع iISO؟ يحاول هذا الوضع تخمين سرعة الغالق الصحيحة لتجميد الحركة بناءً على موضوعك الحالي. إنه ليس خيارًا سيئًا إذا كنت في وضع أولوية الفتحة. ومع ذلك، لن تتنبأ الكاميرا دائمًا بسرعة الغالق المناسبة لمواقف الحركة السريعة. بالنسبة لشيء مثل تصوير الحياة البرية، أفضل استخدام الوضع اليدوي مع Auto ISO بدلاً من ذلك. بعد ذلك يمكنك ضبط سرعة الغالق بنفسك وضمان نتيجة حادة.

         باناسونيك G9 + Laowa 50mm f/2.8X Macro. في تصوير الحياة البرية، أفضل استخدام الوضع اليدوي مع Auto ISO. بالنسبة لهذه الصورة، اخترت يدويًا سرعة غالق قدرها 1/320 ثانية وفتحة عدسة f/4. اختار Panasonic G9 تلقائيًا ISO 800.


        Which Mode Should You Use?


        For general photography, I usually use auto ISO mode. It works in any mode, including manual mode, and it allows you to focus on the two exposure variables that matter most: aperture and shutter speed.

        What about iISO mode? This mode tries to guess the correct shutter speed for freezing movement based on your current subject. It’s not a bad choice if you’re in aperture priority mode. However, the camera will not always predict the right shutter speed for fast-moving situations. For something like wildlife photography, I prefer to use manual mode with Auto ISO instead. Then you can set the shutter speed yourself and guarantee a sharp result.
        Panasonic G9 + Laowa 50mm f/2.8X Macro. In wildlife photography, I prefer to use manual mode combined with Auto ISO. For this photo, I manually chose a shutter speed of 1/320 second and an aperture of f/4. The Panasonic G9 automatically chose an ISO of 800.

        تعليق


        • #5

          ومع ذلك، يمكن أن يكون وضع iISO مفيدًا في بعض الأحيان، كما هو الحال عند التقاط صور شخصية أو تصوير أهداف أخرى أبطأ الحركة. في هذه الحالة، عادة ما يعمل iISO بشكل جيد للغاية. من الجيد أن تكون قادرًا على ترك سرعة الغالق وISO للكاميرا، والتفكير فقط في فتحة العدسة.

          وأخيرا، ماذا عن استخدام ISO اليدوي على G9؟ على الرغم من أنني أستخدم ISO التلقائي في معظم الأوقات، إلا أن هناك بالتأكيد بعض الأسباب الصحيحة لضبط ISO يدويًا:

          أنت تقوم بتصوير المناظر الطبيعية من حامل ثلاثي الأرجل. في هذه الحالة، ستقوم بضبط ISO يدويًا على أدنى قيمة في كل مرة. تحتاج إلى أن تكون جميع إعدادات الكاميرا، بما في ذلك ISO، يدويًا لأحد الأسباب التالية: أنت تقوم بتصوير فيديو ولا تريد تغيير التعريض الضوئي في المنتصف. -لقطة. الضوء متسق تمامًا، مثل التصوير الفوتوغرافي في الاستوديو. الضوء صعب للغاية، مثل تصوير درب التبانة، مما يتسبب في فشل العداد التلقائي للكاميرا. أنت تستخدم فلاشًا وتريد التحكم الكامل فيه. في هذه الصورة للمناظر الطبيعية ، لقد قمت بتعيين ISO 200 يدويًا لأنني كنت أصور من حامل ثلاثي الأرجل ولم أرغب في أن ترفع الكاميرا ISO دون داع.


          However, the iISO mode can sometimes be useful, such as when taking portraits, or photographing other slower-moving subjects. In this case, iISO usually works very well. It’s nice to be able to leave shutter speed and ISO to the camera, and only think about aperture.

          Finally, what about using manual ISO on the G9? Although I use auto ISO most of the time, there are definitely some valid reasons to set the ISO manually:
          • You’re doing landscape photography from a tripod. In this case, you will be manually setting ISO to the lowest value every time.
          • You need all your camera settings, including ISO, to be manual for one of the following reasons:
            • You are shooting video and do not want the exposure to change mid-shot.
            • The light is totally consistent, like studio photography.
            • The light is very tricky, like Milky Way photography, causing the camera’s automatic meter to fail.
            • You’re using a flash and want full control over it.
          In this landscape photo, I manually set ISO 200 because I was shooting from a tripod and didn’t want the camera to needlessly raise the ISO.

          تعليق


          • #6
            خاتمة

            من السهل جدًا تغيير ISO على Panasonic G9، وهناك أسباب وجيهة لاستخدام كل وضع من الأوضاع. في معظم الأوقات، يكون وضع ISO التلقائي جيدًا، ولكنك ستظل ترغب في ضبط ISO يدويًا في مواقف معينة.

            آمل أن تساعدك هذه النصيحة الصغيرة في تحقيق أقصى استفادة من جهاز G9 الخاص بك!


            Conclusion


            ISO is very easy to change on the Panasonic G9, and there are valid reasons to use each of the modes. Most of the time, auto ISO mode is fine, but you’ll still want to manually set ISO in certain situations.

            I hope this little tip helped you get the most out of your G9!

            تعليق

            يعمل...
            X