كيفية استخدام شريط التصفية في لايت روم How to Use the Filter Bar in Lightroom

تقليص
X
 
  • تصفية - فلترة
  • الوقت
  • عرض
إلغاء تحديد الكل
مشاركات جديدة

  • كيفية استخدام شريط التصفية في لايت روم How to Use the Filter Bar in Lightroom


    كيفية استخدام شريط التصفية في لايت روم
    How to Use the Filter Bar in Lightroom

    يعد شريط التصفية داخل Adobe Photoshop Lightroom أحد أكثر الميزات المفيدة في البرنامج. إنها طريقة سريعة وسهلة للعثور على الصور الفوتوغرافية وتصفيتها وفقًا لمعايير محددة وفرزها بشكل صحيح لتسهيل إدارة الملفات وتنظيمها. في هذه المقالة، سنلقي نظرة فاحصة على شريط التصفية في Lightroom ونرى كيف يمكنك الاستفادة منه لأغراض مختلفة.


    The Filter Bar within Adobe Photoshop Lightroom is one of the most useful features in the software. It is a quick and easy way to find photographs, filter them out by specific criteria, and properly sort them for easy file management and organization. In this article, we will take a closer look at the filter bar in Lightroom and see how you can take advantage of it for different purposes.
    التعديل الأخير تم بواسطة غدير معروف; الساعة 01-07-2024, 11:02 AM.

  • #2
    قبل أن ندخل في التفاصيل، دعونا نلقي نظرة عامة سريعة على شريط التصفية وكيف يمكنك الوصول إليه.

    جدول المحتويات

    ما هو شريط التصفية؟
    كيفية الوصول إلى شريط التصفية شرح علامات تبويب التصفية
    التصفية المستندة إلى TextFilter المستندة إلى AttributeFilter
    المستند إلى البيانات الوصفية
    كيفية استخدام شريط التصفية لتنظيم الصور
    استخدام شريط التصفية لتحديد العدسات الأكثر شيوعًا


    Before we get into the details, let’s do a quick overview of the filter bar and how you can access it.

    Table of Contents

    تعليق


    • #3
      ما هو شريط التصفية؟

      إحدى أقوى ميزات Lightroom هي قدرته على العثور على الصور بسرعة. نظرًا لأن Lightroom يستخرج البيانات الوصفية للصورة ويحفظها تلقائيًا أثناء عملية استيراد الصورة، بما في ذلك بيانات EXIF ​​للصورة (مثل وقت / تاريخ الالتقاط، والبعد البؤري للعدسة، ومعلومات التعرض، وما إلى ذلك) في قاعدة بيانات تُعرف باسم "كتالوج Lightroom"، تصبح جميع المعلومات المستوردة قابلة للبحث. بفضل قاعدة بيانات فعالة للغاية، يستطيع Lightroom البحث في هذه البيانات بسرعة كبيرة، مما يسمح للشخص بالعثور على ما يبحث عنه بالضبط من خلال عدة نقرات.

      كما يوحي الاسم، يتحكم شريط التصفية في قدرة Lightroom المدمجة على التصفية من خلال البيانات الوصفية للصور المستوردة، ونص محدد، بالإضافة إلى المعلمات والسمات الأخرى. هناك أربع علامات تبويب متاحة للنقر عليها كمرشحات:

      النص - يسمح بالبحث عن نص محدد في اسم ملف الصورة، والكلمات الرئيسية، والعنوان، وما إلى ذلك. السمة - تسمح بتصفية الصور حسب العلامات والتعديلات والتقييم واللون ونوع الوسائط. البيانات الوصفية - تسمح بتطبيق مستوى واحد أو أكثر من المرشحات القابلة للتخصيص باستخدام البيانات الوصفية للصورة - لا شيء جميع المرشحات

      سوف نستعرض هذه واحدة تلو الأخرى أدناه.

      افتراضيًا، سيبحث Lightroom عن الصور في موقع المجلد الذي تتصفحه حاليًا، وليس الكتالوج بأكمله. إذا كنت لا تستخدم علامة التبويب "المجلدات" / الوحدة الفرعية في Lightroom، أو قمت بالنقر فوق المجلد الجذر الذي يحتوي على جميع صورك، فسوف يستخدم Lightroom قاعدة بياناته بالكامل للبحث / التصفية عبر البيانات.


      What is the Filter Bar?


      One of the most powerful features of Lightroom, is its ability to quickly find photos. Since Lightroom automatically extracts and saves image metadata during the image import process, including image EXIF data (such as capture time / date, lens focal length, exposure information, etc) into a database known as “Lightroom catalog“, all the imported information becomes searchable. Thanks to a very efficient database, Lightroom is able to search through this data very quickly, allowing one to find exactly what they are looking for through several clicks.

      As the name suggests, the Filter Bar controls Lightroom’s built-in ability to filter through imported image metadata, specific text, as well as other parameters and attributes. There are four tabs available to click as filters:
      • Text – allows searching for specific text in image filename, keywords, title, etc.
      • Attribute – allows filtering images by flags, edits, rating, color and media type.
      • Metadata – allows applying one or more levels of customizable filters using image metadata
      • None – disables all filters

      We will go through these one at a time further down below.

      By default, Lightroom will look for images in the folder location that you are currently browsing, and not the whole catalog. If you don’t use the “Folders” tab / sub-module in Lightroom, or you click on the root folder that contains all your images, Lightroom will then use its entire database to search / filter through data.

      تعليق


      • #4
        كيفية الوصول إلى شريط التصفية

        لا يمكن الوصول إلى شريط التصفية إلا من خلال وحدة المكتبة. يمكن تبديله عن طريق الضغط على المفتاح "" على لوحة المفاتيح. وبدلاً من ذلك، يمكنك استخدام قائمة "عرض" لإظهاره أو إخفائه، وذلك من خلال النقر على الخيار الثاني من الجزء العلوي "إظهار شريط التصفية". يظهر شريط التصفية نفسه أعلى شبكة الصور ويتوفر فقط في عرض الشبكة. سيؤدي الضغط على المفتاح "" في Loupe View إلى تحويلك تلقائيًا إلى Grid View ثم إظهار شريط التصفية.


        How to Access the Filter Bar


        The Filter Bar can only be accessed through the Library Module. It can be toggled by hitting the “\” key on your keyboard. Alternatively, you can use the “View” menu to show or hide it, by clicking the second option from the top “Show Filter Bar”. The Filter Bar itself appears at the top of the Image Grid and is only available in Grid View. Hitting on the “\” key in Loupe View will automatically switch you to Grid View and then show the Filter Bar.

        تعليق


        • #5
          شرح علامات تبويب التصفية

          بمجرد تشغيل شريط التصفية، ستلاحظ أن هناك ثلاث طرق لتصفية صورك - عن طريق نص بسيط أو سمة أو بيانات تعريف الصورة. لمزيد من البحث المتعمق، من الممكن دمج مرشحين منفصلين معًا، مثل السمة والبيانات الوصفية (ضع في اعتبارك أنه يمكن تشغيل مرشحين فقط في المرة الواحدة). فلنستعرض علامات التبويب الثلاث واحدة تلو الأخرى.


          Filter Tabs Explained


          Once you toggle the Filter Bar on, you will notice there are three ways to filter your images – by simple text, an attribute or image metadata. For more in-depth search, it is possible to combine two separate filters together, such as Attribute and Metadata (keep in mind that only two filters can be turned on at a time). Let’s go through the three tabs one-by-one.

          تعليق


          • #6

            تصفية على أساس النص

            إذا كنت لا تعرف من أين تبدأ البحث عن صورك وتصفيتها، فمن المحتمل أن يكون البحث المستند إلى النص هو الفلتر الأول الذي ستستكشفه. إنها أداة بسيطة جدًا تتيح لك البحث في نص محدد في صورك.


            المشكلة في هذا الفلتر هي أنه يجب أن يكون هناك نوع من النص موجود بالفعل في الكتالوج الخاص بك حتى يتمكن من العثور على أي شيء مفيد. إذا قمت باستيراد صورك دون إعادة تسميتها وكانت الملفات مثل "DSC_0001.NEF"، فلن تضع علامات على صورك باستخدام كلمات رئيسية أو عناوين أو تسميات توضيحية محددة، أو إذا كانت صورك لا تحتوي على أي بيانات وصفية / EXIF ​​(عمليات فحص الأفلام، إلخ)، فإن هذه الأداة جيدة بقدر ما هي عديمة الفائدة، لأن البيانات ببساطة غير موجودة. ومع ذلك، إذا قمت بإعادة تسمية صورك بشكل صحيح عند الاستيراد وتم وضع علامات على صورك بشكل صحيح، وكانت البيانات الوصفية للصورة موجودة، فيمكن أن يكون مرشح النص فعالاً للغاية لتحديد موقع الصور بسرعة.

            إذا قمت بتحديد "أي حقل قابل للبحث" من القائمة المنسدلة "هدف البحث" (الإعداد الافتراضي)، فاكتب أي شيء تريده في حقل البحث وسيقوم Lightroom بالبحث في جميع أنواع الحقول، بما في ذلك اسم ملف الصورة، والعنوان، والتسمية التوضيحية، والقابلة للبحث البيانات الوصفية / EXIF.

            على سبيل المثال، إذا قمت بإدخال "50"، فسيحاول Lightroom تحديد موقع أي صورة مرتبطة بهذا الرقم. سيعرض جميع الصور التي تحتوي على الرقم "50" في أسماء ملفاتها، وأي صور تحتوي على أي كلمة رئيسية تحتوي على هذا الرقم، بالإضافة إلى أي بيانات وصفية وبيانات EXIF ​​ذات صلة. على سبيل المثال، إذا تم التقاط صورة باستخدام عدسة مقاس 50 مم أو 500 مم، فستعرض تلك الصور أيضًا، تمامًا مثل الصور الملتقطة بسرعات غالق مثل 1/50، أو 1/500، أو ISO 50، أو 450، أو 500، وما إلى ذلك. إذا كان الرقم التسلسلي للكاميرا يحتوي على هذا الرقم، فسوف يعرض كل تلك الصور. في الأساس، أي مطابقة لهذا الرقم في أي من الحقول ستؤدي إلى تشغيل عامل التصفية. لذلك، فإن إجراء بحث واسع النطاق مثل هذا لن يكون مفيدًا بشكل خاص. ومع ذلك، إذا قمت بمعالجة مصطلح بحث محدد للغاية، فيمكن أن تكون هذه الأداة مفيدة للغاية.

            ضع في اعتبارك أنه يمكنك أن تكون محددًا للغاية فيما يتعلق بالمجال الذي تحاول البحث فيه، ويمكنك أيضًا تطبيق مرشحات فرعية مختلفة، مثل "يحتوي على" أو "يبدأ بـ". هناك طريقة أخرى لجعل هذا الفلتر أكثر فائدة، وهي دمجه مع علامتي التبويب "السمة" أو "البيانات الوصفية".

            أنا شخصياً نادراً ما أعتمد على هذه الأداة – أجد أن المرشحين الآخرين أكثر فائدة.


            Filter Based on Text


            If you do not know where to start searching and filtering your images, the Text-based search is probably going to be the first filter you will explore. It is a very simple tool that allows you to search through specific text in your images.

            The problem with this filter, is that there must be some kind of text already present in your catalog for it to find anything useful. If you import your images without renaming them and the files are something like “DSC_0001.NEF”, you didn’t tag your images with specific keywords, titles or captions, or if your images do not contain any metadata / EXIF (film scans, etc), then this tool is as good as useless, because the data is simply not there. However, if you properly rename your images on import and you have your images properly tagged, and image metadata is present, the text filter can actually be quite powerful for quickly locating images.

            If you select “Any Searchable Field” from the “Search Target” drop-down (default setting), type anything you like in the search field and Lightroom will search through all kinds of fields, including image file name, title, caption, searchable metadata / EXIF.

            For example, if you enter “50”, Lightroom will try to locate any image that is related to that number. It will display all images that contain number “50” in their file names, any images that have any keyword that contains that number, as well as any related metadata and EXIF data. For example, if an image was captured with a 50mm or a 500mm lens, it will display those images too, just like images captured at shutter speeds like 1/50, 1/500, or ISO 50, 450, 500, etc. Even if your camera’s serial number contains that figure, it will show all those images. Basically, any match of that number in any of the fields will trigger the filter. Therefore, doing a broad term search like that is not going to be particularly helpful. However, if you tackle a very specific search term, this tool can be very useful.

            Keep in mind that you can be very specific about the field you are trying to search, and you can also apply different sub-filters, such as “Contains” or “Starts with”. Another way to make this filter more useful, is to combine it with the “Attribute” or “Metadata” tabs.

            Personally, I rarely ever rely on this tool – I find the other two filters to be much more useful.

            تعليق


            • #7
              تصفية على أساس السمة

              تتيح لك علامة التبويب "السمة" العثور على الصور التي تحتوي على مرشحات محددة مخصصة لها. وتشمل هذه العلامات، والتعديلات، وتقييم النجوم، وتسميات الألوان. علاوة على ذلك، يمكنك أيضًا تصفية محتوى الكتالوج الخاص بك بناءً على نوع الملف (الصور الرئيسية والنسخ الافتراضية وملفات الفيديو).


              يمكن استخدام أي عدد ونوع من الفلاتر معًا، حتى تتمكن من التصفية وصولاً إلى الصور التي، على سبيل المثال، ذات تقييم أربع نجوم، وهي نسخ افتراضية، ولها تصنيف لون أحمر عن طريق تحديد السمات وفقًا لذلك.

              والأمر الأكثر فائدة هو أنه يمكنك استخدام عوامل تصفية السمات مع البحث النصي أو البحث في البيانات الوصفية. على سبيل المثال، إذا قمت بتحديد تسمية اللون الزرقاء من قسم السمات، فسيتم تقديم كافة الصور الموجودة في هذا الموقع والتي تم تخصيص اللون الأزرق لها. إذا قمت بعد ذلك بإدخال Canon في حقل البحث عن النص، فسيتم تضييق جميع الصور التي تمت تصفيتها مسبقًا إلى تلك التي لا تحمل علامة اللون الزرقاء فحسب، بل تم التقاطها أيضًا بكاميرا Canon أو التي تحتوي على كلمة "Canon" في أي كاميرا أخرى. مجال قابل للبحث.

              غالبًا ما أعتمد على علامة التبويب "السمة"، حيث أقوم بتمييز صوري بنجمة وتطبيق تسميات ألوان مختلفة، مما يجعل من السهل العثور بسرعة على صور معينة قمت بتحريرها أو وضع علامة عليها مسبقًا.


              Filter Based on Attribute


              The Attribute tab allows you to find images that have specific filters assigned to them. These include Flags, Edits, Star Rating and Color Labels. On top of that, you can also filter the content of your catalog based on file type (Master Photos, Virtual Copies and Video Files).

              Any number and type of filter can be used together, so you can filter down to images that, for example, have a four-star rating, are Virtual Copies and have a red Color Label by selecting the attributes accordingly.

              What is more useful, is that you can use Attribute filters along with Text search or Metadata search. For example, if you select the blue Color Label from the Attributes section, you will be presented with all the images in that location that have blue color assigned to them. If you then enter Canon in the text search field, all the images previously filtered will be narrowed down to those that do not only have the blue Color Label, but were also taken with a Canon camera or have the word “Canon” in any other searchable field.

              I quite often rely on the Attribute tab, since I star my images and apply differnt color labels, which makes it easy to quickly find specific images I edited, or previously tagged.

              تعليق


              • #8

                التصفية بناءً على البيانات الوصفية

                تسمى علامة تبويب التصفية الثالثة "بيانات التعريف"، وربما تكون الأكثر فائدة من بين المرشحات الثلاثة عندما يتعلق الأمر بقدرات التصفية الخاصة بها. أستخدم هذه الأداة كثيرًا عند تنظيم الصور، أو عندما أحتاج إلى العثور على صورة تم التقاطها بكاميرا أو عدسة معينة، أو مزيج من الاثنين.


                ما يجعل هذه الأداة مفيدة للغاية، هو القدرة على الاختيار بين العديد من الحقول المختلفة، مثل التاريخ، ونوع الملف، والعلم، والتقييم، والتعرض، وموقع GPS وأكثر من ذلك بكثير، مع القدرة على تطبيق مستويات مختلفة من التصفية.

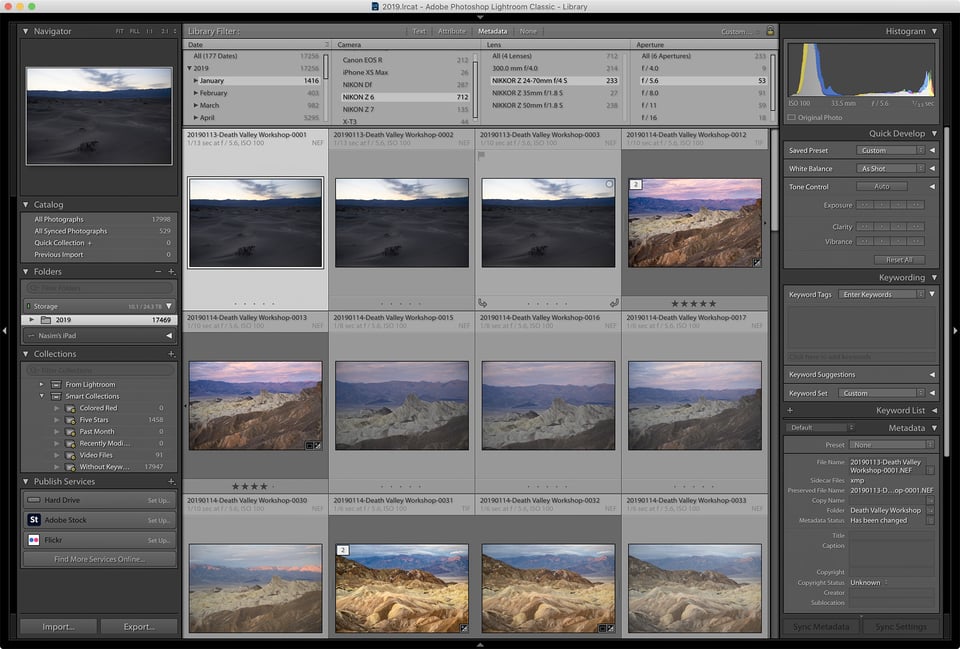
                على سبيل المثال، إذا كنت أبحث عن جميع الصور الملتقطة في شهر يناير، باستخدام كاميرا Nikon Z6 وعدسة 24-70 مم f/4 S بفتحة f/5.6، فيمكنني القيام بذلك بسهولة باستخدام هذه الأداة. ما عليك سوى تحديد "التاريخ" من القائمة المنسدلة للصف الأول، ثم النقر على "يناير". بالنسبة للصف الثاني، قمت باختيار "الكاميرا" واختر "Nikon Z6". بالنسبة للصف الثالث، قمت بتمكين مرشح "العدسة" وحدد "NIKKOR Z مقاس 24-70 مم f/4 S". أخيرًا، أختار "Aperture" في الحقل الأخير وانقر على "f/5.6". في هذه المرحلة، لدي إجمالي 53 صورة متطابقة، كما هو موضح في لقطة الشاشة أدناه:


                عندما يتعلق الأمر بالمرشحات المختلفة، يمكنك تقطيعها وتقطيعها بالطريقة التي تريدها، وبأي ترتيب. طالما أن هناك مطابقات مناسبة للمعايير التي تحددها (والتي يمثلها العدد الإجمالي على يمين القيمة)، فيجب أن تكون قادرًا على التعمق أكثر من مستوى واحد. إذا كنت لا تريد تجاوز مستوى أو مستويين، فيمكنك ببساطة اختيار قيمة "الكل" من الأعلى، أو يمكنك إزالة تلك الأعمدة بالكامل من العرض.

                بالحديث عن ذلك، أحب القدرة على إضافة أو إزالة الأعمدة في مرشح البيانات الوصفية. افتراضيًا، أحتفظ بأربعة مستويات/صفوف مختلفة لعلامة تبويب البيانات التعريفية الخاصة بي، ولكن في بعض الأحيان أقوم بإضافة أعمدة أو إزالتها، اعتمادًا على ما إذا كنت أريد أن أكون أكثر تحديدًا أو أقل. يمكنك القيام بذلك بسهولة شديدة عن طريق النقر على الأيقونة الصغيرة الموجودة على يمين العمود، ثم تحديد "إضافة عمود" أو "إزالة هذا العمود".

                إذا كانت لديك معايير بحث محددة تستخدمها طوال الوقت، فيمكنك أيضًا حفظها كقالب من الجزء العلوي الأيمن من شريط التصفية.


                Filter based on Metadata


                The third filter tab is called “Metadata”, and it is perhaps the most useful of the three filters when it comes to its filtering capabilities. I use this tool quite a bit when organizing photos, or when I need to find an image captured with a specific camera or lens, or a combination of the two.

                What makes this tool extremely useful, is the ability to choose between many different fields, such as Date, File Type, Flag, Rating, Exposure, GPS Location and much more, with the ability to apply different levels of filtering.

                For example, if I am looking for all images captured in the month of January, using the Nikon Z6 and 24-70mm f/4 S lens at f/5.6 aperture, I can easily do that with this tool. I simply select “Date” from the drop-down for the first row, then click on “January”. For the second row, I select “Camera” and choose “Nikon Z6”. For the third row I enable the “Lens” filter and select “NIKKOR Z 24-70mm f/4 S”. Finally, I select “Aperture” for the last field and click on “f / 5.6”. At this point, I have a match of 53 images in total, as shown in the screenshot below:

                When it comes to different filters, you can slice and dice them in any way you want, and in any order. As long as there are appropriate matches for the criteria you select (which is represented by the total number to the right of the value), you should be able to go deeper than 1 level. If you don’t want to go beyond one or two levels, you can simply pick the “All” value from the top, or you can completely remove those columns from view.

                Speaking of which, I love the ability to add or remove columns in the Metadata filter. By default, I keep four different levels / rows for my Metadata tab, but sometimes I add or remove columns, depending on if want to be more or less specific. You can do this very easily by clicking the little icon to the right of the column, then selecting “Add Column”, or “Remove this Column”.

                If you have specific search criteria that you use all the time, you can even save it as a template from the top right part of the filter bar.

                تعليق


                • #9
                  كيفية استخدام شريط التصفية لتنظيم الصور

                  كما ترون، يعد شريط التصفية أداة قوية للغاية، لأنه يسمح لك بتصفية الصور وعرض الصور ذات الصلة ببحثك فقط. إحدى أفضل الطرق لاستخدام هذه الأداة هي عند تنظيم الصور. إذا كان كتالوج Lightroom الخاص بك في حالة من الفوضى، فابدأ بتنظيم مجلدات الصور حسب أشياء مثل نوع الحدث. يمكنك القيام بذلك عن طريق تصفية الصور حسب تواريخ محددة لتحديد مجموعات الصور، ثم تحديد الصور المناسبة ونقلها إلى مجلد تم إنشاؤه حديثًا.

                  بمجرد فرز ملفاتك في مجلد واحد، استخدم شريط التصفية لتطبيق معايير إضافية، مثل تصنيف الصورة، أو الحالة المحررة/غير المحررة - ربما ترغب في تنظيم صورك المصنفة أو المحررة بشكل منفصل عن الباقي. هناك العديد من الطرق للقيام بذلك... قم بإلقاء نظرة على مقالتي التفصيلية حول تنظيم الصور في Lightroom للحصول على معلومات حول كيفية الحفاظ شخصيًا على كتالوج Lightroom الخاص بي نظيفًا. كتبت Meg Faehl أيضًا مقالة ممتازة حول فائدة علامة التبويب/اللوحة "البيانات الوصفية"، والتي تستحق المراجعة بالتأكيد.


                  How to Use the Filter Bar to Organize Photos


                  As you can see, the filter bar is a very powerful tool, as it allows you to filter through your images and only display those that are relevant to your search. One of the best ways to use this tool is when organizing images. If your Lightroom catalog is a mess, start by organizing image folders by things like event type. You can do that by filtering images by specific dates to identify groups of images, then select the appropriate images and move them to a newly created folder.

                  Once your files sorted in a single folder, then use the Filter Bar to apply additional criteria, such as image rating, or edited / not edited status – perhaps you want to organize your rated or edited images separately from the rest. There are many ways to do this…take a look at my detailed article on organizing images in Lightroom for information on how I personally keep my Lightroom catalog clean. Meg Faehl also wrote an excellent article on the usefulness of the Metadata tab / panel, which is definitely worth checking out.

                  تعليق


                  • #10

                    استخدام شريط التصفية لتحديد العدسات الأكثر شيوعًا

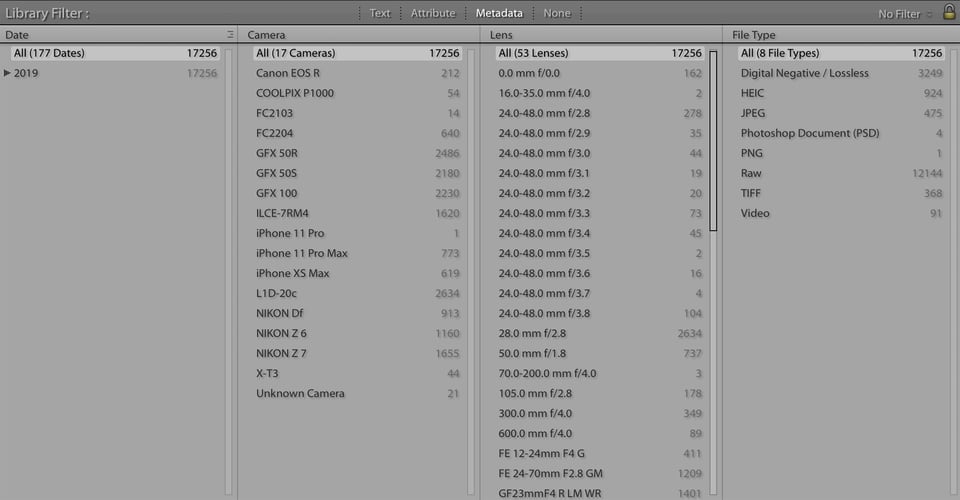
                    يمكن أن يكون شريط التصفية مفيدًا جدًا أيضًا في تحديد العدسات الأكثر شيوعًا في حقيبة الكاميرا الخاصة بك. منذ فترة كتبت مقالة مفصلة "ما هي العدسة التي تستخدمها أكثر من غيرها؟"، حيث تحدثت عن فوائد مرشح مكتبة البيانات الوصفية لتحديد العدسات التي أستخدمها أكثر من غيرها. كانت هذه الأداة مفيدة جدًا في تنظيف خزانة ملابسي وبيع العدسات التي لم أعد أستخدمها، وكانت طريقة رائعة حتى للتحقق من الأطوال البؤرية المحددة التي يبدو أنني أستخدمها أكثر عند التصوير باستخدام عدسات التكبير الخاصة بي.

                    هل كنت تستخدم شريط التصفية للتحقق من المعدات التي تستخدمها أكثر من غيرها؟ هل اتخذت قرار الشراء أو البيع بناءً عليه؟


                    Using the Filter Bar to Identify Most Popular Lenses


                    The Filter Bar can also be very useful for identifying your most popular lenses in your camera bag. A while ago I wrote a detailed article “What Lens Do You Use the Most?“, where I talked abou the benefits of the metadata library filter to identify lenses I use the most. This tool was very handy in cleaning up my closet and selling lenses I no longer use, and it was a great way to even check what particular focal lengths I apparently use more when shooting with my zoom lenses.

                    Have you been using the Filter Bar to check what equipment you use the most? Have you based your purchase or selling decisions based on it?

                    تعليق

                    يعمل...
                    X