كيفية استخدام المنحنيات في برنامج فوتوشوب How to Use Curves in Photoshop

تقليص
X
 
  • تصفية - فلترة
  • الوقت
  • عرض
إلغاء تحديد الكل
مشاركات جديدة

  • كيفية استخدام المنحنيات في برنامج فوتوشوب How to Use Curves in Photoshop

    كيفية استخدام المنحنيات في برنامج فوتوشوب
    How to Use Curves in Photoshop

    كيف يمكن للمرء استخدام المنحنيات في برنامج فوتوشوب؟ في هذه المقالة سوف نلقي نظرة تفصيلية على فهم واستخدام إحدى أقوى الأدوات في Photoshop، وهي Curves. على الرغم من وجود العديد من الأدوات لتحسين التباين في Photoshop، إلا أن المنحنيات هي الأكثر فعالية. تتجاوز المنحنيات حدود مجرد ضبط التباين. في هذه المقالة، بالإضافة إلى تحسين التباين، سنرى كيفية استخدام أداة المنحنيات لتلوين الصور الصحيحة. قبل الشروع في كيفية استخدام المنحنيات لتعزيز التباين مع المنحنيات، يمكنك الاطلاع على مقالتي،


    How does one use curves in Photoshop? In this article we will take a detailed look at understanding and using one of the most powerful tools in Photoshop, Curves. Even though there are many tools to enhance the contrast in Photoshop, curves are the most effective. Curves go beyond the limitations of merely adjusting the contrast. In this article, in addition to enhancing contrast, we will see how to use the curves tool to color correct images. Before proceeding to how to use curves to enhance contrast with curves, you can go through my article,

  • #2
    جدول المحتويات

    بدء المنحنيات
    فهم المنحنيات
    استخدام المنحنيات لإضافة نطاق ديناميكي وضبط المنحنى الدقيق باستخدام أداة الانتقاء اليدوي استخدام المنحنيات لتصحيح الألوان


    Table of Contents

    تعليق


    • #3
      منحنيات البداية

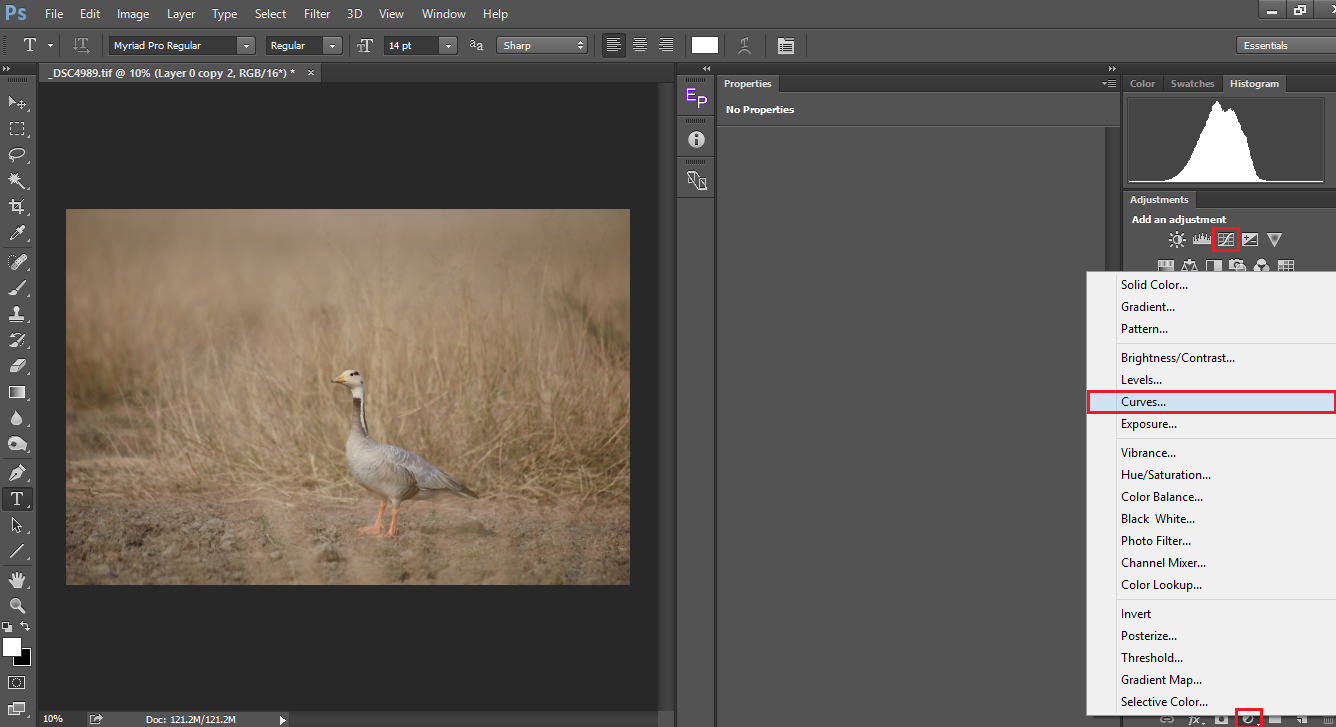
      هناك طريقتان لاستخدام المنحنيات في Photoshop. إحدى طرق القيام بذلك هي الانتقال إلى القائمة Image->Adjustments->Curves. الطريقة الثانية والأكثر فعالية هي استخدام المنحنيات كطبقة ضبط. تطبق الطريقة السابقة المنحنى مباشرة على الصورة مما يجعلها شكلاً مدمرًا من أشكال التحرير، أي لا يمكنك تعديلها لاحقًا، إلا إذا قمت بتحويلها إلى كائن ذكي. باستخدام المنحنيات كطبقة ضبط، فإنك تفعل الشيء نفسه بطريقة غير مدمرة، أي يمكنك تغيير القيم أو حتى حذف الطبقة بأكملها في أي وقت دون تغيير الصورة الأصلية. يمكنك إضافة طبقة ضبط المنحنيات إما عن طريق النقر على أيقونة إنشاء تعبئة أو تعديلات جديدة في لوحة الطبقات أو النقر مباشرة على أداة المنحنيات إذا كانت علامة التبويب "التعديلات" مفتوحة.


      Starting Curves


      There are two ways to use curves in Photoshop. One way of doing it is, by going to the menu Image->Adjustments->Curves. The second and the most effective way is to use curves as an adjustment layer. The former method applies the curve directly to the image making it a destructive form of editing ie., you cannot modify it later, unless you have converted it into a smart object. By using curves as an adjustment layer, you are doing the same in a non-destructive way, ie., you can change the values or even delete the entire layer at any point of time without altering the original image. You can add a Curves adjustment layer either by clicking on the create new fill or adjustments icon in your layers panel or directly clicking on the curves tool if you have the Adjustments tab open.


      تعليق


      • #4

        فهم المنحنيات

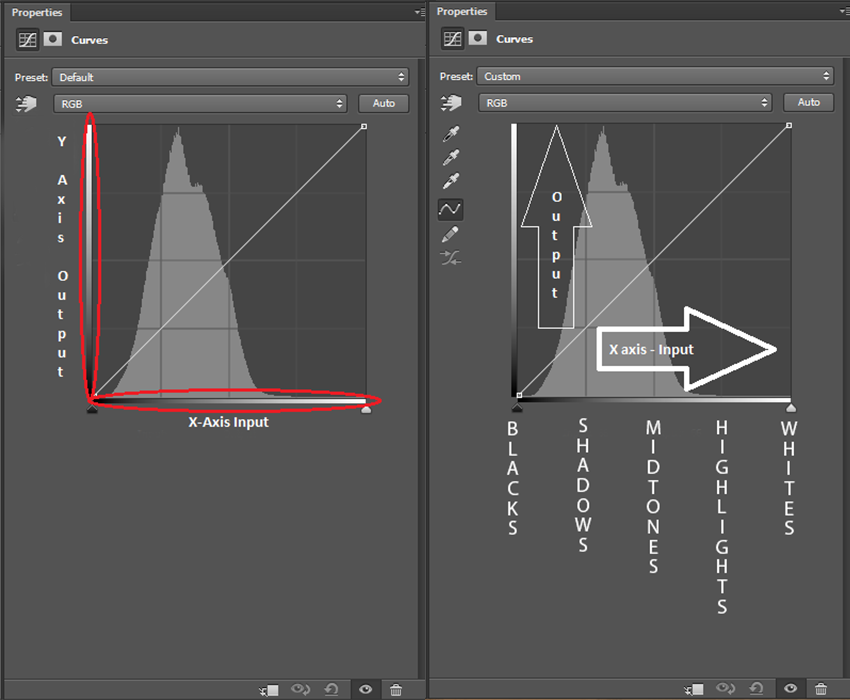
        بمجرد إنشاء طبقة ضبط المنحنيات، ترى ما هو موجود أدناه في علامة تبويب/نافذة الخصائص. تحتوي النافذة على شريطين وخط مائل ورسم بياني مدمج بداخله. دعونا أولاً نحسن ذاكرتنا حول كيفية تعريف Photoshop للبكسل. فهو يعتبر البكسل مزيجًا من الأحمر والأخضر والأزرق كأرقام من 0 إلى 255. على سبيل المثال، (0,0,0) أسود، (255,0,0) أحمر، (0,255,0) هو الأخضر، (0،0،255) أزرق، و (255،255،255) أبيض. لمزيد من المعلومات حول هذا الموضوع، يرجى الاطلاع على مقالة Spencer حول sRGB مقابل Adobe RGB مقابل ProPhotoRGB. لذا فإن الخط المائل الذي تراه يمتد عبر النافذة يمثل قيم السطوع المقابلة.


        Understanding Curves


        Once you create a curves adjustment layer, you see what is below in the properties tab/window. The window has two bars, an inclined line and a histogram embedded inside it. Let us first brush up our memory on how Photoshop defines a pixel. It considers a pixel as a combination of Red, Green & Blue as numerals from 0 to 255. For eg., (0,0,0) is black, (255,0,0) is red, (0,255,0) is green, (0,0,255) is blue and (255,255,255) is white. For more on it please go through Spencer’s article on sRGB Vs Adobe RGB Vs ProPhotoRGB. So the slanting line you see running across the window represents the corresponding luminosity values.


        تعليق


        • #5
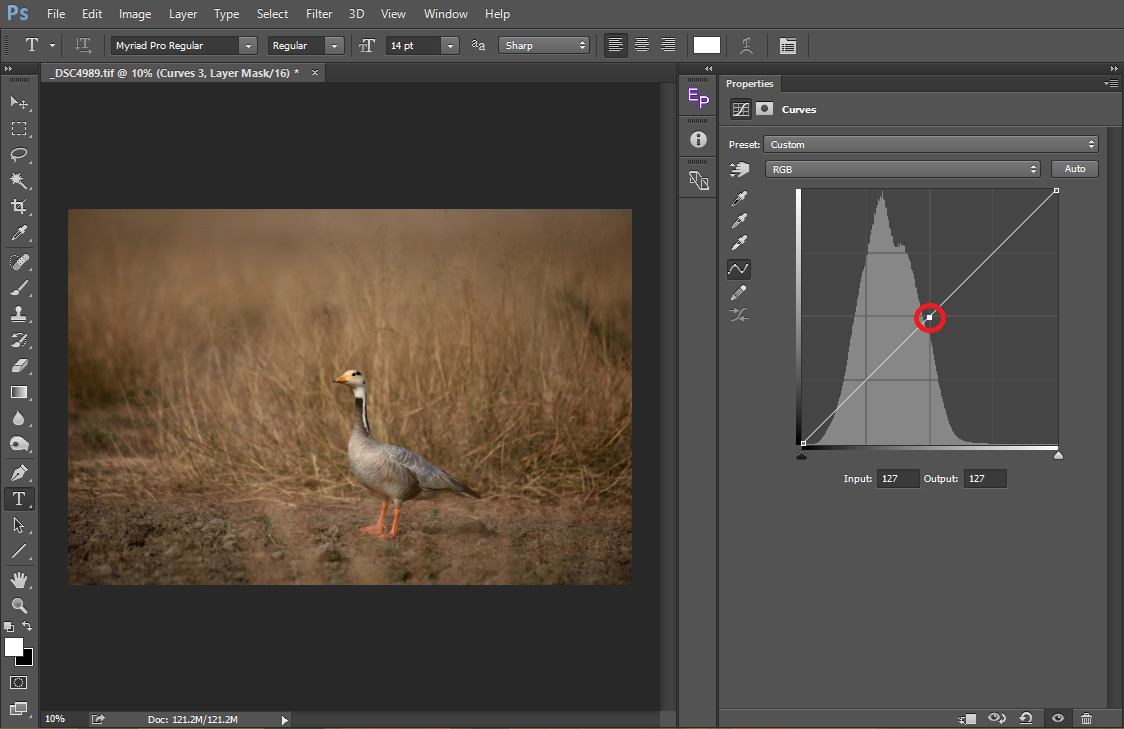
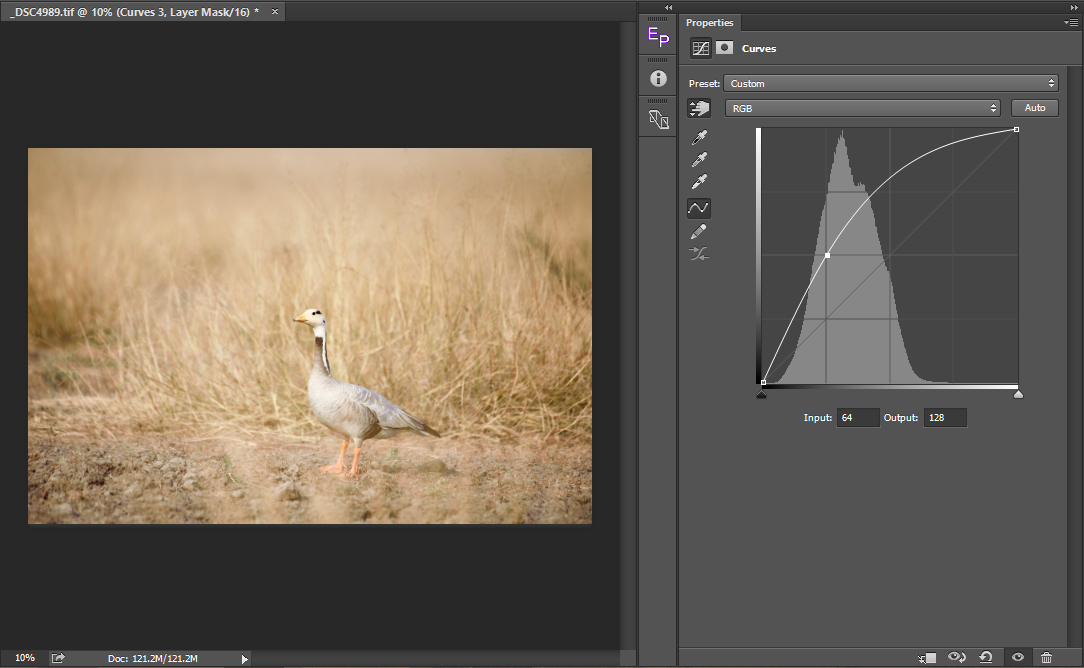
          دعونا نلقي نظرة فاحصة على الأداة. لديك شريطين (باللون الأحمر)، أحدهما يمثل المحور X والآخر يمثل المحور Y. في المحور السيني، يتوافق اليسار بشكل أكبر مع اللون الأسود (0) ويتوافق اليمين بشكل أكبر مع اللون الأبيض (255) مع وجود جميع ظلال اللون الرمادي بينهما. يمثل المحور X وحدات البكسل المدخلة. يمثل المحور Y بكسلات الإخراج. في المحور Y، يتوافق الجزء السفلي مع 0 ويمكنك رؤيته بحد أقصى عند 255 في الأعلى. لذا في النهاية، (0,0) أسود؛ (255,255) هو الأبيض و(128,128) هو الرمادي الأوسط. ألق نظرة على الصورة أدناه. لقد قمت بالنقر فوق المنحنى واخترت نقطة في المنتصف مباشرةً. كما ذكرنا سابقًا، فهو باللون الرمادي المتوسط ​​(127,127)، مما يعني أن كلا من الإدخال والإخراج متماثلان.


          Let us take a closer look at the tool. You have two bars (marked in red), one representing the X-Axis and the other representing the Y-Axis. In the X-Axis, the left most corresponds to black (0) and the right most corresponds to white (255) with all shades of grey inbetween. The X-axis represent the input pixels. The Y-Axis represent the output pixels. In the Y-Axis, the bottom corresponds 0 and you can see it max out at 255 at the top. So eventually, (0,0) is black; (255,255) is white and (128,128) are the middle greys. Take a look at the below image. I have clicked on the curve and selected a point right in the middle. As mentioned above, it is middle grey (127,127), which means both the input and the output are the same.


          تعليق


          • #6
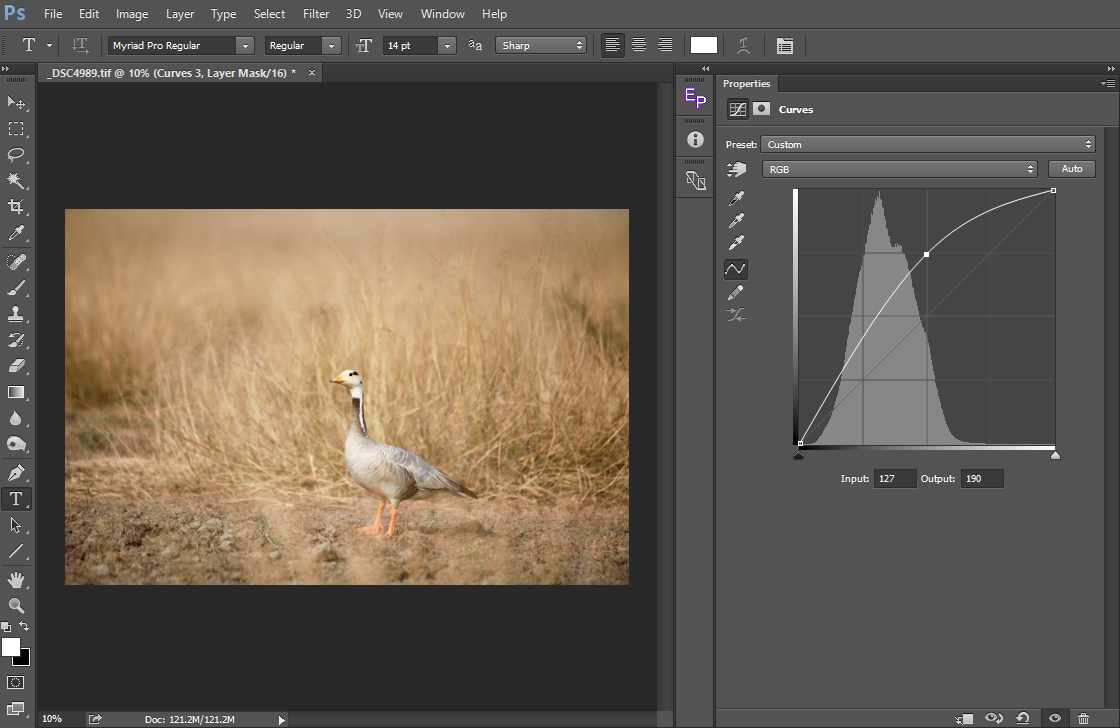
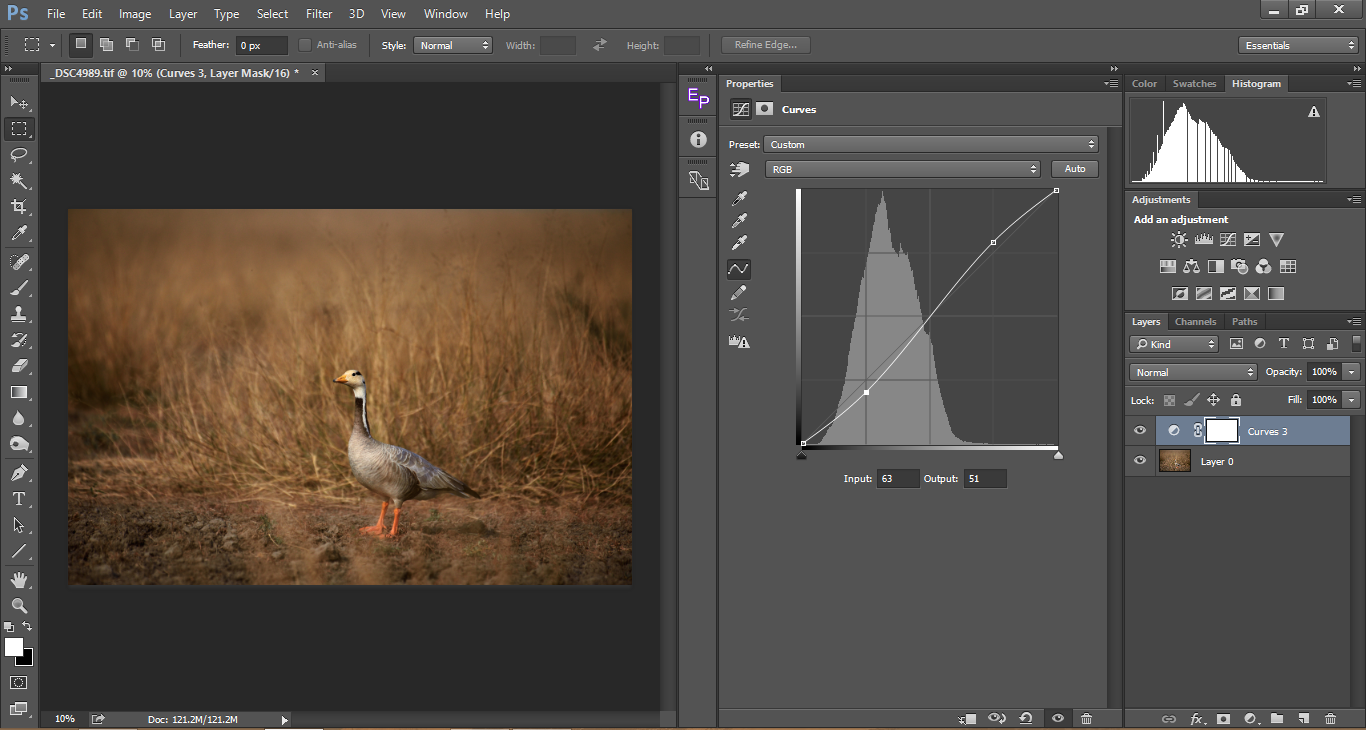
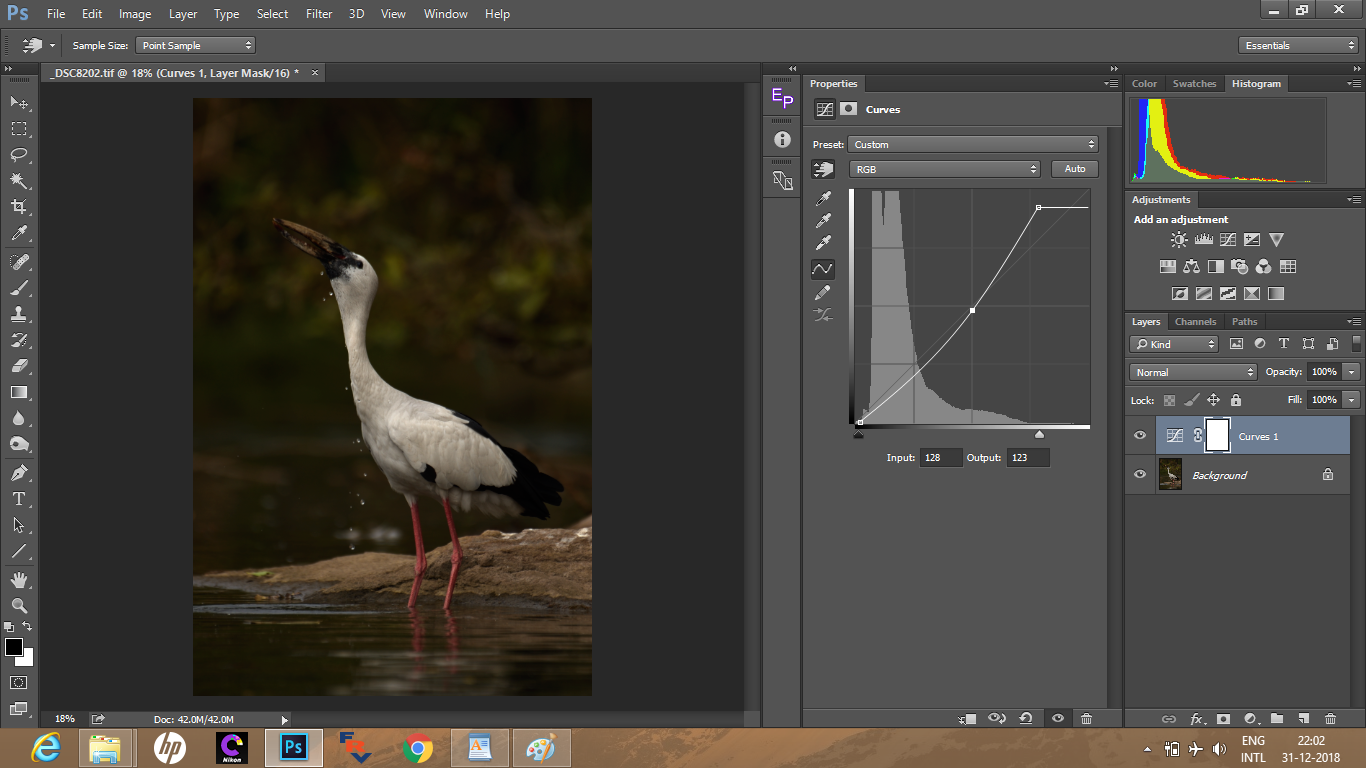
            عندما نسحب النقطة لأعلى، كما هو موضح في الصورة أدناه، يبقى الإدخال عند 127 (وهو ما لم يتغير في المحور X) بينما نرى الإخراج (المحور y) يزداد إلى 190. ما فعلناه هو، لقد اخترنا جميع وحدات البكسل التي يبلغ عددها 127 وقمنا بزيادتها إلى 190، مما جعل تلك البكسلات أكثر سطوعًا. بمعنى آخر، قمنا بنقل جميع وحدات البكسل والدرجات اللونية النصفية إلى الأماكن البارزة ونتيجة لذلك يمكنك أن ترى أن الصورة أصبحت الآن مكشوفة بشكل زائد. لقد تعمدت زيادتها بهامش كبير لإظهار النتيجة الواضحة. نحصل دائمًا على أفضل النتائج عندما نجري التغييرات الدقيقة.


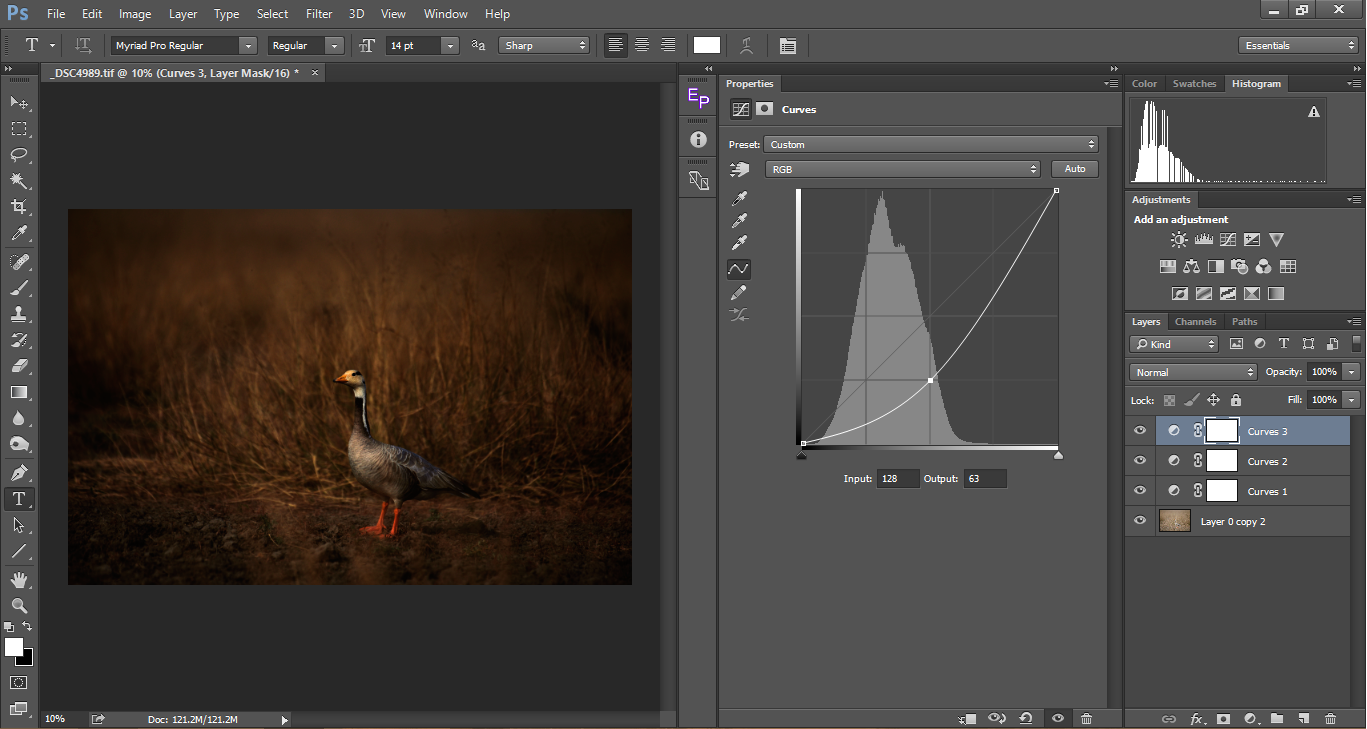
            والآن، بالمثل، دعونا نرى ما سيحدث عندما نسحبه إلى الأسفل. يظل الإدخال كما هو عند 128، بينما نرى الإخراج يتناقص إلى 63. ما فعلناه هنا هو أننا نقلنا جميع وحدات البكسل من الدرجات اللونية النصفية إلى الظلال، وبالتالي جعل الصورة تبدو أكثر قتامة.


            When we drag the point upwards, as shown in the picture below, the input stays at 127 (which is unchanged in the X-Axis) whereas, we see the output (y-axis) increase to 190. What we have done is, we have selected all the pixels that are 127 and increased them to 190, making those pixels brighter. In other words, we have moved all the pixels in midtones to the highlights and as a result you can see that the image is now over-exposed. I have deliberately increased it by a big margin to show the evident result. We always get the best results when we make the changes subtle.


            Now, similarly, let us see what happens when we drag it down. The input remains the same at 128, whereas we see the output decreasing to 63. Here what we have done is, we moved all the pixels from the midtones to the shadows, hence making the image look darker.


            تعليق


            • #7
              عندما نحرك النقطة المحددة على طول المحور Y نرى أن الناتج يتغير وفقًا لذلك. وبالمثل، عندما نحرك النقطة المحددة على طول المحور السيني، تتغير نقاط الإدخال وفقًا لذلك ويظل الإخراج كما هو مرة أخرى مما يجعل وحدات البكسل أكثر سطوعًا أو أغمق اعتمادًا على الجانب الذي نحركه.


              When we move the selected point along the Y-Axis we saw that the output changes accordingly. Similarly, when we move the selected point along the X-Axis, the input points change accordingly and the output remains the same again making the pixels brighter or darker depending upon which side we move it.


              تعليق


              • #8
                لتلخيص ذلك، عندما نحصل على منحنى على شكل حرف 'U'، تظهر الصورة أكثر قتامة وعندما نحصل على منحنى 'n'، تظهر الصورة أكثر سطوعًا. بدلاً من تحديد نقطة واحدة فقط على المنحنى، يمكننا تحديد أي عدد من النقاط وإجراء التعديل المقابل. بالعودة إلى التباين، كيف يمكننا إضافة التباين؟ من خلال جعل الألوان الفاتحة أكثر إشراقًا والظلام أغمق. للقيام بذلك، نحدد نقطة على الإبرازات ونسحبها للأعلى، مما يؤدي إلى زيادة وحدات البكسل الخاصة بها وجعلها أكثر سطوعًا. على الجانب الآخر، نحدد بكسلًا على الظلال ونسحبه لأسفل مما يجعل اللون الداكن أكثر قتامة. والنتيجة هي منحنى "S" نموذجي.


                To summarize, when we get a ‘U’ shaped curve, the image appears darker and when we get a ‘n’ curve, the image appears brighter. Instead of selecting just one point on the curve, we can select any number of points and make the corresponding adjustment. Getting back to contrast, how do we add contrast? By making the brights brighter and darks darker. To do that, we select a point on the highlights and drag it up, increasing its pixels and making it brighter. On the other side, we select a pixel on the shadows and drag it down making the darks darker. The result is a typical ‘S’ Curve.


                تعليق


                • #9

                  فيما يلي بعض النقاط التي يجب مراعاتها عند استخدام المنحنيات:

                  تضيف منحنيات 'n' ضوءًا إلى الصورة ولكنها تقلل من التباين، منحنيات 'U' تجعل الصورة أكثر قتامة ولكنها تزيد من التباين، منحنيات 'S' هي الأكثر تفضيلاً لأنها تضيف تباينًا دون جعل الصورة العامة داكنة، بينما تعمل منحنيات 'S' العكسية على استعادة التفاصيل في الظلال. ولكن قم بإسقاط التباين العام للصورة.


                  Below are a few points to have in mind when using curves:
                  • ‘n’ curves add light to the image but decreases contrast
                  • ‘U’ curves make the image darker but increases contrast
                  • ‘S’ curves are the most preferred as they add contrast without making the overall picture dark
                  • Inverse ‘S’ curves recovers details in the shadows, but bring down the overall contrast of the image.

                  تعليق


                  • #10
                    استخدام المنحنيات لإضافة النطاق الديناميكي

                    في بعض الأحيان ينتهي بنا الأمر بصور ذات نطاق ديناميكي ضيق. يحدث هذا غالبًا مع الضوء الناعم. في معظم الأحيان، تعطي الصورة تأثيرًا سلسًا وممتعًا، ولكن في بعض الأحيان، تجعل الصورة تبدو مسطحة. في مثل هذه السيناريوهات، تأتي أداة المنحنيات للمساعدة في سحب أقصى نطاق ديناميكي ممكن للصورة دون قص الظلال أو الإبرازات.


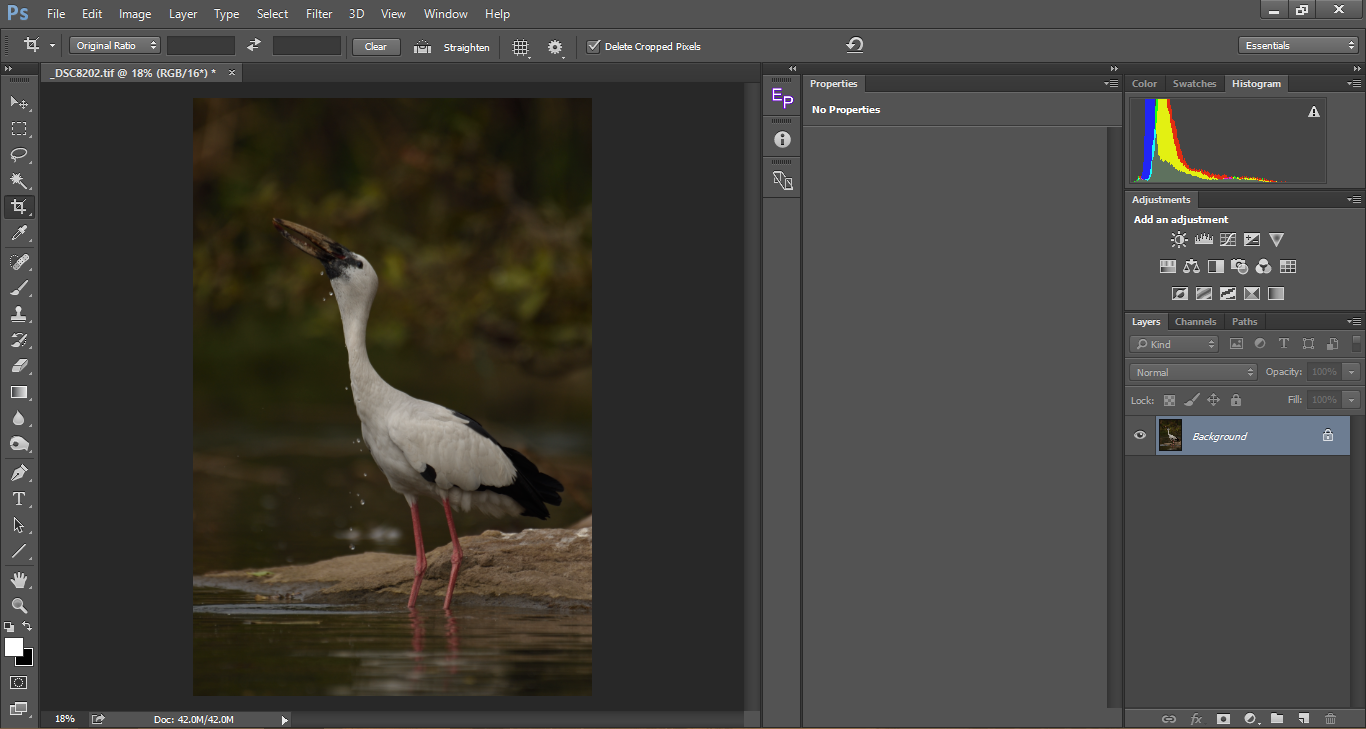
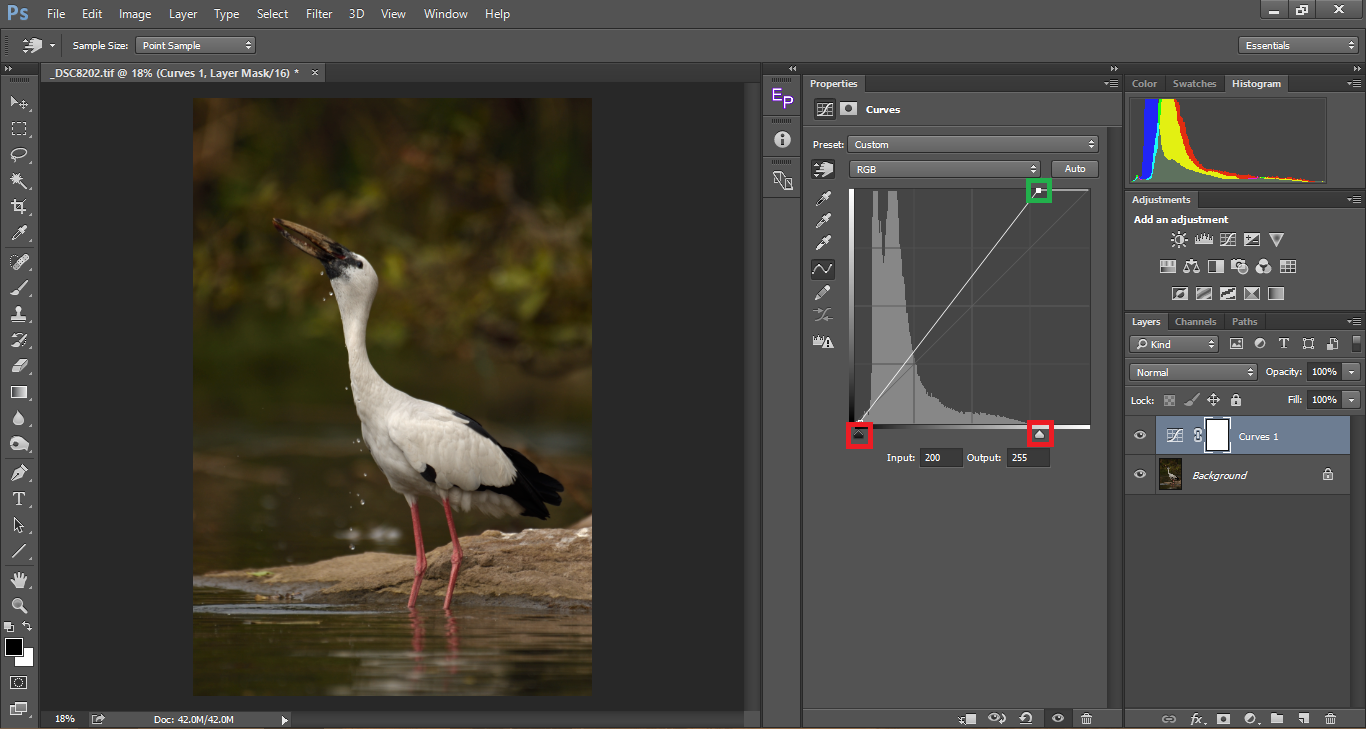
                    الصورة أعلاه تبدو مملة. في سعيي لحماية النقاط البارزة (اللون الأبيض في الموضوع) انتهى بي الأمر بجعل الصورة أكثر قتامة. الصورة تبدو مسطحة. ألقِ نظرة على شريطي التمرير الموجودين على المحور X (المميز باللون الأحمر في الصورة التوضيحية أدناه) في أداة المنحنيات. الآن، اضغط على الزر Alt/Option الموجود على شريط تمرير السطوع واسحبه إلى اليسار حتى ترى المقطع. وبالمثل، اسحب شريط التمرير الداكن (أثناء الضغط على Alt/Option) وحركه نحو اليمين حتى ترى لقطة. بالنظر إلى الرسم البياني، نرى أنه قد تحرك نحو اليمين، مما أدى إلى توسيع الأشرطة، وبالتالي زيادة النطاق الديناميكي. يمكنك رؤية العمق يضاف إلى الرسم البياني.


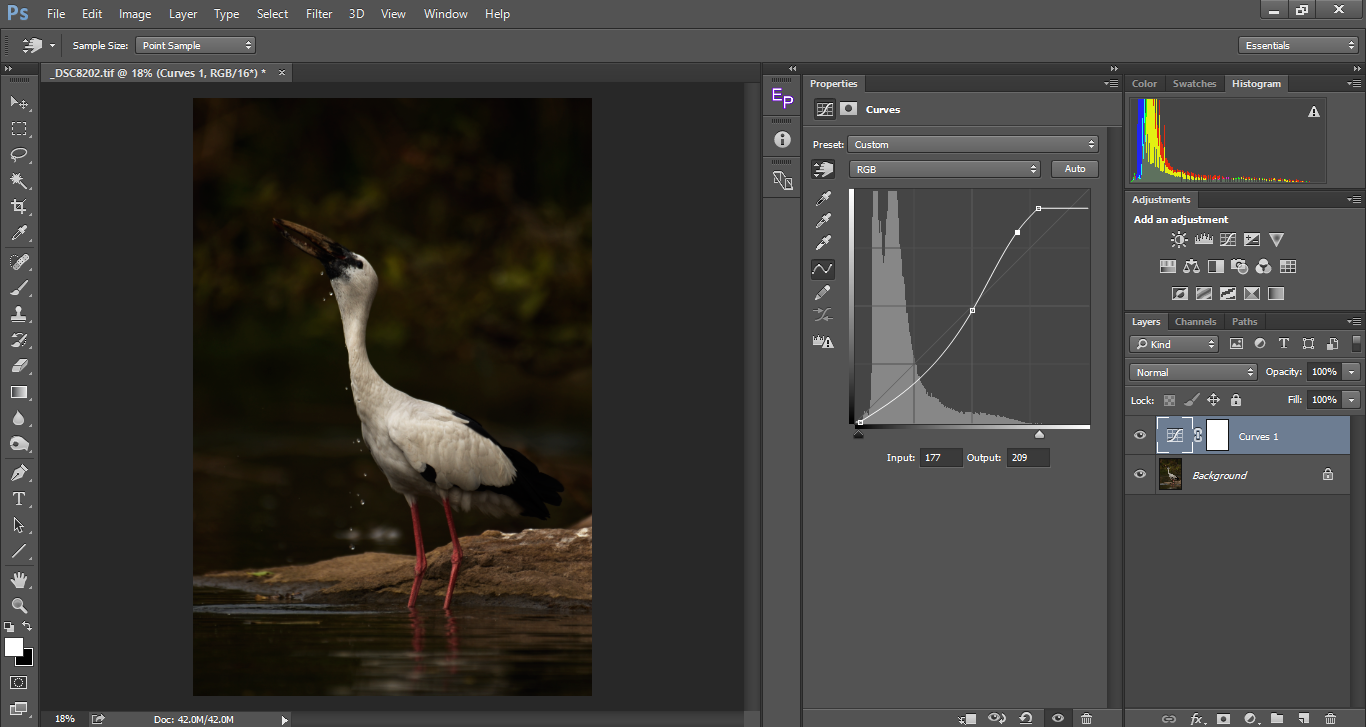
                    بعد إجراء الضبط أعلاه، على الرغم من عدم وجود أي قص، فإن بعض اللون الأبيض في الهدف يبدو مكشوفًا بشكل مفرط. لذلك دعونا ننزل اللون الأبيض كما هو موضح أدناه. عندما نقوم بإسقاط اللون الأبيض، يمكننا أن نرى التباين ينزل أيضًا. لذا لإضافة المزيد من التباين، نجد نقطة وسطية ونسحبها إلى الأسفل أكثر مما يجعلها منحنى على شكل حرف "U".


                    Using Curves to Add Dynamic Range


                    Sometimes we end up with images having a narrow dynamic range. This often happens with soft light. Most of the time, the image give a smooth, pleasing effect, but sometimes, it makes an image look flat. In such scenarios, the curves tool comes to aid to pull out maximum possible dynamic range of the picture without clipping the shadows or the highlights.


                    The above picture looks dull. In the pursuit of protecting the highlights (whites on the subject) I ended up making the picture darker. The picture looks flat. Take a look at the two sliders on the X-Axis (marked with reds in the illustration image below) on the curves tool. Now, press the Alt/Option button on the brights slider and drag it left until you see the clipping. Similarly, drag the darks slider (while pressing alt/option) and move it towards the right until you see clipping. Looking at the histogram, we see that it has moved towards right, widening the bars, hence increasing the dynamic range. You can see depth being added to the histogram.


                    With the above adjustment done, even though there is no clipping, some of the whites on the subject looks over-exposed. So let us bring the whites down as shown below. As we bring down the whites, we can see the contrast coming down as well. So to add more contrast, we find a middle point and drag it further down making it a ‘U’ curve


                    تعليق


                    • #11

                      الآن، نختار نقطة أخرى بالقرب من الإبرازات لتفتيح الصورة مما يعطي نتيجة متباينة وليست باهتة.


                      Now, we select another point near the highlights to brighten the image which gives a result that is contrasty and not dull.


                      تعليق


                      • #12
                        ضبط المنحنى الدقيق باستخدام أداة اختيار اليد

                        يصبح من الصعب تخمين مكان الإبرازات والدرجات اللونية النصفية والظلال. في بعض الأحيان قد نعتقد أن هناك نغمة في الظل، ولكن في الواقع قد يتم وضعها كنغمة متوسطة. وفي حالات أخرى، قد لا نكون قادرين على تحديد النقطة الأكثر سطوعًا في صورتنا بدقة. هذا هو المكان الذي تكون فيه أداة الانتقاء اليدوي مفيدة. باستخدام هذه الأداة، يمكننا النقر على العينة مباشرة على الصورة بدلاً من تخمين المكان المقابل لها على الرسم البياني. في المثال أدناه، قمت بتحديد أداة منتقي العينات (المميزة باللون الأخضر)، ثم قم بتمريرها فوق الصورة وانقر لتحديد نقطة في الصورة ويتم وضع علامة على القيمة المقابلة في الرسم البياني. يمكنك إما سحبها لأعلى أو لأسفل في الصورة نفسها أو يمكنك سحبها على منحنيات الضبط كما فعلنا في الأمثلة السابقة للحصول على التباين المطلوب. لقد قمت باختيار عينتين، البقعة المربعة الموجودة على رقبة الموضوع والتي تعتبر نقطة مضيئة. بقعة التحديد الحمراء المستطيلة وهي الظلال. عند النظر إلى اللون الأخضر الساطع، ربما ظننا أنه تم وضعه في مكان ما حول الدرجات اللونية المتوسطة، لكننا في الواقع نراه موضوعًا بالقرب من الظلال. هذا هو المكان الذي يكون فيه استخدام هذه الأداة مفيدًا ودقيقًا للغاية. من الأفضل دائمًا استخدام هذه الأداة بدلاً من تخمين الإبرازات والظلال.


                        Precise Curve Adjustment with the Hand Pick Tool


                        It becomes hard to guess where the highlights, midtones and the shadows are. Sometimes we might think a tone being in the shadows, but in reality it might be placed as a midtone. In other cases, we might not be able to precisely pin point where the brightest spot in our picture lies. That is where the hand picker tool comes handy. Using this tool, we can click on a sample directly on the image rather than guessing the corresponding place it has on the histogram. In the example below, I have selected the sample picker tool (marked in green), then hover it over the image and click to select a spot on the image and the corresponding value gets marked in the histogram. You can either drag it up or down in the image itself or you can drag it on the curves adjustment as we did in our previous examples to get the desired contrast. I have selected two samples, the square spot on the neck of the subject which is a highlight. The rectangular red selection spot which is the shadows. Looking at the bright green, we might have guessed it would have been placed somewhere around the mid-tones, but in reality we see it placed closer to the shadows. This is where using this tool comes in very handy and accurate. It is always best to use this tool rather than guessing the highlights and shadows.

                        تعليق


                        • #13

                          فيما يلي إجراء خطوة بخطوة لسير عمل Curves النموذجي:

                          يجب أن تكون الخطوة الأولى هي ضبط الإبرازات. تذكر دائمًا، في معظم الأحيان، يكون التمييز المنفوخ والمعروف أيضًا باسم التمييز المقطوع هو ما يضر بجمالية الصورة، إلا إذا كنت تتطلع إلى إنشاء صورة عالية المستوى. وبمجرد الانتهاء من الإبرازات، حاول استعادة الظلال . تذكر دائمًا أنه عند زيادة سطوع الظلال، فإن التباين العام سيتأثر. أنا شخصياً لا أقلق كثيراً عندما أضطر إلى التضحية بتفاصيل الظل إلا إذا كانت تشكل جزءاً مهماً من الموضوع مثل تفاصيل الشعر في التصوير الفوتوغرافي أو عيون الهدف. بعد تثبيت الإبرازات والظلال، اعمل على الدرجات اللونية المتوسطة للحصول على إبراز التباين الأمثل. من الأفضل دائمًا إجراء تغييرات طفيفة بدلاً من المبالغة في ذلك. سيؤدي التباين الزائد عن الحد إلى حرق تفاصيل الظل وتفجير النقاط البارزة. كما أنه يجعل الصورة مشبعة، كما ذكرنا أعلاه، استخدم أداة الانتقاء اليدوي لتحرير دقيق، ضع في اعتبارك أن المنحنيات مكافئة مما يعني أنه عندما تقوم بتغيير نقطة واحدة، فإنها تؤثر على المنحنى بأكمله بدرجات مختلفة. تذكر أيضًا أنه عند ضبط المنحنيات، يتغير التشبع وفقًا لذلك. وهذا سبب آخر لعدم المبالغة في القيام به، ولكن إجراء تغييرات طفيفة.


                          Below is a step-by-step procedure of a typical Curves workflow:
                          • The first step should be adjusting the highlights. Always remember, most of the time a blown out highlight a.k.a clipped highlight is what damages the aesthetic of a photograph, unless and until you are looking to create a high-key image.
                          • Once you are done with the highlights, try to recover the shadows. Always remember that when you brighten the shadows too much, the overall contrast will suffer. I personally do not worry too much when I have to sacrifice shadow details unless it makes an important part of the subject like hair detail in portrait photography or eyes of the subject.
                          • After fixing the highlights and the shadows, work with the mid-tones to bring out optimum contrast. It is always better to make subtle changes than going too much. Too much contrast will burn the shadow details and blow the highlights. It also makes the picture over saturated.
                          • As mentioned above, use the hand picker tool for accurate editing.
                          • Keep in mind that curves are parabolic which means when you change a single point, it does affect the entire curve to various degrees. Also, remember that when you are adjusting curves, saturation changes accordingly. This is another reason not to over do, but make subtle changes.

                          تعليق


                          • #14
                            استخدام المنحنيات لتصحيح الألوان

                            يتجاوز تطبيق المنحنيات إضافة التباين إلى الصورة. يمكن أيضًا استخدام المنحنيات لتصحيح ألوان الصورة، خاصة إذا كنا بحاجة إلى إزالة اللون غير الحقيقي من الصورة. يستخدم معظمنا توازن اللون الأبيض وشريط تمرير الصبغة لتصحيح الألوان، مع الأخذ في الاعتبار أننا نقوم بالتصوير بصيغة RAW. إذا تم التقاط الصورة بصيغة JPG، فسيتم تعطيل شريطي التمرير هذين. في مثل هذه الحالة ستكون أداة المنحنيات بديلاً لتصحيح الألوان. وهذا لا ينصح بالتصوير بصيغة JPG، حيث يعتبر الكثيرون أن استخدام RAW مفيد فقط في تصحيح الألوان. فوائد RAW تذهب إلى أبعد من ذلك. ولهذا السبب ينصح معظمنا، وخاصة هنا في PhotographyLife، بتصوير ملفات RAW. بالعودة إلى تصحيح الألوان، توفر المنحنيات طريقة أكثر تحكمًا لتصحيح الألوان بدلاً من مجرد الاعتماد على شريط تمرير توازن اللون الأبيض.


                            Using Curves for Color Correction


                            The application of curves go beyond adding contrast to an image. Curves can also be used to correct the colors of an image, especially if we need to remove the color cast from an image. Most of us use the White Balance and the tint sliders to correct colors, considering we shoot RAW. If the picture was shot as a JPG those two sliders would be disabled. In such a case, the curves tool will be an alternative to correct colors. This is not to advise on shooting as JPG, as many consider the use of RAW to be only useful in color correction. The benefits of RAW goes way beyond it. That is why most of us, especially here in PhotographyLife advise on shooting RAW. Coming back to color correction, Curves give a more controlled approach to correcting colors than merely relying on the White Balance slider.


                            تعليق


                            • #15
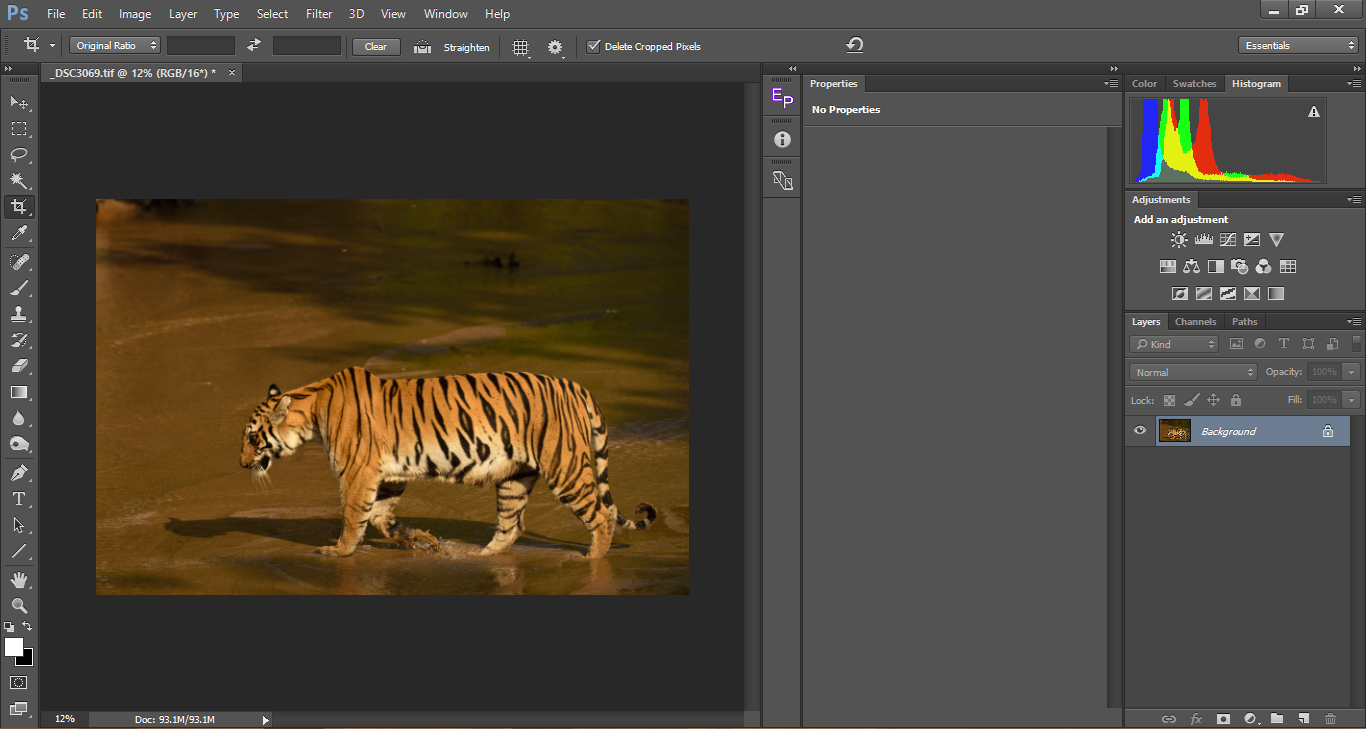
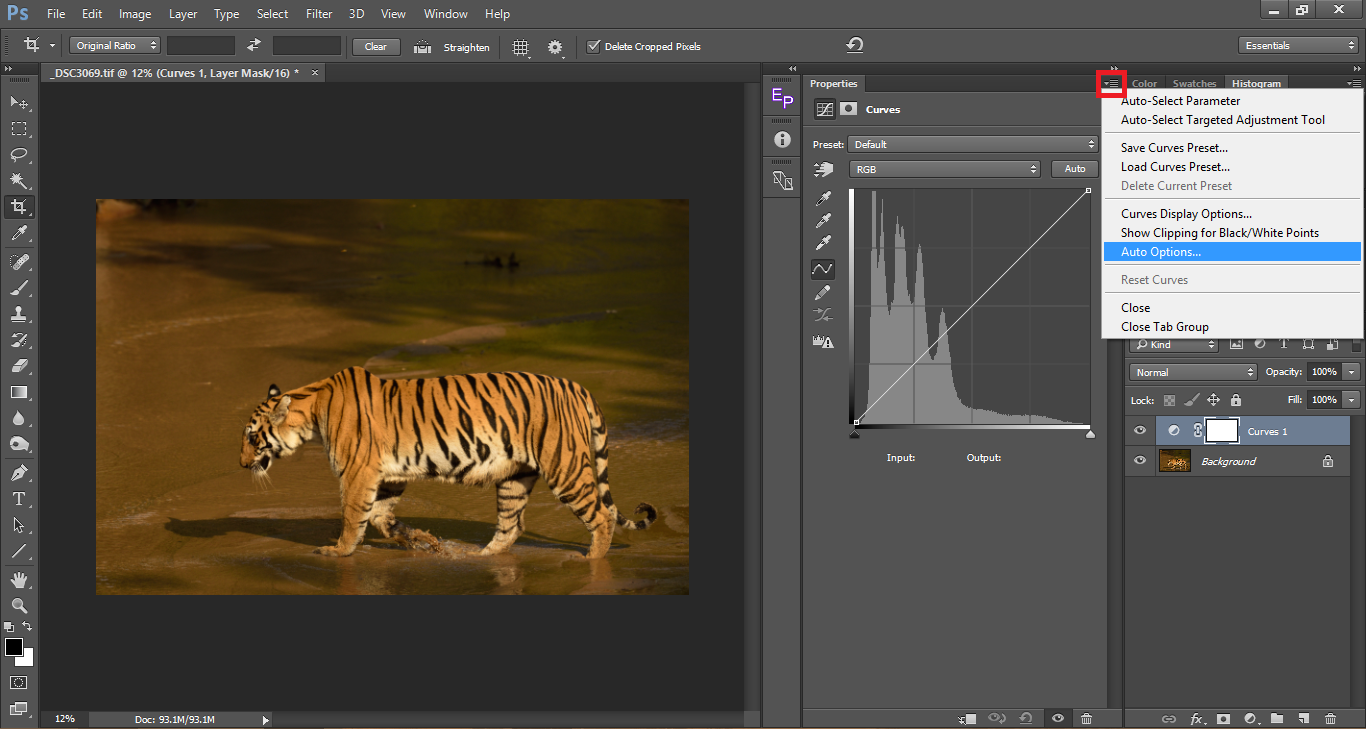
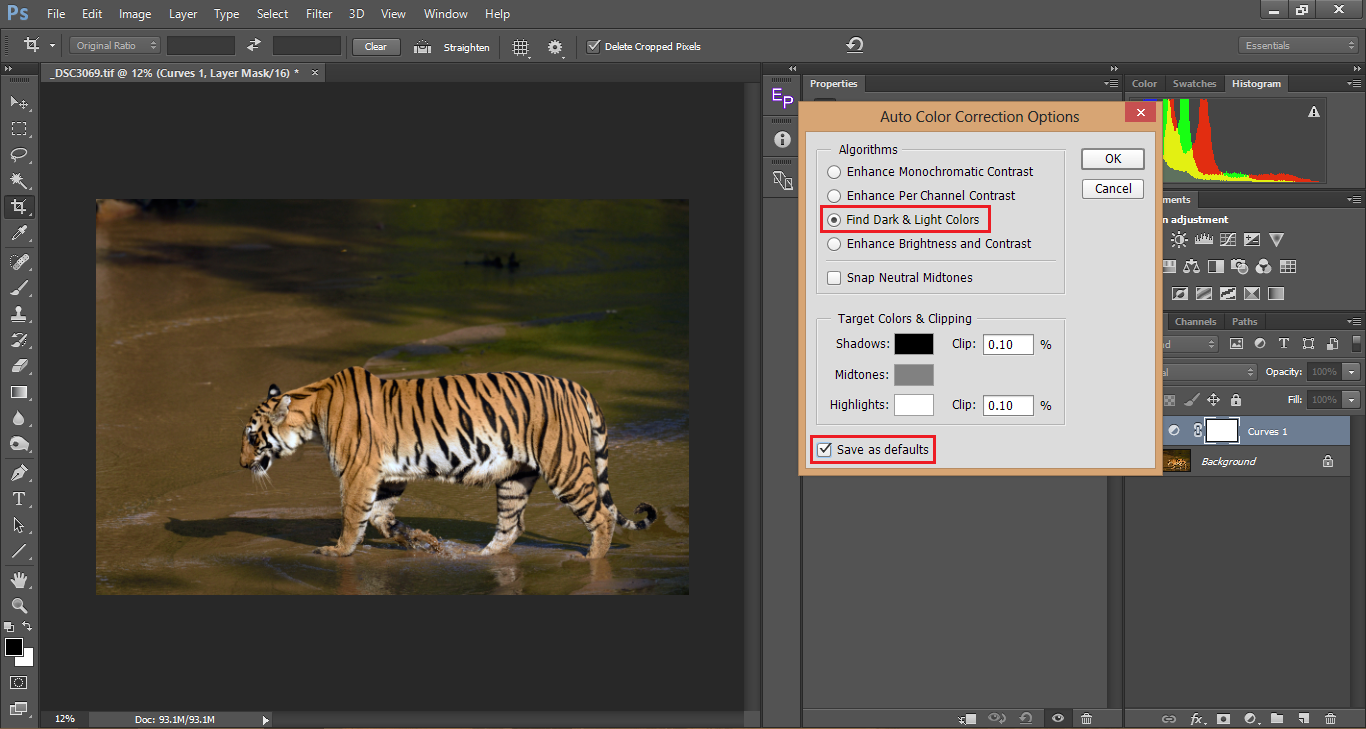
                              إذا ألقيت نظرة على الصورة أعلاه، يمكنك أن ترى بوضوح اللون الأصفر. الجانب السفلي من النمر الذي هو في الواقع أبيض اللون أبيض مصفر مما يمنحه مظهرًا "موحلًا". كما أن قوالب الألوان تجعل الصورة تبدو مسطحة. دعونا نرى أولاً كيفية استخدام خيار تصحيح الألوان تلقائيًا في Photoshop (والذي يعمل بشكل رائع مع حوالي 80% من الصور) ثم دعنا ننتقل إلى القيام بذلك يدويًا. كما هو الحال دائمًا، قم بإضافة طبقة تعديل جديدة للمنحنيات. في نافذة خصائص المنحنيات، انقر على الأيقونة العلوية اليمنى لتظهر القائمة المنسدلة واختر خيارات تلقائية...


                              If you take a look at the above image, you can clearly see a yellow color cast. The underside of the tiger which are infact white are off-white giving it a ‘muddy’ look. Color casts also make the image look flat. First let us see how to simply use the Auto Color Correct option in Photoshop (which works great for about 80% of the images) and then let us move to doing it manually. As always add a new curves adjustment layer. In the curves properties window, click on the upper right icon to pop the drop down list and choose Auto Options…


                              التعديل الأخير تم بواسطة غدير معروف; الساعة 01-04-2024, 12:48 AM. سبب آخر: اضافة الترجمة

                              تعليق

                              يعمل...
                              X