تحقيق التعادل في السماء How to Quickly Even Out the Sky in Post-Processing

تقليص
X
 
  • تصفية - فلترة
  • الوقت
  • عرض
إلغاء تحديد الكل
مشاركات جديدة

  • تحقيق التعادل في السماء How to Quickly Even Out the Sky in Post-Processing

    كيفية تحقيق التعادل بسرعة في السماء في مرحلة ما بعد المعالجة
    How to Quickly Even Out the Sky in Post-Processing


    If you have previously photographed outdoor scenes, you have probably come across images that have an uneven sky. It can happen when photographing landscapes with wide-angle lenses, and it can be particularly visible when using a polarizing filter. The latter cases can be quite difficult to deal with in post-processing, often resulting in failed attempts to save those images. Thankfully, there are some great post-processing tools available that can help. Today, we will take a look at how you can use Lightroom and Nik Software’s Viveza (now part of DxO) to quickly fix uneven skies in your images.

    We will go through two case scenarios – one that has a relatively easy sky to fix, and one that is very difficult to fix due to the use of a polarizer. For the first case scenario, I will use Lightroom’s built-in Graduated Filter tool to take care of the problem. For the second case scenario, I will use Nik Software Viveza as a plugin to Photoshop (but you can launch the tool via Lightroom as a plugin, or you can also run it directly without any other software).

    Please note that while Nik Software can still be downloaded and used for free (you can find the previous free distribution by Google on the Internet), DxO bought the software from Google and now actively maintains it. If you would like to get the latest version of Nik Collection that is fully compatible with all Lightroom and Photoshop versions, you can get it from DxO.
    إذا كنت قد قمت بتصوير مشاهد خارجية من قبل، فمن المحتمل أنك صادفت صورًا تحتوي على سماء غير مستوية. يمكن أن يحدث ذلك عند تصوير المناظر الطبيعية باستخدام عدسات واسعة الزاوية، ويمكن أن يكون مرئيًا بشكل خاص عند استخدام مرشح الاستقطاب. قد يكون من الصعب جدًا التعامل مع الحالات الأخيرة في مرحلة ما بعد المعالجة، مما يؤدي غالبًا إلى فشل محاولات حفظ تلك الصور. ولحسن الحظ، هناك بعض الأدوات الرائعة المتاحة لمرحلة ما بعد المعالجة والتي يمكن أن تساعدك. اليوم، سنلقي نظرة على كيفية استخدام برنامج Viveza من Lightroom وNik Software (الذي أصبح الآن جزءًا من DxO) لإصلاح السماء غير المستوية في صورك بسرعة.

    سنتناول سيناريوهين للحالة - أحدهما يسهل إصلاح السماء نسبيًا، والآخر يصعب إصلاحه بسبب استخدام المستقطب. بالنسبة لسيناريو الحالة الأولى، سأستخدم أداة التصفية المتدرجة المضمنة في Lightroom للتعامل مع المشكلة. بالنسبة لسيناريو الحالة الثانية، سأستخدم برنامج Nik Software Viveza كمكون إضافي لبرنامج Photoshop (ولكن يمكنك تشغيل الأداة عبر Lightroom كمكون إضافي، أو يمكنك أيضًا تشغيلها مباشرة بدون أي برامج أخرى).

    يرجى ملاحظة أنه على الرغم من أنه لا يزال من الممكن تنزيل برنامج Nik واستخدامه مجانًا (يمكنك العثور على الإصدار المجاني السابق من Google على الإنترنت)، فقد اشترت DxO البرنامج من Google وتقوم الآن بصيانته بشكل نشط. إذا كنت ترغب في الحصول على أحدث إصدار من Nik Collection المتوافق تمامًا مع جميع إصدارات Lightroom وPhotoshop، فيمكنك الحصول عليه من DxO.

  • #2
    Fixing Uneven Sky with Lightroom


    The first step in fixing an uneven sky is to check and see if it can be easily fixed in Lightroom by using the Graduated Filter. Whenever the sky has a gradual transition that makes only one part of it look darker than the other one, you should be able to easily take care of the problem without resorting to any other software. Let’s take a look at the first photograph and figure out what needs to be done:
    Note the darker sky on the left side of the image

    إصلاح السماء غير المستوية باستخدام Lightroom

    الخطوة الأولى في إصلاح السماء غير المستوية هي التحقق ومعرفة ما إذا كان من الممكن إصلاحها بسهولة في Lightroom باستخدام مرشح متدرج. عندما تشهد السماء تحولًا تدريجيًا يجعل جزءًا واحدًا فقط منها يبدو أغمق من الجزء الآخر، يجب أن تكون قادرًا على حل المشكلة بسهولة دون اللجوء إلى أي برامج أخرى. دعونا نلقي نظرة على الصورة الأولى ومعرفة ما يجب القيام به:

    لاحظ السماء الداكنة على الجانب الأيسر من الصورة

    تعليق


    • #3
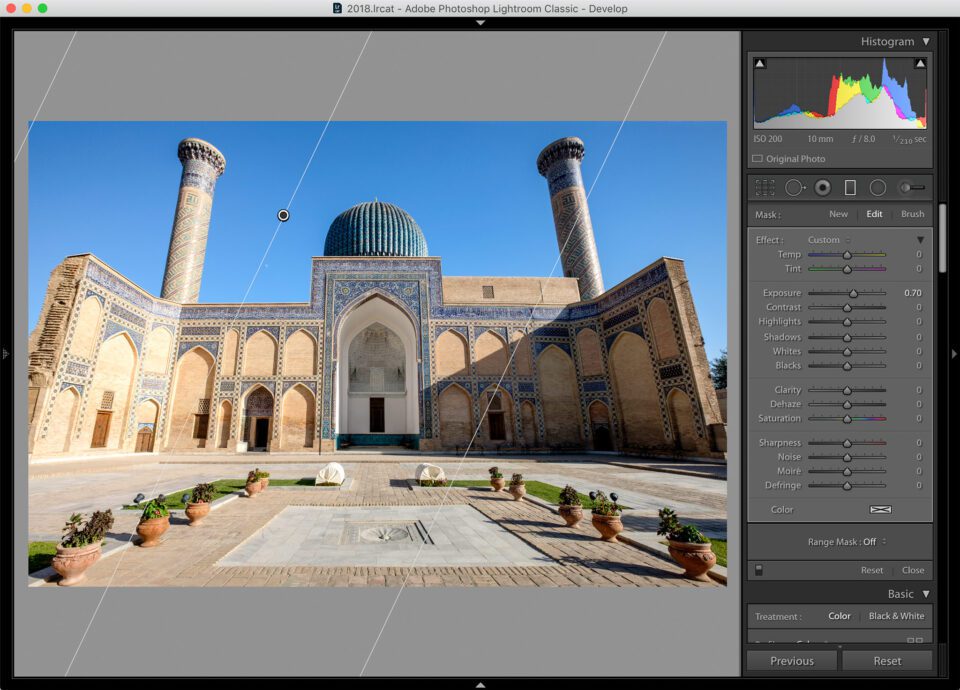
      As you can see, the left side of the image appears noticeably darker when compared to the right side. Sometimes this can happen when using a polarizing filter, or sometimes the sky is simply brighter on one side due to its proximity to the sun. Fixing such issues is quite easy with the help of the Graduated Filter in Lightroom. All you have to do, is pick the tool, then slide it from one corner until the end of the transition line, then increase the exposure, as shown below:


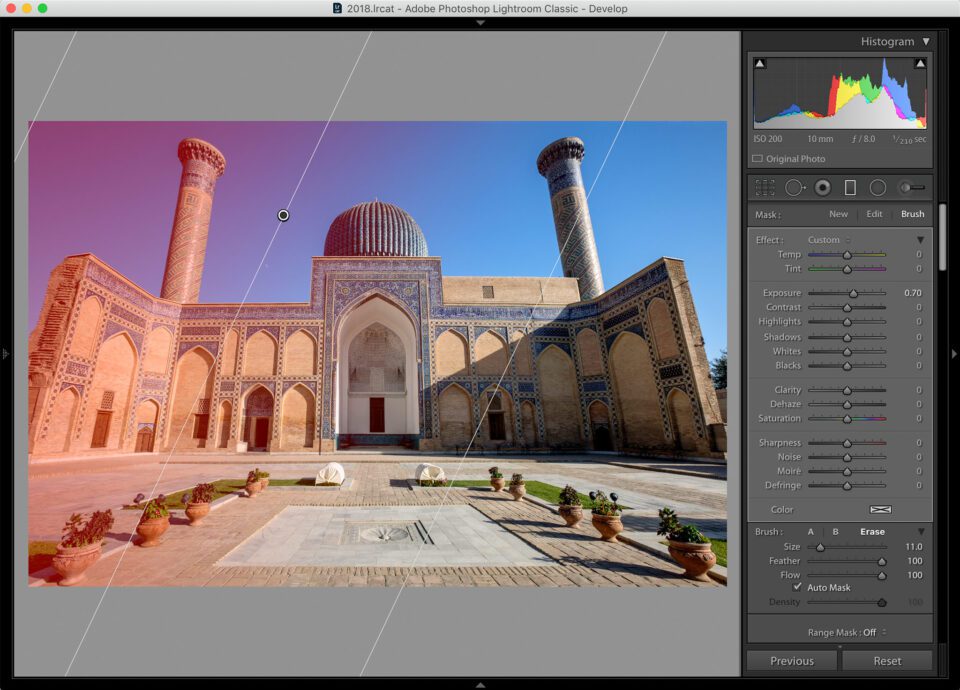
      As you can see, dialing +0.7 exposure took care of the problem in the sky. However, it did introduce an issue – using the graduated filter also impacted the brightness of the left side of the building, which is not good. To make sure that only the sky gets touched with this exposure adjustment, we can use the Brush tool and erase the parts of the mask that are applied to the building. To do this, press the “O” button on your keyboard (which reveals the mask), then navigate to “Tools -> Adjustment Mask Overlay” and set the mask color to something that stands out from the sky and the objects you want to exclude. In my case, I set it to Red.
      كما ترون، يبدو الجانب الأيسر من الصورة أغمق بشكل ملحوظ بالمقارنة مع الجانب الأيمن. في بعض الأحيان يمكن أن يحدث هذا عند استخدام مرشح الاستقطاب، أو في بعض الأحيان تكون السماء أكثر سطوعًا على جانب واحد بسبب قربها من الشمس. يعد إصلاح مثل هذه المشكلات أمرًا سهلاً للغاية بمساعدة Graduated Filter في Lightroom. كل ما عليك فعله هو اختيار الأداة، ثم تحريكها من إحدى الزوايا حتى نهاية خط الانتقال، ثم زيادة التعريض، كما هو موضح أدناه:


      كما ترون، فإن الاتصال بالتعرض +0.7 قد حل المشكلة في السماء. ومع ذلك، فقد أحدثت مشكلة - حيث أثر استخدام الفلتر المتدرج أيضًا على سطوع الجانب الأيسر من المبنى، وهو أمر ليس جيدًا. للتأكد من أن السماء فقط هي التي تم لمسها من خلال تعديل التعريض هذا، يمكننا استخدام أداة الفرشاة ومسح أجزاء القناع التي تم تطبيقها على المبنى. للقيام بذلك، اضغط على الزر "O" على لوحة المفاتيح (والذي يكشف القناع)، ثم انتقل إلى "أدوات -> تعديل قناع التراكب" واضبط لون القناع على شيء يبرز من السماء والكائنات التي تريدها. استبعاد. في حالتي، قمت بضبطه على اللون الأحمر.

      تعليق


      • #4
        From there, click on “Brush” to the right of “Mask” in the Graduated Filter panel, click “Erase” and make sure to select “Auto Mask”, so that your brush strokes do not end up touching the sky. Erase everything that needs to be excluded and change the brush size as needed. For those areas that are not close to the sky, unchecking “Auto Mask” and brushing out the areas will be much faster. Here is the final mask of my image in Lightroom, which shows that I was able to completely eliminate the structure:


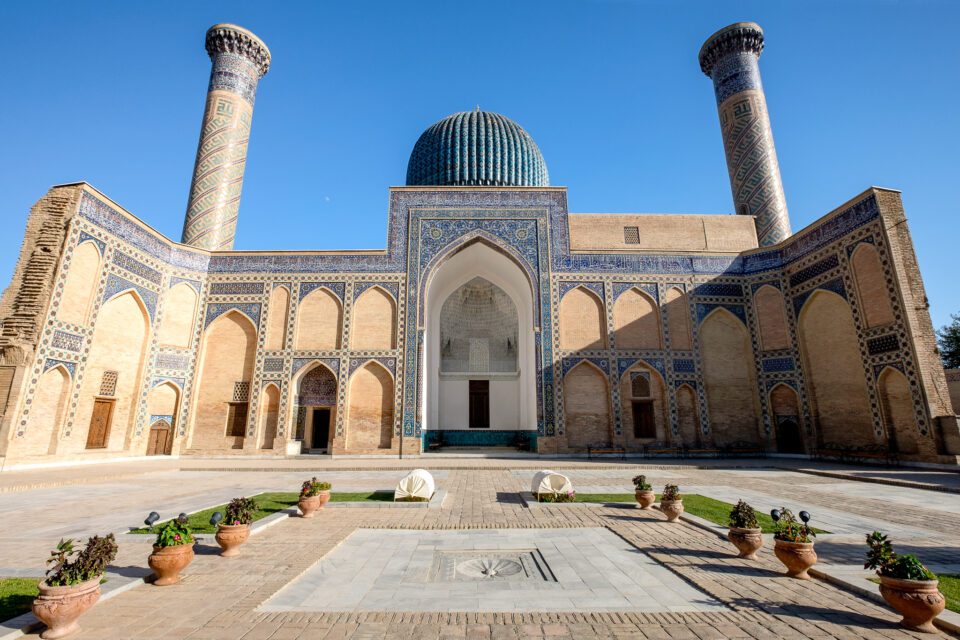
        And here is the final image, which shows a fairly even sky:
        Final image with even sky
        X-H1 + XF 10-24mm f/4 R OIS @ 10mm, ISO 200, 1/210, f/8.0

        من هناك، انقر فوق "Brush" الموجود على يمين "Mask" في لوحة Graduated Filter، وانقر فوق "Erase" وتأكد من تحديد "Auto Mask"، حتى لا تنتهي ضربات الفرشاة بلمس السماء. امسح كل ما تريد استبعاده وقم بتغيير حجم الفرشاة حسب الحاجة. بالنسبة للمناطق غير القريبة من السماء، سيكون إلغاء تحديد "القناع التلقائي" وتنظيف المناطق أسرع بكثير. هذا هو القناع النهائي لصورتي في Lightroom، والذي يوضح أنني تمكنت من إزالة البنية تمامًا:


        وهذه هي الصورة النهائية التي تظهر سماء مستوية إلى حد ما:

        الصورة النهائية مع السماء حتى
        X-H1 + XF 10-24 مم f/4 R OIS @ 10 مم، ISO 200، 1/210، f/8.0

        تعليق


        • #5
          Fixing Uneven Sky with Viveza


          What if you are working on a much more complicated image, where the sky does not have a gradual transition, or worst yet, if the use of a circular polarizer made parts of the sky look very dark while the other parts are bright? In such situations, I find it incredibly difficult to fix the sky using Lightroom’s built-in tools. That’s where Photoshop or third party tools come to the rescue. Let’s take a look at the second case scenario:
          The middle of the sky got uneven color and brightness due to the use of a polarizing filter.
          In this particular situation, I intentionally used a polarizing filter to reduce the haze of the distant mountains. It worked out for the mountains, but as you can see, the filter messed up the sky by darkening the middle part of it. In addition, it changed the color of the sky, which is not good! Trying to fix these problems with Photoshop’s built-in tools would take a lot of effort and it would be impossible to fix in Lightroom. For such situations, Nik Software’s Viveza can come in really handy, which is what I will use to try to fix the sky.
          إصلاح السماء غير المستوية باستخدام Viveza

          ماذا لو كنت تعمل على صورة أكثر تعقيدًا، حيث لا تمر السماء بانتقال تدريجي، أو الأسوأ من ذلك، إذا كان استخدام المستقطب الدائري يجعل أجزاء من السماء تبدو مظلمة جدًا بينما الأجزاء الأخرى مشرقة؟ في مثل هذه المواقف، أجد صعوبة بالغة في إصلاح السماء باستخدام أدوات Lightroom المدمجة. وهنا يأتي دور Photoshop أو أدوات الطرف الثالث للإنقاذ. دعونا نلقي نظرة على سيناريو الحالة الثانية:

           حصل وسط السماء على تباين في الألوان والسطوع بسبب استخدام مرشح الاستقطاب.

          في هذه الحالة بالذات، استخدمت عمدًا مرشحًا مستقطبًا لتقليل ضباب الجبال البعيدة. لقد نجح الأمر بالنسبة للجبال، ولكن كما ترون، أفسد المرشح السماء عن طريق تعتيم الجزء الأوسط منها. بالإضافة إلى أنها غيرت لون السماء وهذا ليس جيدًا! قد تتطلب محاولة إصلاح هذه المشكلات باستخدام أدوات Photoshop المدمجة الكثير من الجهد وسيكون من المستحيل إصلاحها في Lightroom. في مثل هذه المواقف، يمكن أن يكون برنامج Viveza من Nik Software مفيدًا حقًا، وهو ما سأستخدمه لمحاولة إصلاح السماء.

          تعليق


          • #6
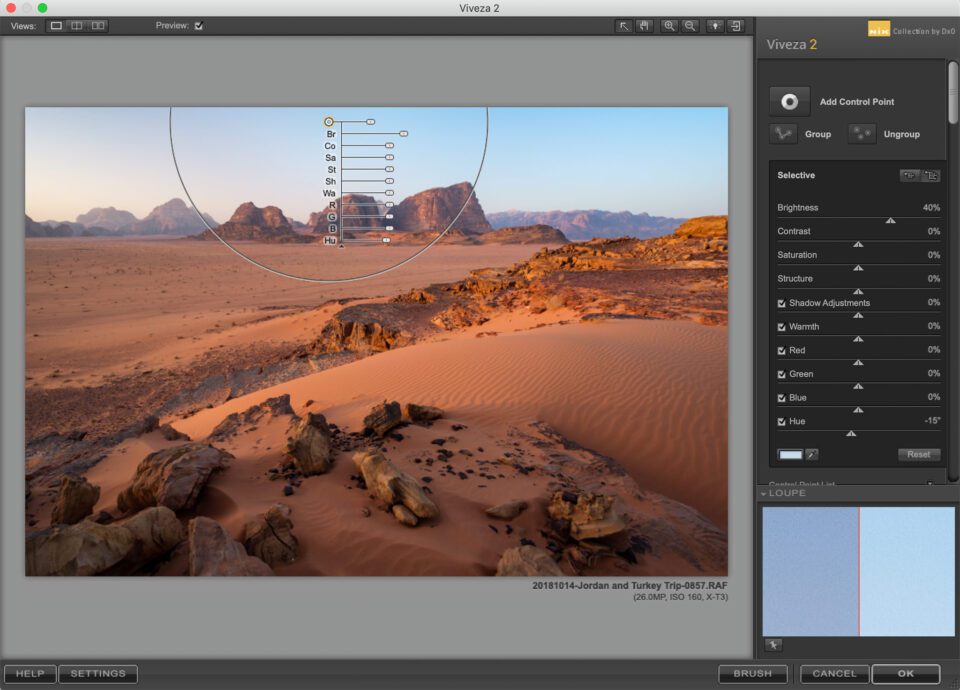
            The great thing about Nik Software is the U Point Technology, which allows one to add a control point to a part of the image, size it, then adjust settings like Brightness, Contrast, Saturation, Structure, as well as specific color adjustments, all without affecting other parts and colors of the image. For this image, my goal was to make the sky look as even as possible, which involves brightening up the middle of the sky, as well as potentially changing its color. Here is how Viveza looks with a control point already added to the middle of the sky and some settings already applied:


            إن الشيء العظيم في برنامج Nik هو تقنية U Point، التي تسمح للشخص بإضافة نقطة تحكم إلى جزء من الصورة، وحجمها، ثم ضبط الإعدادات مثل السطوع والتباين والتشبع والهيكل، بالإضافة إلى تعديلات ألوان محددة، كل ذلك دون التأثير على أجزاء وألوان أخرى من الصورة. بالنسبة لهذه الصورة، كان هدفي هو جعل السماء تبدو متساوية قدر الإمكان، الأمر الذي يتضمن تفتيح منتصف السماء، بالإضافة إلى إمكانية تغيير لونها. إليك كيف تبدو Viveza مع إضافة نقطة تحكم بالفعل إلى منتصف السماء وتطبيق بعض الإعدادات بالفعل:


            تعليق


            • #7
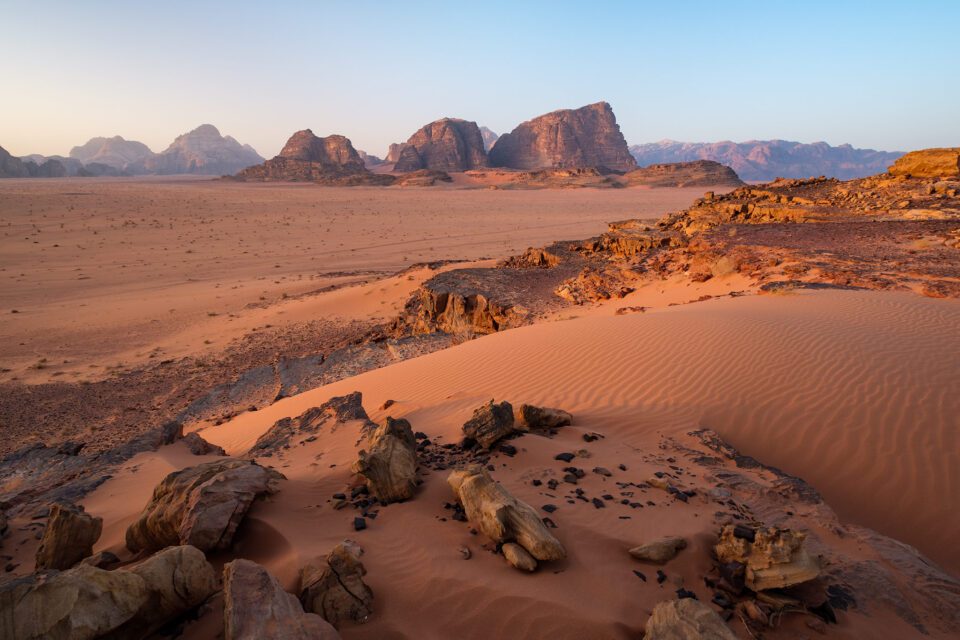
              I had to dial +40% Brightness to make the sky look more or less even, but the middle part still had a very different shade of blue. To reduce color differences, I also added -15 Hue, which made the sky in the middle of the frame look more or less even. Take a look at the result of this quick effort:


              The image is already looking a lot better, but we still have the color problem – the sky has a different shade of blue on the left compared to the right. In such situations, instead of adding another control point to the same image, I find it best to click “OK”, then relaunch the tool and address the next specific problem. Using multiple control points in such cases might make the results look worse due to the way control points overlap, so you might need to apply settings and relaunch Viveza several times.
              كان علي أن أطلب +40% من السطوع لجعل السماء تبدو أكثر أو أقل تساويًا، ولكن الجزء الأوسط لا يزال يحتوي على ظل مختلف تمامًا من اللون الأزرق. لتقليل اختلافات الألوان، أضفت أيضًا -15 درجة لون، مما جعل السماء في منتصف الإطار تبدو متساوية إلى حد ما. ألق نظرة على نتيجة هذا الجهد السريع:


              تبدو الصورة أفضل بكثير بالفعل، ولكن لا تزال لدينا مشكلة اللون - فالسماء لها ظل مختلف من اللون الأزرق على اليسار مقارنة باليمين. في مثل هذه المواقف، بدلاً من إضافة نقطة تحكم أخرى لنفس الصورة، أجد أنه من الأفضل النقر فوق "موافق"، ثم إعادة تشغيل الأداة ومعالجة المشكلة المحددة التالية. قد يؤدي استخدام نقاط تحكم متعددة في مثل هذه الحالات إلى جعل النتائج تبدو أسوأ نظرًا لطريقة تداخل نقاط التحكم، لذلك قد تحتاج إلى تطبيق الإعدادات وإعادة تشغيل Viveza عدة مرات.

              تعليق


              • #8
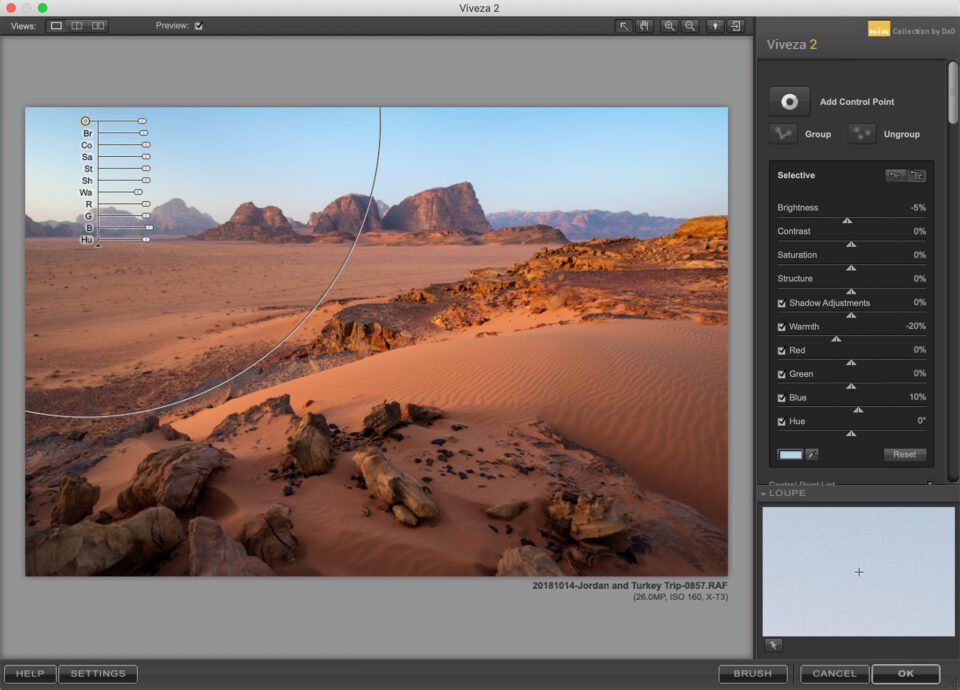
                After relaunching Viveza, I added another control point to the left side of the image, then dialed -5% for Brightness to slightly reduce the brightness of the left side and -20 for Warmth to make the left side look a bit cooler. This helped a lot, but the color was still a bit off, so I added +10% of Blue to make it look much more even:


                Note how much bigger the control point is this time – I tried to select as much of the area that had different color as possible. Here is how the image looks with the second pass:


                بعد إعادة تشغيل Viveza، أضفت نقطة تحكم أخرى إلى الجانب الأيسر من الصورة، ثم طلبت -5% لـ Brightness لتقليل سطوع الجانب الأيسر قليلاً و-20 لـ Warmth لجعل الجانب الأيسر يبدو أكثر برودة قليلاً. لقد ساعدني هذا كثيرًا، لكن اللون كان لا يزال مختلفًا بعض الشيء، لذا أضفت +10% من اللون الأزرق لجعله يبدو أكثر توازنًا:


                لاحظ مدى كبر نقطة التحكم هذه المرة - حاولت تحديد أكبر قدر ممكن من المساحة ذات الألوان المختلفة. إليك كيف تبدو الصورة مع التمريرة الثانية:


                تعليق


                • #9
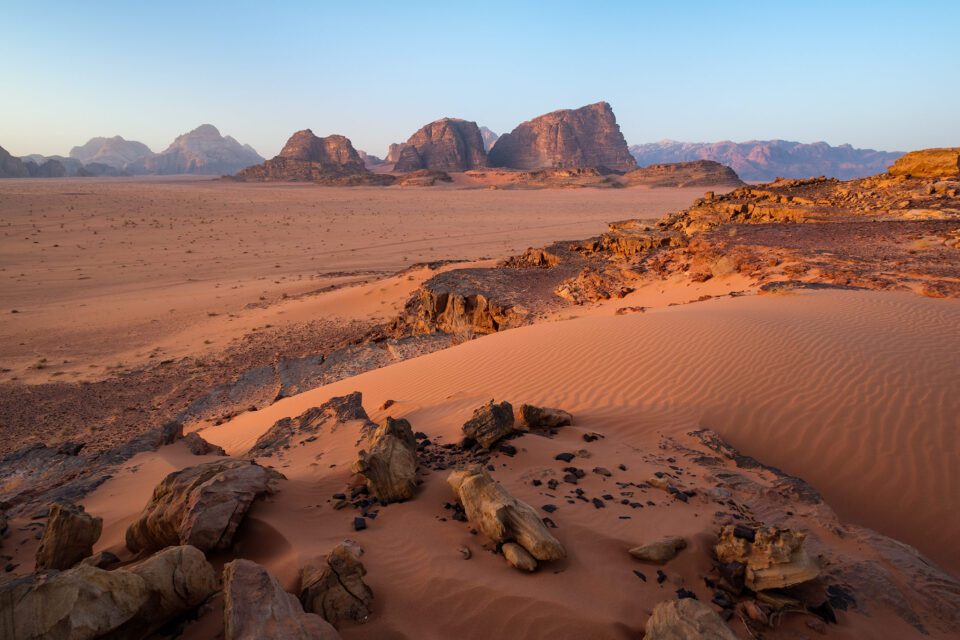
                  That’s looking a whole lot better, doesn’t it? It is not perfect still and there are slight color differences on the left and right side of the image, but I am fine with the way it already looks. If I wanted to, I could run another pass and make it look better…

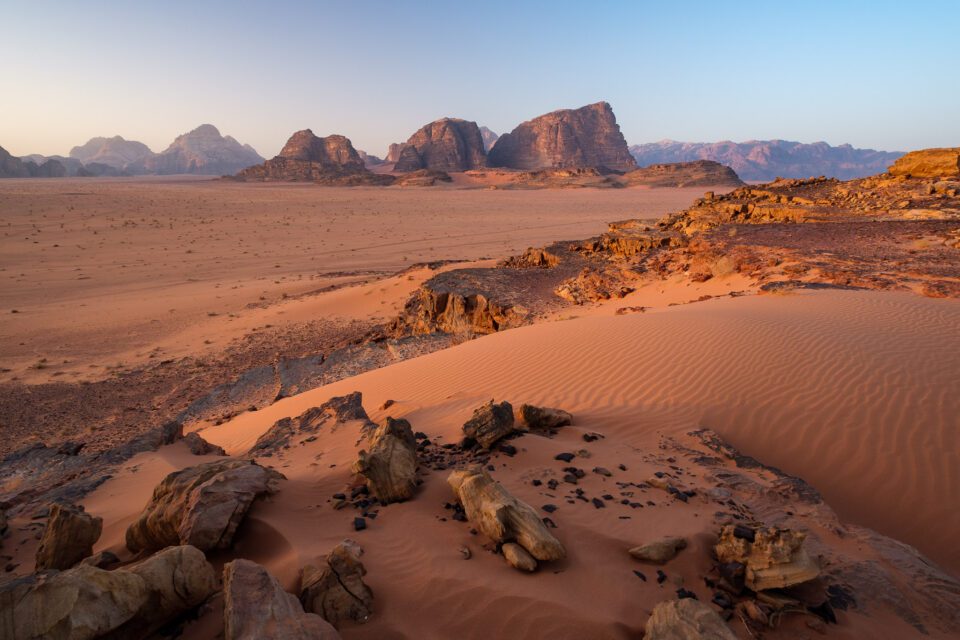
                  Here is how the final image looks after the above adjustments, as well as additional Nik filters applied to the image (Color Efex to add some contrast and Viveza to reduce haze in the distant mountains):
                  Final image with even sky and additional adjustments
                  X-T3 + XF 10-24mm f/4 R OIS @ 12mm, ISO 160, 1/25, f/8.0
                  Not bad – and all this took me just a few minutes to do!
                  هذا يبدو أفضل بكثير، أليس كذلك؟ إنها ليست مثالية بعد وهناك اختلافات طفيفة في اللون على الجانب الأيسر والأيمن من الصورة، لكنني بخير مع الطريقة التي تبدو بها بالفعل. إذا أردت ذلك، يمكنني تشغيل تمريرة أخرى وجعلها تبدو أفضل...

                  إليك كيف تبدو الصورة النهائية بعد التعديلات المذكورة أعلاه، بالإضافة إلى مرشحات Nik الإضافية المطبقة على الصورة (Color Efex لإضافة بعض التباين وViveza لتقليل الضباب في الجبال البعيدة):

                  الصورة النهائية مع سماء متساوية وتعديلات إضافية
                  X-T3 + XF 10-24 مم f/4 R OIS عند 12 مم، ISO 160، 1/25، f/8.0

                  ليس سيئًا - وكل هذا استغرق مني بضع دقائق فقط للقيام به!

                  تعليق

                  يعمل...
                  X