تغيير حجم الصورة بواسطة Capture One How to Properly Resize Images in Capture One

تقليص
X
 
  • تصفية - فلترة
  • الوقت
  • عرض
إلغاء تحديد الكل
مشاركات جديدة

  • تغيير حجم الصورة بواسطة Capture One How to Properly Resize Images in Capture One

    كيفية تغيير حجم الصور بشكل صحيح في Capture One
    How to Properly Resize Images in Capture One


    If you are a Capture One user, you might be wondering how you can properly resize your images for web use, so that the resulting files look great on any platform. Exporting full-size images from your high-resolution camera is typically not ideal, because you end up with very large images that are hard to work with. With most online platforms automatically down-sizing and compressing large images, you might end up with photos that simply do not look good. For this reason, it is a good idea to find out the best resolution for each platform, then export your images in that size. In this article, I will show you the proper way to resize images in Capture One using two different methods.
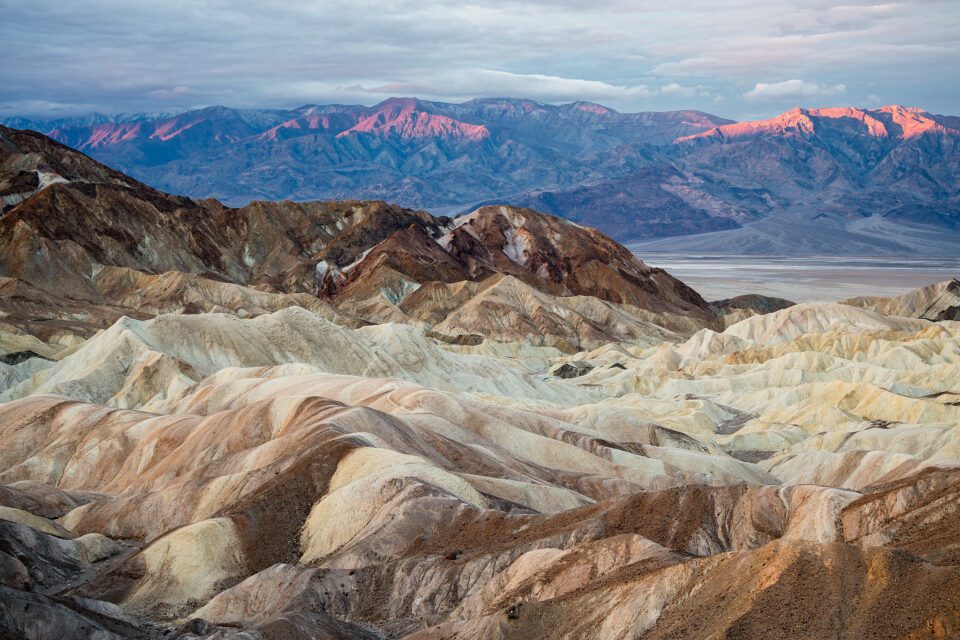
    Zabriskie Point Overlook, Resized with Capture One Pro

    إذا كنت من مستخدمي Capture One، فقد تتساءل عن كيفية تغيير حجم صورك بشكل صحيح لاستخدامها على الويب، بحيث تبدو الملفات الناتجة رائعة على أي نظام أساسي. لا يعد تصدير الصور بالحجم الكامل من الكاميرا عالية الدقة أمرًا مثاليًا، لأنه سينتهي بك الأمر بصور كبيرة جدًا يصعب التعامل معها. مع قيام معظم المنصات عبر الإنترنت تلقائيًا بتصغير حجم الصور الكبيرة وضغطها، قد ينتهي بك الأمر إلى الحصول على صور لا تبدو جيدة. لهذا السبب، من الجيد معرفة أفضل دقة لكل منصة، ثم تصدير صورك بهذا الحجم. في هذه المقالة، سأوضح لك الطريقة الصحيحة لتغيير حجم الصور في Capture One باستخدام طريقتين مختلفتين.

    Zabriskie Point Overlook، تم تغيير حجمها باستخدام Capture One Pro

  • #2
    Capture One Image Resizing Workflow


    Capture One has two methods to effectively resize images. The first method involves creating a “Process Recipe” (which is basically a preset with particular values), then reusing that recipe every time you need to export an image. The second method involves exporting an image variant in JPEG format, which you can invoke through a dialog each time you need to export an image. My personal preference is the former since I can batch export many images at once without changing any settings. I will go through both of these methods in this article. Here is my simplified workflow process for resizing and exporting images from Capture One:
    1. Import images into Capture One
    2. Make necessary adjustments to the image(s) I want to resize
    3. Apply sharpening to the full-sized image via the Details Tool
    4. Create a Process Recipe for specific output resolution and set up output sharpening
    5. Preview output sharpening via the Proofing tool
    6. Select image(s) I want to export, then use the “Process” shortcut to export them using the previously-created Process Recipe

    This method takes a bit of time to set up properly, but once you do it, exporting images is a breeze.
    التقاط صورة واحدة لتغيير حجم سير العمل

    لدى Capture One طريقتان لتغيير حجم الصور بشكل فعال. تتضمن الطريقة الأولى إنشاء "وصفة عملية" (وهي في الأساس إعداد مسبق بقيم معينة)، ثم إعادة استخدام تلك الوصفة في كل مرة تحتاج فيها إلى تصدير صورة. تتضمن الطريقة الثانية تصدير متغير صورة بتنسيق JPEG، والذي يمكنك استدعاؤه من خلال مربع حوار في كل مرة تحتاج فيها إلى تصدير صورة. تفضيلي الشخصي هو الأول حيث يمكنني تصدير العديد من الصور دفعة واحدة دون تغيير أي إعدادات. سأتحدث عن هاتين الطريقتين في هذه المقالة. فيما يلي عملية سير العمل المبسطة لتغيير حجم الصور وتصديرها من Capture One:

    استيراد الصور إلى Capture One إجراء التعديلات اللازمة على الصورة (الصور) التي أريد تغيير حجمها تطبيق التوضيح على الصورة بالحجم الكامل عبر أداة التفاصيل إنشاء وصفة عملية للحصول على دقة إخراج محددة وإعداد وضوح المخرجات معاينة زيادة وضوح المخرجات عبر أداة التدقيق حدد الصورة (الصور) التي أرغب في تصديرها، ثم استخدم اختصار "العملية" لتصديرها باستخدام "وصفة العملية" التي تم إنشاؤها مسبقًا

    تستغرق هذه الطريقة بعض الوقت لإعدادها بشكل صحيح، ولكن بمجرد القيام بذلك، يصبح تصدير الصور أمرًا سهلاً.

    تعليق


    • #3
      Capture One Image Resizing Process: Exporting with a Process Recipe
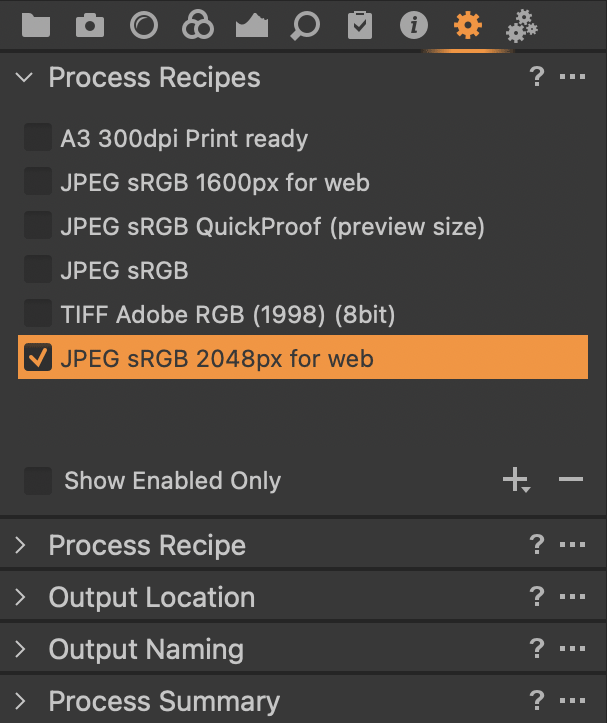
      1. Select an image you want to export out of Capture One Pro, then click on the Output tool to reveal a number of options, including “Process Recipes”, “Output Location”, “Output Naming”, and “Process Summary”. The tool should look like this:


        Let’s go over each section and create a Process Recipe.
      2. Start out by creating a new Process Recipe for the resolution you need to export your images in. Click on the “+” sign under the “Process Recipes” dropdown. A new “Untitled Recipe” will pop-up right above. Click on it and rename it to something more descriptive. I typically export my JPEG images at 2048 pixel long resolution, so that’s what I am going to use as a name for my recipe. I will call it “JPEG sRGB 2048px for web”, as shown in the above screenshot. Make sure that the new recipe remains checked and everything else is unchecked. This will only enable the new preset we created for exporting
      التقط عملية واحدة لتغيير حجم الصورة: التصدير باستخدام وصفة عملية

      حدد الصورة التي تريد تصديرها من Capture One Pro، ثم انقر فوق أداة الإخراج للكشف عن عدد من الخيارات، بما في ذلك "وصفات العملية"، و"موقع الإخراج"، و"تسمية الإخراج"، و"ملخص العملية". يجب أن تبدو الأداة كما يلي:


      دعنا نراجع كل قسم وننشئ "وصفة العملية".

      ابدأ بإنشاء "وصفة عملية" جديدة للحصول على الدقة التي تحتاجها لتصدير صورك إليها. انقر فوق علامة "+" ضمن القائمة المنسدلة "وصفات العملية". ستظهر "وصفة بدون عنوان" جديدة في الأعلى مباشرة. انقر عليه وأعد تسميته إلى شيء أكثر وصفًا. عادةً ما أقوم بتصدير صور JPEG بدقة تبلغ 2048 بكسل، وهذا ما سأستخدمه كاسم لوصفتي. سأطلق عليه اسم "JPEG sRGB 2048px للويب"، كما هو موضح في لقطة الشاشة أعلاه. تأكد من أن الوصفة الجديدة تظل محددة وأن كل شيء آخر غير محدد. سيؤدي هذا فقط إلى تمكين الإعداد المسبق الجديد الذي أنشأناه للتصدير

      تعليق


      • #4
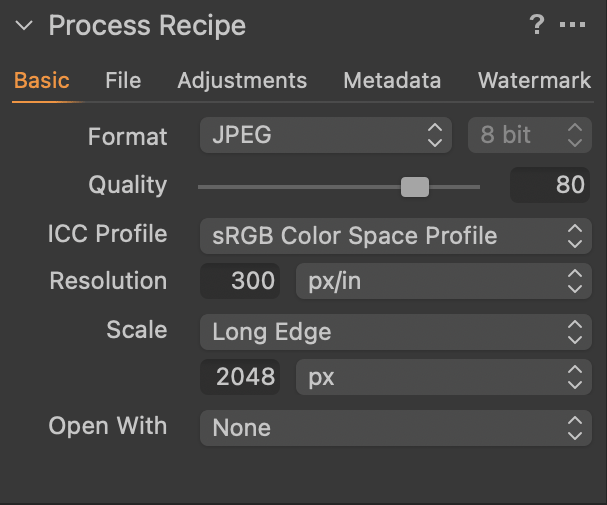
        Next, click on the “Process Recipe” drop-down and expand its options. Here, you will have a few very important tabs that you will need to configure. Under the “Basic” tab, you will be specifying the image format and all the relevant options, including image resolution. Here is what I set up mine to:


        I set up my output format to JPEG, 80% quality, sRGB color space profile, and 2048 pixel-long resolution. The “Resolution” field is only relevant for printing, so you can ignore this setting if you are exporting for the web (this value can be overridden during the printing process anyway). I do not want my exported images to be opened after they are exported, but if you would like to see it with your image viewer, you can set it up under “Open With”.

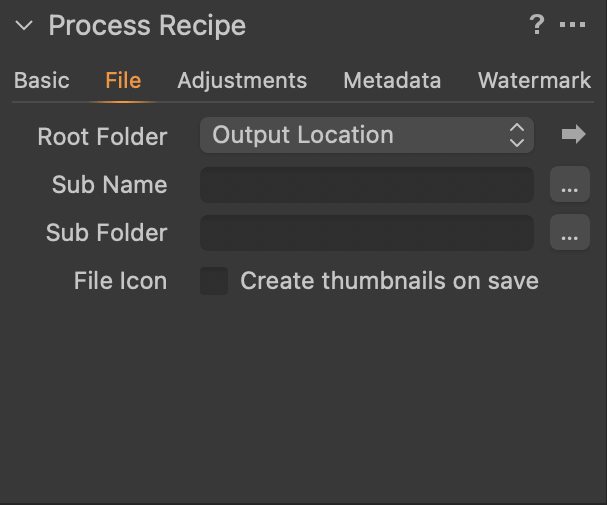
        Click on the “File” tab to select the output folder where your images will be exported to. Here, you can set up all kinds of presets to create subnames and subfolders. Since there is a separate “Output Location” drop-down further down that allows you to select file destination and create sub-folders, I would recommend leaving these fields empty and setting up “Output Location” as the Root Folder:


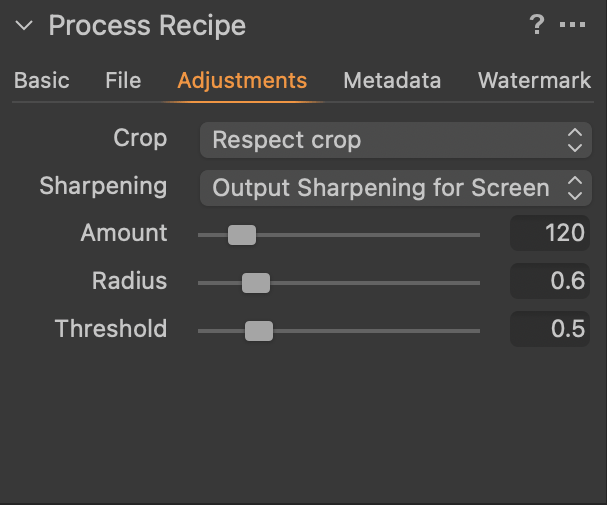
        The next “Adjustments” tab is very important because this is where we will set up output sharpening. Make sure to pick “Respect crop” under the “Crop” setting, so that Capture One does not output the original uncropped image. Under “Sharpening”, make sure to select “Output Sharpening for Screen” when exporting images for the web. Set the desired Amount, Radius, and Threshold:


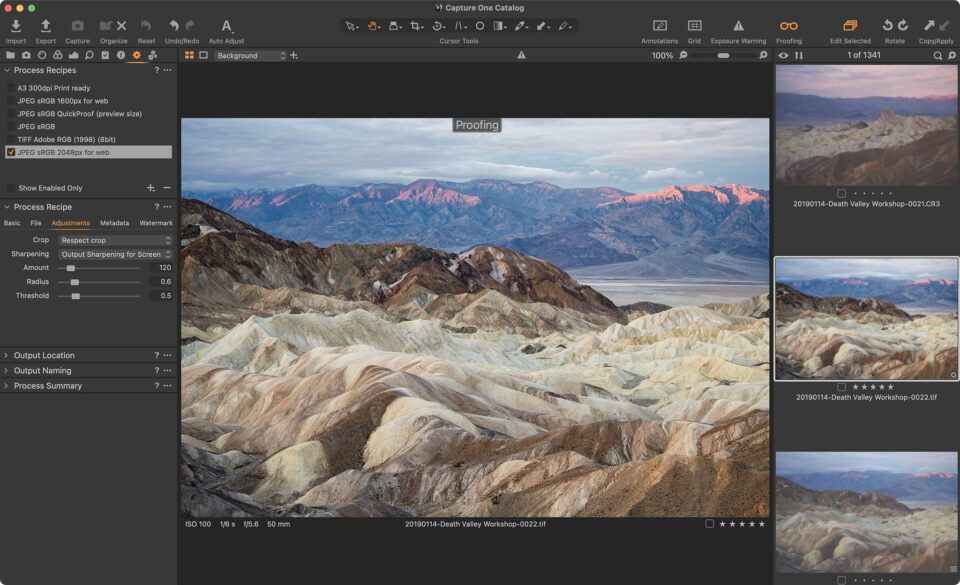
        If you are wondering which settings are best to use here, the answer is “it depends”. Unlike Lightroom that only gives you three output sharpening options, Capture One gives a lot more flexibility. First of all, the output sharpening settings are applied on top of the existing sharpening that you have already applied to the full-size image, so you have to be careful with what you pick. So how can you tell which settings are best without seeing the end result? This is where you utilize the “Recipe Proofing” tool (the icon that looks like eyeglasses):


        You can also invoke the Recipe Proofing tool using the SHIFT + CTRL + \ shortcut (SHIFT + CMD + \ on Mac). Once Recipe Proofing is enabled, you will see the image with “Proofing” text over it. Note that the image will be resized to the exact resolution that you are exporting the image in. From here, make sure you zoom in to 100% or 200% of the image (use the + on the loupe tool or press CTRL + (CMD + on Mac) to see the image up close:


        Now that you are looking at the actual output, it is time to adjust your sharpening settings. For the image above, I wanted to sharpen all the small details, including some of the rocks in the foreground. I picked 120 for “Amount”, 0.6 for “Radius”, which looked great. To make sure that sharpening does not add much noise all over the image, I bumped up “Threshold” to 0.5.

        The Recipe Proofing tool is a great way to look at the end result. Once you are done, your exported sharpened image should look identical to how it appeared in this window!

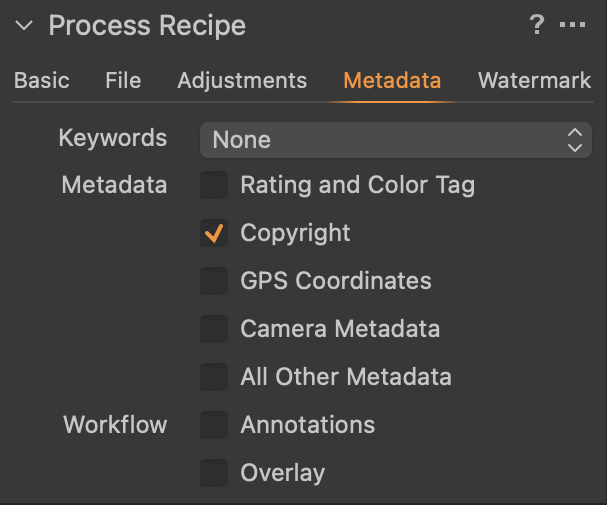
        Next, navigate to the “Metadata” tab. Here, unless you want your exported image to contain sensitive data such as your GPS coordinates and camera settings, you should just uncheck most of the settings. For my recipe, I unchecked everything other than “Copyright”:


        Lastly, the “Watermark” tab is there for adding a watermark to your images. I typically don’t add any watermarks to my images, but if you want to do that, you can do it from here.
        بعد ذلك، انقر فوق القائمة المنسدلة "Process Recipe" وقم بتوسيع خياراتها. هنا، سيكون لديك بعض علامات التبويب المهمة جدًا التي ستحتاج إلى تهيئتها. ضمن علامة التبويب "أساسي"، ستحدد تنسيق الصورة وجميع الخيارات ذات الصلة، بما في ذلك دقة الصورة. إليكم ما قمت بإعداده من أجل:


        لقد قمت بإعداد تنسيق الإخراج الخاص بي على JPEG، وجودة 80%، وملف تعريف مساحة الألوان sRGB، ودقة تبلغ 2048 بكسل. يعد حقل "الدقة" ذا صلة بالطباعة فقط، لذا يمكنك تجاهل هذا الإعداد إذا كنت تقوم بالتصدير للويب (يمكن تجاوز هذه القيمة أثناء عملية الطباعة على أي حال). لا أريد أن يتم فتح الصور التي تم تصديرها بعد تصديرها، ولكن إذا كنت ترغب في رؤيتها باستخدام عارض الصور الخاص بك، فيمكنك إعداده ضمن "فتح باستخدام".

        انقر فوق علامة التبويب "ملف" لتحديد مجلد الإخراج الذي سيتم تصدير صورك إليه. هنا، يمكنك إعداد جميع أنواع الإعدادات المسبقة لإنشاء أسماء فرعية ومجلدات فرعية. نظرًا لوجود قائمة منسدلة منفصلة بعنوان "موقع الإخراج" تسمح لك بتحديد وجهة الملف وإنشاء مجلدات فرعية، فإنني أوصي بترك هذه الحقول فارغة وإعداد "موقع الإخراج" باعتباره المجلد الجذر:


        تعد علامة التبويب "التعديلات" التالية مهمة جدًا، لأنها هي المكان الذي سنقوم فيه بإعداد زيادة وضوح المخرجات. تأكد من اختيار "احترام الاقتصاص" ضمن إعداد "الاقتصاص"، بحيث لا يقوم Capture One بإخراج الصورة الأصلية غير المقصوصة. ضمن "Sharpening"، تأكد من تحديد "Output Sharpening for Screen" عند تصدير الصور للويب. قم بتعيين المبلغ المطلوب ونصف القطر والعتبة:

        
        إذا كنت تتساءل عن الإعدادات الأفضل للاستخدام هنا، فالإجابة هي "يعتمد الأمر على ذلك". على عكس Lightroom الذي يمنحك ثلاثة خيارات لتوضيح المخرجات فقط، يوفر Capture One مرونة أكبر بكثير. أولاً، يتم تطبيق إعدادات زيادة حدة الإخراج أعلى الوضوح الحالي الذي قمت بتطبيقه بالفعل على الصورة بالحجم الكامل، لذا عليك أن تكون حذرًا فيما تختاره. فكيف يمكنك معرفة الإعدادات الأفضل دون رؤية النتيجة النهائية؟ هذا هو المكان الذي تستخدم فيه أداة "تدقيق الوصفة" (الرمز الذي يشبه النظارات):


        يمكنك أيضًا استدعاء أداة تدقيق الوصفات باستخدام الاختصار SHIFT + CTRL + \ (SHIFT + CMD + \ على نظام Mac). بمجرد تمكين تدقيق الوصفة، سترى الصورة مع نص "التدقيق" فوقها. لاحظ أنه سيتم تغيير حجم الصورة إلى الدقة التي تقوم بتصدير الصورة بها. من هنا، تأكد من تكبير الصورة بنسبة 100% أو 200% (استخدم + في أداة العدسة أو اضغط على CTRL + (CMD + في نظام Mac) لرؤية الصورة عن قرب:


        الآن بعد أن نظرت إلى الإخراج الفعلي، فقد حان الوقت لضبط إعدادات التوضيح. بالنسبة للصورة أعلاه، أردت شحذ كل التفاصيل الصغيرة، بما في ذلك بعض الصخور في المقدمة. لقد اخترت 120 لـ "المبلغ"، و0.6 لـ "نصف القطر"، والذي بدا رائعًا. للتأكد من أن الحدة لا تضيف الكثير من الضوضاء في جميع أنحاء الصورة، قمت بزيادة "العتبة" إلى 0.5.

        تعد أداة تدقيق الوصفة طريقة رائعة للنظر إلى النتيجة النهائية. بمجرد الانتهاء من ذلك، يجب أن تبدو الصورة الواضحة المصدرة مطابقة لما ظهرت عليه في هذه النافذة!

        بعد ذلك، انتقل إلى علامة التبويب "البيانات الوصفية". هنا، ما لم تكن تريد أن تحتوي صورتك المصدرة على بيانات حساسة مثل إحداثيات نظام تحديد المواقع العالمي (GPS) وإعدادات الكاميرا، فيجب عليك فقط إلغاء تحديد معظم الإعدادات. بالنسبة إلى وصفتي، قمت بإلغاء تحديد كل شيء بخلاف "حقوق الطبع والنشر":


        أخيرًا، توجد علامة التبويب "العلامة المائية" لإضافة علامة مائية إلى صورك. عادةً لا أقوم بإضافة أي علامات مائية إلى صوري، ولكن إذا كنت تريد القيام بذلك، فيمكنك القيام بذلك من هنا.

        تعليق


        • #5
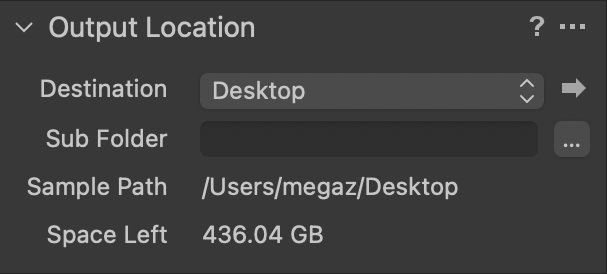
          I picked “Desktop” as my destination, but if you have a particular preference for the export location, you can set it from here.
          1. The “Output Location” drop-down is for picking your output folder and subfolder (if you want to set one):

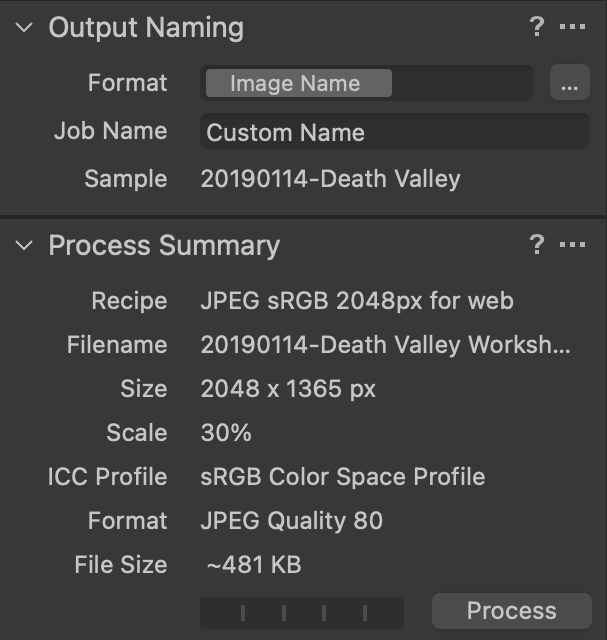
          2. The last two drop-downs are “Output Naming” and “Process Summary”:


            Since I name my images during the image import process and want my exported files to have the same corresponding file name, I do not change them here and leave “Image Name”. However, if you prefer to rename your images when they are exported, you can set up a preset under “Format”. The sample file name is displayed below, as shown in the above screenshot.

            Lastly, the “Process Summary” is basically a summary of your settings. As you can see, my resulting file will be 2048×1365 pixels, in sRGB color space, 80% JPEG quality, and the file should be roughly 481 KB once it is exported.

          Finally, the recipe has been fully set up. Now all you have to do is pick the image(s) you want to export, then go to File -> Process, or use the CTRL + D (CMD + D on Mac) shortcut to start the export process.

          I would recommend to set up similar recipes for all web resolutions you normally use. You can also set up other recipes for printing, etc.
          القائمة المنسدلة "موقع الإخراج" مخصصة لاختيار مجلد الإخراج والمجلد الفرعي (إذا كنت تريد تعيين أحدهما):


          لقد اخترت "سطح المكتب" كوجهة لي، ولكن إذا كان لديك تفضيل معين لموقع التصدير، فيمكنك تعيينه من هنا.

          القائمتان المنسدلتان الأخيرتان هما "تسمية المخرجات" و"ملخص العملية":


          نظرًا لأنني أقوم بتسمية صوري أثناء عملية استيراد الصور وأريد أن يكون لملفاتي المصدرة نفس اسم الملف المقابل، فأنا لا أغيرها هنا وأترك ​​"اسم الصورة". ومع ذلك، إذا كنت تفضل إعادة تسمية صورك عند تصديرها، فيمكنك إعداد إعداد مسبق ضمن "التنسيق". يتم عرض اسم الملف النموذجي أدناه، كما هو موضح في لقطة الشاشة أعلاه.

          وأخيرًا، يعد "ملخص العملية" في الأساس ملخصًا لإعداداتك. كما ترون، سيكون الملف الناتج بحجم 2048 × 1365 بكسل، بمساحة ألوان sRGB، وبجودة JPEG بنسبة 80%، ويجب أن يكون حجم الملف 481 كيلوبايت تقريبًا بمجرد تصديره.

          وأخيرا، تم إعداد الوصفة بالكامل. الآن كل ما عليك فعله هو اختيار الصورة (الصور) التي تريد تصديرها، ثم الانتقال إلى ملف -> معالجة، أو استخدام الاختصار CTRL + D (CMD + D على نظام Mac) لبدء عملية التصدير.

          أوصي بإعداد وصفات مماثلة لجميع قرارات الويب التي تستخدمها عادةً. يمكنك أيضًا إعداد وصفات أخرى للطباعة وما إلى ذلك.

          تعليق


          • #6
            Capture One Image Resizing Process: Exporting as a Variant


            The second method of resizing and exporting images in Capture One involves a simple dialog that can be invoked by visiting “File” -> “Export Images” -> “Variants…”. By default, this window does not have a keyboard shortcut, but if you want to create one, you can do so by visiting “Edit Keyboard Shortcuts…” under the “Edit” menu. Another option is to add the Export button to the top menu, which you can perform by invoking “Customize Toolbar…” when right-clicking the top menu area of Capture One.

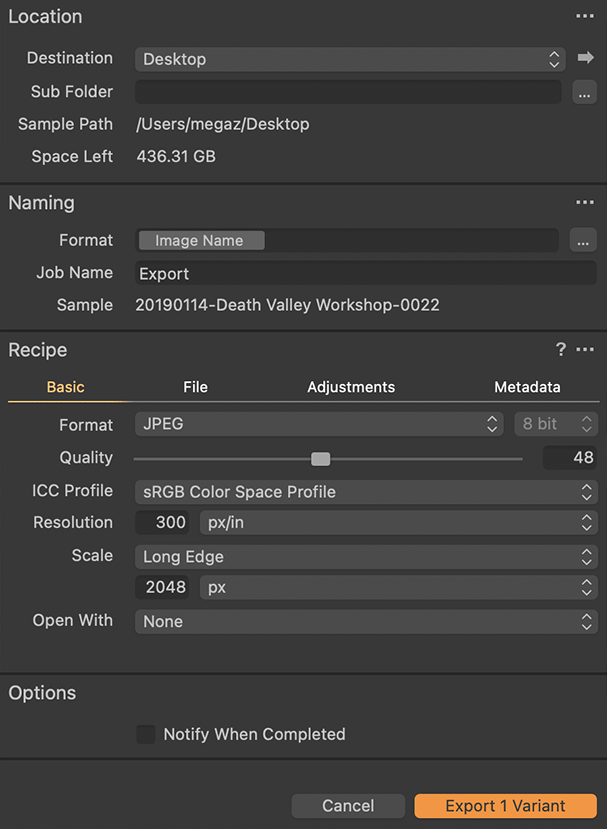
            Once the Export Variants dialog box pops up, it will look like this:


            As you can see, the settings are very similar to the ones we have previously seen on the Process Recipes tool. You set up your export destination under “Destination”, a sub-folder if you want to, set up file naming structure and go through different tabs under “Recipe”.

            Since the settings are the same, I am not going to go through them again. Once you are done, simply click the “Export Variant” button on the bottom right of the dialog box. The export process will start. If you want to be notified when the export is done, simply check the “Notify When Completed” box under “Options”.
            التقاط عملية واحدة لتغيير حجم الصورة: التصدير كمتغير

            تتضمن الطريقة الثانية لتغيير حجم الصور وتصديرها في Capture One مربع حوار بسيط يمكن استدعاؤه عن طريق زيارة "ملف" -> "تصدير الصور" -> "المتغيرات...". بشكل افتراضي، لا تحتوي هذه النافذة على اختصار لوحة مفاتيح، ولكن إذا كنت تريد إنشاء اختصار، فيمكنك القيام بذلك عن طريق زيارة "تحرير اختصارات لوحة المفاتيح..." ضمن قائمة "تحرير". هناك خيار آخر وهو إضافة زر التصدير إلى القائمة العلوية، والذي يمكنك تنفيذه عن طريق استدعاء "تخصيص شريط الأدوات..." عند النقر بزر الماوس الأيمن على منطقة القائمة العلوية في Capture One.

            بمجرد ظهور مربع الحوار "تصدير المتغيرات"، سيبدو كما يلي:


            كما ترون، فإن الإعدادات مشابهة جدًا لتلك التي رأيناها سابقًا في أداة "وصفات العملية". يمكنك إعداد وجهة التصدير الخاصة بك ضمن "الوجهة"، ومجلد فرعي إذا كنت ترغب في ذلك، وإعداد بنية تسمية الملف والانتقال إلى علامات تبويب مختلفة ضمن "الوصفة".

            وبما أن الإعدادات هي نفسها، فلن أخوض فيها مرة أخرى. بمجرد الانتهاء، ما عليك سوى النقر فوق الزر "تصدير متغير" الموجود في أسفل يمين مربع الحوار. ستبدأ عملية التصدير. إذا كنت تريد أن يتم إعلامك عند انتهاء عملية التصدير، فما عليك سوى تحديد مربع "الإخطار عند الانتهاء" ضمن "الخيارات".

            تعليق

            يعمل...
            X