إعدادات كاميرة فوجي X100F الموصى بها Recommended Fuji X100F Settings

تقليص
X
 
  • تصفية - فلترة
  • الوقت
  • عرض
إلغاء تحديد الكل
مشاركات جديدة

  • إعدادات كاميرة فوجي X100F الموصى بها Recommended Fuji X100F Settings

    إعدادات كاميرة فوجي X100F الموصى بها
    Recommended Fuji X100F Settings
    The Fuji X100F is the fourth in Fuji’s line of X100 cameras – the X100, X100S, X100T, and X100F. Although it has a refined design and fairly intuitive menu, the camera’s large number of options and controls can make it overwhelming for new buyers. Hopefully, this guide will help clear up some confusion and explain how to use the Fuji X100F, including our recommended settings for each option in the menu.


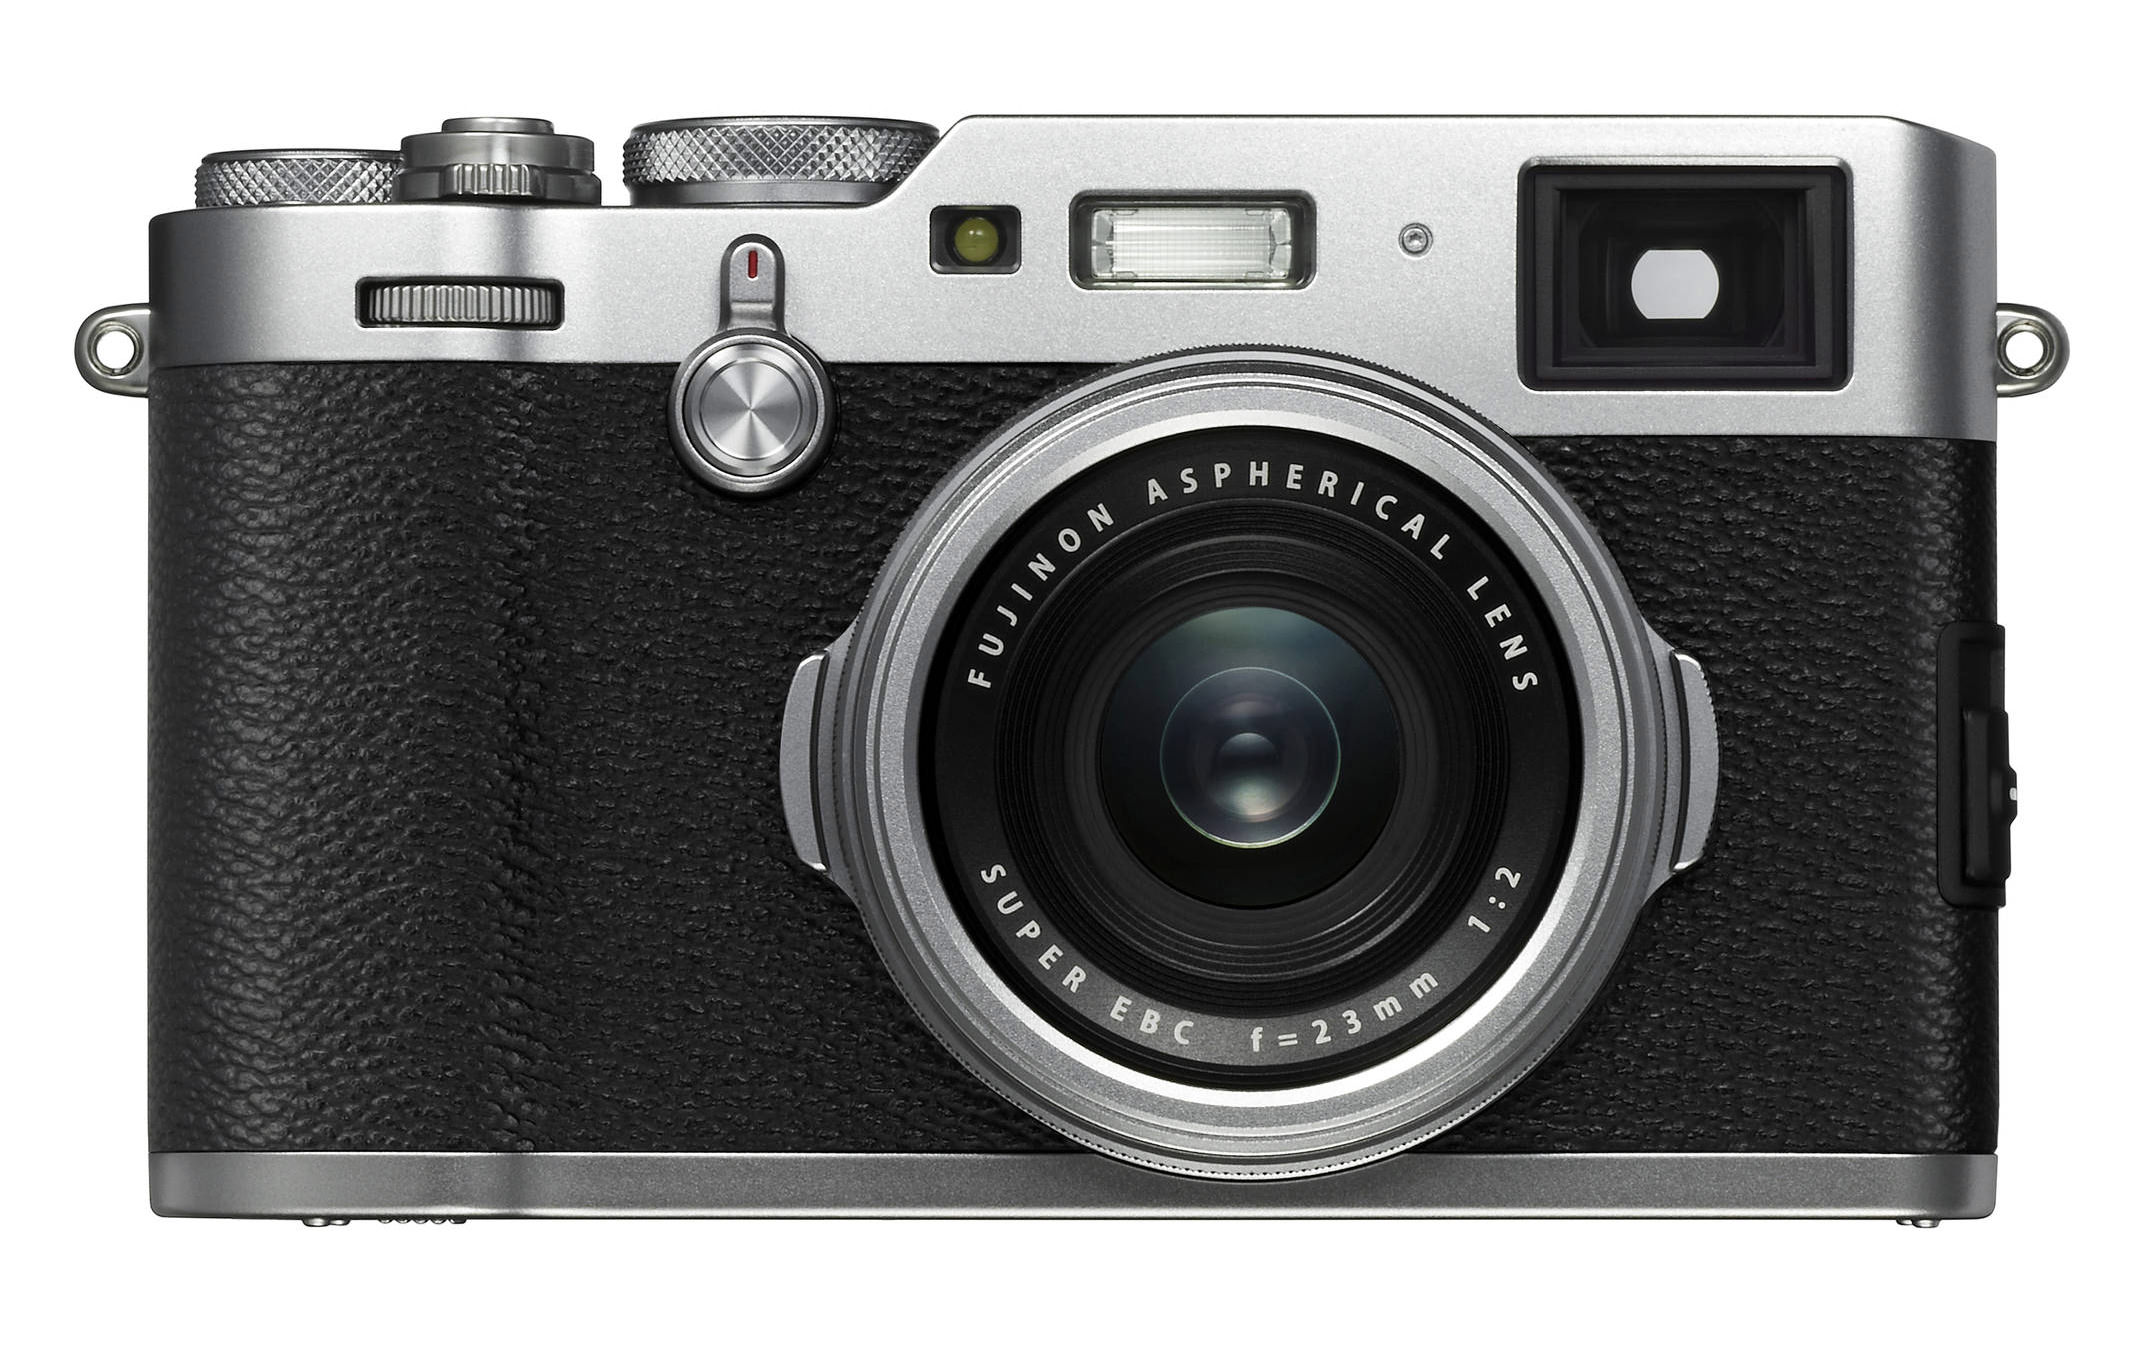
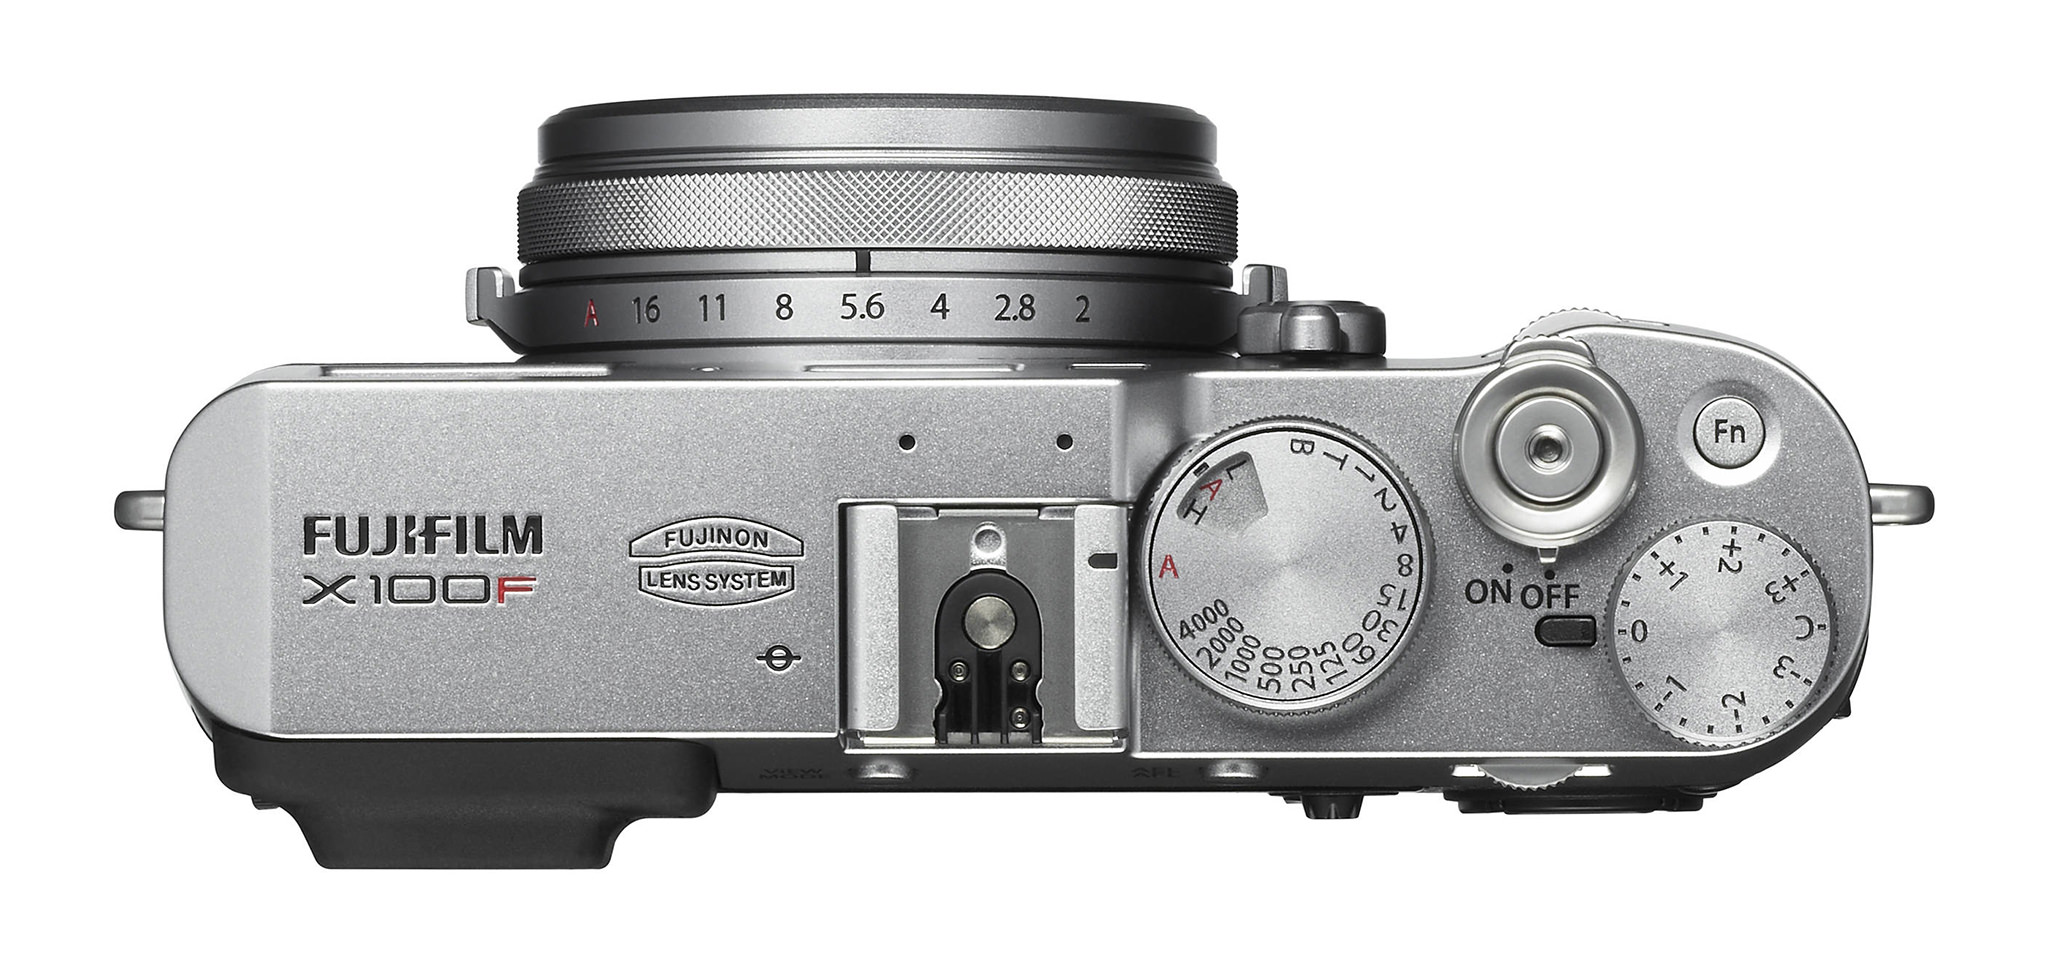
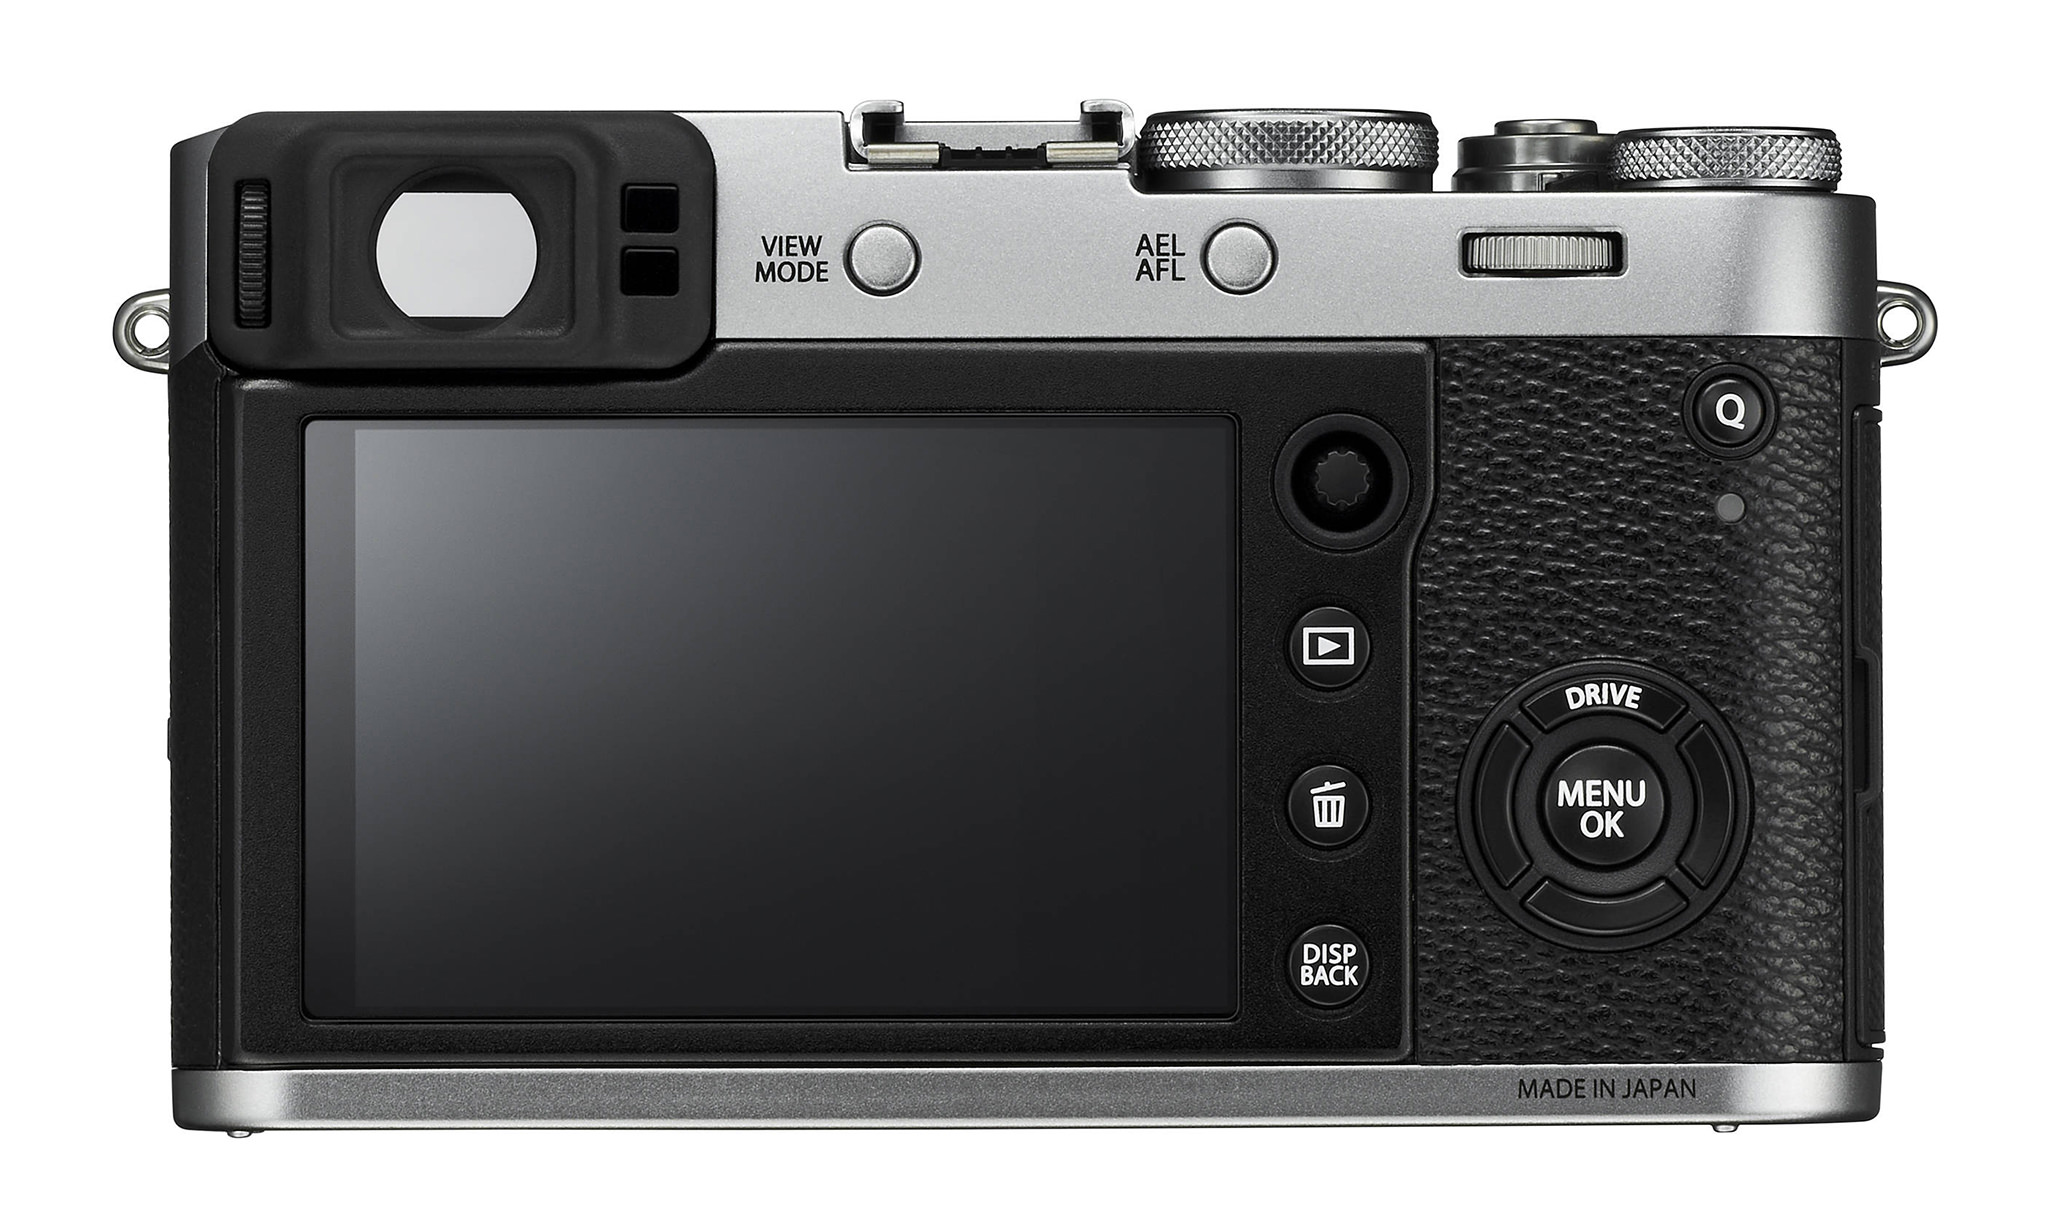
    Controls and Handling


    The X100F has a high number of customizable function buttons, as well as several different dials across the camera that all do different things. It is easy for someone who comes across this camera for the first time to be a bit confused by all the options. So, I’ll go through some of the most important buttons and other controls on the X100F here.

    تعد كاميرا Fuji X100F هي الكاميرا الرابعة في خط كاميرات Fuji X100 – X100 وX100S وX100T وX100F. على الرغم من أنها تتمتع بتصميم أنيق وقائمة بديهية إلى حد ما، إلا أن العدد الكبير من الخيارات وعناصر التحكم في الكاميرا يمكن أن يجعلها مربكة للمشترين الجدد. نأمل أن يساعد هذا الدليل في إزالة بعض الالتباس وشرح كيفية استخدام Fuji X100F، بما في ذلك الإعدادات الموصى بها لكل خيار في القائمة.

    الضوابط والتعامل

    تحتوي كاميرا X100F على عدد كبير من أزرار الوظائف القابلة للتخصيص، بالإضافة إلى العديد من الأقراص المختلفة عبر الكاميرا والتي تقوم جميعها بأشياء مختلفة. من السهل على أي شخص يصادف هذه الكاميرا لأول مرة أن يشعر بالحيرة من جميع الخيارات. لذا، سأستعرض بعضًا من أهم الأزرار وعناصر التحكم الأخرى الموجودة في X100F هنا.

  • #2
    Front of Camera


    • Red switch: Alternates between electronic and optical viewfinder
    • Button within the red switch: Customizable. I set it to “Focus Check” so I can magnify my focus point when in single-servo or manual focus mode.
    • Aperture dial on the lens: Self explanatory – changes your aperture
    • Focus ring on the lens: In manual autofocus mode, it changes focus. In single-servo autofocus, it also changes focus, but only after you’ve already acquired focus automatically (and only when your AF+MF setting is turned on in the AF/MF menu). In continuous servo autofocus mode, it doesn’t do anything. Note that the focusing ring also can be programmed to change things like white balance or film simulation, but I leave those options off because none of them are very useful for taking RAW photos.
    • Front command dial: Can control certain settings depending upon how you’ve set up the X100F. For example, in the Set Up Menu, set “ISO Dial Setting (A)” to “Command,” and you can use this command dial to change your ISO settings any time you have the top ISO dial set to A (auto).
    أمام الكاميرا


    المفتاح الأحمر: يتناوب بين عدسة الكاميرا الإلكترونية والبصرية الزر الموجود داخل المفتاح الأحمر: قابل للتخصيص. لقد قمت بضبطه على "فحص التركيز" حتى أتمكن من تكبير نقطة التركيز الخاصة بي عندما أكون في وضع التركيز البؤري الفردي أو اليدوي. قرص الفتحة على العدسة: توضيحي - يغير حلقة التركيز الخاصة بالفتحة على العدسة: في وضع التركيز البؤري التلقائي اليدوي، يتغير ركز . في التركيز البؤري التلقائي المعزز الفردي، فإنه يغير التركيز أيضًا، ولكن فقط بعد أن تحصل بالفعل على التركيز تلقائيًا (وفقط عند تشغيل إعداد AF+MF في قائمة AF/MF). في وضع التركيز التلقائي المؤازر المستمر، لا يفعل أي شيء. لاحظ أنه يمكن أيضًا برمجة حلقة التركيز لتغيير أشياء مثل توازن اللون الأبيض أو محاكاة الفيلم، لكنني أترك هذه الخيارات معطلة لأن أيًا منها ليس مفيدًا جدًا لالتقاط صور RAW. قرص التحكم الأمامي: يمكن التحكم في إعدادات معينة اعتمادًا على كيفية استخدامك إعداد X100F. على سبيل المثال، في قائمة الإعداد، اضبط "إعداد قرص ISO (A)" على "أمر"، ويمكنك استخدام قرص التحكم هذا لتغيير إعدادات ISO في أي وقت يتم فيه ضبط قرص ISO العلوي على A (تلقائي).

    تعليق


    • #3
      Top of Camera


      • Shutter Speed Setting Dial: By rotating the large dial on top of the X100F (the one with B, T, 1, 2, 4, and so on) you can change your shutter speed. Set it to “T” and use the rear command dial if you prefer adjusting shutter speed that way.
      • ISO Setting Dial: Pull up on the shutter speed setting dial, then rotate to change your ISO. I find that this takes some getting used to, and you may prefer to set ISO via the front command dial (as mentioned above, by changing “ISO Dial Setting” to “Command” in the X100F’s Set Up menu, then setting ISO to “A” on the dial).
      • Exposure compensation dial: Self explanatory – changes your exposure compensation
      • Fn button: You can customize this to set almost anything, as determined by the “Function (Fn) Setting” options in the Set Up menu (under the Button/Dial Setting header).
      أعلى الكاميرا


      قرص ضبط سرعة الغالق: من خلال تدوير القرص الكبير أعلى كاميرا X100F (القرص الذي يحتوي على B وT و1 و2 و4 وما إلى ذلك) يمكنك تغيير سرعة الغالق. اضبطه على "T" واستخدم قرص التحكم الخلفي إذا كنت تفضل ضبط سرعة الغالق بهذه الطريقة.قرص إعداد ISO: اسحب قرص ضبط سرعة الغالق لأعلى، ثم قم بتدويره لتغيير ISO الخاص بك. أجد أن هذا يتطلب بعض الوقت للتعود عليه، وقد تفضل ضبط ISO عبر قرص التحكم الأمامي (كما هو مذكور أعلاه، عن طريق تغيير "إعداد قرص ISO" إلى "أمر" في قائمة إعداد X100F، ثم ضبط ISO على " "A" على القرص). قرص تعويض التعريض الضوئي: لا يحتاج إلى شرح - يغير زر تعويض التعريض الضوئي الخاص بك: يمكنك تخصيص هذا لتعيين أي شيء تقريبًا، كما هو محدد من خلال خيارات "إعداد الوظيفة (Fn)" في قائمة الإعداد (تحت الزر /رأس إعداد الطلب).

      تعليق


      • #4
        Back of Camera


        • Top left vertical dial: Adjust diopter to make viewfinder clearer and tailored to your eyes
        • View mode: Changes how the viewfinder works. You can disable the viewfinder entirely, or enable it exclusively (disabling the rear LCD). You can also set it to detect your eye, switching between the rear LCD and the viewfinder when you look through the viewfinder, or disabling the rear LCD entirely and only turning on the viewfinder when you look through it. I prefer “Eye Sensor,” which leaves the rear LCD enabled and only turns on the viewfinder when it senses your eye.
        • AEL/AFL: This button can be programmed under “Function (Fn) Setting” in the Set Up menu. By default, holding it down locks exposure and focus. I prefer changing it to AF Lock so that you can use it to autofocus without locking exposure. I also change another menu option – AE/AF-L Lock Mode – to On/Off Switch. That way, simply pressing the AEL/AFL button (not holding it down) locks autofocus.
        • Rear command dial: Can serve a number of functions, including changing shutter speed if you have the top shutter speed dial set to T. You also can scroll this wheel to change the size of your autofocus zone once you press in the joystick. And in playback mode, push in this dial to instantly jump to a highly magnified view. (Note that due to an odd design flaw on the X100F and other Fuji cameras, you need to be shooting RAW + JPEG rather than just RAW if you want to magnify your photos in playback mode to any significant degree.)
        • Q button: Pops up a quick menu where you can change some common settings. You can adjust your personal Q menu in the “Edit/Save Quick Menu” setting in the X100F’s Set Up menu.
        • Joystick: This is how you move autofocus points. Press in the joystick and rotate the rear command dial to change the size of your autofocus zone.
        • Review button: Plays back your images
        • Trash button: Deletes images
        • DISP/Back: Changes the information displayed on your LCD or viewfinder while taking photos, or to go back when navigating in the X100F’s menu system
        • Drive: Changes the drive mode of the X100F to let you shoot continuously, single shot, movie mode, and so on
        • Menu/OK: Enters the X100F menu and selects items
        • Left, Down, and Right Arrow Buttons: Fully customizable function buttons, assigned via the “Function (Fn) Setting” options in the Set Up menu (under the Button/Dial Setting header)
        الجزء الخلفي من الكاميرا


        القرص الرأسي العلوي الأيسر: اضبط الديوبتر لجعل محدد المنظر أكثر وضوحًا ومخصصًا لعينيك. وضع العرض: يغير كيفية عمل محدد المنظر. يمكنك تعطيل عدسة الكاميرا بالكامل، أو تمكينها بشكل حصري (تعطيل شاشة LCD الخلفية). يمكنك أيضًا ضبطها لاكتشاف عينك، والتبديل بين شاشة LCD الخلفية وعدسة الكاميرا عندما تنظر من خلال عدسة الكاميرا، أو تعطيل شاشة LCD الخلفية بالكامل وتشغيل عدسة الكاميرا فقط عندما تنظر من خلالها. أفضّل "مستشعر العين،" الذي يترك شاشة LCD الخلفية ممكّنة ويقوم بتشغيل عدسة الكاميرا فقط عندما يستشعر عينك.AEL/AFL: يمكن برمجة هذا الزر ضمن "إعداد الوظيفة (Fn)" في قائمة الإعداد. بشكل افتراضي، يؤدي الضغط باستمرار عليه إلى قفل التعرض والتركيز. أفضل تغييره إلى AF Lock بحيث يمكنك استخدامه للتركيز التلقائي دون قفل التعرض. لقد قمت أيضًا بتغيير خيار القائمة الآخر - وضع قفل AE/AF-L - إلى مفتاح التشغيل/الإيقاف. وبهذه الطريقة، يؤدي الضغط ببساطة على زر AEL/AFL (دون الضغط عليه باستمرار) إلى قفل التركيز التلقائي. قرص التحكم الخلفي: يمكن أن يخدم عددًا من الوظائف، بما في ذلك تغيير سرعة الغالق إذا تم ضبط قرص سرعة الغالق العلوي على T. ويمكنك أيضًا التمرير هذه العجلة لتغيير حجم منطقة التركيز التلقائي بمجرد الضغط على عصا التحكم. وفي وضع التشغيل، اضغط على هذا القرص للانتقال على الفور إلى عرض مكبر للغاية. (لاحظ أنه نظرًا لوجود عيب غريب في التصميم في كاميرا X100F وكاميرات Fuji الأخرى، فأنت بحاجة إلى تصوير RAW + JPEG بدلاً من RAW فقط إذا كنت تريد تكبير صورك في وضع التشغيل إلى أي درجة كبيرة.) زر Q: ينبثق للأعلى. قائمة سريعة حيث يمكنك تغيير بعض الإعدادات الشائعة. يمكنك ضبط قائمة Q الشخصية الخاصة بك في إعداد "Edit/Save Quick Menu" في قائمة إعداد X100F. عصا التحكم: هذه هي الطريقة التي تحرك بها نقاط التركيز البؤري التلقائي. اضغط على عصا التحكم وقم بتدوير قرص التحكم الخلفي لتغيير حجم منطقة التركيز البؤري التلقائي. زر المراجعة: يعرض صورك زر سلة المهملات: يحذف الصور DISP/Back: يغير المعلومات المعروضة على شاشة LCD أو عدسة الكاميرا أثناء التقاط الصور، أو الرجوع إلى الخلف عند التنقل في نظام قائمة X100F Drive: تغيير وضع محرك X100F للسماح لك بالتصوير المستمر، واللقطة الواحدة، ووضع الفيلم، وما إلى ذلك القائمة/موافق: الدخول إلى قائمة X100F واختيار العناصر أزرار السهم الأيسر والأسفل واليمين: أزرار وظيفية قابلة للتخصيص بالكامل، يتم تعيينها من خلال خيارات "إعدادات الوظيفة (Fn)" في قائمة الإعداد (تحت رأس إعداد الزر/الطلب)

        تعليق


        • #5
          Left-hand side autofocus switch
          • M: Manual focus, although you can still press the AEL/AFL button to autofocus – but you can’t track a subject across the frame when focusing this way. If you have assigned “Focus Check” to a certain button in the Set Up menu, or enabled the dedicated “Focus Check” option in the AF/MF menu, autofocusing in M mode will magnify your LCD screen or electronic viewfinder view.
          • C: Continuous servo autofocus, where the X100F focuses continually when you hold down the shutter button and doesn’t stop (unless you press the AEL/AFL button and lock focus). This mode is more prone to errors than single servo autofocus, but it can be necessary when you’re shooting a moving subject. “Focus Check” doesn’t work in continuous servo autofocus mode, and neither does manual focus.
          • S: Single servo autofocus, where the X100F focuses once and locks down after it has acquired focus. This is the most accurate way to focus with the X100F, but it only works when you have a nonmoving subject. After autofocus has locked on in this mode, you can spin the focusing ring or press your assigned Focus Check function button to magnify your focus point and adjust slightly as needed. This is the mode I tend to use with the X100F.
          مفتاح التركيز التلقائي على الجانب الأيسر

          M: التركيز البؤري اليدوي، على الرغم من أنه لا يزال بإمكانك الضغط على زر AEL/AFL للتركيز البؤري التلقائي - ولكن لا يمكنك تتبع الهدف عبر الإطار عند التركيز البؤري بهذه الطريقة. إذا قمت بتعيين "Focus Check" لزر معين في قائمة الإعداد، أو قمت بتمكين خيار "Focus Check" المخصص في قائمة AF/MF، فإن التركيز البؤري التلقائي في الوضع M سيؤدي إلى تكبير شاشة LCD أو عرض عدسة الكاميرا الإلكترونية. C: التركيز التلقائي المؤازر المستمر، حيث يركز X100F بشكل مستمر عند الضغط باستمرار على زر الغالق ولا يتوقف (إلا إذا قمت بالضغط على زر AEL/AFL وقفل التركيز). يكون هذا الوضع أكثر عرضة للأخطاء من التركيز البؤري التلقائي المؤازر الفردي، ولكنه قد يكون ضروريًا عند تصوير هدف متحرك. "لا يعمل "فحص التركيز" في وضع التركيز التلقائي المؤازر المستمر، ولا التركيز اليدوي أيضًا. S: التركيز التلقائي المؤازر الفردي، حيث يركز جهاز X100F مرة واحدة ويتم قفله بعد اكتساب التركيز. هذه هي الطريقة الأكثر دقة للتركيز البؤري باستخدام كاميرا X100F، ولكنها تعمل فقط عندما يكون لديك هدف غير متحرك. بعد قفل التركيز التلقائي في هذا الوضع، يمكنك تدوير حلقة التركيز أو الضغط على زر وظيفة التحقق من التركيز المخصص لك لتكبير نقطة التركيز وضبطها قليلاً حسب الحاجة. هذا هو الوضع الذي أميل إلى استخدامه مع X100F.

          تعليق


          • #6
            X100F Camera Settings


            Here, I’ll explain every one of the Fuji X100F menu settings and give my personal recommendation for how to set it optimally. Please keep in mind that these recommendations are not a one-size-fits-all answer. It’s intended to set you on the right path, but there is a reason why Fuji has so many options here – everyone’s needs are different. So, feel free to take these as a starting point, but don’t be afraid to pick different settings for yourself as needed.

            إعدادات الكاميرا X100F

            سأشرح هنا كل إعدادات قائمة Fuji X100F وأقدم توصيتي الشخصية لكيفية ضبطها على النحو الأمثل. يرجى أن تضع في اعتبارك أن هذه التوصيات ليست إجابة واحدة تناسب الجميع. إنه يهدف إلى وضعك على الطريق الصحيح، ولكن هناك سبب وراء توفر العديد من الخيارات هنا في فوجي - حيث أن احتياجات كل شخص مختلفة. لذا، لا تتردد في اتخاذ هذه كنقطة بداية، ولكن لا تخف من اختيار إعدادات مختلفة لنفسك حسب الحاجة.

            تعليق


            • #7
              Image Quality Menu
              • Image Size: Grayed-out (because of shooting only RAW); when shooting JPEG pick “L 3:2” for maximum quality
              • Image Quality: RAW
              • RAW Recording: Lossless Compressed
              • Film Simulation: Standard (doesn’t affect RAW photo)
              • Grain Effect: Off (doesn’t affect RAW photo)
              • Dynamic Range: DR 100% (doesn’t affect RAW photo)
              • White Balance: Auto (doesn’t affect RAW photo)
              • Highlight Tone: 0 (doesn’t affect RAW photo)
              • Shadow Tone: 0 (doesn’t affect RAW photo)
              • Color: 0 (doesn’t affect RAW photo)
              • Sharpness: 0 (doesn’t affect RAW photo)
              • Noise Reduction: 0 (doesn’t affect RAW photo)
              • Long Exposure Noise Reduction: For long exposures eight seconds or longer, the camera will take two photos: one of the actual scene, and another with the shutter curtain closed that is simply a “dark frame.” The dark frame will still have some noise and hot pixels, though, which the X100F then subtracts from the actual photo, giving a result with less noise. Turn it on if you don’t mind waiting twice as long for long exposure photos to capture, and turn it off if you’re willing to accept some extra noise in exchange for a faster capture process.
              • Color Space: Adobe RGB (doesn’t affect RAW photo)
              • Pixel Mapping: Tells the X100F to read its own sensor for hot pixels in order to subtract them from photos (including RAW). It’s worth doing this from time to time, especially if you start seeing new hot pixels appear in your images.
              • Select Custom Setting: Selects among the custom settings you create from the Edit/Save Custom Setting menu option below
              • Edit/Save Custom Setting: Allows you to create combinations of JPEG-only settings, such as sharpness, noise reduction, dynamic range, and so on, to form a particular look. You don’t need to create these unless you are shooting JPEG, or you want to affect how the in-camera preview of images appear when you review them.
              قائمة جودة الصورة

              حجم الصورة: رمادي (بسبب التصوير بصيغة RAW فقط)؛ عند تصوير JPEG، اختر "L 3:2" للحصول على أقصى جودة جودة الصورة: تسجيل RAWRAW: محاكاة فيلم مضغوط بدون فقدان: قياسي (لا يؤثر على صورة RAW) تأثير الحبوب: إيقاف (لا يؤثر على صورة RAW) النطاق الديناميكي: DR 100 % (توازن اللون الأبيض: تلقائي (لا يؤثر على صورة RAW) درجة التمييز: 0 (لا يؤثر على صورة RAW) درجة الظل: 0 (لا يؤثر على صورة RAW) اللون: 0 (لا يؤثر على صورة RAW) يؤثر صورة RAW) الحدة: 0 (لا يؤثر على صورة RAW) تقليل الضوضاء: 0 (لا يؤثر على صورة RAW) تقليل ضوضاء التعريض الطويل: للتعريض الضوئي الطويل لمدة ثماني ثوانٍ أو أكثر، ستلتقط الكاميرا صورتين: واحدة من الصور الفعلية مشهد وآخر مع إغلاق ستارة الغالق وهو مجرد "إطار مظلم". سيظل الإطار الداكن يحتوي على بعض الضوضاء والبكسلات الساخنة، والتي تطرحها كاميرا X100F بعد ذلك من الصورة الفعلية، مما يعطي نتيجة بضوضاء أقل. قم بتشغيله إذا كنت لا تمانع في الانتظار مرتين لالتقاط الصور ذات التعرض الطويل، وقم بإيقاف تشغيله إذا كنت على استعداد لقبول بعض الضوضاء الإضافية مقابل عملية التقاط أسرع. لا تؤثر على صورة RAW) تعيين البكسل: يخبر X100F بقراءة المستشعر الخاص به لوحدات البكسل الساخنة لطرحها من الصور (بما في ذلك RAW). من المفيد القيام بذلك من وقت لآخر، خاصة إذا بدأت ترى ظهور وحدات بكسل ساخنة جديدة في صورك.حدد الإعداد المخصص: يحدد من بين الإعدادات المخصصة التي تقوم بإنشائها من خيار قائمة تحرير/حفظ الإعداد المخصص الموجود أدناهتحرير/حفظ الإعداد المخصص: يسمح لك لإنشاء مجموعات من إعدادات JPEG فقط، مثل الحدة وتقليل الضوضاء والنطاق الديناميكي وما إلى ذلك، لتكوين مظهر معين. لا تحتاج إلى إنشاء هذه إلا إذا كنت تقوم بتصوير JPEG، أو إذا كنت تريد التأثير على كيفية ظهور معاينة الصور داخل الكاميرا عند مراجعتها.

              تعليق


              • #8
                AF/MF Menu
                • Focus Area: Shows all focus points and lets you select yours, akin to pressing in the joystick. Turn the rear dial to change the size of your focusing zone.
                • AF Mode: Single Point, since it gives you the finest control for focusing in most cases. If you want to track subjects across the entire frame, it is best to use Wide/Tracking and then enable continuous autofocus via the switch on the left of the camera. To track subjects across a smaller portion of the frame, but not just a single point, use Zone and change its size to suit your needs by pressing in the joystick and then turning the rear dial to change the size of your focusing zone.
                • AF Point Display: This only matters when you are in Zone or Wide/Tracking AF Modes, not Single Point. It simply shows your focusing points, which some photographers will find helpful and others distracting. I leave it off.
                • Number of Focus Points: 325 (only available in Single Point) since it gives you the most control. Some prefer 95 simply because you can switch between them faster, since fewer are available.
                • Pre-AF: This is continuous autofocus, prior to taking the photo, on the point you select. Its goal is not to track your subject, but to make it faster to autofocus when you actually want to capture a photo, since your focusing is already close to optimal. However, it can be quite spastic and distracting, so I tend to leave it off.
                • AF Illuminator: On, shines a light to help focus on nearby objects in dark environments. Can be annoying if you are photographing people, so you may want to turn it off.
                • Face/Eye Detection Settings: Depends upon your subject, but you have plenty of options here. I tend to leave mine at Face On/Eye Auto, which detects and focuses on the person’s face and the nearest eye. If you want special control to only focus on the left or right eye, this is where you would do so.
                • AF+MF: On, allows you to manually focus even when in autofocus mode by turning the focusing ring on the lens (only after autofocusing already)
                • MF Assist: This one is down to personal preference in terms of which visual aids you prefer when focusing manually. Personally, I tend to leave it either at standard (which does nothing additional to help when you are manually focusing) but sometimes choose Focus Peak Highlight with Red High in order to emphasize the exact parts of the subject that are the sharpest.
                • Focus Check: This is only used when you are in manual focus mode (accessed via the switch on the side of the camera) or single-servo autofocus and have already focused. When on, this magnifies your focusing area to make it easier to focus manually each time you turn the lens’s focusing ring. I almost always leave it on, because otherwise it can be difficult to tell which areas of the photo are as sharp as possible, even with something like focus peaking enabled.
                • Interlock Spot AE & Focus Area: On, since it means that your metering system (when using spot metering) bases its reading upon the focus point, not a small point in the center of your frame.
                • Instant AF Setting: Even when you are in manual focus mode on the X100F, you will have the ability to autofocus by pressing the AEL AFL button. This setting controls whether you want to focus continuously as you hold down the button, or just once. I almost always keep it on AF-S for single-servo autofocus, but if I am trying to track a moving subject, I occasionally switch to AF-C.
                • Depth-of-Field Scale: When a focus indicator is displayed, either with the depth of field preview button or one of the cycles of the DISP button, this option changes what the X100F tells you is “in focus.” I recommend selecting Pixel Basis because it is more stringent. Film Basis can be too relaxed about what counts as in focus versus not in focus.
                • Release/Focus Priority
                  • AF-S Priority Selection: Release. I prefer to have the camera take a photo when I click the shutter. Some will prefer this option to be “Focus” to make sure the X100F believes it is focused properly before it allows you to take a photo.
                  • AF-C Priority Selection: Release, same reason
                • Corrected AF Frame: If you are in one of the modes with the electronic viewfinder, you can flip the red tab on the front of the X100F to switch between EVF (electronic viewfinder) and OVF (optical viewfinder) with a display overlay. When you are looking at the OVF with a display overlay, and you are focusing closely, enabling “Corrected AF Frame” will show a display of the more accurate autofocus points (considering viewfinder parallax).

                قائمة التركيز البؤري التلقائي/التركيز البؤري التلقائي

                منطقة التركيز: تعرض جميع نقاط التركيز وتتيح لك تحديد نقاط التركيز الخاصة بك، مثل الضغط على عصا التحكم. أدر القرص الخلفي لتغيير حجم منطقة التركيز الخاصة بك.وضع التركيز البؤري التلقائي: نقطة واحدة، لأنه يمنحك أفضل تحكم للتركيز في معظم الحالات. إذا كنت تريد تتبع الأهداف عبر الإطار بأكمله، فمن الأفضل استخدام Wide/Tracking ثم تمكين التركيز التلقائي المستمر عبر المفتاح الموجود على يسار الكاميرا. لتتبع الأهداف عبر جزء أصغر من الإطار، ولكن ليس مجرد نقطة واحدة، استخدم المنطقة وقم بتغيير حجمها ليناسب احتياجاتك عن طريق الضغط على عصا التحكم ثم تدوير القرص الخلفي لتغيير حجم منطقة التركيز البؤري لديك. العرض: هذا مهم فقط عندما تكون في المنطقة أو في أوضاع التركيز البؤري التلقائي الواسعة/التتبع، وليس في نقطة واحدة. إنه يعرض ببساطة نقاط التركيز الخاصة بك، والتي سيجدها بعض المصورين مفيدة والبعض الآخر يشتت انتباههم. أتركه عدد نقاط التركيز: 325 (متوفر فقط في نقطة واحدة) لأنه يمنحك أكبر قدر من التحكم. يفضل البعض 95 ببساطة لأنه يمكنك التبديل بينهما بشكل أسرع، نظرًا لتوفر عدد أقل منها.Pre-AF: هذا هو التركيز التلقائي المستمر، قبل التقاط الصورة، على النقطة التي تحددها. هدفها ليس تتبع موضوعك، ولكن جعل التركيز البؤري التلقائي أسرع عندما تريد بالفعل التقاط صورة، نظرًا لأن التركيز البؤري الخاص بك قريب بالفعل من المستوى الأمثل. ومع ذلك، يمكن أن يكون مشتتًا ومشتتًا للغاية، لذا أميل إلى تركه مطفأً.‏ AF Illuminator: يعمل، يضيء ضوءًا للمساعدة في التركيز على الأشياء القريبة في البيئات المظلمة. قد يكون الأمر مزعجًا إذا كنت تقوم بتصوير الأشخاص، لذا قد ترغب في إيقاف تشغيله.إعدادات اكتشاف الوجه/العين: تعتمد على موضوعك، ولكن لديك الكثير من الخيارات هنا. أميل إلى ترك جهازي في Face On/Eye Auto، الذي يكتشف ويركز على وجه الشخص وأقرب عين. إذا كنت تريد تحكمًا خاصًا للتركيز فقط على العين اليسرى أو اليمنى، فهذا هو المكان الذي يمكنك القيام فيه.AF+MF: تشغيل، يسمح لك بالتركيز يدويًا حتى عندما تكون في وضع التركيز البؤري التلقائي عن طريق تدوير حلقة التركيز على العدسة (فقط بعد مساعدة MF: يرجع هذا إلى التفضيل الشخصي من حيث الوسائل البصرية التي تفضلها عند التركيز يدويًا. أنا شخصياً أميل إلى ترك الأمر إما في المستوى القياسي (والذي لا يفعل شيئًا إضافيًا للمساعدة عند التركيز يدويًا) ولكن في بعض الأحيان أختار Focus Peak Highlight مع Red High من أجل التأكيد على الأجزاء الدقيقة من الموضوع الأكثر وضوحًا. يتم استخدام هذا فقط عندما تكون في وضع التركيز البؤري اليدوي (يتم الوصول إليه عبر المفتاح الموجود على جانب الكاميرا) أو التركيز البؤري التلقائي أحادي المؤازرة وقمت بالتركيز بالفعل. عند التشغيل، يعمل هذا على تكبير منطقة التركيز لتسهيل التركيز يدويًا في كل مرة تقوم فيها بإدارة حلقة التركيز الخاصة بالعدسة. أتركه دائمًا تقريبًا قيد التشغيل، لأنه بخلاف ذلك قد يكون من الصعب معرفة مناطق الصورة الأكثر وضوحًا قدر الإمكان، حتى مع تمكين شيء مثل ذروة التركيز البؤري. (عند استخدام القياس الموضعي) تعتمد قراءتها على نقطة التركيز، وليس نقطة صغيرة في وسط الإطار. إعداد التركيز البؤري التلقائي الفوري: حتى عندما تكون في وضع التركيز البؤري اليدوي على X100F، سيكون لديك القدرة على التركيز البؤري التلقائي بالضغط على زر AEL AFL. يتحكم هذا الإعداد فيما إذا كنت تريد التركيز بشكل مستمر أثناء الضغط باستمرار على الزر، أو مرة واحدة فقط. أحتفظ به دائمًا تقريبًا على AF-S للتركيز البؤري التلقائي الفردي، ولكن إذا كنت أحاول تتبع هدف متحرك، فإنني أتحول أحيانًا إلى AF-C. عمق زر معاينة المجال أو إحدى دورات زر DISP، فإن هذا الخيار يغير ما يخبرك به X100F أنه "في التركيز". أوصي باختيار Pixel Basis لأنه أكثر صرامة. يمكن أن يكون أساس الفيلم مريحًا للغاية بشأن ما يعتبر في التركيز وليس في التركيز.الإصدار/أولوية التركيز AF-S اختيار الأولوية: الإصدار. أفضّل أن تلتقط الكاميرا صورة عندما أنقر على زر الغالق. سيفضل البعض أن يكون هذا الخيار "تركيزًا" للتأكد من أن X100F يعتقد أنه تم التركيز عليه بشكل صحيح قبل أن يسمح لك بالتقاط صورة. اختيار أولوية AF-C: الإصدار، نفس السبب إطار التركيز البؤري التلقائي المصحح: إذا كنت في أحد باستخدام محدد المنظر الإلكتروني، يمكنك قلب علامة التبويب الحمراء الموجودة في الجزء الأمامي من X100F للتبديل بين EVF (معين المنظر الإلكتروني) وOVF (معين المنظر البصري) مع تراكب الشاشة. عندما تنظر إلى OVF مع تراكب شاشة العرض، وتقوم بالتركيز عن كثب، فإن تمكين "إطار التركيز البؤري التلقائي المصحح" سيعرض عرضًا لنقاط التركيز البؤري التلقائي الأكثر دقة (مع الأخذ في الاعتبار اختلاف اختلاف معين المنظر).

                تعليق


                • #9
                  Shooting Setting Menu
                  • Self-Timer: Off for taking photos without a delay, 2 seconds for tripod-based landscape work, 10 seconds when you need to run in front of the camera and join a group photo
                  • Interval Timer Shooting: For taking timelapses. It lets you select the interval between shots and the total number of photos.
                  • Film Simulation BKT: Lets you cycle between film presets across three photos. Only affects JPEGs
                  • Photometry: This is to adjust metering settings. I almost always leave it on Multi, but occasionally use Spot if the X100F is consistently under- or over-exposing my subject. Note that if you have face detection turned on, all Photometry options will be grayed out.
                  • Shutter Type: Mechanical + Electronic. The camera takes photos with the mechanical leaf shutter until your shutter speed is too fast for that to be possible (faster than 1/4000 second), beyond which the X100F switches to electronic shutter. Using solely the electronic shutter can result in a jello-like distortion effect when capturing moving objects.
                  • ISO Auto Setting: Lets you adjust the behavior of Auto ISO. This is an important setting, and the X100F gives you the ability to set up to three different Auto ISO defaults that you can select depending upon the occasion. “Default Sensitivity” is the ISO that the X100F will attempt to use. It will only use a higher ISO if your scene is dark enough that your shutter speed has reached the “Min Shutter Speed” value you set. “Max Sensitivity” is the highest ISO value that the X100F will use, no matter what. If you’re taking pictures in such a dark scene that your Max Sensitivity and Min Shutter Speed values have already been reached, the X100F will use longer shutter speeds rather than increase ISO any further.
                  • Conversion Lens: This setting is only for cases when you are using the TCL-X100 teleconverter or WCL-X100 wide-angle converter with the X100F.
                  • Digital Tele-Conv.: Automatically crops your photos, either for a 41mm or 58mm equivalent view. Keep it turned off. Only available when shooting JPEG.
                  • ND Filter: Enables the built-in ND filter on the X100F. Not recommended unless you are shooting a long exposure on a tripod and need a longer shutter speed, or want to shoot with a wide aperture (and potentially flash) in particularly bright environments.
                  • Wireless Communication: Lets you sync the X100F to an app on your phone
                  قائمة إعدادات التصوير

                  مؤقت ذاتي: إيقاف لالتقاط الصور دون تأخير، ثانيتان لعمل المناظر الطبيعية على حامل ثلاثي القوائم، 10 ثوانٍ عندما تحتاج إلى الركض أمام الكاميرا والانضمام إلى صورة جماعية بفاصل زمني للتصوير: لالتقاط لقطات زمنية. فهو يتيح لك تحديد الفاصل الزمني بين اللقطات والعدد الإجمالي للصور.Film Simulation BKT: يتيح لك التنقل بين الإعدادات المسبقة للفيلم عبر ثلاث صور. يؤثر فقط على القياس الضوئي لملفات JPEG: وذلك لضبط إعدادات القياس. أتركه دائمًا تقريبًا على Multi، لكن في بعض الأحيان أستخدم Spot إذا كان X100F يقوم دائمًا بتعريض هدفي بشكل أقل أو زائد. لاحظ أنه في حالة تشغيل ميزة اكتشاف الوجه، ستصبح جميع خيارات قياس الضوء باللون الرمادي.نوع الغالق: ميكانيكي + إلكتروني. تلتقط الكاميرا صورًا باستخدام الغالق الورقي الميكانيكي حتى تصبح سرعة الغالق لديك سريعة جدًا بحيث لا يكون ذلك ممكنًا (أسرع من 1/4000 ثانية)، وبعد ذلك يتحول X100F إلى الغالق الإلكتروني. يمكن أن يؤدي استخدام الغالق الإلكتروني فقط إلى تأثير تشويه يشبه الجيلي عند التقاط كائنات متحركة.إعداد ISO التلقائي: يتيح لك ضبط سلوك ISO التلقائي. يعد هذا إعدادًا مهمًا، ويمنحك الطراز X100F القدرة على إعداد ما يصل إلى ثلاثة إعدادات ISO تلقائية مختلفة يمكنك تحديدها وفقًا للمناسبة. "الحساسية الافتراضية" هي ISO التي سيحاول X100F استخدامها. لن يستخدم سوى حساسية ISO أعلى إذا كان مشهدك مظلمًا بدرجة كافية بحيث تصل سرعة الغالق إلى قيمة "الحد الأدنى لسرعة الغالق" التي قمت بتعيينها. "الحساسية القصوى" هي أعلى قيمة ISO سيستخدمها جهاز X100F، مهما كان الأمر. إذا كنت تلتقط صورًا في مشهد مظلم بحيث تم بالفعل الوصول إلى قيم الحد الأقصى للحساسية والحد الأدنى لسرعة الغالق، فستستخدم كاميرا X100F سرعات غالق أطول بدلاً من زيادة ISO أكثر.عدسة التحويل: هذا الإعداد فقط للحالات التي تستخدم فيها محول التقريب TCL-X100 أو محول الزاوية العريضة WCL-X100 مع X100F. التحويل الرقمي عن بعد: يقوم باقتصاص صورك تلقائيًا، إما لعرض مكافئ مقاس 41 مم أو 58 مم. أبقيه مغلقا. متاح فقط عند التصوير بصيغة JPEG.مرشح ND: يتيح مرشح ND المدمج في كاميرا X100F. لا يُنصح به إلا إذا كنت تقوم بالتصوير بتعريض ضوئي طويل على حامل ثلاثي القوائم وتحتاج إلى سرعة غالق أطول، أو ترغب في التصوير بفتحة واسعة (وربما فلاش) في بيئات مشرقة بشكل خاص.الاتصال اللاسلكي: يتيح لك مزامنة X100F مع تطبيق على جهازك هاتف

                  تعليق


                  • #10
                    Flash Setting Menu
                    • Flash Function Setting: Main flash control. Off when you don’t need flash, typically TTL when you do (through-the-lens automatic flash).
                      • TTL Mode: TTL
                      • Sync: Fire the flash at the beginning of your exposure (1st Curtain) or at the end (2nd Curtain). When photographing moving objects, you generally will want to change Sync Mode to be 2nd Curtain to capture the motion of the subject before the flash properly – the blur leading into a sharp subject.
                    • Red Eye Removal: Off
                    • TTL-Lock Mode: TTL Lock gives you a consistent flash exposure across several images when enabled (which must be done via a custom function button you assign). This chooses whether the exposure is locked at the prior metered exposure or by metering via a set of pre-flashes.
                    • LED Light Setting: Lets you use the video light on your flash to act as a focus assist beam and/or a catchlight. Keep it off unless you have a need for either of those features. Grayed out except with external flash.
                    • Master Setting: Choose a flash group for a hotshoe-mounted flash, or turn it off and light the photo entirely with off-camera flash. Grayed out unless using external flash.
                    • CH Setting: Channel for master and remote flash communication
                    • Built-in Flash: Whether you want the built-in flash to be able to fire or not

                    قائمة إعدادات الفلاش

                    إعداد وظيفة الفلاش: التحكم الرئيسي في الفلاش. يتم إيقافه عندما لا تحتاج إلى فلاش، وعادةً ما يكون TTL عندما تفعل ذلك (فلاش تلقائي عبر العدسة). وضع TTL: TTLSync: أطلق الفلاش في بداية التعريض الضوئي (الستارة الأولى) أو في النهاية (الستارة الثانية) . عند تصوير كائنات متحركة، فأنت تريد عمومًا تغيير وضع المزامنة ليكون الستارة الثانية لالتقاط حركة الهدف قبل الفلاش بشكل صحيح - حيث يؤدي التمويه إلى كائن حاد. إزالة العين الحمراء: وضع OffTTL-Lock: يمنحك قفل TTL التعرض المستمر للفلاش عبر عدة صور عند تمكينه (والذي يجب أن يتم عبر زر وظيفة مخصص تقوم بتعيينه). يختار هذا ما إذا كان يتم قفل التعريض الضوئي عند التعريض الضوئي المقيس مسبقًا أو عن طريق القياس عبر مجموعة من الفلاشات المسبقة إعداد ضوء LED: يتيح لك استخدام ضوء الفيديو الموجود على الفلاش الخاص بك ليكون بمثابة شعاع مساعد للتركيز و/أو ضوء كاذب. احتفظ به متوقفًا إلا إذا كنت بحاجة إلى أي من هذه الميزات. باللون الرمادي باستثناء وجود فلاش خارجي.الإعداد الرئيسي: اختر مجموعة فلاش لفلاش مثبت على hotshoe، أو قم بإيقاف تشغيله وإضاءة الصورة بالكامل باستخدام فلاش خارج الكاميرا. يصبح باللون الرمادي ما لم يتم استخدام الفلاش الخارجي إعداد CH: قناة للاتصال بالفلاش الرئيسي والبعيد فلاش داخلي: ما إذا كنت تريد أن يكون الفلاش الداخلي قادرًا على الإطلاق أم لا

                    تعليق


                    • #11
                      Movie Setting Menu
                      • Movie Mode: Generally 1080/23.98P, but 1080/59.94P for slow motion
                      • Movie AF Mode: Area (lets you select a more specific autofocus point)
                      • HDMI Output Info Display: Off, or On if you want HDMI devices connected to the X100F to match the camera’s info display.
                      • Mic Level Adjustment: Change to increase or decrease in-camera microphone sensitivity. Higher settings are more prone to audio clipping. Disabled when you are not in video mode (accessed via the “Drive” button on the back of the camera)
                      • Mic/Remote Release: Tell the X100F whether you have connected a microphone or a cable release to the connector. Disabled when you are not in video mode (accessed via the “Drive” button on the back of the camera)
                      قائمة إعداد الفيلم

                      وضع الفيلم: بشكل عام 1080/23.98P، ولكن 1080/59.94P للحركة البطيئة وضع AF للفيلم: المنطقة (تتيح لك تحديد نقطة تركيز تلقائي أكثر تحديدًا) عرض معلومات إخراج HDMI: إيقاف، أو تشغيل إذا كنت تريد توصيل أجهزة HDMI بجهاز X100F لتتناسب مع عرض معلومات الكاميرا. تعديل مستوى الميكروفون: قم بالتغيير لزيادة أو تقليل حساسية الميكروفون داخل الكاميرا. الإعدادات الأعلى أكثر عرضة لقص الصوت. يتم تعطيله عندما لا تكون في وضع الفيديو (يتم الوصول إليه عبر زر "Drive" الموجود في الجزء الخلفي من الكاميرا) إصدار الميكروفون/جهاز التحكم عن بعد: أخبر X100F ما إذا كنت قد قمت بتوصيل ميكروفون أو إصدار كابل بالموصل. يتم تعطيله عندما لا تكون في وضع الفيديو (يتم الوصول إليه عبر زر "Drive" الموجود في الجزء الخلفي من الكاميرا)

                      تعليق


                      • #12
                        Set Up Menu
                        • User Setting
                          • Format: To format your memory card
                          • Date/Time: To change the camera’s internal clock
                          • Time difference: To tell the X100F when you are in a different time zone and adjust the internal clock accordingly
                          • Language: Select the X100F’s default language
                          • My Menu Settings: Add, rank, and remove items from your “My Menu” – very useful
                          • Shutter Count: Check the total number of photos taken from your X100F to the nearest hundred
                          • Sound & Flash: A master switch to disable flash and sounds from the X100F when you need maximum quiet
                          • Reset: Lets you reset all Shooting menu or Set Up menu settings.
                        قائمة الضبط

                        تنسيق إعداد المستخدم: لتنسيق بطاقة الذاكرة الخاصة بك التاريخ/الوقت: لتغيير الساعة الداخلية للكاميرا فرق الوقت: لإخبار X100F عندما تكون في منطقة زمنية مختلفة وضبط الساعة الداخلية وفقًا لذلك اللغة: حدد اللغة الافتراضية لـ X100F إعدادات القائمة الخاصة بي: إضافة، تصنيف، وإزالة العناصر من "قائمتي" - مفيد جدًا عدد المصراع: تحقق من إجمالي عدد الصور الملتقطة من جهاز X100F الخاص بك إلى أقرب مائة الصوت والفلاش: مفتاح رئيسي لتعطيل الفلاش والأصوات من X100F عندما تحتاج إلى أقصى قدر من الهدوء، إعادة الضبط: يتيح لك إعادة ضبط جميع إعدادات قائمة التصوير أو قائمة الإعداد.

                        تعليق


                        • #13
                          • Sound Set-Up
                            • AF Beep Vol: Off
                            • Self-Timer Beep Vol: Off
                            • Operation Vol: Off
                            • Shutter Volume: Off if you want only noises from the mechanical shutter. For 100% silent operation, turn this off and enable electronic shutter only (from “Shutter Type” under the Shooting Setting menu). If it’s disconcerting to hear no noise at all while taking pictures with the electronic shutter, such as when looking through the optical viewfinder, turn the volume to low.
                            • Shutter Sound: I prefer the first sound because I find it to be the most realistic.
                            • Playback Volume: For playing back movies. I tend to leave it at 7 or so.
                          Sound Set-UpAF Beep Vol: OffSelf-Timer Beep Vol: OffOperation Vol: OffShutter Volume: إيقاف إذا كنت تريد فقط الضوضاء الصادرة عن الغالق الميكانيكي. للحصول على تشغيل صامت بنسبة 100%، قم بإيقاف تشغيله وتمكين الغالق الإلكتروني فقط (من "نوع الغالق" ضمن قائمة إعدادات التصوير). إذا كان من المقلق عدم سماع أي ضوضاء على الإطلاق أثناء التقاط الصور باستخدام الغالق الإلكتروني، كما هو الحال عند النظر من خلال عدسة الكاميرا البصرية، فقم بخفض مستوى الصوت إلى مستوى منخفض. صوت الغالق: أفضل الصوت الأول لأنني أجده الأكثر واقعية. حجم التشغيل: لتشغيل الأفلام. أنا أميل إلى تركها في الساعة 7 أو نحو ذلك.

                          تعليق


                          • #14
                            • Screen Set-Up
                              • EVF Brightness: 0
                              • EVF Color: 0
                              • LCD Brightness: 0
                              • Image Disp: How long your photo pops up on the rear screen or electronic viewfinder after capture. Set it to “Off” if you don’t want any display at all, and 0.5, 1.5, or Continuous if you want some length of post-capture image display.
                              • EVF Autorotate Displays: Whether or not the EVF information display rotates as you change camera orientation. I leave it On.
                              • Preview Exposure/White Balance in Manual Mode: Preview EXP/WB, so that you see a preview on the rear LCD and EVF of how bright the photo will be after taking it. Only relevant when aperture, shutter speed, and ISO are all set manually.
                              • Preview Pic Effect: On. Displays on the rear LCD and EVF the JPEG-only settings that you chose in the Image Quality menu. This way, you can choose specific JPEG settings (say, Fuji Velvia simulation) and see that preview in live view even though you are shooting RAW and that setting doesn’t affect the RAW photo. This can be useful for imagining how your final edited image will appear.
                              • Framing Guideline: Grid 9 (personal preference, but I find Grid 24 too distracting and HD Framing unhelpful for stills)
                              • Autorotate PB: Off. This one is important; left On, your vertical photos will automatically rotate during image review, taking up a smaller portion of the LCD. When Off, you can just rotate the camera to review vertical photos more effectively.
                              • Focus Scale Units: Meters versus Feet
                              • Disp. Custom Setting: Choose the information displayed in the optical viewfinder and the EVF/rear LCD. There are a lot of options here, and it’s all personal preference, but I recommend turning off anything that is unnecessary for your work simply to eliminate distractions.
                              • Large Indicators Mode (EVF/OVF): Increase the size of information displayed in the viewfinder (both OVF and EVF).
                              • Large Indicators Mode (LCD): Increase the size of information displayed on the rear LCD.
                              • Large Indicators Display Setting: Pick which settings and icons will be increased in size when you have Large Indicators Mode turned on.
                            إعداد الشاشة سطوع EVF: 0 لون EVF: 0 سطوع LCD: 0 عرض الصورة: المدة التي تظهر فيها صورتك على الشاشة الخلفية أو عدسة الكاميرا الإلكترونية بعد الالتقاط. اضبطه على "إيقاف" إذا كنت لا تريد أي عرض على الإطلاق، و0.5 أو 1.5 أو مستمر إذا كنت تريد بعض الطول لعرض الصورة بعد الالتقاط. تغيير اتجاه الكاميرا. أتركها قيد التشغيل معاينة التعريض الضوئي/توازن اللون الأبيض في الوضع اليدوي: قم بمعاينة EXP/WB، بحيث ترى معاينة على شاشة LCD الخلفية ومعين المنظر الإلكتروني لمدى سطوع الصورة بعد التقاطها. يكون هذا مناسبًا فقط عندما يتم ضبط فتحة العدسة وسرعة الغالق وISO يدويًا. يعرض على شاشة LCD الخلفية ومعين المنظر الإلكتروني إعدادات JPEG فقط التي اخترتها في قائمة جودة الصورة. بهذه الطريقة، يمكنك اختيار إعدادات JPEG معينة (على سبيل المثال، محاكاة Fuji Velvia) ورؤية تلك المعاينة في العرض المباشر حتى لو كنت تقوم بتصوير RAW ولا يؤثر هذا الإعداد على صورة RAW. يمكن أن يكون هذا مفيدًا لتخيل كيف ستظهر الصورة النهائية التي تم تحريرها.إرشادات التأطير: الشبكة 9 (تفضيل شخصي، لكنني أجد أن الشبكة 24 مشتتة للغاية والتأطير عالي الدقة غير مفيد للصور الثابتة) التدوير التلقائي لـ PB: إيقاف. هذا مهم. عند تركه قيد التشغيل، سيتم تدوير الصور العمودية تلقائيًا أثناء مراجعة الصورة، لتشغل جزءًا أصغر من شاشة LCD. عند إيقاف التشغيل، يمكنك فقط تدوير الكاميرا لمراجعة الصور الرأسية بشكل أكثر فعالية.وحدات مقياس التركيز: العرض بالمتر مقابل العرض بالقدم. الإعداد المخصص: اختر المعلومات المعروضة في عدسة الكاميرا البصرية وشاشة EVF/شاشة LCD الخلفية. هناك الكثير من الخيارات هنا، وكلها تفضيلات شخصية، لكنني أوصي بإيقاف تشغيل أي شيء غير ضروري لعملك ببساطة للتخلص من عوامل التشتيت.وضع المؤشرات الكبيرة (EVF/OVF): زيادة حجم المعلومات المعروضة في عدسة الكاميرا ( كل من OVF وEVF). وضع المؤشرات الكبيرة (LCD): زيادة حجم المعلومات المعروضة على شاشة LCD الخلفية. إعداد عرض المؤشرات الكبيرة: اختر الإعدادات والأيقونات التي سيتم زيادة حجمها عند تشغيل وضع المؤشرات الكبيرة.

                            تعليق


                            • #15
                              • Button/Dial Setting
                                • Focus Lever Setting: Affects whether moving the joystick changes autofocus points. When set to Lock, you can’t move autofocus points with the joystick at all. Set to “Push Joystick to Unlock,” you can only start moving your autofocus points when you push in the joystick once. Set to On, you move autofocus points any time you move the joystick. I keep it On.
                                • Edit/Save Quick Menu: A very useful option to adjust the layout and content of the Quick Menu (accessed by pressing the Q button). Change this to suit your shooting style and most frequently accessed controls.
                                • Function (Fn) Setting: Lets you assign custom functions to the five FN buttons, as well as the AEL/AFL button and the rear dial. This is down to personal preference, but it is a good way to access settings you use all the time without entering a menu. I recommend at least setting one of the buttons to ISO Auto Setting, and another to AF Lock (letting it function akin to an AF-On button, which the X100F doesn’t have, so that you can focus via the AEL/AFL button instead of just half-pressing the shutter button).
                                • ISO Dial Setting (H): 25600, since 51200 is too impractical to be useful in ordinary circumstances
                                • ISO Dial Setting (A): Command, which switches all ISO adjustments to the front command dial any time “A” is selected on the top ISO dial. This is useful because you can manually select any ISO or one of the ISO Auto Setting options you created earlier (just spin the front command dial all the way to the end). It gives you more flexibility than Auto, which only allows you to select one of the Auto Settings you created earlier.
                                • Focus Ring: The direction you rotate the focus ring, as viewed from behind the camera, to focus toward infinity. This is another personal preference; I was raised a Nikon shooter, so I prefer clockwise.
                                • Control Ring Setting: Off. None of the options they have are particularly useful for RAW photography, although if you find them valuable, you can adjust one of these settings by rotating the focusing ring on your lens.
                                • AE/AF-L Lock Mode: Determines whether the AEL/AFL button must be held down continually in order to lock your settings, or whether it locks after one press and stays until you press the button a second time. I set my X100F to On/Off Switch (S) to get the latter behavior, since I don’t like holding down the button in order to lock autofocus.
                              • Power Management
                                • Auto Power Off: 2 Min (personal preference)
                                • Performance: Standard in most cases, Economy when I’m worried about battery life
                              إعداد الزر/القرص إعداد ذراع التركيز: يؤثر على ما إذا كان تحريك عصا التحكم يغير نقاط التركيز البؤري التلقائي. عند الضبط على القفل، لا يمكنك تحريك نقاط التركيز البؤري التلقائي باستخدام عصا التحكم على الإطلاق. اضبط على "ادفع عصا التحكم لفتح القفل"، ولا يمكنك البدء في تحريك نقاط التركيز البؤري التلقائي إلا عندما تضغط على عصا التحكم مرة واحدة. عند ضبطه على تشغيل، يمكنك نقل نقاط التركيز البؤري التلقائي في أي وقت تقوم فيه بتحريك عصا التحكم. أبقيه قيد التشغيل: تحرير/حفظ القائمة السريعة: خيار مفيد جدًا لضبط تخطيط ومحتوى القائمة السريعة (يمكن الوصول إليها عن طريق الضغط على الزر Q). قم بتغيير هذا ليناسب أسلوب التصوير الخاص بك وعناصر التحكم التي يتم الوصول إليها بشكل متكرر.إعداد الوظيفة (Fn): يتيح لك تعيين وظائف مخصصة لأزرار FN الخمسة، بالإضافة إلى زر AEL/AFL والقرص الخلفي. يعود هذا إلى التفضيل الشخصي، ولكنه طريقة جيدة للوصول إلى الإعدادات التي تستخدمها طوال الوقت دون الدخول إلى القائمة. أوصي بضبط أحد الأزرار على الأقل على إعداد ISO التلقائي، وآخر على قفل AF (السماح له بالعمل على غرار زر AF-On، الذي لا يحتوي عليه X100F، بحيث يمكنك التركيز عبر زر AEL/AFL بدلاً من مجرد الضغط نصف ضغطة على زر الغالق).إعداد قرص ISO (H): 25600، نظرًا لأن 51200 غير عملي جدًا بحيث لا يكون مفيدًا في الظروف العادية إعداد قرص ISO (A): الأمر، الذي يحول جميع تعديلات ISO إلى قرص التحكم الأمامي في أي وقت يتم تحديد "A" على قرص ISO العلوي. يعد هذا مفيدًا لأنه يمكنك يدويًا تحديد أي ISO أو أحد خيارات إعداد ISO التلقائي التي قمت بإنشائها مسبقًا (فقط قم بتدوير قرص الأمر الأمامي حتى النهاية). فهو يمنحك مرونة أكبر من Auto، والذي يسمح لك فقط بتحديد أحد الإعدادات التلقائية التي قمت بإنشائها مسبقًا.حلقة التركيز: الاتجاه الذي تقوم بتدوير حلقة التركيز فيه، كما يتم عرضه من خلف الكاميرا، للتركيز نحو اللانهاية. هذا تفضيل شخصي آخر؛ لقد نشأت مطلق النار من نيكون، لذلك أفضل اتجاه عقارب الساعة إعداد حلقة التحكم: إيقاف. لا يعد أي من الخيارات المتوفرة مفيدًا بشكل خاص لتصوير RAW، على الرغم من أنه إذا وجدتها ذات قيمة، فيمكنك ضبط أحد هذه الإعدادات عن طريق تدوير حلقة التركيز على عدستك.وضع قفل AE/AF-L: يحدد ما إذا كان AEL/AFL يجب الضغط باستمرار على الزر لقفل إعداداتك، أو ما إذا كان يتم قفله بعد ضغطة واحدة ويظل حتى تضغط على الزر مرة ثانية. لقد قمت بضبط جهاز X100F على مفتاح التشغيل/الإيقاف (S) للحصول على السلوك الأخير، لأنني لا أحب الضغط باستمرار على الزر لقفل التركيز التلقائي. إدارة الطاقة إيقاف التشغيل التلقائي: 2 دقيقة (تفضيل شخصي) الأداء: قياسي في في معظم الحالات، يكون الوضع اقتصاديًا عندما أشعر بالقلق بشأن عمر البطارية

                              تعليق

                              يعمل...
                              X