كيف تم صنع هذه الصورة رقم 12؟ How Was This Picture Made #12?

تقليص
X
 
  • تصفية - فلترة
  • الوقت
  • عرض
إلغاء تحديد الكل
مشاركات جديدة

  • كيف تم صنع هذه الصورة رقم 12؟ How Was This Picture Made #12?

    كيف تم صنع هذه الصورة رقم 12؟
    How Was This Picture Made #12?


    In advance of my upcoming article on the directionality and quality of light, composition, and mood, I decided to post a landscape photograph to invite our readers to share their thoughts on how this photo was visualized and constructed. I made this particular photograph at one of my favorite subjects – the coastal bluffs at Torrey Pines State Natural Reserve in San Diego, CA.

    قبل مقالتي القادمة حول اتجاه وجودة الضوء والتركيب والحالة المزاجية، قررت أن أنشر صورة للمناظر الطبيعية لدعوة قرائنا لمشاركة أفكارهم حول كيفية تصور هذه الصورة وإنشائها. لقد التقطت هذه الصورة بالتحديد في أحد موضوعاتي المفضلة - المنحدرات الساحلية في محمية توري باينز الطبيعية في سان دييغو، كاليفورنيا.

  • #2


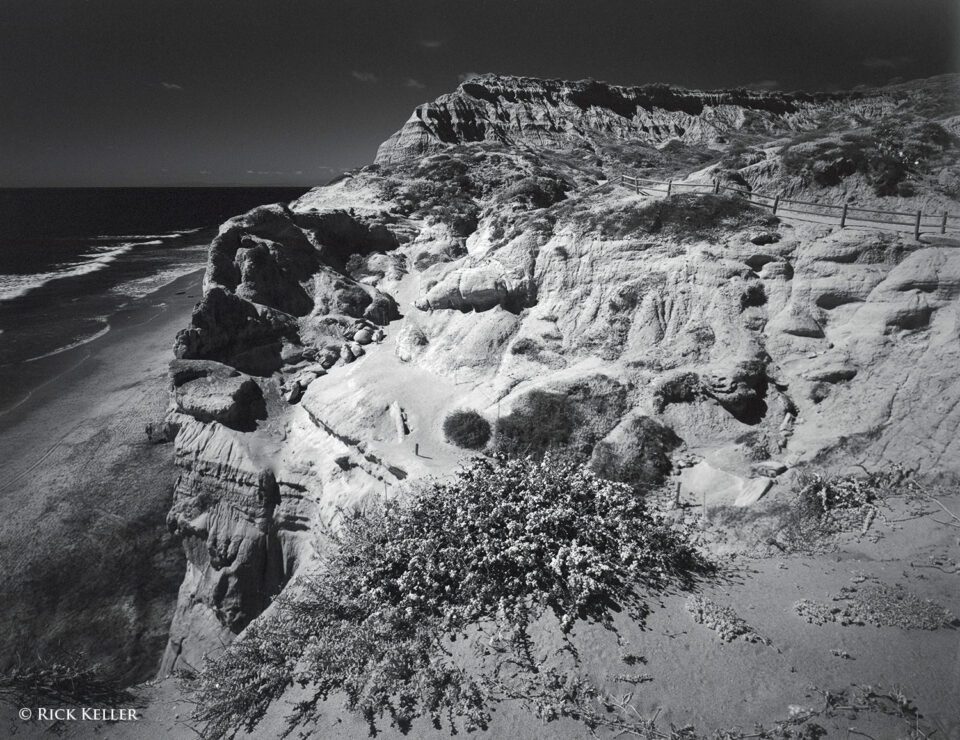
    As you study this image, are there any salient features of the light, contrast, textures, and angle of view? What tools could have been manipulated to create this exposure and print? Any thoughts on the exposure strategy and post-processing (if any)? Hint: one shot, one exposure – as I do with all of my photographs – in the classic tradition.

    Please, stay tuned for the answer next week.


    أثناء دراستك لهذه الصورة، هل هناك أي سمات بارزة للضوء والتباين والأنسجة وزاوية الرؤية؟ ما هي الأدوات التي كان من الممكن التلاعب بها لإنشاء هذا العرض والطباعة؟ هل لديك أي أفكار حول استراتيجية التعرض والمعالجة اللاحقة (إن وجدت)؟ تلميح: لقطة واحدة، وتعريض ضوئي واحد - كما أفعل مع كل صوري الفوتوغرافية - وفقًا للتقليد الكلاسيكي.

    من فضلك تابع الإجابة في الأسبوع القادم.

    تعليق


    • #3
      How Was This Picture Made #12: The Answer
      Last week, for our How Was This Picture Made? series, I had posted a landscape photograph to share and discuss. Thanks to our PL commentators, Gary Bunton, Brian Webster, and Shane, for their participation and sage commentary on the techniques employed and the overall considerations. Well done!


      Let’s review the photograph, which I made along one of the many splendid and uplifting hiking trails at Torrey Pines State Natural Reserve in San Diego, CA.

      Our PL commentator, Brian Webster, had remarked on the dark appearance of the original image (which was actually “straight out of the camera”). Indeed, I agree that the overall exposure was a tad dark (more on this below), so I decided to make a modest adjustment in Photoshop. The new rendition is shown below.


      كيف تم صنع هذه الصورة #12: الجواب
      في الأسبوع الماضي، ناقشنا كيف تم صنع هذه الصورة؟ لقد قمت بنشر صورة للمناظر الطبيعية لمشاركتها ومناقشتها. شكرًا لمعلقينا في PL، غاري بونتون، وبريان ويبستر، وشين، لمشاركتهم وتعليقاتهم الحكيمة على التقنيات المستخدمة والاعتبارات الشاملة. أحسنت!


      دعونا نراجع الصورة التي التقطتها على طول أحد مسارات المشي لمسافات طويلة الرائعة والراقية في محمية توري باينز الطبيعية في سان دييغو، كاليفورنيا.
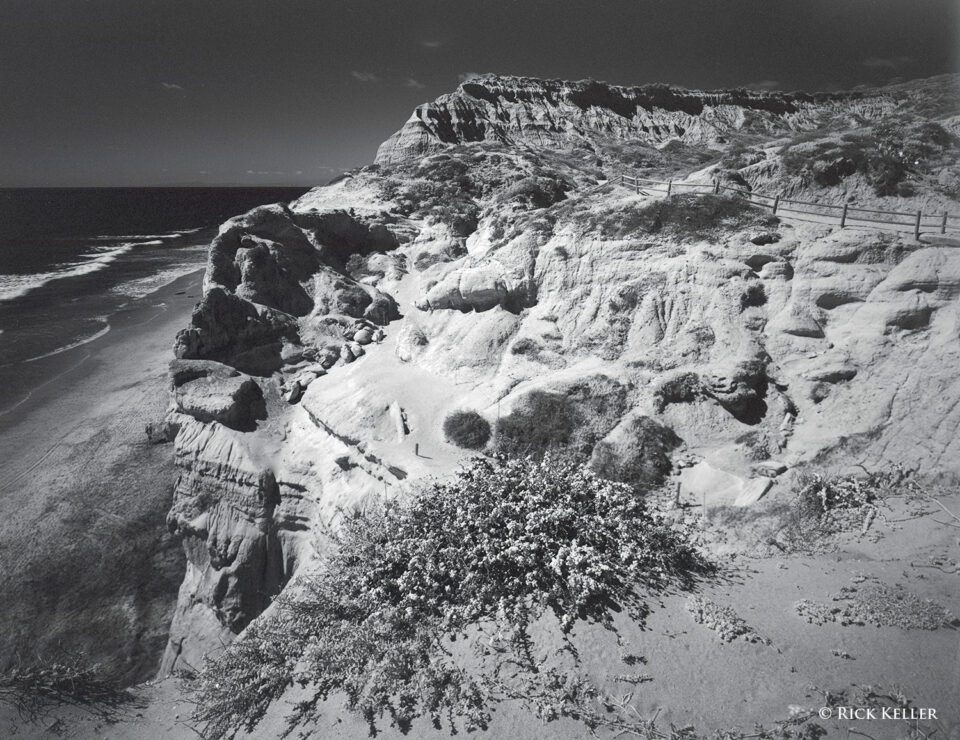
      لقد علق معلقنا في PL، بريان ويبستر، على المظهر المظلم للصورة الأصلية (والتي كانت في الواقع "خارج الكاميرا مباشرة"). في الواقع، أوافق على أن التعرض العام كان غامقًا بعض الشيء (المزيد حول هذا أدناه)، لذلك قررت إجراء تعديل متواضع في Photoshop. يتم عرض التسليم الجديد أدناه.


      تعليق


      • #4
        In terms of the visualization process, after having scouted this scene I desired to create a black and white image that captures the scale, textures, and form of this beautiful sandstone bluff. As I had previously discussed in an article on light, shadows, and visualization, in order for the visual artist to impart shape and depth to a landscape and reveal its textures, ideally the photograph should be made when long shadows are being cast by unidirectional light. Further, I desired to create contrast in such a way that the interplay of light and shadows would draw the viewer’s eyes into the scene.

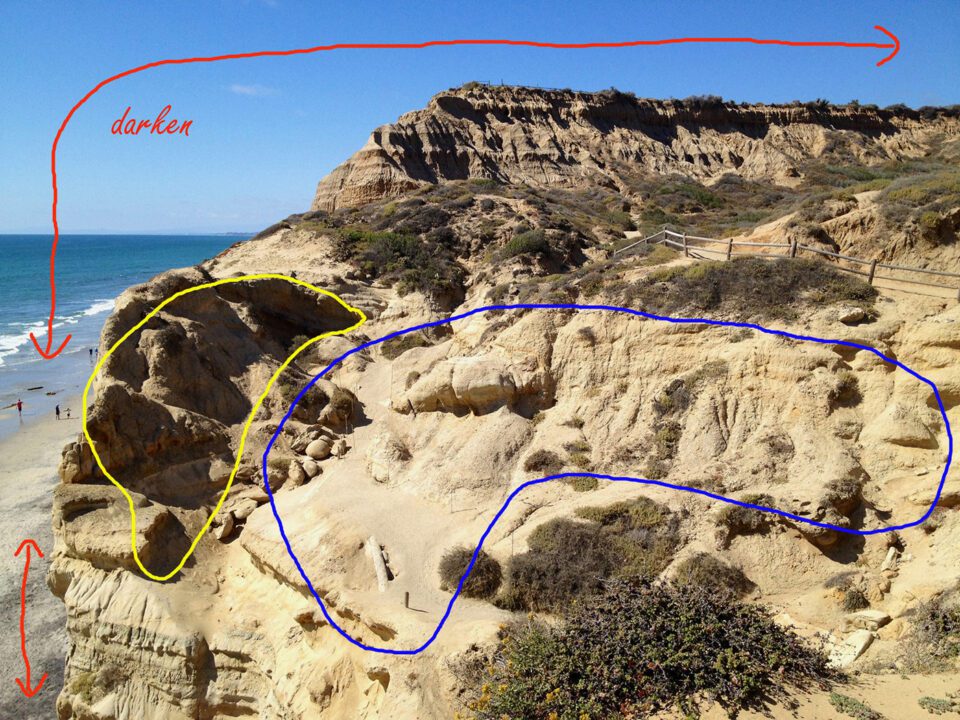
        As I studied the subject through my composing card, I realized that the potential to create a high contrast image was enticing. As the iPhone “scout” photo below reveals, I composed the photograph such that there would be a surrounding rim of sky and sea to the left of the bluff.
        iPhone 4S

        فيما يتعلق بعملية التصور، بعد استكشاف هذا المشهد، كنت أرغب في إنشاء صورة بالأبيض والأسود تلتقط حجم هذه الخدعة الجميلة من الحجر الرملي وملمسها وشكلها. كما ناقشت سابقًا في مقال عن الضوء والظلال والتصور، لكي يتمكن الفنان البصري من نقل الشكل والعمق إلى المناظر الطبيعية والكشف عن قوامها، يجب أن يتم التقاط الصورة بشكل مثالي عندما يتم إلقاء ظلال طويلة بواسطة ضوء أحادي الاتجاه . . علاوة على ذلك، كنت أرغب في خلق التباين بطريقة تجعل التفاعل بين الضوء والظلال يجذب عيون المشاهد إلى المشهد.

        عندما درست الموضوع من خلال بطاقة التأليف الخاصة بي، أدركت أن إمكانية إنشاء صورة عالية التباين كانت مغرية. كما تكشف الصورة أدناه "الكشفية" على جهاز iPhone، فقد قمت بتكوين الصورة بحيث يكون هناك حافة محيطة من السماء والبحر على يسار الخدعة.

        آيفون 4S

        تعليق


        • #5


          In order to draw the viewer into the scene and keep the viewer fixated in the center of the photograph, I needed to darken the blue sky and sea. With the juxtaposition of the dark values in the sand in the left lower corner with dark values in the sky and sea, I visualized creating a rim of “vignetting” around the high values in the center of the bluff to create contrast and invite the viewer’s mind into this world. The deep shadows (shown within the yellow cartoon) at the front of the bluff juxtaposed with the high values in the center lent themselves well to creating depth and revealing form. Our PL commentator, Gary Bunton, wisely pointed out that the dark values in the sky as well as the deep shadows in the bluff could have been created with the use of a red 25A filter (more on this below).

          Based on my previous experience with infrared film in both 35mm and medium formats, an interesting property of sandstone is that it has the potential to appear as “chalk white” when illuminated by infrared light. With this vision in mind, I chose to pursue an infrared rendition. For film I chose Rollei IR 400, which is (sadly) one of the last bastions of infrared film. The previous gold standards, Kodak HIE and Efke, have long been discontinued.
          من أجل جذب المشاهد إلى المشهد وإبقاء المشاهد مثبتًا في وسط الصورة، كنت بحاجة إلى تعتيم السماء الزرقاء والبحر. ومع تجاور القيم الداكنة في الرمال في الزاوية السفلية اليسرى مع القيم الداكنة في السماء والبحر، تصورت إنشاء حافة من "التظليل" حول القيم العالية في وسط المخادعة خلق التباين ودعوة ذهن المشاهد إلى هذا العالم. إن الظلال العميقة (الموضحة في الرسم الكارتوني الأصفر) في مقدمة الخدعة جنبًا إلى جنب مع القيم العالية في المركز تفسح المجال بشكل جيد لخلق شكل عميق وكاشف. أشار معلقنا PL، غاري بونتون، بحكمة إلى أنه كان من الممكن إنشاء القيم المظلمة في السماء وكذلك الظلال العميقة في الخدعة باستخدام مرشح أحمر 25A (المزيد حول هذا أدناه).

          استنادًا إلى تجربتي السابقة مع أفلام الأشعة تحت الحمراء في كل من التنسيقات 35 مم والتنسيقات المتوسطة، فإن إحدى الخصائص المثيرة للاهتمام للحجر الرملي هي أنه لديه القدرة على الظهور كـ "أبيض طباشيري" عند إضاءته بواسطة ضوء الأشعة تحت الحمراء. ومع وضع هذه الرؤية في الاعتبار، اخترت متابعة عملية التسليم بالأشعة تحت الحمراء. بالنسبة للفيلم، اخترت Rollei IR 400، وهو (للأسف) أحد آخر معاقل أفلام الأشعة تحت الحمراء. لقد تم إيقاف المعايير الذهبية السابقة، Kodak HIE وEfke، منذ فترة طويلة.

          تعليق


          • #6
            To create an exposure on infrared film, the photographer must employ filtration to block visible and UV light and allow infrared light to pass through the lens. A key technical point is that the spectral sensitivity of the infrared film must be matched with the spectrum of infrared light that is passed through the filter. For Rollei IR, which has a peak sensitivity of 720 nm with extension up to 820 nm, I used the Hoya R72 infrared filter, which blocks visible light up to 720 nm yet allows passage of light above this threshold (i.e., the infrared spectrum). When you examine this filter, it is not completely opaque, as you can still see slightly through it, meaning that this filter allows some contamination from visible red light. This is not that big of a deal for me, as a mix of a high proportion of IR exposure with a small amount of visible red light exposure might impart a unique look to the image, perhaps distinct from a pure IR or a conventional black and white print.

            In terms of the quality of light (more on this on an upcoming article), I typically (but not always) choose the unidirectional light of early sunrise or sunset to create long shadows in the landscape. However, for creating an infrared exposure, these times of the day are not ideal since light at these extremes of the day is not as enriched with infrared light compared to the intense and non-unidirectional light from the mid-day sun. So, I made a compromise: a clear blue sky in the late afternoon where there would still be a good amount of incident infrared light along with some degree of unidrectionality, which again is instrumental to creating long shadows to lend form and depth to the landscape and revealing its textures. Our PL commentators, Gary Bunton and Brian Webster, had astutely pointed out that this photo was made in the late afternoon, based on the directionality of the shadows.

            لإنشاء تعريض ضوئي على فيلم الأشعة تحت الحمراء، يجب على المصور استخدام الترشيح لحجب الضوء المرئي والأشعة فوق البنفسجية والسماح لضوء الأشعة تحت الحمراء بالمرور عبر العدسة. النقطة التقنية الرئيسية هي أن الحساسية الطيفية لفيلم الأشعة تحت الحمراء يجب أن تتطابق مع طيف ضوء الأشعة تحت الحمراء الذي يتم تمريره عبر المرشح. بالنسبة لـ Rollei IR، الذي يتمتع بحساسية قصوى تبلغ 720 نانومتر مع امتداد يصل إلى 820 نانومتر، استخدمت مرشح الأشعة تحت الحمراء Hoya R72، الذي يحجب الضوء المرئي حتى 720 نانومتر ولكنه يسمح بمرور الضوء فوق هذه العتبة (أي طيف الأشعة تحت الحمراء). . عند فحص هذا الفلتر، فهو ليس معتمًا تمامًا، حيث لا يزال بإمكانك الرؤية قليلاً من خلاله، مما يعني أن هذا الفلتر يسمح ببعض التلوث من الضوء الأحمر المرئي. هذه ليست صفقة كبيرة بالنسبة لي، حيث أن مزيج نسبة عالية من التعرض للأشعة تحت الحمراء مع كمية صغيرة من التعرض للضوء الأحمر المرئي قد يضفي مظهرًا فريدًا على الصورة، ربما يختلف عن الأشعة تحت الحمراء النقية أو اللون الأسود التقليدي طباعة بيضاء.

            فيما يتعلق بجودة الضوء (المزيد حول هذا الأمر في مقال قادم)، عادةً ما أختار (ولكن ليس دائمًا) الضوء أحادي الاتجاه عند شروق الشمس أو غروبها مبكرًا لإنشاء ظلال طويلة في المناظر الطبيعية. ومع ذلك، لإنشاء التعرض للأشعة تحت الحمراء، فإن هذه الأوقات من اليوم ليست مثالية لأن الضوء في هذه الأطراف القصوى من اليوم ليس غنيًا بالأشعة تحت الحمراء مقارنة بالضوء المكثف وغير أحادي الاتجاه من شمس منتصف النهار. لذلك، قمت بتسوية: سماء زرقاء صافية في وقت متأخر بعد الظهر حيث لا يزال هناك قدر كبير من ضوء الأشعة تحت الحمراء الساقط مع درجة معينة من أحادية الاتجاه، وهو ما يعد مرة أخرى مفيدًا في إنشاء ظلال طويلة لإضفاء الشكل والعمق على المناظر الطبيعية .والكشف عن قوامها. لقد أشار معلقونا في PL، غاري بونتون وبريان ويبستر، بذكاء إلى أن هذه الصورة تم التقاطها في وقت متأخر بعد الظهر، بناءً على اتجاه الظلال.

            تعليق


            • #7


              Now, for the trickiest part of the shot: the exposure. Conventional camera light meters and external light meters cannot directly meter infrared light (unless they have been specially modified). In order to obtain a proper exposure on infrared film, the photographer must empirically determine the “working ISO” of the infrared film based on the filter factor of the infrared filter and the prevailing lighting conditions. Rollei IR has a box speed of ISO 400 without the use of an infrared filter. Based on the shared experience of other photographers, the Hoya R72 filter has an estimated filter factor of +5 stops, meaning that the exposure must be increased by five stops (in this case, by prolonging the shutter speed) to obtain a nominal exposure. Many photographers have previously rated the ISO of filtrated Rollei IR 400 to be between ISO 6 to 12. Based on my empiric results with Rollei IR 400 on 120 medium format film where I bracketed exposures between ISO 3 and 25, I previously rated the Hoya R72 filter factor at +6 stops of light and rated the ISO of the film at 6.

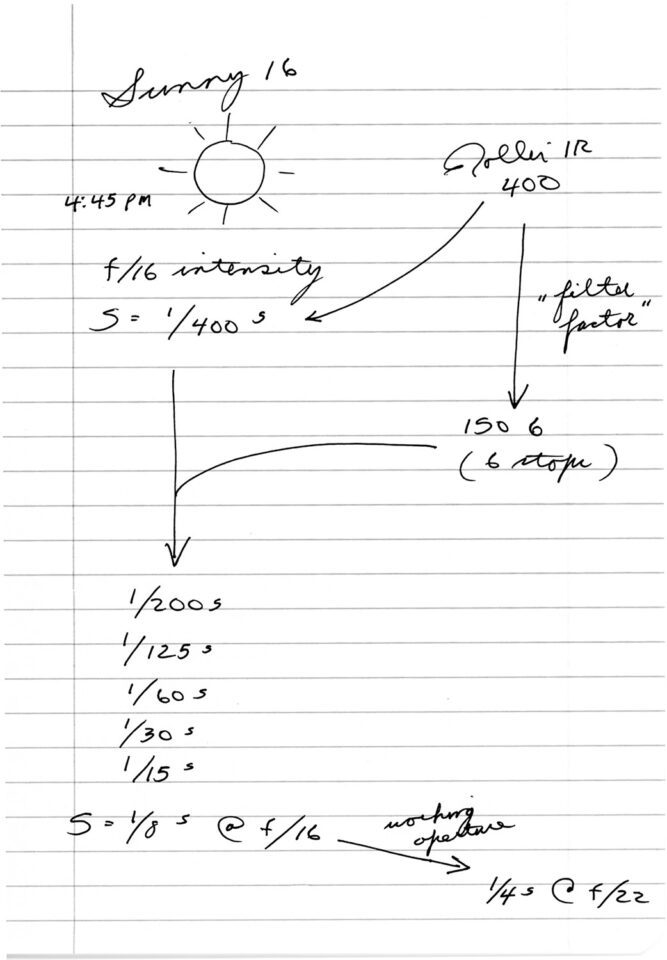
              Once the filter factor and working ISO have been empirically determined, the next step is to properly adjust the exposure (shutter speed) based on the intensity of the light. This is where the time-honored “Sunny 16 Rule” enters the picture. At the time of day of this particular photo (4:45 pm PST), under clear skies, I would have needed to have used a shutter speed (with the aperture set to f/16) that is equal to the reciprocal of the ISO. For example, under clear skies with bright light (as in this exposure), using a film speed of 100 with the aperture set to f/16, a shutter speed of 1100 second (≈1125 second) should render a proper exposure. Therefore, given the box ISO speed of 400 and my chosen filter factor of +6 stops of light, the requisite shutter speed for this exposure would be knocked down from 1400 second to ⅛ second at an aperture of f/16.


              الآن، بالنسبة للجزء الأكثر صعوبة في اللقطة: التعريض الضوئي. لا يمكن لأجهزة قياس ضوء الكاميرا التقليدية وأجهزة قياس الضوء الخارجية قياس ضوء الأشعة تحت الحمراء مباشرة (ما لم يتم تعديلها بشكل خاص). من أجل الحصول على تعريض مناسب لفيلم الأشعة تحت الحمراء، يجب على المصور تحديد "ISO العامل" لفيلم الأشعة تحت الحمراء بشكل تجريبي بناءً على عامل المرشح لمرشح الأشعة تحت الحمراء وظروف الإضاءة السائدة. تبلغ سرعة صندوق Rollei IR ISO 400 دون استخدام مرشح الأشعة تحت الحمراء. استنادًا إلى الخبرة المشتركة للمصورين الفوتوغرافيين الآخرين، يحتوي مرشح Hoya R72 على عامل ترشيح تقديري يبلغ +5 توقفات، مما يعني أنه يجب زيادة التعريض الضوئي بمقدار خمس توقفات (في هذه الحالة، عن طريق إطالة سرعة الغالق) للحصول على تعريض ضوئي اسمي. لقد قام العديد من المصورين سابقًا بتقييم ISO لـ Rollei IR 400 المفلتر ليكون بين ISO 6 إلى 12. استنادًا إلى نتائجي التجريبية مع Rollei IR 400 على 120 فيلمًا متوسط ​​التنسيق حيث قمت بوضع التعريضات بين قوسين بين ISO 3 و25، قمت مسبقًا بتقييم Hoya R72 عامل التصفية عند +6 توقفات للضوء وقيم ISO للفيلم عند 6.

              بمجرد تحديد عامل المرشح وISO العامل بشكل تجريبي، فإن الخطوة التالية هي ضبط التعريض الضوئي (سرعة الغالق) بشكل صحيح بناءً على شدة الضوء. هذا هو المكان الذي تدخل فيه "قاعدة Sunny 16" العريقة إلى الصورة. في وقت التقاط هذه الصورة تحديدًا (4:45 مساءً بتوقيت المحيط الهادئ)، تحت سماء صافية، كنت سأحتاج إلى استخدام سرعة غالق (مع ضبط الفتحة على f/16) والتي تساوي مقلوب ISO . على سبيل المثال، تحت سماء صافية مع ضوء ساطع (كما في هذا التعريض الضوئي)، باستخدام سرعة فيلم تبلغ 100 مع ضبط الفتحة على f/16، يجب أن توفر سرعة الغالق البالغة 1∕100 ثانية (≈1∕125 ثانية) صورة مناسبة التعرض. لذلك، نظرًا لسرعة ISO البالغة 400 وعامل الفلتر الذي اخترته وهو +6 توقفات للضوء، سيتم خفض سرعة الغالق المطلوبة لهذا التعريض الضوئي من 1∕400 ثانية إلى ⅛ ثانية عند فتحة f/16.


              تعليق


              • #8
                But wait . . . this presumes that the photographer intends to use f/16 as the taking aperture for the photo. The photographer may in fact choose to set a different aperture depending on his/her wishes for depth of field (DOF) control. For example, if the photographer desires more DOF than that afforded by f/16 in this scenario, then the aperture will need to be stopped down, requiring a reciprocal increased duration of the shutter speed to compensate. Alternatively, if the photographer desires less DOF that than afforded by f/16 in this scenario, then the aperture will need to be opened with an accompanying reciprocal shortening of the shutter speed to compensate.

                So, which aperture did I choose? This brings us to an equally critical stage of the shot: setting up the camera and lens.

                Our PL commentator, Shane, astutely surmised that I used a view camera for this shot. Indeed, I chose to use a 4×5view camera in order to obtain uniform and simultaneous focus of the foreground and background. To frame the perspective as visualized through my composing card, I used a wide-angle lens, the Nikkor-SW 75mm f/4.5S, which is a razor sharp and contrasty lens and my “go-to” wide-angle lens in large format. This lens provides an angle of view that is similar to that seen with a 21 mm lens in the 35mm format.
                لكن انتظر. . . يفترض هذا أن المصور ينوي استخدام f/16 كفتحة التقاط للصورة. قد يختار المصور في الواقع ضبط فتحة مختلفة وفقًا لرغباته في التحكم في عمق المجال (DOF). على سبيل المثال، إذا كان المصور يرغب في مزيد من DOF أكثر من ذلك الذي يوفره f/16 في هذا السيناريو، فسوف تحتاج فتحة العدسة إلى التوقف، مما يتطلب زيادة متبادلة في مدة سرعة الغالق للتعويض. وبدلاً من ذلك، إذا كان المصور يرغب في مقدار DOF أقل مما يوفره f/16 في هذا السيناريو، فسوف يلزم فتح الفتحة مع تقصير متبادل مصاحب لسرعة الغالق للتعويض.

                إذن، ما هي الفتحة التي اخترتها؟ يقودنا هذا إلى مرحلة بالغة الأهمية من اللقطة: إعداد الكاميرا والعدسة.

                لقد توقع معلق PL الخاص بنا، شين، بذكاء أنني استخدمت كاميرا عرض لهذه اللقطة. في الواقع، اخترت استخدام كاميرا عرض 4 × 5 للحصول على تركيز موحد ومتزامن للمقدمة والخلفية. لتأطير المنظور كما هو متصور من خلال بطاقة التأليف الخاصة بي، استخدمت عدسة واسعة الزاوية، Nikkor-SW مقاس 75 مم f/4.5S، وهي عدسة حادة ومتباينة وعدسة الزاوية الواسعة "المفضلة" كبيرة الحجم شكل. توفر هذه العدسة زاوية رؤية مشابهة لتلك التي تظهر مع عدسة مقاس 21 ملم بتنسيق 35 ملم.

                تعليق


                • #9
                  Of the plethora of technical reasons that I enjoy using a view camera for landscapes is that the design of the camera is such that the lens projects an “inverted” image circle onto the focusing screen (the ground glass) in the same way that images are projected through the human lens onto the retina (before the image is “flipped” by the visual center of the brain). In my humble opinion, viewing an inverted image on the ground glass empowers the photographer to focus more astutely on composition, perspective, shape, and structure. Plus, the use of the dark cloth to shade the ground glass from ambient light in effect isolates the photographer from the distractions of his immediate environment so that he/she becomes “intimate” with the subject. It is a great experience!

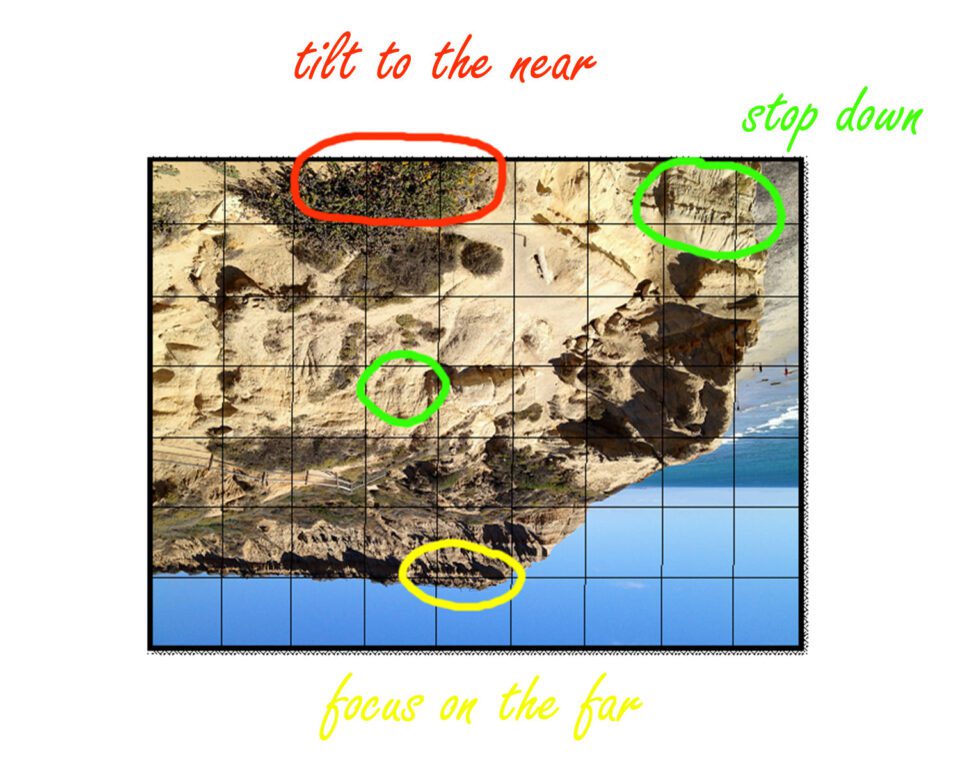
                  Although a full discussion is beyond the scope of this article, the key principle in focusing the view camera is based on the time-honored Scheimpflug Principle, which dictates that the photographer adjust the orientation of the camera such that the plane of focus, the lens plane, and the film plane intersect at a well-defined plane, which renders the foreground and background in complete focus (even before the lens aperture is manually stopped down). The type of camera movements (tilts and swings of the front and rear standards) that are required to arrive at the Scheimpflug “point” vary with the design of the view camera (i.e., base tilts vs axis tilts). The camera that I used here was a Japanese wooden view camera (Ikeda Anba), which is designed to permit tilts of the lens and film planes that pivot at the base of the camera. Other view cameras are constructed such that the lens and film planes must be tilted about a pivot point that is located at the center axis of the front and rear standards. In a nutshell, for view cameras with base tilts, the Scheimpflug plane is best achieved by “tilting (the lens) to the near and focusing on the far”.
                  Ground glass

                  من بين الأسباب الفنية الكثيرة التي أستمتع بها باستخدام كاميرا عرض للمناظر الطبيعية هو أن تصميم الكاميرا بحيث تعرض العدسة دائرة صورة "مقلوبة" على شاشة التركيز (الزجاج الأرضي) بنفس الطريقة التي يتم بها عرض الصور يتم إسقاطها من خلال العدسة البشرية على شبكية العين (قبل "قلب" الصورة بواسطة المركز البصري للدماغ). في رأيي المتواضع، فإن عرض صورة مقلوبة على الزجاج الأرضي يمكّن المصور من التركيز بذكاء أكبر على التركيب والمنظور والشكل والبنية. بالإضافة إلى ذلك، فإن استخدام القماش الداكن لتظليل الزجاج الأرضي من الضوء المحيط يعزل المصور في الواقع عن عوامل التشتيت في بيئته المباشرة بحيث يصبح "حميميًا" مع الهدف. إنها تجربة رائعة!

                  على الرغم من أن المناقشة الكاملة هي خارج نطاق هذه المقالة، إلا أن المبدأ الأساسي في تركيز كاميرا العرض يعتمد على مبدأ Scheimpflug العريق، والذي يقضي بأن يقوم المصور بضبط اتجاه الكاميرا بحيث يكون مستوى التركيز والعدسة يتقاطع مستوى الفيلم ومستوى الفيلم عند مستوى محدد جيدًا، مما يجعل المقدمة والخلفية في تركيز كامل (حتى قبل إيقاف فتحة العدسة يدويًا). يختلف نوع حركات الكاميرا (الإمالة والتأرجح للمعايير الأمامية والخلفية) المطلوبة للوصول إلى "نقطة" Scheimpflug باختلاف تصميم كاميرا العرض (أي إمالة القاعدة مقابل إمالة المحور). الكاميرا التي استخدمتها هنا هي كاميرا عرض خشبية يابانية (إيكيدا أنبا)، وهي مصممة للسماح بإمالة العدسة ومستويات الفيلم التي تدور حول قاعدة الكاميرا. يتم إنشاء كاميرات عرض أخرى بحيث يجب إمالة العدسات ومستويات الأفلام حول نقطة محورية تقع عند المحور المركزي للمعايير الأمامية والخلفية. باختصار، بالنسبة لكاميرات العرض ذات القاعدة المائلة، فإن أفضل طريقة لتحقيق مستوى Scheimpflug هي "إمالة (العدسة) إلى القريب والتركيز على البعيد".

                  زجاج باهت

                  تعليق


                  • #10

                    There are many excellent checklists to help learn and master this process, but one of my personal favorites is one devised by Howard Bond that may be viewed here. For this shot, following three successive adjustments of tilting to the near and focusing on the far to render the foreground and background in focus, the next step was to stop the down the lens for DOF control. Although DOF in view camera photography is a tricky and complicated subject, the salient feature is that the laws of optics and the view camera are such that there is a “wedge” of DOF extending from the lens to the far distance. Close to the lens, the DOF is poor, but as the distance from the lens increases, so do the outer limits of the DOF. For this shot, what complicated the DOF is that the immediate foreground was a not a level surface: I had positioned the camera near the ledge of the bluff where the drop-off would place the descending bluff (the “green circle” at the upper right corner of the “ground glass” illustration above) well beyond the near limit of the DOF wedge. Thus, in order to render this portion of the subject in “acceptable sharpness”, the lens aperture must be stopped down appropriately. So, with the competing considerations of DOF and diffraction in mind (fortunately, the latter is not as problematic in large format compared to smaller formats, as large format negatives/slides need not be enlarged as much for a given print size), I chose an aperture of f/22.
                    هناك العديد من قوائم المراجعة الممتازة للمساعدة في تعلم هذه العملية وإتقانها، ولكن إحدى قوائمي المفضلة الشخصية هي تلك التي ابتكرها هوارد بوند والتي يمكن الاطلاع عليها هنا. بالنسبة لهذه اللقطة، بعد ثلاثة تعديلات متتالية للإمالة إلى القريب والتركيز على البعيد لجعل المقدمة والخلفية في موضع التركيز، كانت الخطوة التالية هي إيقاف العدسة للتحكم في DOF. على الرغم من أن التصوير الفوتوغرافي بكاميرا الرؤية هو موضوع صعب ومعقد، إلا أن السمة البارزة هي أن قوانين البصريات وكاميرا الرؤية تجعل هناك "إسفين" من DOF يمتد من العدسة إلى المسافة البعيدة. بالقرب من العدسة، يكون نطاق DOF ضعيفًا، ولكن مع زيادة المسافة من العدسة، تزداد الحدود الخارجية لنطاق DOF. بالنسبة لهذه اللقطة، ما يزيد من تعقيد DOF هو أن المقدمة المباشرة لم تكن سطحًا مستويًا: لقد وضعت الكاميرا بالقرب من حافة المخادعة حيث سيضع الانخفاض المخادعة الهابطة ("الدائرة الخضراء" في الجزء العلوي الزاوية اليمنى من الرسم التوضيحي "الزجاج الأرضي" أعلاه) بما يتجاوز الحد القريب لإسفين DOF. وبالتالي، من أجل عرض هذا الجزء من الهدف "بوضوح مقبول"، يجب إيقاف فتحة العدسة بشكل مناسب. لذا، مع أخذ الاعتبارات المتنافسة الخاصة بـ DOF والحيود في الاعتبار (لحسن الحظ، لا يمثل الأخير مشكلة في التنسيق الكبير مقارنة بالتنسيقات الأصغر، حيث لا يلزم تكبير الصور السلبية/الشرائح ذات التنسيق الكبير بنفس القدر بالنسبة لحجم طباعة معين)، اخترت فتحة f/22.

                    تعليق


                    • #11
                      Incidentally, one benefit of the mechanical design of large format lenses is that the photographer can manually adjust the lens diaphragm with a continuous and fluid rotation of the aperture lever, which allows the photographer to view instantaneously – in real time – the changes in the DOF on the ground glass; it is almost as if you are viewing a live movie as the diaphragm is being smoothly closed or opened and the scene is slowly coming into sharp focus or out of focus, respectively. This is in stark contrast to the clumsy “clicks” of the aperture ring of manual focus SLR camera lenses, the automated SLR camera lenses where manual diaphragm control has been stripped out, and the fact that DOF can only be “previewed” with a clumsy DOF button in both manual and automated SLRs.

                      Returning to the shot, with a chosen aperture of f/22, I adjusted the shutter speed from ⅛ second at f/16 to ¼ second to make the exposure. A tripod was mandatory. As you study the final image, the effect of infrared light on lightening some parts of the sandstone is evident and interesting. The rim of dark values in the sky, sea, and the beach is effective in drawing the viewer’s eyes into the center of the image. This darkening effect of the blue hues was made possible by the heavy blockade of blue light from the infrared filter, which is essentially a heavy-duty red filter.
                      وبالمناسبة، إحدى فوائد التصميم الميكانيكي للعدسات كبيرة الحجم هي أن المصور يمكنه ضبط غشاء العدسة يدويًا من خلال الدوران المستمر والسلس لرافعة فتحة العدسة، مما يسمح للمصور برؤية التغييرات في مجال التركيز (DOF) بشكل فوري – في الوقت الفعلي على الزجاج الأرضي يبدو الأمر تقريبًا كما لو كنت تشاهد فيلمًا مباشرًا حيث يتم إغلاق الحجاب الحاجز أو فتحه بسلاسة ويدخل المشهد ببطء في التركيز البؤري الحاد أو خارج نطاق التركيز البؤري، على التوالي. وهذا يتناقض بشكل صارخ مع "النقرات" الخرقاء لحلقة الفتحة لعدسات كاميرا SLR ذات التركيز اليدوي، وعدسات كاميرا SLR الآلية حيث تم تجريد التحكم اليدوي في الحجاب الحاجز، وحقيقة أنه لا يمكن "معاينة" DOF إلا باستخدام أداة خرقاء. زر DOF في كل من كاميرات SLR اليدوية والآلية.

                      بالعودة إلى اللقطة، باستخدام فتحة مختارة f/22، قمت بتعديل سرعة الغالق من ⅛ ثانية عند f/16 إلى ¼ ثانية لإجراء التعريض الضوئي. وكان ترايبود إلزاميا. أثناء دراسة الصورة النهائية، يكون تأثير ضوء الأشعة تحت الحمراء على تفتيح بعض أجزاء الحجر الرملي واضحًا ومثيرًا للاهتمام. حافة القيم المظلمة في السماء والبحر والشاطئ فعالة في جذب عيون المشاهد إلى وسط الصورة. أصبح هذا التأثير الداكن للأشكال الزرقاء ممكنًا بفضل الحصار الشديد للضوء الأزرق من مرشح الأشعة تحت الحمراء، وهو في الأساس مرشح أحمر عالي التحمل.

                      تعليق


                      • #12
                        As I had mentioned above, the original, unadjusted image was a tad dark and underexposed for my taste; if I had to retake this photo, I would have added an additional stop of exposure (total exposure ½ sec). In retrospect, compared to my previous empiric bracketing exposures with Rollei IR film at high noon, I likely overestimated the intensity of the “f/16 light” at 4:45 pm (likely it was closer to f/11 intensity). Further, I probably would have stopped the lens down to f/32 to squeeze out a little more DOF. Alternatively, for future exposures with this film, I just may re-adjust my filter factor rating for the Hoya R72 to +7 stops and the ISO of Rollei IR to ISO 3. Overall, though, I felt this was an interesting (and fun) first test shot on 4×5 infrared film.

                        Although I did not originally intend to delve in the following discussion, our PL commentator, Gary Bunton, made an interesting comment on the suggested shutter speed for this exposure: “ . . . based on the wave movement in the background, about 125th of a second.” Indeed, the breaking waves in the distance do appear to be in “acceptable” focus, meaning the shutter speed of ¼ second was sufficient tofreeze the motion,which may sound counterintuitive to the beginning photographer in that such a slow shutter speed had this end result. How could a “slow” shutter speed of ¼ second have rendered the distant breaking waves/ripples reasonably sharp? Well, I am glad that you asked! The answer is encapsulated by three considerations. First, the speed of the subject across the image plane (the most obvious one). Second is the magnification: the size that the subject that will occupy on the image area. Third, the direction that the subject is moving (toward/away vs side-to-side). Let’s examine the latter two factors in more depth.
                        وبالمناسبة، إحدى فوائد التصميم الميكانيكي للعدسات كبيرة الحجم هي أن المصور يمكنه ضبط غشاء العدسة يدويًا من خلال الدوران المستمر والسلس لرافعة فتحة العدسة، مما يسمح للمصور برؤية التغييرات في مجال التركيز (DOF) بشكل فوري – في الوقت الفعلي على الزجاج الأرضي يبدو الأمر تقريبًا كما لو كنت تشاهد فيلمًا مباشرًا حيث يتم إغلاق الحجاب الحاجز أو فتحه بسلاسة ويدخل المشهد ببطء في التركيز البؤري الحاد أو خارج نطاق التركيز البؤري، على التوالي. وهذا يتناقض بشكل صارخ مع "النقرات" الخرقاء لحلقة الفتحة لعدسات كاميرا SLR ذات التركيز اليدوي، وعدسات كاميرا SLR الآلية حيث تم تجريد التحكم اليدوي في الحجاب الحاجز، وحقيقة أنه لا يمكن "معاينة" DOF إلا باستخدام أداة خرقاء. زر DOF في كل من كاميرات SLR اليدوية والآلية.

                        بالعودة إلى اللقطة، باستخدام فتحة مختارة f/22، قمت بتعديل سرعة الغالق من ⅛ ثانية عند f/16 إلى ¼ ثانية لإجراء التعريض الضوئي. وكان ترايبود إلزاميا. أثناء دراسة الصورة النهائية، يكون تأثير ضوء الأشعة تحت الحمراء على تفتيح بعض أجزاء الحجر الرملي واضحًا ومثيرًا للاهتمام. حافة القيم المظلمة في السماء والبحر والشاطئ فعالة في جذب عيون المشاهد إلى وسط الصورة. أصبح هذا التأثير الداكن للأشكال الزرقاء ممكنًا بفضل الحصار الشديد للضوء الأزرق من مرشح الأشعة تحت الحمراء، وهو في الأساس مرشح أحمر عالي التحمل.

                        تعليق


                        • #13
                          Subjects that have a small magnification (i.e., near infinity focus) need a relatively slower shutter speed to freeze motion compared to a larger magnification. Based on the classic thin lens equations for magnification ( M = image distance / subject distance = f / [subject distance – f] ), for a given focal length and for a given image distance (i.e., lens extension), magnification is inversely proportional to the subject distance. Hence, for a distant subject (i.e., the breaking waves that are about 450 yards away moving at about 3 mph on the image plane), the magnification is small, the subject speed across the image plane is small, the focal length is small relative to the size of the format (i.e., wide angle), all of which results in the need for a relatively slower shutter speed to freeze action (¼ to 16 sec). Further, for a given subject distance, the longer the lens, then the greater the magnification that can be achieved. So, if I had used a normal lens for this photograph, I would have needed a faster shutter speed (115 to 120 second) to freeze the distant waves. And if I had used a long lens for this photograph, I would have needed a much faster shutter speed to freeze the distant waves (probably at least 150 second). I would surmise that a very long focal length, say one that affords an angle of view from a 200mm lens in the 35mm format, would require a shutter speed of 1125 second to freeze the motion of the distant waves. Conversely, if I had used the same 75mm wide-angle lens to photograph a breaking wave at a closer distance, say 10 feet, then the situation again changes: the magnification is increased and the speed of the waves across the image plane is faster. Thus, a relatively faster shutter speed would be needed to freeze the motion.
                          تحتاج الأهداف التي لها تكبير صغير (أي بالقرب من التركيز اللانهائي) إلى سرعة غالق أبطأ نسبيًا لتجميد الحركة مقارنةً بالتكبير الأكبر. استنادًا إلى معادلات العدسة الرقيقة الكلاسيكية للتكبير ( M = مسافة الصورة / مسافة الموضوع = f / [مسافة الموضوع - f])، بالنسبة لطول بؤري معين ولمسافة صورة معينة (أي امتداد العدسة)، يكون التكبير متناسبًا عكسيًا إلى مسافة الموضوع. وبالتالي، بالنسبة لهدف بعيد (أي الأمواج المتكسرة التي تبعد حوالي 450 ياردة وتتحرك بسرعة حوالي 3 ميل في الساعة على مستوى الصورة)، يكون التكبير صغيرًا، وسرعة الهدف عبر مستوى الصورة صغيرة، والطول البؤري صغير نسبيًا إلى حجم التنسيق (أي الزاوية الواسعة)، وكل ذلك يؤدي إلى الحاجة إلى سرعة غالق أبطأ نسبيًا لتجميد الحركة (من ¼ إلى 1∕6 ثانية). علاوة على ذلك، بالنسبة لمسافة موضوع معينة، كلما كانت العدسة أطول، كلما زاد التكبير الذي يمكن تحقيقه. لذا، إذا كنت قد استخدمت عدسة عادية لهذه الصورة، لكنت بحاجة إلى سرعة غالق أسرع (من 1 إلى 15 إلى 1 إلى 20 ثانية) لتجميد الموجات البعيدة. ولو كنت قد استخدمت عدسة طويلة لهذه الصورة، لكنت بحاجة إلى سرعة غالق أسرع بكثير لتجميد الموجات البعيدة (ربما على الأقل 1∕50 ثانية). أعتقد أن الطول البؤري الطويل جدًا، مثلًا الذي يوفر زاوية رؤية من عدسة مقاس 200 مم بتنسيق 35 مم، سيتطلب سرعة غالق تبلغ 1∕125 ثانية لتجميد حركة الموجات البعيدة. على العكس من ذلك، إذا كنت قد استخدمت نفس العدسة ذات الزاوية الواسعة مقاس 75 مم لتصوير موجة متكسرة على مسافة أقرب، على سبيل المثال 10 أقدام، فسيتغير الوضع مرة أخرى: يزداد التكبير وتكون سرعة الموجات عبر مستوى الصورة أسرع. وبالتالي، ستكون هناك حاجة إلى سرعة غالق أسرع نسبيًا لتجميد الحركة.

                          تعليق


                          • #14
                            Finally, a subject that is moving across the image plane (as opposed to away or toward the lens) will require a relatively faster shutter speed to freeze motion. I think this factor is relatively intuitive and straightforward in practice.

                            Special thanks to Northcoast Photographic Services, in Carlsbad, CA, for providing the film development services for this photograph. Great job, Scott! Please, stay tuned for an upcoming article, “The Quality of Light”, where I will examine the physical factors of light that influence the aesthetics and emotion of a photograph.
                            أخيرًا، سيتطلب الهدف الذي يتحرك عبر مستوى الصورة (بدلاً من التحرك بعيدًا أو باتجاه العدسة) سرعة غالق أسرع نسبيًا لتجميد الحركة. أعتقد أن هذا العامل بديهي ومباشر نسبيًا في الممارسة العملية.

                            شكر خاص لشركة Northcoast Photography Services، في كارلسباد، كاليفورنيا، لتوفير خدمات تطوير الأفلام لهذه الصورة. عمل عظيم، سكوت! من فضلك، ترقب مقالًا قادمًا بعنوان "جودة الضوء"، حيث سأقوم بفحص العوامل الفيزيائية للضوء التي تؤثر على جماليات الصورة الفوتوغرافية وعاطفتها.

                            تعليق

                            يعمل...
                            X