كيفية تثبيت إعدادات لايت روم المسبقة How to Install Lightroom Presets

تقليص
X
 
  • تصفية - فلترة
  • الوقت
  • عرض
إلغاء تحديد الكل
مشاركات جديدة

  • كيفية تثبيت إعدادات لايت روم المسبقة How to Install Lightroom Presets

    كيفية تثبيت إعدادات لايت روم المسبقة
    How to Install Lightroom Presets

    Lightroom presets are powerful tools that can drastically speed up your editing process. Whether you want to quickly set a baseline edit or easily replicate the signature look of your favorite film stock, presets give you a head start on your Lightroom edit. The install process, however, can be tricky, particularly if you’re not used to working with your systems folders. In this guide to installing Lightroom presets, I’ll walk you through how to install Lightroom presets, as well as discuss some of the important differences between preset types available in Lightroom.
    تعد إعدادات Lightroom المسبقة أدوات قوية يمكنها تسريع عملية التحرير بشكل كبير. سواء كنت تريد تعيين تعديل أساسي سريعًا أو تكرار المظهر المميز لمخزون الأفلام المفضل لديك بسهولة، فإن الإعدادات المسبقة تمنحك السبق في تعديل Lightroom. ومع ذلك، قد تكون عملية التثبيت صعبة، خاصة إذا لم تكن معتادًا على العمل مع مجلدات النظام لديك. في هذا الدليل لتثبيت إعدادات Lightroom المسبقة، سأرشدك إلى كيفية تثبيت إعدادات Lightroom المسبقة، بالإضافة إلى مناقشة بعض الاختلافات المهمة بين أنواع الإعدادات المسبقة المتوفرة في Lightroom.

  • #2
    Table of Contentsجدول المحتويات

    ما هو الإعداد المسبق؟
    أنواع الملفات التثبيت عبر لوحة الإعدادات المسبقة
    التثبيت عبر مجلدات النظام
    أنواع أخرى من الإعدادات المسبقة
    الخاتمة

    تعليق


    • #3
      What’s a Preset?


      Adobe Lightroom offers a variety of configurable presets (more on the different types later). When most people refer to a Lightroom preset, however, they’re talking about a preset for use in the Develop module. These Develop module presets can be basic – changing something as simple as the sharpening levels in your image, for example – as well as complex. Some presets can turn a regular shot into a contrasty B/W, Kodachrome replica, or even an infrared film-style shot.
      This preset replicates an infrared film

      ما هو الإعداد المسبق؟

      يقدم Adobe Lightroom مجموعة متنوعة من الإعدادات المسبقة القابلة للتكوين (المزيد حول الأنواع المختلفة لاحقًا). عندما يشير معظم الأشخاص إلى إعداد Lightroom المسبق، فإنهم يتحدثون عن إعداد مسبق للاستخدام في وحدة التطوير. يمكن أن تكون الإعدادات المسبقة لوحدة التطوير هذه أساسية - حيث تغير شيئًا بسيطًا مثل مستويات الوضوح في صورتك، على سبيل المثال - بالإضافة إلى أنها معقدة. يمكن لبعض الإعدادات المسبقة تحويل لقطة عادية إلى صورة متباينة باللون الأبيض والأسود، أو نسخة طبق الأصل من Kodachrome، أو حتى لقطة بنمط فيلم بالأشعة تحت الحمراء.

      يقوم هذا الإعداد المسبق بتكرار فيلم الأشعة تحت الحمراء

      تعليق


      • #4
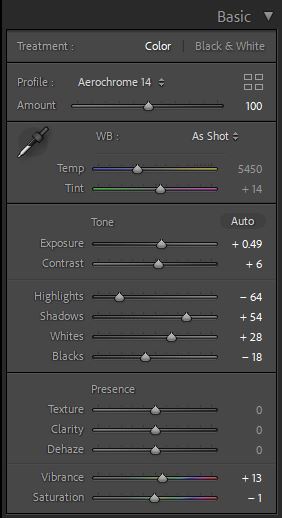
        There are two main areas where Lightroom Develop presets can be applied. The first is the obvious “Presets” panel on the left-hand tab, where you can choose among presets you’ve created. The second is the “Profile” option in the Basic Panel on the right-hand side of your screen, as shown below.
        Here you can see how the preset “Aerochrome 14” is selected in the Profile section of the Basic Panel
        The typical difference is that a preset applied through the Presets panel will move the sliders in your develop panels (it may shift your color temperature, contrast, or saturation, for instance). A preset applied through the Profile box, however, will change the look of your image without affecting the sliders. You can adjust the intensity of the Profile you’ve selected using the “Amount” slider directly below it. Some presets that you download need to be applied in the Profile box, while others must be applied in the Presets panel instead.
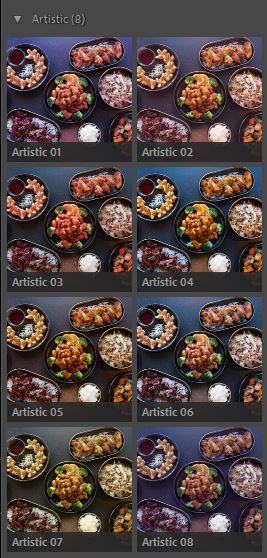
        Some of Lightroom’s built-in presets from the Profile browser

        هناك مجالان رئيسيان يمكن من خلالهما تطبيق إعدادات Lightroom Develop المسبقة. الأول هو لوحة "الإعدادات المسبقة" الواضحة في علامة التبويب اليسرى، حيث يمكنك الاختيار من بين الإعدادات المسبقة التي قمت بإنشائها. أما الخيار الثاني فهو خيار "الملف الشخصي" في اللوحة الأساسية الموجودة على الجانب الأيمن من شاشتك، كما هو موضح أدناه.

        هنا يمكنك رؤية كيفية تحديد الإعداد المسبق "Aerochrome 14" في قسم ملف التعريف باللوحة الأساسية

        يتمثل الاختلاف النموذجي في أن الإعداد المسبق المطبق من خلال لوحة الإعدادات المسبقة سيحرك أشرطة التمرير في لوحات التطوير الخاصة بك (قد يغير درجة حرارة اللون أو التباين أو التشبع، على سبيل المثال). ومع ذلك، فإن الإعداد المسبق المطبق من خلال مربع ملف التعريف سيغير مظهر صورتك دون التأثير على أشرطة التمرير. يمكنك ضبط شدة ملف التعريف الذي حددته باستخدام شريط التمرير "المبلغ" الموجود أسفله مباشرةً. يجب تطبيق بعض الإعدادات المسبقة التي تقوم بتنزيلها في مربع ملف التعريف، بينما يجب تطبيق البعض الآخر في لوحة الإعدادات المسبقة بدلاً من ذلك.

        بعض الإعدادات المسبقة المضمنة في Lightroom من متصفح الملف الشخصي

        تعليق


        • #5
          File Types


          Most Lightroom presets that you download will come as an .xmp file or as an .LRtemplate file. Depending on how you download them, they may come zipped into a folder. If so, unzip the folder in your downloads and make sure you can navigate to the individual preset files. They’ll be named after the preset effects they apply, and will end in .xmp or .LRtemplate.
          Installing Via the Presets Panel


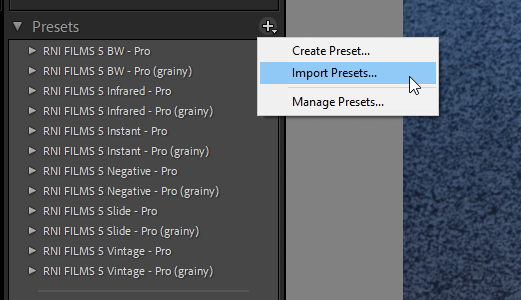
          For either type of preset, it’s possible to install them by opening Lightroom Classic, navigating to the Develop module, and finding the Presets tab in the left-hand panel. If the left-hand panel is collapsed, just click the small arrow to expand it. (If you do that and Presets isn’t one of the options – but you do see other tabs like Snapshots, History, or Collections – right click on any of the other tabs and re-enable the Presets option.)

          From here, you’ll see a plus sign. Click on that, then select Import Preset. Next, navigate to where on your hard drive you stored or unzipped the preset files. Click to select individual presets, or drag to select multiple, then hit import. After a few seconds, they should appear in your presets panel.


          أنواع الملفات

          تأتي معظم إعدادات Lightroom المسبقة التي تقوم بتنزيلها كملف ‎.xmp أو كملف ‎.LRtemplate. اعتمادًا على كيفية تنزيلها، قد يتم ضغطها في مجلد. إذا كان الأمر كذلك، فقم بفك ضغط المجلد الموجود في التنزيلات الخاصة بك وتأكد من أنه يمكنك الانتقال إلى الملفات الفردية المعدة مسبقًا. ستتم تسميتها على اسم التأثيرات المعدة مسبقًا التي تطبقها، وستنتهي بـ .xmp أو .LRtemplate.

          التثبيت عبر لوحة الإعدادات المسبقة

          بالنسبة لأي نوع من الإعدادات المسبقة، من الممكن تثبيتهما عن طريق فتح Lightroom Classic، والانتقال إلى وحدة التطوير، والعثور على علامة التبويب الإعدادات المسبقة في اللوحة اليمنى. إذا كانت اللوحة اليمنى مطوية، فما عليك سوى النقر فوق السهم الصغير لتوسيعها. (إذا قمت بذلك ولم تكن الإعدادات المسبقة أحد الخيارات - ولكنك ترى علامات تبويب أخرى مثل اللقطات أو السجل أو المجموعات - فانقر بزر الماوس الأيمن على أي من علامات التبويب الأخرى وأعد تمكين خيار الإعدادات المسبقة.)

          من هنا، سترى علامة زائد. انقر فوق ذلك، ثم حدد استيراد الإعداد المسبق. بعد ذلك، انتقل إلى المكان الذي قمت فيه بتخزين الملفات المعدة مسبقًا أو فك ضغطها على محرك الأقراص الثابتة لديك. انقر لتحديد إعدادات مسبقة فردية، أو اسحب لتحديد عدة إعدادات، ثم اضغط على "استيراد". بعد بضع ثوان، يجب أن تظهر في لوحة الإعدادات المسبقة.


          تعليق


          • #6

            Installing Via System Folders


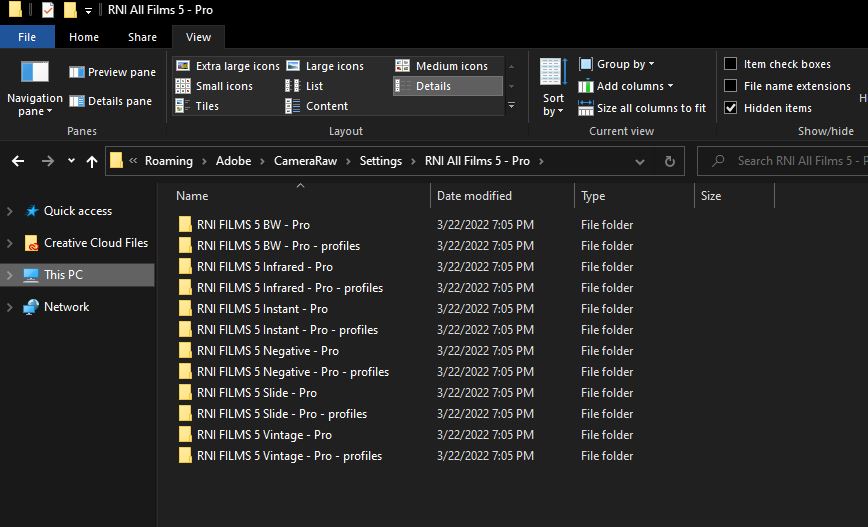
            Some presets that apply via profiles, like the ReallyNiceImages (RNI) All Films pack, are installed differently. For these, you’ll need to consult the instructions that come with your presets. Some include an executable or other automatic installer, while some install differently on one OS compared to another. For example, RNI’s can install via a .pkg on MacOS, but have to be manually placed in an AppData folder on Windows. As a reference, I’ll walk you through the install process for RNI’s profiles on Windows:
            1. Before installing, RNI advises that you disable the “Store presets with this catalog option” in the Preferences>Presets menu, as this prevents Lightroom from picking up the newly installed presets.
            2. Open Explorer and copy the folder containing the presets.
            3. Navigate to C:\ Users \ <YourUsername> \ AppData \ Roaming \ Adobe \ CameraRaw \ Settings and paste the presets folder into that folder. (The AppData folder may be hidden, so this will require you to enable showing Hidden Items via View>Hidden Items in Explorer.)
            4. Once the presets have been copied over, restart Lightroom, and you should see your new presets in the profiles panel in Lightroom.

            For MacOS, the intended install process is a lot simpler: run the .pkg installer they included, which should install all components to the required locations.

            That specific process is created by ReallyNiceImages, and things may be different if your presets/profiles were developed by another company, but the general idea is usually the same. Either way, your preset pack should include specific instructions.

            My general advice is always to create a backup of your preset files in another location. Whether it’s an update problem, or something else, it’s nice to have an easy source to reinstall your presets from, without having to worry about redownloading them.

            التثبيت عبر مجلدا النظام


            يتم تثبيت بعض الإعدادات المسبقة التي يتم تطبيقها عبر ملفات التعريف، مثل حزمة RealNiceImages (RNI) All Films، بشكل مختلف. للقيام بذلك، سوف تحتاج إلى الرجوع إلى الإرشادات التي تأتي مع الإعدادات المسبقة الخاصة بك. يتضمن بعضها برنامج تثبيت قابل للتنفيذ أو برنامج تثبيت تلقائي آخر، بينما يتم تثبيت البعض الآخر بشكل مختلف على نظام تشغيل واحد مقارنة بنظام تشغيل آخر. على سبيل المثال، يمكن تثبيت RNI عبر ملف .pkg على نظام MacOS، ولكن يجب وضعه يدويًا في مجلد AppData على نظام Windows. كمرجع، سأرشدك خلال عملية تثبيت ملفات تعريف RNI على نظام التشغيل Windows:

            قبل التثبيت، ينصح RNI بتعطيل "خيار تخزين الإعدادات المسبقة مع هذا الكتالوج" في قائمة التفضيلات> الإعدادات المسبقة، لأن هذا يمنع Lightroom من التقاط الإعدادات المسبقة المثبتة حديثًا. افتح Explorer وانسخ المجلد الذي يحتوي على الإعدادات المسبقة. انتقل إلى C: \ Users \ <YourUsername> \ AppData \ Roaming \ Adobe \ CameraRaw \ الإعدادات والصق مجلد الإعدادات المسبقة في هذا المجلد. (قد يكون مجلد AppData مخفيًا، لذا سيتطلب منك ذلك تمكين إظهار العناصر المخفية عبر عرض> العناصر المخفية في Explorer.) بمجرد نسخ الإعدادات المسبقة، أعد تشغيل Lightroom، وسترى إعداداتك المسبقة الجديدة في لوحة الملفات الشخصية في لايت روم.

            بالنسبة لنظام التشغيل MacOS، تكون عملية التثبيت المقصودة أبسط كثيرًا: قم بتشغيل برنامج التثبيت .pkg المتضمن، والذي يجب أن يقوم بتثبيت جميع المكونات في المواقع المطلوبة.

            تم إنشاء هذه العملية المحددة بواسطة RealNiceImages، وقد تختلف الأمور إذا تم تطوير الإعدادات المسبقة/الملفات الشخصية الخاصة بك بواسطة شركة أخرى، ولكن الفكرة العامة هي نفسها عادةً. وفي كلتا الحالتين، يجب أن تتضمن الحزمة المعدة مسبقًا تعليمات محددة.

            نصيحتي العامة هي دائمًا إنشاء نسخة احتياطية من ملفاتك المعدة مسبقًا في موقع آخر. سواء كانت مشكلة في التحديث، أو أي شيء آخر، فمن الجيد أن يكون لديك مصدر سهل لإعادة تثبيت إعداداتك المسبقة منه، دون الحاجة إلى القلق بشأن إعادة تنزيلها.

            تعليق


            • #7

              Other Types of Presets


              The process above is all it takes to install a basic Lightroom preset, and I hope you found it useful. But Lightroom also allows you to install more complex types of presets that may be more complicated to install than the steps below. One such example is an ISO-Adaptive Preset.

              An ISO-Adaptive preset is a special type of preset that’s a more recent introduction to Lightroom. An ISO-Adaptive preset lets you set different values to be applied based on the ISO of the image. This makes it particularly useful for setting up a “smart” sharpening or noise reduction setting and is perfect for use as a default import preset. I’ll be covering a deeper dive into how I set up my ISO adaptive presets in an upcoming article, as it requires a bit more work.

              Beyond that, there are also Import Presets. These apply to all your photos upon importing into Lightroom, and they include both post-processing and metadata changes. For example, you can use an Import Preset to change the noise reduction/sharpness settings of all the images you import (since Lightroom’s defaults are otherwise pretty heavy-handed). Or, you can apply a preset to the photo’s metadata. If you want to change the metadata of your images upon import – like adding your name to the description of each photo – you can choose to create and apply a metadata preset.

              Brush or Masking presets also exist. The masking tool within the Develop module lets you save your settings to a preset. If you’ve created a complicated set of settings for your brush or mask, you can save those as a preset and reapply them in the future.
              Brush presets let you quickly return to useful brush settings

              أنواع أخرى من الإعدادات المسبقة

              العملية المذكورة أعلاه هي كل ما يتطلبه الأمر لتثبيت إعداد Lightroom الأساسي، وآمل أن تكون قد وجدته مفيدًا. لكن Lightroom يسمح لك أيضًا بتثبيت أنواع أكثر تعقيدًا من الإعدادات المسبقة التي قد يكون تثبيتها أكثر تعقيدًا من الخطوات الموضحة أدناه. أحد الأمثلة على ذلك هو الإعداد المسبق ISO-Adaptive.

              يعد الإعداد المسبق ISO-Adaptive نوعًا خاصًا من الإعداد المسبق وهو مقدمة أحدث لبرنامج Lightroom. يتيح لك الإعداد المسبق ISO-Adaptive تعيين قيم مختلفة ليتم تطبيقها بناءً على ISO للصورة. وهذا يجعله مفيدًا بشكل خاص لإعداد إعداد "ذكي" للتوضيح أو تقليل الضوضاء وهو مثالي للاستخدام كإعداد استيراد مسبق افتراضي. سأتناول نظرة أعمق حول كيفية إعداد إعدادات ISO المسبقة التكيفية في مقال قادم، حيث يتطلب الأمر المزيد من العمل.

              أبعد من ذلك، هناك أيضًا إعدادات مسبقة للاستيراد. تنطبق هذه على جميع صورك عند استيرادها إلى Lightroom، وتتضمن تغييرات ما بعد المعالجة والبيانات التعريفية. على سبيل المثال، يمكنك استخدام إعداد مسبق للاستيراد لتغيير إعدادات تقليل الضوضاء/الحدة لجميع الصور التي تستوردها (نظرًا لأن إعدادات Lightroom الافتراضية ثقيلة جدًا). أو يمكنك تطبيق إعداد مسبق على البيانات التعريفية للصورة. إذا كنت تريد تغيير البيانات التعريفية لصورك عند الاستيراد - مثل إضافة اسمك إلى وصف كل صورة - فيمكنك اختيار إنشاء إعداد مسبق للبيانات التعريفية وتطبيقه.

              توجد أيضًا الإعدادات المسبقة للفرشاة أو الإخفاء. تتيح لك أداة الإخفاء الموجودة في وحدة التطوير حفظ إعداداتك في إعداد مسبق. إذا قمت بإنشاء مجموعة معقدة من الإعدادات للفرشاة أو القناع، فيمكنك حفظها كإعداد مسبق وإعادة تطبيقها في المستقبل.
              التعديل الأخير تم بواسطة غدير معروف; الساعة 12-29-2023, 09:32 PM. سبب آخر: اضافة الترجمة

              تعليق


              • #8
                Lastly, export presets let you save a default set of export settings for repeated use, letting you configure things like the watermark, file settings, and file naming options with just one click. See here our guide for exporting photos properly from Lightroom.

                أخيرًا، تتيح لك إعدادات التصدير المسبقة حفظ مجموعة افتراضية من إعدادات التصدير للاستخدام المتكرر، مما يتيح لك تكوين أشياء مثل العلامة المائية وإعدادات الملف وخيارات تسمية الملف بنقرة واحدة فقط. انظر هنا دليلنا لتصدير الصور بشكل صحيح من Lightroom.

                تعليق


                • #9
                  Conclusion


                  Lightroom lets you set up a wide range of presets for frequently-performed tasks, but no preset type is more popular than the Develop preset. While the process can seem like a bit of a mess, thanks to the many years and different styles of preset Lightroom have come to support, the actual install process isn’t that hard.

                  Furthermore, making use of the presets is incredibly easy, and can save you a lot of time – or even let you replicate a complicated look – with minimal effort. To take your editing process to the next level, you can even create and use presets of your own, saving you a ton of time in various processes across Lightroom. Let me know in the comments if you have any questions about creating, installing, or using Lightroom presets.
                  خاتمة

                  يتيح لك Lightroom إعداد مجموعة واسعة من الإعدادات المسبقة للمهام التي يتم تنفيذها بشكل متكرر، ولكن لا يوجد نوع إعداد مسبق أكثر شيوعًا من الإعداد المسبق للتطوير. على الرغم من أن العملية قد تبدو وكأنها فوضى بعض الشيء، وذلك بفضل السنوات العديدة والأنماط المختلفة التي يدعمها Lightroom المُعد مسبقًا، فإن عملية التثبيت الفعلية ليست بهذه الصعوبة.

                  علاوة على ذلك، فإن الاستفادة من الإعدادات المسبقة أمر سهل للغاية، ويمكن أن يوفر لك الكثير من الوقت - أو حتى يتيح لك تكرار مظهر معقد - بأقل جهد. للارتقاء بعملية التحرير إلى المستوى التالي، يمكنك أيضًا إنشاء واستخدام الإعدادات المسبقة الخاصة بك، مما يوفر لك الكثير من الوقت في العمليات المختلفة عبر Lightroom. اسمحوا لي أن أعرف في التعليقات إذا كانت لديك أي أسئلة حول إنشاء إعدادات Lightroom المسبقة أو تثبيتها أو استخدامها.

                  تعليق

                  يعمل...
                  X