كيفية زيادة دقة الصورة How to Increase the Resolution of an Image

تقليص
X
 
  • تصفية - فلترة
  • الوقت
  • عرض
إلغاء تحديد الكل
مشاركات جديدة

  • كيفية زيادة دقة الصورة How to Increase the Resolution of an Image

    كيفية زيادة دقة الصورة
    How to Increase the Resolution of an Image

    Photographers love chasing after image quality, including maximum sharpness, detail, and resolution. Most likely, you’ve wondered at some point how to take higher-resolution photos, or increase the resolution of images you already have (whether photographs or digital illustrations). This article explains step-by-step how to increase resolution quickly and easily in common post-processing software. It also includes a comparison of five popular options for upsampling images to find which one yields the best results.


    Note that this article mainly approaches the topic of resolution from the perspective of photography, although the final comparison among software options also includes a digital illustration component.
    You’ll be seeing a lot of these two before long.

    يحب المصورون السعي وراء جودة الصورة، بما في ذلك الحد الأقصى من الحدة والتفاصيل والدقة. على الأرجح، تساءلت في مرحلة ما عن كيفية التقاط صور ذات دقة أعلى، أو زيادة دقة الصور الموجودة لديك بالفعل (سواء كانت صورًا فوتوغرافية أو رسومًا توضيحية رقمية). تشرح هذه المقالة خطوة بخطوة كيفية زيادة الدقة بسرعة وسهولة في برامج ما بعد المعالجة الشائعة. ويتضمن أيضًا مقارنة بين خمسة خيارات شائعة لتجميع الصور للعثور على الخيار الذي يحقق أفضل النتائج.

    لاحظ أن هذه المقالة تتناول بشكل أساسي موضوع الدقة من منظور التصوير الفوتوغرافي، على الرغم من أن المقارنة النهائية بين خيارات البرامج تتضمن أيضًا مكونًا للتوضيح الرقمي.

     ستشاهد الكثير من هذين الاثنين قريبًا.


  • #2
    Table of Contents
    جدول المحتويات

    ما هي الدقة؟ زيادة الدقة في Photoshop وبرامج ما بعد الإنتاج الأخرىكيفية الارتقاء في Photoshop باستخدام برامج الارتقاء المخصصة البدائل المجانية ماذا عن المستقبل؟ مقارنات البرامج التقريبيةPhotoshop CS6 (Bicubic Smoother)Photoshop CC (الحفاظ على التفاصيل 2.0)GIMP برنامج مخصص: ON1 Resize (الفركتلات الأصلية سابقًا) وتغيير الحجم بشكل مثالي) برنامج عبر الإنترنت: تكبير الصور، تحسين تصنيفات البرامج، زيادة الدقة في الميدان، الاستنتاج

    تعليق


    • #3
      What Is Resolution?


      In photography, resolution is the amount of detail in a photo. This is determined by factors such as focus precision, lens quality, and camera sensor pixel count. If you print your photo, other factors come into play as well – the size, display medium, and quality of the print, and so on.

      People use the term “resolution” to talk about more than just the level of detail in a photo, though. It also can refer to more specific things like lens resolving power, pixels per inch in a print, and total pixel count of your digital image. That last usage is one of the most common, and it’s also the focus of this article.

      When photographers ask about increasing an image’s resolution, pixel count is typically what they have in mind – turning something like a 200 × 200 pixel photo into a 1000 × 1000 pixel photo(just to pick arbitrary numbers).

      Of course, it’s not enough just to add pixels if the apparent image quality of your photo doesn’t improve along the way. Otherwise, why bother increasing resolution? Unfortunately, it’s not easy to get a good photo out of a low-res original – but it isn’t impossible. You still can get impressive results if you do things right, as shown below.
      ما هو القرار؟

      في التصوير الفوتوغرافي، الدقة هي مقدار التفاصيل في الصورة. ويتم تحديد ذلك من خلال عوامل مثل دقة التركيز البؤري وجودة العدسة وعدد وحدات البكسل في مستشعر الكاميرا. إذا قمت بطباعة صورتك، فإن هناك عوامل أخرى تلعب دورًا أيضًا - الحجم ووسائط العرض وجودة الطباعة وما إلى ذلك.

      يستخدم الناس مصطلح "الدقة" للحديث عن أكثر من مجرد مستوى التفاصيل في الصورة. ويمكن أن يشير أيضًا إلى أشياء أكثر تحديدًا مثل قوة تحليل العدسة، وعدد البكسلات لكل بوصة في الطباعة، وإجمالي عدد وحدات البكسل لصورتك الرقمية. يعد هذا الاستخدام الأخير واحدًا من أكثر الاستخدامات شيوعًا، وهو أيضًا محور هذه المقالة.

      عندما يسأل المصورون عن زيادة دقة الصورة، عادةً ما يكون عدد وحدات البكسل هو ما يدور في ذهنهم - وهو تحويل صورة بحجم 200 × 200 بكسل إلى صورة مقاس 1000 × 1000 بكسل (فقط لاختيار أرقام عشوائية).

      بالطبع، لا يكفي مجرد إضافة وحدات بكسل إذا لم تتحسن جودة الصورة الظاهرة لصورتك على طول الطريق. وإلا، لماذا تهتم بزيادة القرار؟ لسوء الحظ، ليس من السهل الحصول على صورة جيدة من نسخة أصلية منخفضة الدقة - ولكنه ليس مستحيلاً. لا يزال بإمكانك الحصول على نتائج مبهرة إذا قمت بالأمور بشكل صحيح، كما هو موضح أدناه.

      تعليق


      • #4
        Increasing Resolution in Photoshop and Other Post-Production Software


        Most major post-production software can increase the pixel count of an image. That’s not the hard part, though. The difficulty is in getting any meaningful detail along the way (or even the illusion of it).

        Hopefully, you won’t be surprised to hear that CSI-level “enhancing” of a low-resolution thumbnail is only possible on television. No matter how good your post-processing software is, you can only go so far to improve a low-resolution photo. Depending upon the software you use, sometimes the best-case scenario is making a pixelated image look out-of-focus instead!
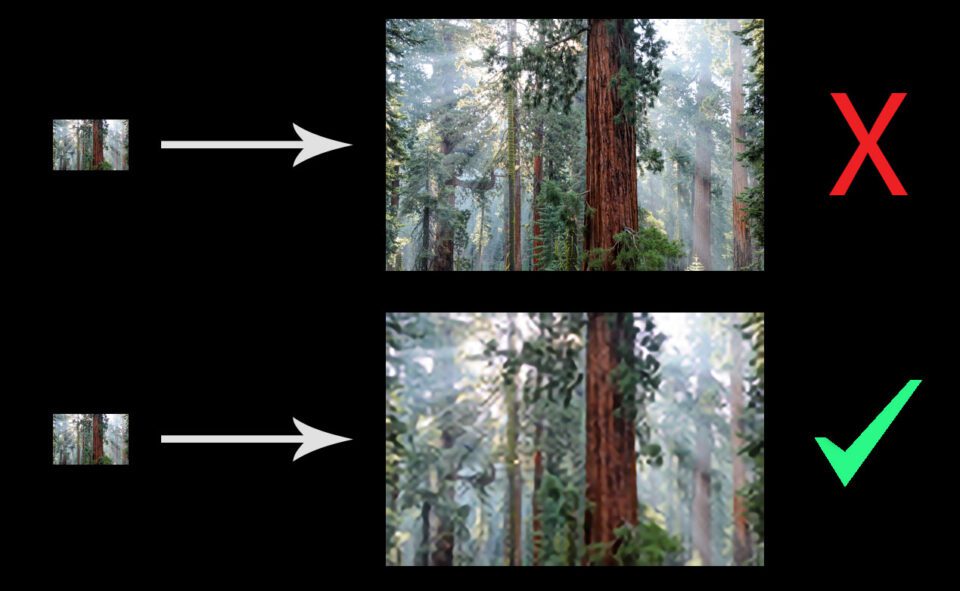
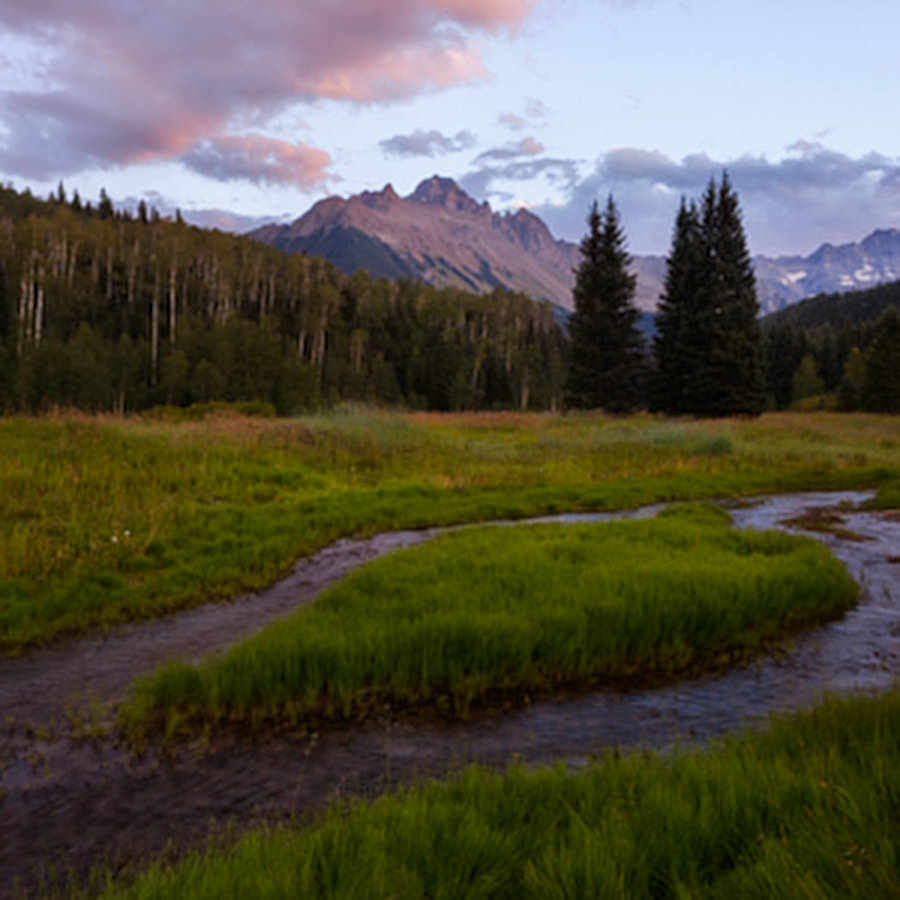
        As nice as it would be, you simply won’t get something as detailed as the top image out of a low-res original.
        But that doesn’t mean the situation is hopeless. It still can help to increase the resolution of an image (meaning pixel count in this case) in post-production through a process known as upsampling. Personally, this is something I do when creating large prints – more than a meter/three feet across. It also helps as a last-ditch way to improve an image that otherwise could be unusable.

        If that sounds good enough for you, here’s what you need to know in order to increase resolution using some common post-production software.
        زيادة الدقة في Photoshop وبرامج ما بعد الإنتاج الأخرى

        يمكن لمعظم برامج ما بعد الإنتاج الرئيسية زيادة عدد وحدات البكسل في الصورة. هذا ليس الجزء الصعب، رغم ذلك. تكمن الصعوبة في الحصول على أي تفاصيل ذات معنى على طول الطريق (أو حتى وهمها).

        نأمل ألا تتفاجأ عندما تعلم أن "تحسين" الصورة المصغرة منخفضة الدقة على مستوى CSI أمر ممكن فقط على التلفزيون. بغض النظر عن مدى جودة برنامج ما بعد المعالجة لديك، لا يمكنك الذهاب إلى أبعد من ذلك لتحسين الصورة ذات الدقة المنخفضة. اعتمادًا على البرنامج الذي تستخدمه، أحيانًا يكون السيناريو الأفضل هو جعل الصورة المنقطة تبدو خارج نطاق التركيز بدلاً من ذلك!

         على الرغم من روعة الأمر، إلا أنك ببساطة لن تحصل على شيء مفصل مثل الصورة العلوية من نسخة أصلية منخفضة الدقة.

        لكن هذا لا يعني أن الوضع ميؤوس منه. لا يزال من الممكن أن يساعد ذلك في زيادة دقة الصورة (أي عدد وحدات البكسل في هذه الحالة) في مرحلة ما بعد الإنتاج من خلال عملية تُعرف باسم رفع العينات. شخصيًا، هذا ما أفعله عند إنشاء مطبوعات كبيرة - يزيد عرضها عن متر/ثلاثة أقدام. كما أنه يساعد كطريقة أخيرة لتحسين الصورة التي قد تكون غير قابلة للاستخدام.

        إذا كان هذا يبدو جيدًا بما فيه الكفاية بالنسبة لك، فإليك ما تحتاج إلى معرفته لزيادة الدقة باستخدام بعض برامج ما بعد الإنتاج الشائعة.

        تعليق


        • #5
          How to Upsample in Photoshop


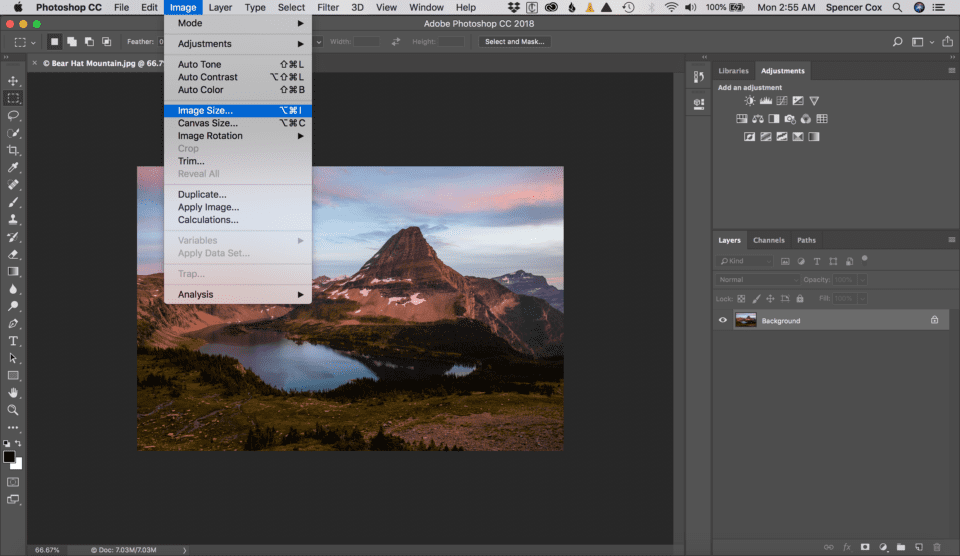
          It is very quick and easy to upsample an image in Photoshop. You simply go to Image > Image Size, type your desired pixel dimensions, and select the upsampling method you prefer. (Hint: If you have Photoshop CC, the new “Preserve Details 2.0” is what you should choose, as you’ll see in a moment.)

          After you’re done, you may want to sharpen the photo slightly, although it depends upon the image. Overall, this is a very quick process.

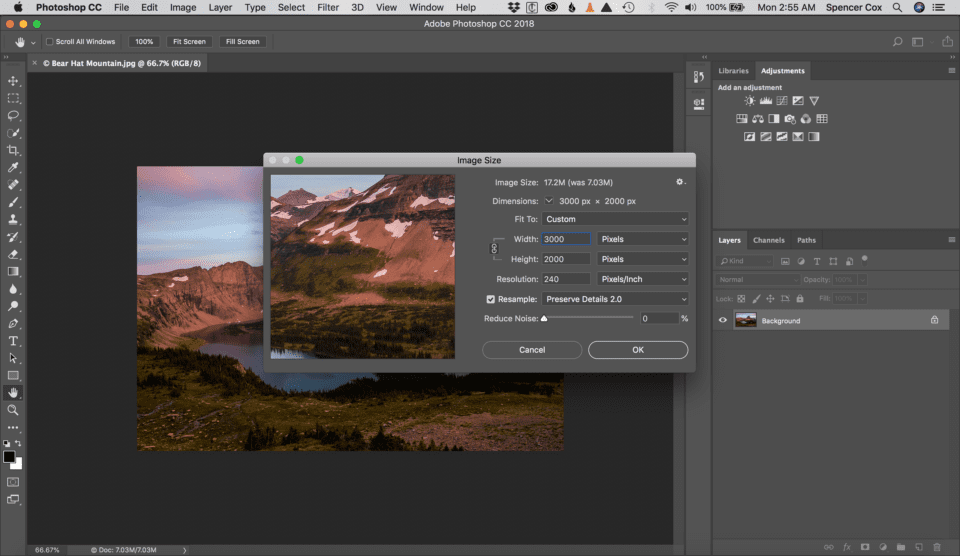
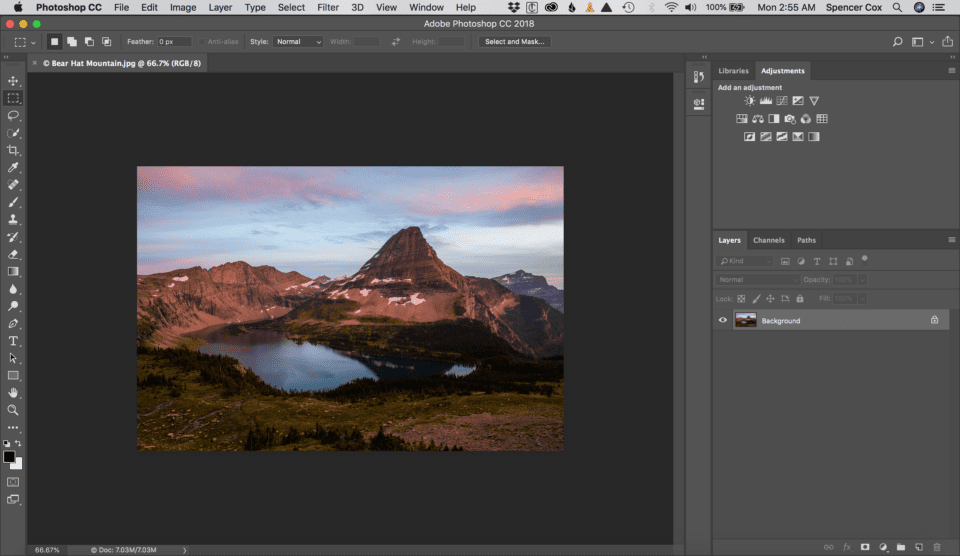
          If you prefer screenshots, here is how it looks in Photoshop CC:
          Open the image in Photoshop.Go to Image > Image Size.Choose your desired width and height for the photo, and pick a resample algorithm (in this case, “Preserve Details 2.0”)
          Personally, this is the method I use in order to upsample a photo for printing. To be specific, I’ll generally upsample the photo to get a 300 PPI image (pixels per inch) at my chosen print size, since anything greater than that is overkill.
          كيفية الدمج في الفوتوشوب

          يعد تحسين صورة في Photoshop أمرًا سريعًا وسهلاً للغاية. ما عليك سوى الانتقال إلى Image > Image Size، واكتب أبعاد البكسل التي تريدها، ثم تحديد طريقة التقريب التي تفضلها. (تلميح: إذا كان لديك Photoshop CC، فإن الإصدار الجديد "Preserve التفاصيل 2.0" هو ما يجب عليك اختياره، كما ستشاهد بعد قليل.)

          بعد الانتهاء، قد ترغب في زيادة وضوح الصورة قليلاً، على الرغم من أن ذلك يعتمد على الصورة. بشكل عام، هذه عملية سريعة جدًا.

          إذا كنت تفضل لقطات الشاشة، فإليك كيف تبدو في Photoshop CC:

          افتح الصورة في Photoshop.انتقل إلى الصورة > حجم الصورة.اختر العرض والارتفاع المطلوبين للصورة، واختر خوارزمية إعادة التشكيل (في هذه الحالة، "الحفاظ على التفاصيل 2.0")

          شخصيًا، هذه هي الطريقة التي أستخدمها لتجميع صورة للطباعة. لكي أكون محددًا، سأقوم عمومًا بتجميع الصورة للحصول على صورة بحجم 300 نقطة في البوصة (بكسل لكل بوصة) بحجم الطباعة الذي اخترته، نظرًا لأن أي شيء أكبر من ذلك يعد مبالغة.

          تعليق


          • #6
            Using Dedicated Upsampling Software


            Many photographers already have Photoshop, and, not surprisingly, it’s the most popular tool for upsampling images. Still, you’ll find a number of dedicated options on the market specifically for this task. Historically, the best-known of these options was called Genuine Fractals. It eventually changed names to Perfect Resize, and now ON1 Resize, but it’s still the same program under the hood.

            Just because it’s standalone software doesn’t mean it’s the best, though. As you’ll see in the comparison section below, Photoshop CC’s “Preserve Details 2.0” algorithm beats out ON1 Resize convincingly. Still, if you don’t have Photoshop CC, some of these dedicated resizing programs may be worth checking out. If you do have CC, there’s not much of a reason to buy them today.
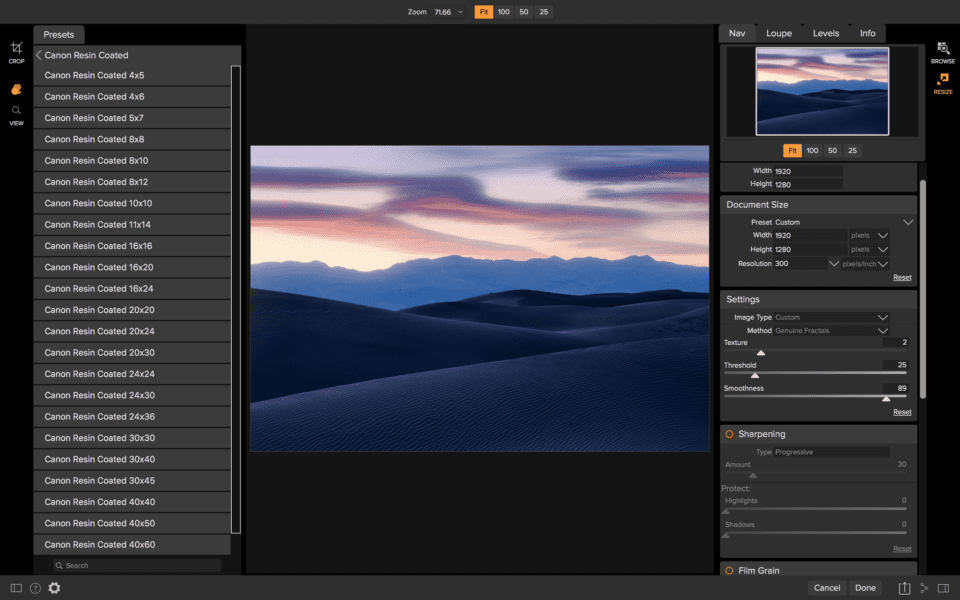
            ON1 Resize layout

            استخدام برامج الاختزال المخصصة

            يمتلك العديد من المصورين برنامج Photoshop بالفعل، وليس من المستغرب أن يكون الأداة الأكثر شيوعًا لتجميع الصور. ومع ذلك، ستجد عددًا من الخيارات المخصصة في السوق خصيصًا لهذه المهمة. تاريخيًا، كان أشهر هذه الخيارات يسمى الفركتلات الحقيقية. في النهاية، تم تغيير الأسماء إلى Perfect Resize، والآن ON1 Resize، لكنه لا يزال هو نفس البرنامج تحت الغطاء.

            لكن مجرد كونه برنامجًا مستقلاً لا يعني أنه الأفضل. كما سترى في قسم المقارنة أدناه، فإن خوارزمية "Preserveتفاصيل 2.0" الخاصة بـ Photoshop CC تتفوق على ON1 Resize بشكل مقنع. ومع ذلك، إذا لم يكن لديك Photoshop CC، فقد تكون بعض برامج تغيير الحجم المخصصة هذه تستحق التدقيق. إذا كان لديك نسخة CC، فليس هناك سبب كبير لشرائها اليوم.

            ON1 تغيير حجم التخطيط

            تعليق


            • #7
              Free Alternatives


              Along with the many paid software options available, a few free tools can do the same thing. The open-source photography software known as GIMP is one of the most popular, not just for upsampling but for broader photography work as well. Upsampling in GIMP is a simple process akin to upsampling in Photoshop. Click Image > Scale Image and select your upsampling options, then consider sharpening the photo after the fact.

              Beyond GIMP, there are some websites which will upsample your images for free. Also, you may already own software with upsampling capabilities without even realizing it, such as Lightroom (which can upsample upon export). Before you pay for another product, it’s worth checking what you already own.
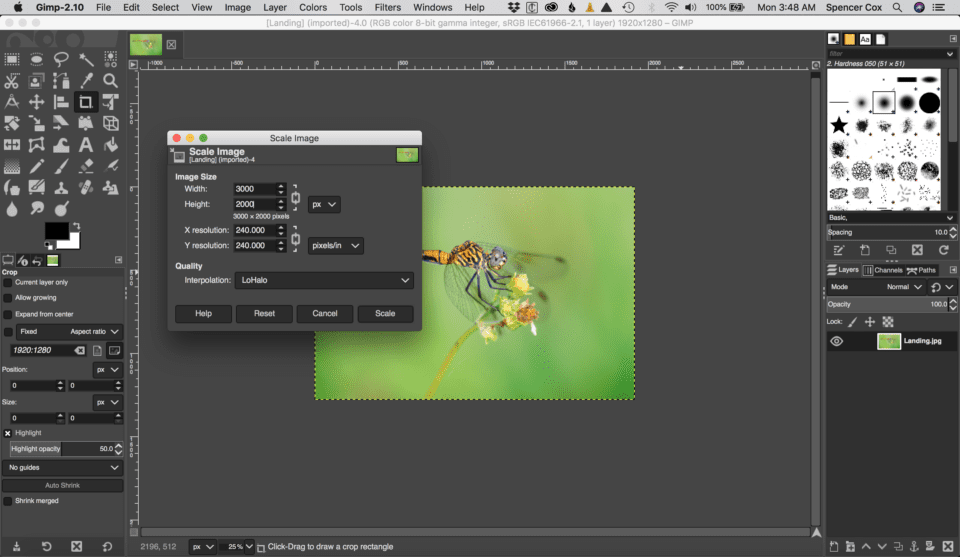
              Upsizing an image in GIMP

              البدائل المجانية

              إلى جانب العديد من خيارات البرامج المدفوعة المتاحة، يمكن لبعض الأدوات المجانية أن تفعل الشيء نفسه. يعد برنامج التصوير الفوتوغرافي مفتوح المصدر المعروف باسم GIMP واحدًا من أكثر البرامج شيوعًا، ليس فقط لتجميع العينات ولكن أيضًا لأعمال التصوير الفوتوغرافي الأوسع. تعد عملية الارتقاء في GIMP عملية بسيطة تشبه عملية الارتقاء في Photoshop. انقر على الصورة > تغيير حجم الصورة وحدد خيارات التكبير، ثم فكر في زيادة وضوح الصورة بعد حدوثها.

              بخلاف برنامج GIMP، هناك بعض مواقع الويب التي يمكنها تحسين صورك مجانًا. أيضًا، قد تمتلك بالفعل برنامجًا يتمتع بقدرات تكبير العينات دون أن تدرك ذلك، مثل Lightroom (الذي يمكنه تكبير العينات عند التصدير). قبل أن تدفع ثمن منتج آخر، من المفيد التحقق مما تملكه بالفعل.

              تكبير حجم الصورة في برنامج GIMP

              تعليق


              • #8
                What About the Future?


                Some companies are already developing software that increases resolution by analyzing the scene and recognizing elements within it – as opposed to “dumb” calculations like nearest-neighbor pixel values, which is generally what we have today. Huge names like Google and Adobe are getting in on this business, and we might see some products implementing these new technologies before long. (With Adobe’s most recent Photoshop CC upsampling algorithm, tested below, we already are seeing hints of what this will be like in the future.)

                Still, these technologies are not fully mature. Some of them are limited purpose algorithms, focusing only on a certain type of image, like people’s faces viewed from a certain angle. Others are more general, like Adobe’s, but not up to the same level as the specialized options. And since most of them aren’t yet available, it’s a bit of a non-issue anyway. Still, it will be exciting to keep an eye out for whatever developments may occur!
                ماذا عن المستقبل؟

                تعمل بعض الشركات بالفعل على تطوير برامج تعمل على زيادة الدقة من خلال تحليل المشهد والتعرف على العناصر الموجودة بداخله - على عكس الحسابات "الغبية" مثل قيم بكسل الجار الأقرب، وهو ما لدينا بشكل عام اليوم. تدخل أسماء ضخمة مثل Google وAdobe في هذا المجال، وقد نرى بعض المنتجات تطبق هذه التقنيات الجديدة في وقت قريب. (باستخدام أحدث خوارزمية تكبير العينات في Photoshop CC من Adobe، والتي تم اختبارها أدناه، نرى بالفعل تلميحات لما سيكون عليه الأمر في المستقبل.)

                ومع ذلك، فإن هذه التقنيات ليست ناضجة تماما. بعضها عبارة عن خوارزميات ذات غرض محدود، تركز فقط على نوع معين من الصور، مثل وجوه الأشخاص التي يتم النظر إليها من زاوية معينة. البعض الآخر أكثر عمومية، مثل Adobe، ولكن لا يصل إلى نفس مستوى الخيارات المتخصصة. وبما أن معظمها غير متوفر بعد، فهي ليست مشكلة على أي حال. ومع ذلك، سيكون من المثير أن نراقب أي تطورات قد تحدث!

                تعليق


                • #9
                  Upsampling Software Comparisons


                  I thought it would be useful to test some of today’s most popular upsampling software to see which options do the best job of increasing resolution. I wanted to test both a photograph and a digital illustration to see if there were any major differences. My method was to start with a 300 × 300 pixel version of each image, then upsample each to 900 × 900 pixels.

                  Keep in mind that I only tested two images for this comparison, and you may find slightly different results with certain photos and illustrations of yours (or different amounts of upsampling). Still, this should give you a good idea of the relative strengths of each software package for increasing resolution.

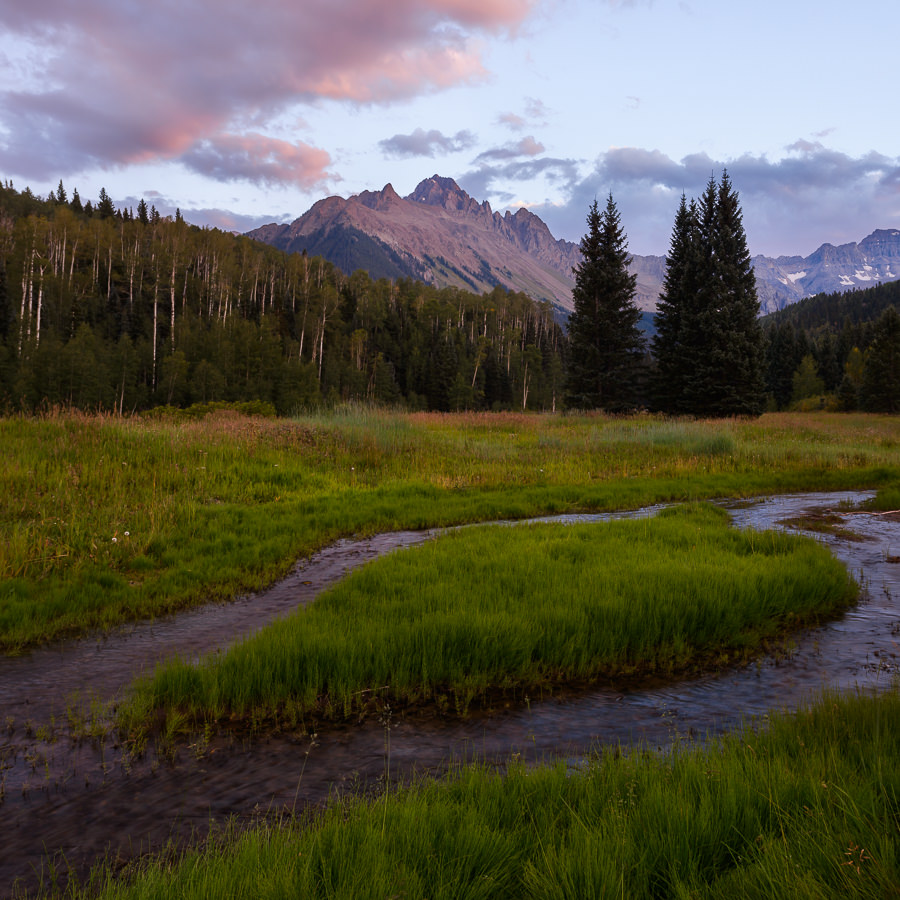
                  With that disclaimer, here are the original 900 × 900 pixel versions of both the photo and the illustration:
                  NIKON D800E + 14-24mm f/2.8 @ 24mm, ISO 100, 0.6 seconds, f/9.0
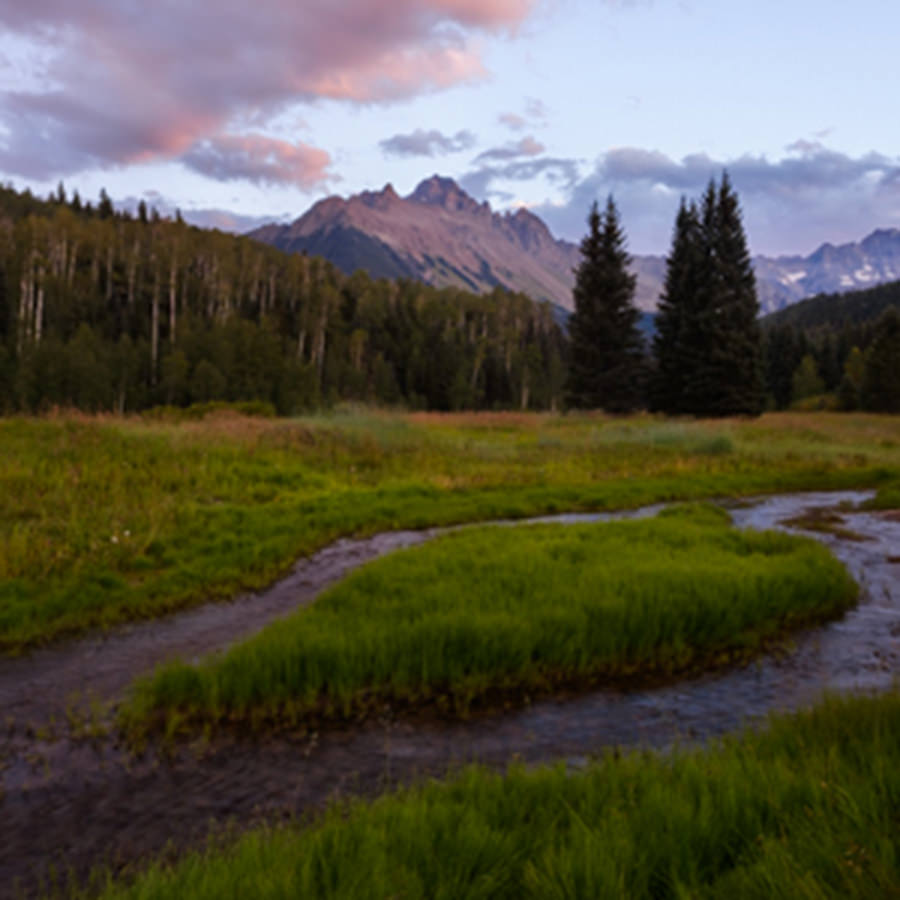

                  And here are the 300×300 pixel versions I used in the upsampling process:


                  How did each program fare? Take a look at the results:
                  Upsampling مقارنات البرمجيات

                  اعتقدت أنه سيكون من المفيد اختبار بعض برامج رفع العينات الأكثر شيوعًا اليوم لمعرفة الخيارات التي تؤدي أفضل وظيفة في زيادة الدقة. كنت أرغب في اختبار كل من الصورة الفوتوغرافية والرسم التوضيحي الرقمي لمعرفة ما إذا كان هناك أي اختلافات كبيرة. كانت طريقتي هي البدء بإصدار 300 × 300 بكسل من كل صورة، ثم تكبير حجم كل صورة إلى 900 × 900 بكسل.

                  ضع في اعتبارك أنني قمت باختبار صورتين فقط لهذه المقارنة، وقد تجد نتائج مختلفة قليلاً مع بعض الصور والرسوم التوضيحية الخاصة بك (أو كميات مختلفة من الاختزال). ومع ذلك، من المفترض أن يمنحك هذا فكرة جيدة عن نقاط القوة النسبية لكل حزمة برامج لزيادة الدقة.

                  مع إخلاء المسؤولية هذا، إليك الإصدارات الأصلية مقاس 900 × 900 بكسل لكل من الصورة والرسم التوضيحي:

                  NIKON D800E + 14-24 مم f/2.8 @ 24 مم، ISO 100، 0.6 ثانية، f/9.0


                  وإليك الإصدارات 300 × 300 بكسل التي استخدمتها في عملية الاختزال:


                  كيف كان أداء كل برنامج؟ ألق نظرة على النتائج:

                  تعليق


                  • #10
                    Photoshop CS6 (Bicubic Smoother)

                    Photoshop Bicubic SmootherPhotoshop Bicubic Smoother
                    This is roughly what we’ve seen in the past with upsampling software. It doesn’t look great, but it’s better than pixelation. Adding some sharpening can help, so long as you do it after the upsampling step.
                    فوتوشوب CS6 (سلاسة Bicubic)

                    Photoshop Bicubic SmootherPhotoshop Bicubic Smoother

                    وهذا تقريبًا ما رأيناه في الماضي مع برامج تكبير العينات. لا يبدو رائعًا، لكنه أفضل من البيكسل. يمكن أن تساعد إضافة بعض الوضوح، طالما أنك تفعل ذلك بعد خطوة التقريب.

                    تعليق


                    • #11
                      Photoshop CC (Preserve Details 2.0)

                      Photoshop Preserve Details 2.0Photoshop Preserve Details 2.0
                      This, on the other hand, is just outstanding. Photoshop CC’s experimental “Preserve Details 2.0” feature is so new that you need to enable a menu option in order to use it in the first place (Preferences > Technology Previews). It works well for both the photo and the illustration – not at the level of the original 900 × 900 pixel image, of course, but much closer than I would have expected.

                      Note that you need to rasterize the layer before upsampling (by right clicking on the layer and selecting Rasterize Layer), or it won’t work. The image will resize, but not with the new algorithm. If you see a drastic difference between Photoshop’s upsampling preview and the actual final image with higher resolution, you’re doing something wrong.
                      Photoshop CC (الحفاظ على التفاصيل 2.0)

                       الاحتفاظ بالتفاصيل في Photoshop 2.0  الاحتفاظ بالتفاصيل في Photoshop 2.0

                      ومن ناحية أخرى، هذا أمر رائع. تعد ميزة "الحفاظ على التفاصيل 2.0" التجريبية في Photoshop CC جديدة جدًا لدرجة أنك تحتاج إلى تمكين خيار القائمة لاستخدامها في المقام الأول (التفضيلات > معاينات التقنية). إنه يعمل بشكل جيد لكل من الصورة والرسم التوضيحي - ليس على مستوى الصورة الأصلية 900 × 900 بكسل بالطبع، ولكنه أقرب بكثير مما كنت أتوقع.

                      لاحظ أنك بحاجة إلى تنقيط الطبقة قبل التكبير (من خلال النقر بزر الماوس الأيمن على الطبقة وتحديد تنقيط الطبقة)، وإلا فلن يعمل ذلك. سيتم تغيير حجم الصورة، ولكن ليس باستخدام الخوارزمية الجديدة. إذا رأيت اختلافًا جذريًا بين معاينة التقريب في Photoshop والصورة النهائية الفعلية ذات الدقة الأعلى، فأنت تفعل شيئًا خاطئًا.

                      تعليق


                      • #12
                        GIMP

                        GIMPGIMP
                        GIMP is a great Photoshop alternative, mainly because it’s free and surprisingly comprehensive. It works fine for resampling images, too, although it’s not at the top of the pack. GIMP’s landscape image is slightly better than Photoshop bicubic smoother’s attempt, but the illustration has more jagged edges.

                        This isn’t a bad result by any means. With some sharpening, it is still respectable – certainly better than nothing when you make large prints.
                        الأعرج

                         الأعرج  الأعرج

                        يعد GIMP بديلاً رائعًا لبرنامج Photoshop، ويرجع ذلك أساسًا إلى أنه مجاني وشامل بشكل مدهش. إنه يعمل بشكل جيد لإعادة تشكيل الصور أيضًا، على الرغم من أنه ليس في الجزء العلوي من الحزمة. تعد الصورة الأفقية لـ GIMP أفضل قليلاً من محاولة Photoshop bicubic الأكثر سلاسة، لكن الرسم التوضيحي يحتوي على حواف خشنة أكثر.

                        هذه ليست نتيجة سيئة بأي حال من الأحوال. مع بعض الشحذ، فإنه لا يزال محترمًا - وبالتأكيد أفضل من لا شيء عندما تقوم بعمل مطبوعات كبيرة.

                        تعليق


                        • #13
                          Dedicated Software: ON1 Resize (formerly Genuine Fractals and Perfect Resize)


                          The best-known image resizing software on the market, at least in the past, was Genuine Fractals. Today it goes by the name ON1 Resize, and it sells for $60 – but it’s also included if you buy the regular ON1 Photo RAW processor for $120 (sometimes on sale), so you may already own it. The good news is that it has more upsizing options than any other software here, and it’s also near the top of the pack in image quality. The bad news is that the new Photoshop algorithm still beats it pretty significantly. But as you can see, ON1 Resize certainly is no slouch:
                          ON1 ResizeON1 Resize
                          برنامج مخصص: ON1 Resize (الفركتلات الأصلية وتغيير الحجم المثالي سابقًا)

                          أشهر برامج تغيير حجم الصور في السوق، على الأقل في الماضي، كانت فركتلات حقيقية. اليوم يحمل اسم ON1 Resize، ويتم بيعه مقابل 60 دولارًا - ولكن يتم تضمينه أيضًا إذا قمت بشراء معالج ON1 Photo RAW العادي مقابل 120 دولارًا (أحيانًا معروض للبيع)، لذلك قد تمتلكه بالفعل. والخبر السار هو أنه يحتوي على خيارات تكبير حجم أكثر من أي برنامج آخر هنا، كما أنه قريب من أعلى الحزمة من حيث جودة الصورة. الخبر السيئ هو أن خوارزمية Photoshop الجديدة لا تزال تتفوق عليها بشكل كبير. ولكن كما ترون، ON1 Resize بالتأكيد ليس أمرًا سهلاً:

                          ON1 تغيير الحجمON1 تغيير الحجم

                          تعليق


                          • #14
                            It does a good job making the landscape image look crisp, although part of that is due to built-in sharpening within the ON1 resampling options. Still, it picks up detail in the river that didn’t exist in Photoshop’s bicubic smoother algorithm, which is a good result.

                            The same is true for the illustration. It’s slightly ahead of Photoshop’s bicubic smoother, although not by a tremendous amount (especially taking the somewhat more aggressive sharpening into account). On balance, ON1 Resize does a good job, but it is not at the level that I recommend paying $60 unless you know you need some of its more advanced options.
                            إنها تقوم بعمل جيد في جعل الصورة الأفقية تبدو واضحة، على الرغم من أن جزءًا من ذلك يرجع إلى الوضوح المدمج ضمن خيارات إعادة التشكيل ON1. ومع ذلك، فهو يلتقط تفاصيل من النهر لم تكن موجودة في خوارزمية Photoshop الأكثر سلاسة، وهي نتيجة جيدة.

                            وينطبق الشيء نفسه على الرسم التوضيحي. إنها تتقدم قليلاً على سلاسة المكعبة في Photoshop، على الرغم من أنها ليست بمقدار هائل (خاصة مع أخذ الشحذ الأكثر قوة إلى حد ما في الاعتبار). بشكل عام، يقوم ON1 Resize بعمل جيد، لكنه ليس بالمستوى الذي أوصي بدفع 60 دولارًا إلا إذا كنت تعلم أنك بحاجة إلى بعض خياراته الأكثر تقدمًا.

                            تعليق


                            • #15
                              Online Program: Photo Enlarger


                              There are a number of online services to enlarge photos. Many of them require an account or cost money, but some of them are free. I tested all the free options I could find, and the best results came from what also appeared to be the most popular option, “Photo Enlarger.” It actually did a surprisingly good job – second best on the illustration and third on the landscape:
                              Photo Enlarger (website)Photo Enlarger (website)
                              Specifically, the landscape photo has a decent amount of detail in the river and grass without looking over-sharpened. The elephant illustration looks quite good, too. Although it has some moderately noticeable jagged edges, it still looks better than almost all the other conversions (with only Photoshop’s “Preserve Details 2.0” winning out). That’s a great result for a website.
                              برنامج اون لاين: تكبير الصور

                              هناك عدد من الخدمات عبر الإنترنت لتكبير الصور. يتطلب العديد منها حسابًا أو تكلف أموالاً، لكن بعضها مجاني. لقد اختبرت جميع الخيارات المجانية التي أمكنني العثور عليها، وجاءت أفضل النتائج مما يبدو أيضًا أنه الخيار الأكثر شيوعًا، "Photo Enlarger". لقد قامت بالفعل بعمل جيد بشكل مدهش، حيث احتلت المرتبة الثانية في الرسم التوضيحي والثالثة في المناظر الطبيعية:

                              مكبر الصور (موقع ويب)مكبر الصور (موقع ويب)

                              على وجه التحديد، تحتوي صورة المناظر الطبيعية على قدر لا بأس به من التفاصيل في النهر والعشب دون أن تبدو حادة للغاية. يبدو رسم الفيل جيدًا أيضًا. على الرغم من أنها تحتوي على بعض الحواف الخشنة الملحوظة إلى حد ما، إلا أنها لا تزال تبدو أفضل من جميع التحويلات الأخرى تقريبًا (مع فوز "Preserveتفاصيل 2.0" في Photoshop فقط). هذه نتيجة رائعة لموقع ويب.

                              تعليق

                              يعمل...
                              X