كيفية قص الصور في الفوتوشوب How to Crop Images in Photoshop

تقليص
X
 
  • تصفية - فلترة
  • الوقت
  • عرض
إلغاء تحديد الكل
مشاركات جديدة

  • كيفية قص الصور في الفوتوشوب How to Crop Images in Photoshop

    كيفية قص الصور في الفوتوشوب
    How to Crop Images in Photoshop

    Cropping is one of the first steps in most post-processing workflows. In fact, most photographers apply some level of cropping to their images while editing. Reasons to crop an image go way beyond just getting closer to the subject. It could be for image stacking, panorama, straightening, or changing the aspect ratio of the photograph. In this article, I will take you through all the options that Photoshop offers with respect to cropping.

    Before I guide you through the steps to crop an image using Photoshop, there are a few points that are worth pointing out:
    • Cropping too much into an image will compromise the overall image quality due to loss of resolution. As a general guideline, it is better not to crop more than 50% of the image.
    • It is always best to check the horizons or the alignment of the subject in an image. A straightening angle of about 5-10 degrees should be the maximum. As the angle increases, so does the loss of pixels. In addition to losing pixels, one might end up misplacing or in worst cases, losing some of the elements that complement the picture.
    • When shooting stacked images hand-held, it is always best to shoot a bit wider due to potential changes in the alignment of images in post-processing software. Aligning and straightening images afterward might affect the composition.

    Table of Contentsيعد الاقتصاص إحدى الخطوات الأولى في معظم عمليات سير العمل بعد المعالجة. في الواقع، يقوم معظم المصورين بتطبيق مستوى معين من الاقتصاص على صورهم أثناء التحرير. تتجاوز أسباب اقتصاص الصورة مجرد الاقتراب من الموضوع. يمكن أن يكون ذلك لتكديس الصور، أو البانوراما، أو التسوية، أو تغيير نسبة العرض إلى الارتفاع للصورة. في هذه المقالة، سأطلعك على جميع الخيارات التي يقدمها Photoshop فيما يتعلق بالاقتصاص.

    قبل أن أرشدك خلال خطوات اقتصاص صورة باستخدام Photoshop، هناك بعض النقاط التي تستحق الإشارة إليها:

    سيؤدي الاقتصاص كثيرًا في الصورة إلى الإضرار بالجودة الإجمالية للصورة بسبب فقدان الدقة. كقاعدة عامة، من الأفضل عدم اقتصاص أكثر من 50% من الصورة. ومن الأفضل دائمًا التحقق من الأفق أو محاذاة الموضوع في الصورة. يجب أن تكون زاوية الاستقامة حوالي 5-10 درجات هي الحد الأقصى. مع زيادة الزاوية، يزداد فقدان البكسل. بالإضافة إلى فقدان وحدات البكسل، قد ينتهي الأمر بالشخص إلى وضع غير موضعه أو في أسوأ الحالات، فقدان بعض العناصر التي تكمل الصورة. عند التقاط صور مجمعة أثناء حمل الكاميرا باليد، فمن الأفضل دائمًا التصوير على نطاق أوسع قليلاً بسبب التغييرات المحتملة في المحاذاة الصور في برامج ما بعد المعالجة. قد تؤثر محاذاة الصور وتسويتها بعد ذلك على التكوين.

    جدول المحتويات

    أداة القطع في Photoshop، نسبة العرض إلى الارتفاع، تغيير نسبة العرض إلى الارتفاع في Photoshop، استقامة الصورة، التراكبات، قاعدة الأثلاث، المثلثات القطرية، النسبة الذهبية، الحلزون الذهبي، أداة قص المنظور، الخاتمة

  • #2
    Crop Tool in Photoshop


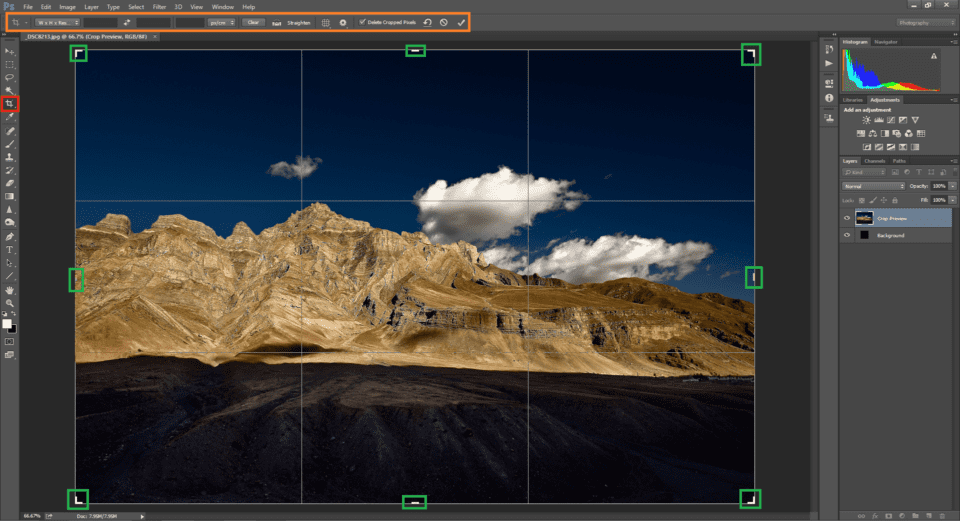
    The crop tool in Photoshop’s toolbar (marked red in the illustrative picture below) can be used to crop an image. The crop toolbox appears (marked orange) after the crop tool is engaged. Clicking on the image area with the crop tool selected brings gridlines to the image.

    Clicking on the resize holders (marked green) and dragging outside the image zooms out the crop. When one tries to zoom out of the actual image size, the background layer adds to the image area. In most cases, the background is transparent. So when the image is saved as a JPG, it becomes white and when saved as a PNG, it stays transparent. On the other hand, dragging it into the image zooms into the crop.

    The mouse pointer turns into a curved double-headed arrow when it is moved to the dark grey workspace area outside the image. Drag the curved double-headed arrow to rotate the image (marked in green boxes):
    Images can be cropped using the holders and can be rotated when dragging outside the resize holders

    أداة القص في الفوتوشوب

    يمكن استخدام أداة الاقتصاص الموجودة في شريط أدوات Photoshop (المميزة باللون الأحمر في الصورة التوضيحية أدناه) لاقتصاص صورة. يظهر صندوق أدوات الاقتصاص (مميز باللون البرتقالي) بعد تشغيل أداة الاقتصاص. يؤدي النقر فوق منطقة الصورة باستخدام أداة الاقتصاص المحددة إلى ظهور خطوط الشبكة في الصورة.

    يؤدي النقر فوق حاملات تغيير الحجم (المميزة باللون الأخضر) والسحب خارج الصورة إلى تصغير حجم الاقتصاص. عندما يحاول أحد التصغير من حجم الصورة الفعلي، تضيف طبقة الخلفية إلى مساحة الصورة. في معظم الحالات، تكون الخلفية شفافة. لذلك عندما يتم حفظ الصورة بتنسيق JPG، تصبح بيضاء وعندما يتم حفظها بتنسيق PNG، تظل شفافة. ومن ناحية أخرى، يؤدي سحبها إلى الصورة إلى تكبير حجم الاقتصاص.

    يتحول مؤشر الماوس إلى سهم منحني برأسين عند نقله إلى منطقة مساحة العمل ذات اللون الرمادي الداكن خارج الصورة. اسحب السهم المنحني ذي الرأسين لتدوير الصورة (المميزة بالمربعات الخضراء):

     يمكن اقتصاص الصور باستخدام الحاملات ويمكن تدويرها عند السحب خارج حاملات تغيير الحجم

    تعليق


    • #3
      Aspect Ratio


      Simply put, the Aspect Ratio is the ratio between the width and the height of an image. For example, if the aspect ratio of an image is 16:9 it means that the longer side is 1.77 (16/9) times longer than the shorter one. Most cameras since the days of 35mm film have a native 3:2 aspect ratio whereas most video formats including some monitors, TVs, and cinema screens have a 16:9 aspect ratio. For more information, check out Nasim’s detailed article on the Aspect Ratio.

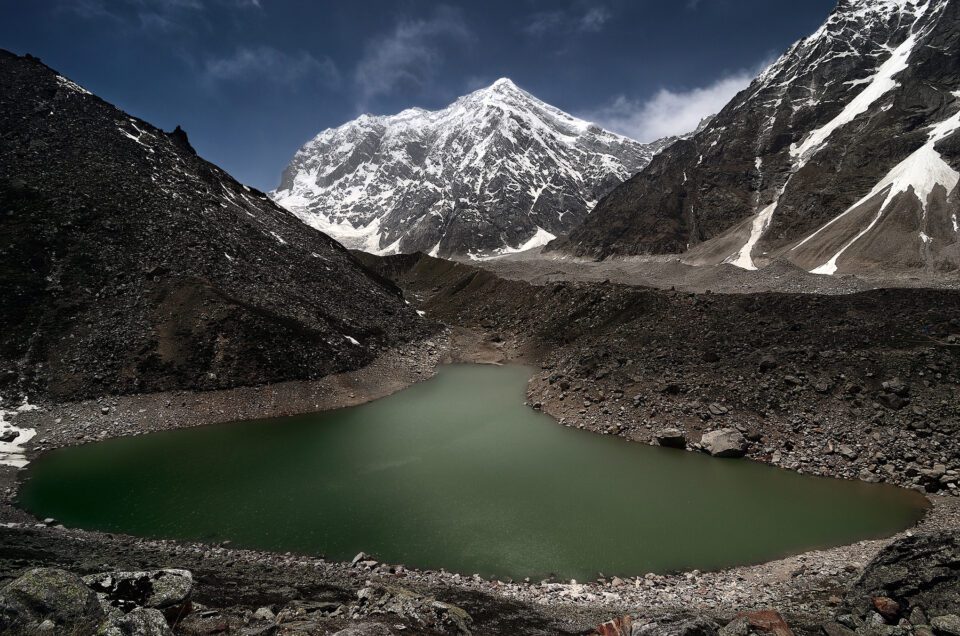
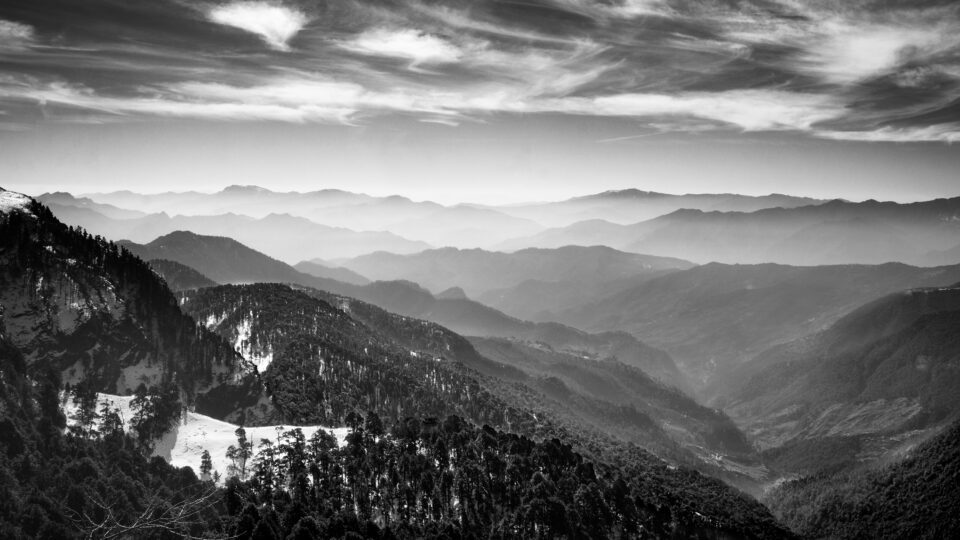
      The aspect ratio can alter the storytelling capacity of an image by a noticeable margin. To understand it, let us compare the two images below. The first one gives a perception of depth. The viewer’s eye is directed bottom-up starting from the lake to the tall mountain in the distance. On the other hand, the image below it gives a wider perception of the scene. Even though the seemingly wide image has more depth in terms of distance from the foreground to the background, it is not conveyed as much as it is in the first one.
      NIKON D7000 @ 11mm, ISO 100, 1/640, f/8.0 (Default 3:2 ratio)NIKON D7000 @ 24mm, ISO 100, 1/250, f/11.0 (16:9 aspect ratio)

      ابعاد متزنة

      ببساطة، نسبة العرض إلى الارتفاع هي النسبة بين عرض الصورة وارتفاعها. على سبيل المثال، إذا كانت نسبة العرض إلى الارتفاع للصورة هي 16:9، فهذا يعني أن الجانب الأطول أطول بمقدار 1.77 (16/9) مرة من الجانب الأقصر. تتمتع معظم الكاميرات منذ أيام الأفلام مقاس 35 مم بنسبة عرض إلى ارتفاع أصلية تبلغ 3:2، بينما تتمتع معظم تنسيقات الفيديو، بما في ذلك بعض الشاشات وأجهزة التلفزيون وشاشات السينما، بنسبة عرض إلى ارتفاع تبلغ 16:9. لمزيد من المعلومات، راجع مقالة نسيم التفصيلية حول نسبة العرض إلى الارتفاع.

      يمكن لنسبة العرض إلى الارتفاع أن تغير قدرة الصورة على سرد القصة بهامش ملحوظ. لفهم ذلك، دعونا نقارن الصورتين أدناه. الأول يعطي تصورا للعمق. يتم توجيه عين المشاهد من الأسفل إلى الأعلى بدءًا من البحيرة وحتى الجبل الشاهق في المسافة. ومن ناحية أخرى، الصورة أدناه تعطي تصورا أوسع للمشهد. على الرغم من أن الصورة التي تبدو واسعة، تتمتع بمزيد من العمق من حيث المسافة من المقدمة إلى الخلفية، إلا أنها لا يتم نقلها بقدر ما كانت عليه في الصورة الأولى.

      NIKON D7000 عند 11 مم، ISO 100، 1/640، f/8.0 (نسبة 3:2 الافتراضية)

      NIKON D7000 @ 24 مم، ISO 100، 1/250، f/11.0 (نسبة العرض إلى الارتفاع 16:9)

      تعليق


      • #4
        Changing the Aspect Ratio in Photoshop


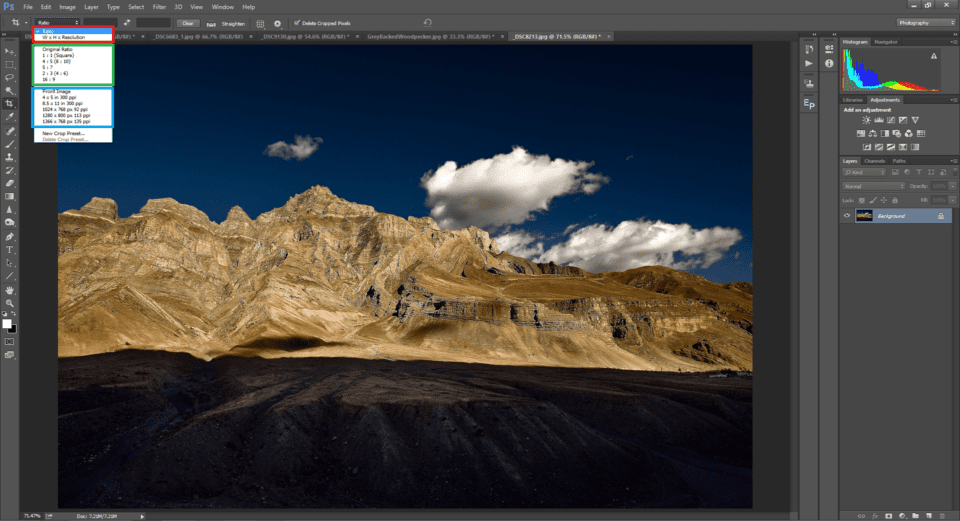
        The aspect ratio drop-down menu holds most of the widely used ratios (marked green in the image below). Selecting a ratio will fix it and as a result, that ratio will be maintained immaterial of the position of the mouse while dragging the resize place holder.
        Aspect ratio options
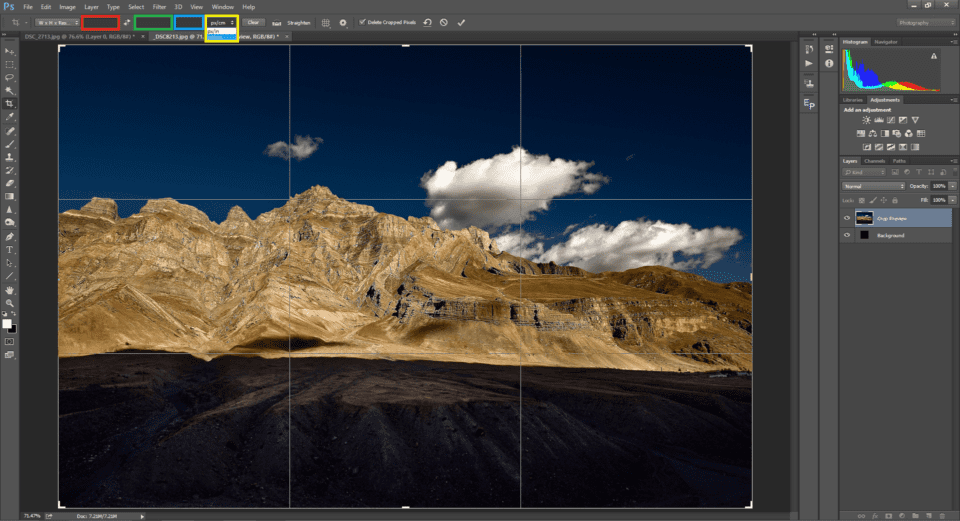
        It can be seen that the corresponding numbers with respect to width (marked red in the image below) and height (marked green in the image below) of the image appear in the text boxes right next to the drop-down. The ratios can be swapped between width and height using the swap button that could be seen in between the width and height text box. Select the W x H x Resolution option to choose a custom aspect ratio. When this option is chosen, you will see a third text box (marked blue) where you can specify numeric values. Further, the units, whether imperial or SI can also be chosen in the drop-down (marked yellow).
        This option is mostly used when we crop an image for a specific sized print
        The clear button can be clicked to remove the aspect ratio and have a free hand crop. In this case, the aspect ratio keeps changing as you drag the resize placeholders.


        تغيير نسبة العرض إلى الارتفاع في برنامج فوتوشوب

        تحتوي القائمة المنسدلة لنسبة العرض إلى الارتفاع على معظم النسب المستخدمة على نطاق واسع (باللون الأخضر في الصورة أدناه). سيؤدي تحديد النسبة إلى إصلاحها ونتيجة لذلك، سيتم الحفاظ على هذه النسبة غير ذات أهمية لموضع الماوس أثناء سحب العنصر النائب لتغيير الحجم.

        خيارات نسبة العرض إلى الارتفاع

        يمكن ملاحظة أن الأرقام المقابلة فيما يتعلق بعرض الصورة (المميزة باللون الأحمر في الصورة أدناه) والارتفاع (المميزة باللون الأخضر في الصورة أدناه) تظهر في مربعات النص بجوار القائمة المنسدلة مباشرةً. يمكن تبديل النسب بين العرض والارتفاع باستخدام زر المبادلة الذي يمكن رؤيته بين مربع نص العرض والارتفاع. حدد خيار W x H x الدقة لاختيار نسبة عرض إلى ارتفاع مخصصة. عند تحديد هذا الخيار، سترى مربع نص ثالثًا (مميز باللون الأزرق) حيث يمكنك تحديد قيم رقمية. علاوة على ذلك، يمكن أيضًا اختيار الوحدات، سواء كانت الإمبراطورية أو SI، في القائمة المنسدلة (باللون الأصفر).

         يُستخدم هذا الخيار في الغالب عندما نقوم باقتصاص صورة لطباعة بحجم معين

        يمكن النقر على الزر الواضح لإزالة نسبة العرض إلى الارتفاع والحصول على قص يدوي حر. في هذه الحالة، تستمر نسبة العرض إلى الارتفاع في التغير أثناء قيامك بسحب العناصر النائبة لتغيير الحجم.

        تعليق


        • #5
          Image Straightening


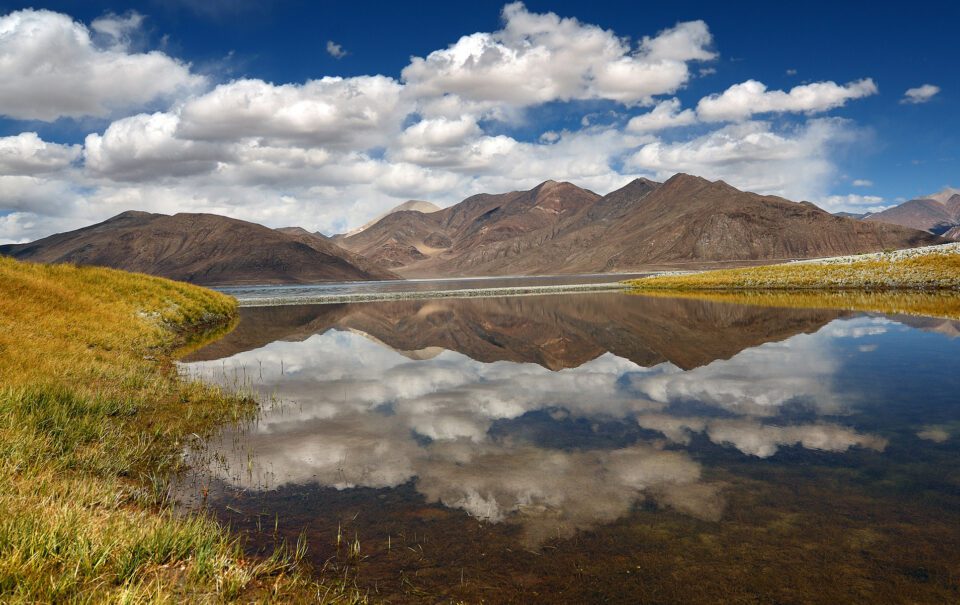
          Take a look at the image below. It can be clearly seen that the image is tilted to its left. This is a common mistake that quite a lot of us end up making while photographing. It is even more common when we are not using a tripod. A 2-degree tilt can make an image look utterly unprofessional. The cropping tool in Photoshop provides a one-click option to straighten the image.
          Image tilted to the left
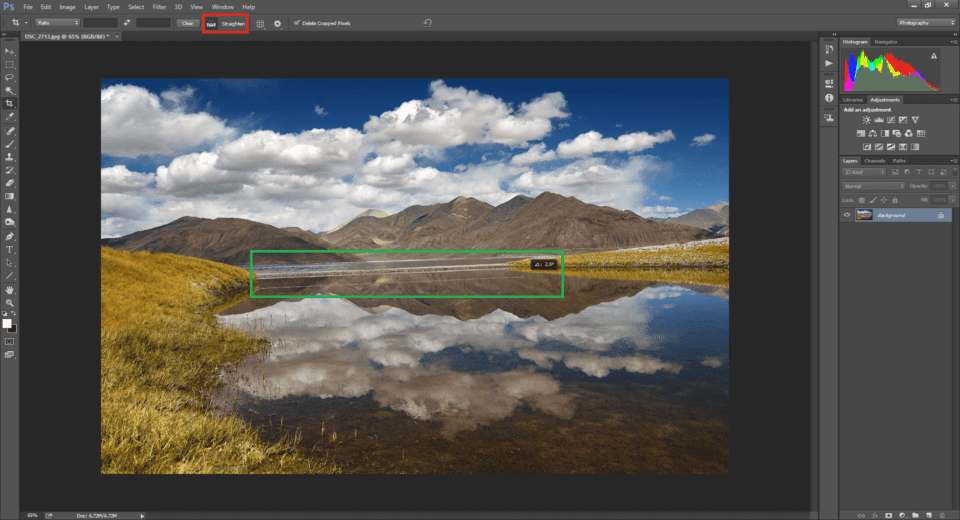
          First, click on the straighten button (marked red in the image below). Then, draw a line by dragging the mouse parallel or on the horizon with respect to which you wish to straighten (marked green).
          Once the Straightened button is clicked, draw a line parallel to or on the horizon
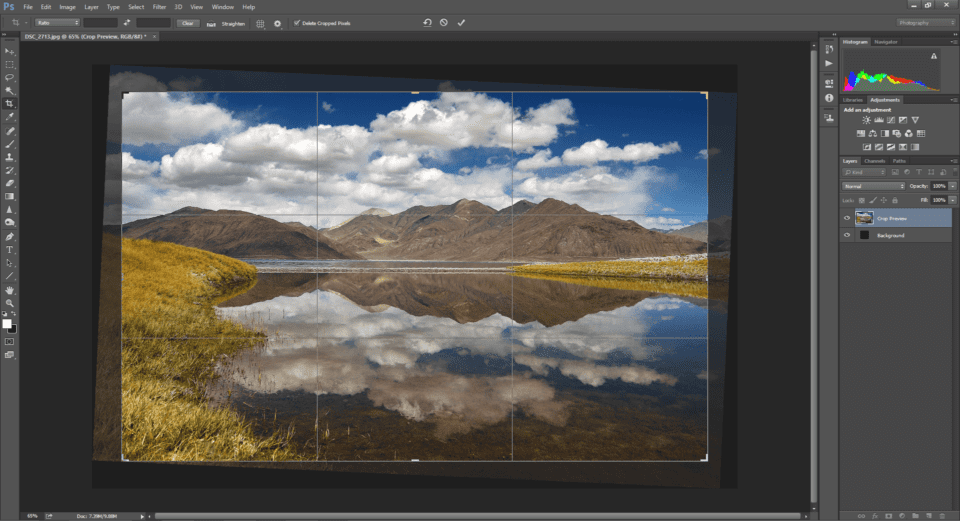
          You can see that the image has been straightened accordingly when you release the mouse button. As you can see in the image below, there is a significant loss of pixels when one tries to straighten or tilt an image, as mentioned earlier in the article.
          The image has been straightened and cropped out

          استقامة الصورة

          ألق نظرة على الصورة أدناه. ويمكن أن نرى بوضوح أن الصورة مائلة إلى اليسار. هذا خطأ شائع يقع فيه الكثير منا أثناء التصوير. بل إنه أكثر شيوعًا عندما لا نستخدم حاملًا ثلاثي الأرجل. يمكن للإمالة بمقدار درجتين أن تجعل الصورة تبدو غير احترافية على الإطلاق. توفر أداة الاقتصاص في Photoshop خيارًا بنقرة واحدة لتسوية الصورة.

          الصورة مائلة إلى اليسار

          أولا، انقر على زر التسوية (المميز باللون الأحمر في الصورة أدناه). بعد ذلك، ارسم خطًا عن طريق سحب الماوس بشكل موازٍ أو في الأفق الذي ترغب في تقويمه (باللون الأخضر).

          بمجرد النقر على زر "التسوية"، ارسم خطًا موازيًا للأفق أو عليه

          يمكنك أن ترى أن الصورة قد تم تقويمها وفقًا لذلك عند تحرير زر الماوس. كما ترون في الصورة أدناه، هناك خسارة كبيرة في وحدات البكسل عندما يحاول المرء تقويم الصورة أو إمالتها، كما ذكرنا سابقًا في المقالة.

           تمت تسوية الصورة واقتصاصها

          تعليق


          • #6
            Overlays


            Crop overlays are merely guidelines that help us compose better and geometric shapes that divide the frame. When the key points of your image like the eye of a subject align with certain intersections of lines, they grab more attention. This is because when you align your frame with reference to geometric proportions, you end up with a geometrically balanced image.

            To select an overlay, click on the overlay button to get the drop-down menu. The cycle overlay option (marked blue) cycles through the overlays in order of appearance in the menu. Overlays can also be cycled using the keyboard shortcut “O” while the crop tool is selected. Certain overlays like the Golden Spiral are not symmetrical. The orientation can be changed using the cycle orientation option or using the “Shift+O” keyboard shortcut with the crop tool selected.

            Even though there are over half a dozen overlays that help compose images better, most people are aware of only one. Let us take a look at all of them, one-by-one.
            تراكبات

            تراكبات القطع هي مجرد إرشادات تساعدنا على تكوين أشكال هندسية أفضل تقسم الإطار. عندما تتم محاذاة النقاط الرئيسية في صورتك، مثل عين الهدف، مع تقاطعات معينة من الخطوط، فإنها تجذب المزيد من الاهتمام. وذلك لأنه عندما تقوم بمحاذاة إطارك بالرجوع إلى النسب الهندسية، فإنك تحصل في النهاية على صورة متوازنة هندسيًا.

            لتحديد تراكب، انقر فوق زر التراكب للحصول على القائمة المنسدلة. يقوم خيار تراكب الدورة (المميز باللون الأزرق) بالتنقل عبر التراكبات بترتيب ظهورها في القائمة. يمكن أيضًا تدوير التراكبات باستخدام اختصار لوحة المفاتيح "O" أثناء تحديد أداة الاقتصاص. بعض التراكبات مثل Golden Spiral ليست متماثلة. يمكن تغيير الاتجاه باستخدام خيار اتجاه الدورة أو باستخدام اختصار لوحة المفاتيح "Shift+O" مع تحديد أداة الاقتصاص.

            على الرغم من وجود أكثر من ستة تراكبات تساعد في تكوين الصور بشكل أفضل، إلا أن معظم الأشخاص على دراية بواحدة فقط. دعونا نلقي نظرة على كل منهم، واحدا تلو الآخر.

            تعليق


            • #7
              The Rule of Thirds


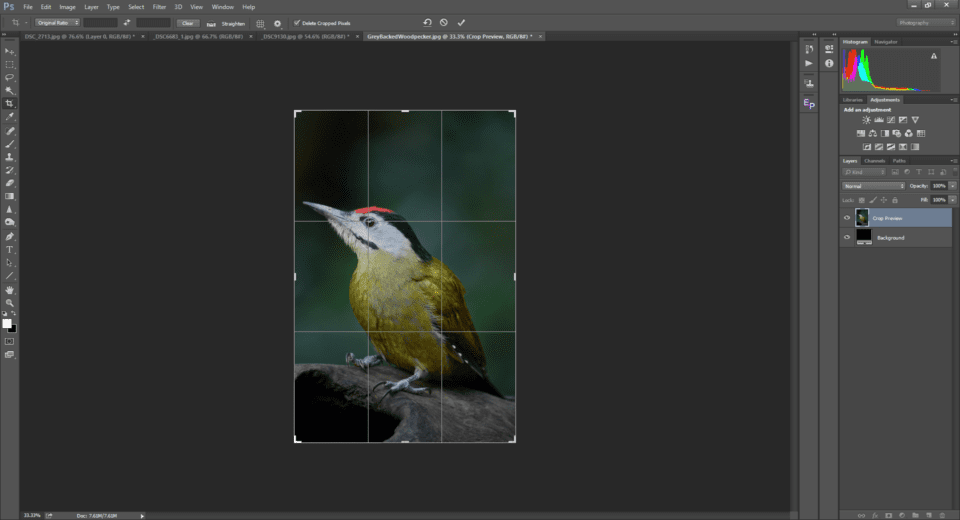
              The Rule of Thirds is pretty much one of the most widely used, and in many cases, widely abused overlays. The Rule of Thirds is also the default overlay in Photoshop. The overlay simply divides the image into nine equal rectangles. The observer’s eyes are drawn more into the image where the lines intersect. In the image below, the eye of the subject is aligned to the top-left intersection to grab the observer’s attention to the eye of the subject.
              The Rule of Thirds in Photoshop
              Rule of Thirds has become so common that most viewers are used to seeing tons of images aligned to the thirds. Sometimes, the Rule of Thirds can create unbalanced results. Even in the example above, I would have liked more negative space on the left. Since the eye is aligned to the left third, I was forced for a tighter frame-filling crop. If you are wondering about the Rule of Thirds and its limitations, we have a few interesting articles at PL that are worth checking out:قاعدة الأثلاث

              تعد قاعدة الأثلاث إلى حد كبير واحدة من أكثر التراكبات استخدامًا، وفي كثير من الحالات، يتم إساءة استخدامها على نطاق واسع. تعد قاعدة الأثلاث أيضًا التراكب الافتراضي في Photoshop. يقوم التراكب ببساطة بتقسيم الصورة إلى تسعة مستطيلات متساوية. تنجذب عيون المراقب أكثر إلى الصورة حيث تتقاطع الخطوط. في الصورة أدناه، تتم محاذاة عين الموضوع إلى التقاطع العلوي الأيسر لجذب انتباه المراقب إلى عين الموضوع.

              قاعدة الأثلاث في الفوتوشوب

              أصبحت قاعدة الثلث شائعة جدًا لدرجة أن معظم المشاهدين معتادون على رؤية الكثير من الصور المتوافقة مع الثلث. في بعض الأحيان، يمكن لقاعدة الأثلاث أن تؤدي إلى نتائج غير متوازنة. حتى في المثال أعلاه، كنت أرغب في وجود مساحة سلبية أكبر على اليسار. وبما أن العين محاذية للثلث الأيسر، فقد اضطررت إلى اقتصاص أكثر إحكامًا لملء الإطار. إذا كنت تتساءل عن قاعدة الأثلاث وقيودها، فلدينا بعض المقالات المثيرة للاهتمام في PL والتي تستحق الاطلاع عليها:

              ما هي قاعدة الأثلاث؟قاعدة الأثلاث: هل تنجح حقاً؟أسطورة قاعدة الأثلاث

              تعليق


              • #8
                Diagonal


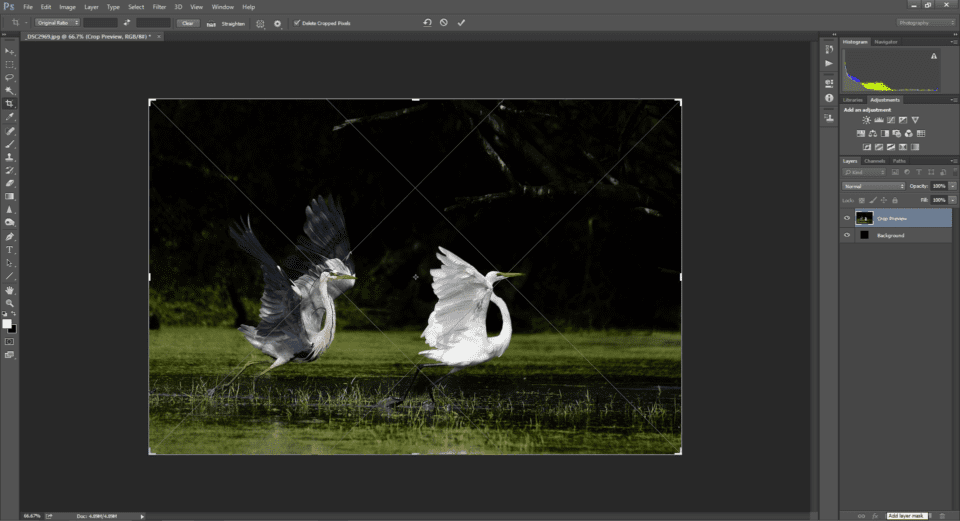
                As a matter of fact, when we use overlays other than the Rule of Thirds, it becomes a rare composition in itself. The diagonal overlay simply has lines running diagonally (45°) from each corner of the frame. To understand when and how to use Diagonals, let us consider the image below:
                Diagonal Overlay
                The subjects would have moved more towards the top or to the bottom of the frame, had I aligned the eyes of the birds to the intersection based on the rule of thirds. As seen above, using the diagonals to crop this image aligns the eyes of the birds closer to the intersection. As a result of aligning to the diagonals, one can avoid negative space either above or below the subject. Just like the Rule of Thirds, the points of intersection also grab the user’s attention.
                قطري

                في واقع الأمر، عندما نستخدم تراكبات أخرى غير قاعدة الأثلاث، فإنها تصبح تركيبة نادرة في حد ذاتها. يحتوي التراكب القطري ببساطة على خطوط تمتد قطريًا (45 درجة) من كل ركن من أركان الإطار. لفهم متى وكيف يتم استخدام القطرات، دعونا ننظر إلى الصورة أدناه:

                 تراكب قطري

                كان من الممكن أن يتحرك الأشخاص أكثر نحو أعلى الإطار أو أسفله، لو أنني قمت بمحاذاة أعين الطيور إلى التقاطع بناءً على قاعدة الأثلاث. كما رأينا أعلاه، فإن استخدام الأقطار لاقتصاص هذه الصورة يؤدي إلى محاذاة أعين الطيور بالقرب من التقاطع. ونتيجة للمحاذاة مع الأقطار، يمكن للمرء تجنب المساحة السلبية سواء فوق أو أسفل الموضوع. تمامًا مثل قاعدة الأثلاث، تجذب نقاط التقاطع أيضًا انتباه المستخدم.

                تعليق


                • #9
                  Triangles


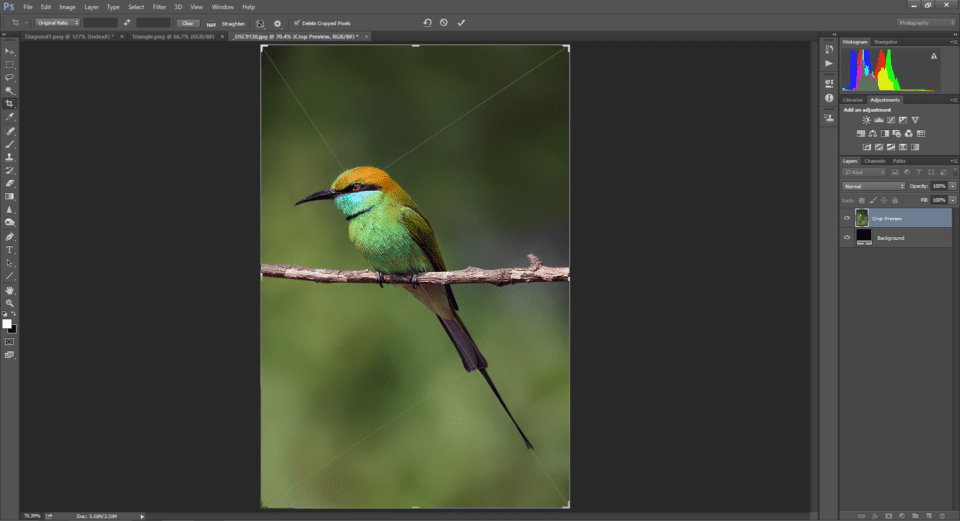
                  The triangles overlay is used predominantly for closer crops, frame-filling shots to be more specific. As can be seen in the picture below, this overlay has one diagonal running across two opposite corners and two vertical (90°) lines bisecting it reaching the other two corners. The central idea remains the same. Subject alignment to the intersections or when aligned to the lines attracts attention.


                  مثلثات

                  يتم استخدام تراكب المثلثات في الغالب للمحاصيل الأقرب، ولقطات ملء الإطار لتكون أكثر تحديدًا. كما هو موضح في الصورة أدناه، يحتوي هذا التراكب على قطري واحد يمتد عبر زاويتين متقابلتين وخطين رأسيين (90 درجة) يشطرانه ليصل إلى الزاويتين الأخريين. الفكرة المركزية تبقى كما هي. إن محاذاة الموضوع مع التقاطعات أو عند محاذاة الخطوط تجذب الانتباه.


                  تعليق


                  • #10
                    The Golden Ratio


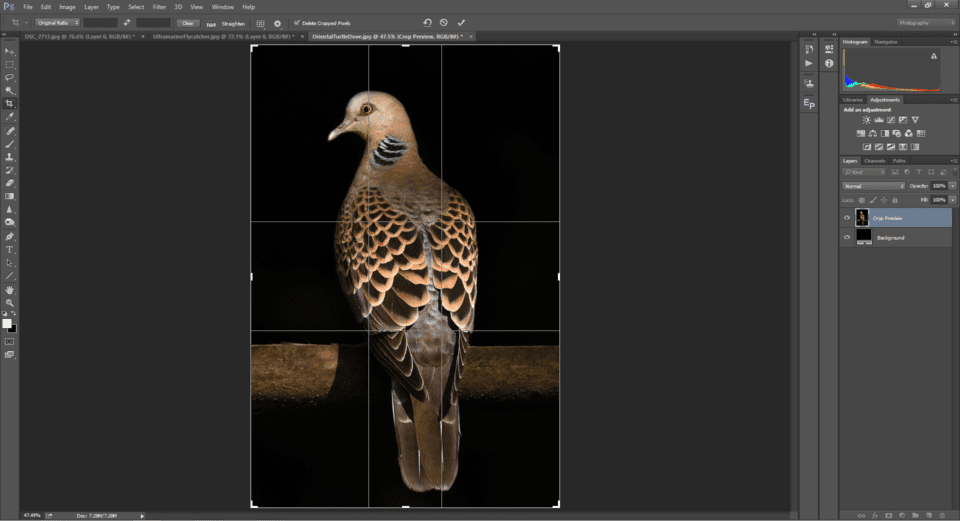
                    The Golden Ratio overlay is similar to the Rule of Thirds with respect to dividing the frame into nine rectangles. The difference is, the length and width of the four corner columns are 1.618 times bigger than the ones in the center as seen in the image below. Also called the Phi ratio, this overlay is used for center-heavy compositions. The Golden Ratio heeds to the Fibonacci series which is found all around us in nature. As you can see in the picture below, the eye of the subject passes through the left vertical line. Even though the subject is center-heavy, it isn’t aligned to the dead center which in most cases makes the image boring. It can also be seen that the highlighted repetitive patterns on the wings fall inside the central rectangle.
                    The center columns are one and a half times smaller than the ones in the corners.

                    النسبة الذهبية

                    يشبه تراكب النسبة الذهبية قاعدة الأثلاث فيما يتعلق بتقسيم الإطار إلى تسعة مستطيلات. الفرق هو أن طول وعرض أعمدة الزاوية الأربعة أكبر بمقدار 1.618 مرة من الأعمدة الموجودة في المركز كما هو موضح في الصورة أدناه. يُطلق عليها أيضًا نسبة Phi، ويتم استخدام هذا التراكب للتركيبات ذات الثقل المركزي. تراعي النسبة الذهبية سلسلة فيبوناتشي الموجودة في كل مكان حولنا في الطبيعة. كما ترون في الصورة أدناه، تمر عين الهدف عبر الخط العمودي الأيسر. على الرغم من أن الهدف ثقيل من المنتصف، إلا أنه لا يتماشى مع المركز الميت مما يجعل الصورة مملة في معظم الحالات. ويمكن أيضًا ملاحظة أن الأنماط المتكررة المميزة على الأجنحة تقع داخل المستطيل المركزي.

                    الأعمدة الوسطى أصغر بمرة ونصف من الأعمدة الموجودة في الزوايا.

                    تعليق


                    • #11
                      The Golden Spiral


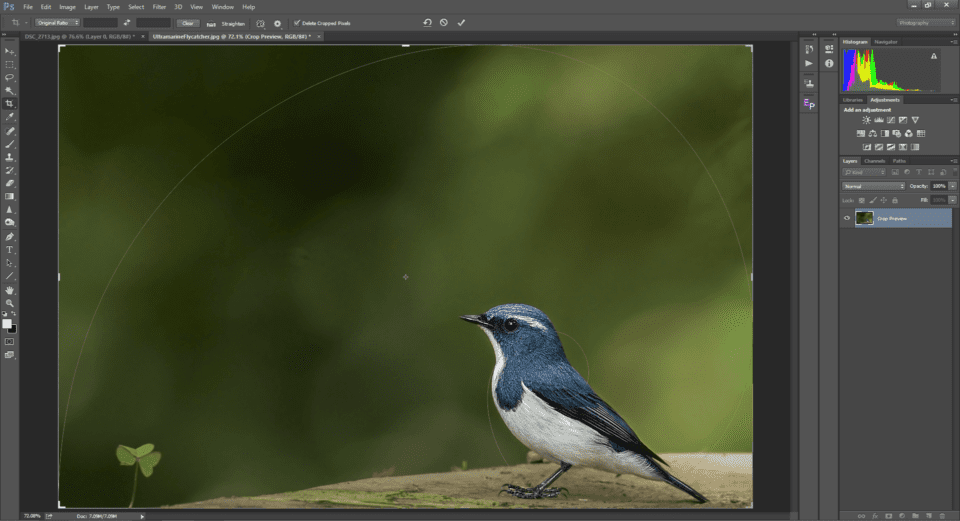
                      The Golden Spiral is a more artistic implementation of the Golden Ratio (1.618). The picture below looks pleasing even though the subject is around the corner. Arguably, it is because it heeds to the Golden Spiral, or perhaps there is simply a healthy amount of negative space and “breathing room”:
                      Golden spiral. Eyes are drawn towards the inner areas of the spiral.
                      The Golden Spiral has been an artistic rule for centuries. Some works of art as famous as the Mona Lisa could have been drawn in accordance with the Golden Spiral. Starting from the arrangements of seeds inside a flower to conch shells to spiral galaxies, spirals are a repetitive form in nature. Each consecutive side of the spiral is approximately 1.618 times bigger as it goes outwards. When the subject is placed towards the innermost spiral, it draws the viewer’s attention.

                      Overlays like Triangle and Golden Spiral can have the orientation changed using the “Shift+O” keyboard shortcut or from the Overlay crop tool. The grid overlay is more useful for graphics designers than photographers and hence not covered in this article.
                      اللولب الذهبي

                      اللولب الذهبي هو تطبيق فني أكثر للنسبة الذهبية (1.618). تبدو الصورة أدناه ممتعة على الرغم من أن الموضوع قاب قوسين أو أدنى. يمكن القول أن السبب في ذلك هو أنها تستجيب للدوامة الذهبية، أو ربما هناك ببساطة قدر صحي من المساحة السلبية و"غرفة التنفس":

                      الدوامة الذهبية. يتم رسم العيون نحو المناطق الداخلية للدوامة.

                      لقد كانت اللولب الذهبي قاعدة فنية لعدة قرون. من الممكن أن تكون بعض الأعمال الفنية المشهورة مثل الموناليزا قد تم رسمها وفقًا للدوامة الذهبية. بدءًا من ترتيبات البذور داخل الزهرة إلى أصداف المحار إلى المجرات الحلزونية، تعد الحلزونات شكلًا متكررًا في الطبيعة. كل جانب متتالي من اللولب يكون أكبر بمقدار 1.618 مرة تقريبًا عندما يتجه للخارج. عندما يتم وضع الموضوع نحو الحلزون الأعمق، فإنه يلفت انتباه المشاهد.

                      يمكن تغيير اتجاه التراكبات مثل Triangle وGolden Spiral باستخدام اختصار لوحة المفاتيح "Shift+O" أو من أداة القطع Overlay. يعتبر تراكب الشبكة أكثر فائدة لمصممي الرسومات من المصورين، وبالتالي لم يتم تناوله في هذه المقالة.

                      تعليق


                      • #12
                        Perspective Crop Tool


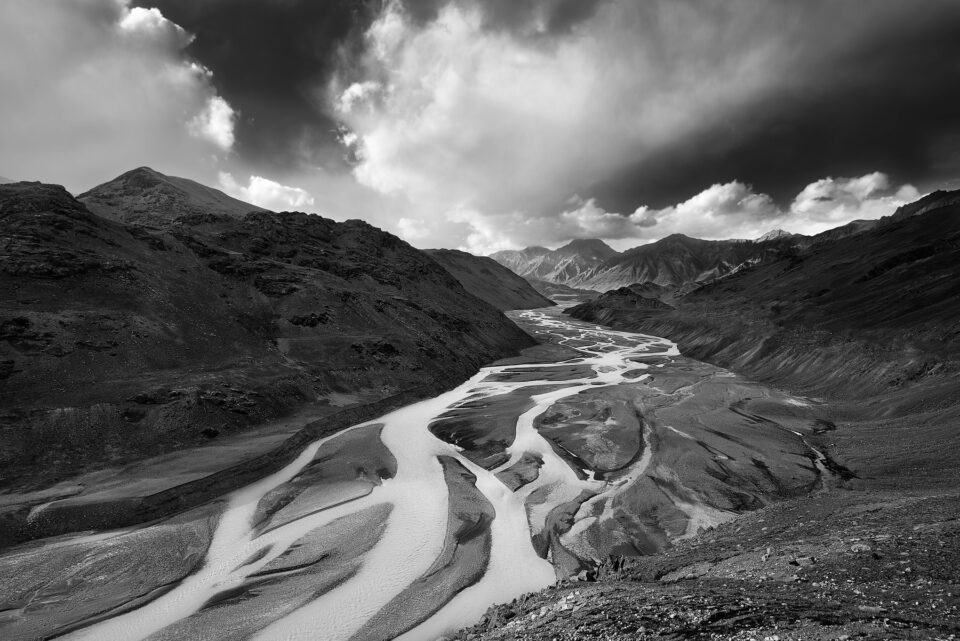
                        The perspective crop tool comes in handy when we need to crop out triangular areas out of an image. As seen in the below image, there is more negative space on the bottom right corner. But when I attempt to crop, I would end up losing the mountains at the top right side, tilting the balance of the image and making it right-heavy.
                        NIKON D750 @ 20mm, ISO 100, 1/100, f/5.6
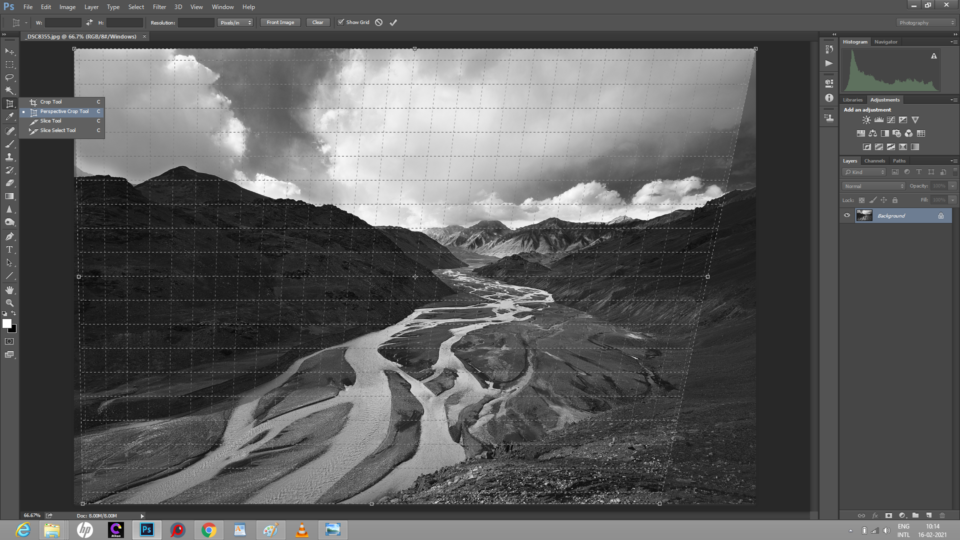
                        This tool allows us to crop the corners at angles. It then stretches the image into a rectangle. As you can see in the illustration below, the perspective crop tool crops out the bottom right, leaving the mountains and the sky comparably unaltered:
                        As it can be seen, triangular sections are cropped out using the perspective crop toolAs a result of perspective crop, triangles are cropped out of the image instead of rectangles
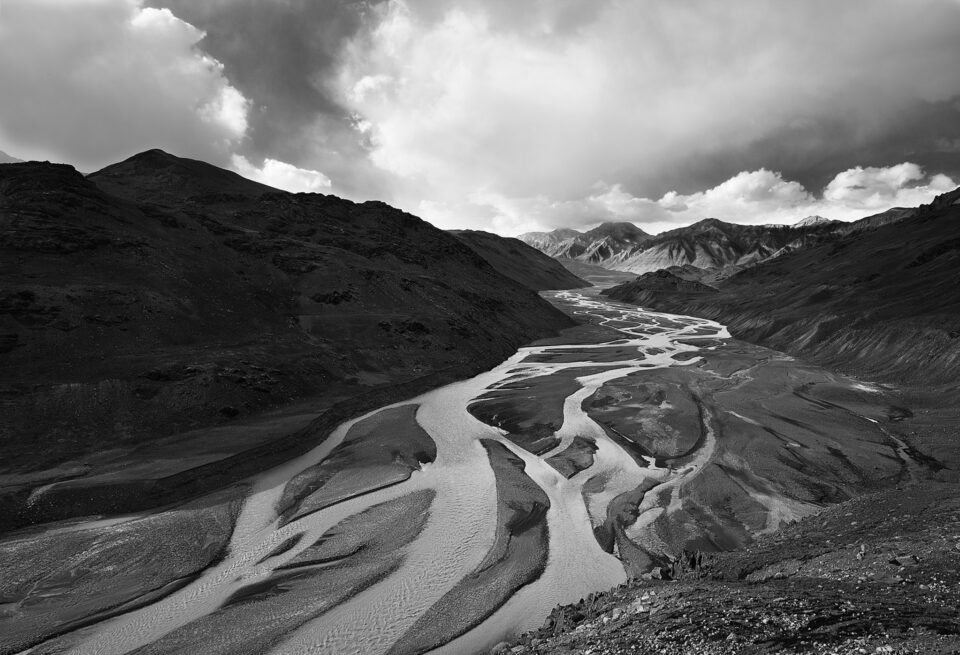
                        The foreground in the resulting image is more enhanced, leaving the mountains on the top right comparably unaltered. However, one needs to be cautious when using the perspective crop. As mentioned earlier, the pixels are stretched respective to the area cropped out to make a rectangular frame. So obviously, there will be a loss of resolution where the stretch is maximum. Care should be taken not to crop too much using the perspective crop, as it can yield distorted images.


                        أداة قص المنظور

                        تكون أداة اقتصاص المنظور مفيدة عندما نحتاج إلى اقتصاص مناطق مثلثة من الصورة. كما هو موضح في الصورة أدناه، هناك مساحة سلبية أكبر في الزاوية اليمنى السفلية. ولكن عندما أحاول الاقتصاص، سينتهي بي الأمر بخسارة الجبال في الجانب الأيمن العلوي، مما يؤدي إلى إمالة توازن الصورة وجعلها ثقيلة إلى اليمين.

                        كاميرا نيكون D750 عند 20 مم، ISO 100، 1/100، f/5.6

                        تتيح لنا هذه الأداة قص الزوايا بزوايا. ثم يقوم بتمديد الصورة إلى مستطيل. كما ترون في الرسم التوضيحي أدناه، يتم اقتصاص أداة قص المنظور من أسفل اليمين، تاركة الجبال والسماء دون تغيير نسبيًا:

                        كما هو واضح، يتم اقتصاص المقاطع المثلثة باستخدام أداة قص المنظور

                        نتيجة لاقتصاص المنظور، يتم اقتصاص المثلثات من الصورة بدلاً من المستطيلات

                        تم تحسين المقدمة في الصورة الناتجة بشكل أكبر، مما يترك الجبال في أعلى اليمين دون تغيير نسبيًا. ومع ذلك، يجب على المرء أن يكون حذرا عند استخدام المحاصيل المنظور. كما ذكرنا سابقًا، يتم تمديد وحدات البكسل وفقًا للمنطقة المقطوعة لتكوين إطار مستطيل. لذا من الواضح أنه سيكون هناك فقدان للدقة عندما يكون التمدد هو الحد الأقصى. يجب الحرص على عدم الاقتصاص أكثر من اللازم باستخدام اقتصاص المنظور، حيث يمكن أن ينتج عنه صور مشوهة.

                        تعليق


                        • #13
                          Conclusion


                          This article covered most of the frequently used cropping options that Adobe Photoshop provides. It also covered how one overlay does not fit all images. The geometry and balance of the image should dictate which overlay guideline to use rather than trying to fit the composition into the default overlay. If there are any queries or if there is anything you feel that I have left out, please pen it down in the comments section below. I shall update or cover those in my upcoming articles.
                          خاتمة

                          تناولت هذه المقالة معظم خيارات الاقتصاص المستخدمة بشكل متكرر والتي يوفرها Adobe Photoshop. كما تناول أيضًا كيف لا يتناسب التراكب الواحد مع جميع الصور. يجب أن تحدد هندسة الصورة وتوازنها إرشادات التراكب التي يجب استخدامها بدلاً من محاولة ملاءمة التركيبة مع التراكب الافتراضي. إذا كانت هناك أية استفسارات أو إذا كان هناك أي شيء تشعر أنني قد أهملته، فيرجى كتابته في قسم التعليقات أدناه. سأقوم بتحديث أو تغطية تلك في مقالاتي القادمة.

                          تعليق

                          يعمل...
                          X