كيف تم تصوير هذه الصورة٩؟ How Was This Picture Made #09?

تقليص
X
 
  • تصفية - فلترة
  • الوقت
  • عرض
إلغاء تحديد الكل
مشاركات جديدة

  • كيف تم تصوير هذه الصورة٩؟ How Was This Picture Made #09?

    كيف تم تصوير هذه الصورة٩؟
    How Was This Picture Made #09?

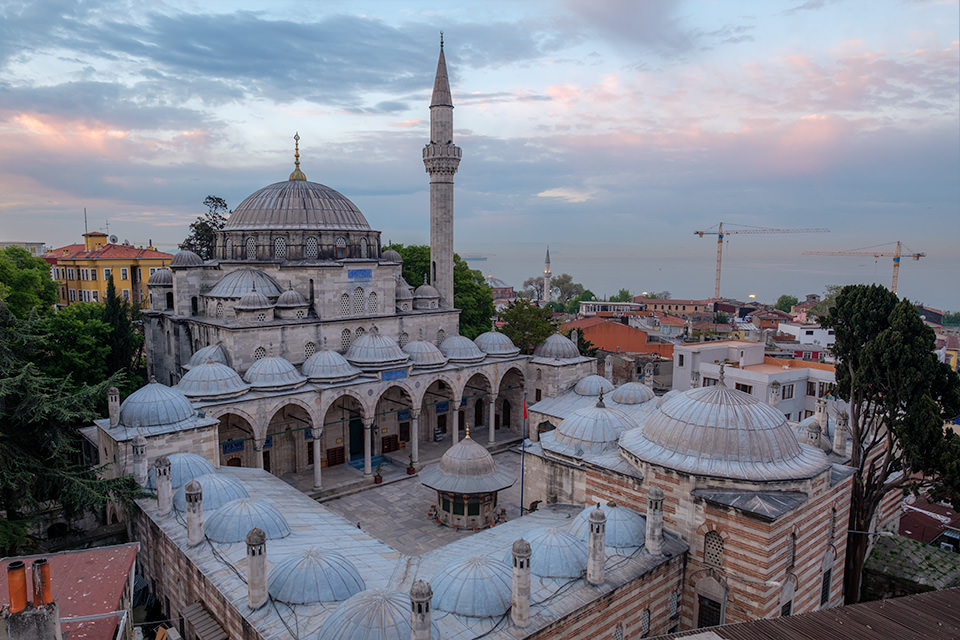
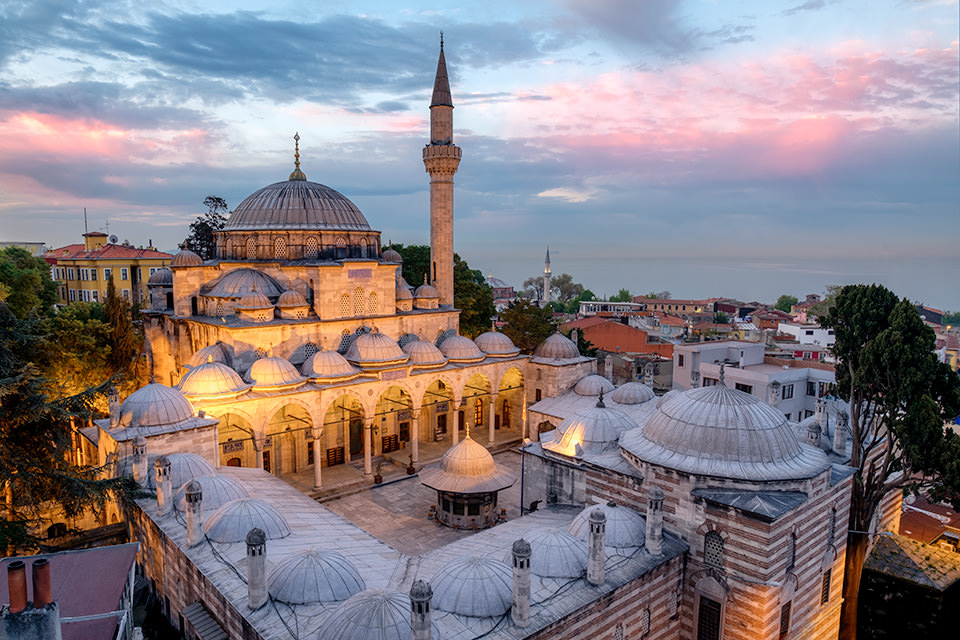
    We are continuing our “how was this picture taken?” series of articles and this time I present an image of the Sokullu Mehmet Pasha mosque, which I captured at sunrise from a rooftop of a hotel in Istanbul
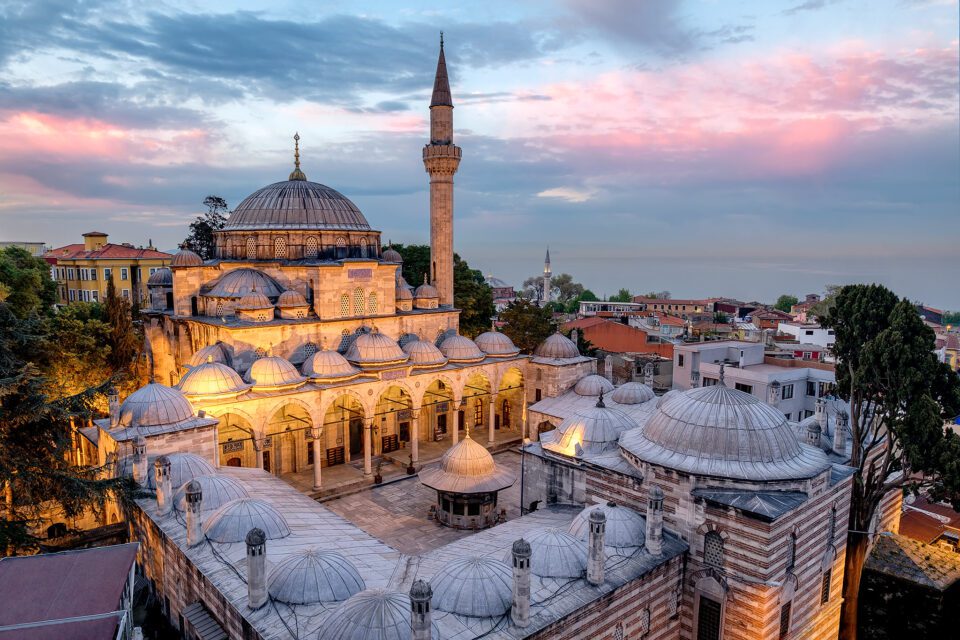


    This will hopefully be an interesting choice for the series, because I was challenged with a few issues when capturing the mosque. Unfortunately, I cannot disclose what the issues were, as they will give away the answer. So, how was this image captured and with what specific techniques? What is the approximate exposure time, aperture and ISO? Was the image captured hand-held or off a tripod? How was the image post-processed?

    نحن نواصل سؤالنا "كيف تم التقاط هذه الصورة؟" سلسلة من المقالات وهذه المرة أقدم صورة لمسجد صقللي محمد باشا، والتي التقطتها عند شروق الشمس من سطح أحد الفنادق في إسطنبول:


    نأمل أن يكون هذا اختيارًا مثيرًا للاهتمام للمسلسل، لأنني واجهت بعض التحديات عند تصوير المسجد. ولسوء الحظ، لا أستطيع الكشف عن ما هي القضايا، لأنها سوف تعطي الجواب. إذًا، كيف تم التقاط هذه الصورة وبأي تقنيات محددة؟ ما هو وقت التعرض التقريبي وفتحة العدسة وISO؟ هل تم التقاط الصورة باليد أم من حامل ثلاثي الأرجل؟ كيف تمت معالجة الصورة بعد ذلك؟


  • #2
    The Answer

    We had quite a few of our readers engage in our last “How Was This Picture Made #9” article for the image of the Sokullu Mehmet Pasa Mosque that I posted from my trip to Istanbul, Turkey. While some of the readers did a great job at giving a description of my shooting environment and even correctly guessed the location, the camera and the lens I used for the shot, none of the readers correctly identified the specific challenges I faced when photographing the scene. And to be honest, it would have been nearly impossible to identify those challenges by just looking at the photo, since it is the final, processed version. Let’s go through all the steps that will reveal everything I did to capture and process this image.
    X-Pro2 @ 14.5mm, ISO 200, 1/3, f/5.6
    لقد شارك عدد لا بأس به من قرائنا في مقالنا الأخير بعنوان "كيف تم صنع هذه الصورة رقم 9" حول صورة مسجد صقللو محمد باشا التي نشرتها من رحلتي إلى إسطنبول، تركيا. في حين أن بعض القراء قاموا بعمل رائع في تقديم وصف لبيئة التصوير الخاصة بي وحتى أنهم خمنوا بشكل صحيح الموقع والكاميرا والعدسة التي استخدمتها في اللقطة، لم يحدد أي من القراء بشكل صحيح التحديات المحددة التي واجهتها عند تصوير المشهد . ولكي نكون صادقين، كان من المستحيل تقريبًا تحديد تلك التحديات بمجرد النظر إلى الصورة، لأنها النسخة النهائية المعالجة. دعنا نستعرض جميع الخطوات التي ستكشف عن كل ما فعلته لالتقاط هذه الصورة ومعالجتها.

    X-Pro2 عند 14.5 ملم، ISO 200، 1/3، f/5.6

    تعليق


    • #3
      Right off the bat, you can see from the EXIF data above that I used the Fuji X-Pro2 camera to capture the image. The focal length is shown as 14.5mm, because I used the Fuji 10-24mm f/4 lens. An awesome combination to capture wide-angle scenes like this. I shot from the roof of the Sultan’s Palace hotel (by the way, if you stay at this hotel, you will be allowed to shoot from the rooftop) and since the mosque is right next to the hotel, the use of a wide-angle lens was necessary. Prior to photographing the scene, I scouted the rooftop a day earlier to see exactly where I would need to stand in order to get the best perspective. Although the rooftop is quite large in size, not every spot offers the same great view. For example, if you stand at the very south end of the rooftop, the center component of the mosque gets completely blocked, as shown in the close-up version below:

      على الفور، يمكنك أن ترى من بيانات EXIF ​​أعلاه أنني استخدمت كاميرا Fuji X-Pro2 لالتقاط الصورة. يظهر الطول البؤري على أنه 14.5 مم، لأنني استخدمت عدسة Fuji مقاس 10-24 مم f/4. مزيج رائع لالتقاط مشاهد واسعة الزاوية مثل هذه. لقد قمت بالتصوير من سطح فندق قصر السلطان (بالمناسبة، إذا كنت تقيم في هذا الفندق، فسيسمح لك بالتصوير من السطح) وبما أن المسجد يقع بجوار الفندق مباشرة، فإن استخدام زاوية واسعة كانت العدسة ضرورية. قبل تصوير المشهد، قمت باستكشاف السطح قبل يوم واحد لأرى بالضبط المكان الذي يجب أن أقف فيه من أجل الحصول على أفضل منظور. على الرغم من أن السطح كبير الحجم، إلا أنه لا توفر كل الأماكن نفس الإطلالة الرائعة. على سبيل المثال، إذا وقفت في أقصى الطرف الجنوبي من السطح، فسيتم حظر الجزء الأوسط من المسجد بالكامل، كما هو موضح في الصورة المقربة أدناه:


      تعليق


      • #4
        Because of this, I had to move around to determine the best location for the ideal composition, which happened to be towards the northern side of the rooftop. So kudos to everyone who correctly guessed the exact location and the equipment I used to capture this image! Although I did capture a few panoramas of the exact same scene with the Fuji 35mm f/2 lens, I decided against the panorama technique for one main reason – light was changing way too fast and the clouds were also moving too quickly that morning.

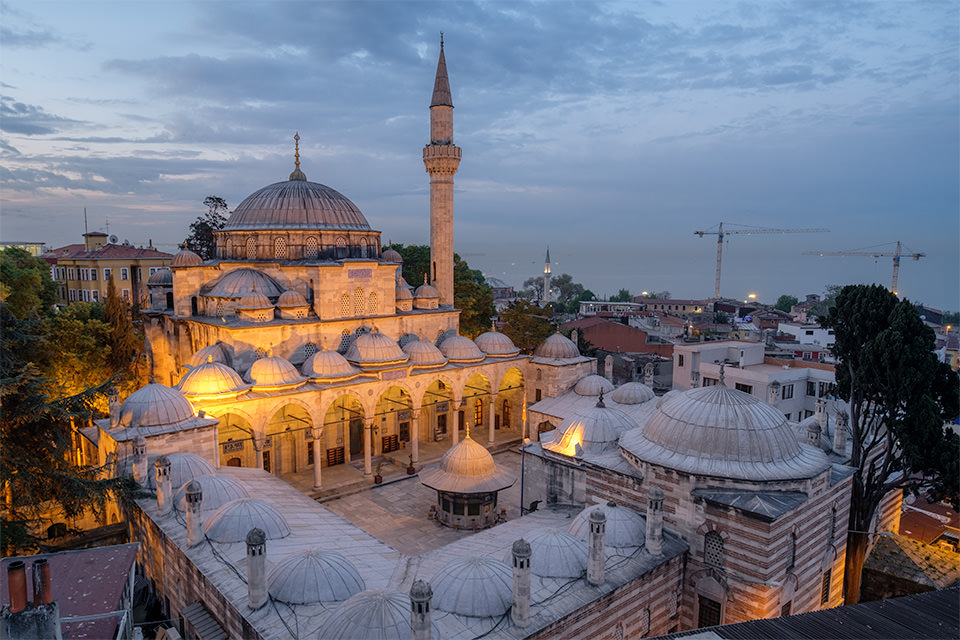
        Yes, I captured the image at sunrise. Actually, let me rephrase that: I captured a series of images in order to make this single blended image. I woke up very early that day. My idea was to capture the mosque with its night lights first, then wait for the sunrise and if I see color, capture another image in order to then blend both images in post-processing. Around 45 minutes before sunrise, I set my camera up on my travel tripod (it was a bit challenging to do this, since the legs of the tripod were touching the glass fence that was a bit elevated), then captured the below image:

        ولهذا السبب، كان علي أن أتحرك لتحديد أفضل موقع للتكوين المثالي، والذي تصادف أن يكون باتجاه الجانب الشمالي من السطح. لذا، تحية لكل من خمن بشكل صحيح الموقع الدقيق والمعدات التي استخدمتها لالتقاط هذه الصورة! على الرغم من أنني التقطت بعض الصور البانورامية لنفس المشهد باستخدام عدسة Fuji 35mm f/2، فقد قررت عدم استخدام تقنية البانوراما لسبب رئيسي واحد - كان الضوء يتغير بسرعة كبيرة وكانت السحب تتحرك بسرعة كبيرة جدًا في ذلك الصباح.

        نعم، لقد التقطت الصورة عند شروق الشمس. في الواقع، اسمحوا لي بإعادة صياغة ما يلي: لقد التقطت سلسلة من الصور لإنشاء هذه الصورة الفردية الممزوجة. استيقظت مبكرا جدا في ذلك اليوم. كانت فكرتي هي التقاط صورة للمسجد بأضوائه الليلية أولاً، ثم انتظار شروق الشمس وإذا رأيت لونًا، فقم بالتقاط صورة أخرى ثم مزج الصورتين في مرحلة ما بعد المعالجة. قبل حوالي 45 دقيقة من شروق الشمس، قمت بتثبيت الكاميرا على حامل ثلاثي القوائم للسفر (كان القيام بذلك أمرًا صعبًا بعض الشيء، نظرًا لأن أرجل الحامل ثلاثي الأرجل كانت تلامس السياج الزجاجي الذي كان مرتفعًا قليلاً)، ثم التقطت الصورة أدناه:


        تعليق


        • #5
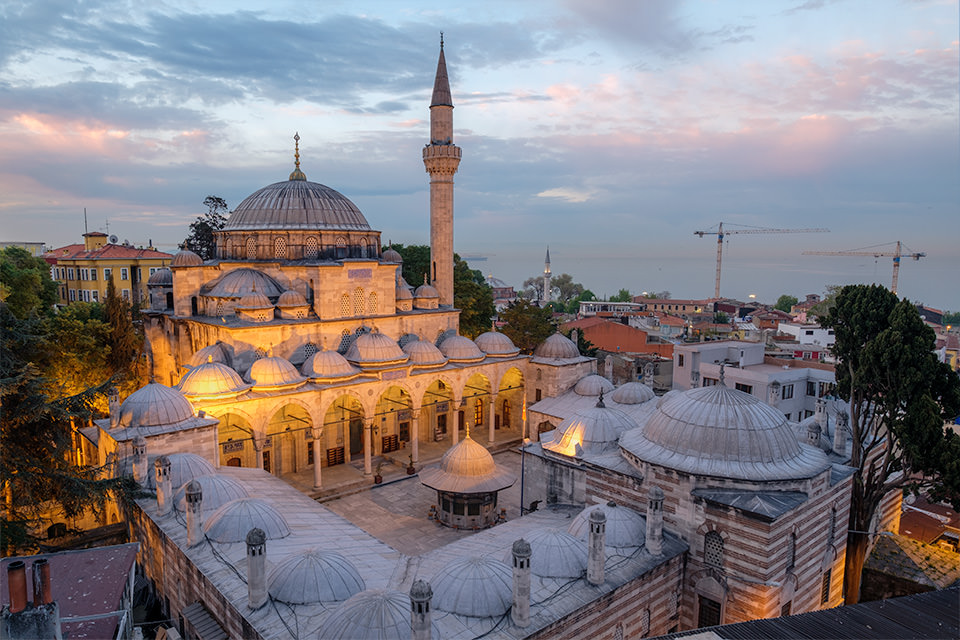
          As you can see, it was a bit too early for the sunrise. However, I was specifically aiming for the night lights shining on the mosque, so it worked out great. Next, it was time to wait for the sunrise. I patiently watched the sky for the next 40+ minutes…I got nothing! The clouds were blocking the horizon and there were no colors to be seen before or at sunrise. Then in about 5 minutes after sunrise, my patience finally paid off. One of the clouds opened up and let some of that red light through:

          It was not a lot of color, but enough to make my day, since I knew I could boost those colors up a bit in post.
          كما ترون، كان الوقت مبكرًا جدًا لشروق الشمس. ومع ذلك، كنت أهدف على وجه التحديد إلى تسليط أضواء الليل على المسجد، لذا فقد نجح الأمر بشكل رائع. وبعد ذلك، حان الوقت لانتظار شروق الشمس. لقد شاهدت السماء بصبر لمدة تزيد عن 40 دقيقة... ولم أحصل على شيء! كانت الغيوم تحجب الأفق ولم تكن هناك ألوان يمكن رؤيتها قبل أو عند شروق الشمس. وبعد حوالي 5 دقائق من شروق الشمس، أتى صبري بثماره أخيرًا. انفتحت إحدى الغيوم وسمحت بمرور بعض من ذلك الضوء الأحمر:


          لم يكن هناك الكثير من الألوان، لكنه كان كافيًا لجعل يومي رائعًا، لأنني كنت أعلم أنه يمكنني تعزيز تلك الألوان قليلاً في المنشور.

          تعليق


          • #6
            Now that I had both images captured, it was time to put them through both Lightroom and Photoshop. I came to my room and immediately started editing the image with my Surface Pro. First, I made some basic tweaks to both images – white balance and exposure adjustments, -100 highlights, +75 shadows and a bit of whites and blacks. I changed the camera profile to Camera PROVIA/STANDARD, which is what I typically work with when editing images from Fuji cameras. The next step was to take both images into Photoshop, since Lightroom cannot be used to blend multiple images together. I right-clicked on both images and picked “Open as Layers in Photoshop”.

            With both images opened as layers, I first made sure that they are perfectly aligned, in case I accidentally moved my tripod. And indeed – it turned out that my tripod did move just a bit from shot to shot. I selected both layers, then aligned them using “Edit->Auto-Align Layers”. It took a second and Photoshop was able to quickly align both layers perfectly. Next, I cropped the image, so that I don’t have any empty space on the sides after alignment.
            الآن بعد أن قمت بالتقاط كلتا الصورتين، فقد حان الوقت لوضعهما عبر كل من Lightroom وPhotoshop. جئت إلى غرفتي وبدأت على الفور في تعديل الصورة باستخدام جهاز Surface Pro. أولاً، قمت بإجراء بعض التعديلات الأساسية على كلتا الصورتين - توازن اللون الأبيض وتعديلات التعرض، -100 تمييز، +75 ظلًا وقليلًا من اللون الأبيض والأسود. لقد قمت بتغيير ملف تعريف الكاميرا إلى Camera PROVIA/STANDARD، وهو ما أستخدمه عادةً عند تحرير الصور من كاميرات Fuji. كانت الخطوة التالية هي نقل الصورتين إلى Photoshop، حيث لا يمكن استخدام Lightroom لدمج صور متعددة معًا. لقد قمت بالنقر بزر الماوس الأيمن على كلتا الصورتين واخترت "فتح كطبقات في Photoshop".

            مع فتح كلتا الصورتين كطبقات، تأكدت أولاً من محاذاةهما تمامًا، في حالة قيامي بتحريك الحامل ثلاثي القوائم عن طريق الخطأ. وبالفعل - اتضح أن الحامل ثلاثي القوائم الخاص بي يتحرك قليلًا من لقطة إلى أخرى. لقد قمت بتحديد كلتا الطبقتين، ثم قمت بمحاذاتهما باستخدام "تحرير->محاذاة الطبقات تلقائيًا". استغرق الأمر ثانية وتمكن Photoshop من محاذاة كلتا الطبقتين بشكل مثالي بسرعة. بعد ذلك، قمت بقص الصورة، بحيث لا يكون لدي أي مساحة فارغة على الجانبين بعد المحاذاة.

            تعليق


            • #7
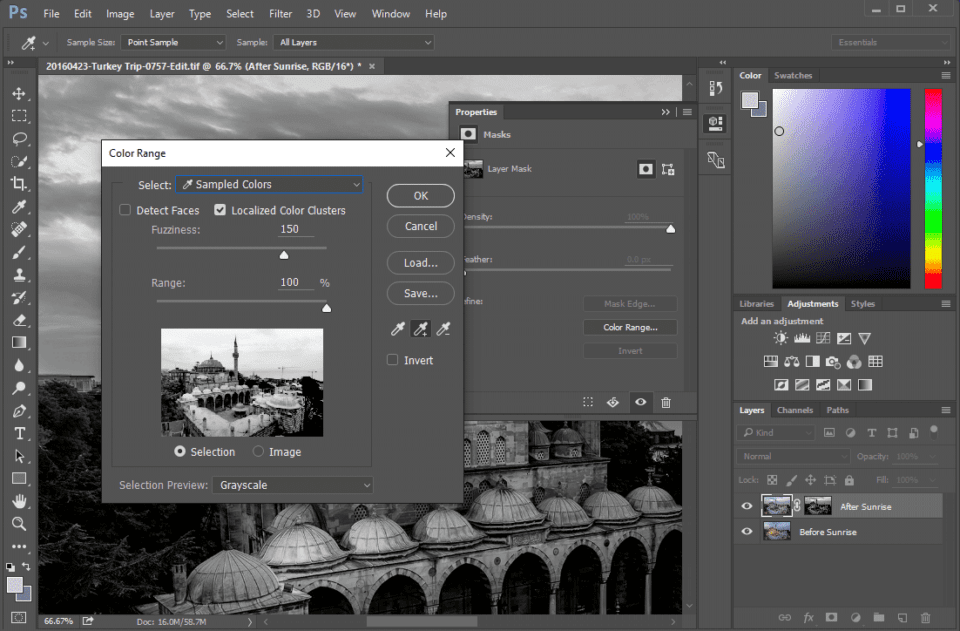
              From here, the biggest challenge was to create a mask that could blend the two images properly together. Although one could use masking techniques to isolate the clouds from the foreground, the biggest problem when combining images like this is to have a good balance of light from both shots. If one just copy-pastes the sky, the rest of the scene will never match the brighter sky, making the image appear very fake. Instead, the best method is to combine exposures using Luminosity Masks in Photoshop, which can yield much more natural-looking results. I started out with a simple Luminosity Mask by visiting the “Channels” tab right next to “Layers” in Photoshop, then CTRL-clicking the RGB Channel. I saved the selection as an Alpha Channel, then added a layer mask on top of the top layer, which was my colorful sky layer. The mask had to be adjusted to make a better selection, so I proceeded to the Mask Properties and clicked “Color Range” to manually mask out the sky:

              من هنا، كان التحدي الأكبر هو إنشاء قناع يمكنه مزج الصورتين معًا بشكل صحيح. على الرغم من أنه يمكن استخدام تقنيات الإخفاء لعزل السحب عن المقدمة، إلا أن المشكلة الأكبر عند دمج صور مثل هذه هي الحصول على توازن جيد للضوء من كلتا اللقطتين. إذا قام أحدهم بنسخ السماء ولصقها، فلن يتطابق باقي المشهد أبدًا مع السماء الأكثر سطوعًا، مما يجعل الصورة تبدو مزيفة للغاية. بدلاً من ذلك، فإن أفضل طريقة هي الجمع بين التعريضات الضوئية باستخدام أقنعة اللمعان في Photoshop، والتي يمكن أن تؤدي إلى نتائج تبدو طبيعية أكثر بكثير. لقد بدأت باستخدام قناع Luminosity Mask البسيط من خلال زيارة علامة التبويب "Channels" بجوار "Layers" في Photoshop، ثم النقر فوق CTRL على قناة RGB. لقد قمت بحفظ التحديد كقناة ألفا، ثم أضفت قناع طبقة أعلى الطبقة العليا، والتي كانت طبقة السماء الملونة الخاصة بي. كان لا بد من تعديل القناع لإجراء تحديد أفضل، لذلك انتقلت إلى خصائص القناع وقمت بالنقر فوق "نطاق الألوان" لإخفاء السماء يدويًا:


              تعليق


              • #8
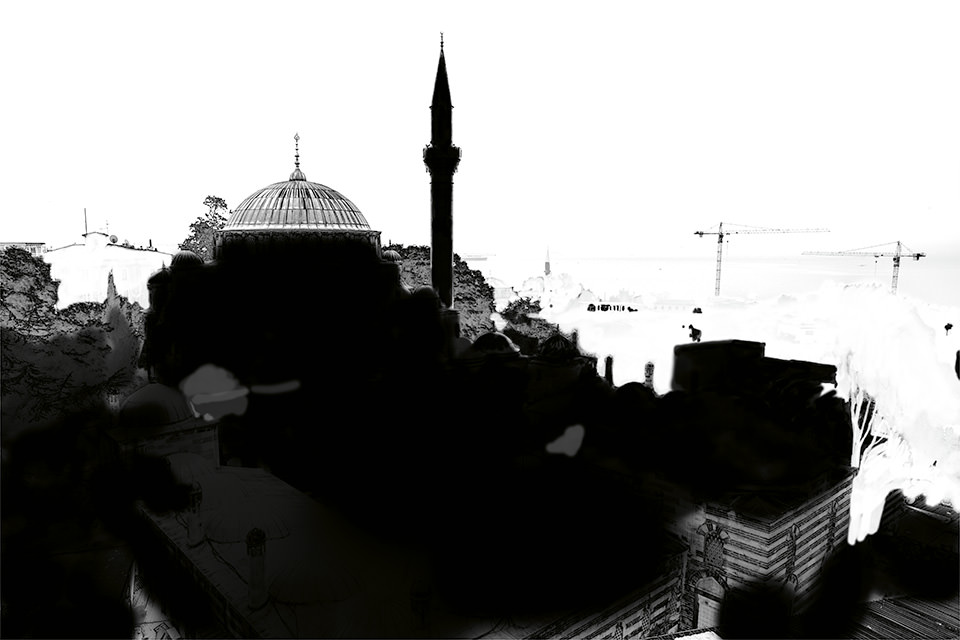
                Although Photoshop did a decent job at creating a workable mask, since the yellow light on the building was so bright, it was also heavily selected, so I had to manually brush out the mask for the lights to come through. This was the messy part of the whole job and it took me a while to create a proper mask. After everything was done, here is the mask I ended up with:

                That’s a pretty messy mask, but it worked out OK As you can see, I concentrated quite heavily on the mosque and its minaret in order to bring back those artificial colors. Here is what the blend looked like after the mask was applied:
                على الرغم من أن Photoshop قام بعمل جيد في إنشاء قناع عملي، نظرًا لأن الضوء الأصفر على المبنى كان ساطعًا جدًا، فقد تم اختياره أيضًا بشكل كبير، لذلك اضطررت إلى تنظيف القناع يدويًا حتى تمر الأضواء. كان هذا هو الجزء الفوضوي من العمل بأكمله واستغرق الأمر بعض الوقت لإنشاء قناع مناسب. بعد الانتهاء من كل شيء، هذا هو القناع الذي انتهيت منه:


                هذا قناع فوضوي للغاية، لكنه نجح بشكل جيد كما ترون، ركزت بشدة على المسجد ومئذنته من أجل إعادة تلك الألوان الاصطناعية. وهذا هو شكل الخلطة بعد تطبيق القناع:


                تعليق


                • #9
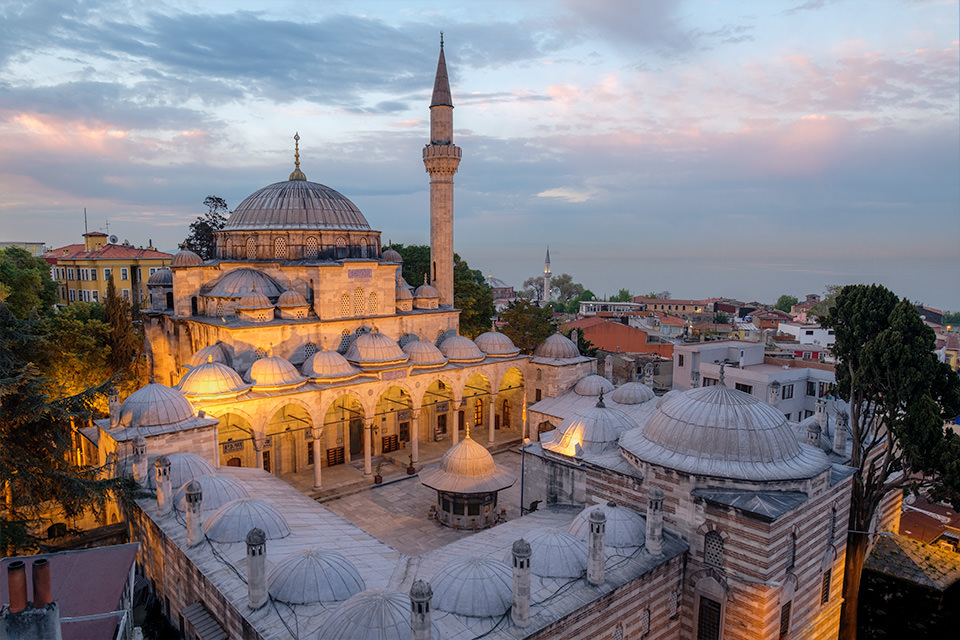
                  From here, I created another layer to remove unwanted objects using the Spot Healing and Clone Stamp tools. Although construction was taking place in the distance, I did not want those large cranes to be part of my image, so I removed them all. Next, I cleaned up the area to the left bottom of the frame, since it was a bit distracting. The next challenge was the large piece of roof that was there on the bottom right side of the screen. Although I initially kept it in the image, I decided to put a bit more time in post to clean it up as well. I really did not want to crop the image any more, as it would cut into the bottom part of the mosque. Photoshop did a pretty decent job here, but the structure on the bottom right corner was not something I was able to create out of nothing. So I ended up darkening it a bit to conceal my terrible cloning work Here is the end result of all that effort:

                  Now that things were cleaned up, I wanted to boost the contrast and the colors in the image. I fired up Google’s Nik Color Efect and Viveza and applied some global adjustments:

                  من هنا، قمت بإنشاء طبقة أخرى لإزالة الكائنات غير المرغوب فيها باستخدام أدوات Spot Healing وClone Stamp. على الرغم من أن البناء كان يجري على مسافة، إلا أنني لم أرغب في أن تكون تلك الرافعات الكبيرة جزءًا من صورتي، لذلك قمت بإزالتها جميعًا. بعد ذلك، قمت بتنظيف المنطقة الموجودة أسفل يسار الإطار، لأنها كانت مشتتة بعض الشيء. كان التحدي التالي هو قطعة السقف الكبيرة الموجودة في الجانب الأيمن السفلي من الشاشة. على الرغم من أنني احتفظت بها في الصورة في البداية، إلا أنني قررت تخصيص المزيد من الوقت للنشر لتنظيفها أيضًا. لم أرغب حقًا في اقتصاص الصورة بعد الآن، لأنها ستقتطع الجزء السفلي من المسجد. لقد قام Photoshop بعمل جيد جدًا هنا، لكن البنية الموجودة في الزاوية اليمنى السفلية لم تكن شيئًا كنت قادرًا على إنشائه من لا شيء. لذلك انتهى بي الأمر إلى تعتيمها قليلاً لإخفاء عملي الاستنساخي الرهيب هذه هي النتيجة النهائية لكل هذا الجهد:


                  الآن بعد أن تم تنظيف الأشياء، أردت تعزيز التباين والألوان في الصورة. لقد قمت بتشغيل Nik Color Efect وViveza من Google وقمت بتطبيق بعض التعديلات العامة:


                  تعليق


                  • #10
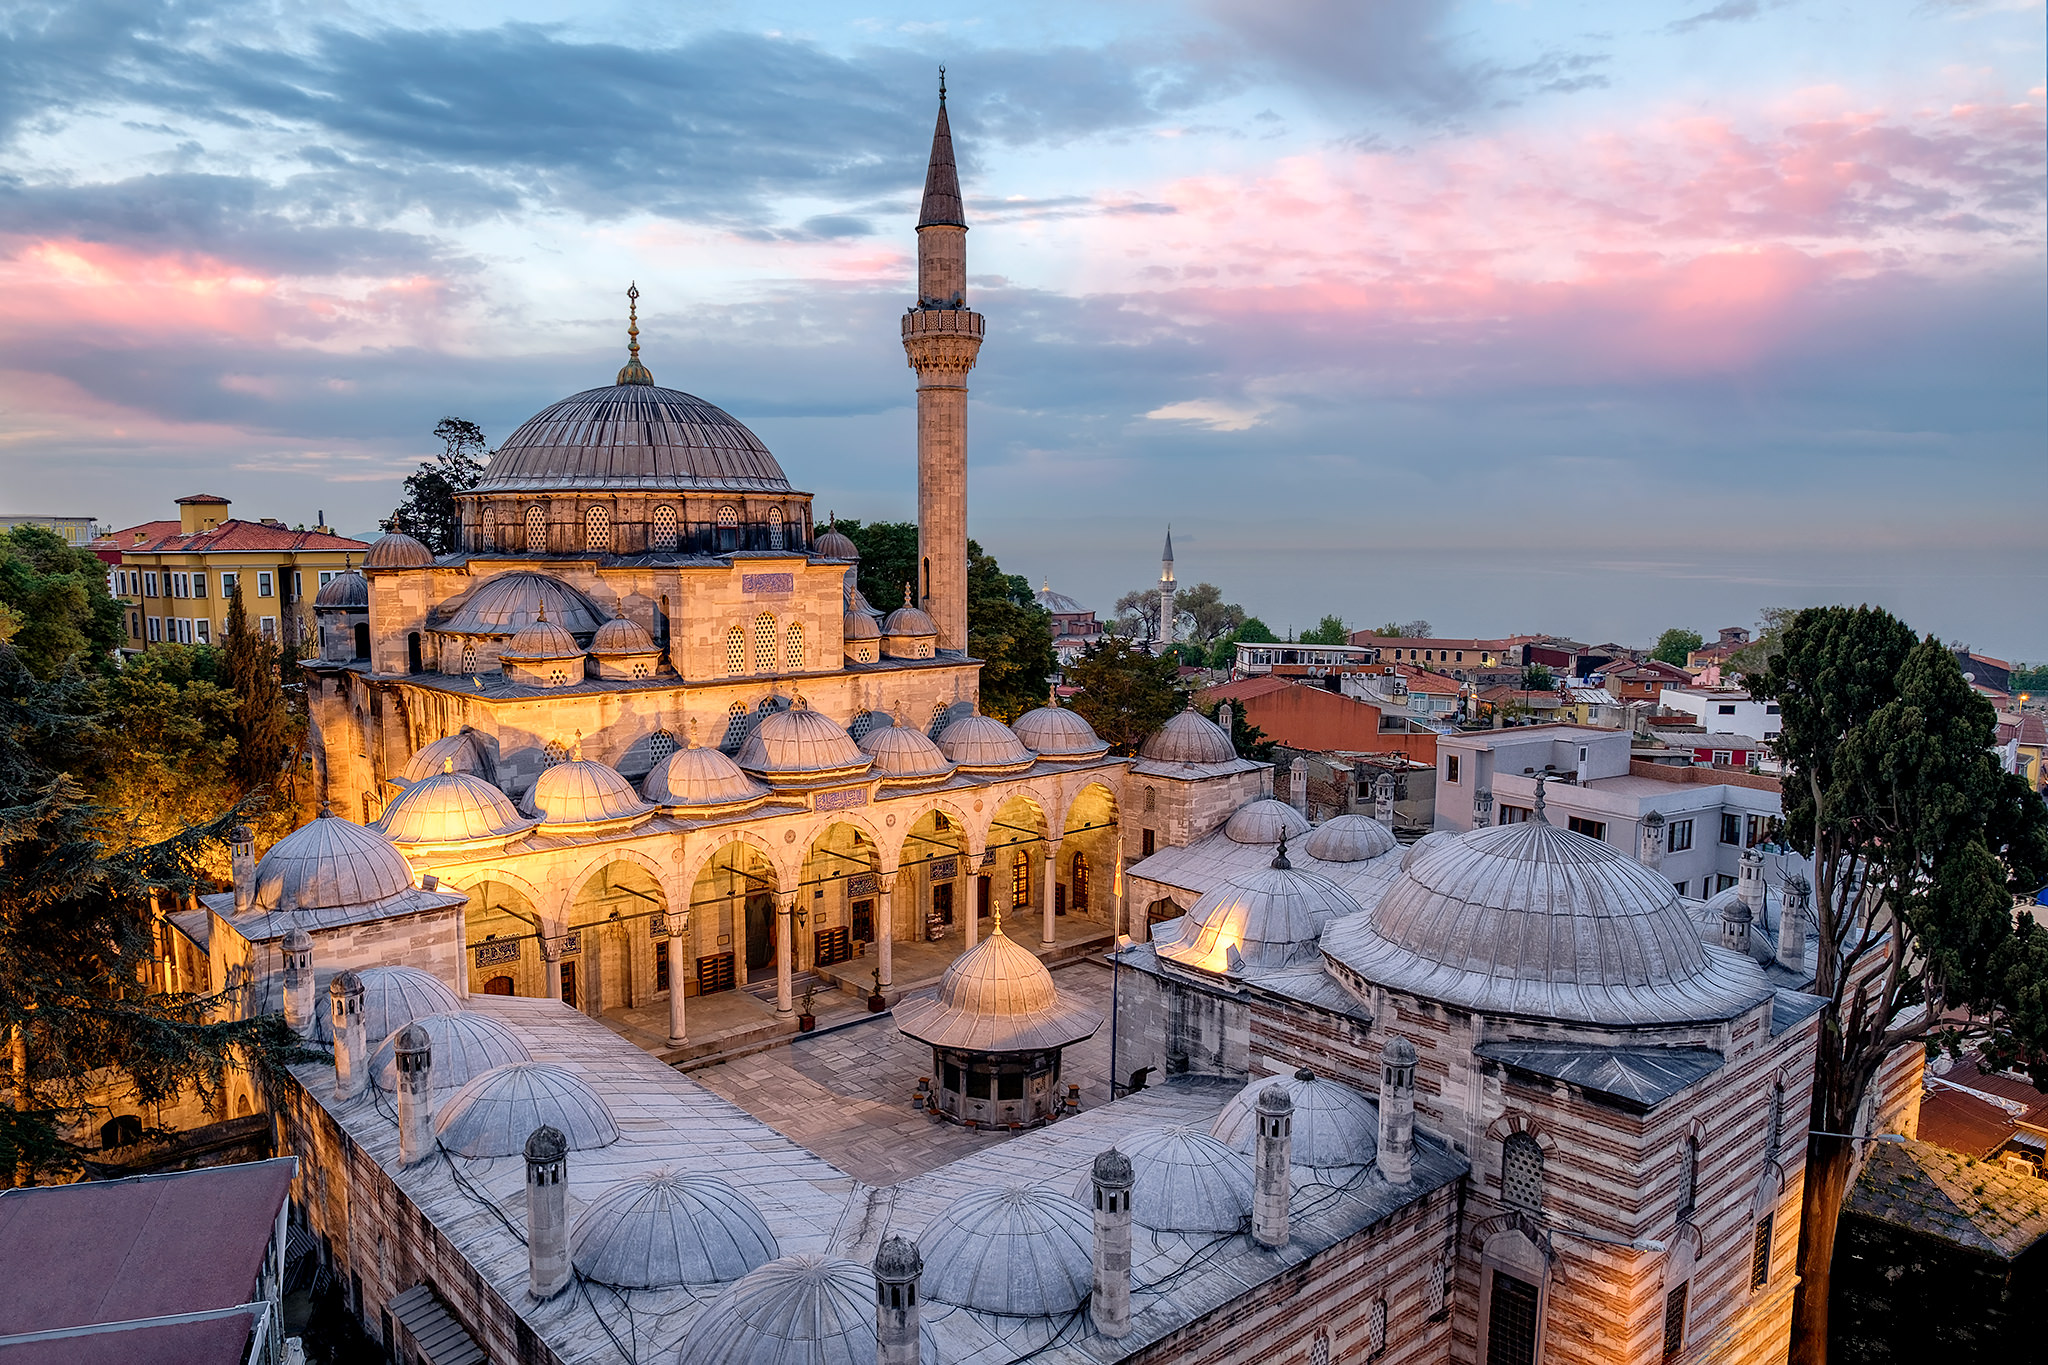
                    The image was done, but there was one last thing I wanted to do while at it, which is to clean up some of the bird poop and the two pipes that are sticking out like a sore thumb. I cleaned those up, then applied some sharpening and I was done! Here is the before and after, showing where I started before sunrise and the final blend with all the adjustments:


                    Hope you’ve enjoyed this article and the tutorial!
                    تم الانتهاء من الصورة، ولكن كان هناك شيء أخير أردت القيام به أثناء ذلك، وهو تنظيف بعض فضلات الطيور والأنبوبين البارزين مثل الإبهام المؤلم. لقد قمت بتنظيفها، ثم قمت بتطبيق بعض الشحذ وانتهيت! هنا ما قبل وبعد، يوضح المكان الذي بدأت فيه قبل شروق الشمس والمزيج النهائي مع جميع التعديلات:


                    آمل أن تكون قد استمتعت بهذا المقال والبرنامج التعليمي!

                    تعليق

                    يعمل...
                    X