تصحيح توازن اللون الأبيض في برنامج فوتوشوب How to Correct White Balance in Photoshop

تقليص
X
 
  • تصفية - فلترة
  • الوقت
  • عرض
إلغاء تحديد الكل
مشاركات جديدة

  • تصحيح توازن اللون الأبيض في برنامج فوتوشوب How to Correct White Balance in Photoshop

    كيفية تصحيح توازن اللون الأبيض في برنامج فوتوشوب
    How to Correct White Balance
    in Photoshop

    White balance is one of the most basic and yet trickiest aspects of photography. Although the white balance you’ve set in-camera may look good most of the time, in other cases, you’ll need to correct it in post-processing. Today, I will show you several ways to correct your white balance in Photoshop.

    Table of Contentsيعد توازن اللون الأبيض أحد الجوانب الأساسية والأكثر صعوبة في التصوير الفوتوغرافي. على الرغم من أن توازن اللون الأبيض الذي قمت بتعيينه في الكاميرا قد يبدو جيدًا في معظم الأوقات، إلا أنه في حالات أخرى، ستحتاج إلى تصحيحه في مرحلة ما بعد المعالجة. سأعرض لك اليوم عدة طرق لتصحيح توازن اللون الأبيض في Photoshop.

    جدول المحتويات

    كيف يؤثر توازن اللون الأبيض على صوري؟ اللون المصبوب، الصور المسطحة، التشبع، إصلاح توازن اللون الأبيض باستخدام Photoshop، Adobe Camera Raw، الضبط التلقائي لتوازن اللون الأبيض باستخدام المنحنيات، الضبط اليدوي لتوازن اللون الأبيض باستخدام المنحنيات

  • #2
    How Does White Balance Affect My Pictures?


    White balance affects how warm or cool your pictures look. We’ve written a complete guide to white balance here that you should check out if you want to refresh yourself on the topic.

    In practice, changing your white balance has more than one effect on a photo. It affects an image’s color cast, flatness, and saturation.
    كيف يؤثر توازن اللون الأبيض على صوري؟

    يؤثر توازن اللون الأبيض على مدى دفء أو برودة صورك. لقد كتبنا دليلاً كاملاً لتوازن اللون الأبيض هنا، والذي يجب عليك الاطلاع عليه إذا كنت تريد تحديث نفسك بشأن هذا الموضوع.

    من الناحية العملية، فإن تغيير توازن اللون الأبيض لديك له أكثر من تأثير على الصورة. إنه يؤثر على لون الصورة وتسويتها وتشبعها.

    تعليق


    • #3
      Color Cast


      One of the biggest problems caused by using the wrong white balance is a color cast in your image. Take a look at the photo below:
      Warmer Color cast throughout the frame
      The image is almost an orange monochrome, with a dramatically warm color cast. I don’t mind an overall warm tone to this image (it is sunset after all), but this goes too far even for me.

      I took the photo above with an in-camera white balance of 8000K. If you haven’t read the guide I linked a moment ago, 8000K is a slightly warm white balance that creates “neutral” tones on an overcast day. Since this wasn’t an overcast day, but rather a golden-colored sunset, it made the photo extra warm/orange in tone.

      On the other hand, consider the shot below. I set the white balance at 8000K here, just like in the image above. The difference is that they were shot in different lighting. This time, I took the picture in the middle of a cloudless day:
      Inaccurate white balance settings lead to dusty/muddy-looking colors
      It definitely has less of a warm color cast this time, but it’s still leaning in that direction. The result is that the sky (which should look fairly blue) is rather faded, with some muddy-looking colors. Also, the parakeet is supposed to be green, but has a yellowish tint. If you just use the proper white balance, you get this instead:
      Accurate daylight settings lead to vibrant colors
      The difference is obvious. The sky looks a lot better, even though I did not alter any other setting like saturation.

      لون الزهر

      واحدة من أكبر المشاكل الناجمة عن استخدام توازن اللون الأبيض الخاطئ هو اللون المتغير في صورتك. ألق نظرة على الصورة بالأسفل:

      لون أكثر دفئًا في جميع أنحاء الإطار

      الصورة تقريبًا أحادية اللون برتقالية اللون، مع مجموعة ألوان دافئة بشكل كبير. لا أمانع استخدام نغمة دافئة بشكل عام لهذه الصورة (إنه غروب الشمس على كل حال)، لكن هذا يذهب بعيدًا حتى بالنسبة لي.

      لقد التقطت الصورة أعلاه بتوازن أبيض في الكاميرا يبلغ 8000 كلفن. إذا لم تكن قد قرأت الدليل الذي قمت بربطه منذ لحظة، فإن 8000K عبارة عن توازن أبيض دافئ قليلاً يخلق نغمات "محايدة" في يوم ملبد بالغيوم. نظرًا لأن هذا لم يكن يومًا ملبدًا بالغيوم، بل كان غروب الشمس ذهبي اللون، فقد جعل الصورة أكثر دفئًا / برتقالية اللون.

      ومن ناحية أخرى، فكر في اللقطة أدناه. قمت بضبط توازن اللون الأبيض على 8000K هنا، تمامًا كما في الصورة أعلاه. الفرق هو أنه تم تصويرهم في إضاءة مختلفة. هذه المرة، التقطت الصورة في منتصف يوم صافي.

      تؤدي إعدادات توازن اللون الأبيض غير الدقيقة إلى ظهور ألوان مغبرة/موحلة

      من المؤكد أن اللون الدافئ أقل هذه المرة، لكنه لا يزال يميل في هذا الاتجاه. والنتيجة هي أن السماء (التي ينبغي أن تبدو زرقاء إلى حد ما) باهتة إلى حد ما، مع بعض الألوان الموحلة. ومن المفترض أيضًا أن يكون لون الببغاء أخضر اللون، ولكن له صبغة صفراء. إذا كنت تستخدم فقط توازن اللون الأبيض المناسب، فستحصل على هذا بدلاً من ذلك:

      تؤدي إعدادات ضوء النهار الدقيقة إلى الحصول على ألوان نابضة بالحياة

      الفرق واضح. تبدو السماء أفضل بكثير، على الرغم من أنني لم أغير أي إعداد آخر مثل التشبع.

      تعليق


      • #4
        Flat Images


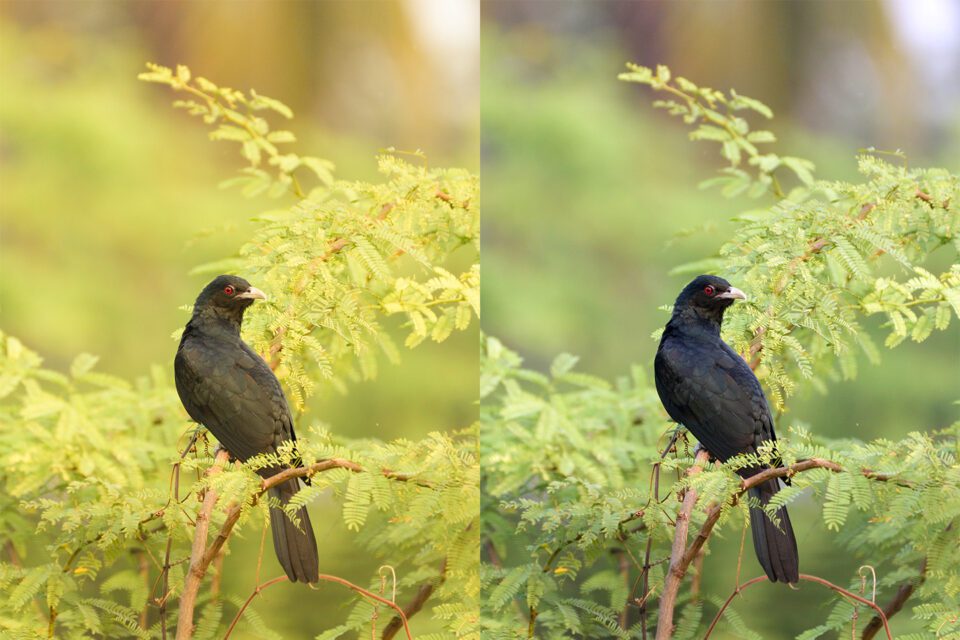
        You may have already noticed it in the samples above, but images with a color cast can seem somewhat flat. For example, consider these photos:
        Images with a color cast appear to be flat as compared to the ones with accurate colors
        I didn’t change any settings like contrast or exposure here, just white balance. And yet the image on the right has noticeably deeper shadows and looks much better.

        There is also better subject separation in the right-hand image. For example, the bird’s beak stands out against the background better when there is no color cast.
        صور مسطحة

        ربما تكون قد لاحظت ذلك بالفعل في العينات المذكورة أعلاه، ولكن الصور ذات الألوان المتغيرة قد تبدو مسطحة إلى حد ما. على سبيل المثال، النظر في هذه الصور:

        تبدو الصور ذات اللون المتغير مسطحة مقارنة بالصور ذات الألوان الدقيقة

        لم أغير أي إعدادات مثل التباين أو التعرض هنا، فقط توازن اللون الأبيض. ومع ذلك، فإن الصورة الموجودة على اليمين تحتوي على ظلال أعمق بشكل ملحوظ وتبدو أفضل بكثير.

        يوجد أيضًا فصل أفضل للموضوع في الصورة اليمنى. على سبيل المثال، يبرز منقار الطائر بشكل أفضل على الخلفية عندما لا يكون هناك لون.

        تعليق


        • #5
          Saturation


          Many of us love to shoot during the golden hour, but it can be tricky to get properly-saturated images. White balance is a useful tool here.

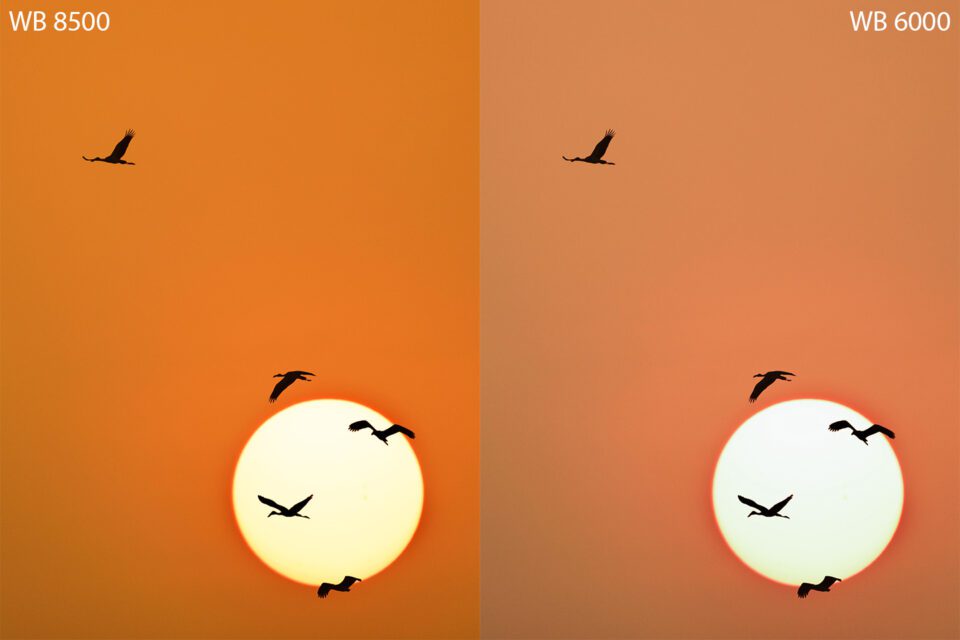
          For instance, compare the two images below. If you’re interested in a higher-saturation look, you can use a warmer white balance like 8500K. Or, if you want a more muted image, a cooler white balance like 6000K could be the way to go.
          White balance has an effect on saturation
          It’s not that one image is better than the other; they’re different artistic interpretations of your subject. So, by using white balance creatively, you can take images that match your photographic vision as best as possible
          التشبع

          يحب الكثير منا التصوير خلال الساعة الذهبية، ولكن قد يكون من الصعب الحصول على صور مشبعة بشكل صحيح. توازن اللون الأبيض هو أداة مفيدة هنا.

          على سبيل المثال، قارن بين الصورتين أدناه. إذا كنت مهتمًا بمظهر ذو تشبع أعلى، فيمكنك استخدام توازن اللون الأبيض الأكثر دفئًا مثل 8500K. أو، إذا كنت تريد صورة أكثر كتمًا، فقد يكون توازن اللون الأبيض الأكثر برودة مثل 6000K هو الحل الأمثل.

          توازن اللون الأبيض له تأثير على التشبع

          لا يعني ذلك أن إحدى الصورتين أفضل من الأخرى؛ إنها تفسيرات فنية مختلفة لموضوعك. لذلك، باستخدام توازن اللون الأبيض بشكل إبداعي، يمكنك التقاط صور تتوافق مع رؤيتك الفوتوغرافية بأفضل شكل ممكن

          تعليق


          • #6
            Fixing White Balance with Photoshop


            There are many ways to adjust white balance using Photoshop. I will take you from the simplest to the most advanced.
            Adobe Camera Raw


            Adobe Camera Raw (ACR) is a plugin that allows you to import RAW images into Photoshop and make basic adjustments. You can even adjust non-RAW images like JPEGs with this tool by clicking “Filter > Camera Raw Filter” in the top menu bar.

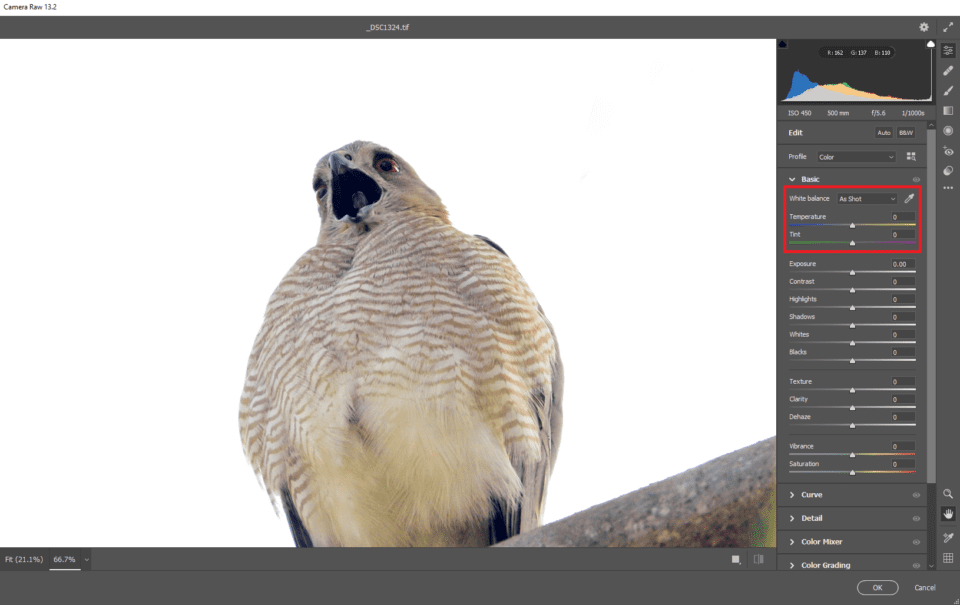
            When you open an image in ACR, the white balance adjustment is near the top, called Temperature:
            Adobe Camera Raw Window
            You can adjust the white balance by moving the Temperature slider. You can also use the eyedropper to select a neutral gray portion of the image and Camera Raw will automatically adjust the white balance (and the Tint) so that area you click appears as gray.

            Note that it’s easier to adjust the white balance of RAW photos, TIFFs, PSDs, and other minimally-compressed files. If you adjust a JPEG too far, you might notice some color problems or compression artifacts.
            إصلاح توازن اللون الأبيض بالفوتوشوب

            هناك طرق عديدة لضبط توازن اللون الأبيض باستخدام Photoshop. سوف آخذك من الأبسط إلى الأكثر تقدمًا.

            أدوبي كاميرا رو

            Adobe Camera Raw (ACR) هو مكون إضافي يسمح لك باستيراد صور RAW إلى Photoshop وإجراء التعديلات الأساسية. يمكنك أيضًا ضبط الصور غير RAW مثل ملفات JPEG باستخدام هذه الأداة من خلال النقر على "Filter > Camera Raw Filter" في شريط القائمة العلوي.

            عندما تفتح صورة في ACR، يكون ضبط توازن اللون الأبيض بالقرب من الأعلى، ويسمى درجة الحرارة:

             نافذة Adobe Camera Raw

            يمكنك ضبط توازن اللون الأبيض عن طريق تحريك شريط تمرير درجة الحرارة. يمكنك أيضًا استخدام القطارة لتحديد جزء رمادي محايد من الصورة وسيقوم Camera Raw تلقائيًا بضبط توازن اللون الأبيض (والصبغة) بحيث تظهر المنطقة التي تنقر عليها باللون الرمادي.

            لاحظ أنه من الأسهل ضبط توازن اللون الأبيض لصور RAW وTIFFs وPSD وغيرها من الملفات المضغوطة إلى الحد الأدنى. إذا قمت بضبط ملف JPEG بدرجة كبيرة، فقد تلاحظ بعض مشكلات اللون أو عيوب الضغط.

            تعليق


            • #7
              Automatic White Balance Adjustment Using Curves


              Curves are a popular tool in Photoshop. Although you might think of the Curves tool mainly as an exposure/contrast adjustment, it can also be used for white balance and color correction.

              First, there is a one-click solution using Curves that works most of the time. Take a look at the picture below:
              Picture with its White balance set warmer than what it is supposed to be
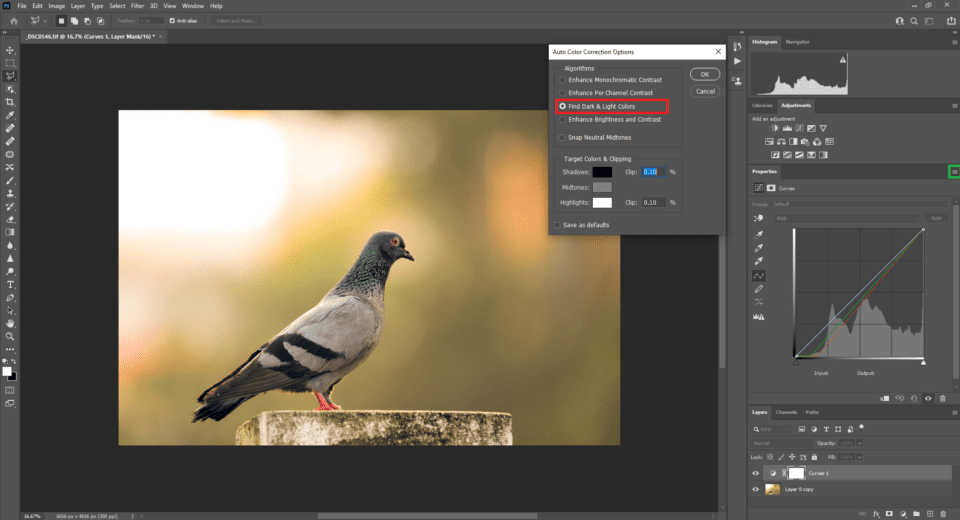
              To automatically fix the white balance of a photo in Photoshop, follow these steps:
              1. Add a Curves adjustment layer
              2. Click on the right edge of the Properties tab (marked green in the screenshot below)
              3. Select Auto Options from the menu that appears; it will pop up the Auto Color Correction Options window
              4. Select the “Find Light & Dark Colors” option from the window (marked red in the screenshot below)
              5. Click Ok

              This screenshot shows the effectiveness of automatic correction:
              Auto White balance correction using Curves

              ضبط تلقائي لتوازن اللون الأبيض باستخدام المنحنيات

              تعتبر المنحنيات أداة شائعة في Photoshop. على الرغم من أنك قد تفكر في أداة المنحنيات بشكل أساسي كأداة لضبط التعريض/التباين، إلا أنه يمكن استخدامها أيضًا لتوازن اللون الأبيض وتصحيح الألوان.

              أولاً، يوجد حل بنقرة واحدة باستخدام Curves الذي يعمل في معظم الأوقات. نلقي نظرة على الصورة أدناه:

              الصورة مع ضبط توازن اللون الأبيض على درجة حرارة أكثر دفئًا مما يفترض أن تكون عليه

              لإصلاح توازن اللون الأبيض للصورة تلقائيًا في Photoshop، اتبع الخطوات التالية:

              أضف طبقة ضبط المنحنيات. انقر على الحافة اليمنى لعلامة التبويب "خصائص" (المميزة باللون الأخضر في لقطة الشاشة أدناه) وحدد "خيارات تلقائية" من القائمة التي تظهر؛ ستظهر نافذة خيارات تصحيح الألوان التلقائية، حدد خيار "البحث عن الألوان الفاتحة والداكنة" من النافذة (المميزة باللون الأحمر في لقطة الشاشة أدناه) انقر فوق "موافق"

              توضح لقطة الشاشة هذه فعالية التصحيح التلقائي:

               التصحيح التلقائي لتوازن اللون الأبيض باستخدام المنحنيات

              تعليق


              • #8
                Manual White Balance Adjustment Using Curves


                You can also manually adjust the white balance of an image using Curves for even greater control.

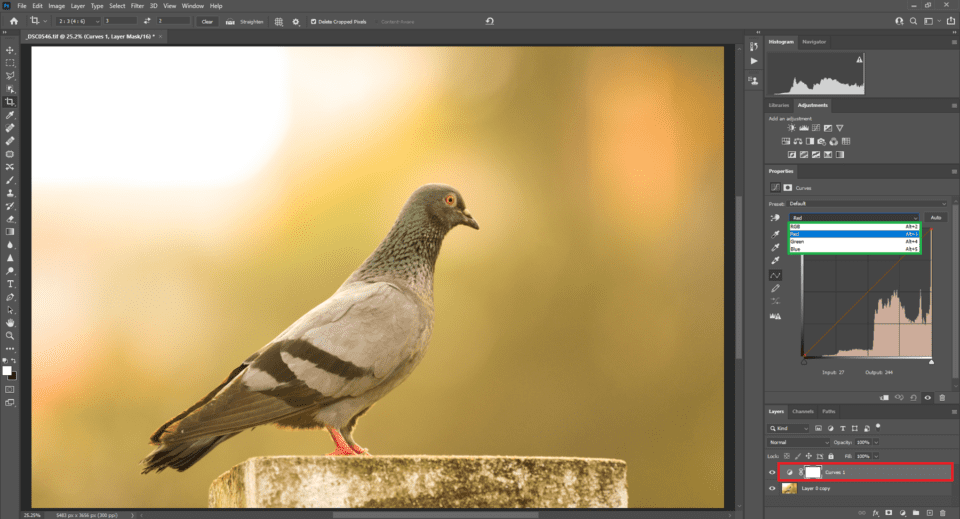
                Just as you did for the automatic color correction as above, create a Curves adjustment layer. You will see a drop-down list to choose between RGB (the default), Red, Green, and Blue. First, select the Red option.
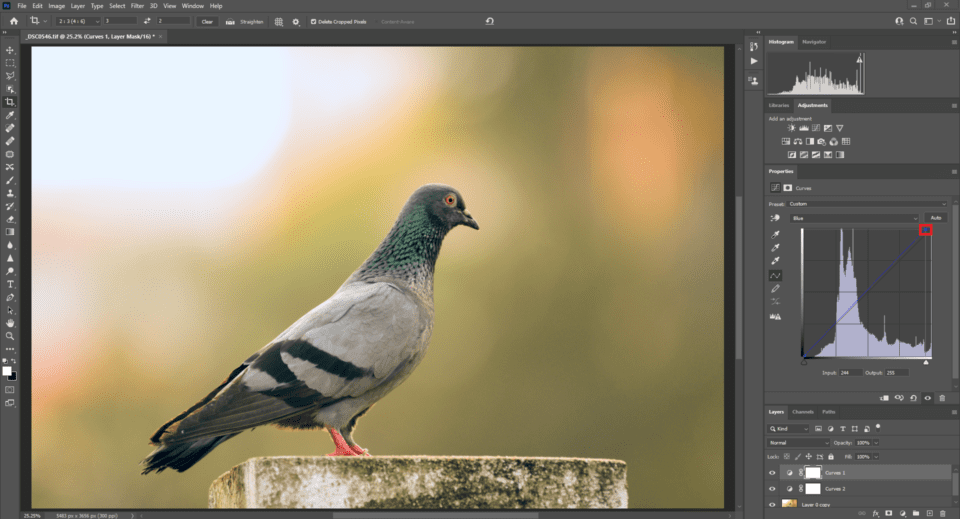
                When you create a Curves adjustment (marked in red above), you’ll see an RGB dropdown menu (marked in green above)

                ضبط توازن اللون الأبيض يدويًا باستخدام المنحنيات

                يمكنك أيضًا ضبط توازن اللون الأبيض للصورة يدويًا باستخدام المنحنيات لمزيد من التحكم.

                تمامًا كما فعلت لتصحيح الألوان تلقائيًا كما هو مذكور أعلاه، قم بإنشاء طبقة ضبط المنحنيات. سترى قائمة منسدلة للاختيار بين RGB (الافتراضي)، والأحمر، والأخضر، والأزرق. أولا، حدد الخيار الأحمر.

                 عند إنشاء ضبط المنحنيات (المحدد باللون الأحمر أعلاه)، سترى قائمة منسدلة RGB (مميزة باللون الأخضر أعلاه)

                تعليق


                • #9
                  When you’ve selected one of the specific colors – red, in this case – the tool alters that color and its complement. For example, when you increase red, cyan is reduced.

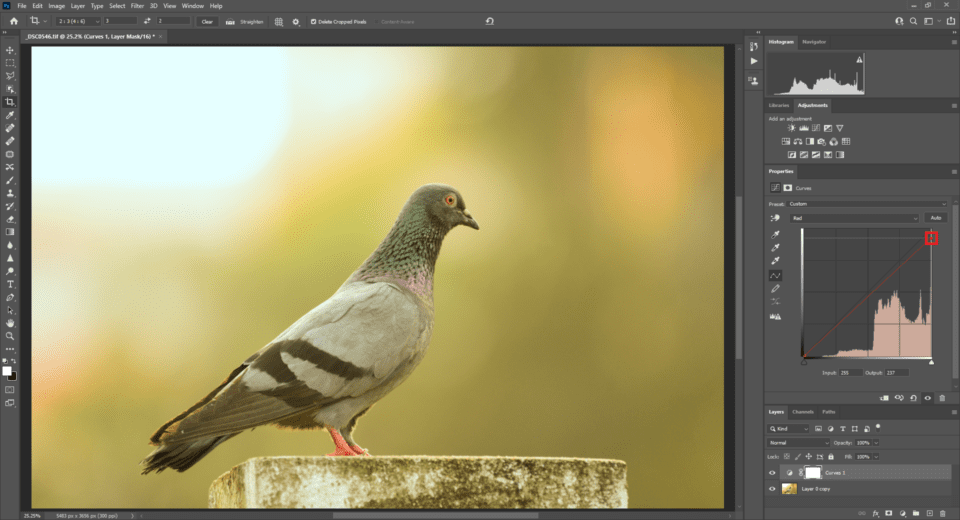
                  Since this image has a warmer color cast, you need to reduce the reds in the highlights, mid-tones, and shadows. To do this, drag the red line from the right upper edge a bit down until the reds improve.

                  Adjustment to reduce the reds
                  عند تحديد أحد الألوان المحددة - الأحمر، في هذه الحالة - تقوم الأداة بتغيير هذا اللون ومكمله. على سبيل المثال، عند زيادة اللون الأحمر، يتم تقليل اللون السماوي.

                  نظرًا لأن هذه الصورة تحتوي على لون أكثر دفئًا، فأنت بحاجة إلى تقليل اللون الأحمر في الإبرازات والدرجات اللونية المتوسطة والظلال. للقيام بذلك، اسحب الخط الأحمر من الحافة العلوية اليمنى قليلاً إلى الأسفل حتى يتحسن اللون الأحمر.

                  التعديل لتقليل الحمر

                  تعليق


                  • #10
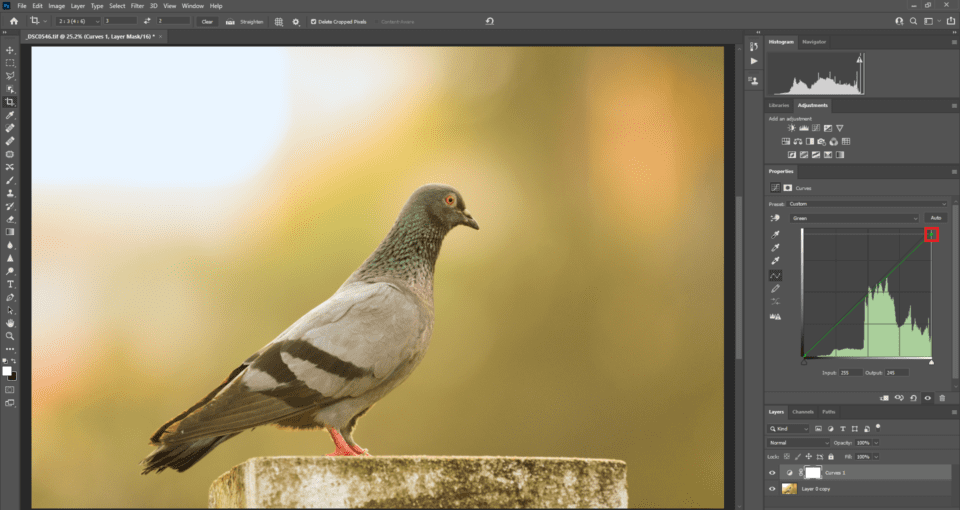
                    As you can see in the illustration above, the warmer color cast is controlled. But the image looks green, so bring down the greens as well, similar to what you did with the reds as shown in the illustration below.
                    Green channel adjustment using curves
                    Now, the green channel looks better. But the image still looks to have a slightly warm tone. Adding a bit of blue to the image will set the final tone of the image as shown below.
                    Adding blue to balance the warmth of the image
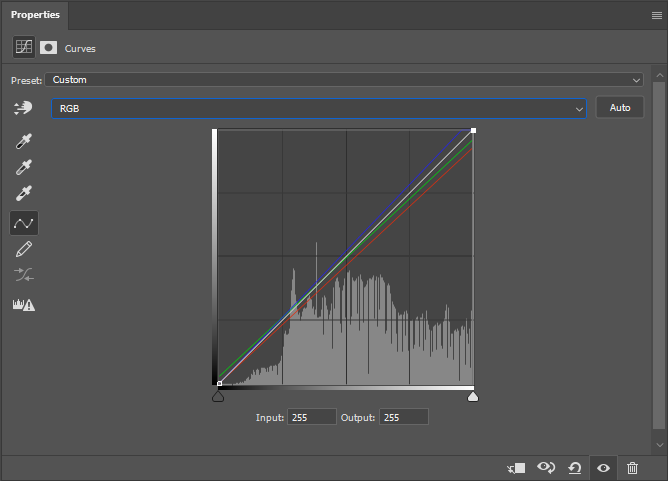
                    Now the image looks natural. The whites in the upper left corner are without a cast. Now if you choose RGB, the properties of the adjustment layer are as below.
                    RGB with the individual color
                    channels adjusted
                    كما ترون في الرسم التوضيحي أعلاه، يتم التحكم في اللون الأكثر دفئًا. لكن الصورة تبدو خضراء، لذا قم بإسقاط اللون الأخضر أيضًا، على غرار ما فعلته باللون الأحمر كما هو موضح في الرسم التوضيحي أدناه.

                    تعديل القناة الخضراء باستخدام المنحنيات

                    الآن تبدو القناة الخضراء أفضل. لكن الصورة لا تزال تبدو ذات نغمة دافئة قليلاً. ستؤدي إضافة القليل من اللون الأزرق إلى الصورة إلى ضبط النغمة النهائية للصورة كما هو موضح أدناه.

                    إضافة اللون الأزرق لموازنة دفء الصورة

                    الآن تبدو الصورة طبيعية. البيض في الزاوية اليسرى العليا بدون قالب. الآن إذا اخترت RGB، فإن خصائص طبقة الضبط هي كما يلي.

                    RGB مع تعديل قنوات الألوان الفردية

                    تعليق


                    • #11
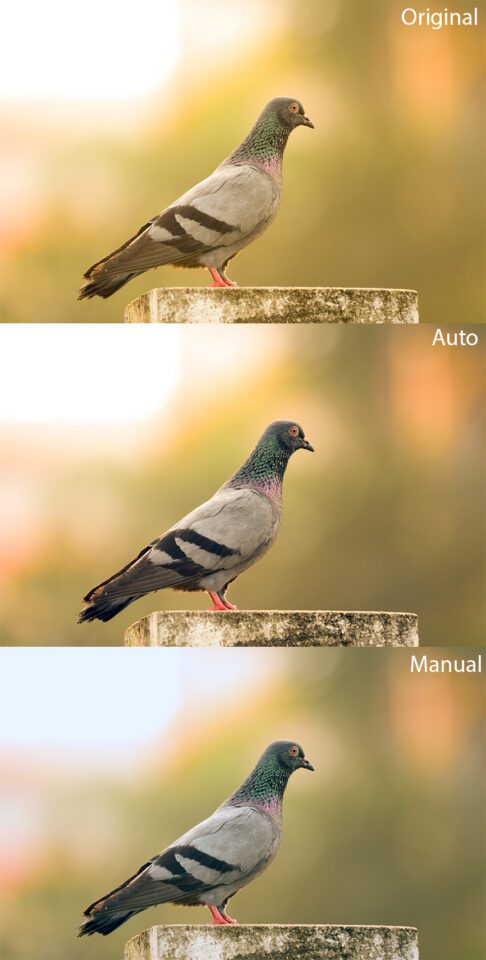
                      Below, I’ve shown a comparison of the original image, automatic Curves adjustment, and manual Curves adjustment.

                      Most of the time, auto adjustments work pretty well, especially in the recent versions of Photoshop. But with tricky images – especially when there are multiple sources of light with different color casts – manual adjustments come in handy.

                      Lastly, since Curves is an adjustment layer, you can use it in combination with layer masks to selectively reduce your adjustment in certain parts of the image. This gives you a lot of flexibility.

                      أدناه، لقد عرضت مقارنة بين الصورة الأصلية، وضبط المنحنيات التلقائي، وضبط المنحنيات اليدوي.


                      في معظم الأحيان، تعمل التعديلات التلقائية بشكل جيد جدًا، خاصة في الإصدارات الأخيرة من Photoshop. ولكن مع الصور الصعبة - خاصة عندما تكون هناك مصادر متعددة للضوء ذات ألوان مختلفة - تكون التعديلات اليدوية مفيدة.

                      أخيرًا، نظرًا لأن Curves هي طبقة ضبط، يمكنك استخدامها مع أقنعة الطبقة لتقليل الضبط بشكل انتقائي في أجزاء معينة من الصورة. وهذا يمنحك الكثير من المرونة.


                      تعليق


                      • #12
                        Conclusion


                        Although cameras are fairly good at automatically choosing the right white balance, they are not going to be perfect or always to your taste. I hope you feel more comfortable now adjusting the white balance in Photoshop when necessary. If you wish to add any pointers or have questions, please leave a comment. Happy shooting and editing!
                        خاتمة

                        على الرغم من أن الكاميرات جيدة إلى حد ما في اختيار توازن اللون الأبيض الصحيح تلقائيًا، إلا أنها لن تكون مثالية أو تناسب ذوقك دائمًا. أتمنى أن تشعر براحة أكبر الآن عند ضبط توازن اللون الأبيض في Photoshop عند الضرورة. إذا كنت ترغب في إضافة أي مؤشرات أو لديك أسئلة، يرجى ترك تعليق. تصوير وتحرير سعيد!

                        تعليق

                        يعمل...
                        X