كيف تم تصوير هذه الصورة ٨ How Was This Picture Made #08

تقليص
X
 
  • تصفية - فلترة
  • الوقت
  • عرض
إلغاء تحديد الكل
مشاركات جديدة

  • كيف تم تصوير هذه الصورة ٨ How Was This Picture Made #08

    كيف تم تصوير هذه الصورة ٨
    How Was This Picture Made #08
    For Part 8 of our How Was This Picture Taken? series, I have chosen the following photograph to share. On two recent road trips into the desert near my home base in Southern California, I had the pleasure of going on two landscape photo shoots, both of which I plan to write a photo essay for Photography Life readers very soon. In the meantime, I thought it would be fun and educational to post one particular photograph and invite our readers to share their thoughts on how this photo was visualized and constructed. Also, I thought that by sharing technical aspects on the making of this photograph in advance of my upcoming essay, the narrative and images in my essay might be aesthetically richer.

    للجزء الثامن من مقالنا كيف تم التقاط هذه الصورة؟ السلسلة، لقد اخترت الصورة التالية للمشاركة. في رحلتين بريتين قمت بهما مؤخرًا إلى الصحراء بالقرب من مقر منزلي في جنوب كاليفورنيا، كان من دواعي سروري أن أقوم بالتقاط صورتين للمناظر الطبيعية، وأخطط لكتابة مقال مصور لقراء Photography Life قريبًا جدًا. في هذه الأثناء، اعتقدت أنه سيكون من الممتع والتعليمي أن أنشر صورة معينة وأدعو قرائنا لمشاركة أفكارهم حول كيفية تصور هذه الصورة وإنشائها. وأعتقد أيضًا أنه من خلال مشاركة الجوانب الفنية حول التقاط هذه الصورة قبل مقالتي القادمة، قد يكون السرد والصور في مقالتي أكثر ثراءً من الناحية الجمالية.

  • #2
    Please, consider the following:
    1. What mood is conveyed by this photograph? That is, what was the photographer feeling and seeing at the decisive moment of opening the shutter? And what do you, as the viewer, feel and see with this photograph?
    2. What tools were used to construct this photograph, and what could have been the rationale for these tools?
    3. Is there any salient feature of the lighting used?
    4. Any thoughts on the exposure strategy?
    5. Any thoughts on post-processing, if any?

    Of note, this past week I had already posted this photo to my one-line photography galleries along with salient information on this photograph. Although I always welcome visitors to my galleries, I would kindly ask our readers to temporarily resist the temptation to view this photograph on my gallery and then promptly return to regurgitate the details in the comments section below, which would defeat the purpose of this exercise.
    يرجى مراعاة ما يلي:

    ما المزاج الذي تنقله هذه الصورة؟ أي ما الذي كان يشعر به المصور ويشاهده في اللحظة الحاسمة لفتح الغالق؟ وما الذي تشعر به وتراه كمشاهد من خلال هذه الصورة؟ ما هي الأدوات التي تم استخدامها لإنشاء هذه الصورة، وما هو الأساس المنطقي لهذه الأدوات؟ هل هناك أي سمة بارزة للإضاءة المستخدمة؟ أي أفكار حول استراتيجية التعرض؟ أية أفكار حول مرحلة ما بعد المعالجة، إن وجدت؟

    تجدر الإشارة إلى أنني قمت بالفعل في الأسبوع الماضي بنشر هذه الصورة في معرض الصور الفوتوغرافية المكون من سطر واحد بالإضافة إلى معلومات بارزة عن هذه الصورة. على الرغم من أنني أرحب دائمًا بالزوار في معارضي، إلا أنني أطلب من القراء أن يقاوموا مؤقتًا إغراء عرض هذه الصورة في معرضي ثم يعودوا على الفور لتكرار التفاصيل في قسم التعليقات أدناه، الأمر الذي من شأنه أن يتعارض مع الغرض من هذا التمرين.

    تعليق


    • #3
      How Was This Picture Made #08: The Answer

      Last week, I had posted alandscape photograph for installment #8 of our How Was This Picture Taken? series. Judging from the comments, many of our readers took this exercise very seriously and posted deliberate and insightful remarks on how this photograph was visualized and constructed. I enjoyed both the aesthetic and technical analyses offered by our readers, some of whom were correct on many aspects of why and how I chose to make this photograph. Well done!


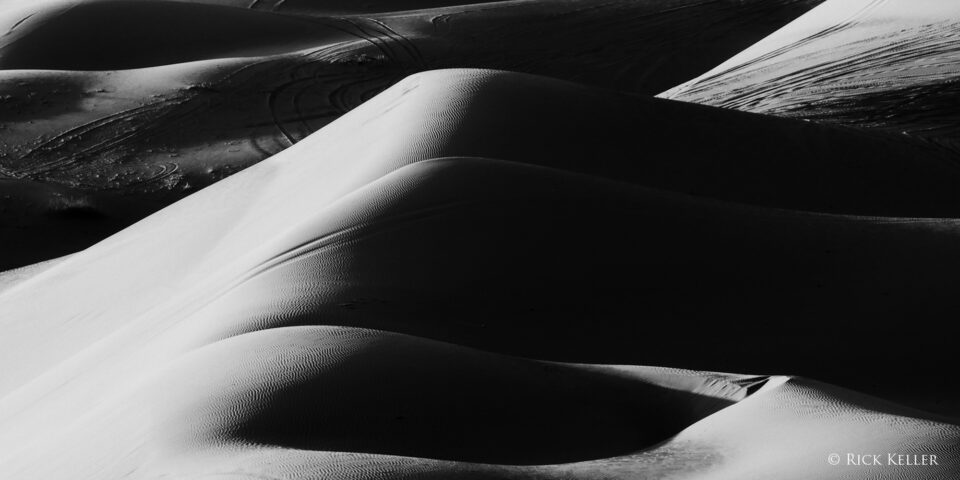
      Let’s review the photograph again, which I made last month during a road trip into the Southern California desert. I will have much more to express on the reasons for embarking on this particular photo shoot in my upcoming photo essay, but for this particular photograph I sought to study and capture structure, tonality, and textures in a way that would impart an abstract and provocative mood. I visualized high contrast – bright and alluring highlights balanced with equally alluring deep shadows.
      Nikon F6, Nikkor 70-200mm f/4 G ED VR, Adox CMS 20 II

      كيف تم صنع هذه الصورة #08: الجواب

      في الأسبوع الماضي، نشرت صورة
      للمناظر الطبيعية للجزء رقم 8 من كتابنا "كيف تم التقاط هذه الصورة؟" مسلسل. انطلاقًا من التعليقات، أخذ العديد من قرائنا هذا التمرين على محمل الجد ونشروا ملاحظات متعمدة وثاقبة حول كيفية تصور هذه الصورة وإنشائها. لقد استمتعت بالتحليلات الجمالية والتقنية التي قدمها قراؤنا، وكان بعضهم على حق في العديد من الجوانب حول سبب وكيفية اختياري لالتقاط هذه الصورة. أحسنت!

      دعونا نراجع الصورة مرة أخرى، التي التقطتها الشهر الماضي خلال رحلة برية إلى صحراء جنوب كاليفورنيا. سيكون لدي الكثير للتعبير عنه حول أسباب الشروع في جلسة التصوير هذه في مقالتي المصورة القادمة، ولكن بالنسبة لهذه الصورة تحديدًا، سعيت إلى دراسة البنية والنغمة والأنسجة والتقاطها بطريقة من شأنها أن تضفي صورة مجردة واستفزازية مزاج. لقد تصورت تباينًا عاليًا - نقاط مشرقة وجذابة متوازنة مع ظلال عميقة جذابة بنفس القدر.

      نيكون F6، نيكور 70-200 ملم f/4 G ED VR، Adox CMS 20 II
      التعديل الأخير تم بواسطة غدير معروف; الساعة 12-20-2023, 06:23 PM.

      تعليق


      • #4
        As I further studied the scene under the burgeoning light, many emotions were permeating my mind. I was feeling an uncanny sense of minimalism and romanticism. I visualized not just the intersection of light and land, but the intersection of man and nature. I felt an emotion of scarred beauty, as in a scar on a human face. I saw and felt the juxtaposition of smooth skin tones, a scar, with deep shadows conveying an untold story. At that moment, I felt compelled to create a rendition of this beauty with the hope of conveying some degree of emotional impact.

        Now, for the technical rationale. I made this photograph with one shot – one exposure. As a few readers astutely surmised, I used black and white film in a 35mm format coupled with a long lens. I was impressed with our readers surmising that I made the photograph at night – under moonlight – to craft the mood for this scene. Although my rendition for this scene does indeed have the appearance of a nighttime exposure under moonlight, that was not my specific intent. I made this photograph at early sunrise to capture the unidirectionality of high contrast light bathing the triad of dunes in the center of the frame. Although a moonlit scene would not be expected to create this degree of directionality of light, the quality of the light captured nonetheless imparts the emotion and appearance of moonlight
        وبينما كنت أدرس المشهد تحت الضوء المتصاعد، كانت العديد من المشاعر تتخلل ذهني. كنت أشعر بإحساس غريب بالبساطة والرومانسية. لم أتخيل فقط تقاطع الضوء والأرض، بل تقاطع الإنسان والطبيعة. شعرت بعاطفة الجمال الممزق، كما هو الحال في ندبة على وجه إنسان. رأيت وشعرت بتجاور ألوان البشرة الناعمة، والندبة، والظلال العميقة التي تنقل قصة لا توصف. في تلك اللحظة، شعرت بأنني مضطر لإنشاء عرض لهذا الجمال على أمل نقل درجة معينة من التأثير العاطفي.

        الآن، لأسباب فنية. لقد التقطت هذه الصورة بلقطة واحدة – تعريض ضوئي واحد. كما توقع بعض القراء بذكاء، استخدمت فيلمًا بالأبيض والأسود بتنسيق 35 مم مقترنًا بعدسة طويلة. لقد تأثرت بتخمين قرائنا بأنني التقطت الصورة ليلاً - تحت ضوء القمر - لصياغة الحالة المزاجية لهذا المشهد. على الرغم من أن عرضي لهذا المشهد يبدو بالفعل وكأنه تعريض ليلي تحت ضوء القمر، إلا أن ذلك لم يكن هدفي المحدد. لقد التقطت هذه الصورة عند شروق الشمس المبكر لالتقاط أحادية الاتجاه للضوء عالي التباين الذي يغمر ثالوث الكثبان الرملية في وسط الإطار. على الرغم من أنه من غير المتوقع أن يخلق المشهد المقمر هذه الدرجة من اتجاه الضوء، إلا أن جودة الضوء الملتقط تضفي إحساسًا ومظهر ضوء القمر

        تعليق


        • #5
          So, how were these effects – high contrast, deep shadows, with preservation of detail and texture (and even a night time appearance) – made possible?

          Well, the answer is both interesting and straightforward. As I had described previously in my one of my articles on Film Photography and Visualization, to create stark contrast, deep shadows, and extreme tonal separation, I used a classic tool in black and white photography – the red filter.
          إذًا، كيف أصبحت هذه التأثيرات - التباين العالي، والظلال العميقة، مع الحفاظ على التفاصيل والملمس (وحتى المظهر الليلي) - ممكنة؟

          حسنًا، الإجابة مثيرة للاهتمام ومباشرة. كما شرحت سابقًا في إحدى مقالاتي حول التصوير الفوتوغرافي للأفلام والتصور، لإنشاء تباين صارخ وظلال عميقة وفصل لوني شديد، استخدمت أداة كلاسيكية في التصوير الفوتوغرافي بالأبيض والأسود - الفلتر الأحمر.

          تعليق


          • #6
            Why the red filter?

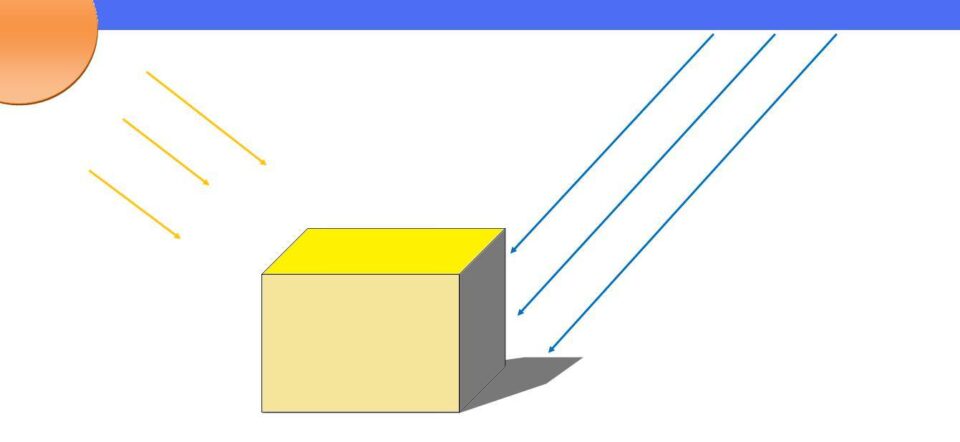
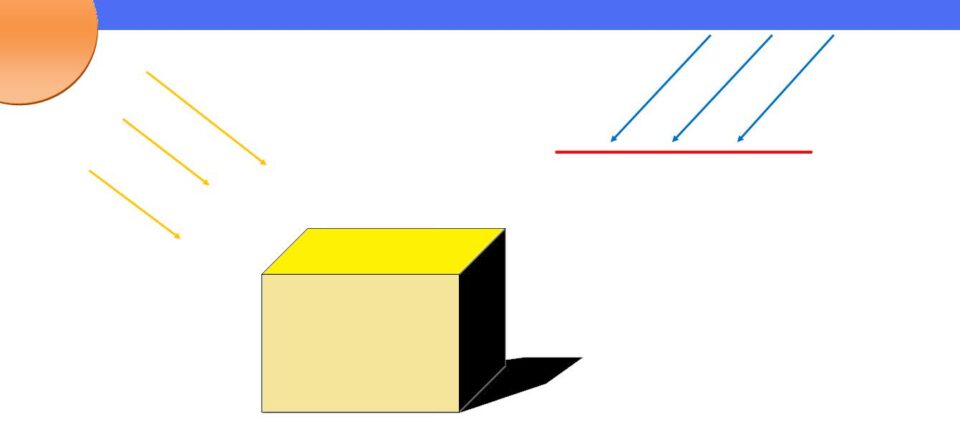
            Here’s a brief and simplified rationale. The red filter is one of many contrast filters in black and white photography that can be manipulated to create a multitude of effects. As I have previously written, red filters exert their strong and unique effects by heavily blocking blue light from exposing the film. Since blue light (via sky light) is responsible for illuminating shadows in outdoor scenes, any filter in front of the lens that curbs blue light transmission has the potential to strongly reduce shadow detail, and thus, strongly increase contrast.
            No filtersRed filter in place

            لماذا الفلتر الأحمر؟

            إليك مبررات مختصرة ومبسطة. يعد الفلتر الأحمر أحد مرشحات التباين العديدة في التصوير الفوتوغرافي بالأبيض والأسود والتي يمكن معالجتها لإنشاء العديد من التأثيرات. كما كتبت سابقًا، تمارس المرشحات الحمراء تأثيراتها القوية والفريدة من نوعها عن طريق حجب الضوء الأزرق بشكل كبير من تعريض الفيلم. نظرًا لأن الضوء الأزرق (عبر ضوء السماء) مسؤول عن إضاءة الظلال في المشاهد الخارجية، فإن أي مرشح أمام العدسة يحد من انتقال الضوء الأزرق لديه القدرة على تقليل تفاصيل الظل بقوة، وبالتالي زيادة التباين بقوة.

            لا توجد مرشحاتمرشح أحمر في مكانه

            تعليق


            • #7
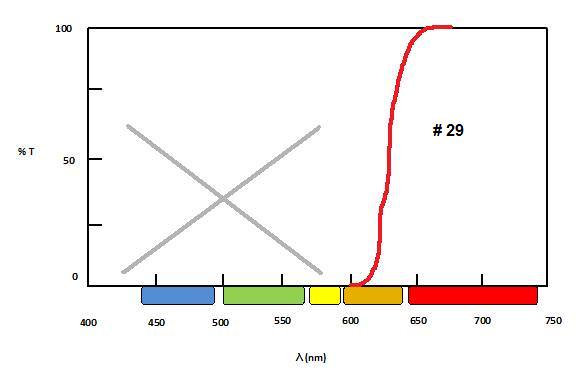
              Within the visible portion of the electromagnetic spectrum, red light extends from approximately 650-750 nm, whereas blue light occupies the far left of the visible spectrum from approximately 450-495 nm. Since red filters only *begin* their light transmission in the 570-610 nm range (depending on the specific filter grade and manufacturer), any wavelength of radiation below this transmission threshold is essentially cut off. It’s simple physics.
              Transmission Curve of the Wratten # 29 (Deep Red) Filter

              ضمن الجزء المرئي من الطيف الكهرومغناطيسي، يمتد الضوء الأحمر من حوالي 650-750 نانومتر، بينما يحتل الضوء الأزرق أقصى يسار الطيف المرئي من حوالي 450-495 نانومتر. نظرًا لأن المرشحات الحمراء *تبدأ* فقط في نقل الضوء في نطاق 570-610 نانومتر (اعتمادًا على درجة المرشح المحددة والشركة المصنعة)، فإن أي طول موجي للإشعاع أقل من عتبة النقل هذه يتم قطعه بشكل أساسي. إنها فيزياء بسيطة.

              منحنى ناقل الحركة لمرشح Wratten رقم 29 (أحمر غامق).

              تعليق


              • #8


                In order of strength of the blockade of blue light transmission through the lens, green filter < yellow filter < orange filter << red filters. Among red filters, there are varying strengths, such as the Wratten # 23, Wratten # 25A, and Wratten # 29, with the #29 exerting the strongest effect. These filters block so much blue light that their creative potential in both still and landscape photography is boundless. They even block UV light.

                For this photograph, I used the # 29 filter grade, also known as the deep red filter.
                Wratten # 29 (Deep Red Filter)

                حسب قوة حصار انتقال الضوء الأزرق عبر العدسة، المرشح الأخضر < المرشح الأصفر < المرشح البرتقالي << المرشح الأحمر. من بين المرشحات الحمراء، هناك نقاط قوة مختلفة، مثل Wratten # 23، وWratten # 25A، وWratten # 29، حيث يتمتع #29 بأقوى تأثير. تحجب هذه المرشحات الكثير من الضوء الأزرق مما يجعل إمكاناتها الإبداعية في التصوير الفوتوغرافي الثابت والمناظر الطبيعية لا حدود لها. حتى أنها تحجب الأشعة فوق البنفسجية.

                بالنسبة لهذه الصورة، استخدمت درجة الفلتر رقم 29، والمعروفة أيضًا باسم الفلتر الأحمر العميق.

                المكتوب رقم 29 (فلتر أحمر غامق)

                تعليق


                • #9
                  Next, how was the exposure manipulated? In order to create the high contrast that I visualized, I needed to manipulate the light in a way that would *obliterate* as much shadow detail as possible in my subject. A photographer could easily accomplish this feat by attaching a red filter, then underexpose the strong high values on the left face of the dunes by 1-2 stops by placing them on Zone VII or VI (which would ensure that the opposing shadows close), then extend development of the film by N+1 to N+2 to recover the highlights. If I had used sheet film, I would have certainly used that strategy. However, with 35mm roll film, I typically avoid overdeveloping in order to minimize grain structure in the negative. So, I chose to spot meter the high values on the left face of the dunes on Zone VIII (white, pale details in the highlights), develop the film normally, and hope that the deep red filter would deliver the goods in blocking enough blue light to obliterate shadow detail (i.e., Zone 0, or Zone I at most) on the opposing face of the dunes. Based on the lighting at the moment, I knew there would be areas of highlights on the upper and lower borders of the left face of the dunes that would fall onto Zone IX (bright white, minimal detail), but I was not concerned about that.

                  For black and white film, I chose Adox CMS 20 II, which is a new film for me and one with which I had been planning on experimenting for some time. What is interesting about this panchromatic film stock is that it is a very low ISO film. When used with its proprietary developer, Adox rates this film at ISO 20. However, when developed with conventional black and white chemistry, Adox rates this film at an astounding ISO 6. Since I planned to develop this film using regular black and white chemistry, I exposed it at ISO 6.
                  وبعد ذلك، كيف تم التلاعب بالتعرض؟ من أجل إنشاء التباين العالي الذي تصورته، كنت بحاجة إلى معالجة الضوء بطريقة من شأنها *طمس* أكبر قدر ممكن من تفاصيل الظل في موضوعي. يمكن للمصور إنجاز هذا العمل الفذ بسهولة عن طريق إرفاق مرشح أحمر، ثم تعريض القيم العالية القوية على الجانب الأيسر من الكثبان الرملية بمقدار 1-2 توقف عن طريق وضعها في المنطقة VII أو VI (والتي تضمن إغلاق الظلال المتعارضة)، ثم قم بتوسيع تطوير الفيلم بواسطة N+1 إلى N+2 لاستعادة النقاط البارزة. إذا كنت قد استخدمت الفيلم الورقي، كنت سأستخدم بالتأكيد هذه الإستراتيجية. ومع ذلك، مع فيلم رول مقاس 35 مم، عادةً ما أتجنب الإفراط في التطوير من أجل تقليل البنية الحبيبية في الصورة السلبية. لذلك، اخترت قياس القيم العالية على الجانب الأيسر من الكثبان الرملية في المنطقة الثامنة (التفاصيل البيضاء والشاحبة في النقاط البارزة)، وتطوير الفيلم بشكل طبيعي، وآمل أن يقوم الفلتر الأحمر العميق بتسليم البضائع في حجب ما يكفي من اللون الأزرق ضوء لطمس تفاصيل الظل (على سبيل المثال، المنطقة 0، أو المنطقة I على الأكثر) على الوجه المقابل للكثبان الرملية. استنادًا إلى الإضاءة في الوقت الحالي، كنت أعلم أنه ستكون هناك مناطق بارزة على الحدود العلوية والسفلية للوجه الأيسر للكثبان الرملية التي ستقع في المنطقة التاسعة (أبيض ناصع، مع الحد الأدنى من التفاصيل)، لكنني لم أكن قلقًا بشأن ذلك .

                  بالنسبة للأفلام بالأبيض والأسود، اخترت Adox CMS 20 II، وهو فيلم جديد بالنسبة لي والذي كنت أخطط لتجربته منذ بعض الوقت. الأمر المثير للاهتمام في مخزون الأفلام البانكروماتية هذا هو أنه فيلم ISO منخفض جدًا. عند استخدامه مع مطوره الخاص، يقوم Adox بتقييم هذا الفيلم عند ISO 20. ومع ذلك، عند تطويره باستخدام كيمياء أبيض وأسود تقليدية، يقوم Adox بتقييم هذا الفيلم عند ISO 6 مذهل. وبما أنني خططت لتطوير هذا الفيلم باستخدام كيمياء أبيض وأسود عادية، لقد كشفته عند ISO 6.

                  تعليق


                  • #10
                    For the camera settings, I zoomed in at the maximum focal length for my lens (200 mm) and stopped down the aperture to “f/8 and be there”. Of course, with a film speed of 6 coupled with a deep red filter (filter factor +3 stops), a tripod was mandatory.

                    In terms of the post-processing, well, this image is “straight out of the camera”. The raw scan of the negative was so good that I made no adjustments. I cropped the image to a 2:1 aspect ratio. Once again, superb job by Scott and Bonnie at Northcoast Photographic Services!

                    The final image was exactly as I had visualized it in my mind and in my heart: a scene filled with emotion and beauty, captured in a way that evokes deep thought, maybe a sense of mystery and romanticism, with strong contrast to impart an element of abstraction, yet still abound with fine texture and detail to visually explore. Overall, I was quite pleased with the result and the experience.

                    بالنسبة إلى إعدادات الكاميرا، قمت بتكبير الحد الأقصى للطول البؤري للعدسة (200 ملم) وأوقفت فتحة العدسة إلى "f/8 وكن هناك". بالطبع، مع سرعة فيلم تبلغ 6 مقترنة بفلتر أحمر عميق (عامل الفلتر +3 توقفات)، كان الحامل ثلاثي الأرجل إلزاميًا.

                    فيما يتعلق بالمعالجة اللاحقة، حسنًا، هذه الصورة "مباشرة خارج الكاميرا". كان الفحص الأولي للسلبية جيدًا جدًا لدرجة أنني لم أجري أي تعديلات. لقد قمت بقص الصورة إلى نسبة العرض إلى الارتفاع 2:1. مرة أخرى، عمل رائع قام به سكوت وبوني في Northcoast Photography Services!

                    كانت الصورة النهائية تمامًا كما تصورتها في ذهني وفي قلبي: مشهد مليء بالعاطفة والجمال، تم التقاطه بطريقة تثير تفكيرًا عميقًا، وربما إحساسًا بالغموض والرومانسية، مع تباين قوي لإضفاء عنصر ما. من التجريد، ومع ذلك لا تزال مليئة بالملمس الدقيق والتفاصيل التي يمكن استكشافها بصريًا. بشكل عام، كنت سعيدًا جدًا بالنتيجة والتجربة.

                    تعليق


                    • #11
                      Incidentally, Adox CMS 20 II is a *wickedly* sharp film with stunning resolution, high dynamic range, and minimal grain. I have never before seen any 35mm film with a performance anywhere near this level. This film stock has now become one of my “go-to” films for landscape and fine art photography. This month, I am thrilled to have acquired a supply of Adox CMS 20 II in both 120 roll and 4×5 sheet films to use with my medium and large format cameras, respectively, and I look forward to reviewing this film for Photography Life by this summer

                      بالمناسبة، يعد Adox CMS 20 II فيلمًا حادًا *بشكل شرير* يتمتع بدقة مذهلة ونطاق ديناميكي عالٍ وأقل قدر من التحبب. لم يسبق لي أن رأيت أي فيلم مقاس 35 ملم بأداء قريب من هذا المستوى. لقد أصبح مخزون الأفلام هذا الآن واحدًا من أفلامي "المفضلة" لتصوير المناظر الطبيعية والفنون الجميلة. هذا الشهر، أشعر بسعادة غامرة لأنني حصلت على إمدادات من Adox CMS 20 II في كل من الأفلام الورقية ذات 120 لفة و4×5 لاستخدامها مع الكاميرات ذات التنسيق المتوسط ​​والكبير، على التوالي، وأتطلع إلى مراجعة هذا الفيلم لـ Photography Life بواسطة هذا الصيف

                      تعليق

                      يعمل...
                      X