طمس الخلفية في فوتوشوب Lens Blur How to Blur Background in Photoshop Using Lens Blur

تقليص
X
 
  • تصفية - فلترة
  • الوقت
  • عرض
إلغاء تحديد الكل
مشاركات جديدة

  • طمس الخلفية في فوتوشوب Lens Blur How to Blur Background in Photoshop Using Lens Blur

    كيفية طمس الخلفية في برنامج فوتوشوب باستخدام Lens Blur
    How to Blur Background in Photoshop Using Lens Blur
    Subject isolation is one of the most sought-after effects in photography. It is one of the primary reasons (along with low-light capability and sharpness) why anyone would even think of buying those expensive fast primes. It is undeniable that there is no replacement for getting it right in the camera. But most of the time, we are thrown into less than ideal situations. Be it not being able to afford an expensive fast prime, or that we simply could not get close enough to the subject. And this is when Photoshop can potentially save the day. In this article, we will go through the underlying concepts of how our lenses achieve desired “bokeh” and use Photoshop to get similar results. Before you read on, I recommend that you check out the article on bokeh and how to obtain maximum bokeh.
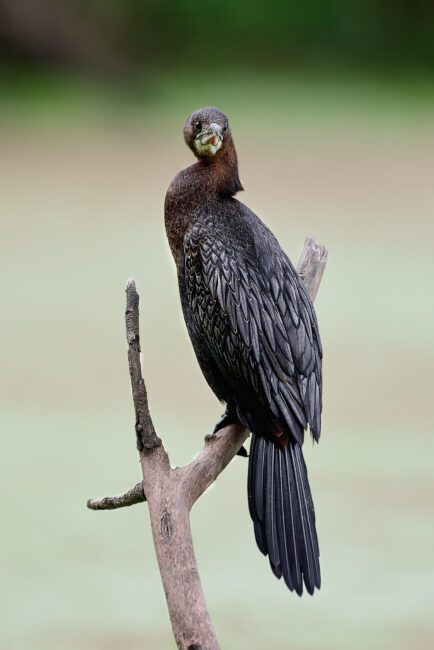
    As the subject is far away from the background, there is even blur throughout

    يعد عزل الهدف أحد أكثر التأثيرات المرغوبة في التصوير الفوتوغرافي. إنه أحد الأسباب الرئيسية (إلى جانب إمكانية الإضاءة المنخفضة والحدة) التي تجعل أي شخص يفكر في شراء تلك الأعداد الأولية السريعة الباهظة الثمن. لا يمكن إنكار أنه لا يوجد بديل للحصول على الحق في الكاميرا. لكن في أغلب الأحيان، نواجه مواقف أقل من مثالية. سواء كان ذلك بسبب عدم قدرتنا على تحمل تكاليف التصوير الأولي السريع باهظ الثمن، أو أننا ببساطة لم نتمكن من الاقتراب بدرجة كافية من الموضوع. وهذا هو الوقت الذي يمكن فيه لبرنامج Photoshop أن ينقذ الموقف. في هذه المقالة، سنتناول المفاهيم الأساسية لكيفية تحقيق عدساتنا لـ "البوكيه" المطلوب واستخدام Photoshop للحصول على نتائج مماثلة. قبل مواصلة القراءة، أنصحك بمراجعة المقالة حول تأثير البوكيه وكيفية الحصول على الحد الأقصى من تأثير البوكيه.

     نظرًا لأن الهدف بعيدًا عن الخلفية، يكون هناك ضبابية في كل مكان

  • #2
    Take a look at the above image. The creamy background blur is straight out of the camera. The image was shot at close to ideal conditions where the subject was relatively close, and the background was pretty far away from the subject. More importantly, the entire background is evenly blurred. Now compare the image above with the one below:
    NIKON D750 @ 500mm, ISO 1000, 1/400, f/5.6

    نلقي نظرة على الصورة أعلاه. تمويه الخلفية الكريمية يخرج مباشرة من الكاميرا. تم التقاط الصورة في ظروف قريبة من المثالية حيث كان الهدف قريبًا نسبيًا وكانت الخلفية بعيدة جدًا عن الموضوع. والأهم من ذلك، أن الخلفية بأكملها غير واضحة بالتساوي. الآن قارن الصورة أعلاه مع الصورة أدناه:

    كاميرا نيكون D750 عند 500 مم، ISO 1000، 1/400، f/5.6

    تعليق


    • #3
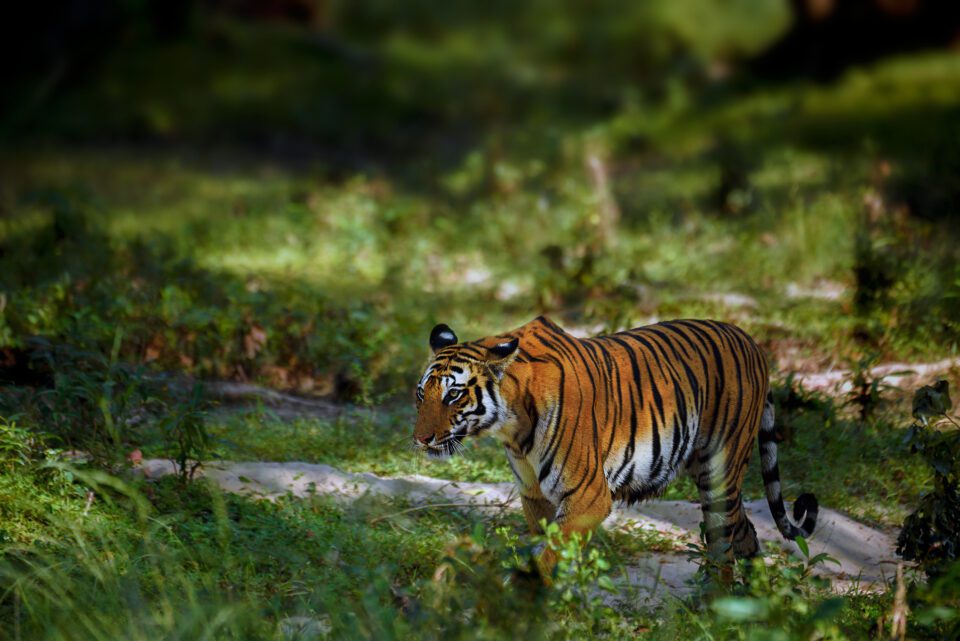
      This image has varying levels of blur. You can see a bit of blur in the foreground grass, and the background behind the tiger transitions into a more pronounced blur as the distance increases from where the focal plane is. Most of us end up blurring the entire frame with the same magnitude. This is one of the most common mistakes people make when they blur the background in post. There is no way for Photoshop to accurately determine the distance between a particular pixel with respect to what is in focus. You need to tell Photoshop which pixels are near and which ones are far. So blurring the background in Photoshop has three sequential steps:
      1. First, we need to make a selection. This is pretty much the first step most of the time when we edit any image in Photoshop. The selection is generally made either using a layer mask or an alpha channel. Remember that when you see the layer mask attached to a layer, whites are shown and blacks are hidden.
      2. We have to tell Photoshop which pixels are closer to focus and which are far away. It is done so by creating a depth map.
      3. We do the actual blurring using the Lens Blur tool. Remember that the lens blur is directly applied to the selected layer. Once done, it cannot be modified, making it a destructive form of applying a blur. So always make it a habit to duplicate the layer before proceeding and if the blur goes out of hand here and there, you can always adjust it using the opacity with respect to the original layer using layer masks.
      تحتوي هذه الصورة على مستويات مختلفة من التمويه. يمكنك رؤية القليل من الضبابية في العشب الأمامي، والخلفية خلف النمر تتحول إلى ضبابية أكثر وضوحًا مع زيادة المسافة من حيث يكون المستوى البؤري. ينتهي الأمر بمعظمنا إلى تشويش الإطار بأكمله بنفس الحجم. يعد هذا أحد الأخطاء الأكثر شيوعًا التي يرتكبها الأشخاص عندما يقومون بطمس الخلفية في المنشور. لا توجد طريقة يستطيع Photoshop من خلالها تحديد المسافة بين بكسل معين بدقة فيما يتعلق بما هو موضع التركيز. عليك أن تخبر Photoshop عن وحدات البكسل القريبة وأيها بعيدة. لذا فإن طمس الخلفية في Photoshop له ثلاث خطوات متتالية:

      أولا، نحن بحاجة إلى إجراء اختيار. هذه هي الخطوة الأولى تقريبًا في أغلب الأحيان عندما نقوم بتحرير أي صورة في Photoshop. يتم التحديد بشكل عام إما باستخدام قناع الطبقة أو قناة ألفا. تذكر أنه عندما ترى قناع الطبقة مرتبطًا بطبقة ما، يظهر اللون الأبيض ويتم إخفاء اللون الأسود. علينا أن نخبر Photoshop عن وحدات البكسل الأقرب إلى التركيز وتلك البعيدة. ويتم ذلك عن طريق إنشاء خريطة عمق. ونقوم بالطمس الفعلي باستخدام أداة Lens Blur. تذكر أن تمويه العدسة يتم تطبيقه مباشرة على الطبقة المحددة. بمجرد الانتهاء من ذلك، لا يمكن تعديله، مما يجعله شكلاً مدمرًا لتطبيق التمويه. لذا، اجعل من عادة تكرار الطبقة قبل المتابعة، وإذا خرج التمويه عن نطاق السيطرة هنا وهناك، فيمكنك دائمًا ضبطه باستخدام العتامة فيما يتعلق بالطبقة الأصلية باستخدام أقنعة الطبقة.

      تعليق


      • #4
        Take a look at the above image. The subject was pretty far away from me and the background was comparably closer to the subject, hence making everything sharp. In other words, there is no subject isolation. Whenever we decide to blur the background of an image, it is of primary importance that we understand the image.

        For example, in the above image, if I attempt to completely blur out the leaves surrounding the subject, I would only end up with an artificial-looking image. I would be doing more so if I end up blurring the entire background equally. So the first step is to decide how much blur is actually possible without making the image look “plastic” and the second step would be to decide which part of the image gets how much blur in post. In other words, deciding how much is too much will be one of the most important factors that makes or breaks the image.

        Table of Contentsنلقي نظرة على الصورة أعلاه. كان الموضوع بعيدًا جدًا عني وكانت الخلفية أقرب نسبيًا إلى الموضوع، مما جعل كل شيء حادًا. وبعبارة أخرى، لا يوجد عزل للموضوع. عندما نقرر تعتيم خلفية الصورة، فمن الأهمية بمكان أن نفهم الصورة.

        على سبيل المثال، في الصورة أعلاه، إذا حاولت طمس الأوراق المحيطة بالموضوع تمامًا، فلن ينتهي بي الأمر إلا بصورة مصطنعة المظهر. سأفعل المزيد إذا انتهى بي الأمر إلى تشويش الخلفية بأكملها بالتساوي. لذا فإن الخطوة الأولى هي تحديد مقدار التمويه الممكن فعليًا دون جعل الصورة تبدو "بلاستيكية" والخطوة الثانية هي تحديد أي جزء من الصورة سيحصل على مقدار التمويه في المنشور. بمعنى آخر، تحديد المقدار الزائد عن الحد سيكون أحد أهم العوامل التي تؤدي إلى تحسين الصورة أو فشلها.

        جدول المحتويات

        إجراء التحديد، أداة التحديد السريع، طمس الخلفية باستخدام تمويه العدسة، تطبيق تدرج التحديد، الاستنتاج

        تعليق


        • #5
          Making a Selection


          Selecting an area of an image to be edited locally is one of the most challenging tasks in Photoshop. As always with Photoshop, there are multiple ways to make a selection. I will explain two options for selection in this article. The first one is to select and isolate the subject alone, which comes handy most of the time. The other is to apply a gradient of selection from the focal plane. We use the latter method when there is already a certain degree of subject isolation in the image.
          إجراء الاختيار

          يعد تحديد منطقة من الصورة لتحريرها محليًا إحدى المهام الأكثر تحديًا في Photoshop. كما هو الحال دائمًا مع Photoshop، هناك طرق متعددة لإجراء التحديد. سأشرح خيارين للاختيار في هذه المقالة. الأول هو اختيار الموضوع وعزله وحده، وهو الأمر الذي يكون مفيدًا في معظم الأوقات. والآخر هو تطبيق تدرج التحديد من المستوى البؤري. نستخدم الطريقة الأخيرة عندما تكون هناك بالفعل درجة معينة من عزل الموضوع في الصورة.

          تعليق


          • #6
            Quick Selection Tool


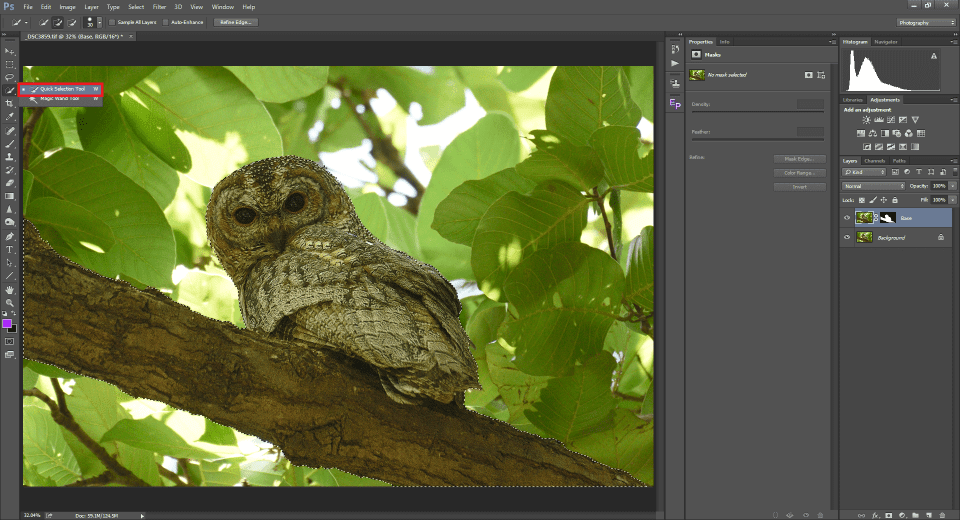
            This is one of the most common tools in Photoshop. You can use it by clicking the tool selection option from the toolbox (highlighted in red) in the illustrative picture below:

            When you hover around the image, you can see the mouse pointer with a “+” symbol in the center. Click near the border inside the subject and drag the mouse around the area that you wish to select. You can see the marching ants around the selected area and the selection adds up as you move it through.

            Photoshop makes the selection using the contrast between adjacent pixels. It seeks well-defined borders to make the selection. Sometimes, if there are no definitive borders, Photoshop ends up selecting a part of the background. You can always click on the Alt (in PC) or Option (in Mac) to subtract an unwanted selection. When you press Alt / Option, you can see the “+” symbol inside the mouse pointer turn to “-“. In the illustrative image, you can see the selection I have made. It is the Owl and the branch on which it is resting, which obviously lies on the same focal plane.
            اختيار أداة سريعة

            هذه هي واحدة من الأدوات الأكثر شيوعا في برنامج فوتوشوب. يمكنك استخدامها من خلال الضغط على خيار تحديد الأداة من صندوق الأدوات (المظلل باللون الأحمر) في الصورة التوضيحية أدناه:


            عندما تحوم حول الصورة، يمكنك رؤية مؤشر الماوس مع الرمز "+" في المنتصف. انقر بالقرب من الحدود داخل الموضوع واسحب الماوس حول المنطقة التي ترغب في تحديدها. يمكنك رؤية النمل يزحف حول المنطقة المحددة ويزداد التحديد أثناء تحريكك له.

            يقوم Photoshop بإجراء التحديد باستخدام التباين بين وحدات البكسل المتجاورة. يسعى إلى حدود محددة جيدًا لإجراء الاختيار. في بعض الأحيان، إذا لم تكن هناك حدود محددة، ينتهي الأمر بالفوتوشوب إلى تحديد جزء من الخلفية. يمكنك دائمًا النقر فوق Alt (في الكمبيوتر الشخصي) أو Option (في Mac) لطرح تحديد غير مرغوب فيه. عند الضغط على Alt / Option، يمكنك رؤية الرمز "+" داخل مؤشر الماوس يتحول إلى "-". في الصورة التوضيحية، يمكنك رؤية الاختيار الذي قمت به. إنها البومة والغصن الذي ترتكز عليه، والذي يقع بوضوح على نفس المستوى البؤري.

            تعليق


            • #7
              Now that I have an isolated selection of the subject, I cannot just go ahead and blur the rest. There is a problem. Take a look at the illustrative image below to understand how the output would look if I just make a selection and blur the rest. You can see that the subject actually looks “copy-pasted”. That is because the selection is harsh ie., there is too much contrast between the background and the border of the subject that makes it look cut-out. I am going to show you how to fix this issue by refining the edges.

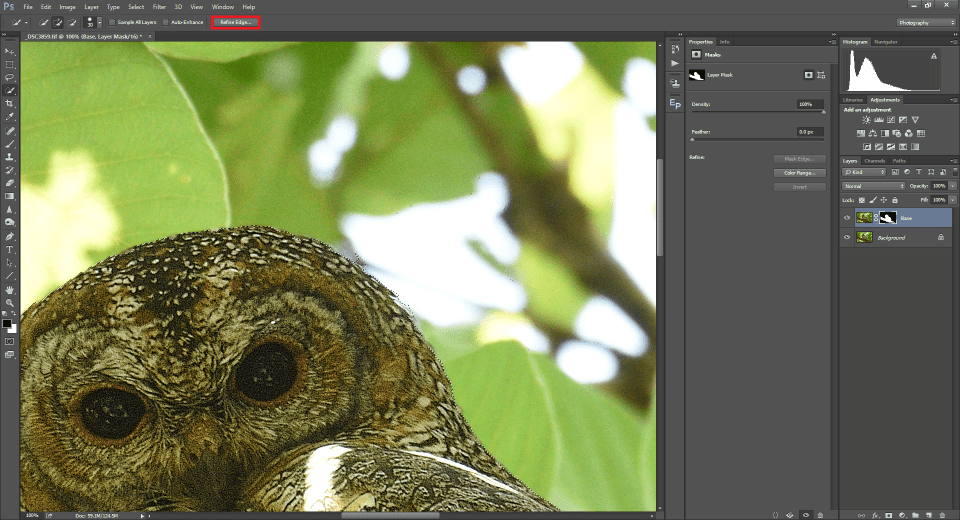
              As I have mentioned earlier, the edge of the subject which is right next to the blurred background is what gives the image an unnatural look. If I manage to soften the borders (edges) of the subject, I can make it look comparably more natural. The “Refine Edge” option of the quick selection tool (highlighted in red in the image below) comes to rescue in such a scenario.
              والآن بعد أن أصبح لدي اختيار معزول للموضوع، لا أستطيع المضي قدمًا وطمس الباقي. هناك مشكلة. ألقِ نظرة على الصورة التوضيحية أدناه لفهم كيف سيبدو الإخراج إذا قمت فقط بإجراء تحديد وطمس الباقي. يمكنك أن ترى أن الموضوع يبدو في الواقع "نسخًا ولصقًا". وذلك لأن التحديد قاسي، أي أن هناك الكثير من التباين بين الخلفية وحدود الموضوع مما يجعله يبدو مقطوعًا. سأوضح لك كيفية حل هذه المشكلة عن طريق تحسين الحواف.


              كما ذكرت سابقًا، فإن حافة الموضوع الموجودة بجوار الخلفية غير الواضحة هي ما يمنح الصورة مظهرًا غير طبيعي. إذا تمكنت من تخفيف حدود (حواف) الموضوع، فيمكنني جعله يبدو أكثر طبيعية نسبيًا. يأتي خيار "Refine Edge" الخاص بأداة التحديد السريع (المظللة باللون الأحمر في الصورة أدناه) للإنقاذ في مثل هذا السيناريو.

              تعليق


              • #8
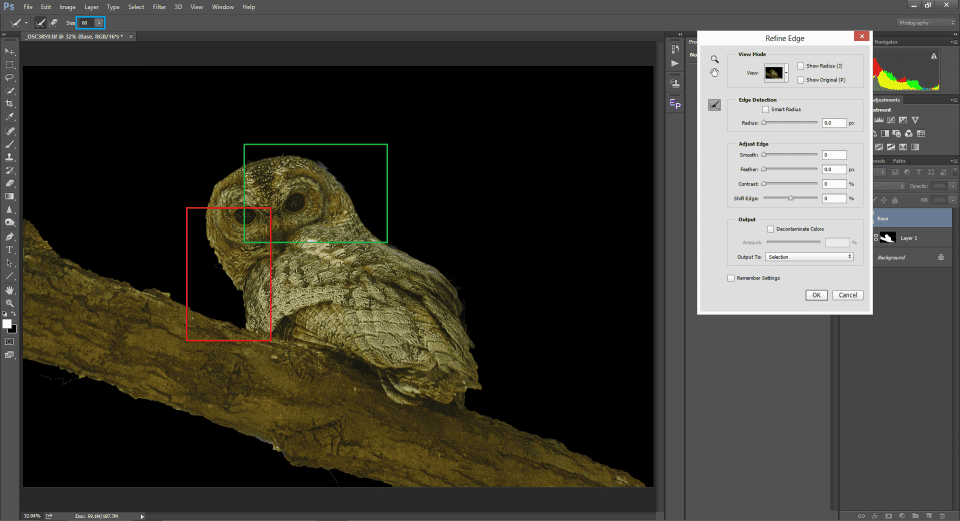
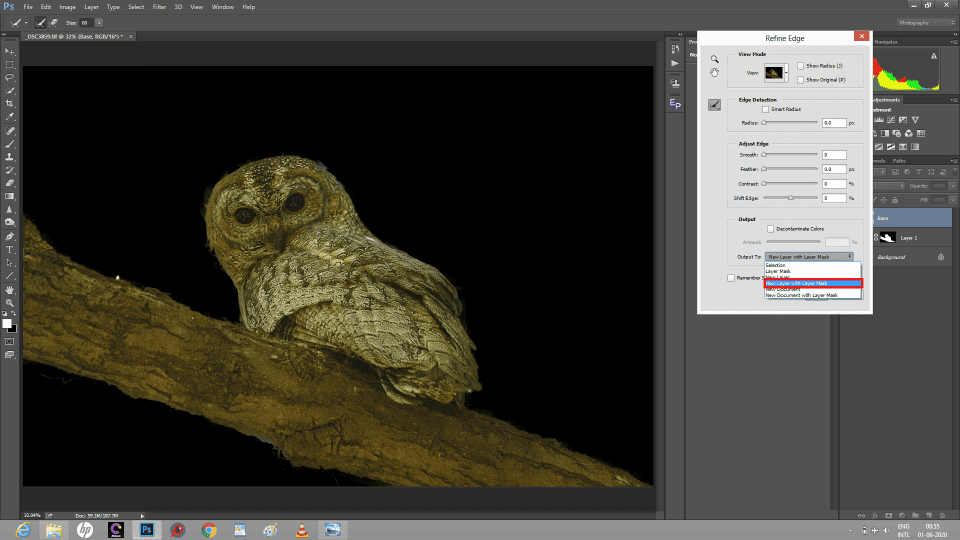
                Once you click on the Refine Edge button, a new window pops out and the image appears to have been changed. You can notice that the selected area is visible and everything else turns black. To make the edges smooth, I have to select an appropriate soft brush and hover the mouse around the edges. You can now see the difference between the smooth edges (highlighted in green in the image below) versus the harsh selection (highlighted red) that was done previously.
                Refine Edge options window
                As mentioned earlier, the blur is applied directly to the layer and since there is a mask involved, converting it into a smart object will not work. Once you have made the selection and refined the edges, it is always a good practice to create a copy of the layer with a mask. You can do so in the refine edges window itself by using the “New Layer with layer mask” option from the output section. Now this layer and the mask attached to it will be the Depth map ie., it will tell Photoshop which pixels of the image are used to mark the plane of focus.
                Output options for selections made

                بمجرد النقر على زر Refine Edge، تظهر نافذة جديدة ويبدو أن الصورة قد تم تغييرها. يمكنك ملاحظة أن المنطقة المحددة مرئية وكل شيء آخر يتحول إلى اللون الأسود. لجعل الحواف ناعمة، لا بد لي من تحديد فرشاة ناعمة مناسبة وتحريك الماوس حول الحواف. يمكنك الآن رؤية الفرق بين الحواف الناعمة (المظللة باللون الأخضر في الصورة أدناه) مقابل التحديد القاسي (المظلل باللون الأحمر) الذي تم إجراؤه مسبقًا.

                 تحسين نافذة خيارات الحافة

                كما ذكرنا سابقًا، يتم تطبيق التمويه مباشرة على الطبقة وبما أن هناك قناعًا، فلن ينجح تحويله إلى كائن ذكي. بمجرد الانتهاء من التحديد وتحسين الحواف، فمن الممارسات الجيدة دائمًا إنشاء نسخة من الطبقة باستخدام قناع. يمكنك القيام بذلك في نافذة تحسين الحواف نفسها باستخدام خيار "طبقة جديدة مع قناع الطبقة" من قسم الإخراج. الآن ستكون هذه الطبقة والقناع المرفق بها عبارة عن خريطة العمق، أي أنها ستخبر Photoshop عن وحدات بكسل الصورة المستخدمة لتحديد مستوى التركيز.

                خيارات الإخراج للاختيارات التي تم إجراؤها

                تعليق


                • #9
                  Blurring the Background Using Lens Blur


                  Once the selection is made with the edges refined, the next step is to feed the selection as the plane of focus to create a depth map. Now I have a layer with the mask (selection). With the layer selected, go to the menu option Filter -> Blur -> Lens Blur. This will bring up the lens blur window.

                  Note: Make sure that the layer is selected and not the layer mask. Since it is a filter, the result is applied directly to the selected layer.
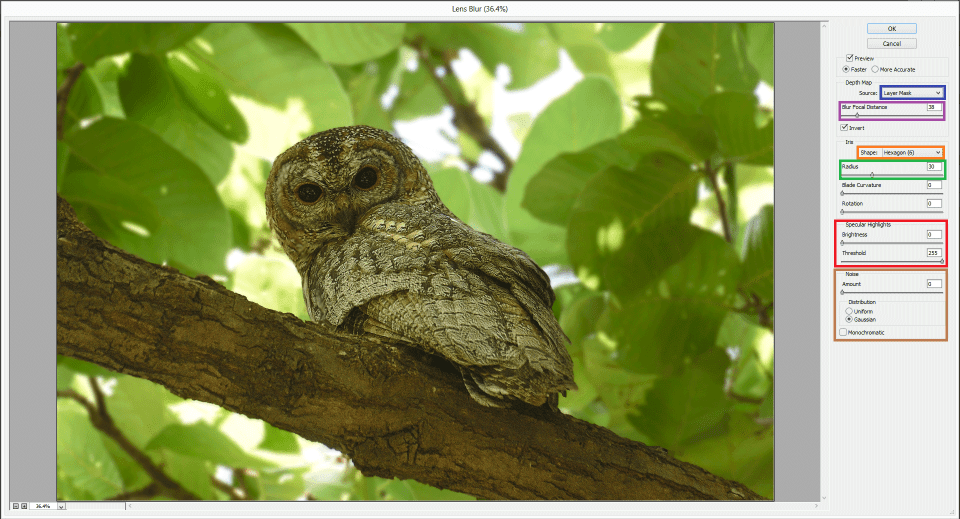
                  Lens blur Window

                  طمس الخلفية باستخدام Lens Blur

                  بمجرد إجراء التحديد مع تحسين الحواف، فإن الخطوة التالية هي تغذية التحديد كمستوى التركيز لإنشاء خريطة عمق. الآن لدي طبقة مع القناع (الاختيار). بعد تحديد الطبقة، انتقل إلى خيار القائمة Filter -> Blur -> Lens Blur. سيؤدي هذا إلى إظهار نافذة تمويه العدسة.

                  ملاحظة: تأكد من تحديد الطبقة وليس قناع الطبقة. وبما أنه مرشح، يتم تطبيق النتيجة مباشرة على الطبقة المحددة.

                   نافذة طمس العدسة

                  تعليق


                  • #10
                    • In the Lens blur window, the first option you will see, is the preview section. This only changes the preview of the lens blur applied in the lens blur window. Depending upon the size of the image, applying lens blur takes time. So it is always advisable to choose “faster”.
                    • Below the preview is the depth map. We have already made a layer mask that defines the dept map ie., the selection (whites) in the layer mask becoming the plane of focus. Make sure that the Layer Mask option (highlighted in blue) is selected from the source.
                    • Next is the blur focal distance (highlighted in purple). This option is to tell Photoshop either to blur the selection or to blur everything excluding the selection. You can understand it better by toggling “Invert”. For this image, I thought the focal distance of about 38 worked pretty well. As you increase the blur focal distance, you can see that the pixels closer to the focal plane undergo less blur than the ones that are farther from it.
                    • Below the depth map is the Iris option. You see a drop-down called shape (highlighted in orange). This option is used to define the shape of the blur. For example, if I have blocks of blurred highlights in the background, selecting hexagon in shape will render hexagonal highlights. In other words, it mimics the effects created by the aperture blades.
                    في نافذة Lens Blur، الخيار الأول الذي ستراه هو قسم المعاينة. يؤدي هذا إلى تغيير معاينة تمويه العدسة المطبقة في نافذة تمويه العدسة فقط. اعتمادًا على حجم الصورة، يستغرق تطبيق طمس العدسة وقتًا. لذلك يُنصح دائمًا باختيار "أسرع". توجد خريطة العمق أسفل المعاينة. لقد قمنا بالفعل بإنشاء قناع طبقة يحدد خريطة القسم، أي أن التحديد (اللون الأبيض) في قناع الطبقة يصبح مستوى التركيز. تأكد من تحديد خيار قناع الطبقة (المظلل باللون الأزرق) من المصدر. وبعد ذلك، المسافة البؤرية المعتمة (المظللة باللون الأرجواني). هذا الخيار هو إخبار Photoshop إما بتعتيم التحديد أو تعتيم كل شيء باستثناء التحديد. يمكنك فهم ذلك بشكل أفضل عن طريق تبديل "عكس". بالنسبة لهذه الصورة، اعتقدت أن المسافة البؤرية البالغة حوالي 38 تعمل بشكل جيد. كلما قمت بزيادة المسافة البؤرية الضبابية، يمكنك أن ترى أن وحدات البكسل الأقرب إلى المستوى البؤري تتعرض لضبابية أقل من تلك البعيدة عنه. أسفل خريطة العمق يوجد خيار القزحية. ستشاهد قائمة منسدلة تسمى الشكل (مميز باللون البرتقالي). يستخدم هذا الخيار لتحديد شكل التمويه. على سبيل المثال، إذا كانت لدي كتل من الإبرازات المعتمة في الخلفية، فإن تحديد الشكل السداسي سيؤدي إلى عرض الإبرازات السداسية. وبعبارة أخرى، فهو يحاكي التأثيرات التي تم إنشاؤها بواسطة شفرات الفتحة.

                    تعليق


                    • #11
                      1. Below that, is the Radius (highlighted in green) which defines the aperture. A lower value corresponds to a wide-open aperture and a higher value corresponds to a smaller aperture.
                      2. The Curvature option defines the curvature of the aperture blades and the Rotation option below that signifies the angle of curvature.
                      3. The highlights marked in red in the illustrative image is to define the Specular Highlights. This option is used to tell Photoshop if we want to blow out any highlights. A blown-out highlight with no details appears to be blurred overall. The threshold option gives the maximum luminosity value of the pixel that is to be thrown out as specular highlights. This option works similarly to “Blend-If” when it comes to selecting highlights. For example, if I choose a value of 200, every pixel brighter than 200 will be blown out.
                      4. The last section is Noise. Always remember, when we apply blur, the noise in the image gets blurred too. If you have a noisy image, blurring the background will blur noise as well, leaving noise in the focus intact. This sometimes yields results that look unnatural. This option is used to suppress noise reduction. In fact, Photoshop does what it usually does and then adds a bit of noise. Use this slider to match the noise in the area that is in focus.
                      5. Now when you click on the “Ok” button, the corresponding blur is applied to the image. But it appears as if the blur is not applied to the layer. This is because the layer mask is attached to the image with the selection of the focal plane alone. So everything except the focal plane is masked out. Delete the layer mask by right-clicking on the layer mask and selecting Delete Layer Mask.
                      يوجد أسفل ذلك نصف القطر (المظلل باللون الأخضر) الذي يحدد فتحة العدسة. تتوافق القيمة الأقل مع فتحة مفتوحة على مصراعيها وتتوافق القيمة الأعلى مع فتحة أصغر. يحدد خيار الانحناء انحناء شفرات الفتحة وخيار التدوير أدناه الذي يشير إلى زاوية الانحناء. يتم تمييز النقاط البارزة باللون الأحمر في الرسم التوضيحي الصورة هي لتحديد النقاط البارزة. يُستخدم هذا الخيار لإخبار Photoshop إذا أردنا إزالة أي إبرازات. يبدو أن التركيز البارز بدون تفاصيل غير واضح بشكل عام. يوفر خيار العتبة الحد الأقصى لقيمة اللمعان للبكسل الذي سيتم طرحه كإبرازات مرآوية. يعمل هذا الخيار بشكل مشابه لـ "Blend-If" عندما يتعلق الأمر بتحديد النقاط البارزة. على سبيل المثال، إذا اخترت قيمة 200، فسيتم حجب كل بكسل أكثر سطوعًا من 200. القسم الأخير هو الضوضاء. تذكر دائمًا، عندما نقوم بتطبيق التمويه، يصبح التشويش في الصورة غير واضح أيضًا. إذا كانت لديك صورة مشوشة، فإن تشويش الخلفية سيؤدي إلى تشويش الضوضاء أيضًا، مما يترك التشويش في التركيز كما هو. يؤدي هذا في بعض الأحيان إلى نتائج تبدو غير طبيعية. يُستخدم هذا الخيار لمنع تقليل الضوضاء. في الواقع، يقوم Photoshop بما يفعله عادة ثم يضيف القليل من الضوضاء. استخدم شريط التمرير هذا لمطابقة الضوضاء في المنطقة التي يتم التركيز عليها. الآن عند النقر فوق الزر "موافق"، يتم تطبيق التمويه المقابل على الصورة. ولكن يبدو كما لو أن التمويه لم يتم تطبيقه على الطبقة. وذلك لأن قناع الطبقة مرتبط بالصورة مع تحديد المستوى البؤري وحده. لذلك يتم إخفاء كل شيء ما عدا المستوى البؤري. احذف قناع الطبقة عن طريق النقر بزر الماوس الأيمن على قناع الطبقة وتحديد حذف قناع الطبقة.

                      تعليق


                      • #12
                        Applying Selection Gradient


                        As mentioned earlier, using the same technique does not help every image. The first step is to understand the image and then apply the blur accordingly. So obviously, each image demands it’s own algorithm to blur. Let me explain with another example where the blur needs to be a gradient. Let us go back to the tiger image:

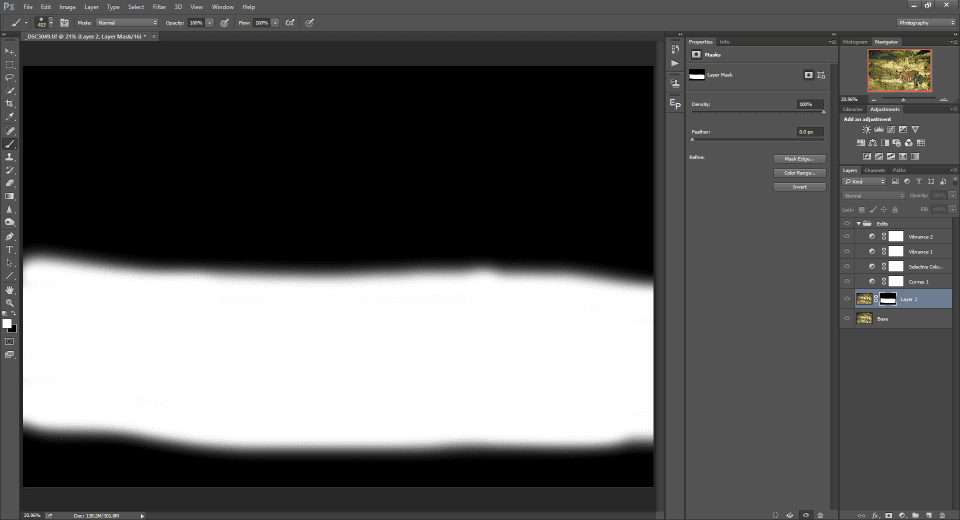
                        In the previous example, I selected only the subject and blurred everything else out. That approach is not likely going to work for this image. You can see a little bit of sand and grass in focus which is pretty close to the subject. It would look artificial if we blur everything except the tiger as the plane of focus extends beyond the subject. For this, selecting the entire plane works as shown in the illustrative image below. I have selected a soft brush and brushed over the entire plane of focus:
                        Then entire plane of focus is selected in the layer mask using a soft brush

                        تطبيق التدرج التحديد

                        كما ذكرنا سابقًا، فإن استخدام نفس التقنية لا يساعد في كل صورة. الخطوة الأولى هي فهم الصورة ثم تطبيق التمويه وفقًا لذلك. من الواضح أن كل صورة تتطلب خوارزمية خاصة بها للتعتيم. اسمحوا لي أن أشرح بمثال آخر حيث يجب أن يكون التمويه متدرجًا. ولنعد إلى صورة النمر:


                        في المثال السابق، قمت بتحديد الموضوع فقط وقمت بإخفاء كل شيء آخر. من غير المرجح أن ينجح هذا النهج مع هذه الصورة. يمكنك رؤية القليل من الرمل والعشب في التركيز وهو قريب جدًا من الموضوع. سيبدو الأمر مصطنعًا إذا قمنا بطمس كل شيء باستثناء النمر حيث يمتد مستوى التركيز إلى ما هو أبعد من الموضوع. ولهذا السبب، يتم اختيار المستوى بأكمله كما هو موضح في الصورة التوضيحية أدناه. لقد قمت باختيار فرشاة ناعمة ومسحت مستوى التركيز بالكامل:

                        ثم يتم تحديد مستوى التركيز بالكامل في قناع الطبقة باستخدام فرشاة ناعمة

                        تعليق


                        • #13
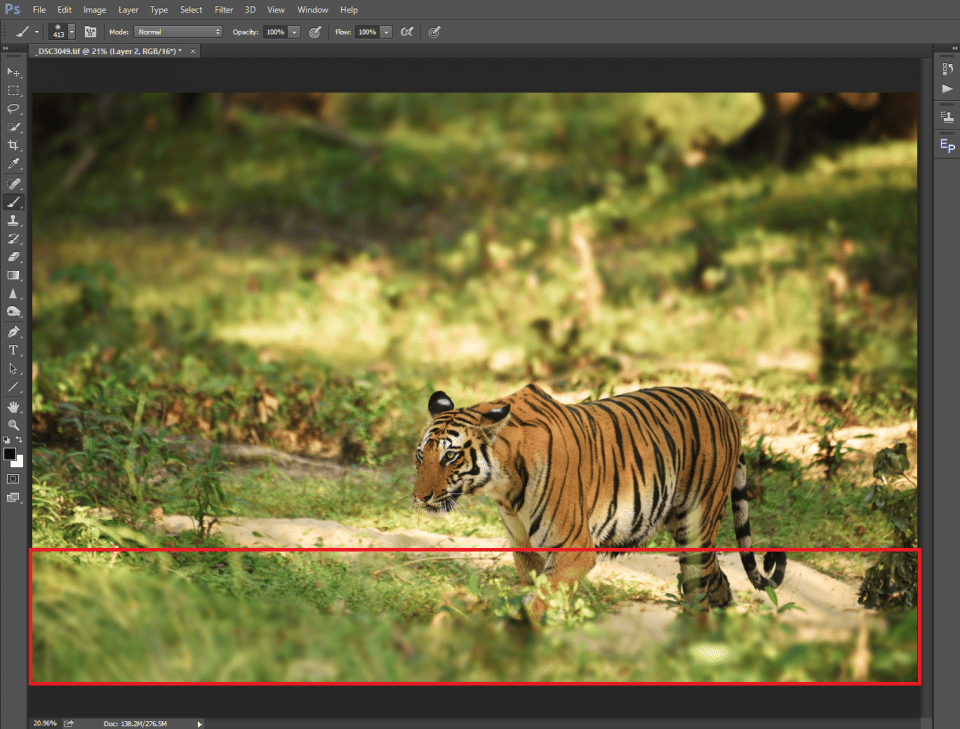
                          With this selection made I repeat the same procedure as we did with the previous example. The result is the image shown below. I just missed out on one little detail. The Foreground was not selected in the depth map. As a result, the grass at the bottom is blurred and a part of the tiger’s leg is also included, making it completely unnatural. Since the blur has been applied to the selected layer as a filter, it cannot be modified. This is why it is always advisable to take a copy of the layer before applying filters. You can do so by selecting the layer and by pressing Control/Command + J. Now that I have the source (depth map) as a new layer with a mask, I can always add a layer mask and mask out inappropriate areas of the current layer.

                          مع هذا التحديد، أكرر نفس الإجراء كما فعلنا في المثال السابق. والنتيجة هي الصورة الموضحة أدناه. لقد فاتني تفاصيل صغيرة واحدة فقط. لم يتم تحديد المقدمة في خريطة العمق. ونتيجة لذلك، يصبح العشب الموجود في الأسفل غير واضح ويتم تضمين جزء من ساق النمر أيضًا، مما يجعله غير طبيعي تمامًا. نظرًا لأنه تم تطبيق التمويه على الطبقة المحددة كمرشح، فلا يمكن تعديله. ولهذا السبب يُنصح دائمًا بأخذ نسخة من الطبقة قبل تطبيق المرشحات. يمكنك القيام بذلك عن طريق تحديد الطبقة والضغط على Control/Command + J. والآن بعد أن أصبح لدي المصدر (خريطة العمق) كطبقة جديدة مع قناع، يمكنني دائمًا إضافة قناع طبقة وإخفاء المناطق غير المناسبة من التيار طبقة.


                          تعليق


                          • #14
                            Conclusion


                            In this article on How to Blur the Background Using Lens Blur in Photoshop, we understood the factors that need to be taken into account while blurring the background in post-production. This is only one of many ways to blur the background using Photoshop. There are other filters just like Lens Blur viz., Gaussian Blur, Field Blur, and Tilt-Shift blur. We will be covering those in future articles. If there are any queries or if you wish to know about any of the specific options, please pen it down in the comments section and I shall try to address it as soon as possible.
                            خاتمة

                            في هذه المقالة حول كيفية تعتيم الخلفية باستخدام Lens Blur في Photoshop، فهمنا العوامل التي يجب أخذها في الاعتبار أثناء تعتيم الخلفية في مرحلة ما بعد الإنتاج. هذه مجرد طريقة واحدة من عدة طرق لطمس الخلفية باستخدام Photoshop. هناك مرشحات أخرى تمامًا مثل Lens Blur، وGaussian Blur، وField Blur، وTilt-Shift Blur. وسوف نقوم بتغطية تلك في المقالات المقبلة. إذا كانت هناك أية استفسارات أو إذا كنت ترغب في معرفة أي من الخيارات المحددة، فيرجى كتابتها في قسم التعليقات وسأحاول معالجتها في أقرب وقت ممكن.

                            تعليق

                            يعمل...
                            X