شرح بيانات EXIF ​​​​​​​ EXIF Data Explained

تقليص
X
 
  • تصفية - فلترة
  • الوقت
  • عرض
إلغاء تحديد الكل
مشاركات جديدة

  • #16
    How to Completely Remove EXIF Data


    The easiest way to remove EXIF and XMP Data from an image without involving third party software is to either do it in Photoshop or in Lightroom. In Photoshop, simply go to File -> Export -> Save for Web and make sure that “Metadata” is set to “None”:
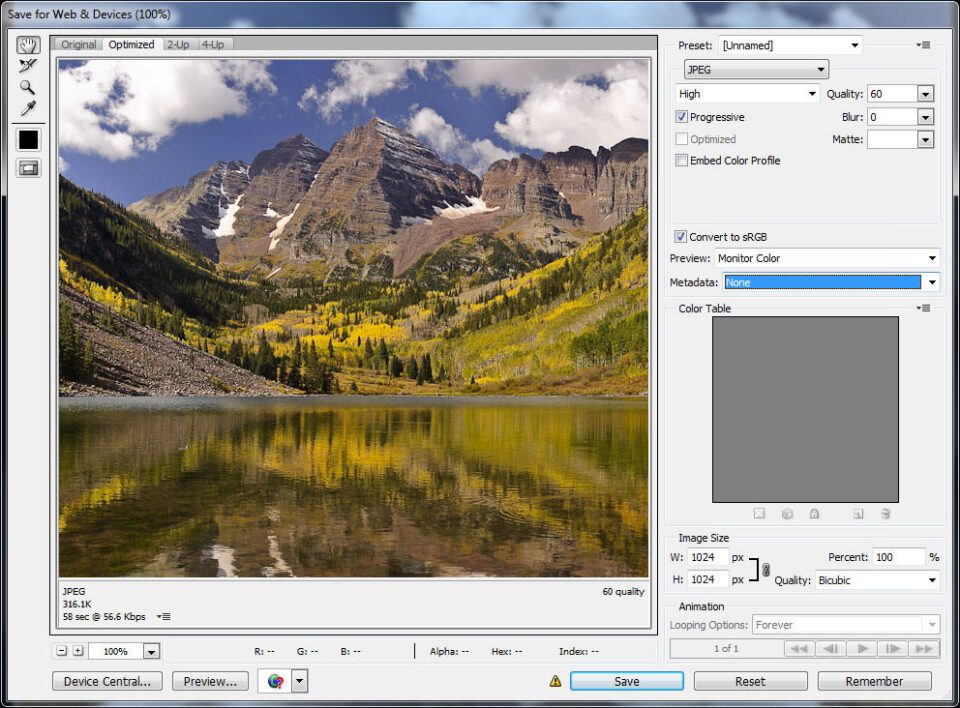
    Once you save the file, all EXIF and XMP Data will be completely removed!

    You can achieve a similar result in Lightroom by selecting “Copyright Only” from the “Include” drop-down field under “Metadata” section, which will remove the EXIF data, except your copyright information from the image:
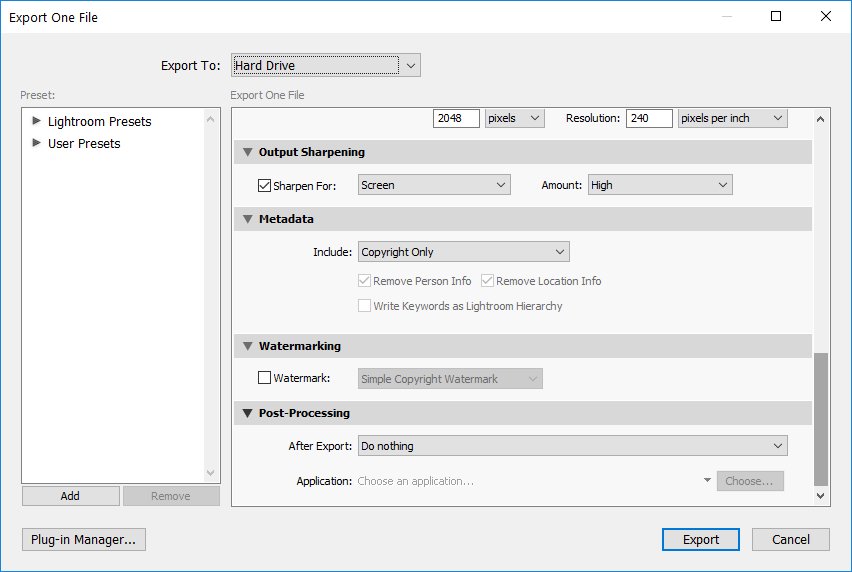
    However, this only does what it says – it does not completely remove all the metadata. While things like your camera information, exposure settings, and XMP data will be gone, your copyright information along with an embedded image thumbnail will be preserved. Unfortunately, Lightroom does not give an option to strip all the metadata from files, so you will need to use other tools to do it.

    While there are some websites that allow one to upload images and strip metadata from them, I personally use Phil Harvey’s “ExifTool” to do the job, because it is fast and I can process many images at once. Download the executable file, then use the following command prompt:

    exiftool -all= SourceFile.jpg
    Obviously, replace SourceFile.jpg with the name of the JPEG file you want EXIF data deleted from. As a result, all metadata, including the image thumbnail will be stripped from the file. If you want to remove EXIF data from all images in the same folder, specify “*” (without quotes) instead of the file name and it will go through every image.

    تعليق


    • #17
      كيفية إزالة بيانات EXIF ​​بالكامل

      أسهل طريقة لإزالة بيانات EXIF ​​وXMP من الصورة دون الحاجة إلى استخدام برامج خارجية هي القيام بذلك إما في Photoshop أو Lightroom. في Photoshop، ما عليك سوى الانتقال إلى ملف -> تصدير -> حفظ للويب وتأكد من تعيين "بيانات التعريف" على "لا شيء":


      بمجرد حفظ الملف، ستتم إزالة جميع بيانات EXIF ​​وXMP بالكامل!

      يمكنك تحقيق نتيجة مماثلة في Lightroom عن طريق تحديد "حقوق الطبع والنشر فقط" من الحقل المنسدل "تضمين" ضمن قسم "البيانات الوصفية"، مما سيؤدي إلى إزالة بيانات EXIF، باستثناء معلومات حقوق الطبع والنشر الخاصة بك من الصورة:


      ومع ذلك، فإن هذا لا يفعل إلا ما يقوله – فهو لا يزيل جميع البيانات الوصفية بشكل كامل. على الرغم من اختفاء أشياء مثل معلومات الكاميرا وإعدادات التعرض وبيانات XMP، سيتم الاحتفاظ بمعلومات حقوق النشر الخاصة بك بالإضافة إلى الصورة المصغرة المضمنة. لسوء الحظ، لا يوفر Lightroom خيارًا لإزالة جميع البيانات التعريفية من الملفات، لذلك ستحتاج إلى استخدام أدوات أخرى للقيام بذلك.

      على الرغم من وجود بعض مواقع الويب التي تسمح لأحد بتحميل الصور وإزالة البيانات الوصفية منها، فأنا شخصيًا أستخدم "ExifTool" الخاص بـ Phil Harvey للقيام بهذه المهمة، لأنه سريع ويمكنني معالجة العديد من الصور في وقت واحد. قم بتنزيل الملف القابل للتنفيذ، ثم استخدم موجه الأوامر التالي:

      exiftool -all= SourceFile.jpg

      من الواضح، استبدل SourceFile.jpg باسم ملف JPEG الذي تريد حذف بيانات EXIF ​​منه. ونتيجة لذلك، سيتم تجريد كافة البيانات الوصفية، بما في ذلك الصورة المصغرة من الملف. إذا كنت تريد إزالة بيانات EXIF ​​من جميع الصور الموجودة في نفس المجلد، فحدد "*" (بدون علامتي الاقتباس) بدلاً من اسم الملف وسوف يمر عبر كل صورة.

      تعليق


      • #18
        How to Selectively Remove EXIF Data


        This part is for those like me, who like to keep important EXIF data in their images, but want to get rid of all other junk such as XMP Data and image thumbnails from their images. There are two ways to do this – from Lightroom directly, or from a command prompt. I personally like to do it directly from Lightroom, because it saves me a lot of time. If you already have a bunch of exported files, it might be easier to just run the tool from the command prompt.

        First, download ExifTool, if you haven’t done it already.
        Instructions for Windows OS


        If you use Windows OS, create a folder called “ExifTool” on your root folder and put the executable “exiftool(-k).exe” into that folder. On my Windows 10 system, the full path to the executable file is “C:\ExifTool\exiftool(-k).exe”. You can save it elsewhere, if you want to – that’s totally your choice. Then, go ahead and create a text file in notepad and copy-paste the following into it:

        “C:\ExifTool\exiftool(-k).exe” -overwrite_original ^ -XMP:All= ^ -IPTC:Keywords= ^ -ThumbnailImage= ^ %*
        Now save the file as “RemoveJunkEXIF.bat” in the same folder where you saved the ExifTool executable. You should now have two files in that folder.

        So, what does the above batch file do? It basically calls ExifTool, removes all XMP Data, IPTC Keywords, and image thumbnail from your file, while keeping the rest of the EXIF data intact. The option “-overwrite_original” makes the tool overwrite the file, rather than creating a separate file and renaming the original.

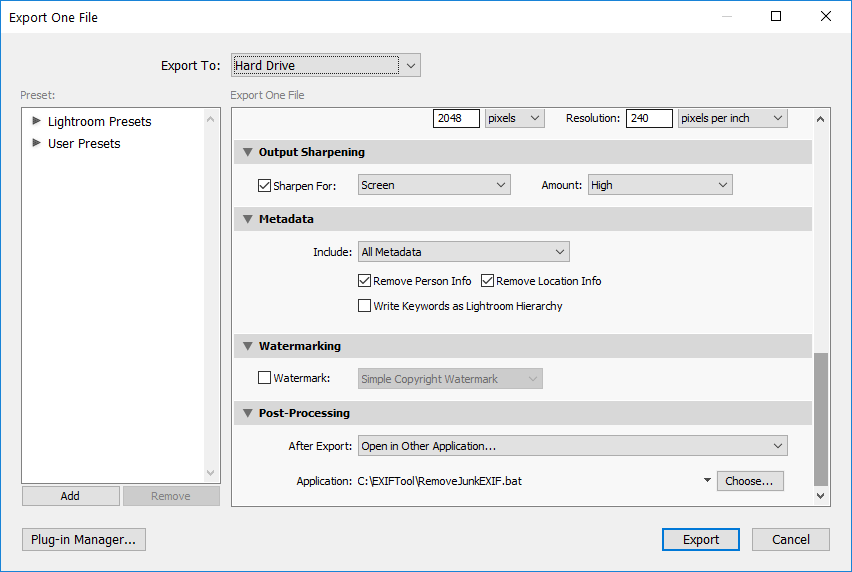
        Once you save the file, go to Lightroom and open the export dialog box. On the very bottom of the page, expand “Post-Processing”, then select “Open in Other Application…” from the “After Export” drop-down. Then click on “Choose…” button, browse to “C:\ExifTool” folder, and double click on the RemoveJunkEXIF.bat file. The export screen should look like this:

        Now click “Export” and make sure that you are not getting any errors. If the export succeeded and you did not receive any errors, you are all set! Next time when you export your images, this setting will be preserved and your EXIF data will be automatically removed from your files

        تعليق


        • #19
          كيفية إزالة بيانات EXIF ​​بشكل انتقائي

          هذا الجزء مخصص لأولئك مثلي، الذين يرغبون في الاحتفاظ ببيانات EXIF ​​المهمة في صورهم، ولكنهم يريدون التخلص من جميع الأشياء غير المرغوب فيها الأخرى مثل بيانات XMP والصور المصغرة للصور من صورهم. هناك طريقتان للقيام بذلك – من Lightroom مباشرة، أو من موجه الأوامر. أنا شخصيا أحب أن أفعل ذلك مباشرة من Lightroom، لأنه يوفر لي الكثير من الوقت. إذا كان لديك بالفعل مجموعة من الملفات المصدرة، فقد يكون من الأسهل تشغيل الأداة من موجه الأوامر.

          أولاً، قم بتنزيل ExifTool، إذا لم تكن قد قمت بذلك بالفعل.

          تعليمات لنظام التشغيل ويندوز

          إذا كنت تستخدم نظام التشغيل Windows، فقم بإنشاء مجلد يسمى "ExifTool" على المجلد الجذر الخاص بك ووضع الملف القابل للتنفيذ "exiftool(-k.exe" في هذا المجلد. على نظام Windows 10 الخاص بي، المسار الكامل للملف القابل للتنفيذ هو "C:\ExifTool\exiftool(-k).exe". يمكنك حفظه في مكان آخر، إذا كنت تريد ذلك - فهذا اختيارك تمامًا. ثم تابع وأنشئ ملفًا نصيًا في المفكرة وانسخ ما يلي والصقه فيه:

          "C:\ExifTool\exiftool(-k).exe" -overwrite_original ^ -XMP:All= ^ -IPTC:Keywords= ^ -ThumbnailImage= ^ %*

          الآن احفظ الملف باسم "RemoveJunkEXIF.bat" في نفس المجلد الذي قمت بحفظ ExifTool القابل للتنفيذ فيه. يجب أن يكون لديك الآن ملفين في هذا المجلد.

          إذن، ماذا يفعل الملف الدفعي أعلاه؟ فهو يستدعي ExifTool بشكل أساسي، ويزيل جميع بيانات XMP وكلمات IPTC الرئيسية والصور المصغرة للصورة من ملفك، مع الحفاظ على بقية بيانات EXIF ​​سليمة. الخيار "-overwrite_original" يجعل الأداة تقوم بالكتابة فوق الملف، بدلاً من إنشاء ملف منفصل وإعادة تسمية الملف الأصلي.

          بمجرد حفظ الملف، انتقل إلى Lightroom وافتح مربع حوار التصدير. في أسفل الصفحة، قم بتوسيع "ما بعد المعالجة"، ثم حدد "فتح في تطبيق آخر..." من القائمة المنسدلة "بعد التصدير". ثم انقر فوق الزر "اختيار..."، وتصفح للوصول إلى المجلد "C:\ExifTool"، وانقر نقرًا مزدوجًا على ملف RemoveJunkEXIF.bat. يجب أن تبدو شاشة التصدير كما يلي:


          الآن انقر فوق "تصدير" وتأكد من عدم ظهور أي أخطاء. إذا نجحت عملية التصدير ولم تتلق أي أخطاء، فأنت جاهز تمامًا! في المرة القادمة عندما تقوم بتصدير صورك، سيتم الاحتفاظ بهذا الإعداد وستتم إزالة بيانات EXIF ​​تلقائيًا من ملفاتك

          تعليق


          • #20
            Removing EXIF Data from a Batch of JPEG Images


            If you have a bunch of images that you need to remove EXIF data from, then I recommend executing ExifTool directly from a command prompt. Just copy all your image files to a folder like “C:\ExifTool”, then open up the command prompt and do the following:

            cd "C:\ExifTool" RemoveJunkEXIF.bat *.jpg
            On macOS, you would do something similar using Terminal:

            cd /Users/YourName/Desktop sh RemoveJunkEXIF.sh *.jpg
            Obviously, if you placed ExifTool in a different folder, just change the folder path above and everything should work perfectly!

            تعليق


            • #21
              إزالة بيانات EXIF ​​من مجموعة صور JPEG

              إذا كان لديك مجموعة من الصور التي تحتاج إلى إزالة بيانات EXIF ​​منها، فإنني أوصي بتنفيذ ExifTool مباشرة من موجه الأوامر. ما عليك سوى نسخ جميع ملفات الصور الخاصة بك إلى مجلد مثل "C:\ExifTool"، ثم افتح موجه الأوامر وقم بما يلي:

              القرص المضغوط "C:\ExifTool" RemoveJunkEXIF.bat *.jpg

              على نظام التشغيل macOS، يمكنك القيام بشيء مماثل باستخدام الوحدة الطرفية:

              cd /Users/YourName/Desktop sh RemoveJunkEXIF.sh *.jpg

              من الواضح، إذا قمت بوضع ExifTool في مجلد مختلف، فما عليك سوى تغيير مسار المجلد أعلاه وسيعمل كل شيء بشكل مثالي!

              تعليق

              يعمل...
              X