شرح بيانات EXIF ​​​​​​​ EXIF Data Explained

تقليص
X
 
  • تصفية - فلترة
  • الوقت
  • عرض
إلغاء تحديد الكل
مشاركات جديدة

  • شرح بيانات EXIF ​​​​​​​ EXIF Data Explained

    شرح بيانات EXIF
    EXIF Data Explained

    While it is important for photographers, EXIF data can also contain sensitive information

    When viewing images on the Internet, you might have noticed that some websites provide valuable information related to those images, such as their exposure settings, camera brand, etc. This information known as “EXIF Data” can be an important source of knowledge in figuring out how photographers capture images and what tools they use in the process. In this article, we will take a look at what EXIF data is and how you can extract it from images.

    Table of Contents​​​​​​​شرح بيانات EXIF

    على الرغم من أهمية بيانات EXIF ​​للمصورين، إلا أنها يمكن أن تحتوي أيضًا على معلومات حساسة

    عند عرض الصور على الإنترنت، ربما لاحظت أن بعض مواقع الويب توفر معلومات قيمة تتعلق بتلك الصور، مثل إعدادات التعرض لها، والعلامة التجارية للكاميرا، وما إلى ذلك. ويمكن أن تكون هذه المعلومات المعروفة باسم "بيانات EXIF" مصدرًا مهمًا للمعرفة في اكتشاف تعرف على كيفية التقاط المصورين للصور والأدوات التي يستخدمونها في هذه العملية. في هذه المقالة، سنلقي نظرة على ماهية بيانات EXIF ​​وكيف يمكنك استخراجها من الصور.

    جدول المحتويات

    ما هي بيانات EXIF؟
    كيفية عرض بيانات EXIF
    كيفية عرض بيانات EXIF ​​في Firefox
    كيفية عرض بيانات EXIF ​​في Chrome
    كيفية عرض بيانات EXIF ​​في نظام التشغيل ومع عارض الصوركيفية استخراج الصور باستخدام بيانات EXIF ​​في Lightroomكيفية إزالة بيانات EXIFلماذا إزالة بيانات EXIF ما هي بيانات EXIF ​​المحفوظة في الصوركيفية إزالة بيانات EXIF ​​بشكل كاملكيفية إزالة بيانات EXIF ​​بشكل انتقائيتعليمات لنظام التشغيل Windowsتعليمات لنظام التشغيل macOSإزالة بيانات EXIF ​​من مجموعة من صور JPEG​​​​​​

  • #2
    What is EXIF Data?


    Exchangeable Image File Format (EXIF) is a standard that defines specific information related to an image or other media captured by a digital camera. It is capable of storing such important data as camera exposure, date/time the image was captured, and even GPS location.

    Back in the early film days, photographers were forced to carry a pen and a notepad with them to record important information such as shutter speed, aperture, and date. They would then use this information in the lab, going through one picture at a time, hoping that what they wrote actually corresponds to the right image. It was a very painful process, especially for newbies who wanted to understand what they did wrong when an image didn’t come out right.

    Nowadays, every modern digital camera has the capability to record this information, along with many other camera settings and other relevant data, right into photographs. These settings can then be later used to organize photographs, perform searches, and provide vital information to photographers about the way a particular photograph was captured. Such stored data is called “EXIF Data”, and it is comprised of a range of settings such as ISO speed, shutter speed, aperture, white balance, camera model and make, date and time, lens used, focal length, and much more.

    Being able to read such data can be of great importance not only for beginners but also for other photographers who want to find out what settings and tools were used to create a particular photograph. Unfortunately, though, the only web-friendly (in terms of size) file format that can handle EXIF is JPEG, which means that you often cannot read the data from other image formats such as GIF and PNG.

    In addition, some photographers choose to strip EXIF data from their images to protect their work and their style, while others do it to save website traffic (yes, EXIF does add up to the size of the file). Those, who leave this data in their images either have no idea that they even have it, or they intentionally leave it like I do – for others to see and possibly learn from.

    While many photographers choose to retain EXIF data in their images, this information does not show up when looking at photos through web browsers, because it is not part of the actual image. Instead, EXIF data is embedded in the physical file, and specific tools that are capable of reading this information must be used to view it. For example, some image viewers and post-processing tools like Lightroom are capable of viewing and extracting such information in order to properly organize images, while some operating systems are capable of reading and displaying this data.

    تعليق


    • #3
      ما هي بيانات EXIF؟

      يعد تنسيق ملف الصورة القابل للتبديل (EXIF) معيارًا يحدد معلومات محددة تتعلق بصورة أو وسائط أخرى تم التقاطها بواسطة كاميرا رقمية. إنه قادر على تخزين البيانات المهمة مثل تعرض الكاميرا وتاريخ/وقت التقاط الصورة وحتى موقع GPS.

      في الأيام الأولى لصناعة الأفلام، كان المصورون مجبرين على حمل قلم ومفكرة معهم لتسجيل المعلومات المهمة مثل سرعة الغالق وفتحة العدسة والتاريخ. ثم يستخدمون هذه المعلومات في المختبر، ويفحصون صورة واحدة في كل مرة، على أمل أن يكون ما كتبوه يتوافق بالفعل مع الصورة الصحيحة. لقد كانت عملية مؤلمة للغاية، خاصة بالنسبة للمبتدئين الذين أرادوا فهم الأخطاء التي ارتكبوها عندما لم تظهر الصورة بشكل صحيح.

      في الوقت الحاضر، تتمتع كل كاميرا رقمية حديثة بالقدرة على تسجيل هذه المعلومات، إلى جانب العديد من إعدادات الكاميرا الأخرى والبيانات الأخرى ذات الصلة، مباشرة في الصور الفوتوغرافية. يمكن بعد ذلك استخدام هذه الإعدادات لاحقًا لتنظيم الصور الفوتوغرافية وإجراء عمليات البحث وتوفير معلومات حيوية للمصورين حول طريقة التقاط صورة معينة. تسمى هذه البيانات المخزنة "بيانات EXIF"، وتتكون من مجموعة من الإعدادات مثل سرعة ISO، وسرعة الغالق، وفتحة العدسة، وتوازن اللون الأبيض، وطراز الكاميرا وطرازها، والتاريخ والوقت، والعدسة المستخدمة، والبعد البؤري، وغير ذلك الكثير. .

      يمكن أن تكون القدرة على قراءة مثل هذه البيانات ذات أهمية كبيرة ليس فقط للمبتدئين ولكن أيضًا للمصورين الآخرين الذين يرغبون في معرفة الإعدادات والأدوات المستخدمة لإنشاء صورة معينة. ومع ذلك، لسوء الحظ، فإن تنسيق الملف الوحيد المناسب للويب (من حيث الحجم) الذي يمكنه التعامل مع EXIF ​​هو JPEG، مما يعني أنك غالبًا لا تستطيع قراءة البيانات من تنسيقات الصور الأخرى مثل GIF وPNG.

      بالإضافة إلى ذلك، يختار بعض المصورين إزالة بيانات EXIF ​​من صورهم لحماية عملهم وأسلوبهم، بينما يفعل آخرون ذلك لحفظ حركة المرور على موقع الويب (نعم، يضيف EXIF ​​ما يصل إلى حجم الملف). أولئك الذين يتركون هذه البيانات في صورهم إما ليس لديهم أي فكرة عن أنهم يمتلكونها، أو أنهم يتركونها عمدًا كما أفعل - ليراها الآخرون وربما يتعلمون منها.

      بينما يختار العديد من المصورين الاحتفاظ ببيانات EXIF ​​في صورهم، فإن هذه المعلومات لا تظهر عند النظر إلى الصور من خلال متصفحات الويب، لأنها ليست جزءًا من الصورة الفعلية. وبدلاً من ذلك، يتم تضمين بيانات EXIF ​​في الملف الفعلي، ويجب استخدام أدوات محددة قادرة على قراءة هذه المعلومات لعرضها. على سبيل المثال، بعض برامج عرض الصور وأدوات ما بعد المعالجة مثل Lightroom قادرة على عرض هذه المعلومات واستخراجها من أجل تنظيم الصور بشكل صحيح، في حين أن بعض أنظمة التشغيل قادرة على قراءة هذه البيانات وعرضها.

      تعليق


      • #4
        How to View EXIF Data


        So, how does one view this EXIF data online? Let’s take a look at a few easy ways to read it from images.
        How to View EXIF Data in Firefox


        If you are using the Firefox browser, get the Exif Viewer addon by clicking the “Add to Firefox” button. After the addon is installed and Firefox is restarted, you will be able to instantly view the EXIF data by just right-clicking on an image and selecting “Exif Viewer”.

        Go ahead and try it on this image:

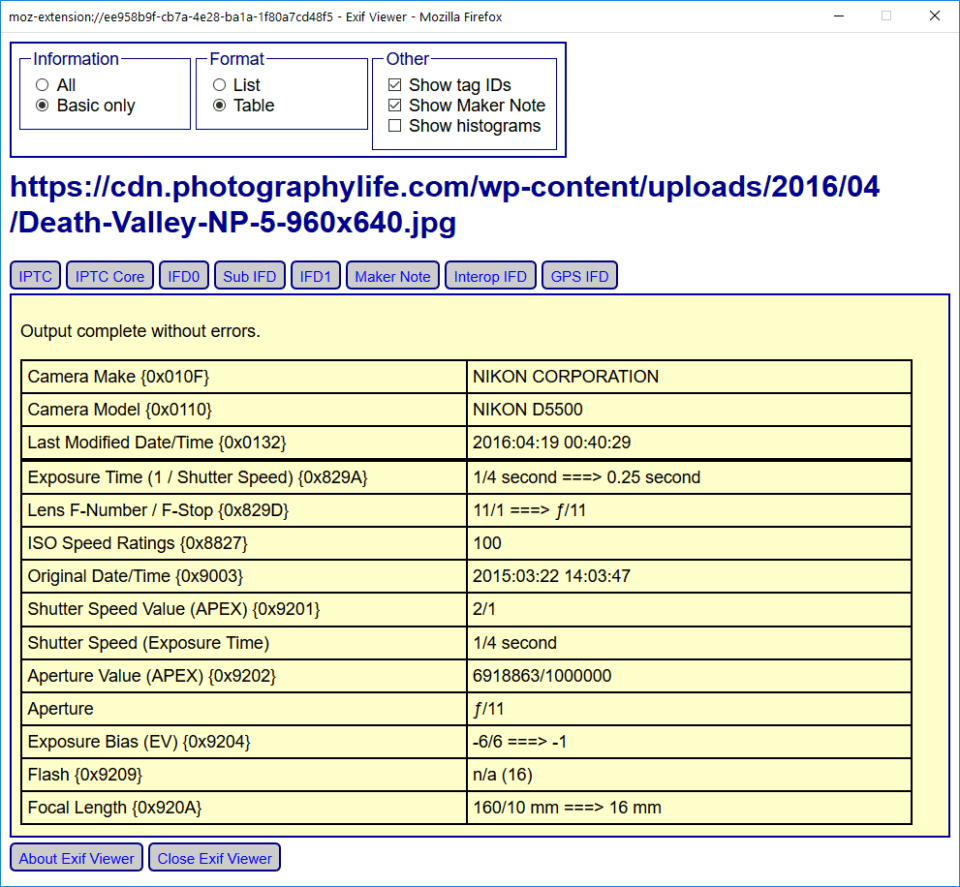
        Once you click on “Exif Viewer”, you should see a new window that looks like this:

        As you can see from the above screenshot, the EXIF information indicates that I used the Nikon D5500, with camera ISO set to ISO 100, aperture at f/11, and shutter speed set to 1/4th of a second to photograph the above image. I used a wide-angle lens for this shot and the EXIF data indicates that the lens was set to 16mm at the time of taking. The original date/time field indicates 2016-04-19, although the time on my camera was set wrong (probably forgot to adjust it after traveling). There are a few other bits of information that can be useful, especially if you select the “All” checkbox under “Information”.

        One thing to keep in mind though – thumbnail images typically do not contain EXIF data. So, whenever you see a clickable thumbnail image, do not select “Exif Data”, but rather open the image fully, then use the tool on the full-sized image.

        If you see an error that says “Unable to extract some or all of the Exif data”, it means that the JPEG file you are looking at contains no EXIF information.

        تعليق


        • #5
          كيفية عرض بيانات EXIF

          إذًا، كيف يمكن للمرء عرض بيانات EXIF ​​هذه عبر الإنترنت؟ دعونا نلقي نظرة على بعض الطرق السهلة لقراءتها من الصور.

          كيفية عرض بيانات EXIF ​​في فايرفوكس

          إذا كنت تستخدم متصفح Firefox، فاحصل على الملحق Exif Viewer بالنقر على الزر "إضافة إلى Firefox". بعد تثبيت الملحق وإعادة تشغيل Firefox، ستتمكن من عرض بيانات EXIF ​​على الفور بمجرد النقر بزر الماوس الأيمن على الصورة واختيار "Exif Viewer".

          تفضل وجربه على هذه الصورة:


          بمجرد النقر على "Exif Viewer"، يجب أن تشاهد نافذة جديدة تبدو كما يلي:


          كما ترون من لقطة الشاشة أعلاه، تشير معلومات EXIF ​​إلى أنني استخدمت كاميرا Nikon D5500، مع ضبط الكاميرا ISO على ISO 100، وفتحة العدسة عند f/11، وسرعة الغالق مضبوطة على 1/4 من الثانية لتصوير الصورة أعلاه . لقد استخدمت عدسة ذات زاوية واسعة لهذه اللقطة وتشير بيانات EXIF ​​إلى أنه تم ضبط العدسة على 16 ملم في وقت الالتقاط. يشير حقل التاريخ/الوقت الأصلي إلى 19-04-2016، على الرغم من أنه تم ضبط الوقت على الكاميرا بشكل خاطئ (ربما نسيت تعديله بعد السفر). هناك بعض المعلومات الأخرى التي يمكن أن تكون مفيدة، خاصة إذا قمت بتحديد مربع الاختيار "الكل" ضمن "المعلومات".

          هناك شيء واحد يجب أخذه في الاعتبار، وهو أن الصور المصغرة عادةً لا تحتوي على بيانات EXIF. لذلك، عندما ترى صورة مصغرة قابلة للنقر، لا تحدد "Exif Data"، بل افتح الصورة بالكامل، ثم استخدم الأداة على الصورة بالحجم الكامل.

          إذا رأيت خطأً يقول "غير قادر على استخراج بعض أو كل بيانات Exif"، فهذا يعني أن ملف JPEG الذي تبحث عنه لا يحتوي على معلومات EXIF.

          تعليق


          • #6
            How to View EXIF Data in Chrome


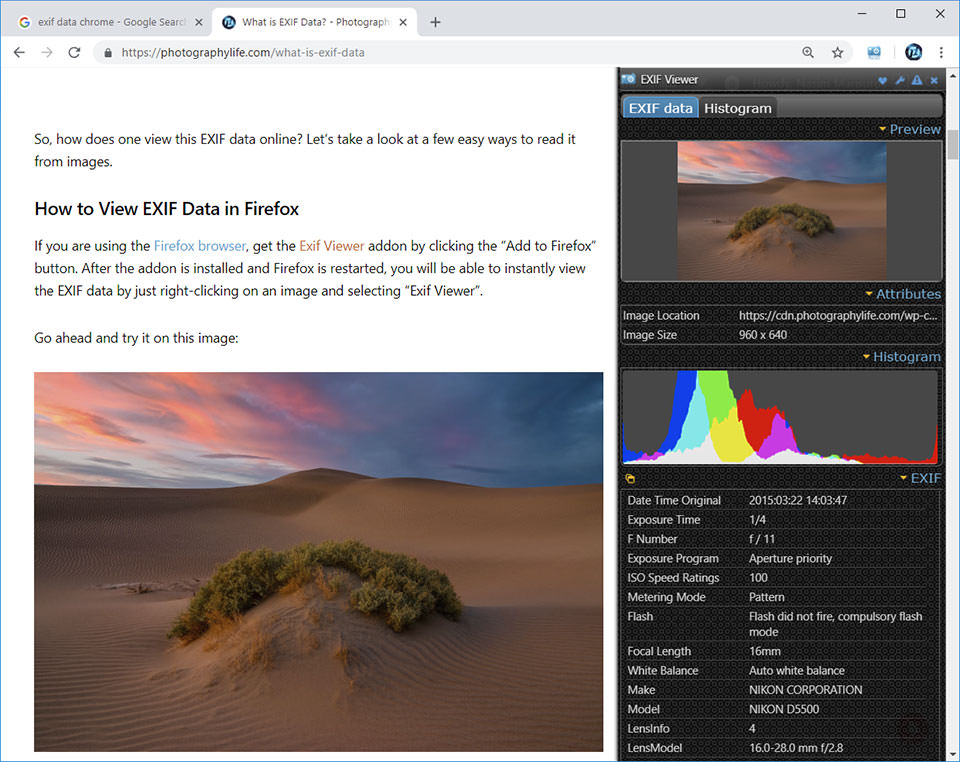
            If you prefer to use the Chrome browser, it also has a similar extension that is capable of viewing EXIF data. Download and install the “EXIF Viewer” by clicking “Add to Chrome”. Once installed, you will be able to right-click any image and select “Show EXIF data”, which brings up a pop-up that looks like this:

            As you can see, this tool provides quite a bit of useful information, including a histogram. All the common exposure, camera, date and other information is provided in the “EXIF” section of the extension.

            تعليق


            • #7
              كيفية عرض بيانات EXIF ​​في كروم

              إذا كنت تفضل استخدام متصفح Chrome، فهو يحتوي أيضًا على ملحق مشابه قادر على عرض بيانات EXIF. قم بتنزيل وتثبيت "عارض EXIF" بالنقر فوق "إضافة إلى Chrome". بمجرد التثبيت، ستتمكن من النقر بزر الماوس الأيمن فوق أي صورة وتحديد "إظهار بيانات EXIF"، والتي ستظهر لك نافذة منبثقة تبدو كما يلي:


              كما ترون، توفر هذه الأداة قدرًا كبيرًا من المعلومات المفيدة، بما في ذلك الرسم البياني. يتم توفير جميع معلومات التعرض والكاميرا والتاريخ وغيرها من المعلومات الشائعة في قسم "EXIF" بالملحق.

              تعليق


              • #8
                How to View EXIF Data in OS and with a Photo Viewer


                If for whatever reason you do not want to install a browser add-on, or perhaps you want to be able to view this data on existing images on your computer, you can also use a separate photo viewer application or the built-in capabilities of your operating system. This method can be a bit slower than the above two for viewing images online because you will need to first download images, then use the photo viewer or your OS to view the EXIF data. However, if images are already on your computer, a dedicated photo viewer application or your OS tools will probably be the best way to go.

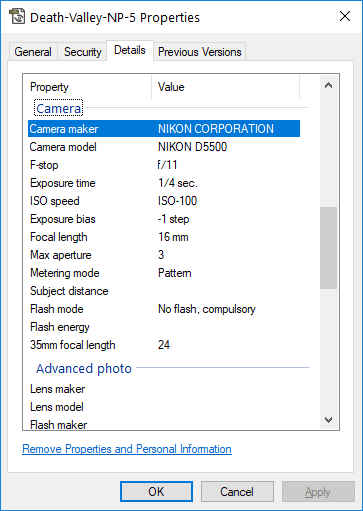
                Let’s first take a look at how you can use your operating system to view EXIF data. If you are using a Windows OS, simply right-clicking the image and clicking the “Details” tab will reveal some information, as you can see below:

                However, keep in mind that this is pretty limited information – if you want more details, such as what lens was used when capturing the image, you might not be able to find such detail in this tab. To get that information, you will need to use a photo viewer.

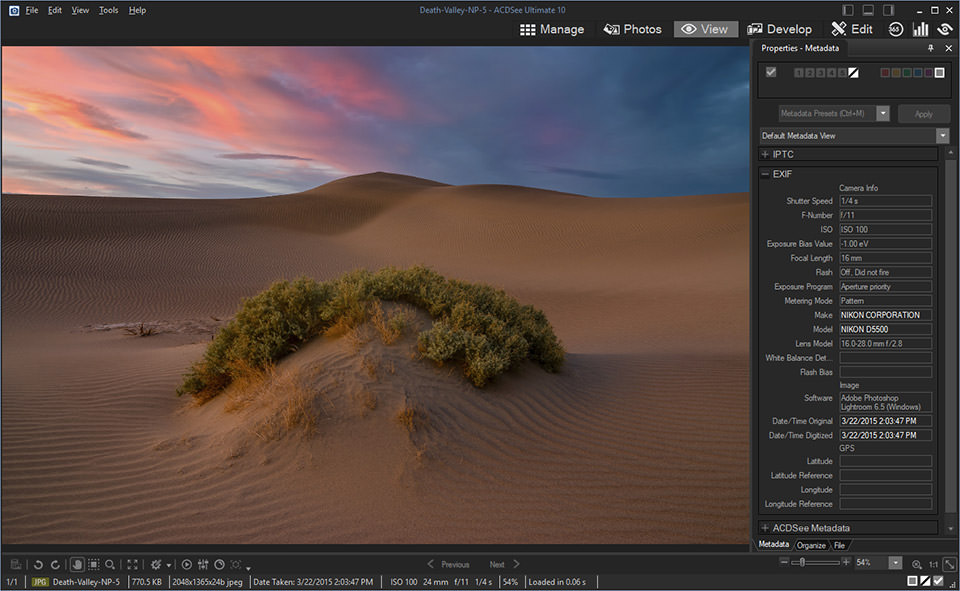
                Now if you are wondering which photo viewer to use, there are way too many to list and it is all a matter of personal preference. Personally, I have been using ACDSee for years and find it to be an excellent tool to view EXIF data. Take a look at the below screenshot that shows EXIF data for the same image above:

                Lastly, if you do not want to deal with any addons or software to install on your computer, you might want to check out online EXIF data viewers. Jeffrey’s Image Metadata Viewer, along with MetaPicz provide the ability to view EXIF data by uploading images to them first.

                تعليق


                • #9
                  كيفية عرض بيانات EXIF ​​في نظام التشغيل وباستخدام عارض الصور

                  إذا كنت لا ترغب لأي سبب من الأسباب في تثبيت وظيفة إضافية للمتصفح، أو ربما تريد أن تكون قادرًا على عرض هذه البيانات على الصور الموجودة على جهاز الكمبيوتر الخاص بك، فيمكنك أيضًا استخدام تطبيق عارض صور منفصل أو الإمكانات المضمنة في برنامج نظام التشغيل الخاص بك. يمكن أن تكون هذه الطريقة أبطأ قليلاً من الطريقتين السابقتين لعرض الصور عبر الإنترنت لأنك ستحتاج أولاً إلى تنزيل الصور، ثم استخدام عارض الصور أو نظام التشغيل لديك لعرض بيانات EXIF. ومع ذلك، إذا كانت الصور موجودة بالفعل على جهاز الكمبيوتر الخاص بك، فمن المحتمل أن يكون تطبيق عارض الصور المخصص أو أدوات نظام التشغيل لديك هو أفضل طريقة للقيام بذلك.

                  دعونا أولاً نلقي نظرة على كيفية استخدام نظام التشغيل الخاص بك لعرض بيانات EXIF. إذا كنت تستخدم نظام التشغيل Windows، فما عليك سوى النقر بزر الماوس الأيمن فوق الصورة والنقر فوق علامة التبويب "التفاصيل" التي ستظهر لك بعض المعلومات، كما ترون أدناه:


                  ومع ذلك، ضع في اعتبارك أن هذه المعلومات محدودة جدًا - إذا كنت تريد المزيد من التفاصيل، مثل العدسة المستخدمة عند التقاط الصورة، فقد لا تتمكن من العثور على مثل هذه التفاصيل في علامة التبويب هذه. للحصول على هذه المعلومات، سوف تحتاج إلى استخدام عارض الصور.

                  الآن، إذا كنت تتساءل عن عارض الصور الذي تريد استخدامه، فهناك الكثير مما يجب إدراجه، والأمر كله مسألة تفضيل شخصي. أنا شخصياً أستخدم برنامج ACDSee منذ سنوات وأجده أداة ممتازة لعرض بيانات EXIF. ألقِ نظرة على لقطة الشاشة أدناه التي تعرض بيانات EXIF ​​لنفس الصورة أعلاه:


                  أخيرًا، إذا كنت لا ترغب في التعامل مع أي إضافات أو برامج لتثبيتها على جهاز الكمبيوتر الخاص بك، فقد ترغب في التحقق من عارض بيانات EXIF ​​عبر الإنترنت. يوفر عارض البيانات الوصفية للصور من Jeffrey، إلى جانب MetaPicz، القدرة على عرض بيانات EXIF ​​عن طريق تحميل الصور إليها أولاً.

                  تعليق


                  • #10
                    How to Extract Images with EXIF Data in Lightroom


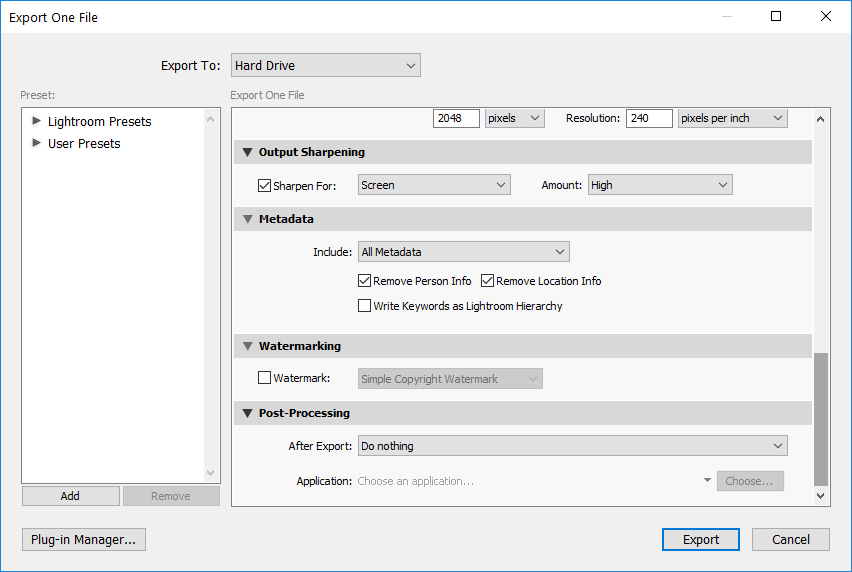
                    Now that you know how to view EXIF data in images using various tools, let’s take a look at how you can extract photos with the EXIF data preserved in them. I will go through the export process in Lightroom, but if you are using some other post-processing tool, it should be able to handle this process as well. Pick a photo you want to export, then navigate to the Export screen (File -> Export), which will bring up a window like this:

                    There is a “Metadata” field here, which is what describes the EXIF data that will be extracted with the image. If “All Metadata” is selected, all EXIF data will be embedded into the resulting JPEG image. There are two important checkboxes that you might want to look into here. The first one is “Remove Person Info” and the second one is “Remove Location Info”. If you want to protect your privacy and make sure that your personal info and GPS location are not extracted, always make sure to keep both of these boxes checked, something I recommend to do.

                    For example, if you extract an image that you captured with a GPS-enabled camera or your smartphone and you have the “Remove Location Info” field unchecked, your GPS data will be saved as part of your EXIF data, and someone else might use that information to track your location.

                    If you want to be selective about the type of information you want to extract from Lightroom, you can click on the “Include” drop-down and pick a different setting. For example, some photographers might want to strip all EXIF data but only keep their copyright information. You can achieve that by selecting “Copyright Only” from the drop-down field.

                    If you have already extracted images and you want to strip EXIF data from them, or your post-processing tool does not have the capability to remove EXIF data, you might want to check out the next section of this article.

                    تعليق


                    • #11
                      كيفية استخراج الصور باستخدام بيانات EXIF ​​في Lightroom

                      الآن بعد أن عرفت كيفية عرض بيانات EXIF ​​في الصور باستخدام أدوات متنوعة، دعنا نلقي نظرة على كيفية استخراج الصور باستخدام بيانات EXIF ​​المحفوظة فيها. سأقوم بإجراء عملية التصدير في Lightroom، ولكن إذا كنت تستخدم أداة أخرى لمرحلة ما بعد المعالجة، فمن المفترض أن تكون قادرة على التعامل مع هذه العملية أيضًا. اختر الصورة التي تريد تصديرها، ثم انتقل إلى شاشة التصدير (ملف -> تصدير)، والتي ستظهر لك نافذة مثل هذه:


                      يوجد هنا حقل "البيانات الوصفية"، وهو ما يصف بيانات EXIF ​​التي سيتم استخراجها مع الصورة. إذا تم تحديد "All Metadata"، فسيتم تضمين جميع بيانات EXIF ​​في صورة JPEG الناتجة. هناك مربعا اختيار مهمان قد ترغب في إلقاء نظرة عليهما هنا. الأول هو "إزالة معلومات الشخص" والثاني هو "إزالة معلومات الموقع". إذا كنت تريد حماية خصوصيتك والتأكد من عدم استخراج معلوماتك الشخصية وموقعك عبر نظام تحديد المواقع العالمي (GPS)، فتأكد دائمًا من تحديد هذين المربعين، وهو أمر أوصي به.

                      على سبيل المثال، إذا قمت باستخراج صورة التقطتها بكاميرا تدعم نظام تحديد المواقع العالمي (GPS) أو هاتفك الذكي ولم يكن لديك حقل "إزالة معلومات الموقع" محددًا، فسيتم حفظ بيانات نظام تحديد المواقع العالمي (GPS) كجزء من بيانات EXIF، وقد يستخدمها شخص آخر تلك المعلومات لتتبع موقعك.

                      إذا كنت تريد أن تكون انتقائيًا بشأن نوع المعلومات التي تريد استخراجها من Lightroom، فيمكنك النقر فوق القائمة المنسدلة "تضمين" واختيار إعداد مختلف. على سبيل المثال، قد يرغب بعض المصورين في تجريد جميع بيانات EXIF ​​مع الاحتفاظ بمعلومات حقوق الطبع والنشر الخاصة بهم فقط. يمكنك تحقيق ذلك عن طريق تحديد "حقوق النشر فقط" من الحقل المنسدل.

                      إذا كنت قد قمت بالفعل باستخراج الصور وتريد تجريد بيانات EXIF ​​منها، أو إذا لم تكن أداة المعالجة اللاحقة لديك قادرة على إزالة بيانات EXIF، فقد ترغب في مراجعة القسم التالي من هذه المقالة.

                      تعليق


                      • #12
                        How to Remove EXIF Data


                        When sending images or exporting them from your post-processing software, you might be including sensitive data such as your GPS location in those images. That’s because most cameras today automatically embed this information into photographs by default. In this section, we will go through the process of removing EXIF data from your photographs using different tools.
                        Why Remove EXIF Data?


                        There are multiple reasons why you might want to remove EXIF fully or partially from files:
                        • To remove sensitive data such as your personal information and GPS location
                        • To post images to a low-bandwidth site and keep their sizes small
                        • To protect your work and hide information that reveals your camera gear, settings, and even post-processing adjustments
                        • To remove unnecessary junk from JPEG files to keep them smaller, yet retain important EXIF data such as camera exposure and equipment used.

                        I personally use the last reason to keep my files a little smaller and to make sure that unnecessary junk does not get written into my JPEG files. However, in many cases, you might want to remove sensitive data such as your GPS location from every image you are planning to send or upload on the web.

                        تعليق


                        • #13
                          كيفية إزالة بيانات exif

                          عند إرسال الصور أو تصديرها من برنامج المعالجة اللاحقة لديك، قد تقوم بتضمين بيانات حساسة مثل موقع gps الخاص بك في تلك الصور. وذلك لأن معظم الكاميرات اليوم تقوم تلقائيًا بتضمين هذه المعلومات في الصور الفوتوغرافية بشكل افتراضي. في هذا القسم، سنتناول عملية إزالة بيانات exif ​​من صورك الفوتوغرافية باستخدام أدوات مختلفة.

                          لماذا إزالة بيانات exif؟

                          هناك عدة أسباب وراء رغبتك في إزالة exif ​​كليًا أو جزئيًا من الملفات:

                          لإزالة البيانات الحساسة مثل معلوماتك الشخصية وموقع gps لنشر الصور على موقع ذو نطاق ترددي منخفض والحفاظ على أحجامها صغيرة لحماية عملك وإخفاء المعلومات التي تكشف عن معدات الكاميرا والإعدادات وحتى تعديلات ما بعد المعالجة لإزالة الملفات غير الضرورية غير الضرورية من jpeg لإبقائها أصغر حجمًا، مع الاحتفاظ ببيانات exif ​​المهمة مثل تعرض الكاميرا والمعدات المستخدمة.

                          أنا شخصياً أستخدم السبب الأخير لإبقاء ملفاتي أصغر قليلاً وللتأكد من عدم كتابة الرسائل غير الضرورية في ملفات jpeg الخاصة بي. ومع ذلك، في كثير من الحالات، قد ترغب في إزالة البيانات الحساسة مثل موقع gps الخاص بك من كل صورة تخطط لإرسالها أو تحميلها على الويب.

                          تعليق


                          • #14
                            What EXIF Data is Saved In Images


                            Let me first explain what EXIF data is written into a file. If you use Adobe products such as Photoshop or Lightroom for manipulating your images, EXIF Data typically consists of three parts: normal EXIF data that contains your camera settings, XMP Data that contains post-processing steps you took before the image was exported, and a thumbnail of the image. Here is a short excerpt from the linked Wikipedia article:
                            XMP also defines particular schemas for basic properties useful for recording the history of a resource as it passes through multiple processing steps, from being photographed, scanned, or authored as text, through photo editing steps (such as cropping or color adjustment), to assembly into a final image. XMP allows each software program or device along the way to add its own information to a digital resource, which can then be retained in the final digital file.

                            Is this good or bad? Storing XMP data in your original images certainly has its benefits, especially in case you lose your image catalog. Since all your post-processing adjustments are stored as XMP data either directly in the file (JPEG, TIFF and DNG), or in a separate XMP sidecar file (RAW), you can easily restore your image catalog without losing your edits.

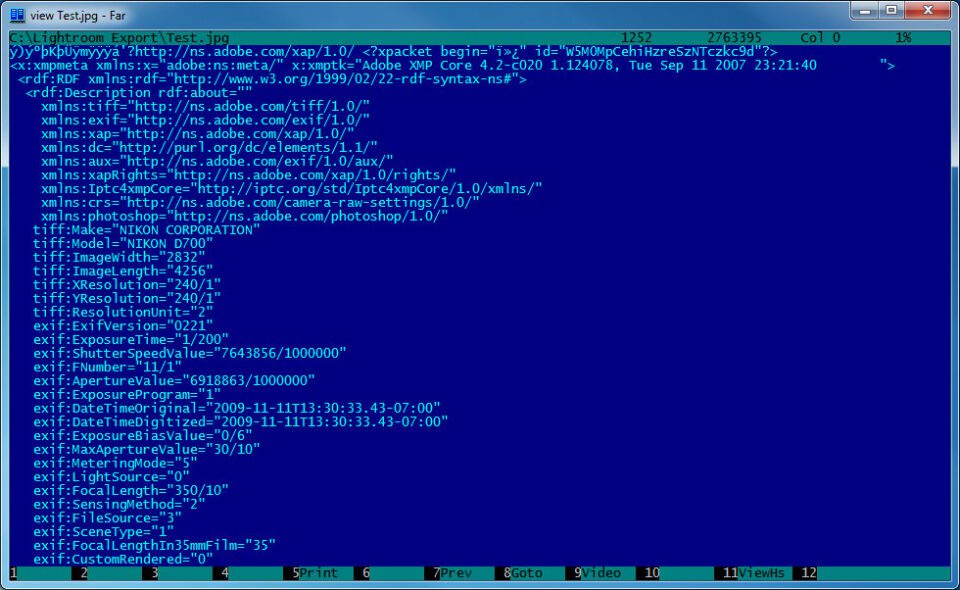
                            However, why would you want to keep all of that in your exported images Let’s look at a sample image that contains XMP Data:

                            I opened an image using an ASCII text editor and look at what’s in that file – that’s in addition to the EXIF data that is already stored in the file header. Scrolling down, I could see everything from White Balance to Saturation and Hue adjustments I used in Lightroom before exporting the image. Worst of all, the file even included ALL of the image history, including what I did in Photoshop and how many times the image was saved!

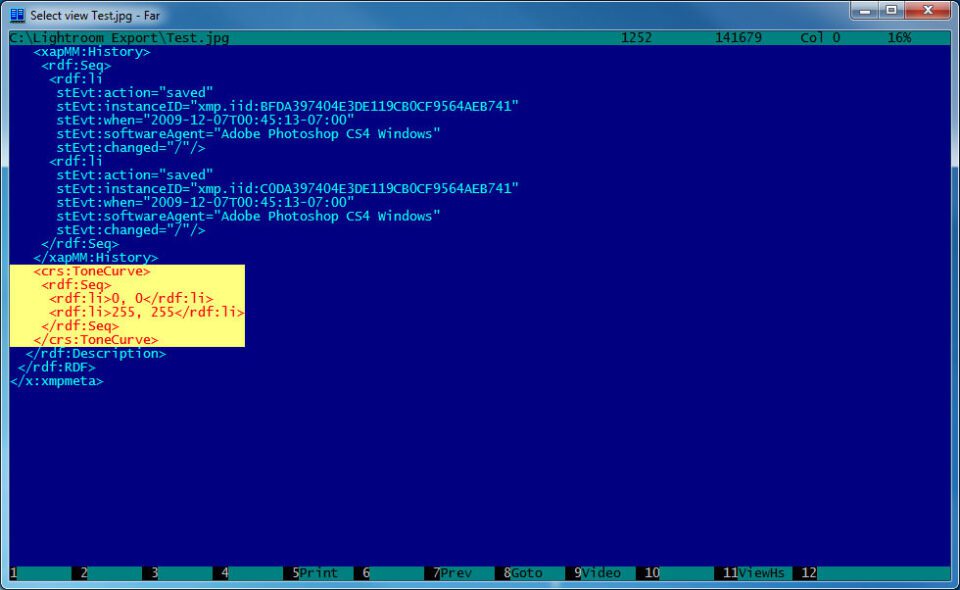
                            Take a look at the yellow area highlighted in this screenshot:

                            I applied Tone Curve to my image and as you can see, the history is right there. Imagine how large your files can grow if you work on them multiple times! In addition, why would you want to preserve the thumbnail of the image (saved inside the image) that is being exported for the web?

                            Let’s now talk about how you can either completely or partially remove both EXIF and XMP Data from an image. There are multiple ways to remove EXIF and XMP data from JPEG files – you can either remove it completely, or you can choose what to keep while deleting specifically what you want.

                            تعليق


                            • #15
                              ما هي بيانات EXIF ​​المحفوظة في الصور

                              اسمحوا لي أولاً أن أشرح ما هي بيانات EXIF ​​التي تتم كتابتها في الملف. إذا كنت تستخدم منتجات Adobe مثل Photoshop أو Lightroom لمعالجة صورك، فإن بيانات EXIF ​​تتكون عادةً من ثلاثة أجزاء: بيانات EXIF ​​العادية التي تحتوي على إعدادات الكاميرا، وبيانات XMP التي تحتوي على خطوات ما بعد المعالجة التي اتخذتها قبل تصدير الصورة، و الصورة المصغرة للصورة. فيما يلي مقتطف قصير من مقالة ويكيبيديا المرتبطة:

                              يحدد XMP أيضًا مخططات معينة للخصائص الأساسية المفيدة لتسجيل تاريخ المورد أثناء مروره عبر خطوات معالجة متعددة، بدءًا من تصويره أو مسحه ضوئيًا أو تأليفه كنص، مرورًا بخطوات تحرير الصور (مثل الاقتصاص أو ضبط اللون)، وحتى التجميع في الصورة النهائية. يسمح XMP لكل برنامج أو جهاز على طول الطريق بإضافة معلوماته الخاصة إلى مورد رقمي، والتي يمكن بعد ذلك الاحتفاظ بها في الملف الرقمي النهائي.

                              هل هذا جيد أم سيء؟ من المؤكد أن تخزين بيانات XMP في صورك الأصلية له فوائده، خاصة في حالة فقدان كتالوج الصور الخاص بك. نظرًا لأنه يتم تخزين جميع تعديلات ما بعد المعالجة كبيانات XMP إما مباشرةً في الملف (JPEG وTIFF وDNG)، أو في ملف XMP جانبي منفصل (RAW)، يمكنك بسهولة استعادة كتالوج الصور الخاص بك دون فقدان تعديلاتك.

                              ومع ذلك، لماذا تريد الاحتفاظ بكل ذلك في الصور المصدرة؟ دعنا نلقي نظرة على نموذج صورة يحتوي على بيانات XMP:


                              لقد فتحت صورة باستخدام محرر نصوص ASCII وألقيت نظرة على ما يوجد في هذا الملف - هذا بالإضافة إلى بيانات EXIF ​​المخزنة بالفعل في رأس الملف. بالتمرير لأسفل، تمكنت من رؤية كل شيء بدءًا من تعديلات توازن اللون الأبيض وحتى التشبع ودرجة اللون التي استخدمتها في Lightroom قبل تصدير الصورة. والأسوأ من ذلك كله، أن الملف يتضمن كل سجل الصور، بما في ذلك ما فعلته في Photoshop وعدد مرات حفظ الصورة!

                              ألقِ نظرة على المنطقة الصفراء الموضحة في لقطة الشاشة هذه:


                              لقد قمت بتطبيق Tone Curve على صورتي وكما ترون، فإن التاريخ موجود هناك. تخيل مدى حجم ملفاتك التي يمكن أن تنمو إذا عملت عليها عدة مرات! بالإضافة إلى ذلك، لماذا تريد الاحتفاظ بالصورة المصغرة (المحفوظة داخل الصورة) التي يتم تصديرها للويب؟

                              لنتحدث الآن عن كيفية إزالة بيانات EXIF ​​وXMP من الصورة كليًا أو جزئيًا. هناك طرق متعددة لإزالة بيانات EXIF ​​وXMP من ملفات JPEG - يمكنك إما إزالتها بالكامل، أو يمكنك اختيار ما تريد الاحتفاظ به أثناء حذف ما تريده على وجه التحديد.

                              تعليق

                              يعمل...
                              X