Photography Backup Workflow سير عمل النسخ الاحتياطي للتصوير الفوتوغرافي

تقليص
X
 
  • تصفية - فلترة
  • الوقت
  • عرض
إلغاء تحديد الكل
مشاركات جديدة

  • Photography Backup Workflow سير عمل النسخ الاحتياطي للتصوير الفوتوغرافي

    Photography Backup Workflow
    سير عمل النسخ الاحتياطي للتصوير الفوتوغرافي


    Don't underestimate the importance of a proper backup

    Data loss is a very painful experience that unfortunately many of us go through at some point in our lives. In my workshops, lectures and this website, I spend quite a bit of time advocating the need for a well-established workflow that incorporates solid backup strategies to prevent data loss. And during this process, I came across many different backup routines practiced by other photographers, some of which I found to be downright scary. You have probably heard of horror stories of professional photographers losing their life’s work, or wedding photographers losing images of weddings that they were not able to deliver to their clients yet.

    It sure happens, and it usually happens at the worst possible time too! It is one thing when you lose your personal data or photos, and totally another when you are dealing with a client who paid you money. I cannot imagine how one could even handle a situation with lost wedding photos, as it would be impossible to recreate those precious moments. Sadly, for many of us, it seems like data loss has to take place in order for us to seriously consider a solid backup strategy and workflow.

    But it does not have to! In this article, I will walk you through two scenarios for establishing a good photography backup workflow: a low-cost and painless workflow for hobbyists, and a much more serious workflow for enthusiasts and professionals. For the second scenario, I will reveal my own backup strategy.


    لا تقلل من أهمية النسخ الاحتياطي المناسب

    يعد فقدان البيانات تجربة مؤلمة للغاية يمر بها الكثير منا للأسف في مرحلة ما من حياتنا. في ورش العمل والمحاضرات وهذا الموقع، أقضي قدرًا كبيرًا من الوقت في الدفاع عن الحاجة إلى سير عمل راسخ يتضمن استراتيجيات نسخ احتياطي قوية لمنع فقدان البيانات. وخلال هذه العملية، صادفت العديد من إجراءات النسخ الاحتياطي المختلفة التي يمارسها مصورون آخرون، والتي وجدت بعضها مخيفًا تمامًا. ربما سمعتم عن قصص رعب لمصورين محترفين فقدوا عملهم، أو لمصوري حفلات زفاف فقدوا صور حفلات زفاف لم يتمكنوا من إيصالها لعملائهم بعد.

    من المؤكد أن هذا يحدث، وعادةً ما يحدث في أسوأ وقت ممكن أيضًا! إن فقدان بياناتك الشخصية أو صورك شيء، وشيء آخر تمامًا عندما تتعامل مع عميل دفع لك المال. لا أستطيع أن أتخيل كيف يمكن للمرء حتى التعامل مع الموقف مع فقدان صور الزفاف، لأنه سيكون من المستحيل إعادة خلق تلك اللحظات الثمينة. للأسف، بالنسبة للكثيرين منا، يبدو أن فقدان البيانات يجب أن يحدث حتى نتمكن من التفكير بجدية في استراتيجية نسخ احتياطي قوية وسير عمل.

    ولكن ليس من الضروري أن! في هذه المقالة، سأوجهك عبر سيناريوهين لإنشاء سير عمل جيد للنسخ الاحتياطي للتصوير الفوتوغرافي: سير عمل منخفض التكلفة وغير مؤلم للهواة، وسير عمل أكثر جدية للمتحمسين والمحترفين. بالنسبة للسيناريو الثاني، سأكشف عن استراتيجية النسخ الاحتياطي الخاصة بي.

  • #2
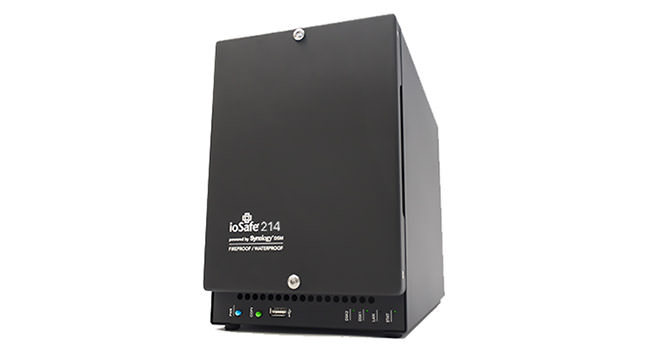
    ioSafe – a fireproof, waterproof network attached storage for backup
    Any time you deal with data, there is always a potential for partial or complete loss, and it is not a matter of “if”, but a matter of “when”. You might think your data sits safely on your computer and your external drive, but what if you lose both? Have you thought of a possibility of burglary, fire, flood or other natural disasters? What do you have in place today to protect your data from such catastrophes? If you have never thought of such questions, it might be a good time to revisit your workflow and make necessary adjustments, before it is too late.

    ioSafe - وحدة تخزين متصلة بالشبكة مقاومة للحريق ومقاومة للماء للنسخ الاحتياطي

    في أي وقت تتعامل فيه مع البيانات، هناك دائمًا احتمال فقدان جزئي أو كامل، والأمر ليس مسألة "إذا"، بل مسألة "متى". قد تعتقد أن بياناتك موجودة بشكل آمن على جهاز الكمبيوتر الخاص بك ومحرك الأقراص الخارجي، ولكن ماذا لو فقدت كليهما؟ هل فكرت في احتمالية السطو أو الحريق أو الفيضانات أو غيرها من الكوارث الطبيعية؟ ما الذي لديك اليوم لحماية بياناتك من مثل هذه الكوارث؟ إذا لم تفكر مطلقًا في مثل هذه الأسئلة، فقد يكون الوقت مناسبًا لإعادة النظر في سير عملك وإجراء التعديلات اللازمة، قبل فوات الأوان.

    تعليق


    • #3
      Table of Contentsجدول المحتويات

      ابدأ بسير عمل قوي، إدارة الملفات وتنظيمها، إدارة الملفات اليدوية، إدارة الملفات عبر البرامج، إدارة الملفات الهجينة، النهج البسيط: الهواة، ماذا عن التخزين السحابي؟ بطاقتي ذاكرة في الكاميرا، ضع بطاقة في جيبك انسخ الصور احتياطيًا على الفور أنشئ معاينات ذكية في LightroomSummary

      تعليق


      • #4
        Start with a Solid Workflow


        Before you think about a backup strategy, it is a good idea to revisit your current workflow process. Where do you import your images? Where do you store your images and how? Is there a single place where your data resides, or is it scattered in different locations?

        These are all very important questions to ask and if you do not have the answers or you are confused about the process, this is where you need to start. Personally, I like taking a simplistic approach to file management. I always import my images to a single folder and store them there, which makes it easy to locate, backup and potentially restore images.

        I organize images with a two-tiered approach: both on file system level and on software level (Lightroom), a process that I dubbed “hybrid file management”, which you can read about below. It is a very solid and proven approach, and I am happy to say that many photographers have successfully adopted it, using it actively as part of their workflows. Let’s discuss it in detail.

        If you have not read my article on photography workflow, now is the time to do it, as you need to understand what workflow stands for and what it is comprised of.

        Here are my recommendations on setting up a workflow process:
        • Do not reinvent the wheel – use best practices
        • Do not oversimplify
        • Do not overcomplicate
        • Do not dismiss important workflow components
        • Take time to establish a good, solid workflow
        • Once a solid workflow is established, stick to the same process for consistency and efficiency
        • If new technology is available or there is a faster/better way to do something, make your workflow flexible to modify it as needed
        • Look at all the recommended options before committing to a certain workflow process (again refer to point #1)

        تعليق


        • #5
          ابدأ بسير عمل متين

          قبل أن تفكر في استراتيجية النسخ الاحتياطي، من الجيد إعادة النظر في عملية سير العمل الحالية. أين تستورد صورك؟ أين تخزن صورك وكيف؟ هل هناك مكان واحد تتواجد فيه بياناتك، أم أنها منتشرة في مواقع مختلفة؟

          هذه كلها أسئلة مهمة جدًا يجب طرحها، وإذا لم يكن لديك الإجابات أو كنت في حيرة من أمرك بشأن العملية، فهذا هو المكان الذي يجب أن تبدأ فيه. أنا شخصياً أحب اتباع نهج مبسط لإدارة الملفات. أقوم دائمًا باستيراد الصور الخاصة بي إلى مجلد واحد وتخزينها هناك، مما يجعل من السهل تحديد موقع الصور ونسخها احتياطيًا وربما استعادتها.

          أقوم بتنظيم الصور باستخدام نهج ذي مستويين: سواء على مستوى نظام الملفات أو على مستوى البرنامج (Lightroom)، وهي عملية أطلق عليها اسم "إدارة الملفات المختلطة"، والتي يمكنك القراءة عنها أدناه. إنه نهج قوي ومثبت للغاية، ويسعدني أن أقول إن العديد من المصورين قد تبنوه بنجاح، واستخدموه بنشاط كجزء من سير عملهم. دعونا نناقش الأمر بالتفصيل.

          إذا لم تكن قد قرأت مقالتي عن سير عمل التصوير الفوتوغرافي، فهذا هو الوقت المناسب للقيام بذلك، حيث تحتاج إلى فهم ما يمثله سير العمل وما يتكون منه.

          فيما يلي توصياتي بشأن إعداد عملية سير العمل:

          لا تعيد اختراع العجلة - استخدم أفضل الممارسات. لا تبالغ في التبسيط. لا تبالغ في التعقيد. لا تتجاهل مكونات سير العمل المهمة. خذ وقتًا لإنشاء سير عمل جيد وقوي. بمجرد إنشاء سير عمل قوي، التزم بنفس العملية لتحقيق الاتساق والكفاءة. إذا كانت التكنولوجيا الجديدة متاحة أو كان هناك أسرع /طريقة أفضل لفعل شيء ما، اجعل سير عملك مرنًا لتعديله حسب الحاجة، انظر إلى جميع الخيارات الموصى بها قبل الالتزام بعملية سير عمل معينة (راجع مرة أخرى النقطة رقم 1)

          تعليق


          • #6
            File Management and Organization


            A major part of your workflow starts with the transfer of images from your camera to your computer. Whether you copy images or import them via software, you need to decide where and how you will be storing those images. And this is one of the most critical steps because it will define your backup strategy going forward.

            While some photographers prefer importing images first and organizing them later, I strongly oppose such practice, because it can lead to inconsistencies and other problems in the long run. My preference is to organize images at the time of import and if I never have a chance to revisit my files, it is not a big deal, as images were properly named and stored in the first place. This leads us to the importance of file management and organization – a topic I have written about a number of times in the past due to its importance.

            Another article that you should give a read, is on organizing photos in Lightroom. Whether you use Lightroom or any other software, I recommend that you check this article out, as I discuss the process of organizing and storing images in detail.

            In short, I store all images in a single folder called “Photos”, which is located in the root folder of my storage drive, and I group photos in folders by year and event name. A very simple and yet effective method of storing images that works for myself and thousands of other photographers. But how do you actually do it? Let’s take a look at two different methods – manual file management and file management via software.

            تعليق


            • #7
              إدارة وتنظيم الملفات

              يبدأ جزء كبير من سير عملك بنقل الصور من الكاميرا إلى جهاز الكمبيوتر الخاص بك. سواء قمت بنسخ الصور أو استيرادها عبر البرامج، عليك أن تقرر أين وكيف سيتم تخزين تلك الصور. وهذه إحدى الخطوات الأكثر أهمية لأنها ستحدد استراتيجية النسخ الاحتياطي الخاصة بك للمضي قدمًا.

              في حين أن بعض المصورين يفضلون استيراد الصور أولا وتنظيمها لاحقا، فأنا أعارض بشدة مثل هذه الممارسة، لأنها يمكن أن تؤدي إلى تناقضات ومشاكل أخرى على المدى الطويل. أفضلي هو تنظيم الصور في وقت الاستيراد، وإذا لم تتح لي الفرصة لزيارة ملفاتي مرة أخرى، فهذا ليس بالأمر الكبير، حيث تم تسمية الصور وتخزينها بشكل صحيح في المقام الأول. وهذا يقودنا إلى أهمية إدارة الملفات وتنظيمها، وهو موضوع كتبت عنه عدة مرات في الماضي لأهميته.

              هناك مقالة أخرى يجب عليك قراءتها وهي حول تنظيم الصور في Lightroom. سواء كنت تستخدم Lightroom أو أي برنامج آخر، أنصحك بمراجعة هذه المقالة، حيث أناقش عملية تنظيم الصور وتخزينها بالتفصيل.

              باختصار، أقوم بتخزين جميع الصور في مجلد واحد يسمى "الصور"، الموجود في المجلد الجذر لمحرك التخزين الخاص بي، وأقوم بتجميع الصور في مجلدات حسب السنة واسم الحدث. طريقة بسيطة جدًا وفعالة لتخزين الصور تناسبني أنا وآلاف المصورين الآخرين. ولكن كيف تفعل ذلك في الواقع؟ دعونا نلقي نظرة على طريقتين مختلفتين – إدارة الملفات يدويًا وإدارة الملفات عبر البرنامج.

              تعليق


              • #8
                Manual File Management


                Manual file management is the most simplistic approach to file management and organization since everything is done manually and it is something that you are already familiar with. You start by copying images to a designated folder, then you decide on the folder structure and where those files will reside in the file system, and finally, you name the files to your liking. You do this on the file system level, and the process is really no different than the process of transferring other files from external media. I detailed this process in my “how to organize pictures” article.

                Manual file management is simple because it is easy to understand. Those who do not use Lightroom, Bridge or other software with file management capabilities often end up using this process, and sometimes even quite effectively. Since one knows exactly where the files are going, it also simplifies the process of backing up images.

                However, there are many disadvantages to manual file management. First, it is quite inefficient, since traditional file systems are not designed and optimized for easy file management and indexing. Your computer might have the capability to preview your RAW images, but it surely has no way of reading the proprietary EXIF metadata in order to be able to filter through specific criteria, like the type of gear that was used, or the date when images were captured.

                Your operating system cannot go through this data and index it, to make it easily searchable for you. In addition, there is a big potential for file duplication, as your operating system has no clue about what photos you are copying – it just does what you want it to do. Even if you do efficiently manage files on the file system level, how would you be able to locate a specific photo without going through tens, hundreds or even thousands of images? That’s when file management via imaging software comes into play.

                تعليق


                • #9
                  إدارة الملفات يدويا

                  تعد إدارة الملفات اليدوية هي الطريقة الأكثر تبسيطًا لإدارة الملفات وتنظيمها نظرًا لأن كل شيء يتم يدويًا وهو أمر مألوف لديك بالفعل. تبدأ بنسخ الصور إلى مجلد معين، ثم تقرر بنية المجلد ومكان وجود هذه الملفات في نظام الملفات، وأخيرًا، تقوم بتسمية الملفات حسب رغبتك. يمكنك القيام بذلك على مستوى نظام الملفات، ولا تختلف العملية حقًا عن عملية نقل الملفات الأخرى من الوسائط الخارجية. لقد قمت بتفصيل هذه العملية في مقالتي "كيفية تنظيم الصور".

                  تعد إدارة الملفات يدويًا أمرًا بسيطًا لأنه من السهل فهمه. غالبًا ما ينتهي الأمر بأولئك الذين لا يستخدمون Lightroom أو Bridge أو أي برنامج آخر مزود بقدرات إدارة الملفات إلى استخدام هذه العملية، وأحيانًا بشكل فعال تمامًا. وبما أن الشخص يعرف بالضبط أين تذهب الملفات، فإنه يبسط أيضًا عملية النسخ الاحتياطي للصور.

                  ومع ذلك، هناك العديد من العيوب لإدارة الملفات يدويًا. أولاً، إنها غير فعالة تمامًا، نظرًا لأن أنظمة الملفات التقليدية لم يتم تصميمها وتحسينها لتسهيل إدارة الملفات وفهرستها. قد يتمتع جهاز الكمبيوتر الخاص بك بالقدرة على معاينة صور RAW، ولكن من المؤكد أنه ليس لديه طريقة لقراءة بيانات EXIF ​​الوصفية الخاصة حتى يتمكن من التصفية من خلال معايير محددة، مثل نوع المعدات المستخدمة أو تاريخ ظهور الصور. تم الاستيلاء عليها.

                  لا يمكن لنظام التشغيل الخاص بك الاطلاع على هذه البيانات وفهرستها، لجعلها قابلة للبحث بسهولة بالنسبة لك. بالإضافة إلى ذلك، هناك احتمال كبير لتكرار الملفات، حيث أن نظام التشغيل الخاص بك ليس لديه أدنى فكرة عن الصور التي تقوم بنسخها - فهو يفعل فقط ما تريد أن يفعله. حتى لو كنت تدير الملفات بكفاءة على مستوى نظام الملفات، فكيف ستتمكن من تحديد موقع صورة معينة دون المرور عبر عشرات أو مئات أو حتى آلاف الصور؟ وذلك عندما يتم تشغيل إدارة الملفات عبر برامج التصوير.

                  تعليق


                  • #10
                    File Management via Software


                    Whether you use Lightroom or any other file management software, the advantages of software that is capable of going through images and extracting information are numerous. First, such software, being a specialized tool for photography needs, can be very efficient in scanning through and gathering of valuable metadata, then indexing it for search purposes.

                    Software can reduce and potentially even eliminate duplication, which can save space and improve the efficiency of the backup process. Once indexed, images can be easily searchable in many different ways. For example, you can use Lightroom’s library filter to see what lenses you use the most, which is really neat. You can filter through specific metadata such as lens, camera and even find images captured at specific apertures and shutter speeds.

                    But just like any other process, file management with software certainly does have its own disadvantages. It is more complex to understand. It requires the creation and potential maintenance of a database catalog, which adds more steps to the backup process. If done improperly, it can result in files residing in different folders, drives, etc, making it difficult to identify file locations. And lastly, it is often impossible to share data and access it from multiple computers, making such a process potentially difficult to implement in workgroup environments.
                    إدارة الملفات عبر البرامج

                    سواء كنت تستخدم Lightroom أو أي برنامج آخر لإدارة الملفات، فإن مزايا البرنامج القادر على تصفح الصور واستخراج المعلومات عديدة. أولاً، يمكن أن تكون هذه البرامج، باعتبارها أداة متخصصة لاحتياجات التصوير الفوتوغرافي، فعالة جدًا في مسح البيانات الوصفية القيمة وجمعها، ثم فهرستها لأغراض البحث.

                    يمكن للبرامج أن تقلل من الازدواجية وربما تزيلها، الأمر الذي يمكن أن يوفر المساحة ويحسن كفاءة عملية النسخ الاحتياطي. بمجرد فهرستها، يمكن البحث بسهولة عن الصور بعدة طرق مختلفة. على سبيل المثال، يمكنك استخدام مرشح مكتبة Lightroom لمعرفة العدسات التي تستخدمها أكثر من غيرها، وهو أمر رائع حقًا. يمكنك التصفية من خلال بيانات وصفية محددة مثل العدسة والكاميرا وحتى العثور على الصور الملتقطة بفتحات وسرعات غالق محددة.

                    ولكن، تمامًا مثل أي عملية أخرى، فإن إدارة الملفات باستخدام البرامج لها بالتأكيد عيوبها الخاصة. إنه أكثر تعقيدًا للفهم. ويتطلب إنشاء كتالوج قاعدة البيانات وصيانته المحتملة، مما يضيف المزيد من الخطوات إلى عملية النسخ الاحتياطي. إذا تم القيام بذلك بشكل غير صحيح، فقد يؤدي ذلك إلى وجود ملفات في مجلدات ومحركات أقراص مختلفة وما إلى ذلك، مما يجعل من الصعب تحديد مواقع الملفات. وأخيرًا، غالبًا ما يكون من المستحيل مشاركة البيانات والوصول إليها من أجهزة كمبيوتر متعددة، مما يجعل تنفيذ مثل هذه العملية في بيئات مجموعات العمل أمرًا صعبًا.

                    تعليق


                    • #11
                      Hybrid File Management


                      What if you were able to combine the best of the two worlds to create the most efficient way to organize your photos? I came up with a name for such a process and called it “hybrid file management“.

                      I personally use this method, and after tens of thousands of images stored over a period of 12+ years (with very positive feedback from many other photographers), I would call it the ultimate way to organize images. In short, you get all the advantages of both manual file management and file management via software.

                      If executed right, you end up with very few disadvantages to worry about. The reason why hybrid file management works best, is because you organize images both on file system level and software level. If you ever lose your software catalog/database, you have enough information on file level to be able to easily rebuild that database from scratch. Since files are already properly named and sorted, you don’t have to worry about doing it again via software. You also do not lock yourself into using one particular software package – you could easily move to other software in the future with this approach.

                      So how does hybrid file management work? Below are some of the steps, which you can extract from the same article I pointed out above on organizing images in Lightroom:
                      1. First, decide on the master folder to store your photos, such as “Photos” or “Pictures”. Ideally, put it in a root folder of your storage drive, as previously explained.
                      2. Come up with a proper and consistent way to name files, so that you have enough information on the file system level to be able to quickly locate files. Ideally, each of your file names should contain the date (year, month and day) and the name of the event or sub-event, followed by a sequence number. For example “20200418-Jane and John Wedding-0001.NEF”
                      3. Import images using software such as Lightroom and create folder structure during the import process. Images should be renamed at the time of import.
                      4. Do not heavily rely on keywords and other software-based indexing criteria to reduce software dependency.
                      5. If you need to reorganize or rename images, do that through software to avoid potential mismatches between the database and the file system. Software such as Lightroom performs moving and renaming of images on the file system level, and automatically remaps images in the database after the completion of the process. Use the provided tools to mass-rename images when necessary.
                      6. After completing the editing process, force the software to write changes to each image (this will write changes to DNG files or force the creation of sidecar / XMP files), so that you do not lose your changes if your database gets corrupted or lost.

                      These steps are discussed in detail in the below video, where I demonstrate the file management capabilities of Lightroom:

                      https://www.youtube.com/watch?v=dBhVvU8ZD4w

                      Once you come up with a solid workflow and you organize your images, it is time to think of a backup strategy.

                      تعليق


                      • #12
                        إدارة الملفات الهجينة


                        ماذا لو تمكنت من الجمع بين أفضل ما في العالمين لإنشاء الطريقة الأكثر فعالية لتنظيم صورك؟ لقد توصلت إلى اسم لهذه العملية وأطلقت عليها اسم "إدارة الملفات المختلطة".

                        أنا شخصيًا أستخدم هذه الطريقة، وبعد تخزين عشرات الآلاف من الصور على مدار فترة تزيد عن 12 عامًا (مع تعليقات إيجابية للغاية من العديد من المصورين الآخرين)، أود أن أسميها الطريقة المثلى لتنظيم الصور. باختصار، يمكنك الحصول على جميع مزايا إدارة الملفات يدويًا وإدارة الملفات عبر البرنامج.

                        إذا تم تنفيذه بشكل صحيح، فسينتهي بك الأمر مع عدد قليل جدًا من العيوب التي تدعو للقلق. السبب وراء عمل إدارة الملفات المختلطة بشكل أفضل، هو أنك تقوم بتنظيم الصور على مستوى نظام الملفات ومستوى البرنامج. إذا فقدت كتالوج البرامج/قاعدة البيانات الخاصة بك، فلديك معلومات كافية عن مستوى الملف لتتمكن من إعادة بناء قاعدة البيانات هذه بسهولة من البداية. نظرًا لأن الملفات تم تسميتها وفرزها بشكل صحيح بالفعل، فلا داعي للقلق بشأن القيام بذلك مرة أخرى عبر البرنامج. كما أنك لا تقيد نفسك باستخدام حزمة برامج معينة - حيث يمكنك بسهولة الانتقال إلى برامج أخرى في المستقبل باستخدام هذا النهج.

                        إذًا كيف تعمل إدارة الملفات المختلطة؟ فيما يلي بعض الخطوات، التي يمكنك استخراجها من نفس المقالة التي أشرت إليها أعلاه حول تنظيم الصور في Lightroom: أولاً، حدد المجلد الرئيسي لتخزين صورك، مثل "الصور" أو "الصور". من الناحية المثالية، ضعه في المجلد الجذر لمحرك التخزين الخاص بك، كما هو موضح سابقًا. توصل إلى طريقة مناسبة ومتسقة لتسمية الملفات، بحيث يكون لديك معلومات كافية على مستوى نظام الملفات لتتمكن من تحديد موقع الملفات بسرعة. من الناحية المثالية، يجب أن يحتوي كل اسم من أسماء ملفاتك على التاريخ (السنة والشهر واليوم) واسم الحدث أو الحدث الفرعي، متبوعًا برقم تسلسلي. على سبيل المثال "20200418-Jane and John Wedding-0001.NEF"قم باستيراد الصور باستخدام برنامج مثل Lightroom وإنشاء بنية المجلد أثناء عملية الاستيراد. يجب إعادة تسمية الصور في وقت الاستيراد. لا تعتمد بشكل كبير على الكلمات الأساسية ومعايير الفهرسة المستندة إلى البرامج الأخرى لتقليل اعتماد البرامج. إذا كنت بحاجة إلى إعادة تنظيم الصور أو إعادة تسميتها، فافعل ذلك من خلال البرنامج لتجنب عدم التطابق المحتمل بين قاعدة البيانات وقاعدة البيانات. نظام الملفات. تقوم برامج مثل Lightroom بنقل الصور وإعادة تسميتها على مستوى نظام الملفات، وإعادة تعيين الصور تلقائيًا في قاعدة البيانات بعد اكتمال العملية. استخدم الأدوات المتوفرة لإعادة تسمية الصور بشكل جماعي عند الضرورة. بعد الانتهاء من عملية التحرير، أجبر البرنامج على كتابة تغييرات على كل صورة (سيؤدي هذا إلى كتابة تغييرات على ملفات DNG أو فرض إنشاء ملفات Sidecar / XMP)، حتى تتمكن من القيام بذلك لا تفقد تغييراتك في حالة تلف قاعدة البيانات الخاصة بك أو فقدانها.
                        تتم مناقشة هذه الخطوات بالتفصيل في الفيديو أدناه، حيث أقوم بتوضيح إمكانيات إدارة الملفات في Lightroom:
                        (نعتذر لعدم توفر الفديو باللغة العربية)
                        ​​​​​​https://www.youtube.com/watch?v=dBhVvU8ZD4w

                        بمجرد التوصل إلى سير عمل قوي وتنظيم الصور الخاصة بك، فقد حان الوقت للتفكير في استراتيجية النسخ الاحتياطي.

                        تعليق


                        • #13
                          The Simple Approach: Hobbyists


                          What is the “bare minimum”, low-cost approach for performing backups if you are a hobbyist? Beginner photographers cringe when looking at complex backup strategies of enthusiasts and pros, because the process can be over-the-head complex and very expensive.

                          So if you are just starting out, I recommend a simpler and more cost-effective approach for backups. No, I won’t suggest keeping your images on your memory card as a backup – that is not good enough even for a beginner! You want to make sure that you are protected against two main potential problems: hard drive failure and loss / theft / natural disaster.

                          Basically, always keep two backups, at the minimum, in two separate physical locations. The second part is very important. Do not just rely on keeping one single backup or multiple backups in a single location. This is something you should not skip on and it should become a good habit in the future.

                          Hard drives fail and having another backup will certainly give you peace of mind. But it won’t protect you from theft, flood, fire or other natural disasters. So while buying that external drive for backups, make it two in order to have two copies of the same data. Establish an offsite backup routine, depending on how often you shoot and how important your pictures are for you – have a weekly, monthly or quarterly process of updating your offsite backups to keep that data somewhat fresh.

                          The good news is, hard drives are very cheap nowadays. You can buy a small, portable, large capacity hard drive for less than $100. Just buy two of those and store the second drive somewhere safe, preferably away from where you live. If you do not want to pay for storage services, perhaps you could ask your parents or your relatives to store that drive for you. If it is too much of a hassle, just get a storage box in your local post office or bank and make it a routine to drop off the updated backups.

                          As for the backup process itself, you can do it manually at zero cost, which would require copying and overwriting files each time, or you could pay $20-50 to buy backup software that will back up your photos automatically. There are many different software and hardware solutions out there to accomplish automated file backups. Apple offers Time Capsule, and there are literally hundreds, if not thousands of backup software suites. For backing up my PCs at home, I have used Acronis software successfully for many years, and it works great. You can backup and restore not only individual files but also entire volumes and partitions if needed.

                          So here is the quick summary:
                          1. At the minimum, buy two external drives for backups.
                          2. Backup to one drive on a continuous basis either using automated software tools or manual file copy.
                          3. Backup to the second drive as often as you will be taking it offsite. You can rotate the two drives, but you have to make sure that you are not just doing incremental/differential backups – you have to have full backups for rotation.

                          If you follow this process, you will have your images stored in three places: your computer, an external drive connected to your computer and another external drive that is sitting in an offsite location.

                          تعليق


                          • #14
                            النهج البسيط: الهواة

                            ما هو النهج "الحد الأدنى" ومنخفض التكلفة لإجراء النسخ الاحتياطية إذا كنت من الهواة؟ يشعر المصورون المبتدئون بالإحباط عند النظر إلى استراتيجيات النسخ الاحتياطي المعقدة التي يستخدمها المتحمسون والمحترفون، لأن العملية يمكن أن تكون معقدة للغاية ومكلفة للغاية.

                            لذا، إذا كنت بدأت للتو، فإنني أوصي باتباع نهج أبسط وأكثر فعالية من حيث التكلفة للنسخ الاحتياطي. لا، لن أقترح الاحتفاظ بصورك على بطاقة الذاكرة الخاصة بك كنسخة احتياطية - فهذا ليس جيدًا بما يكفي حتى بالنسبة للمبتدئين! أنت تريد التأكد من أنك محمي ضد مشكلتين رئيسيتين محتملتين: فشل القرص الصلب والخسارة / السرقة / الكوارث الطبيعية.

                            بشكل أساسي، احتفظ دائمًا بنسختين احتياطيتين، على الأقل، في موقعين فعليين منفصلين. الجزء الثاني مهم جدا. لا تعتمد فقط على الاحتفاظ بنسخة احتياطية واحدة أو نسخ احتياطية متعددة في مكان واحد. هذا شيء لا يجب عليك تخطيه ويجب أن يصبح عادة جيدة في المستقبل.

                            تفشل محركات الأقراص الثابتة ومن المؤكد أن الحصول على نسخة احتياطية أخرى سيمنحك راحة البال. ولكنها لن تحميك من السرقة أو الفيضانات أو الحرائق أو غيرها من الكوارث الطبيعية. لذا، أثناء شراء محرك الأقراص الخارجي هذا للنسخ الاحتياطي، اجعله اثنين حتى تحصل على نسختين من نفس البيانات. أنشئ روتينًا للنسخ الاحتياطي خارج الموقع، اعتمادًا على عدد مرات التصوير ومدى أهمية صورك بالنسبة لك - قم بإجراء عملية أسبوعية أو شهرية أو ربع سنوية لتحديث النسخ الاحتياطية خارج الموقع للحفاظ على تلك البيانات حديثة إلى حد ما.

                            والخبر السار هو أن محركات الأقراص الصلبة رخيصة جدًا هذه الأيام. يمكنك شراء محرك أقراص ثابتة صغير ومحمول وكبير السعة بأقل من 100 دولار. ما عليك سوى شراء اثنين منها وتخزين محرك الأقراص الثاني في مكان آمن، ويفضل أن يكون بعيدًا عن المكان الذي تعيش فيه. إذا كنت لا ترغب في الدفع مقابل خدمات التخزين، فربما يمكنك أن تطلب من والديك أو أقاربك تخزين محرك الأقراص هذا لك. إذا كان الأمر يمثل الكثير من المتاعب، فما عليك سوى الحصول على صندوق تخزين في مكتب البريد المحلي أو البنك الخاص بك وجعل تسليم النسخ الاحتياطية المحدثة أمرًا روتينيًا.

                            أما بالنسبة لعملية النسخ الاحتياطي نفسها، فيمكنك القيام بذلك يدويًا دون أي تكلفة، الأمر الذي يتطلب نسخ الملفات والكتابة فوقها في كل مرة، أو يمكنك دفع 20 إلى 50 دولارًا لشراء برنامج النسخ الاحتياطي الذي سيعمل على نسخ صورك احتياطيًا تلقائيًا. هناك العديد من حلول البرامج والأجهزة المختلفة المتوفرة لإنجاز النسخ الاحتياطية التلقائية للملفات. تقدم شركة Apple Time Capsule، وهناك المئات، إن لم يكن الآلاف، من مجموعات برامج النسخ الاحتياطي. لإجراء نسخ احتياطي لأجهزة الكمبيوتر الشخصية في المنزل، استخدمت برنامج Acronis بنجاح لسنوات عديدة، وهو يعمل بشكل رائع. يمكنك النسخ الاحتياطي واستعادة ليس فقط الملفات الفردية ولكن أيضًا وحدات التخزين والأقسام بأكملها إذا لزم الأمر.

                            إذن هذا هو الملخص السريع:

                            على الأقل، قم بشراء محركي أقراص خارجيين للنسخ الاحتياطي. قم بالنسخ الاحتياطي لمحرك أقراص واحد بشكل مستمر إما باستخدام أدوات البرامج الآلية أو نسخ الملفات يدويًا. قم بالنسخ الاحتياطي إلى محرك الأقراص الثاني بقدر ما ستأخذه خارج الموقع. يمكنك تدوير محركي الأقراص، ولكن عليك التأكد من أنك لا تقوم فقط بعمل نسخ احتياطية تزايدية/تفاضلية - بل يجب أن يكون لديك نسخ احتياطية كاملة للتدوير.

                            إذا اتبعت هذه العملية، فسيتم تخزين صورك في ثلاثة أماكن: جهاز الكمبيوتر الخاص بك، ومحرك أقراص خارجي متصل بجهاز الكمبيوتر الخاص بك، ومحرك أقراص خارجي آخر موجود في مكان خارج الموقع.

                            تعليق


                            • #15
                              What About Cloud Storage?


                              With cloud storage getting incredibly cheap and potentially even free, you might wonder if it is worth keeping your backups on the cloud. Companies like Adobe, Dropbox, Amazon, Google and many others have been offering free limited storage or practically unlimited storage if you subscribe to their services.

                              For example, if you are an Amazon Prime member, you can get a ton of storage for your photos without extra cost. And you can upload not only JPEG images but also RAW files as well, as detailed on this page. Sounds great, doesn’t it? Why wouldn’t you skip on the second external drive, since the “Cloud” can be considered an offsite backup?

                              Well, it all depends on how much you shoot and what your upload bandwidth is like. Unless you live in an area where providers can supply you with a boatload of upload bandwidth, trying to upload your entire collection of photos might take a very long time. I would start by estimating the total storage that your photos are currently consuming. If it is reasonable, and your bandwidth can keep up without angering your ISP, then go right ahead. It will save you the hassle of going offsite for backups.

                              In case your computer hard drive dies, you have a backup of your files on an external drive. If both fail, you still either have the offsite backup, or a backup in the cloud depending on which route you take. With this method, you won’t risk losing everything you have, as the likelihood of all three failing or disappearing on you is extremely small.

                              تعليق

                              يعمل...
                              X