How Was This Picture Made #05? كيف تم تصوير هذه الصورة رقم 05؟

تقليص
X
 
  • تصفية - فلترة
  • الوقت
  • عرض
إلغاء تحديد الكل
مشاركات جديدة

  • How Was This Picture Made #05? كيف تم تصوير هذه الصورة رقم 05؟

    How Was This Picture Made #05?
    كيف تم تصوير هذه الصورة رقم 05؟

    For Part 5 of our How Was This Picture Taken series, I present to you: this portrait.
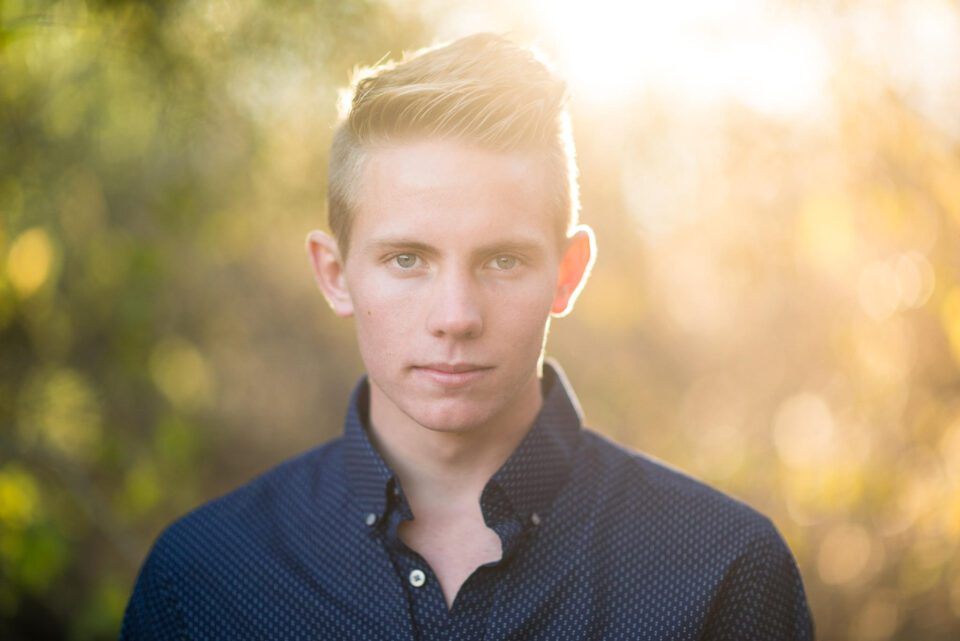


    This is Sander. We worked together to create some high school senior portraits a few years ago and this has to be one of my favorite images from the day. While it might look like a fairly straightforward portrait, I’ll admit that there was a bit of work done on it in post production. My question to you is: how was this picture created?

    A few things to consider:
    • What camera and lens were used?
    • What camera settings were used?
    • What was the light source (or sources)?
    • What was done in post production?
    • What was the setting where this image was taken?
    • Just for fun, at what point in our portrait session was this created? (thanks to Spencer’s post for making me think of this question)
    كيف تم صنع هذه الصورة رقم 05؟

    بالنسبة للجزء الخامس من سلسلة كيف تم التقاط هذه الصورة، أقدم لكم: هذه الصورة.


    ​

    هذا ساندر. لقد عملنا معًا لإنشاء بعض الصور الشخصية لكبار السن في المدرسة الثانوية منذ بضع سنوات مضت، ويجب أن تكون هذه إحدى الصور المفضلة لدي في ذلك اليوم. على الرغم من أنها قد تبدو وكأنها صورة واضحة إلى حد ما، إلا أنني أعترف أنه كان هناك القليل من العمل المنجز عليها في مرحلة ما بعد الإنتاج. سؤالي لك هو: كيف تم إنشاء هذه الصورة؟

    بعض الأشياء التي يجب وضعها في الاعتبار: ما هي الكاميرا والعدسة المستخدمة؟ ما هي إعدادات الكاميرا المستخدمة؟ ما هو مصدر الضوء (أو المصادر)؟ ما الذي تم فعله في مرحلة ما بعد الإنتاج؟ ما هو الإعداد الذي تم التقاط هذه الصورة فيه؟ للمتعة فقط، في أي نقطة من جلسة التصوير الشخصية الخاصة بنا تم إنشاء هذا؟ (شكرًا لمشاركة سبنسر التي جعلتني أفكر في هذا السؤال)

  • #2
    How Was This Picture Made #05: The Answer

    Earlier this week I posted a portrait as the next installment to our How Was This Picture Taken series. Most of our readers took this as an opportunity to stretch their brains a bit and try to use visual clues within an image to figure out how it was taken. They are rewarded all of the internet points.* A few, missing the entire point of the post in an effort to be “right”, decided to go directly to the image’s EXIF data and rattle off the technical details of the image. They are rewarded zero internet points.*

    *internet points are imaginary, useless and non-redeemable for anything except for maybe bragging rights


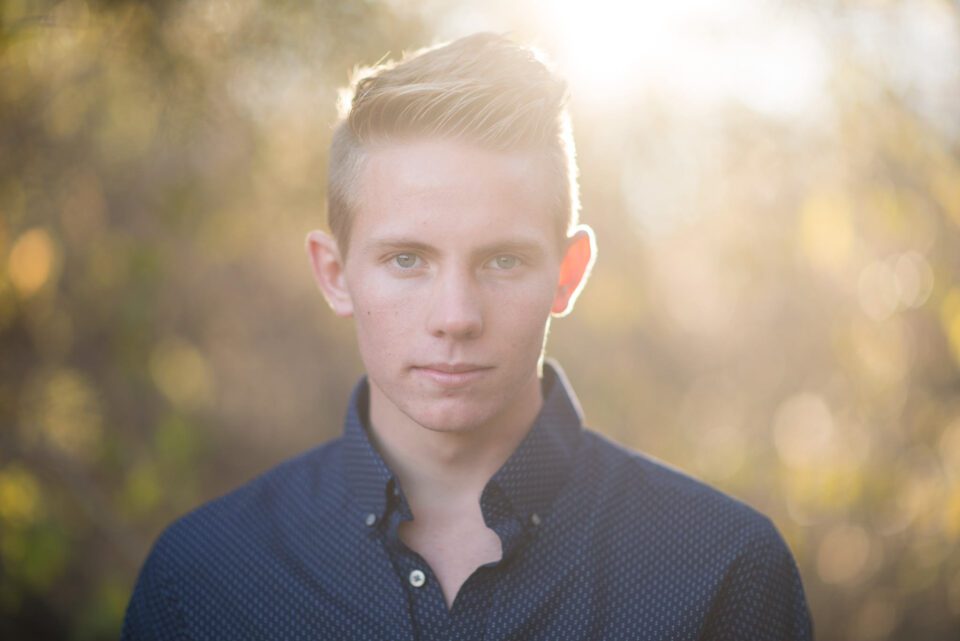
    If you need a refresher, here is the original post and the photo in question (this time with metadata). I highly suggest you click on the image and view it that way versus embedded in the post. The image quality is better and it’s easy to compare to the next image:
    NIKON D800 + 85mm f/1.4 @ 85mm, ISO 200, 1/640, f/1.4

    كيف تم صنع هذه الصورة #05: الجواب

    ​​​​​​​في وقت سابق من هذا الأسبوع، قمت بنشر صورة شخصية باعتبارها الجزء التالي من سلسلة How Was This Picture Taken. انتهز معظم قرائنا هذه الفرصة لتمديد أدمغتهم قليلاً ومحاولة استخدام الأدلة المرئية داخل الصورة لمعرفة كيفية التقاطها. لقد تمت مكافأتهم بجميع نقاط الإنترنت.* قرر عدد قليل منهم، الذين أخطأوا الهدف بأكمله من المنشور في محاولة ليكونوا "على حق"، الانتقال مباشرة إلى بيانات EXIF ​​الخاصة بالصورة والتحدث عن التفاصيل الفنية للصورة. يتم مكافأتهم بصفر نقاط إنترنت.*

    *نقاط الإنترنت وهمية وغير مجدية وغير قابلة للاستبدال بأي شيء باستثناء حقوق التفاخر


    إذا كنت بحاجة إلى تجديد المعلومات، فإليك المنشور الأصلي والصورة المعنية (هذه المرة مع البيانات الوصفية). أقترح عليك بشدة النقر على الصورة ومشاهدتها بهذه الطريقة بدلاً من تضمينها في المنشور. جودة الصورة أفضل ومن السهل مقارنتها بالصورة التالية:
    ​نيكون D800 + 85 مم f/1.4 @ 85 مم، ISO 200، 1/640، f/1.4

    تعليق


    • #3
      As you can see from the caption with the metadata information, I used a full frame camera with an 85mm lens at an aperture of f/1.4. This is my go-to camera/lens combination for portraits like this. Whenever possible I shoot at f/1.4, which gives the background a beautiful, dreamy look like you see here. A few people guessed that I spot metered for the face, which is indeed what I did.

      This image was taken in Fort Collins, CO near the Poudre River. I positioned Sander about 10 feet in front of some bushes that were growing near the river. With the sun behind him, there were specular highlights on the leaves from the direct sun that was hitting them. At an aperture of f/1.4, these highlights turned into the soft, appealing bokeh you see here.

      Since the sun was behind him, I also used a white reflector to add a bit of fill light to the side of his face that was away from the sun (due to the reflector, you can see a very soft shadow from his collar on his neck). Some people guessed that I used a secondary light source like a strip light or an LED panel for fill, but this wasn’t the case. I had him standing in open shade with plenty of light coming from the sky (which created the horizontal catch lights in his eyes) to keep shadows to a minimum. No additional lighting was used to compliment the sun.
      كما ترون من التعليق الذي يحتوي على معلومات البيانات الوصفية، استخدمت كاميرا كاملة الإطار مع عدسة مقاس 85 مم بفتحة f/1.4. هذه هي مجموعة الكاميرا/العدسة التي أستخدمها لالتقاط صور مثل هذه. كلما كان ذلك ممكنًا، أقوم بالتقاط f/1.4، مما يمنح الخلفية مظهرًا جميلاً وحالمًا كما ترون هنا. لقد خمن عدد قليل من الناس أنني قمت بقياس قياس الوجه، وهو ما فعلته بالفعل.

      تم التقاط هذه الصورة في فورت كولينز بولاية كولورادو بالقرب من نهر بودري. لقد وضعت ساندر على بعد حوالي 10 أقدام أمام بعض الشجيرات التي كانت تنمو بالقرب من النهر. مع وجود الشمس خلفه، كانت هناك نقاط مضيئة على الأوراق من أشعة الشمس المباشرة التي كانت تضربها. عند فتحة f/1.4، تحولت هذه النقاط البارزة إلى البوكيه الناعم والجذاب الذي تراه هنا.

      نظرًا لأن الشمس كانت خلفه، فقد استخدمت أيضًا عاكسًا أبيض لإضافة القليل من الضوء إلى جانب وجهه الذي كان بعيدًا عن الشمس (بسبب العاكس، يمكنك رؤية ظل ناعم جدًا من ياقته على قميصه). رقبة). خمن بعض الأشخاص أنني استخدمت مصدرًا ثانويًا للضوء مثل شريط الإضاءة أو لوحة LED للتعبئة، لكن لم يكن هذا هو الحال. لقد جعلته يقف في الظل المفتوح مع الكثير من الضوء القادم من السماء (مما أدى إلى ظهور أضواء أفقية في عينيه) لتقليل الظل إلى الحد الأدنى. لم يتم استخدام إضاءة إضافية لتكمل الشمس.

      تعليق


      • #4
        Now let’s take a look at the original (again, click on it and you can easily toggle back and forth between the original and final image):
        NIKON D800 + 85mm f/1.4 @ 85mm, ISO 200, 1/640, f/1.4
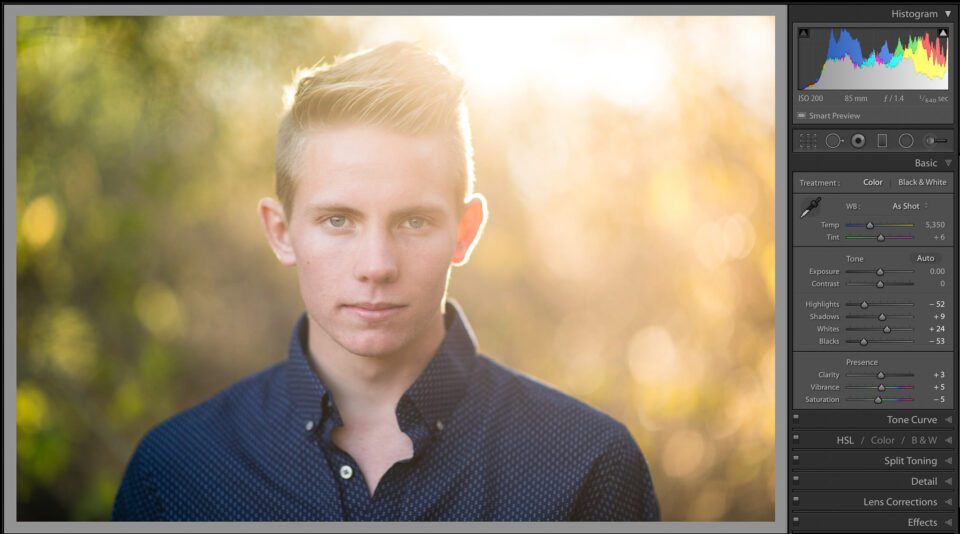
        Can you tell what was done to it? You should be able to tell that it’s now warmer and has more contrast than the original. Here’s a screenshot of my Lightroom settings so you can see what I did:
        Lightroom Screenshot With Develop Settings

        الآن دعونا نلقي نظرة على الصورة الأصلية (مرة أخرى، انقر عليها ويمكنك التبديل بسهولة بين الصورة الأصلية والصورة النهائية):

        كاميرا نيكون D800 + 85 مم f/1.4 @ 85 مم، ISO 200، 1/640، f/1.4

        هل يمكنك معرفة ما تم فعله به؟ يجب أن تكون قادرًا على معرفة أنه أصبح الآن أكثر دفئًا وبه تباين أكبر من الأصل. فيما يلي لقطة شاشة لإعدادات Lightroom الخاصة بي حتى تتمكن من رؤية ما قمت به:

         لقطة شاشة Lightroom مع إعدادات التطوير

        تعليق


        • #5
          Not shown in these settings are also a slight curve adjustment to make everything pop a bit more and split toning to warm things up a bit. I also used Lightroom’s lens correction for the particular lens I used. If you compare the original to the edited version, you’ll also see that I removed a few small blemishes, which is pretty standard for any portrait work. No additional masking or dodging of Sander’s face was involved.

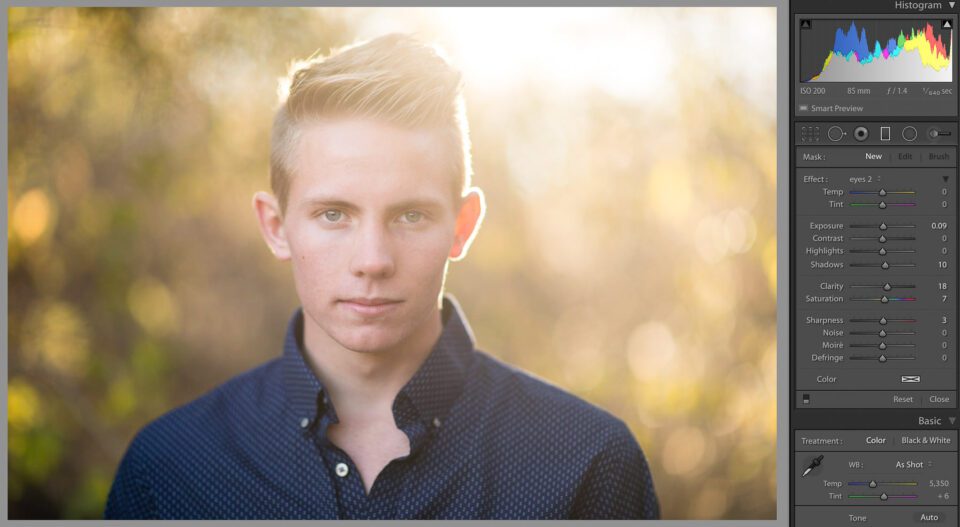
          You might think this is all I did to this image. I could have stopped there and been happy, but since I liked this image so much, I wanted to add just a little something extra. Maybe if you look at the image without it you’ll be able to notice:
          Lightroom Screenshot With No Gradients
          لا يظهر في هذه الإعدادات أيضًا تعديل طفيف للمنحنى لجعل كل شيء بارزًا أكثر قليلاً وتقسيم التنغيم لتدفئة الأشياء قليلاً. لقد استخدمت أيضًا تصحيح عدسة Lightroom للعدسة المحددة التي استخدمتها. إذا قارنت النسخة الأصلية بالنسخة المعدلة، فستلاحظ أيضًا أنني قمت بإزالة بعض العيوب الصغيرة، وهو أمر قياسي جدًا لأي عمل بورتريه. لم يكن هناك أي إخفاء أو تهرب إضافي لوجه ساندر.

          قد تعتقد أن هذا هو كل ما فعلته بهذه الصورة. كان بإمكاني أن أتوقف عند هذا الحد وأكون سعيدًا، ولكن بما أنني أحببت هذه الصورة كثيرًا، أردت إضافة شيء إضافي بسيط. ربما إذا نظرت إلى الصورة بدونها ستتمكن من ملاحظة:

           لقطة شاشة Lightroom بدون تدرجات

          تعليق


          • #6
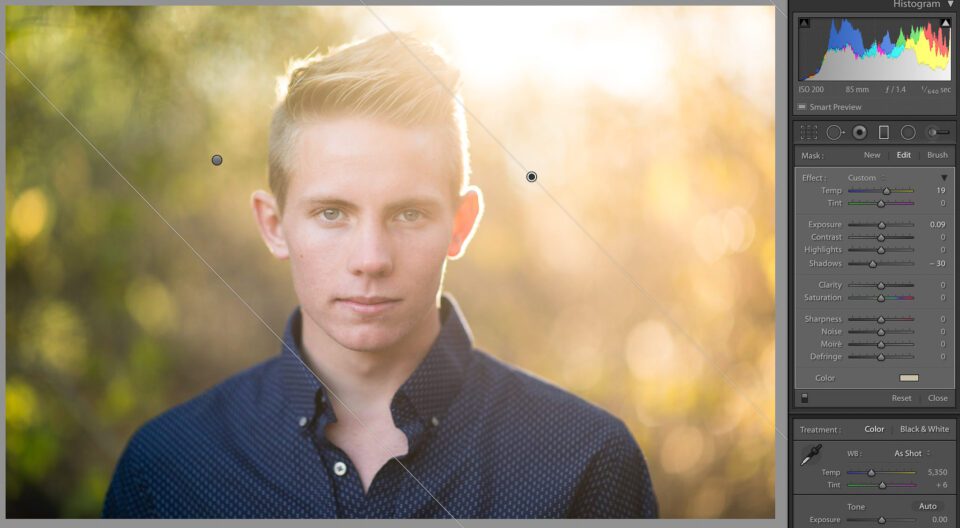
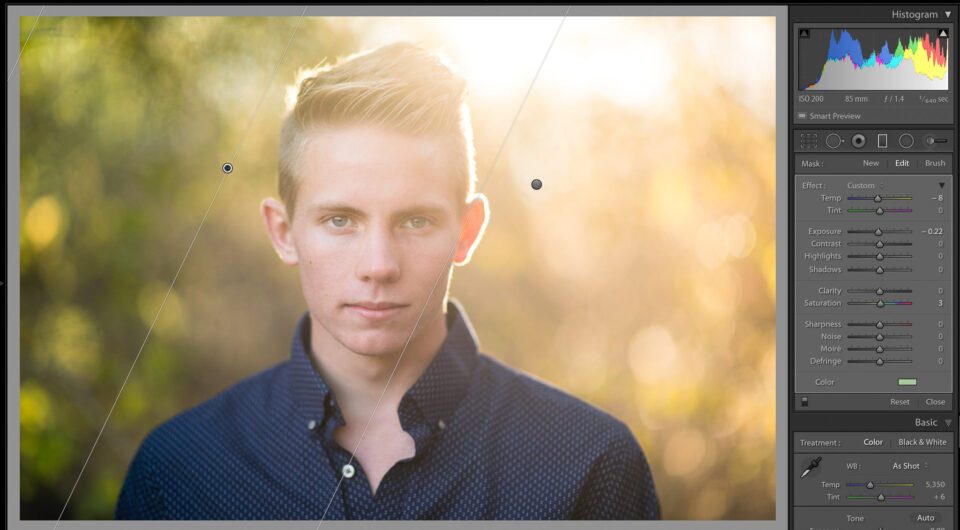
            Doesn’t it look more plain? That’s because I added two colored gradients, one to each side. I added a slightly overexposed light yellow gradient coming from the top-right corner (which enhances the sunlight) and a slightly underexposed green gradient coming from the upper-left side (which enhances the foliage).

            Here are screen shots of both gradients and their settings:
            Lightroom Screenshot With Yellow GradientLightroom Screenshot With Green Gradient
            ألا يبدو الأمر أكثر وضوحًا؟ وذلك لأنني أضفت تدرجين لونيين، واحد لكل جانب. أضفت تدرجًا أصفر فاتحًا مفرط التعريض قليلاً قادمًا من الزاوية العلوية اليمنى (مما يعزز ضوء الشمس) وتدرجًا أخضر منخفض التعريض قليلاً قادمًا من الجانب العلوي الأيسر (مما يعزز أوراق الشجر).

            فيما يلي لقطات شاشة لكل من التدرجات وإعداداتها:

             لقطة شاشة Lightroom مع التدرج الأصفر  لقطة شاشة Lightroom مع التدرج الأخضر

            تعليق


            • #7
              Once you know to look for it, this is an effect you’ll see used occasionally in portrait and wedding photography. I never try to go too crazy with it (some people add reds, blues and other colors), but it does come in useful when you want to add a little something extra, yet subtle, to your images. I should also note that this was done before Lightroom introduced the ability to use an eraser brush on portions of a gradient, so if you look closely you might see a very slight tint of green on his hair.

              Finally, at what point during the photo session did I take this photo? This was one of the last images of the day. I find that almost everyone starts out portrait sessions wanting to do big “cheese” smiles. That’s what we’re taught to do in front of the camera from the time we’re old enough to smile. Photos of a nice big smile are great, but I also like to get some that are more calm and relaxed, as it’s actually a more natural look for our faces (not to mention most teenagers prefer a more “moody” photo to a big smile). This is difficult to do until the end of a session. By that point, my subjects trust me and are more willing to do something a little different, even if it’s only as simple as not smiling for a photo.

              Hopefully this was fun for you and you learned something along the way. It was great reading all of your guesses and responses. Thanks for playing along and I’ll be on the lookout for another photo to use for the next How Was This Picture Taken!

              تعليق


              • #8
                بمجرد أن تعرف أنك تبحث عنه، فهذا هو التأثير الذي ستراه يستخدم أحيانًا في التصوير الفوتوغرافي للصور الشخصية وحفلات الزفاف. لا أحاول أبدًا أن أكون مجنونًا به (بعض الأشخاص يضيفون اللون الأحمر والأزرق والألوان الأخرى)، ولكنه يكون مفيدًا عندما تريد إضافة شيء إضافي بسيط، ولكنه دقيق، إلى صورك. يجب أن أشير أيضًا إلى أن هذا تم قبل أن يقدم Lightroom القدرة على استخدام فرشاة ممحاة على أجزاء متدرجة، لذلك إذا نظرت عن كثب قد ترى لونًا خفيفًا جدًا من اللون الأخضر على شعره.

                أخيرًا، في أي وقت أثناء جلسة التصوير قمت بالتقاط هذه الصورة؟ وكانت هذه واحدة من الصور الأخيرة لهذا اليوم. أجد أن الجميع تقريبًا يبدأون جلسات التصوير ويرغبون في رسم ابتسامات "الجبن" الكبيرة. هذا ما تعلمنا أن نفعله أمام الكاميرا منذ أن وصلنا إلى سن الابتسام. تعد صور الابتسامة الكبيرة اللطيفة أمرًا رائعًا، ولكني أحب أيضًا الحصول على صور أكثر هدوءًا واسترخاء، لأنها في الواقع تبدو أكثر طبيعية لوجوهنا (ناهيك عن أن معظم المراهقين يفضلون صورة أكثر "مزاجية" على ابتسامة كبيرة ). من الصعب القيام بذلك حتى نهاية الجلسة. عند هذه النقطة، يثق بي الأشخاص الذين أصورهم ويكونون أكثر استعدادًا لفعل شيء مختلف قليلًا، حتى لو كان بسيطًا مثل عدم الابتسام لالتقاط الصورة.

                نأمل أن يكون هذا ممتعًا بالنسبة لك وأنك تعلمت شيئًا ما على طول الطريق. كان من الرائع قراءة كل تخميناتك وردودك. نشكرك على مشاركتك وسأكون في انتظار صورة أخرى لاستخدامها في المقالة التالية "كيف تم التقاط هذه الصورة"!

                تعليق

                يعمل...
                X