كيف تقلل احتياجات النسخ الاحتياطيHow to Significantly Reduce Your Backup Needs

تقليص
X
 
  • تصفية - فلترة
  • الوقت
  • عرض
إلغاء تحديد الكل
مشاركات جديدة

  • كيف تقلل احتياجات النسخ الاحتياطيHow to Significantly Reduce Your Backup Needs

    كيف تقلل احتياجات النسخ الاحتياطي؟
    How to Significantly Reduce Your Backup Needs


    One of the biggest issues many of us photographers face is the gigantic size of our photo libraries, which creates a lot of issues for backing up and restoring images. While we have written a number of articles on properly backing up images, with a recent article on a backup workflow, we have not spent much time on managing the backup size and reducing it. After all, if the backup size itself is significantly reduced, the time it takes to back up those images improves drastically as well! Let’s talk about some of the tips, techniques and potential changes to your workflow you can administer today in order to reduce your backup needs in the future.

    There are two primary strategies for reducing the size of your photo library: one involves potential changes to your current workflow process before images are transferred to your computer (which will address the growth of your photo library in the future), and the other one consists of steps you can take to reduce what you have today.

    إحدى أكبر المشكلات التي يواجهها العديد من المصورين هي الحجم الهائل لمكتبات الصور لدينا، مما يخلق الكثير من المشكلات المتعلقة بالنسخ الاحتياطي للصور واستعادتها. على الرغم من أننا كتبنا عددًا من المقالات حول النسخ الاحتياطي للصور بشكل صحيح، ومقالة حديثة حول سير عمل النسخ الاحتياطي، إلا أننا لم نقضي الكثير من الوقت في إدارة حجم النسخة الاحتياطية وتقليله. بعد كل شيء، إذا تم تقليل حجم النسخة الاحتياطية بشكل كبير، فإن الوقت المستغرق لعمل نسخة احتياطية من تلك الصور يتحسن بشكل كبير أيضًا! دعنا نتحدث عن بعض النصائح والتقنيات والتغييرات المحتملة لسير العمل لديك والتي يمكنك إدارتها اليوم لتقليل احتياجات النسخ الاحتياطي في المستقبل.

    هناك إستراتيجيتان أساسيتان لتقليل حجم مكتبة الصور الخاصة بك: تتضمن إحداهما تغييرات محتملة في عملية سير العمل الحالية قبل نقل الصور إلى جهاز الكمبيوتر الخاص بك (وهو ما سيعالج نمو مكتبة الصور الخاصة بك في المستقبل)، وتتكون الإستراتيجية الأخرى من من الخطوات التي يمكنك اتخاذها لتقليل ما لديك اليوم.
    التعديل الأخير تم بواسطة غدير معروف; الساعة 11-20-2023, 10:37 AM.

  • #2
    Table of Contentsجدول المحتويات

    تغييرات على سير العمل الحالي في خيارات RAW للكاميرا، RAW + JPEGB، وضع التراكيب أمر شرير! إزالة الصور السيئة في الكاميرا الخاصة بك، الصور السيئة: التخلص من صور RAW للإنقاذ، تنظيف الفوضى: تقليل تخزين النسخ الاحتياطية RAW + JPEG: حذف ملفات JPEG، ضغط صور JPEG المتبقية: JPEGMini إلى RescueSummary

    تعليق


    • #3

      1) Changes to Current Workflow


      It would be pointless to discuss strategies to reduce your backup needs, if your photo library is needlessly growing at an exponential rate. Thanks to all the nice options we have today in cameras and in software, it is extremely easy to waste space. Yes, storage is extremely cheap today and you can easily stock up on a lot of hard drives. However, why go through all the hassle with additional storage and add the unnecessary wait time to our backup processes, if there are some simple steps you can take to reduce your storage needs in the future? Let’s go through your workflow and see if what you have set up today is in line with our best practices. We will start with your camera.
      1) التغييرات في سير العمل الحالي

      سيكون من غير المجدي مناقشة إستراتيجيات تقليل احتياجات النسخ الاحتياطي، إذا كانت مكتبة الصور الخاصة بك تنمو بمعدل هائل دون داع. بفضل جميع الخيارات الرائعة المتوفرة لدينا اليوم في الكاميرات والبرامج، أصبح من السهل للغاية إهدار المساحة. نعم، التخزين رخيص للغاية اليوم ويمكنك بسهولة تخزين الكثير من محركات الأقراص الثابتة. ومع ذلك، لماذا نتحمل كل هذه المتاعب مع سعة التخزين الإضافية ونضيف وقت الانتظار غير الضروري إلى عمليات النسخ الاحتياطي لدينا، إذا كانت هناك بعض الخطوات البسيطة التي يمكنك اتخاذها لتقليل احتياجات التخزين الخاصة بك في المستقبل؟ دعنا نستعرض سير عملك ونرى ما إذا كان ما قمت بإعداده اليوم يتماشى مع أفضل ممارساتنا. سنبدأ بالكاميرا الخاصة بك.

      تعليق


      • #4
        1.1) Camera RAW Options


        First, let’s go through your camera settings. Since you are a Photography Life reader, we are already making an assumption that you shoot RAW (if you don’t know what I am talking about, please see our RAW vs JPEG article that explains why you should be shooting RAW). But what kind of RAW do you shoot? sRAW/mRAW? 12-bit? 14-bit? Uncompressed? Compressed? Losslessly Compressed? With all kinds of options available, even shooting RAW can get confusing! So which RAW format is the best and why? Unfortunately, the answer is not so simple, because it all varies depending on what camera you shoot with. Some cameras give you the option to choose from different RAW formats, while others don’t. If you have the ability to choose from different RAW format options, our general recommendation is to pick Losslessly Compressed RAW in the highest bit depth available (typically 14-bit) for best results. Losslessly Compressed RAW images preserve all the data, making Uncompressed RAW a complete waste of space on your hard drive. As for bit depth, while most people won’t be able to tell the difference between 14-bit and 12-bit RAW images, when you need to recover maximum information from a file, you do have quite a bit more data to work with when shooting at higher bit depth. If you nail exposure every single time and you never have to recover much data in post, shooting 12-bit is the way to go. But for everyone else who wants to have the maximum data to work with in post-processing in order to reduce banding and other artifacts in both highlights and shadows, my recommendation would still be to stick with 14-bit or higher.

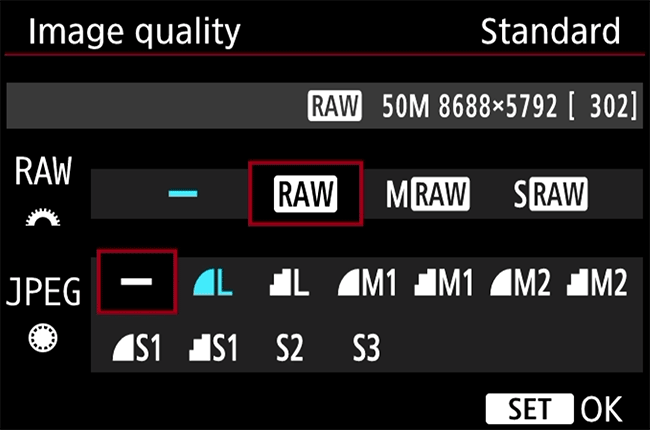
        Now if you shoot Canon, you have a limited number of options to choose from, such as RAW, mRAW and sRAW, along with a number of options to shoot in JPEG, as shown below:


        1.1) خيارات الكاميرا RAW

        أولاً، دعنا ننتقل إلى إعدادات الكاميرا. نظرًا لأنك أحد قراء Photography Life، فإننا نفترض بالفعل أنك تقوم بالتصوير بصيغة RAW (إذا كنت لا تعرف ما أتحدث عنه، فيرجى الاطلاع على مقالة RAW مقابل JPEG التي تشرح سبب وجوب تصوير RAW). ولكن ما هو نوع ملف RAW الذي تقوم بتصويره؟ sRAW/mRAW؟ 12 بت؟ 14 بت؟ غير مضغوط؟ مضغوط؟ مضغوط بلا فقدان؟ مع توفر جميع أنواع الخيارات، حتى التصوير بصيغة RAW يمكن أن يكون مربكًا! إذن ما هو تنسيق RAW الأفضل ولماذا؟ لسوء الحظ، الإجابة ليست بهذه البساطة، لأن الأمر كله يختلف اعتمادًا على الكاميرا التي تقوم بالتصوير بها. تمنحك بعض الكاميرات خيار الاختيار من بين تنسيقات RAW المختلفة، بينما لا توفرها البعض الآخر. إذا كانت لديك القدرة على الاختيار من بين خيارات تنسيق RAW المختلفة، فإن توصيتنا العامة هي اختيار تنسيق RAW المضغوط بدون فقدان البيانات بأعلى عمق بت متاح (عادةً 14 بت) للحصول على أفضل النتائج. تحافظ صور RAW المضغوطة التي لا يمكن فقدانها على جميع البيانات، مما يجعل RAW غير المضغوطة مضيعة كاملة للمساحة على محرك الأقراص الثابتة لديك. أما بالنسبة لعمق البت، فبينما لن يتمكن معظم الأشخاص من معرفة الفرق بين صور RAW ذات 14 بت و12 بت، عندما تحتاج إلى استرداد الحد الأقصى من المعلومات من ملف ما، يكون لديك المزيد من البيانات للعمل بها عند التصوير على عمق بت أعلى. إذا كنت تتقن التعريض الضوئي في كل مرة ولم تضطر مطلقًا إلى استعادة الكثير من البيانات بعد النشر، فإن التصوير بدقة 12 بت هو الحل الأمثل. ولكن بالنسبة لأي شخص آخر يريد الحصول على الحد الأقصى من البيانات للعمل معها في مرحلة ما بعد المعالجة من أجل تقليل النطاقات والتأثيرات الأخرى في كل من الإبرازات والظلال، فإن توصيتي هي الالتزام بـ 14 بت أو أعلى.

        الآن إذا قمت بالتصوير بكاميرا Canon، فلديك عدد محدود من الخيارات للاختيار من بينها، مثل RAW وmRAW وsRAW، بالإضافة إلى عدد من الخيارات للتصوير بتنسيق JPEG، كما هو موضح أدناه:


        تعليق


        • #5
          By default, Canon shoots in highest bit depth available, so you don’t have to worry about that. Just choose “RAW”, which will give you the best image quality. Don’t pick mRAW (medium RAW) or sRAW (small RAW), even though those two options might sound appealing for reducing image size – that’s because those two options will result in a file that is really not a true RAW file, as explained in my article on the sRAW format. You will also see another option to shoot JPEG – skip that, unless you know what you are doing (more on RAW + JPEG below).

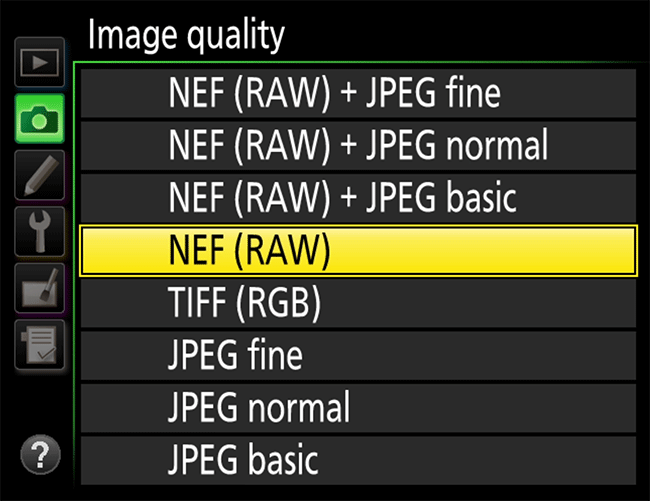
          If you shoot Nikon, you have a lot more options to choose from. First, make sure that you have RAW selected from the Shooting Menu option, as shown below:


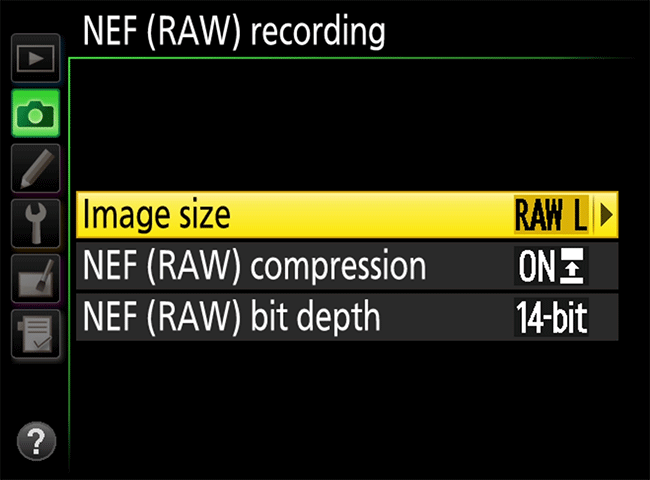
          Next, you will find another setting in the same menu called “NEF (RAW) recording”. Choose the options as shown below:


          Don’t worry if you don’t have the first option (it is only available on some of the newer cameras) – that’s for choosing between sRAW and full size RAW, which as stated above, you should always keep at full size. The next two options are NEF (RAW) compression and bit depth. Make sure to select “Lossless compressed” for the compression algorithm, because it gives you the best quality, while keeping the file size relatively small. You don’t lose any data with this option. The “Compressed” option is basically “Lossy Compression”, which is not what you want (unless you really know what you are doing), as it results in loss of data. As for “Uncompressed”, don’t ever choose that option, as you will end up with enormous files every single time, even if you photograph a plain blue sky!

          Most other brand cameras don’t give you so many different options. On the Sony A7R II and A7 II, you have a new option to shoot Compressed and Uncompressed RAW. Unless you need to keep the shooting speed fast, I would stick with Uncompressed RAW, as it preserves all the data from the sensor. Since Sony has not provided the option for Lossless Compressed RAW, you have the option to convert RAW images to DNG format, since DNG automatically applies Lossless Compression to Uncompressed RAW images. Personally, I avoid the DNG format as stated in this article, but in the case of Sony, I really don’t see another option until Sony adds the Losslessly Compressed RAW option. See this article for more details

          افتراضيًا، تقوم Canon بالتصوير بأعلى عمق بت متاح، لذلك لا داعي للقلق بشأن ذلك. ما عليك سوى اختيار "RAW"، والذي سيمنحك أفضل جودة للصورة. لا تختر mRAW (RAW متوسط) أو sRAW (RAW صغير)، على الرغم من أن هذين الخيارين قد يبدوان جذابين لتقليل حجم الصورة - وذلك لأن هذين الخيارين سيؤديان إلى ملف ليس في الحقيقة ملف RAW حقيقي، كما هو موضح. في مقالتي عن تنسيق sRAW. سترى أيضًا خيارًا آخر لالتقاط الصور بتنسيق JPEG - قم بتخطي ذلك، إلا إذا كنت تعرف ما تفعله (المزيد حول RAW + JPEG أدناه).

          إذا قمت بتصوير كاميرا Nikon، فلديك الكثير من الخيارات للاختيار من بينها. أولاً، تأكد من تحديد RAW من خيار قائمة التصوير، كما هو موضح أدناه:


          بعد ذلك، ستجد إعدادًا آخر في نفس القائمة يسمى "تسجيل NEF (RAW)". قم باختيار الخيارات كما هو موضح أدناه:


          لا تقلق إذا لم يكن لديك الخيار الأول (وهو متاح فقط في بعض الكاميرات الأحدث) – وهو الاختيار بين sRAW وRAW بالحجم الكامل، والذي كما هو مذكور أعلاه، يجب عليك دائمًا الاحتفاظ بالحجم الكامل. الخياران التاليان هما ضغط NEF (RAW) وعمق البت. تأكد من اختيار "Lossless Compressed" لخوارزمية الضغط، لأنها تمنحك أفضل جودة، مع الحفاظ على حجم الملف صغيرًا نسبيًا. لن تفقد أي بيانات مع هذا الخيار. الخيار "مضغوط" هو في الأساس "ضغط مع فقدان الضغط"، وهو ليس ما تريده (إلا إذا كنت تعرف حقًا ما تفعله)، لأنه يؤدي إلى فقدان البيانات. أما بالنسبة إلى "غير مضغوط"، فلا تختر هذا الخيار أبدًا، حيث سينتهي بك الأمر بملفات هائلة في كل مرة، حتى لو قمت بتصوير سماء زرقاء صافية!

          لا توفر لك معظم الكاميرات ذات العلامات التجارية الأخرى الكثير من الخيارات المختلفة. في كاميرا A7R II وA7 II من سوني، لديك خيار جديد لتصوير ملفات RAW المضغوطة وغير المضغوطة. ما لم تكن بحاجة إلى الحفاظ على سرعة التصوير بسرعة، فإنني سألتزم باستخدام صيغة RAW غير المضغوطة، لأنها تحافظ على جميع البيانات من المستشعر. نظرًا لأن Sony لم توفر خيار Lossless Compressed RAW، فلديك خيار تحويل صور RAW إلى تنسيق DNG، حيث يقوم DNG تلقائيًا بتطبيق الضغط بدون فقدان البيانات على صور RAW غير المضغوطة. شخصيًا، أتجنب تنسيق DNG كما هو مذكور في هذه المقالة، ولكن في حالة Sony، لا أرى حقًا خيارًا آخر حتى تضيف Sony خيار Lossless Compressed RAW. راجع هذه المقالة لمزيد من التفاصيل

          تعليق


          • #6
            1.2) RAW + JPEG


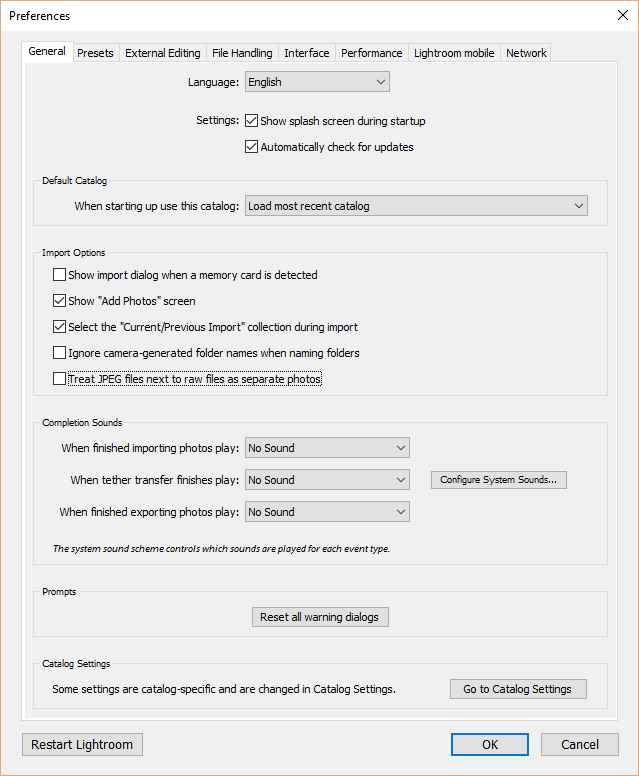
            What about RAW + JPEG? I find a lot of folks out there who end up shooting both RAW and JPEG. Some do it because they really need the JPEG images (sports shooters, news shooters / reporters, etc) and others do it for little to no reason. If you belong to the latter group, it might be a good idea to re-evaluate your menu settings. If you end up importing both RAW and JPEG into Lightroom, I can already tell you that you are most likely doing it wrong. Why? Because Lightroom does not really care for the JPEG image in the first place when there is a RAW image already present. Unless you have a specific menu setting in Lightroom to treat RAW and JPEG images separately, the two images will be combined as a single image and you will only be able to work on the RAW image. Take a look at your Lightroom Preferences and see if the option “Treat JPEG files next to raw files as separate photos” is checked or not:


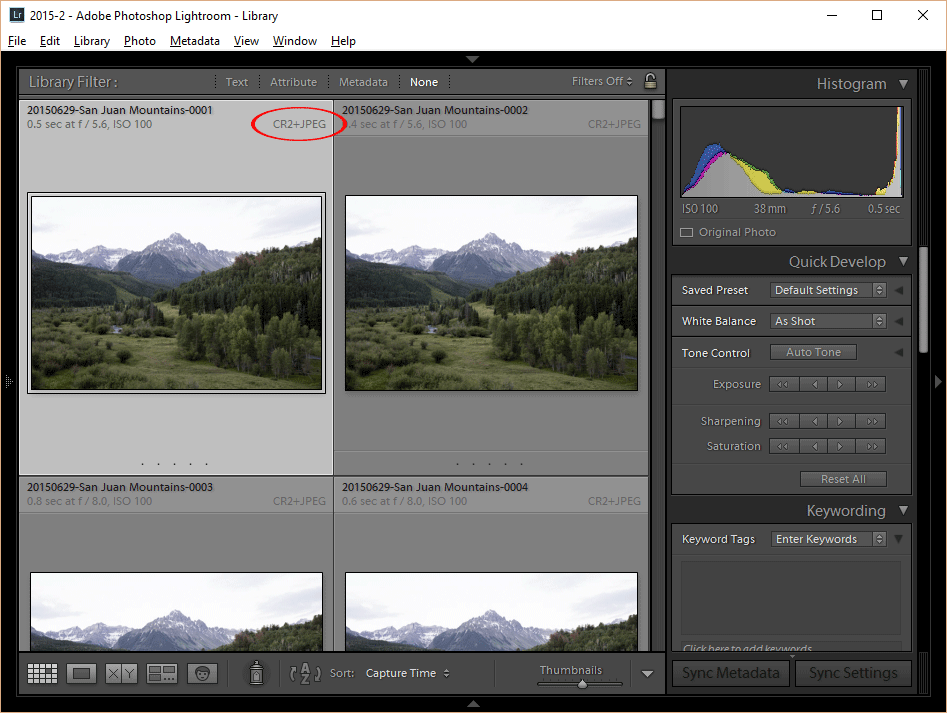
            Most likely it is not, because that’s the default setting. Here is what happens when you load a RAW + JPEG into Lightroom:


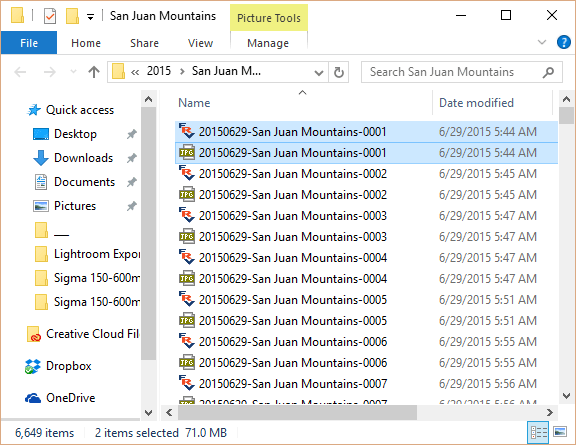
            Look at that – you have a single image being displayed in Lightroom, when in reality, there are two images residing within your file system:


            This means that you are essentially storing a total of two JPEG images in your file system. That’s right, not one, but two! How? Well, a full-size JPEG image that your camera created is already sitting within a RAW image. By preserving another JPEG image, you are storing a separate copy of that JPEG file on its own. So what’s the point of keeping that camera-rendered JPEG image? Those files are just wasting a lot of space for no good reason! And if you really ever want to be able to go back to your original JPEG image as it was spat out by your camera, you can always extract it out of your RAW file using free tools such as Phil Harvey’s excellent ExifTool. It is as simple as running the following command “exiftool -b -JpgFromRaw DSC0001.NEF > DSC0001.JPG”.

            So if you have been storing all those JPEG images, what do you do? How do you get rid of them now? Unfortunately, Lightroom has no way of simply deleting those JPEG images, but there are a couple of tricks you can employ to get rid of them – keep on reading this article to find out how!

            تعليق


            • #7
              1.2) الخام + جبيغ

              ماذا عن RAW + JPEG؟ أجد الكثير من الأشخاص الذين ينتهي بهم الأمر إلى تصوير ملفات RAW وJPEG. يقوم البعض بذلك لأنهم يحتاجون حقًا إلى صور JPEG (مصورو الألعاب الرياضية، ومصورو الأخبار/المراسلون، وما إلى ذلك) والبعض الآخر يفعل ذلك بدون سبب يذكر. إذا كنت تنتمي إلى المجموعة الأخيرة، فقد يكون من الجيد إعادة تقييم إعدادات القائمة الخاصة بك. إذا انتهى بك الأمر إلى استيراد كل من RAW وJPEG إلى Lightroom، فيمكنني أن أخبرك بالفعل أنك على الأرجح تقوم بذلك بطريقة خاطئة. لماذا؟ لأن Lightroom لا يهتم حقًا بصورة JPEG في المقام الأول عندما تكون هناك صورة RAW موجودة بالفعل. ما لم يكن لديك إعداد قائمة محدد في Lightroom للتعامل مع صور RAW وJPEG بشكل منفصل، فسيتم دمج الصورتين كصورة واحدة وستكون قادرًا على العمل على صورة RAW فقط. قم بإلقاء نظرة على تفضيلات Lightroom الخاصة بك ومعرفة ما إذا كان خيار "معاملة ملفات JPEG بجوار الملفات الأولية كصور منفصلة" محددًا أم لا:


              على الأرجح ليس كذلك، لأن هذا هو الإعداد الافتراضي. إليك ما يحدث عند تحميل ملف RAW + JPEG إلى Lightroom:


              انظر إلى ذلك - لديك صورة واحدة يتم عرضها في Lightroom، بينما في الواقع، هناك صورتان موجودتان داخل نظام الملفات الخاص بك:


              وهذا يعني أنك تقوم أساسًا بتخزين إجمالي صورتين بتنسيق JPEG في نظام الملفات لديك. هذا صحيح، ليس واحدًا، بل اثنان! كيف؟ حسنًا، صورة JPEG بالحجم الكامل التي أنشأتها الكاميرا موجودة بالفعل داخل صورة RAW. من خلال الاحتفاظ بصورة JPEG أخرى، فإنك تقوم بتخزين نسخة منفصلة من ملف JPEG هذا بمفردها. إذن ما الفائدة من الاحتفاظ بصورة JPEG التي تعرضها الكاميرا؟ هذه الملفات تهدر مساحة كبيرة بدون سبب وجيه! وإذا كنت تريد حقًا أن تكون قادرًا على العودة إلى صورة JPEG الأصلية كما تم إخراجها بواسطة الكاميرا، فيمكنك دائمًا استخراجها من ملف RAW باستخدام أدوات مجانية مثل ExifTool الممتازة من Phil Harvey. الأمر بسيط مثل تشغيل الأمر التالي "exiftool -b -JpgFromRaw DSC0001.NEF > DSC0001.JPG".

              لذا، إذا كنت قد قمت بتخزين كل صور JPEG تلك، فماذا تفعل؟ فكيف تتخلص منهم الآن؟ لسوء الحظ، لا يوجد لدى Lightroom طريقة لحذف صور JPEG تلك ببساطة، ولكن هناك بعض الحيل التي يمكنك استخدامها للتخلص منها – استمر في قراءة هذه المقالة لتعرف كيف!

              تعليق


              • #8
                1.3) Bracketing is Evil!


                Bracketing is evil if you don’t know what it is used for, because it results in 3+ images of the same thing. This one is fun to see in the field and in my workshops. If I hear “click-click-click” in good light, I usually come up to the person and ask why they shoot in brackets. Every once in a while, the answer is “HDR” or some other advanced answer, which I totally respect, as it is intentional. But most of the time, I hear something like “because another photographer told me”, or “because I want to get the best exposure”. Sadly, after spending a lot of time shooting with other photographers, I realized that most people have bracketing enabled without real purpose. Think of that – that’s 3+ images of the same thing, over and over again! That’s a lot of wasted frames and occupied storage. Even worse, if a camera does not automatically shoot brackets in a single burst, many photographers end up with underexposed and overexposed images without knowing why it is happening.

                There is no reason to shoot bracketed exposures in good light. The best exposure is the one that contains the most amount of data without any losses, a technique known as “Exposing To The Right“, or “ETTR”. Most of the time you can achieve that with a single shot. Unless you are dealing with a very wide dynamic range that your camera is incapable of capturing, you should not shoot in brackets.

                تعليق


                • #9
                  1.3) وضع الأقواس بين قوسين هو الشر!

                  يعد التصحيح أمرًا سيئًا إذا كنت لا تعرف الغرض من استخدامه، لأنه ينتج عنه أكثر من 3 صور لنفس الشيء. من الممتع رؤية هذا في الميدان وفي ورش العمل الخاصة بي. إذا سمعت "نقرة-نقرة-نقرة" في ضوء جيد، فعادةً ما أتوجه إلى الشخص وأسأله عن سبب قيامه بالتقاط الصور بين قوسين. من حين لآخر، تكون الإجابة "hdr" أو أي إجابة متقدمة أخرى، والتي أحترمها تمامًا، لأنها مقصودة. لكن في أغلب الأحيان، أسمع شيئًا مثل "لأن مصورًا آخر أخبرني بذلك"، أو "لأنني أريد الحصول على أفضل تعرض". للأسف، بعد قضاء الكثير من الوقت في التصوير مع مصورين فوتوغرافيين آخرين، أدركت أن معظم الأشخاص قد قاموا بتمكين التصحيح بين قوسين دون غرض حقيقي. فكر في ذلك – إنها أكثر من 3 صور لنفس الشيء، مرارًا وتكرارًا! هذا كثير من الإطارات الضائعة والتخزين المشغول. والأسوأ من ذلك، إذا لم تقم الكاميرا بتصوير الأقواس تلقائيًا في دفعة واحدة، فسينتهي الأمر بالعديد من المصورين بالتقاط صور ذات تعريض ناقص أو تعريض زائد دون معرفة سبب حدوث ذلك.

                  لا يوجد سبب لتصوير التعريضات بين قوسين في الإضاءة الجيدة. التعريض الأفضل هو الذي يحتوي على أكبر قدر من البيانات دون أي خسائر، وهي تقنية تعرف باسم "التعريض إلى اليمين" أو "ettr". في معظم الأحيان يمكنك تحقيق ذلك من خلال طلقة واحدة. ما لم تكن تتعامل مع نطاق ديناميكي واسع جدًا لا تستطيع كاميرتك التقاطه، فلا ينبغي عليك التصوير بين قوسين.

                  تعليق


                  • #10
                    1.4) Eliminate Bad Images In Your Camera


                    I know some people won’t like this for different reasons. Some argue that they do not have the time to do it while shooting, while others argue that they dread of potentially deleting good images. I totally understand both. However, when an image is bad and you know it is bad at the time of capture, why keep in on your memory card in the first place? If you have a second and you are currently viewing that one bad image, all you have to do is press the trash button and it is gone! There is no need to review all the images and delete the bad ones – I personally don’t do it either, as I rarely have the time when working in the field. If you limit yourself to deleting one or two images at the time of capture, you will have practically no risk of accidentally deleting other important images in the memory card. By reducing the number of images stored in the card, you will be saving a lot more time during the culling process.

                    تعليق


                    • #11
                      1.4) إزالة الصور السيئة في الكاميرا

                      أعلم أن بعض الأشخاص لن يعجبهم هذا لأسباب مختلفة. يجادل البعض بأنهم ليس لديهم الوقت الكافي للقيام بذلك أثناء التصوير، بينما يجادل آخرون بأنهم يخشون احتمال حذف الصور الجيدة. أنا أفهم كليهما تمامًا. ومع ذلك، عندما تكون الصورة سيئة وأنت تعلم أنها سيئة وقت التقاطها، فلماذا تحتفظ ببطاقة الذاكرة الخاصة بك في المقام الأول؟ إذا كان لديك صورة ثانية وأنت تشاهد حاليًا تلك الصورة السيئة، فكل ما عليك فعله هو الضغط على زر سلة المهملات وستختفي! ليست هناك حاجة لمراجعة جميع الصور وحذف الصور السيئة - وأنا شخصيًا لا أفعل ذلك أيضًا، حيث نادرًا ما يكون لدي الوقت عند العمل في هذا المجال. إذا اقتصرت على حذف صورة أو صورتين في وقت الالتقاط، فلن يكون لديك أي خطر عمليًا لحذف الصور المهمة الأخرى عن طريق الخطأ في بطاقة الذاكرة. من خلال تقليل عدد الصور المخزنة في البطاقة، ستوفر الكثير من الوقت أثناء عملية الفرز.

                      تعليق


                      • #12
                        1.5) Bad Photos: RAW Image Culling to the Rescue


                        Even if you removed all the obviously bad images from the card at the time of capture and disabled unnecessary bracketing, you will still end up with images that you will never touch again. Everyone shoots bad photos, even the best of the best. Whether it is a soft photo, a heavily underexposed photo or just not a keeper, many of us run into the same problem – we import everything we have in a memory card into post-processing software like Lightroom, then leave the sorting and culling for later. Well, I wish we could all say that we are super diligent in cleaning up our photo catalogs after the fact, but the reality is, it rarely ever happens when we get busy, doesn’t it? In addition to ending up with a boatload of space wasters, we are also decreasing the speed of the photo catalog! That’s right, if you did not know – importing images adds a bunch of data into database-driven software like Lightroom. Even if you delete images afterwards, it does not mean that all the wasted space within the database/catalog gets freed up! Yes, you can take steps to minimize the wasted space by optimizing your catalog or you can re-import all the images into a brand new catalog, but that’s still so much unnecessary work that you could have prevented by properly culling images.

                        So what is the best way to cull images?

                        Don’t cull images after the import process – do it beforehand. There are two methods of image culling – do it from the memory card directly, or copy images to a folder on your computer first, then cull images before you start importing them into your post-processing software. I personally prefer doing it directly in the memory card. For this to work well, you will need fast memory cards. If you are still running USB 2.0 and those old 10 MB/sec cards, it is time to move up to faster storage my friend! Memory cards from reliable brands like SanDisk are dirt cheap nowadays and you can get very fast, large capacity 90+ MB/sec SD cards for $10-$30 per card. If your memory card and memory card reader are fast, you can cull through the images very quickly. And if you are scared about doing it directly from the card, you can obviously copy images to your computer first. But if you are using the right software, there should be no reason to be afraid of that, as it should not be deleting anything from the card in the first place.

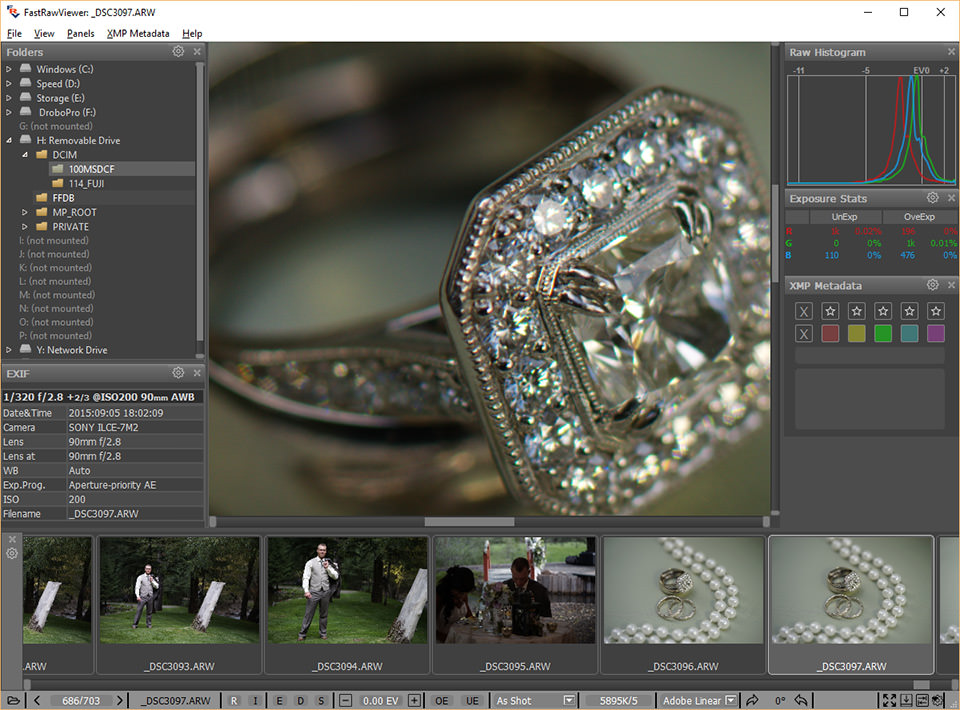
                        Speaking of culling software, my personal favorite is FastRawViewer. Ever since I tried it out, I have been using FRV for image culling directly from cards and it works wonders. It is incredibly fast and best of all, I can zoom in to a particular area of an image at 100% view (CTRL+1), then press the “Space” and “Backspace” buttons on the keyboard (which you can completely customize to your liking) in order to navigate forward and back between images. This is extremely useful, because I do not have to navigate to an image, then zoom in to see if something is sharp – if my subject is in the same area, I leave it there to check for sharpness. If the subject moves, I scroll in the direction I want to see and leave it there for the next image:


                        1.5) الصور السيئة: التخلص من صور RAW للإنقاذ


                        حتى إذا قمت بإزالة جميع الصور السيئة بشكل واضح من البطاقة في وقت الالتقاط وتعطيل التصحيح غير الضروري، فسوف ينتهي بك الأمر مع صور لن تلمسها مرة أخرى أبدًا. الجميع يلتقط صورًا سيئة، حتى الأفضل على الإطلاق. سواء أكانت صورة ناعمة، أو صورة قليلة التعرض للضوء، أو مجرد صورة غير محفوظة، يواجه الكثير منا نفس المشكلة - فنحن نستورد كل ما لدينا في بطاقة الذاكرة إلى برنامج ما بعد المعالجة مثل Lightroom، ثم نترك الفرز والفرز لـ لاحقاً. حسنًا، أتمنى أن نقول جميعًا إننا مجتهدون للغاية في تنظيف كتالوجات الصور الخاصة بنا بعد وقوعها، ولكن الحقيقة هي أنه نادرًا ما يحدث ذلك عندما نكون مشغولين، أليس كذلك؟ بالإضافة إلى أن ينتهي الأمر بحمولة قارب من مضيعات الفضاء، فإننا نعمل أيضًا على تقليل سرعة كتالوج الصور! هذا صحيح، إذا كنت لا تعرف - يضيف استيراد الصور مجموعة من البيانات إلى البرامج المستندة إلى قاعدة البيانات مثل Lightroom. حتى إذا قمت بحذف الصور بعد ذلك، فهذا لا يعني أنه سيتم تحرير كل المساحة الضائعة داخل قاعدة البيانات/الكتالوج! نعم، يمكنك اتخاذ خطوات لتقليل المساحة المهدرة عن طريق تحسين الكتالوج الخاص بك أو يمكنك إعادة استيراد جميع الصور إلى كتالوج جديد تمامًا، ولكن لا يزال هذا عملاً غير ضروري كثيرًا وكان من الممكن منعه عن طريق التخلص من الصور بشكل صحيح.

                        إذن ما هي أفضل طريقة لحذف الصور؟

                        لا تقم بإعدام الصور بعد عملية الاستيراد – افعل ذلك مسبقًا. هناك طريقتان لتصفية الصور - قم بذلك من بطاقة الذاكرة مباشرة، أو انسخ الصور إلى مجلد على جهاز الكمبيوتر الخاص بك أولاً، ثم قم بحذف الصور قبل البدء في استيرادها إلى برنامج ما بعد المعالجة. أنا شخصيا أفضل القيام بذلك مباشرة في بطاقة الذاكرة. لكي يعمل هذا بشكل جيد، سوف تحتاج إلى بطاقات ذاكرة سريعة. إذا كنت لا تزال تستخدم USB 2.0 وتلك البطاقات القديمة التي تبلغ سعتها 10 ميجابايت/ثانية، فقد حان الوقت للانتقال إلى مساحة تخزين أسرع يا صديقي! تعد بطاقات الذاكرة من العلامات التجارية الموثوقة مثل SanDisk رخيصة الثمن هذه الأيام، ويمكنك الحصول على بطاقات SD سريعة جدًا وكبيرة السعة تزيد عن 90 ميجابايت/ثانية مقابل 10 إلى 30 دولارًا أمريكيًا لكل بطاقة. إذا كانت بطاقة الذاكرة وقارئ بطاقة الذاكرة لديك سريعين، فيمكنك التخلص من الصور بسرعة كبيرة. وإذا كنت خائفًا من القيام بذلك مباشرة من البطاقة، فمن الواضح أنه يمكنك نسخ الصور إلى جهاز الكمبيوتر الخاص بك أولاً. ولكن إذا كنت تستخدم البرنامج الصحيح، فلا ينبغي أن يكون هناك سبب للخوف من ذلك، حيث لا ينبغي حذف أي شيء من البطاقة في المقام الأول.

                        عند الحديث عن برنامج الإعدام، فإن برنامجي المفضل هو FastRawViewer. منذ أن جربته، كنت أستخدم FRV لالتقاط الصور مباشرة من البطاقات وهو يعمل بشكل رائع. إنه سريع بشكل لا يصدق وأفضل ما في الأمر هو أنه يمكنني تكبير منطقة معينة من الصورة بنسبة عرض 100% (CTRL+1)، ثم الضغط على زري "Space" و"Backspace" على لوحة المفاتيح (والتي يمكنك تخصيصها بالكامل حسب رغبتك) للتنقل للأمام والخلف بين الصور. يعد هذا مفيدًا للغاية، لأنه لا يتعين علي الانتقال إلى صورة ما، ثم تكبيرها لمعرفة ما إذا كان هناك شيء حاد - إذا كان موضوعي في نفس المنطقة، أتركه هناك للتحقق من الحدة. إذا تحرك الموضوع، أقوم بالتمرير في الاتجاه الذي أريد رؤيته واتركه هناك للصورة التالية:

                        ​

                        تعليق


                        • #13
                          Saves me a ton of time! Once I find an image I do not like, I press the “Delete” button on my keyboard (I modified this shortcut under File->Keyboard Shortcuts), which moves it to a “_Rejected” folder. When you launch FRV for the first time, it will give you a warning that the file is about to be moved to the rejected folder. I personally disabled this behavior from the File Handling option in Preferences. From there, it is just finding images and pressing the same delete button action to get rid of the images I don’t like. And if I accidentally delete an image and want to restore it, I can press CTRL+SHIFT+] to bring it back, or I can do it directly from the File menu.

                          During the culling process, I also identify images that I want to edit in Lightroom. I changed the keyboard shortcuts to be the same in FRV as in Lightroom, so by pressing 0 to 5, I can assign star ratings to each file. This creates a sidecar (XMP) file right on the memory card, so when I import the file into Lightroom, all those stars will already be there in images.

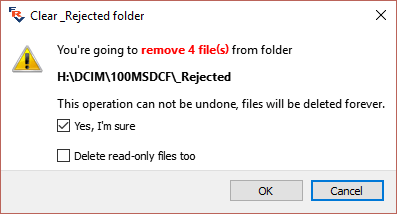
                          Before the import process, I delete everything from the “_Rejected” folder on the memory card, so that those files are not accidentally imported into Lightroom. I get a nice warning from FRV that tells me about all the files getting wiped out and once I click “Yes, I’m sure”, the files are gone:


                          Obviously, you should be very careful with this feature, as the files will be gone. If you don’t write anything else on the card you can still restore images via recovery software, but it is rather painful. If you are not comfortable with this, you can move the _Rejected folder into a temporary folder on your computer and delete it later.

                          That’s pretty much it when it comes to RAW image culling! From here, the next step is to import images into your post-processing software of choice.

                          Trust me, if you do this process, you will save yourself hours of work and frustration, because you are eliminating bad images way before they make it to your post-processing software!

                          تعليق


                          • #14
                            يوفر لي الكثير من الوقت! بمجرد العثور على صورة لا تعجبني، أضغط على الزر "حذف" الموجود على لوحة المفاتيح (لقد قمت بتعديل هذا الاختصار ضمن ملف->اختصارات لوحة المفاتيح)، مما ينقله إلى مجلد "_Rejected". عند تشغيل FRV لأول مرة، سيعطيك تحذيرًا بأن الملف على وشك النقل إلى المجلد المرفوض. لقد قمت شخصيًا بتعطيل هذا السلوك من خيار معالجة الملفات في التفضيلات. من هناك، كل ما عليك فعله هو العثور على الصور والضغط على نفس إجراء زر الحذف للتخلص من الصور التي لا أحبها. وإذا قمت بحذف صورة عن طريق الخطأ وأردت استعادتها، فيمكنني الضغط على CTRL+SHIFT+] لإعادتها، أو يمكنني القيام بذلك مباشرة من القائمة "ملف".

                            أثناء عملية الفرز، أقوم أيضًا بتحديد الصور التي أريد تحريرها في Lightroom. لقد قمت بتغيير اختصارات لوحة المفاتيح لتكون هي نفسها في FRV كما في Lightroom، لذلك بالضغط من 0 إلى 5، يمكنني تعيين تصنيفات النجوم لكل ملف. يؤدي هذا إلى إنشاء ملف جانبي (XMP) مباشرة على بطاقة الذاكرة، لذلك عندما أقوم باستيراد الملف إلى Lightroom، ستكون كل تلك النجوم موجودة بالفعل في الصور.

                            قبل عملية الاستيراد، أقوم بحذف كل شيء من المجلد "_Rejected" الموجود على بطاقة الذاكرة، حتى لا يتم استيراد تلك الملفات عن طريق الخطأ إلى Lightroom. تلقيت تحذيرًا لطيفًا من FRV يخبرني بمسح جميع الملفات وبمجرد النقر فوق "نعم، أنا متأكد"، اختفت الملفات:


                            ومن الواضح أنه يجب عليك توخي الحذر الشديد مع هذه الميزة، حيث ستختفي الملفات. إذا لم تكتب أي شيء آخر على البطاقة، فلا يزال بإمكانك استعادة الصور عبر برنامج الاسترداد، ولكنه أمر مؤلم إلى حد ما. إذا لم تكن راضيًا عن ذلك، فيمكنك نقل المجلد _Rejected إلى مجلد مؤقت على جهاز الكمبيوتر الخاص بك وحذفه لاحقًا.

                            هذا إلى حد كبير عندما يتعلق الأمر بإعدام صور RAW! من هنا، الخطوة التالية هي استيراد الصور إلى برنامج المعالجة اللاحقة الذي تختاره.

                            ثق بي، إذا قمت بهذه العملية، فسوف توفر على نفسك ساعات من العمل والإحباط، لأنك تقوم بإزالة الصور السيئة قبل أن تصل إلى برنامج ما بعد المعالجة!

                            تعليق


                            • #15

                              2) Cleaning Up the Mess: Reducing Backup Storage


                              What if you have not been doing a good job with keeping your photo library clean? Don’t worry, most of us are guilty of such sins, including myself! Yes, for years, I have been shooting images without properly culling through them or sorting them. While my file and folder organization is pretty tidy, putting 40-50 thousand images per year into catalogs has not been pretty! Earlier this year, I realized that I have close to 6 terabytes of images. That’s a lot, considering that the images I actually ended up using probably comprise less than 5% of the total storage. So what’s the point of keeping all those images you might ask? Well, who knows, maybe one day I will go back and edit those extra images. Most likely not, but back in my mind I do count on that potential And if that were to happen, I would still want those extra images. But wait – how many will I actually need? I only recently started doing the proper RAW image culling thanks to FRV and my catalogs earlier than 2014 look absolutely terrible, with all kinds of bad images I will never ever touch. Unfortunately, I cannot find myself sitting through tens of thousands of images again, even with FRV in my hands – I simply don’t have the time. However, there are some things I can do to minimize the number of images that I really need to backup.

                              First of all, after going through some of the folders on my computer, I realized that I have a boatload of JPEG images. A lot of them are older images from different cameras, some are scans, some are from our smartphone and others are those same JPEG images that were the result of me shooting RAW + JPEG. Since I test cameras quite a bit, I often shoot RAW + JPEG, because RAW support is typically not immediately available. Well, that in itself created many gigabytes of wasted storage, which needs to be cleaned up. But the question is “how?”. If you have been shooting RAW + JPEG and you want to clean up all that wasted storage, below are some steps you can take to clean up your image library in Lightroom. If you don’t have Lightroom, you can utilize command prompts to go through images and delete them (you can easily find such scripts on Google), but that would be a riskier proposition, especially if you are not very tech-savvy. If you don’t have Lightroom, you can install a trial version, get your library cleaned up and you can uninstall it afterwards.
                              2) تنظيف الفوضى: تقليل تخزين النسخ الاحتياطية

                              ماذا لو لم تقم بعمل جيد في الحفاظ على نظافة مكتبة الصور الخاصة بك؟ لا تقلق، فمعظمنا مذنب بمثل هذه الخطايا، بما فيهم أنا! نعم، لقد كنت أقوم منذ سنوات بالتقاط الصور دون فرزها أو فرزها بشكل صحيح. على الرغم من أن تنظيم الملفات والمجلدات الخاص بي مرتب جدًا، إلا أن وضع ما بين 40 إلى 50 ألف صورة سنويًا في الكتالوجات لم يكن أمرًا رائعًا! في وقت سابق من هذا العام، أدركت أن لدي ما يقرب من 6 تيرابايت من الصور. هذا كثير، مع الأخذ في الاعتبار أن الصور التي انتهى بي الأمر باستخدامها بالفعل ربما تشكل أقل من 5% من إجمالي مساحة التخزين. إذن ما الفائدة من الاحتفاظ بكل تلك الصور التي قد تسألها؟ حسنًا، من يدري، ربما سأعود ذات يوم وأقوم بتحرير تلك الصور الإضافية. على الأرجح لا، ولكن في ذهني أعتمد على هذه الإمكانية وإذا حدث ذلك، سأظل أرغب في تلك الصور الإضافية. لكن مهلا – كم سأحتاج فعلا؟ لقد بدأت مؤخرًا فقط في إجراء عملية التخلص من صور RAW المناسبة بفضل FRV، وتبدو كتالوجاتي قبل عام 2014 فظيعة للغاية، مع كل أنواع الصور السيئة التي لن أتطرق إليها أبدًا. لسوء الحظ، لا أستطيع أن أجد نفسي جالسًا أمام عشرات الآلاف من الصور مرة أخرى، حتى مع وجود FRV بين يدي - ببساطة ليس لدي الوقت. ومع ذلك، هناك بعض الأشياء التي يمكنني القيام بها لتقليل عدد الصور التي أحتاج حقًا إلى نسخها احتياطيًا.

                              أولاً، بعد مراجعة بعض المجلدات الموجودة على جهاز الكمبيوتر الخاص بي، أدركت أن لدي كمية كبيرة من صور JPEG. الكثير منها عبارة عن صور قديمة من كاميرات مختلفة، وبعضها عبارة عن عمليات مسح ضوئي، وبعضها من هواتفنا الذكية والبعض الآخر عبارة عن صور JPEG نفسها التي نتجت عن تصوير RAW + JPEG. نظرًا لأنني أختبر الكاميرات قليلًا، غالبًا ما أقوم بتصوير RAW + JPEG، لأن دعم RAW عادةً لا يكون متاحًا على الفور. حسنًا، أدى هذا في حد ذاته إلى إنشاء العديد من الجيجابايت من مساحة التخزين المهدرة، والتي تحتاج إلى التنظيف. ولكن السؤال هو كيف؟". إذا كنت تقوم بتصوير RAW + JPEG وتريد تنظيف كل مساحة التخزين المهدرة، فإليك بعض الخطوات التي يمكنك اتخاذها لتنظيف مكتبة الصور الخاصة بك في Lightroom. إذا لم يكن لديك Lightroom، يمكنك استخدام موجهات الأوامر لتصفح الصور وحذفها (يمكنك بسهولة العثور على مثل هذه البرامج النصية على Google)، ولكن هذا سيكون اقتراحًا أكثر خطورة، خاصة إذا لم تكن ماهرًا جدًا في التكنولوجيا. إذا لم يكن لديك Lightroom، فيمكنك تثبيت إصدار تجريبي وتنظيف مكتبتك ويمكنك إلغاء تثبيته بعد ذلك.

                              تعليق

                              يعمل...
                              X