كيف تم تصوير هذهالصورة ٤؟How Was This Picture Made #04?

تقليص
X
 
  • تصفية - فلترة
  • الوقت
  • عرض
إلغاء تحديد الكل
مشاركات جديدة

  • كيف تم تصوير هذهالصورة ٤؟How Was This Picture Made #04?

    كيف صورت هذه الصورة ٤؟
    How Was This Picture Made #04?

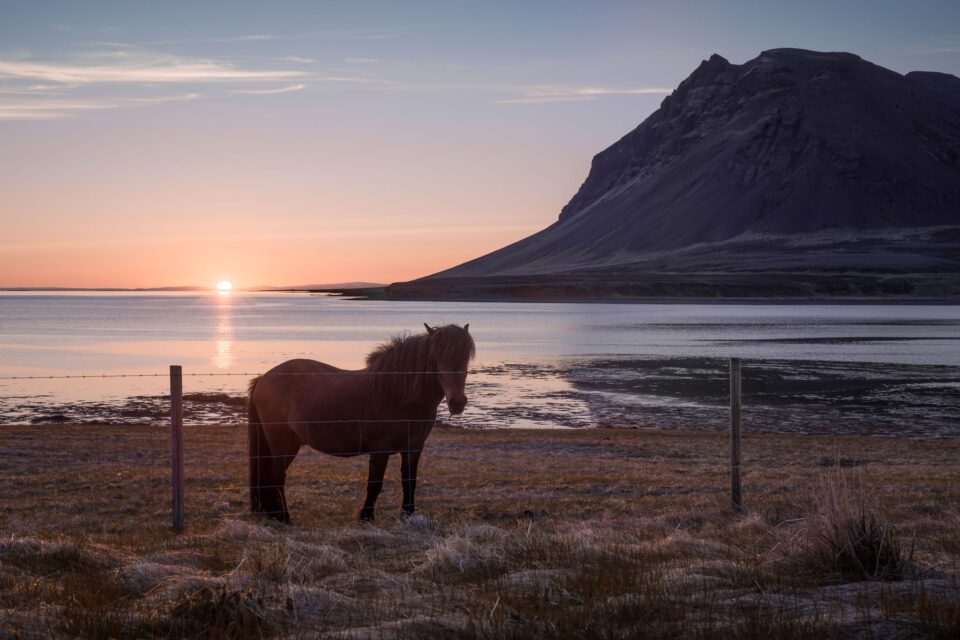
    To continue our “How was this picture taken?” series, I would like to invite our readers to analyze this photograph and try to figure out how it was made. It may not seem out-of-the-ordinary at first glance, but this was one of the most technically-difficult photographs I have ever taken. In fact, my post-processing was particularly interesting for this image, and I employed a technique that I have used only three or four other times in my life.


    Here are the questions related to this image:
    1. Is this a single photograph?
    2. What “unusual” post-processing did I do for this image?
    3. Did I use any filters while I was in the field?
    4. Which settings did I use for the photo? In particular, what was my exposure compensation (using matrix metering)?
    5. And just for fun – was this photograph taken at sunrise or sunset?


    ​ كيف صورت هذه الصورة ٤؟

    لمواصلة سؤالنا "كيف تم التقاط هذه الصورة؟" أود أن أدعو قرائنا إلى تحليل هذه الصورة ومحاولة معرفة كيفية التقاطها. قد لا يبدو الأمر غير عادي للوهلة الأولى، ولكن هذه كانت واحدة من أكثر الصور الفوتوغرافية التي التقطتها على الإطلاق صعوبة من الناحية الفنية. في الواقع، كانت عملية المعالجة اللاحقة التي قمت بها مثيرة للاهتمام بشكل خاص لهذه الصورة، واستخدمت تقنية لم أستخدمها إلا ثلاث أو أربع مرات أخرى في حياتي.


    ​

    فيما يلي الأسئلة المتعلقة بهذه الصورة: هل هذه صورة فوتوغرافية واحدة؟ ما هي المعالجة اللاحقة "غير العادية" التي قمت بها لهذه الصورة؟ هل استخدمت أي مرشحات أثناء وجودي في الميدان؟ ما هي الإعدادات التي استخدمتها للصورة؟ على وجه الخصوص، ما هو تعويض التعريض الضوئي الخاص بي (باستخدام معايرة المصفوفة)؟ وللمتعة فقط - هل تم التقاط هذه الصورة عند شروق الشمس أم غروبها؟

  • #2
    How Was This Picture Made #04: The Answer


    This article is the answer to my “How was this picture made?” post from a couple weeks ago. First, an apology – I intended to have this article published several days ago, but my winter classes already have taken their toll on my spare time (and sleep). That said, I hope the answer is worth the wait!


    In all, people did quite a good job of guessing how this image was taken. No one got every part of my question correct, but many of you were close. I especially would like to congratulate our reader Rob, who somehow managed to find the Google Maps location that I took the image. Well done! Others of you got four out of the five questions correct, so I must extend another congratulations.
    NIKON D800E + 50mm f/1.4 @ 50mm, ISO 100, 1/25, f/11.0
    Without further ado, then, here are the answers to my five questions:

    Table of Contents

    تعليق


    • #3
      كيف تم صنع هذه الصورة #04: الجواب


      هذه المقالة هي الإجابة على سؤالي "كيف تم التقاط هذه الصورة؟" مشاركة من بضعة أسابيع مضت. أولاً، اعتذار - كنت أنوي نشر هذا المقال منذ عدة أيام، لكن فصولي الشتوية أثرت بالفعل على وقت فراغي (والنوم). ومع ذلك، آمل أن يكون الجواب يستحق الانتظار!


      بشكل عام، قام الناس بعمل جيد جدًا في تخمين كيفية التقاط هذه الصورة. لم يقم أحد بإجابة كل جزء من سؤالي بشكل صحيح، لكن الكثير منكم كان قريبًا من ذلك. أود بشكل خاص أن أهنئ القارئ روب، الذي تمكن بطريقة ما من العثور على موقع خرائط Google الذي التقطت فيه الصورة. أحسنت! لقد حصل الآخرون منكم على أربعة أسئلة صحيحة من أصل خمسة، لذا يجب أن أقدم تهنئة أخرى.
      ​نيكون D800E + 50 مم f/1.4 @ 50 مم، ISO 100، 1/25، f/11.0
      ومن دون مزيد من اللغط، إليكم الإجابات على أسئلتي الخمسة:

      جدول المحتويات هل هذه صورة فوتوغرافية واحدة؟ ما هي المعالجة اللاحقة "غير العادية" التي قمت بها لهذه الصورة؟ هل استخدمت أي مرشحات أثناء وجودي في الميدان؟ ما هي الإعدادات التي استخدمتها للصورة؟ على وجه الخصوص، ما هو تعويض التعريض الضوئي الخاص بي (باستخدام معايرة المصفوفة)؟ وللمتعة فقط - هل تم التقاط هذه الصورة عند شروق الشمس أم غروبها؟
      تعليق


      • #4
        Is this a single photograph?


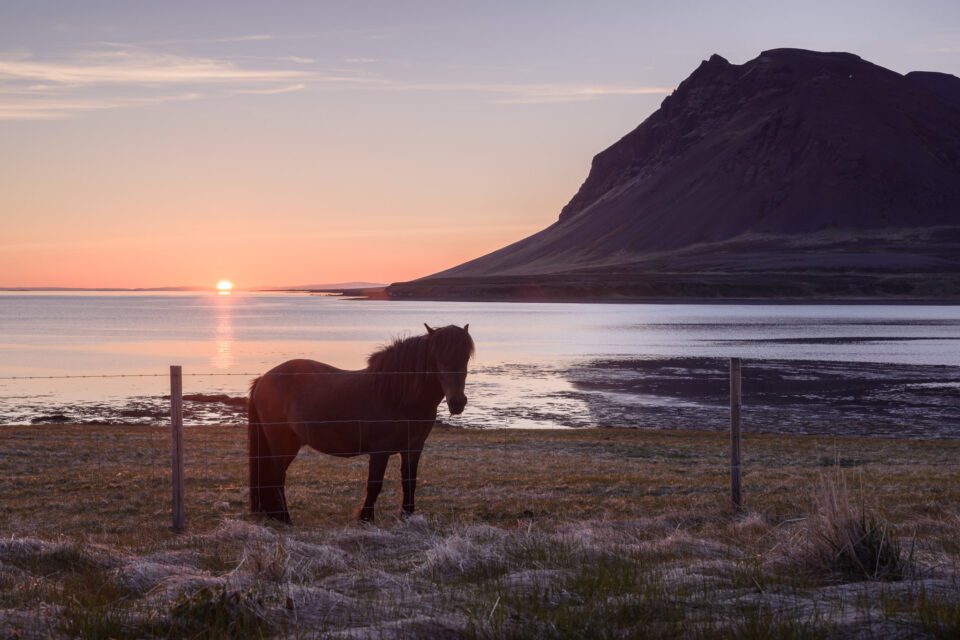
        Yes, it is a single image. Many people took the shadows as evidence that it was a composite – which is very clever thinking – but the image is just a single frame. Other readers suggested that I used an off-camera flash to illuminate the subject, which also is not the case. What happened instead (as I will mention in the next answer) is that I lifted the shadows fairly dramatically on the horse; if you do this, something is going to light your subject. In this particular case, due to the off-camera pattern of clouds, the light from the left-hand side of the sky was brightest; that’s why the horse appears lit from the left, even though it should be a silhouette. As much as it looks like a trick, it wasn’t!

        A couple of readers wisely pointed out that the fringes of the horse’s legs still look backlit, which shows that the main source of light is indeed from behind. An astute Photoshopper certainly could have added these highlights for a more realistic effect, but I am far from an expert at compositing! Indeed, no parts of this image were cloned or removed, aside from a couple of dust specks and distracting bits of snow.

        Also, the horse does indeed cast a shadow; the light is just so low that it is difficult to see. Look, though, at the grass closest to my camera. You can see a few backlit sparkles on either side of the horse, but none directly in the center of the image. Again, a professional photo manipulator easily could simulate this effect, but it was entirely natural in this case.

        تعليق


        • #5
          هل هذه صورة واحدة؟

          نعم هي صورة واحدة. اعتبر الكثير من الناس الظلال دليلاً على أنها كانت مركبة – وهو تفكير ذكي للغاية – لكن الصورة مجرد إطار واحد. اقترح قراء آخرون أنني استخدمت فلاشًا خارج الكاميرا لإلقاء الضوء على الموضوع، وهذا ليس هو الحال أيضًا. ما حدث بدلاً من ذلك (كما سأذكر في الإجابة التالية) هو أنني رفعت الظلال بشكل كبير إلى حد ما على الحصان؛ إذا قمت بذلك، فسيضيء شيء ما موضوعك. في هذه الحالة تحديدًا، نظرًا لنمط السحب بعيدًا عن الكاميرا، كان الضوء من الجانب الأيسر من السماء أكثر سطوعًا؛ ولهذا السبب يظهر الحصان مضاءً من اليسار، على الرغم من أنه يجب أن يكون صورة ظلية. بقدر ما يبدو الأمر وكأنه خدعة، لم يكن كذلك!

          أشار بعض القراء بحكمة إلى أن أطراف أرجل الحصان لا تزال تبدو مضاءة من الخلف، مما يدل على أن المصدر الرئيسي للضوء هو بالفعل من الخلف. من المؤكد أنه كان من الممكن أن يضيف Photoshopper الماهر هذه النقاط البارزة للحصول على تأثير أكثر واقعية، لكنني لست خبيرًا في التركيب! في الواقع، لم يتم استنساخ أو إزالة أي جزء من هذه الصورة، باستثناء بعض بقع الغبار وقطع الثلج المشتتة للانتباه.

          كما أن الحصان يلقي بظلاله بالفعل؛ الضوء منخفض جدًا بحيث يصعب رؤيته. انظر، مع ذلك، إلى العشب الأقرب إلى الكاميرا. يمكنك رؤية بعض التألقات ذات الإضاءة الخلفية على جانبي الحصان، ولكن لا يوجد أي منها مباشرة في وسط الصورة. مرة أخرى، يستطيع معالج الصور الاحترافي محاكاة هذا التأثير بسهولة، ولكن كان الأمر طبيعيًا تمامًا في هذه الحالة.

          تعليق


          • #6
            What “unusual” post-processing did I do for this image?


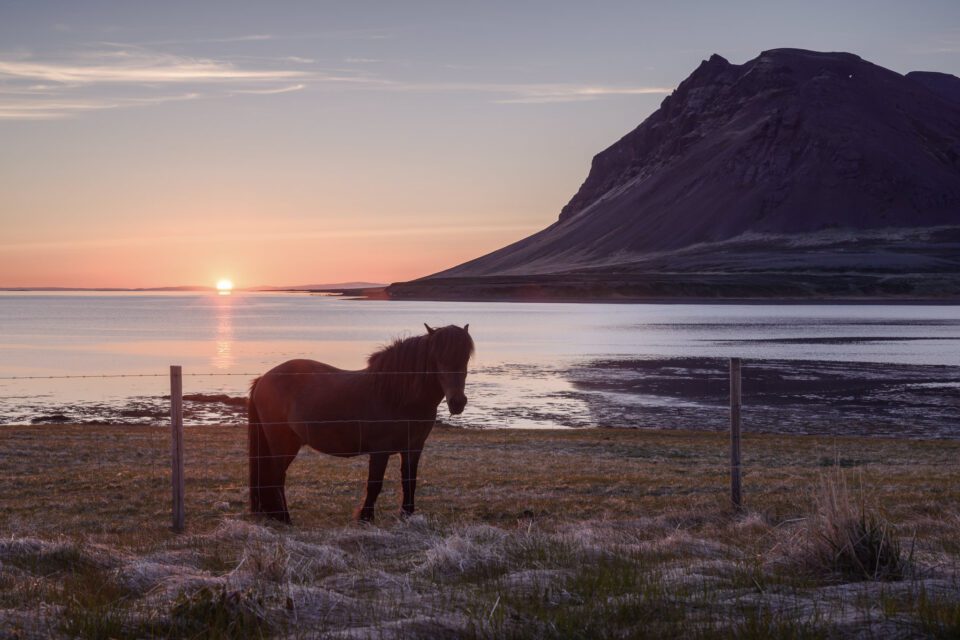
            This is the fun part. To process this image as best as possible, I needed to brighten it significantly. For comparison, here is the original RAW file (with Lightroom’s “camera standard” rendering):
            NIKON D800E + 50mm f/1.4 @ 50mm, ISO 100, 1/25, f/11.0
            Quite a big difference! If the photograph hadn’t been so dark, though, the sun would have lost all of its detail – underexposing was my only option. The tricky part was to make the image look natural in post-processing. (I was helped by the high dynamic range of my Nikon D800e, although I am convinced that most any modern camera would be able to make something of this shot.)

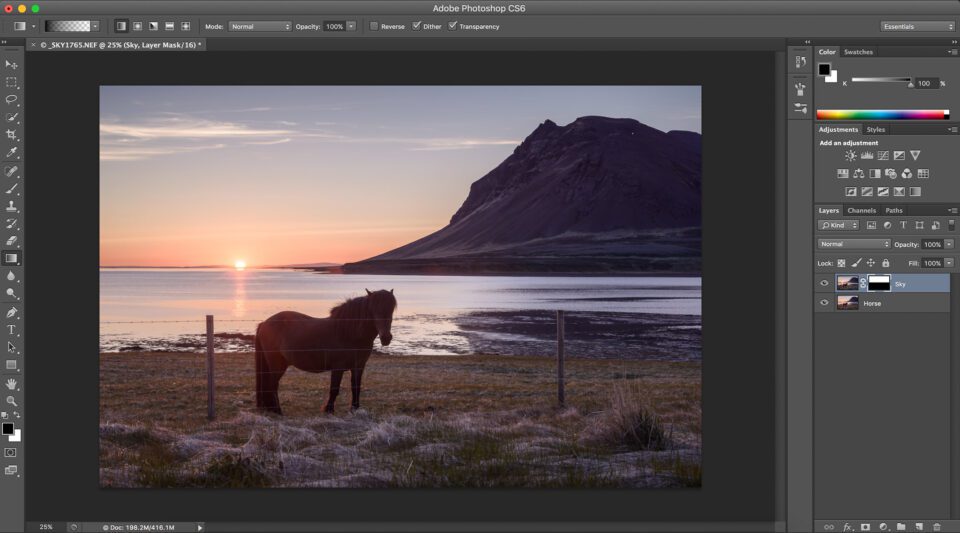
            Although I experimented for quite a while on this RAW photograph, I wasn’t getting anywhere. My edits for the land were ruining the sky, and vice versa. Even the local adjustments in Lightroom weren’t doing the job, since they are fairly limited in functionality (for instance, the Hue/Saturation/Lightness sliders are conspicuously absent from the local adjustment options). Since this image needed opposite post-processing adjustments for almost every slider, my best option was to combine two separate edits in Photoshop.

            Here is my initial Lightroom edit for the ground:
            NIKON D800E + 50mm f/1.4 @ 50mm, ISO 100, 1/25, f/11.0


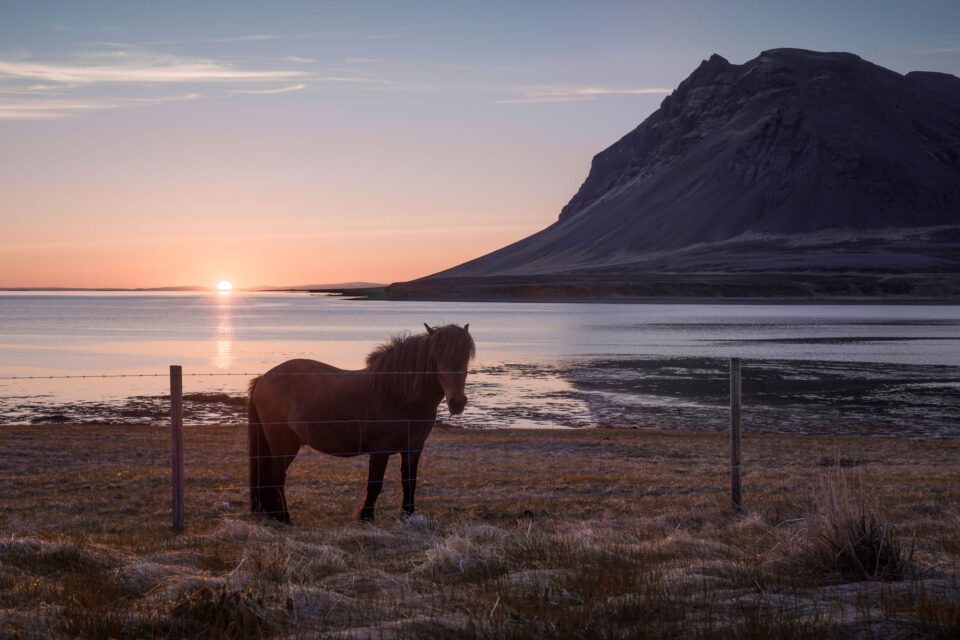
            More than anything, I increased the overall brightness of the image, then vastly decreased its highlights. The result is far better than the RAW file, but I don’t like the washed-out purple color of the sky. As much time as I spent with local adjustments, I couldn’t get the sky to be the nice blue color that I wanted. This was accomplished in a few seconds with a virtual copy:
            NIKON D800E + 50mm f/1.4 @ 50mm, ISO 100, 1/25, f/11.0
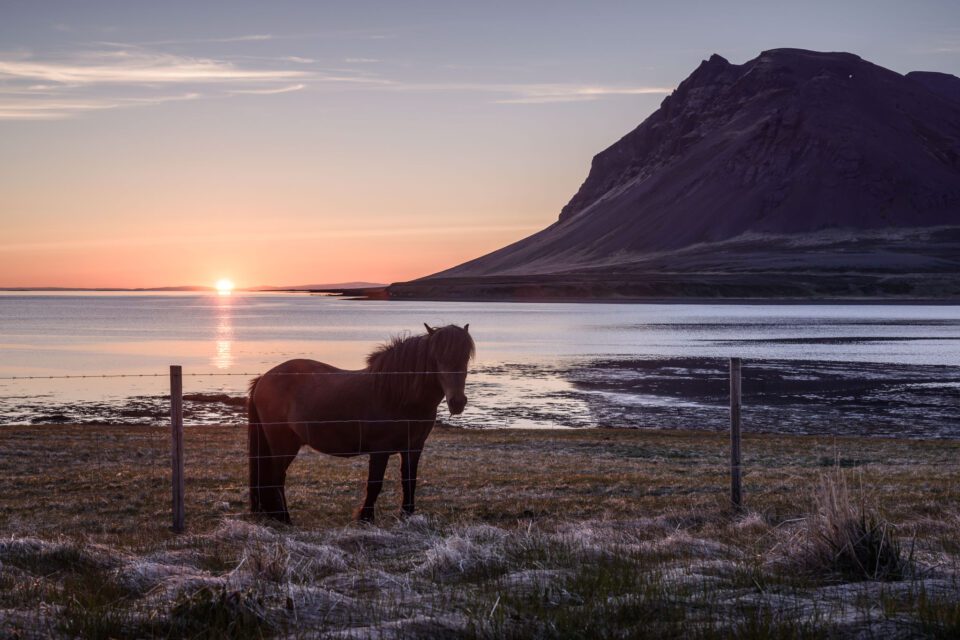
            With this separate copy, though, the colors in the ground are far too cool (and the clarity is too high, although that can be fixed by a local adjustment). To reach the final image, I brought both copies into Photoshop as layers, and I used a simple gradient mask to blend the two shots together. I centered the gradient along the horizon, making for the most natural transition. If I had wanted, I could have been more elaborate with my blending; in this case, there simply was no need for it.


            Here is the result of that blend:
            NIKON D800E + 50mm f/1.4 @ 50mm, ISO 100, 1/25, f/11.0
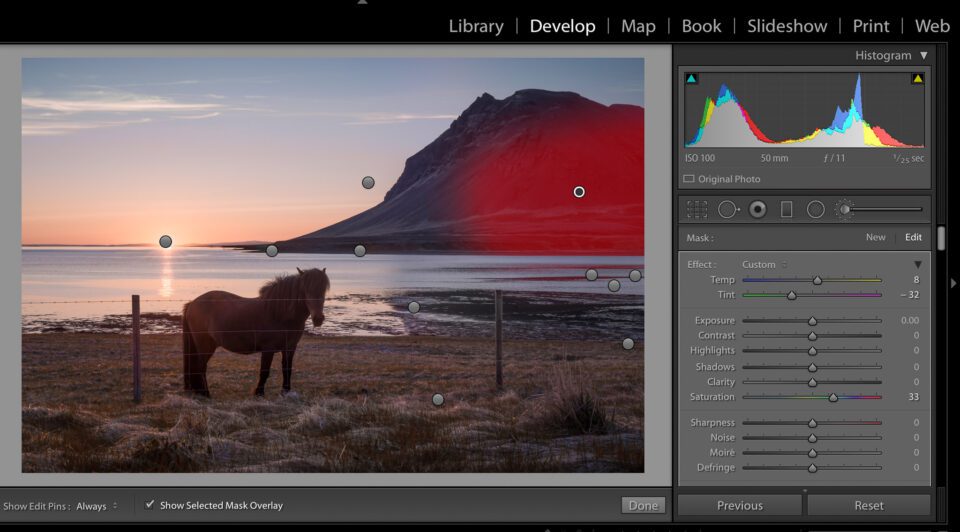
            It’s starting to look much better! I then exported the resulting image back to Lightroom, where I made a few final edits. I cloned out a few spots of snow, and I minimized the small amount of lens flare that had appeared. More than anything, I just changed around some local contrast and saturation, primarily trying to draw attention to my subject. This part was no different than for most of my images; the hard work is already done. Perhaps the most dramatic adjustment I made was to remove the purple cast of the right-hand mountain; I simply moved the “tint” slider to the left with a local brush. A screenshot shows some of my edits:


            Perhaps a more skilled photographer could do the same edits without Photoshop; I hold no delusions that my method is the only way to process such an image. Personally, though, this was the quickest way to reach my end goal. I rarely blend multiple copies of an image in post-processing, but it can be an invaluable technique when it is needed.

            تعليق


            • #7
              ما هي المعالجة اللاحقة "غير العادية" التي قمت بها لهذه الصورة؟


              هذا هو الجزء الممتع. لمعالجة هذه الصورة بأفضل شكل ممكن، كنت بحاجة إلى تفتيحها بشكل ملحوظ. للمقارنة، إليك ملف RAW الأصلي (مع عرض "معيار الكاميرا" الخاص بـ Lightroom):
              ​نيكون D800E + 50 مم f/1.4 @ 50 مم، ISO 100، 1/25، f/11.0
              فرق كبير جدا! لو لم تكن الصورة مظلمة جدًا، لكانت الشمس قد فقدت كل تفاصيلها - وكان التعريض الضوئي المنخفض هو خياري الوحيد. كان الجزء الصعب هو جعل الصورة تبدو طبيعية في مرحلة ما بعد المعالجة. (لقد ساعدني النطاق الديناميكي العالي لكاميرا Nikon D800e، على الرغم من أنني مقتنع بأن معظم الكاميرات الحديثة ستكون قادرة على صنع شيء ما من هذه اللقطة.)

              على الرغم من أنني قمت بالتجربة لفترة طويلة على هذه الصورة بصيغة RAW، إلا أنني لم أحقق أي نتيجة. تعديلاتي على الأرض كانت تدمر السماء، والعكس صحيح. حتى التعديلات المحلية في Lightroom لم تكن تؤدي المهمة، نظرًا لأنها محدودة إلى حد ما في الوظائف (على سبيل المثال، أشرطة تمرير Hue/Saturation/Lightness غائبة بشكل واضح عن خيارات التعديل المحلية). نظرًا لأن هذه الصورة كانت تحتاج إلى تعديلات معاكسة بعد المعالجة لكل شريط تمرير تقريبًا، كان أفضل خيار لدي هو الجمع بين تعديلين منفصلين في Photoshop.

              إليكم تعديل Lightroom الأولي للأرض:
              ​نيكون D800E + 50 مم f/1.4 @ 50 مم، ISO 100، 1/25، f/11.0


              الأهم من ذلك كله، أنني قمت بزيادة السطوع الإجمالي للصورة، ثم خفضت سطوعها بشكل كبير. وكانت النتيجة أفضل بكثير من ملف RAW، لكنني لا أحب اللون الأرجواني الباهت للسماء. على الرغم من الوقت الذي أمضيته في إجراء التعديلات المحلية، لم أتمكن من جعل السماء باللون الأزرق الجميل الذي أردته. تم إنجاز ذلك في بضع ثوانٍ باستخدام نسخة افتراضية:
              ​نيكون D800E + 50 مم f/1.4 @ 50 مم، ISO 100، 1/25، f/11.0
              مع هذه النسخة المنفصلة، ​​تكون الألوان الموجودة على الأرض رائعة جدًا (والوضوح مرتفع جدًا، على الرغم من أنه يمكن إصلاح ذلك عن طريق تعديل محلي). للوصول إلى الصورة النهائية، أحضرت النسختين إلى Photoshop كطبقات، واستخدمت قناعًا متدرجًا بسيطًا لمزج اللقطتين معًا. لقد قمت بتوسيط التدرج على طول الأفق، مما أدى إلى التحول الأكثر طبيعية. لو أردت، كان بإمكاني أن أكون أكثر تفصيلاً في عملية المزج الخاصة بي؛ وفي هذه الحالة، ببساطة لم تكن هناك حاجة لذلك.

              ​

              وهذه نتيجة هذا الخليط:
              ​نيكون D800E + 50 مم f/1.4 @ 50 مم، ISO 100، 1/25، f/11.0
              لقد بدأت تبدو أفضل بكثير! ثم قمت بعد ذلك بتصدير الصورة الناتجة مرة أخرى إلى Lightroom، حيث أجريت بعض التعديلات النهائية. لقد قمت باستنساخ بعض بقع الثلج، وقمت بتقليل كمية توهج العدسة الصغيرة التي ظهرت. أكثر من أي شيء آخر، لقد قمت بتغيير بعض التباين والتشبع المحلي، محاولًا في المقام الأول لفت الانتباه إلى موضوعي. لم يكن هذا الجزء مختلفًا عن معظم صوري؛ لقد تم العمل الشاق بالفعل. ربما كان التعديل الأكثر دراماتيكية الذي أجريته هو إزالة القالب الأرجواني للجبل الأيمن؛ لقد قمت ببساطة بتحريك شريط تمرير "الصبغة" إلى اليسار باستخدام فرشاة محلية. تعرض لقطة الشاشة بعض تعديلاتي:

              ​

              ربما يستطيع المصور الأكثر مهارة إجراء نفس التعديلات بدون استخدام Photoshop؛ لا أحمل أي أوهام بأن طريقتي هي الطريقة الوحيدة لمعالجة مثل هذه الصورة. شخصيًا، كانت هذه هي أسرع طريقة للوصول إلى هدفي النهائي. نادرًا ما أقوم بمزج نسخ متعددة من الصورة في مرحلة ما بعد المعالجة، ولكن يمكن أن يكون هذا أسلوبًا لا يقدر بثمن عند الحاجة إليه.

              تعليق


              • #8
                Did I use any filters while I was in the field?


                This question tripped up most readers, although that certainly was not my intent. I did use a filter for this photograph – specifically, a soft-edged graduated filter with a -2.5 stop rating. This helped me keep the sky and water manageable, as you can see in the original photograph, although it may not have been essential.
                Which settings did I use for the photo? In particular, what was my exposure compensation (using matrix metering)?


                I asked this question because I wanted to point out a particular feature of the matrix meter in most cameras, and one which may not be obvious at first. This photograph was vastly underexposed – an exposure compensation of -2 and 2/3. (I was in aperture-priority mode.) Most commenters in the original article were correct, but others said just the opposite: they believed I had a significant positive exposure compensation. Why is this?

                If you have ever shot into the sun, or another bright light source, you may realize that your meter underexposes the image heavily – it tries too hard to preserve highlight detail, and you may need a high exposure compensation as a result (assuming that you don’t blow out any important highlights). In this photograph, though, the sun was not yet bright enough for my camera’s meter to care; as far as I could tell, it didn’t even take the sun into consideration.

                This is an interesting scenario if you are shooting into a bright light, particularly one which changes in intensity. At first, the meter may not yet recognize the bright object at all; once it does, your reading may change suddenly and significantly. If you want definition in your highlights – as I did for this photograph – you will need a vastly shorter exposure than the camera recommends.

                Aside from exposure compensation, my other settings depended entirely upon the brightness of the scene (and the wide depth of field that I needed): f/11, 1/25 second, and ISO 100. My D800e was on a tripod with the Sigma 50mm f/1.4 A lens; as one commenter mentioned, the lens quality is the reason that this image has minimal flare (although I corrected it slightly in Lightroom). I took several photographs to ensure that the horse would be sharp at 1/25 second, but I didn’t need to worry – that horse was a perfect subject!

                تعليق


                • #9
                  هل استخدمت أي مرشحات أثناء وجودي في الميدان؟

                  لقد أزعج هذا السؤال معظم القراء، على الرغم من أن هذا لم يكن هدفي بالتأكيد. لقد استخدمت مرشحًا لهذه الصورة - على وجه التحديد، مرشحًا متدرجًا ذو حواف ناعمة مع تصنيف توقف -2.5. لقد ساعدني هذا في الحفاظ على التحكم في السماء والمياه، كما ترون في الصورة الأصلية، على الرغم من أنه ربما لم يكن ضروريًا.

                  ما الإعدادات التي استخدمتها للصورة؟ على وجه الخصوص، ما هو تعويض التعريض الضوئي الخاص بي (باستخدام قياس المصفوفة)؟

                  لقد طرحت هذا السؤال لأنني أردت الإشارة إلى ميزة معينة لمقياس المصفوفة في معظم الكاميرات، والتي قد لا تكون واضحة في البداية. كانت هذه الصورة منخفضة التعرض للضوء إلى حد كبير - تعويض تعريض ضوئي قدره -2 و2/3. (كنت في وضع أولوية فتحة العدسة.) كان معظم المعلقين في المقالة الأصلية على حق، لكن آخرين قالوا عكس ذلك تمامًا: لقد اعتقدوا أنني حصلت على تعويض تعريض إيجابي كبير. لماذا هذا؟

                  إذا سبق لك أن التقطت صورة في الشمس، أو مصدر ضوء ساطع آخر، فقد تدرك أن جهاز القياس الخاص بك يقلل من تعريض الصورة بشكل كبير - فهو يحاول جاهدًا الحفاظ على تفاصيل التمييز، وقد تحتاج إلى تعويض تعريض ضوئي مرتفع نتيجة لذلك (بافتراض أنك لا تفجر أي نقاط بارزة مهمة). ومع ذلك، في هذه الصورة، لم تكن الشمس مشرقة بما يكفي حتى يهتم بها عداد الكاميرا؛ وبقدر ما أستطيع أن أقول، فإنه لم يأخذ حتى الشمس بعين الاعتبار.

                  يعد هذا سيناريو مثيرًا للاهتمام إذا كنت تقوم بالتصوير في ضوء ساطع، خاصة الضوء الذي يتغير في شدته. في البداية، قد لا يتعرف جهاز القياس على الجسم الساطع على الإطلاق؛ بمجرد أن يحدث ذلك، قد تتغير قراءتك فجأة وبشكل ملحوظ. إذا كنت تريد تعريفًا في النقاط البارزة - كما فعلت في هذه الصورة - فستحتاج إلى تعريض ضوئي أقصر بكثير مما توصي به الكاميرا.

                  بصرف النظر عن تعويض التعريض الضوئي، اعتمدت إعداداتي الأخرى كليًا على سطوع المشهد (والعمق الواسع للمجال الذي أحتاجه): f/11، و1/25 ثانية، وISO 100. وكانت كاميرا D800e الخاصة بي موضوعة على حامل ثلاثي الأرجل مزود بـ Sigma. عدسة 50 ملم f/1.4؛ كما ذكر أحد المعلقين، فإن جودة العدسة هي السبب في أن هذه الصورة تحتوي على الحد الأدنى من التوهج (على الرغم من أنني قمت بتصحيحها قليلاً في Lightroom). لقد التقطت العديد من الصور للتأكد من أن الحصان سيكون حادًا عند 1/25 ثانية، لكن لم يكن هناك داع للقلق - كان هذا الحصان موضوعًا مثاليًا!

                  تعليق


                  • #10
                    And just for fun – was this photograph taken at sunrise or sunset?


                    I was very impressed that most people guessed that the photo was taken at sunrise – I didn’t think that this question would be so easy! Also, I will give credit to the readers who said that this was the midnight sun, and thus neither sunset nor sunrise. Indeed, I took the photo right around Iceland’s summer solstice, when the sun barely dips below the horizon. However, Iceland is mostly below the Arctic circle, and at my elevation the sun actually did set – though only for an hour or so. Technically, yes, this image is from sunrise; at the same time, it was taken at two in the morning!

                    I hope that this exercise was fun and informative – I certainly enjoyed writing it.

                    تعليق


                    • #11
                      وللتسلية فقط – هل تم التقاط هذه الصورة عند شروق الشمس أم غروبها؟
                      لقد تأثرت كثيرًا لأن معظم الناس ظنوا أن الصورة تم التقاطها عند شروق الشمس، ولم أكن أعتقد أن هذا السؤال سيكون بهذه السهولة! وأيضًا، سأعطي الفضل للقراء الذين قالوا إن هذه كانت شمس منتصف الليل، وبالتالي لا غروب ولا شروق. في الواقع، لقد التقطت الصورة بالقرب من الانقلاب الصيفي في أيسلندا، عندما تنخفض الشمس بالكاد تحت الأفق. ومع ذلك، فإن أيسلندا تقع في معظمها تحت الدائرة القطبية الشمالية، وعلى ارتفاعي تغرب الشمس بالفعل، ولو لمدة ساعة أو نحو ذلك فقط. من الناحية الفنية، نعم، هذه الصورة من شروق الشمس. وفي نفس الوقت تم التقاطها في الساعة الثانية صباحًا!

                      أتمنى أن يكون هذا التمرين ممتعًا وغنيًا بالمعلومات - لقد استمتعت بالتأكيد بكتابته.

                      تعليق

                      يعمل...
                      X