معايرة شاشة Dell u2413 How to Properly Calibrate Dell U2413 / U2713H / U3014 Monitors

تقليص
X
 
  • تصفية - فلترة
  • الوقت
  • عرض
إلغاء تحديد الكل
مشاركات جديدة

  • معايرة شاشة Dell u2413 How to Properly Calibrate Dell U2413 / U2713H / U3014 Monitors

    How to Properly Calibrate Dell U2413 / U2713H / U3014 Monitors

    After we published our article on 10 bit per channel workflow, our readers requested to provide information on how to calibrate monitors with a built-in Look-Up Table (LUT). Specifically, a number of our readers asked to provide a detailed guide on how to properly calibrate the Dell U2413, U2713H and U3014 monitors, which we have recommended a number of times before due to their affordable price, attractive features and superb color reproduction for photography needs. Historically, true 10-bit and higher monitors with hardware LUT capabilities were extremely expensive, making them only attractive to those with large budgets. With the introduction of sub-$500 monitors featuring professional-grade IPS panels (read our article here to understand IPS terminology), those with tighter budgets are now seriously considering such monitors for photography work. Unfortunately, many end up even more confused after acquiring such tools due to questions related to proper monitor calibration.


    كيفية معايرة شاشات Dell U2413 / U2713H / U3014 بشكل صحيح

    بعد أن نشرنا مقالتنا حول سير عمل 10 بت لكل قناة، طلب قراؤنا تقديم معلومات حول كيفية معايرة الشاشات باستخدام جدول البحث المدمج (LUT). على وجه التحديد، طلب عدد من قرائنا تقديم دليل تفصيلي حول كيفية معايرة شاشات Dell U2413 وU2713H وU3014 بشكل صحيح، والتي أوصينا بها عدة مرات من قبل نظرًا لسعرها المعقول وميزاتها الجذابة وإعادة إنتاج الألوان الرائعة للتصوير الفوتوغرافي الاحتياجات. تاريخيًا، كانت الشاشات الحقيقية ذات 10 بت والأعلى المزودة بقدرات LUT للأجهزة باهظة الثمن للغاية، مما يجعلها جذابة فقط لأولئك الذين لديهم ميزانيات كبيرة. مع تقديم شاشات أقل من 500 دولار تتميز بلوحات IPS ذات درجة احترافية (اقرأ مقالتنا هنا لفهم مصطلحات IPS)، يفكر الأشخاص ذوو الميزانيات المحدودة الآن بجدية في استخدام هذه الشاشات لأعمال التصوير الفوتوغرافي. لسوء الحظ، ينتهي الأمر بالعديد من الأشخاص إلى المزيد من الارتباك بعد الحصول على مثل هذه الأدوات بسبب الأسئلة المتعلقة بمعايرة الشاشة المناسبة.

  • #2
    Table of Contents
    جدول المحتويات
    معايرة البرامج مقابل معايرة الأجهزة إعداد تثبيت البرامج والأجهزة البرامج إعادة تعيين تثبيت البرامج إلى إعدادات المصنع الافتراضية عملية معايرة LUT للأجهزة

    تعليق


    • #3

      1) Software vs Hardware Calibration


      There are two types of calibrations available for monitors – software and hardware. Software calibration works by modifying the colors via the computer graphics card and loading those colors every time the operating system boots. Software calibration is usually performed on monitors that do not have the LUT capability (very few do). Thus, most monitors on the market today would be calibrated via software. During the calibration process, calibration software will usually ask to adjust brightness, contrast and color levels on the monitor, if such options are available.

      Hardware calibration, on the other hand, generates a Look Up Table that is written into the monitor to map all the colors. Brightness, contrast and color levels are automatically adjusted by the monitor through calibration software. Compared to software, hardware calibration is much more accurate and there is no need to modify color output through the graphics card. Depending on the monitor type / model, several combinations of color calibration are possible. With the Dell U2413, for example, one can calibrate two separate user-selectable preset modes: CAL1 and CAL2. This allows calibrating the U2413 for several color spaces such as AdobeRGB and sRGB. Please note that the factory-calibrated AdobeRGB and sRGB profiles are different and might not be as accurate, especially after several months of use.
      1) معايرة البرامج مقابل الأجهزة

      هناك نوعان من المعايرة المتاحة للشاشات – البرامج والأجهزة. تعمل معايرة البرامج عن طريق تعديل الألوان عبر بطاقة رسومات الكمبيوتر وتحميل تلك الألوان في كل مرة يتم فيها تشغيل نظام التشغيل. عادةً ما يتم إجراء معايرة البرامج على الشاشات التي لا تتمتع بإمكانية جدول البحث (LUT) (عدد قليل جدًا منها). وبالتالي، سيتم معايرة معظم الشاشات الموجودة في السوق اليوم عبر البرامج. أثناء عملية المعايرة، سيطلب برنامج المعايرة عادةً ضبط مستويات السطوع والتباين والألوان على الشاشة، إذا كانت هذه الخيارات متاحة.

      من ناحية أخرى، تؤدي معايرة الأجهزة إلى إنشاء جدول بحث مكتوب على الشاشة لتعيين كافة الألوان. يتم ضبط مستويات السطوع والتباين والألوان تلقائيًا بواسطة الشاشة من خلال برنامج المعايرة. بالمقارنة مع البرامج، تعد معايرة الأجهزة أكثر دقة وليس هناك حاجة لتعديل إخراج الألوان من خلال بطاقة الرسومات. اعتمادًا على نوع/طراز الشاشة، من الممكن إجراء عدة مجموعات من معايرة الألوان. باستخدام الطراز U2413 من Dell، على سبيل المثال، يمكن للمرء معايرة وضعين منفصلين محددين مسبقًا بواسطة المستخدم: CAL1 وCAL2. يتيح ذلك معايرة U2413 للعديد من مساحات الألوان مثل AdobeRGB وsRGB. يرجى ملاحظة أن ملفات تعريف AdobeRGB وsRGB التي تمت معايرتها في المصنع مختلفة وقد لا تكون دقيقة، خاصة بعد عدة أشهر من الاستخدام.

      تعليق


      • #4

        2) Calibration Hardware and Software


        The Dell U2413 / U2713H and U3014 monitors have a very specific process for hardware calibration using the LUT. They require the X-Rite i1 Display Pro hardware and specific Dell UltraSharp Color Calibration software. Unfortunately, you cannot use any other hardware or software for true hardware LUT calibration. Even using X-Rite’s calibration software will not work, only giving you options for software calibration, since only the Dell calibration software contains specific drivers for these Dell monitors.

        Once you get the X-Rite i1 Display Pro Colorimeter, it is time to download the Dell UltraSharp Calibration Solution. As of 07/16/2014, the latest version is 1.5.3 and it can be downloaded directly from Dell’s support page. Go ahead and download the software.
        2) أجهزة وبرامج المعايرة

        تتمتع الشاشات U2413 / U2713H وU3014 من Dell بعملية محددة للغاية لمعايرة الأجهزة باستخدام جدول البحث (LUT). وهي تتطلب أجهزة X-Rite i1 Display Pro وبرنامج محدد لمعايرة الألوان UltraSharp من Dell. لسوء الحظ، لا يمكنك استخدام أي أجهزة أو برامج أخرى لمعايرة LUT للأجهزة بشكل صحيح. حتى استخدام برنامج معايرة X-Rite لن ينجح، مما يمنحك فقط خيارات لمعايرة البرنامج، نظرًا لأن برنامج معايرة Dell فقط هو الذي يحتوي على برامج تشغيل محددة لشاشات Dell هذه.

        بمجرد حصولك على مقياس الألوان X-Rite i1 Display Pro، فقد حان الوقت لتنزيل حل المعايرة UltraSharp من Dell. اعتبارًا من 16/07/2014، أحدث إصدار هو 1.5.3 ويمكن تنزيله مباشرة من صفحة دعم Dell. المضي قدما وتنزيل البرنامج.

        تعليق


        • #5
          3) Software Installation Preparation


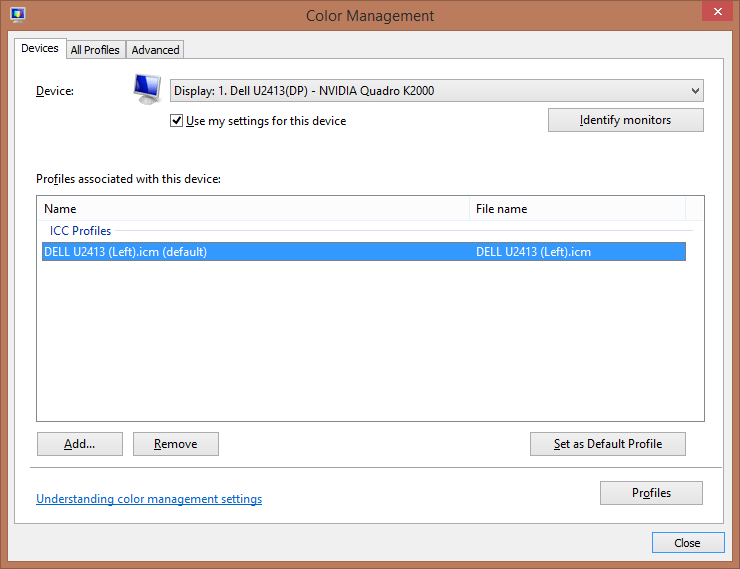
          Before installing the software, absolutely make sure that you uninstall all existing color calibration software and profiles. If you have previously installed X-Rite’s calibration software, go ahead and uninstall it completely and reboot the computer. Next, open up “Color Management” in Control Panel and make sure to get rid of all existing color profiles that you have previously created. When the window opens up, check “Use my settings for this device”, then select every ICC profile and click the “Remove” button:


          Make sure to do this for every monitor you have. Once you get to the last profile, your computer will complain that the color profile is default. Click “Continue” and delete the default profile as well. After you delete all profiles, reboot the computer one more time.

          After the computer is rebooted, go back to Color Management and make sure that all custom profiles are deleted under the “All Profiles” tab. Do not delete any of the default ICC profiles – only delete the ones that you specifically created for your monitor(s) before.


          3) إعداد تثبيت البرمجيات

          قبل تثبيت البرنامج، تأكد تمامًا من إلغاء تثبيت كافة برامج وملفات تعريف معايرة الألوان الموجودة. إذا كنت قد قمت مسبقًا بتثبيت برنامج معايرة X-Rite، فاستمر في إلغاء تثبيته بالكامل وأعد تشغيل الكمبيوتر. بعد ذلك، افتح "إدارة الألوان" في لوحة التحكم وتأكد من التخلص من جميع ملفات تعريف الألوان الموجودة التي قمت بإنشائها مسبقًا. عندما تفتح النافذة، حدد "استخدام إعداداتي لهذا الجهاز"، ثم حدد كل ملف تعريف ICC وانقر فوق الزر "إزالة":


          تأكد من القيام بذلك لكل شاشة لديك. بمجرد وصولك إلى ملف التعريف الأخير، سيشكو جهاز الكمبيوتر الخاص بك من أن ملف تعريف الألوان هو الوضع الافتراضي. انقر فوق "متابعة" واحذف ملف التعريف الافتراضي أيضًا. بعد حذف جميع ملفات التعريف، أعد تشغيل الكمبيوتر مرة أخرى.

          بعد إعادة تشغيل الكمبيوتر، ارجع إلى إدارة الألوان وتأكد من حذف جميع ملفات التعريف المخصصة ضمن علامة التبويب "جميع ملفات التعريف". لا تحذف أيًا من ملفات تعريف ICC الافتراضية - فقط احذف الملفات التي قمت بإنشائها خصيصًا لشاشتك (شاشاتك) من قبل.

          تعليق


          • #6
            4) Software Installation


            Now that your system is clean, go ahead and install the Dell UltraSharp Calibration Solution. The process is pretty self-explanatory – just click Next until the software starts installing. Once the installation is complete, you should have a monitor icon on your desktop that says “Dell UltraSharp Calibration Solution”. Go ahead and double click it to start the calibration software.
            4) تثبيت البرامج

            الآن بعد أن أصبح نظامك نظيفًا، تابع وقم بتثبيت حل المعايرة UltraSharp من Dell. العملية واضحة بذاتها - ما عليك سوى النقر فوق "التالي" حتى يبدأ تثبيت البرنامج. بمجرد اكتمال التثبيت، يجب أن يكون لديك رمز شاشة على سطح المكتب الخاص بك مكتوب عليه "Dell UltraSharp Calibration Solution". تفضل بالمضي قدمًا وانقر عليه نقرًا مزدوجًا لبدء برنامج المعايرة.

            تعليق


            • #7
              5) Reset to Factory Defaults


              At this point, you should reset your monitor to factory default settings. This will wipe out existing LUT data and return the monitor to the “clean” state for proper calibration. Resetting to factory defaults is easy – press the navigation button on the side of the monitor, then go to Menu -> Other Settings -> Factory Reset. Only start the calibration process after all monitors are fully reset
              5) إعادة التعيين إلى إعدادات المصنع الافتراضية

              في هذه المرحلة، يجب عليك إعادة ضبط شاشتك على إعدادات المصنع الافتراضية. سيؤدي هذا إلى مسح بيانات جدول البحث (LUT) الموجودة وإعادة الشاشة إلى الحالة "النظيفة" لإجراء المعايرة المناسبة. تعد إعادة الضبط إلى إعدادات المصنع الافتراضية أمرًا سهلاً - اضغط على زر التنقل الموجود على جانب الشاشة، ثم انتقل إلى القائمة -> إعدادات أخرى -> إعادة ضبط المصنع. لا تبدأ عملية المعايرة إلا بعد إعادة ضبط كافة الشاشات بالكامل

              تعليق


              • #8

                6) Hardware LUT Calibration Process


                Before starting the calibration process, you will have to decide what “RGB primary”, or color space to emulate. The software will give you the following options:
                1. AdobeRGB
                2. sRGB
                3. Rec. 601
                4. DCI-P3 Emulation
                5. SMPTE-C
                6. Native

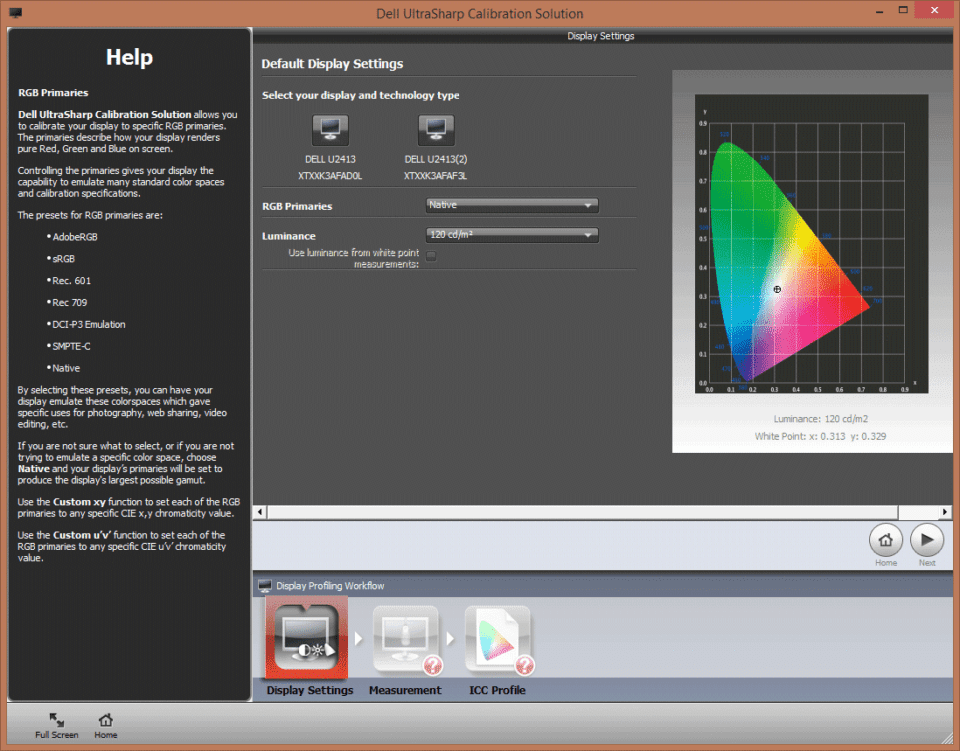
                Out of all the modes listed above, the “Native” mode will give you the most number of colors, so I would recommend to start with that one. Both AdobeRGB and sRGB will limit the color space to a smaller number, with sRGB stripping out most of the color gamut. Therefore, my recommendation would be to calibrate the “CAL 1” preset to “Native” color space for the most colors and “CAL 2” to “sRGB”. This way, you would normally be looking at the most number of colors in “CAL 1” Preset and if you need to fall back to less colors for images that you are publishing to the web or perhaps printing in sRGB color space, you could change to “CAL 2” Preset. If you do a lot of printing and your printer / printing company can work with AdobeRGB color space, then set “CAL 2” to AdobeRGB instead. Basically, set up these color profiles to color space you will be using the most. Personally, I set up mine to “Native” and “sRGB”, with “Native” staying as default preset most of the time.

                When the software launches, you will be presented with the home screen that has a number of options to the left of the screen such as “Display Profiling”, “Projector Profiling”, “Printer Profiling” and “Scanner Profiling”. Go ahead and click on “Display Profiling”. On the next page, you will be presented with Display Settings. This screen will show the RGB Primary referenced above and the Luminance level. Go ahead and pick “Native” and “120 cd/m2“.


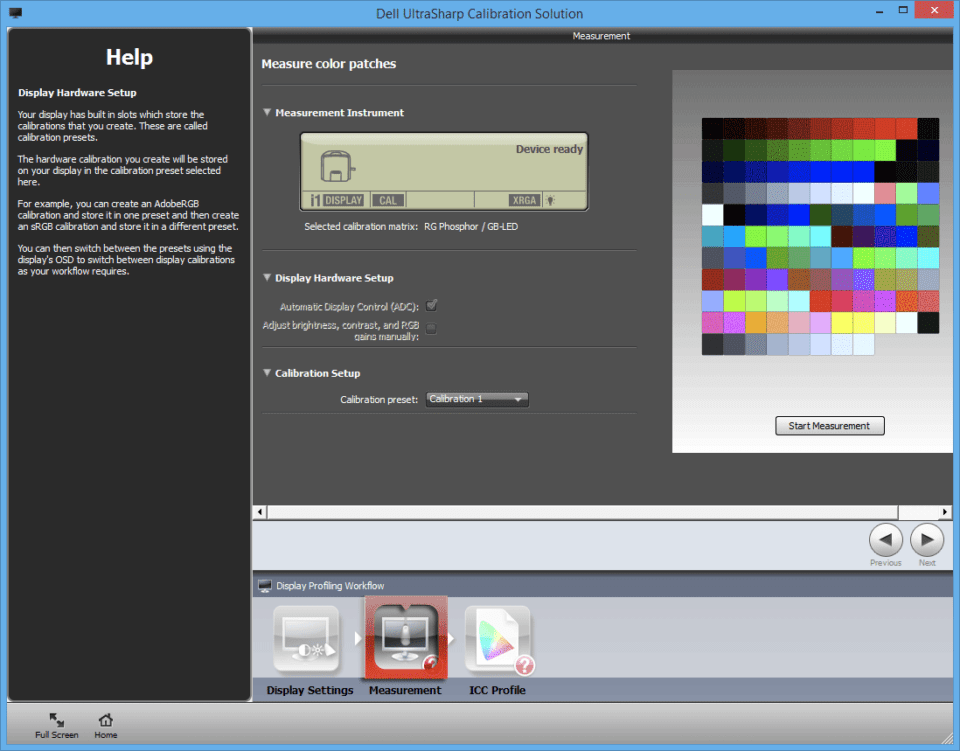
                Click Next and you will be presented with the “Measurement” screen. Make sure to pick “Calibration 1” and now do the same on your monitor by going to Preset Modes -> Color Space -> CAL 1. Once there, click the “Start Measurement” button:


                Now the software will ask you to hang the colorimeter on the center of the monitor to start the calibration process. First, the software will determine the brightness and contrast levels and after that, it will start measuring all the colors. The whole process will take between 5 to 10 minutes to complete. Once the calibration is complete, you will be presented with a screen to save the profile name. I saved mine as “DELL U2413 (Left).icm” for the left screen and “DELL U2413 (Right).icm” for the right screen.

                Please note that the current version of Dell UltraSharp Calibration Solution has a problem when calibrating the second screen – the software might not recognize the LUT hardware. If you do not see the above-mentioned color spaces and if the “Selected calibration matrix” is not “RG Phosphor / GB-LED”, then you will have to run calibration through a workaround until Dell addresses the issue in the next release. The workaround is simple – all you have to do is turn off the primary display, close the software and relaunch it. In single monitor mode, the software will recognize the hardware and let you calibrate the screen. After calibration is finished, turn the primary display back on and you will be good to go.

                If you want to set up CAL 2 for sRGB, repeat the same process, except this time change the “RGB primary” setting to sRGB. Make sure to pick CAL 2 on your monitor before you start the calibration process, or you will end up overwriting the CAL 1 preset.

                That’s really it as far as calibration is concerned! Please let me know if you have any questions!

                NOTE: This guide can also be used to calibrate the new Dell 4K monitors: UP2414Q and UP3214Q.

                تعليق


                • #9
                  6) عملية معايرة LUT للأجهزة


                  قبل البدء في عملية المعايرة، سيتعين عليك تحديد "RGB الأساسي" أو مساحة اللون التي تريد محاكاتها. سيعطيك البرنامج الخيارات التالية: AdobeRGBsRGBRec. مضاهاة 601DCI-P3SMPTE-CNative
                  من بين جميع الأوضاع المذكورة أعلاه، سيمنحك الوضع "الأصلي" أكبر عدد من الألوان، لذا أوصي بالبدء بهذا الوضع. سيحد كل من AdobeRGB وsRGB من مساحة الألوان إلى رقم أصغر، مع تجريد sRGB من معظم التدرج اللوني. ولذلك، فإن توصيتي هي معايرة الإعداد المسبق "CAL 1" إلى مساحة الألوان "الأصيلة" لمعظم الألوان و"CAL 2" إلى "sRGB". بهذه الطريقة، ستنظر عادةً إلى أكبر عدد من الألوان في الإعداد المسبق "CAL 1" وإذا كنت بحاجة إلى الرجوع إلى ألوان أقل للصور التي تنشرها على الويب أو ربما تطبعها في مساحة ألوان sRGB، فيمكنك تغييرها إلى "CAL 2" مسبقا. إذا كنت تقوم بالكثير من أعمال الطباعة ويمكن لشركة الطابعة/الطباعة الخاصة بك العمل مع مساحة ألوان AdobeRGB، فقم بتعيين "CAL 2" على AdobeRGB بدلاً من ذلك. بشكل أساسي، قم بإعداد ملفات تعريف الألوان هذه على مساحة الألوان التي ستستخدمها كثيرًا. شخصيًا، قمت بإعداد إعداداتي على "Native" و"sRGB"، مع بقاء "Native" كإعداد افتراضي مسبقًا في معظم الأوقات.

                  عند إطلاق البرنامج، ستظهر لك الشاشة الرئيسية التي تحتوي على عدد من الخيارات على يسار الشاشة مثل "ملف تعريف العرض" و"ملف تعريف جهاز العرض" و"ملف تعريف الطابعة" و"ملف تعريف الماسح الضوئي". تابع وانقر على "عرض ملف التعريف". في الصفحة التالية، ستظهر لك إعدادات العرض. ستعرض هذه الشاشة RGB الأساسي المشار إليه أعلاه ومستوى النصوع. تفضل واختر "Native" و"120 cd/m2".

                  ​
                  انقر على "التالي" وستظهر لك شاشة "القياس". تأكد من اختيار "المعايرة 1" وقم الآن بنفس الشيء على شاشتك بالانتقال إلى أوضاع الإعداد المسبق -> مساحة اللون -> CAL 1. وبمجرد الوصول إلى هناك، انقر فوق الزر "بدء القياس":

                  ​

                  سيطلب منك البرنامج الآن تعليق مقياس الألوان في منتصف الشاشة لبدء عملية المعايرة. أولاً، سيحدد البرنامج مستويات السطوع والتباين وبعد ذلك سيبدأ في قياس جميع الألوان. ستستغرق العملية برمتها ما بين 5 إلى 10 دقائق حتى تكتمل. بمجرد اكتمال المعايرة، ستظهر لك شاشة لحفظ اسم ملف التعريف. لقد قمت بحفظ ملفي باسم "DELL U2413 (يسار).icm" للشاشة اليسرى و"DELL U2413 (يمين).icm" للشاشة اليمنى.

                  يرجى ملاحظة أن الإصدار الحالي من Dell UltraSharp Calibration Solution يواجه مشكلة عند معايرة الشاشة الثانية - فقد لا يتعرف البرنامج على جهاز LUT. إذا كنت لا ترى مساحات الألوان المذكورة أعلاه وإذا كانت "مصفوفة المعايرة المحددة" ليست "RG Phosphor / GB-LED"، فسيتعين عليك تشغيل المعايرة من خلال حل بديل حتى تعالج Dell المشكلة في الإصدار التالي. الحل بسيط - كل ما عليك فعله هو إيقاف تشغيل الشاشة الأساسية وإغلاق البرنامج وإعادة تشغيله. في وضع الشاشة الواحدة، سيتعرف البرنامج على الأجهزة ويتيح لك معايرة الشاشة. بعد الانتهاء من المعايرة، قم بتشغيل شاشة العرض الأساسية مرة أخرى وستكون جاهزًا للبدء.

                  إذا كنت تريد إعداد CAL 2 لـ sRGB، كرر نفس العملية، باستثناء تغيير إعداد "RGB الأساسي" إلى sRGB هذه المرة. تأكد من اختيار CAL 2 على شاشتك قبل بدء عملية المعايرة، وإلا سينتهي بك الأمر بالكتابة فوق الإعداد المسبق لـ CAL 1.

                  هذا هو حقا بقدر ما يتعلق الأمر بالمعايرة! واسمحوا لي أن أعرف إذا كان لديك أي أسئلة!

                  ملاحظة: يمكن أيضًا استخدام هذا الدليل لمعايرة شاشات Dell 4K الجديدة: UP2414Q وUP3214Q.

                  تعليق

                  يعمل...
                  X