كيف تم تصوير هذه الصورة ٣؟ How Was This Picture Made #03?

تقليص
X
 
  • تصفية - فلترة
  • الوقت
  • عرض
إلغاء تحديد الكل
مشاركات جديدة

  • كيف تم تصوير هذه الصورة ٣؟ How Was This Picture Made #03?

    How Was This Picture Made #03?

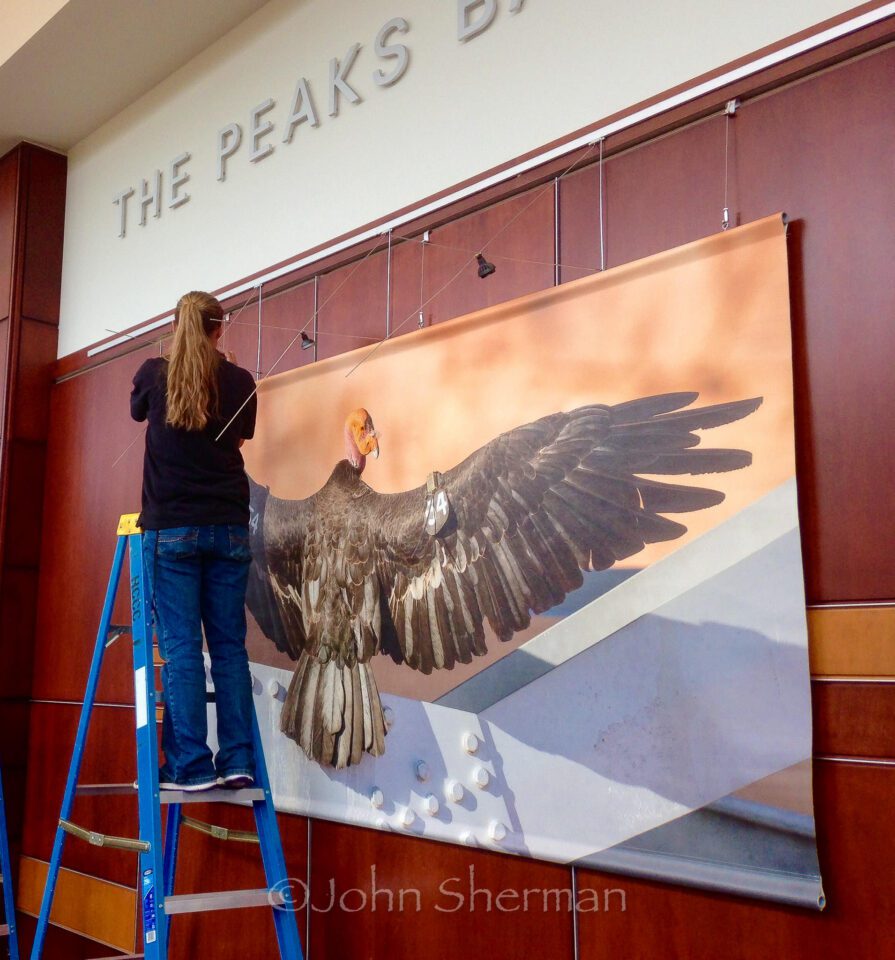
    I recently hung my show Plight of the Condor at Flagstaff’s High Country Conference Center. It’s an honor being recognized as so talented, egocentric and stupid that I’d dump hundreds of hours and thousands of dollars to fill an entire gallery with just my work. As this is my last, er, I mean first, one-artist show, of course I want to make a gargantuan impression. My subject is the California Condor, the largest bird in North America and with a population of only 425, one of the most critically endangered species in the world.
    اضغط على الصورة لعرض أكبر.   الإسم:	Verm-Condor354-full.jpg  مشاهدات:	0  الحجم:	124.5 كيلوبايت  الهوية:	176355 كيف تم صنع هذه الصورة رقم 03؟
    ​​​​​​​
    لقد قمت مؤخرًا بتعليق عرضي "Plight of the Condor" في مركز المؤتمرات High Country في فلاجستاف. إنه لشرف عظيم أن يتم الاعتراف بي كشخص موهوب وأناني وغبي لدرجة أنني أمضيت مئات الساعات وآلاف الدولارات لملء معرض كامل بعملي فقط. بما أن هذا هو عرضي الأخير، أعني الأول، لفنان واحد، بالطبع أريد أن أترك انطباعًا هائلاً. موضوعي هو كوندور كاليفورنيا، وهو أكبر طائر في أمريكا الشمالية ويبلغ عدد سكانه 425 شخصًا فقط، وهو أحد أكثر الأنواع المهددة بالانقراض في العالم.
    ​​​​​​​

  • #2
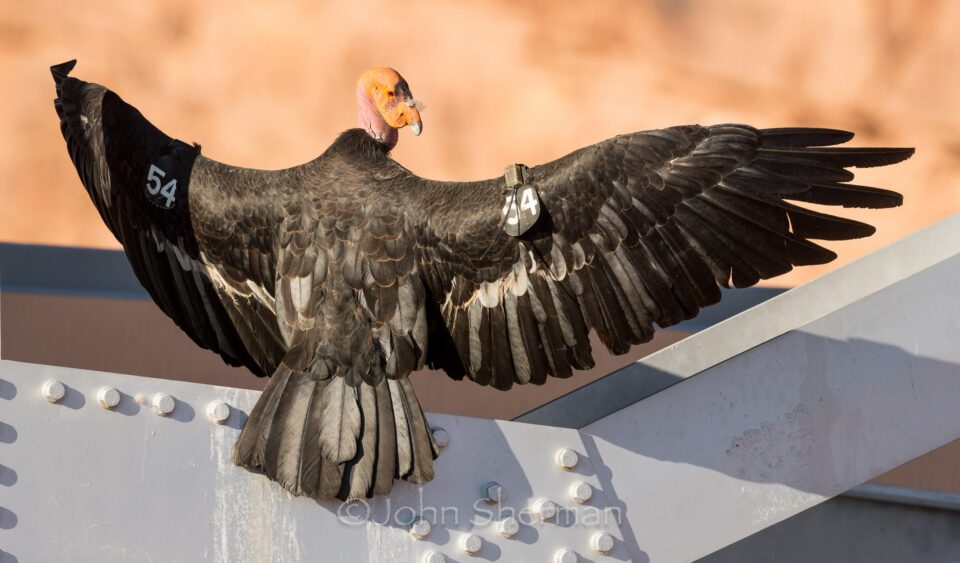
    At first glance this seems like a simple shot of a condor hanging out on a bridge girder 460 feet above the Colorado River, but there’s a catch – this came from a file 24000 pixels wide.

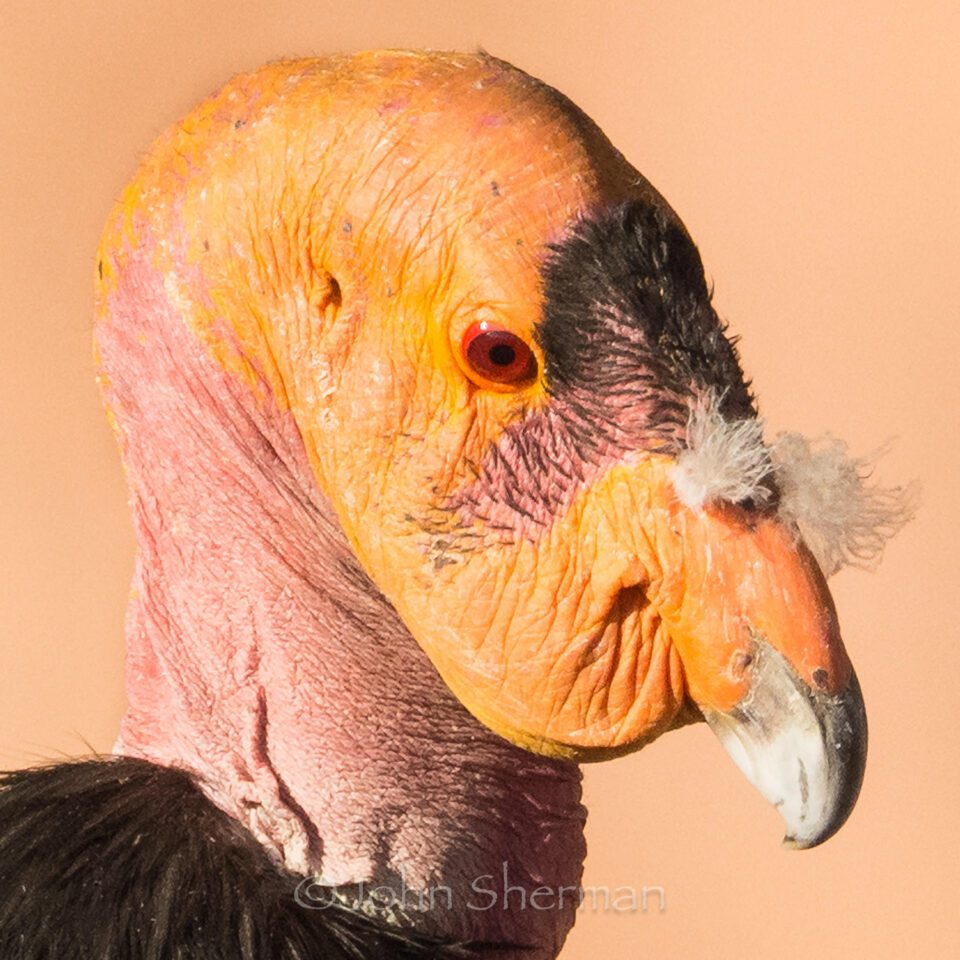
    Until you’ve seen a condor up close, it’s impossible to fathom how huge they really are. As they are so rare and most people have never seen one, I figured a great way to introduce folks to the bird would be to create a life-sized print of one. As these birds have a nine-and-a-half foot wingspan, that’s going to be an enormous print. I didn’t want some fuzzy blow up, but a print with excruciating detail down to every speck of bird dandruff. A print that would make viewers feel like there was an actual condor right next to them.

    Fortunately for my wallet, my subject was at a bit of an angle to me and had some natural curl in its wings, so my final print came out to be five by eight feet. As it would hang in a corridor, viewers would not be able to step back to a “normal viewing distance” hence I couldn’t get away with a low-resolution print. It needed to be very sharp and in-your-face.


    للوهلة الأولى، تبدو هذه لقطة بسيطة لكوندور معلقًا على عارضة جسر على ارتفاع 460 قدمًا فوق نهر كولورادو، ولكن هناك مشكلة - جاءت هذه من ملف بعرض 24000 بكسل.

    إلى أن ترى طائر الكوندور عن قرب، فمن المستحيل أن تفهم حجمه الحقيقي. نظرًا لأنها نادرة جدًا ولم يسبق لمعظم الناس رؤيتها من قبل، فقد فكرت في أن الطريقة الرائعة لتعريف الناس بالطائر هي إنشاء نسخة مطبوعة بالحجم الطبيعي لواحد منها. نظرًا لأن هذه الطيور يبلغ طول جناحيها تسعة أقدام ونصف، فسيكون ذلك بمثابة بصمة هائلة. لم أكن أرغب في بعض الانفجارات الغامضة، بل أريد طباعة تفاصيل مؤلمة تصل إلى كل ذرة من قشرة الطيور. طبعة من شأنها أن تجعل المشاهدين يشعرون وكأن هناك كوندور حقيقي بجانبهم.

    لحسن الحظ بالنسبة لمحفظتي، كان موضوعي في زاوية معينة بالنسبة لي وكان به بعض التجعد الطبيعي في جناحيه، لذلك كانت طبعتي النهائية خمسة في ثمانية أقدام. نظرًا لأنه سيتم تعليقه في الممر، فلن يتمكن المشاهدون من الرجوع إلى "مسافة المشاهدة الطبيعية"، وبالتالي لم أتمكن من الحصول على طباعة منخفضة الدقة. يجب أن تكون حادة جدًا وفي وجهك.


    تعليق


    • #3
      Before I created this image I did a lot of thinking. How could I shoot this live animal in the wild and create the big print I had in mind? A print with detail this fine.


      How would you do it? I shared this challenge with the PL Team a couple weeks ago and got some very interesting answers. My favorite was Nasim musing that perhaps I had access to a secret camera he didn’t know about. In less time than an iPhone shutter lag, our fearless leader shook off that notion as ridiculous. Please put forth your strategies for this shot – gear used, exposure settings, techniques applied, and so forth – in the comments below and I’ll reveal how I did it in a few days.
      قبل أن أخلق هذه الصورة، فكرت كثيرًا. كيف يمكنني إطلاق النار على هذا الحيوان الحي في البرية وإنشاء النسخة الكبيرة التي كنت أفكر فيها؟ طباعة مع تفاصيل هذه الغرامة.


      كيف يمكنك أن تفعل ذلك؟ لقد شاركت هذا التحدي مع فريق PL منذ بضعة أسابيع وحصلت على بعض الإجابات المثيرة للاهتمام. وكان المفضل لدي هو تفكير نسيم بأنه ربما تمكنت من الوصول إلى كاميرا سرية لم يكن يعرف عنها شيئًا. وفي وقت أقل من تأخر مصراع هاتف iPhone، تخلص قائدنا الشجاع من هذه الفكرة ووصفها بأنها سخيفة. يرجى طرح إستراتيجياتك لهذه اللقطة - المعدات المستخدمة، وإعدادات التعريض الضوئي، والتقنيات المطبقة، وما إلى ذلك - في التعليقات أدناه وسأكشف كيف فعلت ذلك في غضون أيام قليلة.

      تعليق


      • #4
        How Was This Picture Made #03: The Answer

        First, thanks to everybody who weighed in with their strategies to make the image in question. Some very good sleuthing on behalf of our readers and as you’ll see the answer is a combination of a lot of your suggestions and keen observations. The answer to how the life-sized condor print was made was based on biological knowledge, technological application at the DSLR level and use of sophisticated software.


        كيف تم صنع هذه الصورة #03: الجواب

        أولاً، شكرًا لكل من شارك في استراتيجياتهم لجعل الصورة المعنية. بعض التجسس الجيد جدًا نيابة عن قرائنا، وكما سترى، فإن الإجابة هي مزيج من الكثير من اقتراحاتك وملاحظاتك الدقيقة. استندت الإجابة على كيفية صنع طبعة الكوندور بالحجم الطبيعي إلى المعرفة البيولوجية والتطبيق التكنولوجي على مستوى الكاميرات الرقمية ذات العدسة الأحادية العاكسة (DSLR) واستخدام البرامج المتطورة.

        تعليق


        • #5
          Table of Contents
          جدول المحتويات

          علم الأحياء، أشياء الكاميرا، الحل البرمجي، التلخيص

          تعليق


          • #6
            The Biology


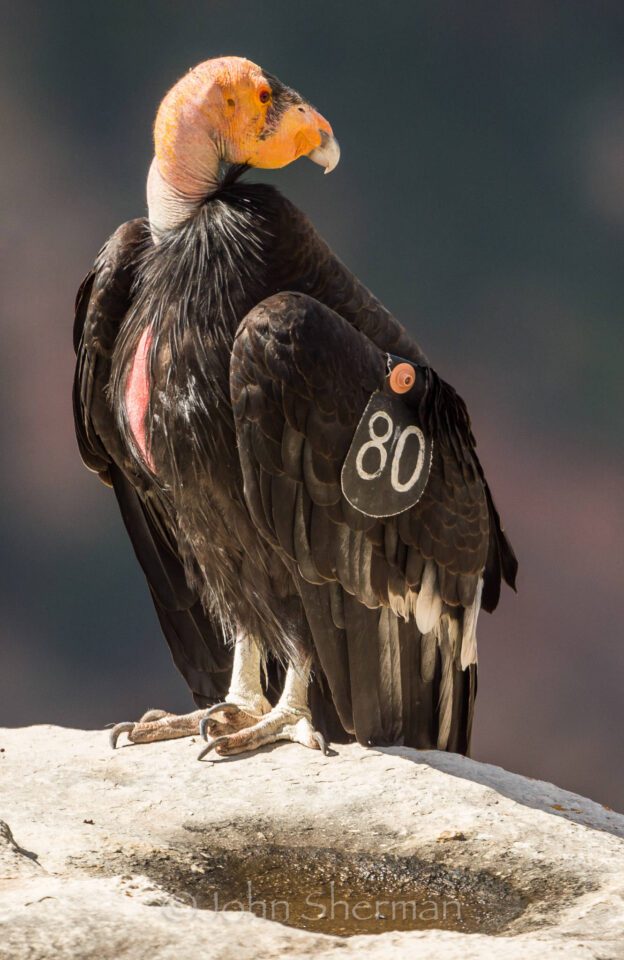
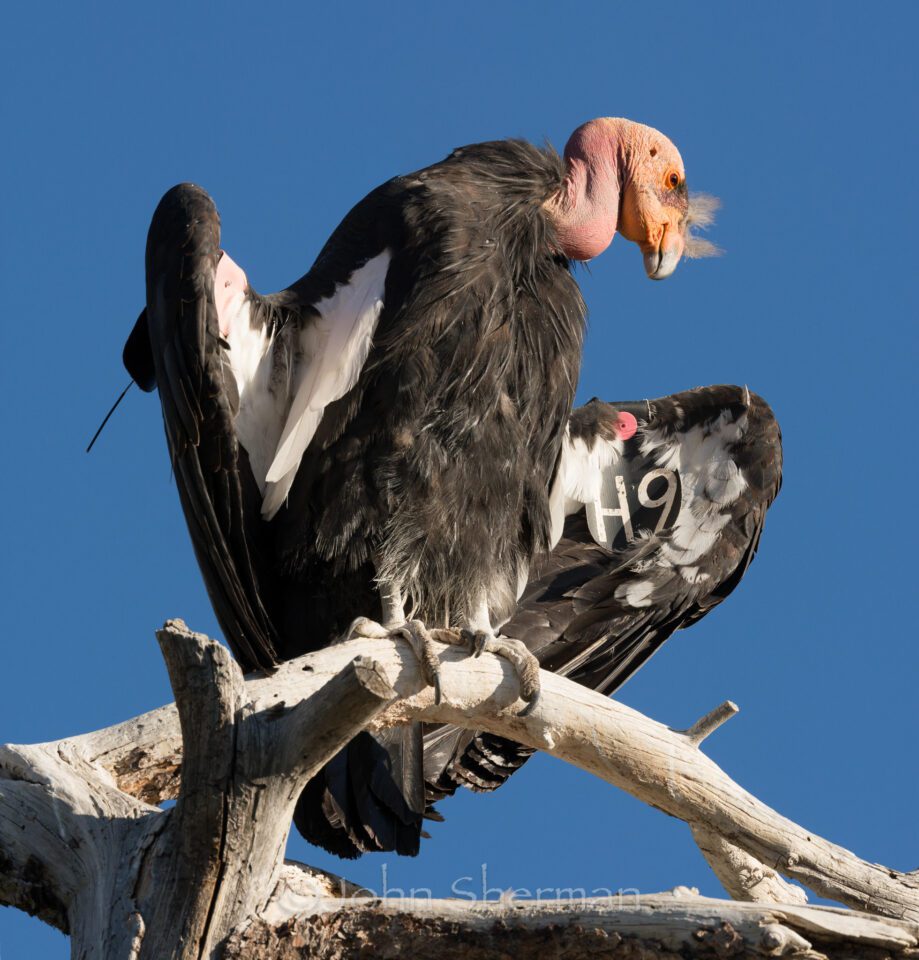
            Condors can fly up to 200 miles a day in search of a fresh carcass to feed on. When you fly that much, you need to keep every feather in tiptop shape. Wing sunning is a ritual performed every morning. While the actual purpose of the sunning behavior is debated, one theory is that the heat of the sun warms and softens the keratin in the bird’s feathers, allowing the feathers to take on optimal shaping. Whatever the purpose, I knew if I could find the right condor in the right setting I had a chance at my shot. Though condors sometimes rotate a bit while sunning, they generally orient their spread wings perpendicular to the sun and hold relatively still. If I got lucky, one would hold still long enough that I could snap multiple frames of it to stitch later.

            Knowing the likely whereabouts of the condors was key. I scouted several possible roosting spots along the South Rim of the Grand Canyon, but never had luck with finding the birds there in the good morning light.
            C’mon, spread those wings

            بيولوجيا

            يمكن للكوندور أن يطير لمسافة تصل إلى 200 ميل يوميًا بحثًا عن جثة جديدة ليتغذى عليها. عندما تطير كثيرًا، تحتاج إلى الحفاظ على كل ريشة في شكل قمة. تشمس الأجنحة هي طقوس يتم إجراؤها كل صباح. في حين أن الغرض الفعلي من سلوك التشمس محل جدل، فإن إحدى النظريات تقول أن حرارة الشمس تعمل على تدفئة الكيراتين الموجود في ريش الطائر وتنعيمه، مما يسمح للريش باتخاذ الشكل الأمثل. أيًا كان الغرض، كنت أعلم أنه إذا تمكنت من العثور على الكوندور المناسب في المكان المناسب، فستتاح لي فرصة التسديد. على الرغم من أن الكندور يدور أحيانًا قليلًا أثناء التشمس، إلا أنه عمومًا يوجه أجنحته المنتشرة بشكل عمودي على الشمس ويظل ثابتًا نسبيًا. إذا حالفني الحظ، فسيظل أحدهم ثابتًا لفترة كافية حتى أتمكن من التقاط إطارات متعددة منه لخياطتها لاحقًا.

            كانت معرفة المكان المحتمل لطيور الكندور أمرًا أساسيًا. لقد استكشفت العديد من المواقع التي يمكن أن تتواجد فيها الطيور على طول الحافة الجنوبية لجراند كانيون، ولكن لم يحالفني الحظ في العثور على الطيور هناك في ضوء الصباح الجيد.

             هيا، انشر تلك الأجنحة

            تعليق


            • #7


              I tried for the shot again in Utah, but as the condors roost in trees there instead of on cliffs, I was shooting upwards at an angle I didn’t like.


              Finally I hit pay dirt at Navajo Bridge. Decades back the original bridge crossing the Colorado River was replaced by a new bridge parallel to it and about 140 feet away. The bridges make ideal roosts for condors, much to the delight of onlookers at the walkover bridge.

              I showed up before sunrise and Condor 354 was perched on a girder of the vehicle bridge. I could shoot from the pedestrian bridge and have him at eye level for the shot – ideal. Also the morning sun would be coming in at a nice angle. Next came the waiting – would 354 sun his wings while the light was still good? Condor 354 rewarded my patience (I’d been trying for months to get this shot) and spread his massive wings in the warm early morning light.

              حاولت التقاط الصورة مرة أخرى في ولاية يوتا، لكن بينما كانت طيور الكندور تجثم على الأشجار هناك بدلًا من المنحدرات، كنت أطلق النار لأعلى بزاوية لم تعجبني.


              أخيرًا وصلت إلى جسر نافاجو. منذ عقود مضت، تم استبدال الجسر الأصلي الذي يعبر نهر كولورادو بجسر جديد موازٍ له وعلى بعد حوالي 140 قدمًا. تعد الجسور موطنًا مثاليًا لطيور الكندور، الأمر الذي يسعد المتفرجين عند جسر المشاة.

              لقد حضرت قبل شروق الشمس وكانت طائرة كوندور 354 موضوعة على عارضة جسر السيارة. يمكنني إطلاق النار من جسر المشاة وجعله على مستوى العين أثناء اللقطة - وهو أمر مثالي. كما أن شمس الصباح ستأتي بزاوية لطيفة. بعد ذلك جاء الانتظار – هل سيشمس 354 جناحيه بينما لا يزال الضوء جيدًا؟ كافأ كوندور 354 صبري (كنت أحاول منذ أشهر التقاط هذه اللقطة) وبسط جناحيه الضخمين في ضوء الصباح الباكر الدافئ.

              تعليق


              • #8
                The camera stuff


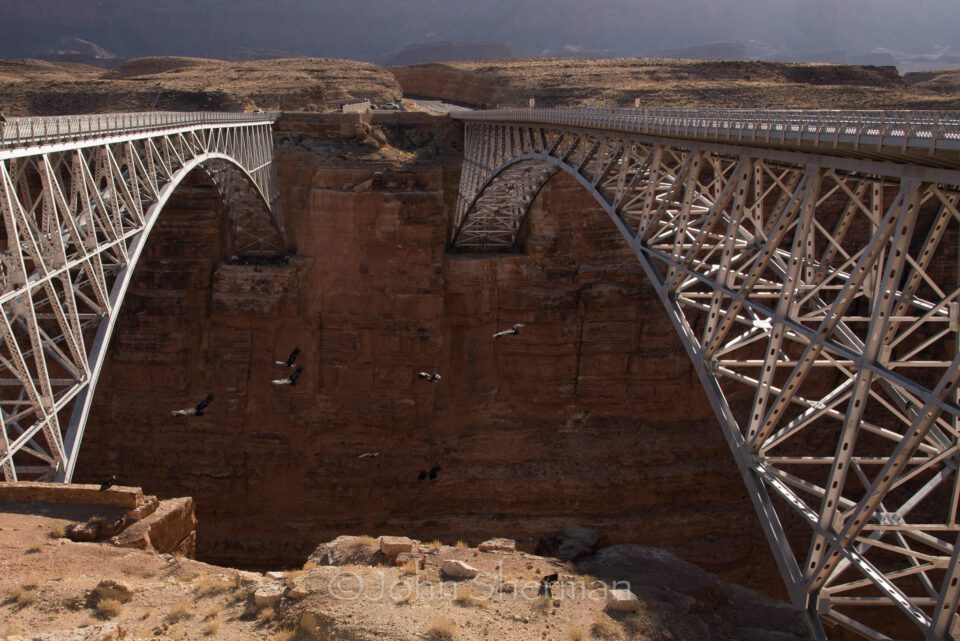
                To get the resolution I wanted I would not just need a high resolution camera, but would need to stitch multiple high res files together. This would require being close enough to the bird that just a portion of the bird would fill the frame. The South Rim locations I’d scouted seemed ideal as I could shoot a full frame DSLR with a 500mm lens and be close enough to fill the frame with half a wing or so. However the Navajo Bridge location required me to shoot from one bridge across a 140 foot gap to the other bridge. At that distance and angle the entire bird would pretty much fill a D810 frame.
                Navajo Bridges – Condor 354 was perched on the right bridge, I shot from the left bridge. Note that over two percent of the world’s entire condor population is in this picture

                الاشياء الكاميرا

                للحصول على الدقة التي أردتها، لن أحتاج إلى كاميرا عالية الدقة فحسب، بل سأحتاج إلى دمج عدة ملفات عالية الدقة معًا. قد يتطلب ذلك أن تكون قريبًا بدرجة كافية من الطائر بحيث يملأ الإطار جزءًا فقط من الطائر. بدت مواقع الحافة الجنوبية التي استكشفتها مثالية حيث يمكنني تصوير كاميرا DSLR كاملة الإطار بعدسة مقاس 500 مم وأن أكون قريبًا بما يكفي لملء الإطار بنصف جناح أو نحو ذلك. ومع ذلك، تطلب مني موقع جسر نافاجو أن أقوم بالتصوير من أحد الجسور عبر فجوة تبلغ 140 قدمًا إلى الجسر الآخر. عند تلك المسافة والزاوية، سيملأ الطائر بأكمله إطار كاميرا D810 تقريبًا.

                جسور نافاجو - كان كوندور 354 جالسًا على الجسر الأيمن، وأطلقت النار من الجسر الأيسر. لاحظ أن أكثر من اثنين بالمائة من إجمالي عدد طيور الكندور في العالم موجود في هذه الصورة

                تعليق


                • #9
                  Time to go for all the reach I could muster. I took a Nikon D7200 and put an 800mm on it with a 1.25x teleconverter. This gave me an equivalent focal length of 1500mm. The D7200 has a tighter pixel pitch than the D810, so would give me as much resolving power as any possible combination in the Nikon DSLR lineup (going with a lens mount adapter on a Nikon 1 mirrorless would open up some interesting possibilities). With the camera oriented vertically, the condor from head to tail would fill the frame and 4 frames across would be able to capture the open wings. I was prepared for 5 frames across, but 354 was at an angle so in the end I just needed the four shots and I would have enough overlap to stitch.

                  I shot on a carefully leveled tripod with a gimbal head and swept back and forth across the scene constantly in hopes of grabbing 4 or 5 frames where the condor didn’t move or the wind ruffle his feathers. I had previously practiced this with a D4s shooting at 11 fps in constant motion and discovered at such a great focal length I needed 1/5000 sec minimum not to suffer too much blur. But I also needed depth of field to get the width of the bird’s body all in focus so if I shot at f/11 and 1/5000, it would necessitate an ISO of 2500 in full direct sun, not a big issue with a D4s, but a noise monster on a D810 or D7200. As my camera to subject distance at Navajo Bridge limited me to the D7200, I shot at a lower ISO 800, then shot at 1/800 sec and f/11, stopping briefly between pans to minimize camera movement. It would then take two to three seconds to pan across the entire body. I panned both left to right, then back right to left, then back again and just kept shooting. The goal was to get one sequence with an attractive head angle, ample wing spread and of course no motion on the bird’s part between frames. On most passes it was obvious while shooting that there was movement or the head turned away. The sunning lasted four minutes in which I shot 100 frames. Time to download all those shots and try stitching a shot together.

                  تعليق


                  • #10
                    حان الوقت للوصول إلى كل ما يمكنني حشده. أخذت كاميرا Nikon D7200 ووضعت عليها عدسة مقاس 800 مم باستخدام محول تقريب 1.25x. هذا أعطاني طولًا بؤريًا مكافئًا يبلغ 1500 ملم. تحتوي كاميرا D7200 على درجة بكسل أكثر إحكامًا من كاميرا D810، لذا ستمنحني قدرًا كبيرًا من قوة التحليل مثل أي مجموعة ممكنة في مجموعة Nikon DSLR (الذهاب مع محول تركيب العدسة على كاميرا Nikon 1 بدون مرآة سيفتح بعض الاحتمالات المثيرة للاهتمام). مع توجيه الكاميرا عموديًا، سيملأ الكوندور من الرأس إلى الذيل الإطار وستكون 4 إطارات عرضية قادرة على التقاط الأجنحة المفتوحة. لقد كنت مستعدًا لخمسة إطارات، لكن 354 كانت بزاوية لذا في النهاية كنت بحاجة فقط إلى اللقطات الأربع وسيكون لدي ما يكفي من التداخل للخياطة.

                    لقد قمت بالتصوير على حامل ثلاثي الأرجل تم تسويته بعناية برأس ذو محورين وتحركت ذهابًا وإيابًا عبر المشهد باستمرار على أمل التقاط 4 أو 5 إطارات حيث لم يتحرك الكوندور أو تلاعب الريح بريشه. لقد تدربت على ذلك سابقًا باستخدام كاميرا D4s عند التصوير بمعدل 11 إطارًا في الثانية في حركة ثابتة واكتشفت عند هذا البعد البؤري الرائع أنني بحاجة إلى 1/5000 ثانية على الأقل حتى لا أعاني من الكثير من الضبابية. لكنني كنت بحاجة أيضًا إلى عمق المجال للتركيز على عرض جسم الطائر، لذلك إذا قمت بالتصوير عند f/11 و1/5000، فسيتطلب ذلك حساسية ISO تبلغ 2500 تحت أشعة الشمس المباشرة الكاملة، وهي ليست مشكلة كبيرة مع كاميرا D4s ، ولكن وحش الضوضاء على D810 أو D7200. نظرًا لأن كاميرتي لمسافة الهدف عند Navajo Bridge اقتصرت على كاميرا D7200، فقد قمت بالتصوير بمعدل ISO 800 أقل، ثم قمت بالتصوير بسرعة 1/800 ثانية وبفتحة f/11، وتوقفت لفترة وجيزة بين اللقطات لتقليل حركة الكاميرا. سيستغرق الأمر بعد ذلك من ثانيتين إلى ثلاث ثوانٍ لتحريك الجسم بالكامل. قمت بتحريك كل من اليسار إلى اليمين، ثم العودة من اليمين إلى اليسار، ثم العودة مرة أخرى واستمرت في إطلاق النار. كان الهدف هو الحصول على تسلسل واحد بزاوية رأس جذابة وانتشار كبير للجناح وبالطبع عدم وجود حركة من جانب الطائر بين الإطارات. في معظم التمريرات كان من الواضح أثناء التسديد أن هناك حركة أو أن الرأس قد انحرف بعيدًا. استغرق التشمس أربع دقائق قمت خلالها بتصوير 100 إطار. حان الوقت لتنزيل كل تلك اللقطات ومحاولة تجميع اللقطة معًا.

                    تعليق


                    • #11
                      The Software Solution


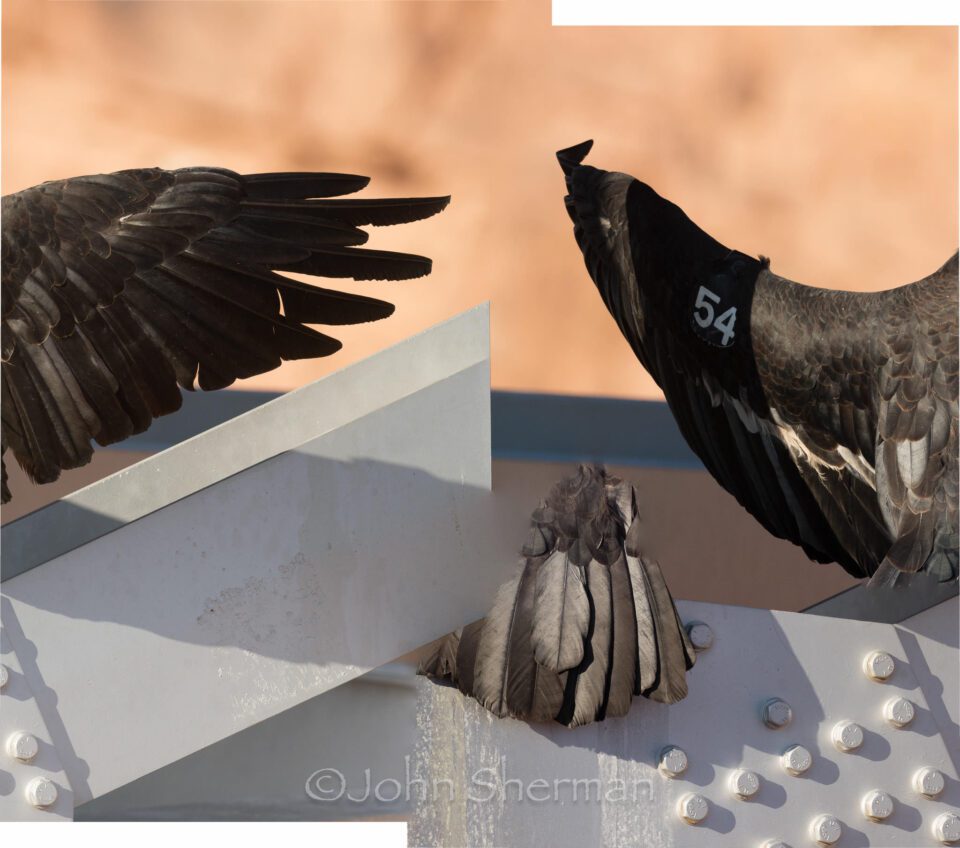
                      With 354 angled slightly, for a life-sized image the final dimensions would have to be 7.5 feet from wingtip to wingtip. Of all the sequences I shot, there were several with appealing head angles. Of those, I only got one to successfully stitch using the photo merge panorama function in Lightroom 6.


                      D’oh, that didn’t work.


                      Ah, that’s better. Subtracting the overlaps, this stitched image ended up as 10000 pixels wide. My goal was to print at 250 ppi so people could put their noses right up to the print and count the vanes in each feather. Sadly, 10000 pixels at 250 dpi would only yield a 40-inch wide print – why heck, even some puny Red-Tailed Hawk has a wingspan wider than that.


                      الحل البرمجي

                      مع زاوية 354 قليلاً، للحصول على صورة بالحجم الطبيعي، يجب أن تكون الأبعاد النهائية 7.5 قدم من قمة الجناح إلى قمة الجناح. من بين جميع المشاهد التي قمت بتصويرها، كان هناك العديد منها بزوايا رأس جذابة. من بين هؤلاء، حصلت على واحدة فقط لخياطتها بنجاح باستخدام وظيفة بانوراما دمج الصور في Lightroom 6.


                      دوه، هذا لم ينجح.


                      اه، هذا أفضل. بطرح التداخلات، انتهى الأمر بهذه الصورة المُدمجة بعرض 10000 بكسل. كان هدفي هو الطباعة بدقة 250 نقطة في البوصة حتى يتمكن الأشخاص من وضع أنوفهم على الطباعة مباشرة وحساب الريش في كل ريشة. للأسف، 10000 بكسل بدقة 250 نقطة في البوصة لن تؤدي إلا إلى طباعة بعرض 40 بوصة - لماذا بحق الجحيم، حتى بعض الصقر ذو الذيل الأحمر الضعيف لديه جناحيها أوسع من ذلك.

                      تعليق


                      • #12
                        Enter Perfect Resize. Formerly know as Genuine Fractals, Perfect Resize is an upsampling program. It analyzes every detail in your image, then using cleverly written algorithms creates new pixels to bridge the gaps between the original pixels and create a much larger file. You can also upsample in Lightroom or Photoshop, but in my experience, image quality deteriorates more quickly with those methods than with Perfect Resize. Perfect Resize has multiple upsampling methods to choose from. I chose Genuine Fractals, entered 96 inches wide for my destination size, then experimented with the sharpness and smoothness sliders until I got the result I wanted. This is very time-consuming because with such huge files it takes several minutes for Perfect Resize to crunch the data every time you push a slider or enter a new parameter.

                        Because I started with a very large, very sharp file, I ended up with a great result. Note however, that if you attempt to use Perfect Resize with soft files, you’ll just end up magnifying all the defects and end up with mush. My final file ended up being over 2GB, but when zipped got down to 1.9GB which just made the cut to send online to the printing company.


                        تعليق


                        • #13
                          أدخل تغيير الحجم المثالي. يعد برنامج Perfect Resize، الذي كان يُعرف سابقًا باسم "Genue Fractals"، برنامجًا لتجميع العينات. فهو يحلل كل التفاصيل في صورتك، ثم يستخدم خوارزميات مكتوبة بذكاء لإنشاء وحدات بكسل جديدة لسد الفجوات بين وحدات البكسل الأصلية وإنشاء ملف أكبر بكثير. يمكنك أيضًا رفع العينة باستخدام Lightroom أو Photoshop، ولكن من خلال تجربتي، تتدهور جودة الصورة بسرعة أكبر باستخدام تلك الطرق مقارنة باستخدام Perfect Resize. يحتوي Perfect Resize على طرق متعددة لتجميع العينات للاختيار من بينها. اخترت فركتلات أصلية، وأدخلت عرضًا يبلغ 96 بوصة لحجم وجهتي، ثم جربت أشرطة تمرير الحدة والنعومة حتى حصلت على النتيجة التي أردتها. يستغرق هذا وقتًا طويلاً للغاية لأنه مع مثل هذه الملفات الضخمة، يستغرق الأمر عدة دقائق حتى يقوم Perfect Resize بمعالجة البيانات في كل مرة تضغط فيها على شريط التمرير أو تدخل معلمة جديدة.

                          ولأنني بدأت بملف كبير جدًا ودقيق جدًا، انتهى بي الأمر بنتيجة رائعة. ومع ذلك، لاحظ أنه إذا حاولت استخدام Perfect Resize مع الملفات الإلكترونية، فسوف ينتهي بك الأمر إلى تضخيم جميع العيوب وينتهي بك الأمر إلى الهريسة. انتهى ملفي النهائي بأكثر من 2 غيغابايت، ولكن عندما تم ضغطه انخفض إلى 1.9 غيغابايت مما أدى إلى قطع الملف لإرساله عبر الإنترنت إلى شركة الطباعة.

                          تعليق


                          • #14
                            Summing Up


                            What a crazy fun and challenging assignment. A lot of things had to come together to get this shot. First I had to find the birds (there are only 70 total in all of Arizona and Utah). Next I needed one to bust a good pose in good light close enough for me to get the frames I needed. I maxed out the capabilities of the camera gear I had available. Finally, I pushed the software as far as I felt it would go and still produce the result desired. I’m pretty amazed that over 75% of the pixels in the final file were made up by software, not captured by the camera. I planned this all out in advance, felt it would be possible, practiced the techniques I’d need, then when the time came, Condor 354 was a champ.

                            The Plight of the Condor will be showing at the High Country Conference Center in Flagstaff, Arizona from now until Jan 5th, 2016. The public is welcome so please drop by if you’re in the area. To learn more about California Condors and how you can support them please visit peregrinefund.org/condor.
                            تلخيص لما سبق

                            يا لها من متعة مجنونة ومهمة صعبة. كان لا بد من تضافر الكثير من الأشياء للحصول على هذه اللقطة. كان عليّ أولاً العثور على الطيور (يوجد 70 فقط في ولايتي أريزونا ويوتا). بعد ذلك، كنت بحاجة إلى وضعية جيدة في ضوء جيد قريب بدرجة كافية بالنسبة لي للحصول على الإطارات التي أحتاجها. لقد استنفذت الحد الأقصى من إمكانيات معدات الكاميرا المتوفرة لدي. أخيرًا، دفعت البرنامج إلى الحد الذي شعرت أنه سيصل إليه وسيظل ينتج النتيجة المرجوة. أنا مندهش جدًا من أن أكثر من 75% من وحدات البكسل في الملف النهائي تم إنشاؤها بواسطة برنامج، ولم يتم التقاطها بواسطة الكاميرا. لقد خططت لكل هذا مسبقًا، وشعرت أنه سيكون ممكنًا، وتدربت على التقنيات التي أحتاجها، وعندما جاء الوقت، كان كوندور 354 هو البطل.

                            سيتم عرض "Plight of the Condor" في مركز High Country Conference Center في فلاجستاف، أريزونا من الآن وحتى 5 كانون الثاني (يناير) 2016. نرحب بالجمهور، لذا يرجى الحضور إذا كنت في المنطقة. لمعرفة المزيد عن نسور كاليفورنيا وكيف يمكنك دعمهم، يرجى زيارة peregrinefund.org/condor.

                            تعليق

                            يعمل...
                            X