كيف تعيير حجم الصورة بشكل صحيح للفيسبوكHow to Properly Resize Images for Facebook

تقليص
X
 
  • تصفية - فلترة
  • الوقت
  • عرض
إلغاء تحديد الكل
مشاركات جديدة

  • كيف تعيير حجم الصورة بشكل صحيح للفيسبوكHow to Properly Resize Images for Facebook

    How to Properly Resize Images for Facebook

    Love it or hate it, Facebook has become an important social media platform for not only promoting your work but also for finding new clients. Whether you choose to create a fan page for your business or just upload your photographs to your own profile, you might be wondering what the best resolution and export settings should be for your images, so that Facebook can display them at the highest quality. In this article, I will not only go over Facebook’s resizing and compression behavior but also show you the proper settings to use when exporting images from both Lightroom and Photoshop

    كيفية تغيير حجم الصور بشكل صحيح للفيسبوك

    ​​​​​​​سواء أحببته أم كرهته، أصبح فيسبوك منصة تواصل اجتماعية مهمة ليس فقط للترويج لعملك ولكن أيضًا للعثور على عملاء جدد. سواء اخترت إنشاء صفحة معجبين لشركتك أو قمت فقط بتحميل صورك إلى ملفك الشخصي، فقد تتساءل عن أفضل إعدادات الدقة والتصدير التي يجب أن تكون لصورك، حتى يتمكن فيسبوك من عرضها بأعلى جودة. في هذه المقالة، لن أتناول سلوك تغيير الحجم والضغط في فيسبوك فحسب، بل سأعرض لك أيضًا الإعدادات المناسبة لاستخدامها عند تصدير الصور من كل من Lightroom وPhotoshop.

  • #2
    Table of Contents
    جدول المحتويات

    تغيير حجم صور فيسبوك وضغطها ضغط صور فيسبوك تغيير حجم صور فيسبوك تحويل مساحة ألوان فيسبوك تغيير حجم الصور من Lightroom لفيسبوك تغيير حجم الصور من Photoshop لفيسبوك ملخص

    تعليق


    • #3
      1. Facebook Image Resizing and Compression


      A few years ago, Facebook was terrible at resizing images. If you were to upload an image back then, it would not only make it look awful by compressing the heck out of it, but it would also strip out the color profile. If you were not very careful about the particular resolution you resize to and if you exported images in anything other than sRGB, your photographs would look nothing like they did on your computer. Since then, a lot of things have changed for the better – Facebook’s image processing engine has gotten much more advanced and better, so most issues of the past have thankfully been addressed. Still, Facebook recommends resizing images to certain resolutions before they are posted, as explained in this article. As of 11/09/2014, below are the recommended sizes for uploading photographs to Facebook:
      1. Regular Photos: 720 px, 960 px, 2048 px
      2. Cover Photos: 851 px by 315 px
      3. Full Width Link Thumbnails: 484 px by 252 px
      4. Profile Picture in Header: 180 px by 180 px

      Based on the above data, the three best resolutions to extract photographs are 720, 960 and 2048 pixels. What I wanted to find out, was what happens if one is to upload images at these and at different sizes. What is the impact to a photo, if it is uploaded at say 980 pixels instead of 960? And what happens if one accidentally uses a different color profile like Adobe RGB or ProPhoto? Let’s take a look at these case scenarios and see.
      1. تغيير حجم وضغط صور الفيسبوك

      قبل بضع سنوات، كان فيسبوك سيئًا في تغيير حجم الصور. إذا قمت بتحميل صورة في ذلك الوقت، فلن يجعلها تبدو فظيعة فقط عن طريق ضغطها، بل سيؤدي أيضًا إلى إزالة ملف تعريف الألوان. إذا لم تكن حذرًا جدًا بشأن الدقة المحددة التي قمت بتغيير الحجم إليها وإذا قمت بتصدير الصور في أي شيء آخر غير sRGB، فلن تبدو صورك كما كانت على جهاز الكمبيوتر الخاص بك. منذ ذلك الحين، تغيرت أشياء كثيرة نحو الأفضل - أصبح محرك معالجة الصور في فيسبوك أكثر تقدمًا وأفضل، لذلك تمت معالجة معظم مشكلات الماضي لحسن الحظ. ومع ذلك، يوصي Facebook بتغيير حجم الصور إلى درجات دقة معينة قبل نشرها، كما هو موضح في هذه المقالة. اعتبارًا من 11/09/2014، فيما يلي الأحجام الموصى بها لتحميل الصور على فيسبوك:

      الصور العادية: 720 بكسل، 960 بكسل، 2048 بكسل صور الغلاف: 851 بكسل × 315 بكسل رابط العرض الكامل الصور المصغرة: 484 بكسل × 252 بكسل صورة الملف الشخصي في الرأس: 180 بكسل × 180 بكسل

      بناءً على البيانات المذكورة أعلاه، فإن أفضل ثلاث دقة لاستخراج الصور الفوتوغرافية هي 720 و960 و2048 بكسل. ما أردت معرفته هو ما يحدث إذا قام الشخص بتحميل الصور بهذه الأحجام وبأحجام مختلفة. ما هو التأثير على الصورة، إذا تم تحميلها على سبيل المثال بحجم 980 بكسل بدلاً من 960؟ وماذا يحدث إذا استخدم شخص ما عن طريق الخطأ ملف تعريف ألوان مختلفًا مثل Adobe RGB أو ProPhoto؟ دعونا نلقي نظرة على سيناريوهات هذه الحالة ونرى.

      تعليق


      • #4
        1.1. Facebook Image Compression


        What does Facebook do to an image that is extracted at a recommended resolution? Let’s take a look at the before and after of an image that I extracted from Lightroom at 960 pixels wide resolution and 77% JPEG Quality:


        The original file size was 204 KB in the “Before” state and Facebook resized it to 64 KB, so there is a pretty aggressive compression algorithm taking place here. If you look closely, the “After” image shows some artifacts in the sky and around the subject, but it is not bad and certainly tolerable. How much compression is applied? It depends on each image, but it seems like the compression varies between 47-61% quality equivalent in Lightroom. In addition to compressing the image, Facebook’s image compression algorithm also removed all of EXIF data, PPI data and changed out the color profile information, replacing “sRGB IEC61966-2.1” with a “c2” color profile. When looking at images using a color space aware image viewer or my browser, I can see no difference between the two, so the “c2” profile is indeed very similar to sRGB, as indicated in this article from a Facebook engineer.

        Summary: Even if you upload at the recommended resolution, Facebook still applies a compression algorithm on images. The only way to prevent compression is by uploading images that are smaller than 100 KB (which is often too little for a high-quality image).

        1.1. ضغط الصور في الفيسبوك

        ماذا يفعل فيسبوك بالصورة التي يتم استخراجها بدقة موصى بها؟ دعونا نلقي نظرة على ما قبل وبعد الصورة التي استخرجتها من Lightroom بدقة عرض 960 بكسل وجودة JPEG بنسبة 77%:


        كان حجم الملف الأصلي 204 كيلو بايت في الحالة "قبل" وقام فيسبوك بتغيير حجمه إلى 64 كيلو بايت، لذلك هناك خوارزمية ضغط قوية جدًا تحدث هنا. إذا نظرت عن كثب، فإن الصورة "بعد" تظهر بعض القطع الأثرية في السماء وحول الموضوع، لكنها ليست سيئة ومقبولة بالتأكيد. ما مقدار الضغط المطبق؟ يعتمد ذلك على كل صورة، ولكن يبدو أن الضغط يتراوح بين 47-61% من الجودة المكافئة في Lightroom. بالإضافة إلى ضغط الصورة، قامت خوارزمية ضغط الصور في فيسبوك أيضًا بإزالة جميع بيانات EXIF ​​وبيانات PPI وغيرت معلومات ملف تعريف الألوان، واستبدلت "sRGB IEC61966-2.1" بملف تعريف ألوان "c2". عند النظر إلى الصور باستخدام عارض الصور الذي يراعي مساحة الألوان أو المتصفح الخاص بي، لا أستطيع رؤية أي فرق بين الاثنين، وبالتالي فإن ملف التعريف "c2" يشبه إلى حد كبير sRGB، كما هو موضح في هذه المقالة من أحد مهندسي Facebook.

        ملخص: حتى إذا قمت بالتحميل بالدقة الموصى بها، فسيظل Facebook يطبق خوارزمية ضغط على الصور. الطريقة الوحيدة لمنع الضغط هي تحميل صور أصغر من 100 كيلو بايت (والتي غالبًا ما تكون صغيرة جدًا بالنسبة لصورة عالية الجودة).

        تعليق


        • #5
          1.2. Facebook Image Resizing


          Now let’s take a look at what happens when one uploads an image that is slightly different in size than the recommended value. For this test, I uploaded two images – one at 960 pixels and one at 980 pixels. Below are the results for the 960-pixel image:


          Just like in our first test, there is a massive amount of compression taking place. For this second landscape shot, I extracted the image at very high quality – 85%, which is a step lower than 100% JPEG quality. The original image size was 772 KB, with EXIF and other JPEG data preserved. Facebook’s compressed the image all the way to 150 KB and removed all the embedded data. Again, the embedded color space was replaced from “sRGB IEC61966-2.1” to “c2”.

          1.2. تغيير حجم الصور في الفيسبوك

          الآن دعونا نلقي نظرة على ما يحدث عندما يقوم أحد بتحميل صورة تختلف قليلاً في الحجم عن القيمة الموصى بها. في هذا الاختبار، قمت بتحميل صورتين – واحدة بدقة 960 بكسل والأخرى بدقة 980 بكسل. فيما يلي نتائج الصورة بحجم 960 بكسل:


          تمامًا كما حدث في اختبارنا الأول، هناك قدر هائل من الضغط الذي يحدث. بالنسبة للقطة المناظر الطبيعية الثانية هذه، قمت باستخراج الصورة بجودة عالية جدًا - 85%، وهي خطوة أقل من جودة JPEG بنسبة 100%. كان حجم الصورة الأصلي 772 كيلو بايت، مع الاحتفاظ ببيانات EXIF ​​وبيانات JPEG الأخرى. قام Facebook بضغط الصورة إلى 150 كيلو بايت وإزالة جميع البيانات المضمنة. مرة أخرى، تم استبدال مساحة اللون المضمنة من "sRGB IEC61966-2.1" إلى "c2".

          تعليق


          • #6
            But what happens if the image is not provided at the recommended resolution of 960 pixels? Let’s see what happens to an image that I exported at 980 pixels:


            Interestingly, the image looks remarkably close to the image that I extracted at 960 pixels. Facebook’s algorithm did not resize my 980-pixel image to 960 pixels and the only thing that happened here was compression again – the image went down from 802 KB to 159 KB and EXIF data was wiped out again. The only difference is, this time, the color space was replaced with “sRGB IEC61966-2-1 black scaled”. Not sure why the profile’s name was not “c2”, but the image did not differ in any way in terms of colors.

            I also tried uploading higher resolution images at 1024, 1200, 1600 and 2048 pixels. All images were simply compressed and the data was removed, without any resizing taking place.

            Summary: It turns out that the resolution of your images is not important, so it does not matter whether you extract images at recommended sizes like 960 or 2048 pixels. Any image size works and each image will be treated with plenty of compression and removal of embedded data.

            ولكن ماذا يحدث إذا لم يتم توفير الصورة بالدقة الموصى بها وهي 960 بكسل؟ دعونا نرى ما يحدث للصورة التي قمت بتصديرها بدقة 980 بكسل:


            ومن المثير للاهتمام أن الصورة تبدو قريبة بشكل ملحوظ من الصورة التي استخرجتها بدقة 960 بكسل. لم تقم خوارزمية Facebook بتغيير حجم صورتي ذات 980 بكسل إلى 960 بكسل والشيء الوحيد الذي حدث هنا هو الضغط مرة أخرى - انخفض حجم الصورة من 802 كيلو بايت إلى 159 كيلو بايت وتم مسح بيانات EXIF ​​مرة أخرى. والفرق الوحيد هو أنه تم استبدال مساحة اللون هذه المرة بـ "sRGB IEC61966-2-1 باللون الأسود". لست متأكدا لماذا لم يكن اسم الملف الشخصي "c2"، ولكن الصورة لم تختلف بأي شكل من الأشكال من حيث الألوان.

            لقد حاولت أيضًا تحميل صور بدقة أعلى تبلغ 1024 و1200 و1600 و2048 بكسل. تم ضغط جميع الصور ببساطة وتمت إزالة البيانات، دون إجراء أي تغيير في الحجم.

            ملخص: اتضح أن دقة صورك ليست مهمة، لذلك لا يهم ما إذا كنت تستخرج الصور بالأحجام الموصى بها مثل 960 أو 2048 بكسل. يعمل أي حجم للصورة وسيتم التعامل مع كل صورة بالكثير من الضغط وإزالة البيانات المضمنة.

            تعليق


            • #7
              1.3. Facebook Color Space Conversion


              What happens if you accidentally export images with a different color space like Adobe RGB or ProPhoto RGB instead of sRGB? Let’s take a look at the two images below that I exported in Adobe RGB and ProPhoto RGB color spaces (Before: Adobe RGB, After: ProPhoto RGB):


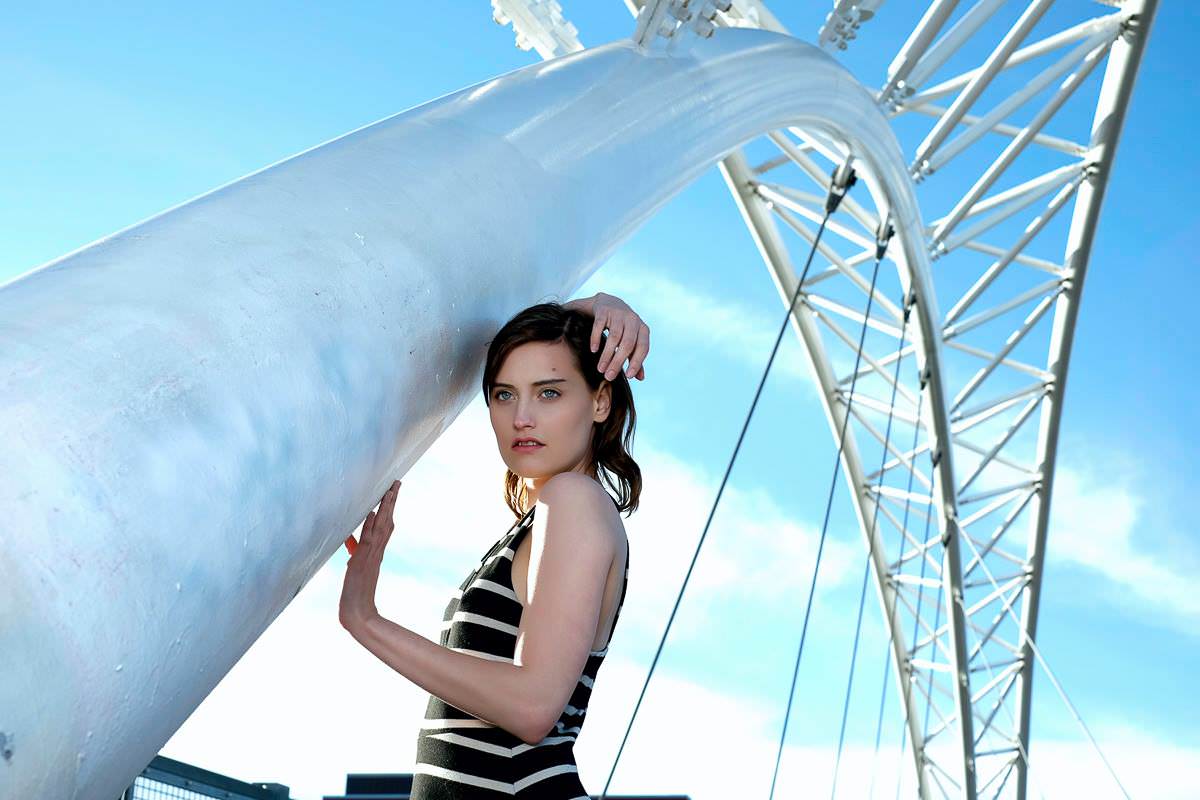
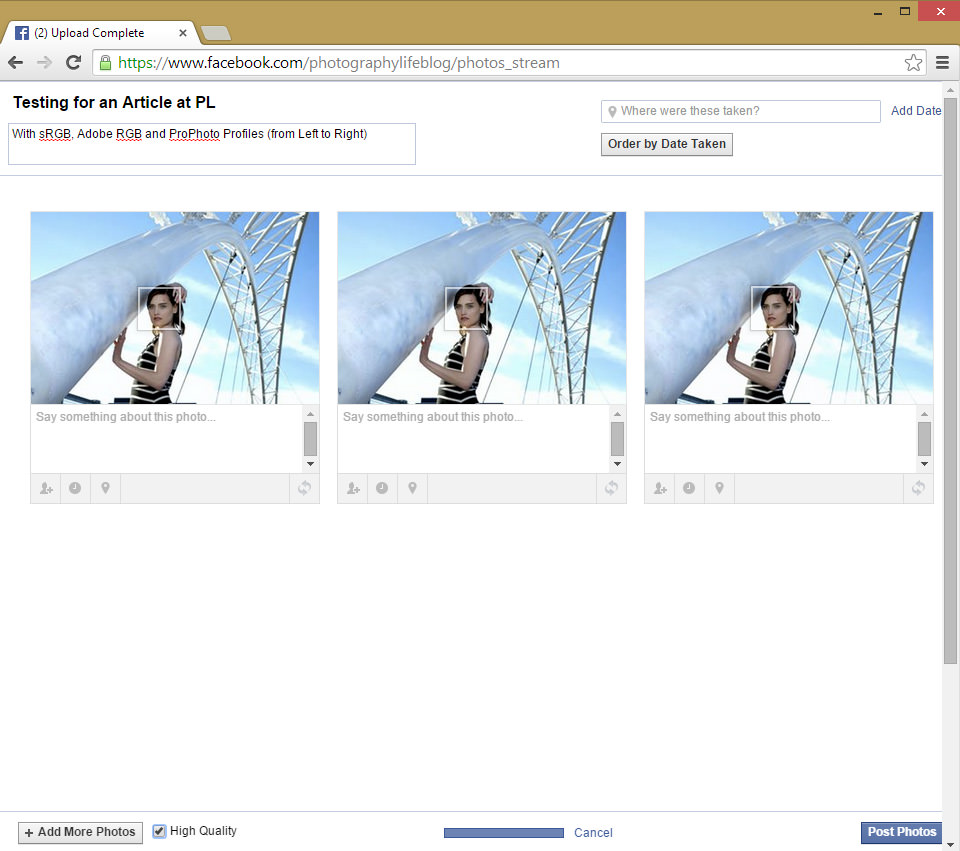
              If you compare the two images above to the first image in this article, you will see that the colors are the same. This means that Facebook’s image compression algorithm is also doing a conversion from Adobe RGB and ProPhoto RGB to sRGB automatically. So if you do upload an image with a non-standard color space, Facebook will still change it back to sRGB automatically. The color space change can be seen clearly from the below screenshot, where all three images appear the same, despite having different color space before upload:

              Does it mean that one should not care about what color space to use during exporting? No, I would still use sRGB during exporting, because rich colors could get altered and look a bit different after the conversion process. You are better off with color conversion taking place on your computer, rather than relying on Facebook’s conversion engine.

              Summary: Facebook automatically converts color space to sRGB, even if Adobe RGB or ProPhoto RGB images are provided. To avoid color conversion issues, I would still recommend to extract images with the sRGB color space.
              1.3. تحويل مساحة اللون في الفيسبوك

              ماذا يحدث إذا قمت عن طريق الخطأ بتصدير صور ذات مساحة ألوان مختلفة مثل Adobe RGB أو ProPhoto RGB بدلاً من sRGB؟ دعونا نلقي نظرة على الصورتين أدناه اللتين قمت بتصديرهما بمساحات ألوان Adobe RGB وProPhoto RGB (قبل: Adobe RGB، بعد: ProPhoto RGB):


              إذا قمت بمقارنة الصورتين أعلاه مع الصورة الأولى في هذه المقالة، سترى أن الألوان هي نفسها. وهذا يعني أن خوارزمية ضغط الصور الخاصة بفيسبوك تقوم أيضًا بإجراء تحويل من Adobe RGB وProPhoto RGB إلى sRGB تلقائيًا. لذا، إذا قمت بتحميل صورة ذات مساحة ألوان غير قياسية، فسيظل Facebook يغيرها مرة أخرى إلى sRGB تلقائيًا. يمكن رؤية تغير مساحة اللون بوضوح من لقطة الشاشة أدناه، حيث تظهر الصور الثلاث بنفس الشكل، على الرغم من وجود مساحة ألوان مختلفة قبل التحميل:


              هل يعني ذلك أنه لا ينبغي للمرء أن يهتم بمساحة الألوان التي يجب استخدامها أثناء التصدير؟ لا، سأظل أستخدم sRGB أثناء التصدير، لأن الألوان الغنية يمكن أن تتغير وتبدو مختلفة قليلاً بعد عملية التحويل. من الأفضل أن تتم عملية تحويل الألوان على جهاز الكمبيوتر الخاص بك، بدلاً من الاعتماد على محرك التحويل الخاص بفيسبوك.

              ملخص: يقوم Facebook تلقائيًا بتحويل مساحة الألوان إلى sRGB، حتى في حالة توفير صور Adobe RGB أو ProPhoto RGB. لتجنب مشكلات تحويل الألوان، ما زلت أوصي باستخراج الصور باستخدام مساحة ألوان sRGB.

              تعليق


              • #8

                2. Resizing Images from Lightroom for Facebook


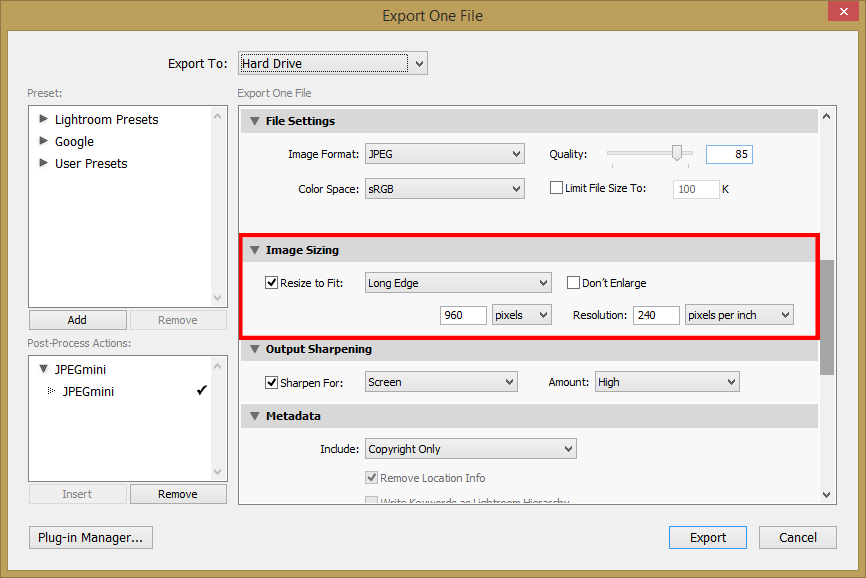
                Now that we know a few things about Facebook’s compression and color conversion process, we can move on to the process of exporting and resizing images for Facebook using Lightroom. Here is Lightroom’s export window that shows me exporting an image at 960 pixels (feel free to change this to any resolution you are comfortable with):

                As you can see, I picked “sRGB” for color space and 85% quality for the image. Actually, JPEG quality is not critically important, because Facebook compresses the heck out of it anyway. When I experimented with a 100% quality JPEG file and compared it to an 85% quality JPEG file, Facebook compressed both to about the same size, with 1 KB difference. However, if you pick anything lower than 85%, Facebook will compress the image even more and degrade its quality, so my recommendation would be to stay at 85% or higher.

                2. تغيير حجم الصور من Lightroom للفيسبوك

                الآن بعد أن عرفنا بعض الأشياء عن عملية الضغط وتحويل الألوان في فيسبوك، يمكننا الانتقال إلى عملية تصدير الصور وتغيير حجمها لفيسبوك باستخدام Lightroom. إليك نافذة تصدير Lightroom التي توضح لي تصدير صورة بدقة 960 بكسل (لا تتردد في تغيير هذا إلى أي دقة تناسبك):


                كما ترون، اخترت "sRGB" لمساحة الألوان وجودة الصورة بنسبة 85%. في الواقع، جودة JPEG ليست ذات أهمية كبيرة، لأن فيسبوك يضغطها بشدة على أي حال. عندما قمت بتجربة ملف JPEG بجودة 100% ومقارنته بملف JPEG بجودة 85%، قام فيسبوك بضغط الملفين بنفس الحجم تقريبًا، مع اختلاف قدره 1 كيلوبايت. ومع ذلك، إذا اخترت أي شيء أقل من 85%، فسيقوم فيسبوك بضغط الصورة بشكل أكبر وتقليل جودتها، لذا فإن توصيتي هي البقاء عند 85% أو أعلى.

                تعليق


                • #9

                  In the “Image Resizing” window, pick “Long Edge” from the dropdown and indicate the longest side in pixels. For best presentation of your work, I would recommend to upload images at higher resolution than 960 though. Keep in mind that many people own high resolution screens nowadays (Retina, 4K, etc), so making your images tiny will not help promote your work. Do not worry about the “Resolution” setting (shown as 240 on my screenshot) – that’s only used for printing and it has zero effect on how it is displayed or processed by Facebook. In fact, Facebook completely strips out that data from images anyway. I usually keep my resizing sharpening at “Screen” and “High”, but if that’s too much for your taste, you can either lower the value or skip the output sharpening completely. The EXIF data / metadata gets stripped out by Facebook anyway, so you can skip that part as well.

                  في نافذة "تغيير حجم الصورة"، اختر "الحافة الطويلة" من القائمة المنسدلة وأشر إلى الجانب الأطول بالبكسل. للحصول على أفضل عرض لعملك، أوصي بتحميل الصور بدقة أعلى من 960. ضع في اعتبارك أن العديد من الأشخاص يمتلكون شاشات عالية الدقة في الوقت الحاضر (Retina، 4K، وما إلى ذلك)، لذا فإن جعل صورك صغيرة لن يساعد في الترويج لعملك. لا تقلق بشأن إعداد "الدقة" (الموضح بالرقم 240 في لقطة الشاشة الخاصة بي) - فهو يُستخدم فقط للطباعة وليس له أي تأثير على كيفية عرضه أو معالجته بواسطة Facebook. في الواقع، يقوم فيسبوك بإزالة تلك البيانات من الصور تمامًا على أي حال. عادةً ما أحتفظ بتوضيح تغيير الحجم عند "الشاشة" و"عالي"، ولكن إذا كان هذا أكثر من اللازم بالنسبة لذوقك، فيمكنك إما خفض القيمة أو تخطي زيادة وضوح الإخراج تمامًا. يتم إزالة بيانات EXIF/البيانات الوصفية بواسطة Facebook على أي حال، لذا يمكنك تخطي هذا الجزء أيضًا.

                  تعليق


                  • #10

                    3. Resizing Images from Photoshop for Facebook


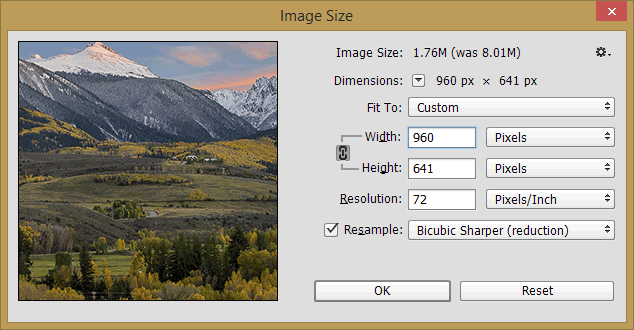
                    When working with images in Photoshop, you can perform resizing either in a separate step through the “Image Size” dialog (CTRL + ALT + I), or you can also resize the image in the “Save for Web” window. I personally prefer to do it through the Image Size dialog, as shown below:


                    3. تغيير حجم الصور من Photoshop للفيسبوك

                    عند العمل مع الصور في Photoshop، يمكنك إجراء تغيير الحجم إما في خطوة منفصلة من خلال مربع الحوار "حجم الصورة" (CTRL + ALT + I)، أو يمكنك أيضًا تغيير حجم الصورة في نافذة "حفظ للويب". أنا شخصياً أفضل القيام بذلك من خلال مربع حوار حجم الصورة، كما هو موضح أدناه:


                    تعليق


                    • #11


                      3. Resizing Images from Photoshop for Facebook


                      When working with images in Photoshop, you can perform resizing either in a separate step through the “Image Size” dialog (CTRL + ALT + I), or you can also resize the image in the “Save for Web” window. I personally prefer to do it through the Image Size dialog, as shown below:


                      3. تغيير حجم الصور من Photoshop للفيسبوك

                      عند العمل مع الصور في Photoshop، يمكنك إجراء تغيير الحجم إما في خطوة منفصلة من خلال مربع الحوار "حجم الصورة" (CTRL + ALT + I)، أو يمكنك أيضًا تغيير حجم الصورة في نافذة "حفظ للويب". أنا شخصياً أفضل القيام بذلك من خلال مربع حوار حجم الصورة، كما هو موضح أدناه:


                      تعليق


                      • #12
                        Pick the size you are comfortable with and put it in the Width input area for landscape orientation or Height input area for portrait orientation. For the same landscape shot above, I picked 960 in width and Photoshop automatically computed what the right height should be. Again, resolution does not matter, so you can leave it at its default value. For resampling, my preference is to use “Bicubic Sharper” when reducing image resolution, since it does a good job with the details and I rarely have to worry about sharpening the image.

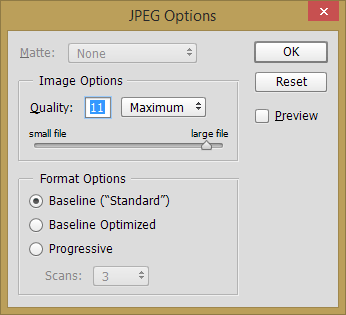
                        Once you resize the image, you can save it. When the “JPEG Options” dialog box comes up, pick a value between 10 and 12 for the best quality JPEG file, as shown below:

                        اختر الحجم الذي يناسبك وضعه في منطقة إدخال العرض للاتجاه الأفقي أو منطقة إدخال الارتفاع للاتجاه العمودي. بالنسبة إلى نفس المشهد الطبيعي أعلاه، اخترت عرضًا يبلغ 960 درجة وقام Photoshop تلقائيًا بحساب الارتفاع المناسب. مرة أخرى، لا يهم الدقة، لذا يمكنك تركها بقيمتها الافتراضية. لإعادة أخذ العينات، أفضل استخدام "Bicubic Sharper" عند تقليل دقة الصورة، لأنه يقوم بعمل جيد مع التفاصيل ونادرًا ما أقلق بشأن زيادة وضوح الصورة.

                        بمجرد تغيير حجم الصورة، يمكنك حفظها. عندما يظهر مربع الحوار "خيارات JPEG"، اختر قيمة بين 10 و12 للحصول على أفضل جودة لملف JPEG، كما هو موضح أدناه:


                        تعليق


                        • #13
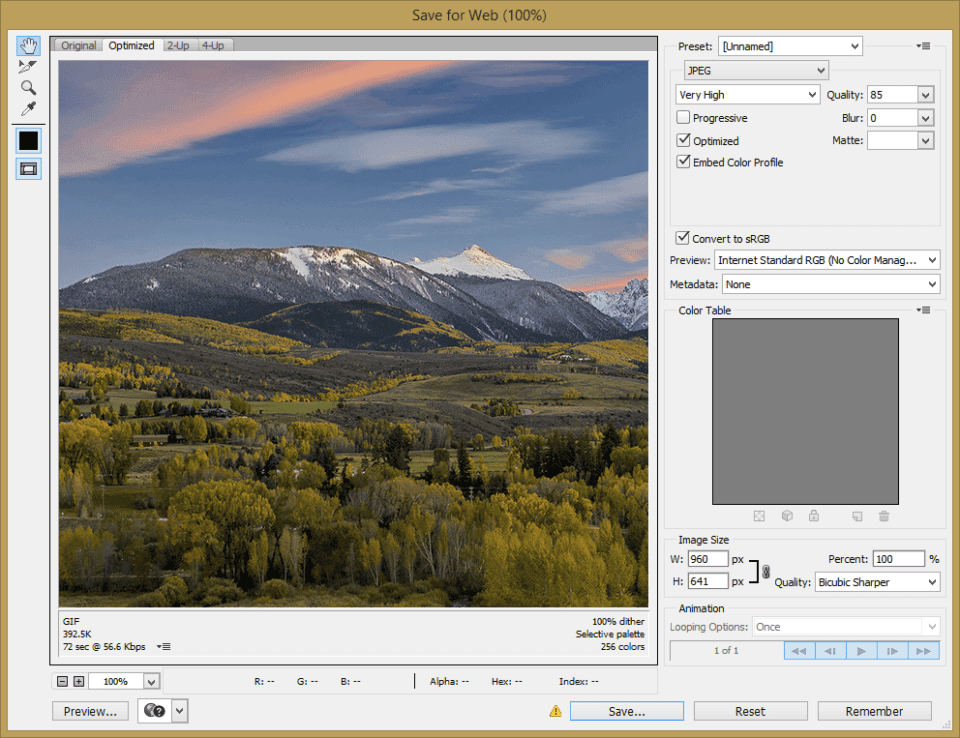
                          Another way is to use the “Save for Web” tool in Photoshop, which you can access by pressing ALT + SHIFT + CTRL + S, or by going to “File -> Save for Web…”. In this window, pick the JPEG quality between 85 and 100, make sure to keep “Embed Color Profile” checked and also make sure that “Convert to sRGB” is also checked:

                          With the “Save for Web” tool, you can skip the process of resizing the image completely – simply put in the desired image size under “Image Size” and pick the resizing algorithm such as “Bicubic Sharper”. Photoshop will resize the image and save it for you in the desired format and quality setting.


                          هناك طريقة أخرى وهي استخدام أداة "Save for Web" في Photoshop، والتي يمكنك الوصول إليها بالضغط على ALT + SHIFT + CTRL + S، أو بالانتقال إلى "File -> Save for Web...". في هذه النافذة، اختر جودة JPEG بين 85 و100، وتأكد من تحديد "تضمين ملف تعريف الألوان" وتأكد أيضًا من تحديد "التحويل إلى sRGB":


                          باستخدام أداة "حفظ للويب"، يمكنك تخطي عملية تغيير حجم الصورة تمامًا - ما عليك سوى وضع حجم الصورة المطلوب ضمن "حجم الصورة" واختيار خوارزمية تغيير الحجم مثل "Bicubic Sharper". سيقوم Photoshop بتغيير حجم الصورة وحفظها لك بالتنسيق المطلوب وإعدادات الجودة.

                          تعليق


                          • #14

                            4. Summary


                            Despite Facebook’s recommendation to resize photographs to 720, 960 or 2048 pixel resolution for best image quality, it seems like there is no harm in picking other non-standard resolutions. As I have shown in the above article, as long as you are not trying to upload a full resolution image higher than 2048 pixels, Facebook will not resize the uploaded image to a smaller resolution – it will only apply compression and strip out the embedded metadata. For showcasing your work, feel free to pick any size you are comfortable with. I personally pick 2048 pixels and that’s the same resolution we provide images here at PL, but some people might not be comfortable with providing images at such resolution. Still, keep in mind that devices that people are using to access the Internet are increasing in resolution rapidly, so larger images will certainly look more presentable than tiny ones.

                            If you are updating your timeline cover photo or your profile image though, I would recommend to extract those in the exact dimension recommended by Facebook to avoid resizing. You can use the crop tools in Lightroom and Photoshop to achieve that…
                            4. ملخص

                            على الرغم من توصية فيسبوك بتغيير حجم الصور إلى دقة 720 أو 960 أو 2048 بكسل للحصول على أفضل جودة للصورة، يبدو أنه لا يوجد ضرر في اختيار دقة أخرى غير قياسية. كما أوضحت في المقالة أعلاه، طالما أنك لا تحاول تحميل صورة كاملة الدقة أعلى من 2048 بكسل، فلن يقوم فيسبوك بتغيير حجم الصورة التي تم تحميلها إلى دقة أقل - بل سيطبق فقط الضغط ويزيل البيانات الوصفية المضمنة . لعرض عملك، لا تتردد في اختيار أي حجم يناسبك. أنا شخصيًا أختار 2048 بكسل وهي نفس الدقة التي نقدمها للصور هنا في PL، لكن قد لا يشعر بعض الأشخاص بالارتياح عند تقديم الصور بهذه الدقة. ومع ذلك، ضع في اعتبارك أن الأجهزة التي يستخدمها الأشخاص للوصول إلى الإنترنت تتزايد دقتها بسرعة، لذا فإن الصور الأكبر حجمًا ستبدو بالتأكيد أفضل مظهرًا من الصور الصغيرة.

                            إذا كنت تقوم بتحديث صورة غلاف مخططك الزمني أو صورة ملفك الشخصي، فإنني أوصي باستخراج تلك الصور بالبعد الدقيق الذي أوصى به فيسبوك لتجنب تغيير الحجم. يمكنك استخدام أدوات الاقتصاص في Lightroom وPhotoshop لتحقيق ذلك...

                            تعليق

                            يعمل...
                            X