الاعدادات الموصى بها لكامرا كانون D6 Recommended Canon 6D Settings

تقليص
X
 
  • تصفية - فلترة
  • الوقت
  • عرض
إلغاء تحديد الكل
مشاركات جديدة

  • الاعدادات الموصى بها لكامرا كانون D6 Recommended Canon 6D Settings

    Recommended Canon 6D Settings

    After we’ve published our series on recommended settings for Nikon D600 / D610 and D800 / D800E DSLRs, we received a lot of requests from our readers to provide similar information for Canon and Sony cameras. So, in this article, we will cover the Canon 6D and how we recommend setting up its menu. Especially for first-time Canon shooters, the Canon 6D’s menu can be very confusing, but this guide is a great starting point if you don’t know which settings to use.


    Before going into the camera menu, let’s first get started on the exterior controls. The Canon 6D has a lot of menu options, but there are some things that you can only control with the external controls. In addition, even if menu settings provide options to change particular settings, using external buttons / controls is simply faster.
    بعد أن نشرنا سلسلتنا حول الإعدادات الموصى بها لكاميرات Nikon D600 / D610 وD800 / D800E DSLR، تلقينا الكثير من الطلبات من قرائنا لتقديم معلومات مماثلة لكاميرات Canon وSony. لذا، سنتناول في هذه المقالة هاتف Canon 6D وكيف نوصي بإعداد القائمة الخاصة به. يمكن أن تكون قائمة Canon 6D مربكة للغاية، خاصة بالنسبة لمصوري Canon لأول مرة، ولكن هذا الدليل يعد نقطة بداية رائعة إذا كنت لا تعرف الإعدادات التي يجب استخدامها.


    قبل الدخول إلى قائمة الكاميرا، فلنبدأ أولاً في عناصر التحكم الخارجية. يحتوي Canon 6D على الكثير من خيارات القائمة، ولكن هناك بعض الأشياء التي لا يمكنك التحكم فيها إلا باستخدام عناصر التحكم الخارجية. بالإضافة إلى ذلك، حتى إذا كانت إعدادات القائمة توفر خيارات لتغيير إعدادات معينة، فإن استخدام الأزرار / عناصر التحكم الخارجية يكون ببساطة أسرع.

  • #2
    Autofocus, Drive Modes and Metering


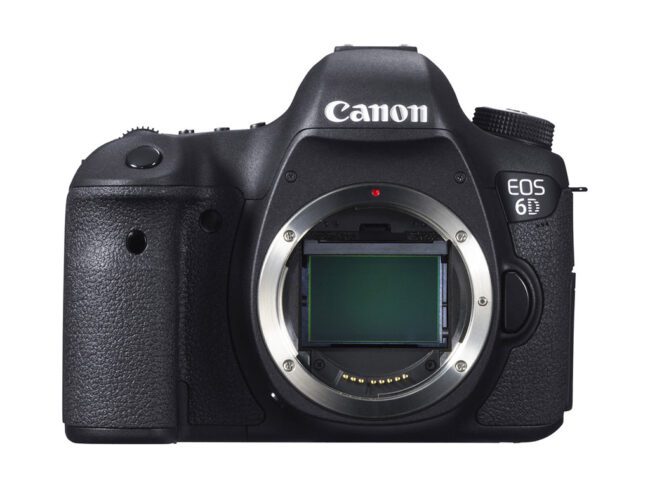
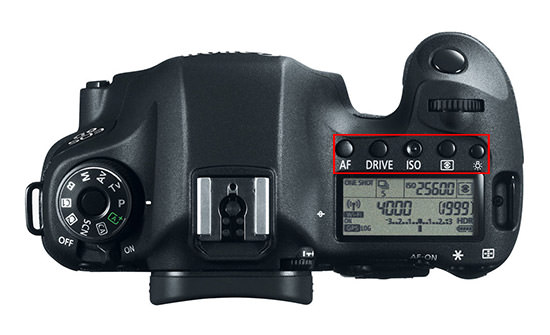
    The Canon 6D has a very simple and uncluttered front, with a single programmable button that is by default used for exposure preview. The top of the camera, however, has a number of buttons that make it easy and convenient to switch between different camera modes. Here they are, to the right of the flash hotshoe:


    التركيز التلقائي وأوضاع القيادة والقياس

    تتميز كاميرا Canon 6D بواجهة بسيطة جدًا ومرتبة، مع زر واحد قابل للبرمجة يُستخدم افتراضيًا لمعاينة التعريض. ومع ذلك، يحتوي الجزء العلوي من الكاميرا على عدد من الأزرار التي تجعل من السهل والمريح التبديل بين أوضاع الكاميرا المختلفة. وها هم على يمين الفلاش hotshoe:


    تعليق


    • #3
      Let’s go through each of these one by one. After you press the AF button, the top LCD of the camera will only display the currently set autofocus mode. In order to toggle between different autofocus modes, you either rotate the top dial, or the round dial on the back of the camera. This will make the camera go between “One Shot”, “AI Focus” and “AI Servo” modes. I won’t go into too much detail about each focus mode, since it is all explained in detail in this article that I wrote a while ago. Here is a quick recap:
      • One Shot – is used only for stationary subjects that do not move. When you half-press the shutter button, autofocus locks on the subject and if the subject moves, the focus will not change, resulting in a blurry picture. Only use this mode for photographing stationary subjects (landscapes, architecture, etc).
      • AI Focus – this mode is a combination of both One Shot and AI Servo (below) modes in one setting. The camera evaluates the subject/scene and automatically switches between the above two modes depending on what you are photographing.
      • AI Servo – this setting is used for photographing moving subjects. When you half-press the shutter button and your subject moves, the camera will re-acquire focus. I usually keep my camera in AI Servo autofocus mode when photographing people, especially my kids running around

      دعونا نذهب من خلال كل من هذه واحدة تلو الأخرى. بعد الضغط على زر AF، ستعرض شاشة LCD العلوية للكاميرا وضع التركيز التلقائي المضبوط حاليًا فقط. من أجل التبديل بين أوضاع التركيز التلقائي المختلفة، يمكنك إما تدوير القرص العلوي أو القرص الدائري الموجود في الجزء الخلفي من الكاميرا. سيؤدي هذا إلى جعل الكاميرا تنتقل بين أوضاع "One Shot" و"AI Focus" و"AI Servo". لن أخوض في الكثير من التفاصيل حول كل وضع من أوضاع التركيز، حيث تم شرح كل ذلك بالتفصيل في هذه المقالة التي كتبتها منذ فترة. هنا خلاصة سريعة:

      لقطة واحدة - تُستخدم فقط للأهداف الثابتة التي لا تتحرك. عندما تضغط نصف زر على زر الغالق، يتم تثبيت التركيز البؤري التلقائي على الهدف وإذا تحرك الهدف، فلن يتغير التركيز، مما يؤدي إلى صورة ضبابية. استخدم هذا الوضع فقط لتصوير الأهداف الثابتة (المناظر الطبيعية، والهندسة المعمارية، وما إلى ذلك). التركيز على الذكاء الاصطناعي - هذا الوضع عبارة عن مزيج من وضعي One Shot وAI Servo (أدناه) في إعداد واحد. تقوم الكاميرا بتقييم الموضوع/المشهد والتبديل تلقائيًا بين الوضعين المذكورين أعلاه اعتمادًا على ما تقوم بتصويره. AI Servo - يُستخدم هذا الإعداد لتصوير الأهداف المتحركة. عندما تضغط نصف زر على زر الغالق ويتحرك هدفك، ستعيد الكاميرا التركيز. عادةً ما أحتفظ بالكاميرا في وضع التركيز التلقائي بتقنية AI Servo عند تصوير الأشخاص، وخاصة أطفالي وهم يركضون

      تعليق


      • #4


        If you don’t know where to start, keep the setting on AI Focus, which will let the camera decide on how to focus in different situations.

        The second “DRIVE” button is used to switch between different camera drive modes such as Single, Continuous, Single Silent, Continuous Silent, 10 second Self-Timer / Remote Control and 2 second Self-Timer / Remote Control. Here is a quick rundown of these drive modes:
        • Single Drive – pressing the shutter release button will only fire one shot. If you continue to hold, nothing will happen.
        • Continuous Drive – pressing and holding the shutter release button will continuously fire the camera at a speed of 4.5 frames per second.
        • Silent Single Drive – similar to the first setting, but the mirror is raised slower for less noise.
        • Silent Continuous Drive – similar to the second setting, but the mirror is raised slower for less noise when firing continuously.
        • 10 second Self-Timer / Remote Control – after you press the shutter release button or engage a remote trigger, the camera waits for 10 seconds before taking a picture.
        • 2 second Self-Timer / Remote Control – similar as above, except the wait time is reduced to 2 seconds.

        إذا كنت لا تعرف من أين تبدأ، فاحتفظ بالإعداد على AI Focus، والذي سيتيح للكاميرا أن تقرر كيفية التركيز في المواقف المختلفة.

        يتم استخدام زر "DRIVE" الثاني للتبديل بين أوضاع تشغيل الكاميرا المختلفة مثل الوضع المفرد والمستمر والصامت الفردي والصامت المستمر والمؤقت الذاتي لمدة 10 ثوانٍ / جهاز التحكم عن بعد والمؤقت الذاتي لمدة ثانيتين / جهاز التحكم عن بعد. فيما يلي ملخص سريع لأوضاع القيادة هذه:

        محرك فردي - سيؤدي الضغط على زر تحرير الغالق إلى إطلاق طلقة واحدة فقط. إذا واصلت الضغط، فلن يحدث شيء. القيادة المستمرة - يؤدي الضغط مع الاستمرار على زر تحرير الغالق إلى تشغيل الكاميرا بشكل مستمر بسرعة 4.5 إطار في الثانية. القيادة المفردة الصامتة - تشبه الإعداد الأول، ولكن يتم رفع المرآة بشكل أبطأ لضوضاء أقل. محرك مستمر صامت - يشبه الإعداد الثاني، ولكن يتم رفع المرآة بشكل أبطأ لتقليل الضوضاء عند إطلاق النار بشكل مستمر. مؤقت ذاتي لمدة 10 ثوانٍ / جهاز تحكم عن بعد - بعد الضغط على زر تحرير الغالق أو تشغيل مشغل عن بعد، تنتظر الكاميرا لمدة 10 ثوانٍ قبل التقاط الصورة. مؤقت ذاتي لمدة ثانيتين / جهاز تحكم عن بعد - كما هو مذكور أعلاه، باستثناء تقليل وقت الانتظار إلى ثانيتين.

        تعليق


        • #5
          Unless you are planning to photograph action (sports, wildlife, etc), keep the camera in either Single Drive or Silent Single Drive mode. Personally, I like the Silent Single Drive mode compared to the Single Drive mode – the combination of the mirror and shutter sounds is very damp, which is nice.

          Next we have the ISO button for changing between different ISO sensitivity levels. Once you press the ISO button, rotating the top or rear dials will toggle between Auto ISO and regular ISO levels like 100, 200, 400, etc. all the way to ISO 25,600. Personally, I am a fan of the Auto ISO setting, as it automatically selects the right ISO for me depending on the brightness of the scene. If you are a beginner, I recommend using the Auto ISO setting, the behavior of which can be fine-tuned in the camera menu (as explained in detail further down below)
          ما لم تكن تخطط لتصوير الأحداث (الرياضة، الحياة البرية، إلخ)، احتفظ بالكاميرا في وضع محرك فردي أو محرك فردي صامت. أنا شخصياً أحب وضع القيادة الصامتة الفردية مقارنةً بوضع القيادة الفردية - فالجمع بين أصوات المرآة والغالق رطب جدًا، وهو أمر لطيف.

          بعد ذلك لدينا زر ISO للتغيير بين مستويات حساسية ISO المختلفة. بمجرد الضغط على زر ISO، سيؤدي تدوير الأقراص العلوية أو الخلفية إلى التبديل بين مستويات ISO التلقائية ومستويات ISO العادية مثل 100 و200 و400 وما إلى ذلك وصولاً إلى ISO 25600. شخصيًا، أنا من محبي إعداد Auto ISO، لأنه يقوم تلقائيًا بتحديد ISO المناسب لي اعتمادًا على سطوع المشهد. إذا كنت مبتدئًا، فإنني أوصي باستخدام إعداد Auto ISO، الذي يمكن ضبط سلوكه بدقة في قائمة الكاميرا (كما هو موضح بالتفصيل أدناه)

          تعليق


          • #6
            The fourth button from left is used for switching between different metering modes such as Evaluative, Partial, Center-Weighted Average and Spot. Once again, I won’t go over each mode in detail, as you can read my Camera Metering Modes article, where each metering mode is covered in detail. If you do not know where to start, keep your metering mode in the default “Evaluative” mode, which is the one that looks like an eye.

            The last button is used to light up the top LCD of the camera, which can be useful when photographing in dark.
            يتم استخدام الزر الرابع من اليسار للتبديل بين أوضاع القياس المختلفة مثل التقييمي والجزئي والمتوسط ​​المرجح للمركز والنقطة. مرة أخرى، لن أتطرق إلى كل وضع بالتفصيل، حيث يمكنك قراءة مقالتي عن أوضاع قياس الكاميرا، حيث يتم تناول كل وضع قياس بالتفصيل. إذا كنت لا تعرف من أين تبدأ، فاحتفظ بوضع القياس الخاص بك في الوضع "التقييمي" الافتراضي، وهو الوضع الذي يشبه العين.

            يُستخدم الزر الأخير لإضاءة شاشة LCD العلوية للكاميرا، وهو ما قد يكون مفيدًا عند التصوير في الظلام.

            تعليق


            • #7
              Camera Shooting Mode Dial


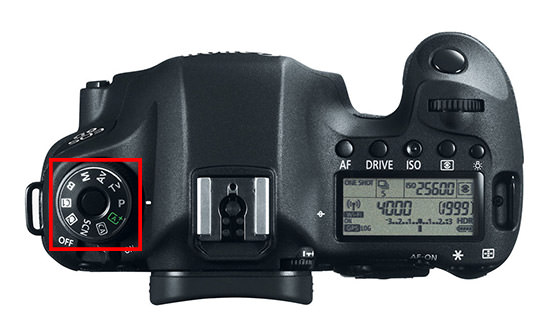
              On the top left side of the camera you will find a camera shooting mode dial (often referred to as the “PASM” dial). I have my dial set to “Av” (Aperture Priority Mode) 90% of the time, because the camera does a great job in giving me good exposures. Once you get to know the camera better, I would recommend to explore the “C1” / “C2” settings (more on this below under Setup Menu), because they could save you time when switching between different shooting environments (say when switching between photographing landscapes to running kids).


              قرص وضع التصوير بالكاميرا

              في الجانب العلوي الأيسر من الكاميرا، ستجد قرص وضع التصوير بالكاميرا (يُشار إليه غالبًا باسم قرص "PASM"). لقد قمت بضبط القرص على "Av" (وضع أولوية فتحة العدسة) بنسبة 90% من الوقت، لأن الكاميرا تقوم بعمل رائع في إعطائي تعريضات ضوئية جيدة. بمجرد التعرف على الكاميرا بشكل أفضل، أوصي باستكشاف إعدادات "C1" / "C2" (المزيد حول هذا أدناه ضمن قائمة الإعداد)، لأنها يمكن أن توفر لك الوقت عند التبديل بين بيئات التصوير المختلفة (على سبيل المثال، عند التبديل بين بيئات التصوير المختلفة). تصوير المناظر الطبيعية لتشغيل الاطفال).

              تعليق


              • #8
                Some situations, such as when photographing panoramas or using off-camera flash call for using the Manual (M) mode, but I would only recommend to use this mode when you get comfortable with the exposure triangle.

                في بعض المواقف، مثل عند تصوير صور بانورامية أو استخدام مكالمة فلاش خارج الكاميرا لاستخدام الوضع اليدوي (M)، لكنني أوصي باستخدام هذا الوضع فقط عندما تشعر بالارتياح تجاه مثلث التعريض.

                تعليق


                • #9
                  Back Buttons


                  The Canon 6D has a number of buttons on the back of the camera that also serve particular needs. To the top right of the camera, you can find three buttons: AF-ON, AE Lock (Asterisk) and AF Area Mode. The AF-ON button can be used in conjunction with the Custom Functions (see below) for “back-button AF” that you can use for the focusing and recomposing.

                  The AE Lock button is used to lock the exposure, which can be useful for keeping the exposure consistent between shots or when using the above-mentioned focus and recompose technique.
                  أزرار العودة

                  يحتوي Canon 6D على عدد من الأزرار الموجودة في الجزء الخلفي من الكاميرا والتي تخدم أيضًا احتياجات خاصة. في الجزء العلوي الأيمن من الكاميرا، يمكنك العثور على ثلاثة أزرار: AF-ON، وAE Lock (العلامة النجمية)، ووضع منطقة AF. يمكن استخدام زر AF-ON جنبًا إلى جنب مع الوظائف المخصصة (انظر أدناه) لـ "زر الرجوع للتركيز البؤري التلقائي" الذي يمكنك استخدامه للتركيز وإعادة التركيب.

                  يتم استخدام زر قفل AE لقفل التعريض الضوئي، والذي يمكن أن يكون مفيدًا للحفاظ على اتساق التعريض الضوئي بين اللقطات أو عند استخدام تقنية التركيز وإعادة التركيب المذكورة أعلاه.

                  تعليق


                  • #10
                    The last AF Area Mode button is used for selecting a particular focus point. When you press this button once, the top LCD will display “SEL [ ]”, which allows switching between different focus points in the viewfinder, or switching to dynamic focusing / automatic selection (with all focus points activated). If you look through the viewfinder and rotate the rear dial, you will see the focus points go vertically from top to bottom and vice versa. If you rotate the top dial, the focus points will switch horizontally from left to right and vice versa. Personally, I do not like the fact that I have to press a button to activate focus points, so I always use the multi-controller instead, as explained in detail below.

                    There is one more button on the back of the camera that can be quite handy for making quick adjustments to the camera and that’s the “Q” button that is located to the right of the magnifying glass and playback buttons. I love this button, because it serves as a shortcut to get to the most important settings without having to dig through the many menu items. It gives you access to the exposure triangle, exposure and flash exposure compensation, WiFi, picture styles, white balance + white balance shift, auto lighting optimizer, custom controls, AF operation, AF point selection, drive mode, metering mode and image size / quality settings. So this button is a great shortcut to seeing a summary of all settings on the camera that are currently applied. From here, you can override the top buttons easily by simply using the multi-controller on the back of the camera.

                    Let’s go through the camera Menu settings now.
                    يتم استخدام زر وضع منطقة التركيز البؤري التلقائي (AF) الأخير لتحديد نقطة تركيز معينة. عندما تضغط على هذا الزر مرة واحدة، ستعرض شاشة LCD العلوية "SEL [ ]"، مما يسمح بالتبديل بين نقاط التركيز البؤري المختلفة في معين المنظر، أو التبديل إلى التركيز البؤري الديناميكي / التحديد التلقائي (مع تنشيط جميع نقاط التركيز البؤري). إذا نظرت من خلال عدسة الكاميرا وقمت بتدوير القرص الخلفي، فسترى أن نقاط التركيز تنتقل عموديًا من الأعلى إلى الأسفل والعكس صحيح. إذا قمت بتدوير القرص العلوي، ستتحول نقاط التركيز أفقيًا من اليسار إلى اليمين والعكس. شخصيًا، لا أحب حقيقة أنني يجب أن أضغط على زر لتنشيط نقاط التركيز، لذلك أستخدم دائمًا وحدة التحكم المتعددة بدلاً من ذلك، كما هو موضح بالتفصيل أدناه.

                    يوجد زر آخر في الجزء الخلفي من الكاميرا يمكن أن يكون مفيدًا جدًا لإجراء تعديلات سريعة على الكاميرا، وهو الزر "Q" الموجود على يمين العدسة المكبرة وأزرار التشغيل. أنا أحب هذا الزر، لأنه بمثابة اختصار للوصول إلى الإعدادات الأكثر أهمية دون الحاجة إلى البحث في عناصر القائمة العديدة. يتيح لك الوصول إلى مثلث التعريض، وتعويض التعريض الضوئي والفلاش، وWiFi، وأنماط الصورة، وتوازن اللون الأبيض + إزاحة توازن اللون الأبيض، ومحسن الإضاءة التلقائي، وأدوات التحكم المخصصة، وتشغيل التركيز البؤري التلقائي، واختيار نقطة التركيز البؤري التلقائي، ووضع القيادة، ووضع القياس وحجم الصورة / إعدادات الجودة. لذلك يعد هذا الزر اختصارًا رائعًا لرؤية ملخص لجميع الإعدادات المطبقة حاليًا على الكاميرا. من هنا، يمكنك تجاوز الأزرار العلوية بسهولة عن طريق استخدام وحدة التحكم المتعددة الموجودة في الجزء الخلفي من الكاميرا.

                    دعنا ننتقل إلى إعدادات قائمة الكاميرا الآن.

                    تعليق


                    • #11
                      Camera Menu 1


                      Here are the settings I use for Camera Menu 1, with explanations:
                      • Image Quality: RAW – I always recommend to shoot in RAW format. As explained in my RAW versus JPEG article, there is a huge difference between RAW and JPEG. With RAW, you also do not have to worry about other camera settings such as picture styles, white balance and lighting optimizer, because you can modify those in post-processing.
                      • Beep: Disable – leave this disabled, since the camera will beep every time focus is achieved, which is annoying.
                      • Release shutter without card: OFF / Disable – you do not want the camera to fire without a memory card, in case you forget to insert one.
                      • Image review: 2 sec – I leave this at the default 2 seconds. After you take an image, it will be shown on the rear LCD for 2 seconds. If you want to preserve the battery life, you can turn this off as well.
                      قائمة الكاميرا 1

                      فيما يلي الإعدادات التي أستخدمها لقائمة الكاميرا 1، مع التوضيحات:

                      جودة الصورة: RAW - أوصي دائمًا بالتصوير بتنسيق RAW. كما هو موضح في مقالتي RAW مقابل JPEG، هناك فرق كبير بين RAW وJPEG. مع RAW، لا داعي للقلق أيضًا بشأن إعدادات الكاميرا الأخرى مثل أنماط الصورة وتوازن اللون الأبيض ومحسن الإضاءة، لأنه يمكنك تعديل تلك الإعدادات في مرحلة ما بعد المعالجة. صوت تنبيه: تعطيل – اترك هذا معطلاً، حيث ستصدر الكاميرا صوت تنبيه في كل مرة يتم تحقيق التركيز، وهو أمر مزعج. تحرير الغالق بدون بطاقة: إيقاف / تعطيل - لا تريد تشغيل الكاميرا بدون بطاقة ذاكرة، في حالة نسيان إدخال واحدة. مراجعة الصورة: ثانيتان - أترك هذا كإعداد افتراضي 2 ثانية. بعد التقاط الصورة، سيتم عرضها على شاشة LCD الخلفية لمدة ثانيتين. إذا كنت تريد الحفاظ على عمر البطارية، يمكنك إيقاف تشغيل هذا أيضًا.

                      تعليق


                      • #12
                        Camera Menu 2
                        • Lens aberration correction:
                          • Peripheral illumin.: Disable
                          • Chromatic aberration: Disable

                          I usually leave both disabled, because lens corrections are only relevant to JPEG images. If you are a JPEG shooter, leaving these on will reduce vignetting and chromatic aberration.
                        • External Speedlite control: default – leave this at default, unless you want to change flash behavior. Some settings will not work unless you attach a compatible flash unit.
                        • Mirror lockup: OFF – unless you want to reduce vibrations from the camera when the mirror is raised (when shooting at very low shutter speeds on a tripod), leave this turned off. When mirror lockup is on, pressing the shutter release or firing the camera with a remote will raise the mirror and the second time you trigger the shutter will start the exposure, then lower the mirror at the end of the exposure.

                        قائمة الكاميرا 2

                        تصحيح انحراف العدسة: الإضاءة الطرفية: تعطيل الانحراف اللوني: تعطيل

                        عادةً ما أتركهما معطلين، لأن تصحيحات العدسة تتعلق فقط بصور JPEG. إذا كنت من هواة التصوير بتنسيق JPEG، فإن ترك هذه العناصر قيد التشغيل سيؤدي إلى تقليل التظليل والانحراف اللوني.

                        التحكم في Speedlite الخارجي: افتراضي - اترك هذا الإعداد افتراضيًا، إلا إذا كنت تريد تغيير سلوك الفلاش. لن تعمل بعض الإعدادات إلا إذا قمت بتوصيل وحدة فلاش متوافقة. قفل المرآة: إيقاف - إلا إذا كنت تريد تقليل اهتزازات الكاميرا عند رفع المرآة (عند التصوير بسرعات غالق منخفضة جدًا على حامل ثلاثي الأرجل)، فاترك هذا قيد إيقاف التشغيل. عند تشغيل قفل المرآة، سيؤدي الضغط على تحرير الغالق أو إطلاق الكاميرا بجهاز التحكم عن بعد إلى رفع المرآة وفي المرة الثانية التي تقوم فيها بتشغيل الغالق سيبدأ التعريض الضوئي، ثم قم بخفض المرآة في نهاية التعريض الضوئي.

                        تعليق


                        • #13
                          Camera Menu 3
                          • Expo.comp./AEB: 0 – this is for setting exposure compensation or exposure bracketing. I would not bother with setting exposure compensation through the menu, since you can do it much quicker with the large rotary dial on the back of the camera
                          • ISO speed settings:
                            • ISO speed: Auto – as explained earlier, I like to use the Auto ISO feature, since I do not have to worry about the exposure.
                            • ISO speed range: 100-25600 – this setting affects what you are able to see when changing ISO through the ISO button or through the Quick menu. I want to keep the entire range for ISO selection, so I leave it at 100-25600 range.
                            • Auto ISO range: 100-6400 – now this setting is particularly useful when shooting in “Auto ISO” mode. I am not comfortable with noise above ISO 6400 on the 6D, so I keep the maximum range limited to ISO 6400.
                            • Min. shutter spd.: Auto – with the “Auto” setting, the camera will automatically adjust the shutter speed of the camera to the current focal length of the lens. When using the Sigma 50mm f/1.4 Art, I noticed that the camera would toggle between 1/40 and 1/50th of a second. For steady hands and good posture, this might be sufficient. However, if you have shaky hands, then the “Auto” setting might not do justice to keep you away from camera shake. If you notice blur in your images, I would change this from “Auto” to something faster than the focal length of the lens. For example, for the same Sigma 50mm lens, setting the minimum shutter speed to 1/60 might be better than 1/40 or 1/50th of a second. And if you set it to 1/125, it will be plenty even for shaky hands. Unfortunately, unlike Nikon, Canon does not allow for automatic “faster” or “slower” compensations and you are limited to 1/250 shutter speed maximum. This is a deal breaker for sports and wildlife photographers, because they have no options for fast shutter speeds like 1/2000. For those particular situations, you will probably be better off turning Auto ISO off.
                          • Auto Lighting Optimizer: OFF – ALO settings are only applicable to JPEG images and I usually keep them turned off.
                          • White balance: AWB – Just like ALO, white balance setting also does not matter, as you can adjust it later in post-processing.
                          • Custom White Balance – unless you have a gray card to set custom white balance, skip this setting.
                          • WB Shift/Bkt.: 0,0/±0 – don’t mess with this unless you know what you are doing.
                          • Color space: Adobe RGB – although color space does not matter for RAW images, Adobe RGB gives a slightly more accurate histogram to determine the correct exposure (since the camera shows histogram based on camera-rendered JPEG image, even if you shoot exclusively in RAW).

                          قائمة الكاميرا 3

                          Expo.comp./AEB: 0 - هذا مخصص لضبط تعويض التعريض الضوئي أو تصحيح التعريض الضوئي. لن أزعج نفسي بتعيين تعويض التعريض الضوئي من خلال القائمة، حيث يمكنك القيام بذلك بشكل أسرع بكثير باستخدام القرص الدوار الكبير الموجود في الجزء الخلفي من الكاميرا. إعدادات سرعة ISO: سرعة ISO: تلقائي - كما هو موضح سابقًا، أحب استخدام ميزة Auto ISO ، حيث لا داعي للقلق بشأن التعرض. نطاق سرعة ISO: 100-25600 - يؤثر هذا الإعداد على ما يمكنك رؤيته عند تغيير ISO من خلال زر ISO أو من خلال القائمة السريعة. أريد الاحتفاظ بالنطاق الكامل لاختيار ISO، لذلك أتركه عند نطاق 100-25600. نطاق ISO التلقائي: 100-6400 - أصبح هذا الإعداد الآن مفيدًا بشكل خاص عند التصوير في وضع "Auto ISO". أنا لست مرتاحًا للضوضاء التي تتجاوز ISO 6400 في 6D، لذا أبقي الحد الأقصى للنطاق محدودًا بـ ISO 6400.Min. سرعة الغالق: تلقائي - مع الإعداد "تلقائي"، ستقوم الكاميرا تلقائيًا بضبط سرعة غالق الكاميرا على البعد البؤري الحالي للعدسة. عند استخدام Sigma 50mm f/1.4 Art، لاحظت أن الكاميرا يمكن التبديل بين 1/40 و1/50 من الثانية. للحصول على أيدي ثابتة ووضعية جيدة، قد يكون هذا كافيًا. ومع ذلك، إذا كانت يداك مرتعشتين، فقد لا يكون الإعداد "تلقائي" منصفًا لإبعادك عن اهتزاز الكاميرا. إذا لاحظت ضبابية في صورك، فسأغير هذا من "تلقائي" إلى شيء أسرع من البعد البؤري للعدسة. على سبيل المثال، بالنسبة لنفس عدسة Sigma مقاس 50 مم، قد يكون ضبط الحد الأدنى لسرعة الغالق على 1/60 أفضل من 1/40 أو 1/50 من الثانية. وإذا قمت بضبطه على 1/125، فسيكون كافيًا حتى للأيدي المرتعشة. لسوء الحظ، على عكس نيكون، لا تسمح Canon بالتعويضات التلقائية "الأسرع" أو "الأبطأ" وتقتصر على سرعة غالق 1/250 كحد أقصى. يعد هذا بمثابة كسر للصفقات بالنسبة لمصوري الألعاب الرياضية والحياة البرية، لأنه ليس لديهم خيارات لسرعات الغالق السريعة مثل 1/2000. في تلك المواقف المحددة، ربما يكون من الأفضل إيقاف تشغيل ISO التلقائي. مُحسِّن الإضاءة التلقائي: إيقاف - تنطبق إعدادات ALO فقط على صور JPEG وعادةً ما أبقيها قيد إيقاف التشغيل. توازن اللون الأبيض: AWB - تمامًا مثل ALO، إعداد توازن اللون الأبيض لا يهم أيضًا، حيث يمكنك ضبطه لاحقًا في مرحلة ما بعد المعالجة. توازن اللون الأبيض المخصص – ما لم يكن لديك بطاقة رمادية لتعيين توازن اللون الأبيض المخصص، قم بتخطي هذا الإعداد. WB Shift/Bkt.: 0,0/±0 – دون لا تعبث بهذا إلا إذا كنت تعرف ما تفعله. مساحة اللون: Adobe RGB - على الرغم من أن مساحة اللون لا تهم صور RAW، فإن Adobe RGB يوفر رسمًا بيانيًا أكثر دقة قليلاً لتحديد التعرض الصحيح (نظرًا لأن الكاميرا تعرض رسمًا بيانيًا بناءً على صورة JPEG المعروضة بالكاميرا، حتى إذا قمت بالتصوير بصيغة RAW حصريًا).

                          تعليق


                          • #14
                            Camera Menu 4
                            • Picture Style: Standard – does not matter for shooting RAW images. I set mine to “Standard” and use the Standard camera profile in Lightroom for consistency. For more details about this, check out my article “how to get accurate Canon colors.”
                            • Long exp. noise reduction: OFF – I leave this off, but you might want to turn it on if you are planning to shoot very long exposures such as when doing astrophotography.
                            • High ISO speed NR: OFF – another one I leave off, as it only affects JPEG images.
                            • Highlight tone priority: OFF – unlike Auto Lighting Optimizer (ALO), Highlight tone priority does affect RAW data, since it actually underexposes an image to recover highlights. Unless you shoot JPEG, instead of letting the camera underexpose images with HTP to keep highlight details, I would recommend to properly expose images and even slightly over-expose, then recover the data in post. This technique is known as “Exposing to the right” and it gives you better results, especially when dealing with noise.
                            • Dust Delete Data – this is used for removing dust in images if you have dust particles on the image sensor. I never use this feature, since I prefer cleaning the camera sensor instead.
                            • Multiple exposure: Disable – this is used for creative photography when stacking photos on top of each other.
                            • HDR Mode: Disable HDR – this is automatically disabled when you choose RAW format.

                            قائمة الكاميرا 4

                            نمط الصورة: قياسي – لا يهم عند التقاط صور RAW. لقد قمت بضبط إعداداتي على "قياسي" واستخدم ملف تعريف الكاميرا القياسي في Lightroom لتحقيق الاتساق. لمزيد من التفاصيل حول هذا الأمر، راجع مقالتي "كيفية الحصول على ألوان Canon دقيقة". تجربة طويلة. تقليل الضوضاء: OFF - أترك هذا في وضع إيقاف التشغيل، ولكن قد ترغب في تشغيله إذا كنت تخطط لالتقاط تعريضات ضوئية طويلة جدًا كما هو الحال عند التصوير الفلكي. سرعة ISO عالية NR: OFF - ميزة أخرى أتركها، لأنها تؤثر فقط صور JPEG. أولوية درجة التمييز: إيقاف - على عكس مُحسِّن الإضاءة التلقائي (ALO)، تؤثر أولوية درجة التمييز على بيانات RAW، نظرًا لأنها في الواقع تقلل من تعريض الصورة لاستعادة الإبرازات. ما لم تقم بتصوير JPEG، فبدلاً من السماح للكاميرا بتعريض الصور بشكل ناقص باستخدام HTP للاحتفاظ بتفاصيل التمييز، أوصي بتعريض الصور بشكل صحيح وحتى الإفراط في تعريضها قليلاً، ثم استعادة البيانات في النشر. تُعرف هذه التقنية باسم "التعريض إلى اليمين" وتمنحك نتائج أفضل، خاصة عند التعامل مع الضوضاء. بيانات حذف الغبار - يُستخدم هذا لإزالة الغبار في الصور إذا كان لديك جزيئات غبار على مستشعر الصورة. لا أستخدم هذه الميزة مطلقًا، لأنني أفضل تنظيف مستشعر الكاميرا بدلاً من ذلك. التعرض المتعدد: تعطيل - يستخدم هذا للتصوير الفوتوغرافي الإبداعي عند تجميع الصور فوق بعضها البعض. وضع HDR: تعطيل HDR - يتم تعطيل هذا تلقائيًا عند اختيار تنسيق RAW .

                            تعليق


                            • #15
                              Live View Menu 1 and 2


                              Live View settings do not affect images, so I usually leave them at default settings.
                              Movie Menu 1 and 2


                              If you have the Live View switch on the back of the camera to “Movie” mode (red camera), instead of the above Live View menus you will see two movie menus. I don’t shoot video, so these are also set to default settings.
                              Playback Menu 1 and 2


                              Playback menus are used for altering images after they are captured. I normally do not mess with these and leave the settings in Menu 1 and 2 at default. The only setting I do change is in Playback Menu 2 – Image jump with rotary dial. I personally do not like the fact that the images jump by 10 by default when rotating the top dial, so I set it to “Display images one by one” instead. This way, whether I turn the top or the rear dials, both will display images one by one without skipping.
                              Playback Menu 3


                              The playback menu 3 has some important settings that I often use:
                              • Highlight alert: Enable – this will show the “blinkies” when there is overexposure / loss of highlight data.
                              • AF point disp. Enable – when displaying images, I want to see where the focus point was.
                              • Playback grid: Off – it is nice to see a grid in the viewfinder, but I don’t want to see it after the image is captured.
                              • Histogram disp: Brightness – if you want to see a histogram for each color channel, pick RGB.
                              • Movie play count: Rec time.
                              • Magnificatn (apx): Actual size – this allows me to see 100% crop when I press the magnification button when playing back images.
                              • Ctrl over HDMI: Disable.


                              قائمة العرض المباشر 1 و2

                              لا تؤثر إعدادات العرض المباشر على الصور، لذا عادةً ما أتركها على الإعدادات الافتراضية.

                              قائمة الفيلم 1 و2

                              إذا كان لديك مفتاح العرض المباشر الموجود في الجزء الخلفي من الكاميرا إلى وضع "الفيلم" (الكاميرا الحمراء)، فبدلاً من قوائم العرض المباشر المذكورة أعلاه، سترى قائمتين للأفلام. لا أقوم بتصوير الفيديو، لذا تم ضبط هذه الإعدادات أيضًا على الإعدادات الافتراضية.

                              قائمة التشغيل 1 و2

                              تُستخدم قوائم التشغيل لتعديل الصور بعد التقاطها. أنا عادة لا أعبث بهذه الأشياء وأترك ​​الإعدادات في القائمة 1 و 2 بشكل افتراضي. الإعداد الوحيد الذي أقوم بتغييره هو في قائمة التشغيل 2 - انتقال الصورة باستخدام قرص دوار. أنا شخصياً لا أحب حقيقة أن الصور تقفز بمقدار 10 بشكل افتراضي عند تدوير القرص العلوي، لذلك قمت بضبطه على "عرض الصور واحدة تلو الأخرى" بدلاً من ذلك. بهذه الطريقة، سواء قمت بإدارة الأقراص العلوية أو الخلفية، فسيعرض كلاهما الصور واحدة تلو الأخرى دون تخطي.

                              قائمة التشغيل 3

                              تحتوي قائمة التشغيل 3 على بعض الإعدادات المهمة التي أستخدمها غالبًا:

                              تنبيه التمييز: تمكين - سيُظهر هذا "الوميض" عندما يكون هناك تعريض زائد / فقدان لبيانات التمييز. عرض نقطة التركيز البؤري التلقائي. تمكين - عند عرض الصور، أريد أن أرى مكان نقطة التركيز. شبكة التشغيل: متوقفة - من الجيد رؤية شبكة في عدسة الكاميرا، لكنني لا أريد رؤيتها بعد التقاط الصورة. عرض الرسم البياني: السطوع - إذا كنت تريد رؤية رسم بياني لكل قناة لون، فاختر RGB. عدد تشغيل الفيلم: وقت التسجيل. Magnificatn (apx): الحجم الفعلي - يتيح لي هذا رؤية اقتصاص بنسبة 100% عندما أضغط على زر التكبير عند إعادة تشغيل الصور .التحكم عبر HDMI: تعطيل.

                              تعليق

                              يعمل...
                              X