كيف تنظم صورك بشكل صحيح How to Properly Organize Your Photos
تقليص
X
 
  • تصفية - فلترة
  • الوقت
  • عرض
إلغاء تحديد الكل
مشاركات جديدة

  • كيف تنظم صورك بشكل صحيح How to Properly Organize Your Photos

    How to Properly Organize Your Photos

    The process of organizing pictures is a time-consuming, but crucial task. Keeping your images organized and backed up will save you a lot of time and headache in the future. Therefore, it is essential that you do it properly early on and keep a consistent system in place. Photographs are our precious memories frozen in time, and we simply cannot afford to lose them. In this article, I will provide detailed information on how you can organize your digital photographs on your computer and implement simple backup practices.

    Whether you take pictures with your smartphone or a dedicated camera, you have most likely accumulated thousands of images over the years. Those images are probably scattered all over the place – some on your phone, others on your computer. And if you previously ran out of storage, you might have dumped some onto an external drive as well.

    كيفية تنظيم صورك بشكل صحيح
    ​
    تستغرق عملية تنظيم الصور وقتًا طويلاً ولكنها مهمة حاسمة. سيؤدي الحفاظ على تنظيم صورك ونسخها احتياطيًا إلى توفير الكثير من الوقت والصداع في المستقبل. لذلك، من الضروري أن تقوم بذلك بشكل صحيح في وقت مبكر وأن تحافظ على نظام ثابت في مكانه. الصور الفوتوغرافية هي ذكرياتنا الثمينة المجمدة في الوقت المناسب، ونحن ببساطة لا نستطيع تحمل فقدانها. في هذه المقالة، سأقدم معلومات مفصلة حول كيفية تنظيم صورك الرقمية على جهاز الكمبيوتر الخاص بك وتنفيذ ممارسات النسخ الاحتياطي البسيطة.

    سواء كنت تلتقط صورًا بهاتفك الذكي أو بكاميرا مخصصة، فمن المرجح أنك تراكمت لديك آلاف الصور على مر السنين. من المحتمل أن تكون هذه الصور منتشرة في كل مكان – بعضها على هاتفك، والبعض الآخر على جهاز الكمبيوتر الخاص بك. وإذا نفدت مساحة التخزين لديك سابقًا، فربما تكون قد قمت بإلقاء بعضها على محرك أقراص خارجي أيضًا.


  • #2
    But what if you were able to put them all in a single location, properly organize them in an easy to remember manner, then store them in a safe and reliable location? It sounds like a hard job, but it is extremely simple and effective, as you will see below.

    Please note that this is NOT a guide for serious photographers with large image catalogs. If you are a photographer looking for ways to organize your photo library, please see my article on “organizing pictures in Lightroom” instead.

    Before we go through a detailed, step-by-step process of organizing your photos, below is a quick “TLDR” version.
    ولكن ماذا لو تمكنت من وضعهم جميعًا في مكان واحد، وتنظيمهم بشكل صحيح بطريقة سهلة التذكر، ثم تخزينهم في مكان آمن وموثوق؟ قد يبدو الأمر وكأنه عمل شاق، ولكنه بسيط للغاية وفعال، كما سترى أدناه.

    يرجى ملاحظة أن هذا ليس دليلاً للمصورين الجادين الذين لديهم كتالوجات صور كبيرة. إذا كنت مصورًا فوتوغرافيًا وتبحث عن طرق لتنظيم مكتبة الصور الخاصة بك، فيرجى الاطلاع على مقالتي حول "تنظيم الصور في Lightroom" بدلاً من ذلك.

    قبل أن نخوض في عملية تفصيلية خطوة بخطوة لتنظيم صورك، فيما يلي نسخة سريعة من "TLDR".

    تعليق


    • #3
      The Best Way to Organize Photos
      • Find All Printed Photos. If you have printed images, find every single one that you want to preserve and digitize. Go through all prints and family albums. Considering reaching out to other family members to locate more photographs.
      • Digitize Printed Photos. Once you locate all the photos, use a good-quality scanner to scan the photos in high resolution.
      • Locate Digital Photos. Go through every device, starting from your smartphone all the way to external drives to locate every digital photograph you have.
      • Use a Single Storage Device. No matter how many photos you have, it is best that you put them all in a single storage device. If your current storage device has insufficient storage, buy an external hard drive with enough capacity to fir your entire photo library.
      • Use a Solid Folder Structure. Once you put all the photos in a single location, come up with an easy-to-remember folder structure that you can use consistently for all your photos today and in the future. I recommend splitting your photos into folders organized by year and event name.
      • Organize All Photos. After you decide on the folder structure, go through all the images that you previously scanned, as well as your digital photos, then organize them. This is going to be the most time-consuming process.
      • Backup Your Photos. Now that you have all the photos properly organized by folders, it is time to back them up. Use several local storage locations to back up your photos. Also, consider using online cloud storage to store another backup.

      أفضل طريقة لتنظيم الصور

      البحث عن كافة الصور المطبوعة. إذا كانت لديك صور مطبوعة، فابحث عن كل صورة تريد الاحتفاظ بها ورقمنتها. تصفح جميع المطبوعات وألبومات العائلة. النظر في التواصل مع أفراد الأسرة الآخرين لتحديد المزيد من الصور الفوتوغرافية. رقمنة الصور المطبوعة. بمجرد تحديد موقع جميع الصور، استخدم ماسحًا ضوئيًا عالي الجودة لمسح الصور ضوئيًا بدقة عالية. حدد موقع الصور الرقمية. انتقل عبر كل جهاز، بدءًا من هاتفك الذكي وصولاً إلى محركات الأقراص الخارجية لتحديد موقع كل صورة رقمية لديك. استخدم جهاز تخزين واحد. بغض النظر عن عدد الصور التي لديك، فمن الأفضل أن تضعها كلها في جهاز تخزين واحد. إذا كان جهاز التخزين الحالي الخاص بك لا يحتوي على مساحة تخزين كافية، فاشترِ محرك أقراص ثابتًا خارجيًا بسعة كافية لاستيعاب مكتبة الصور بأكملها. استخدم بنية المجلد الصلب. بمجرد وضع جميع الصور في مكان واحد، توصل إلى بنية مجلد سهلة التذكر يمكنك استخدامها باستمرار لجميع صورك اليوم وفي المستقبل. أوصي بتقسيم صورك إلى مجلدات منظمة حسب السنة واسم الحدث. تنظيم جميع الصور. بعد أن تحدد بنية المجلد، راجع جميع الصور التي قمت بمسحها ضوئيًا مسبقًا، بالإضافة إلى الصور الرقمية، ثم قم بتنظيمها. ستكون هذه العملية الأكثر استهلاكًا للوقت. قم بعمل نسخة احتياطية لصورك. الآن بعد أن تم تنظيم جميع الصور بشكل صحيح حسب المجلدات، فقد حان الوقت لعمل نسخة احتياطية منها. استخدم عدة مواقع تخزين محلية لعمل نسخة احتياطية من صورك. ضع في اعتبارك أيضًا استخدام التخزين السحابي عبر الإنترنت لتخزين نسخة احتياطية أخرى.

      تعليق


      • #4
        Now that we went through the quick summary, you might want to read the full version of the article below.

        Table of Contents
        الآن بعد أن استعرضنا الملخص السريع، قد ترغب في قراءة النسخة الكاملة من المقالة أدناه.

        جدول المحتويات

        حدد موقع جميع الصور الفوتوغرافية الخاصة بكالتخزين والنسخ الاحتياطيمكان تخزين الصور الخاصة بكمكان النسخ الاحتياطي لصوركإنشاء هيكل المجلد الرئيسيإنشاء مجلد واحد لكل حدث ونقل الصورإعادة تسمية الصور الفوتوغرافية الخاصة بكنسخ الصور احتياطيًاتردد النسخ الاحتياطي

        تعليق


        • #5

          1) Locate All of Your Photographs


          Start with your computer and try to locate every single picture. Common places to look for photographs are in your “My Documents” or “My Pictures” folders, but you might have pictures in other folders as well. Just search your computer for all files with “JPG” extension and see what it finds. Create a local folder on your desktop and move all your pictures there. If you have other computers/laptops at home, perform the same search and try to find every single picture. Next, go through your mobile devices (iPhone, iPod, Zune, etc) and see if you have any pictures stored there too. Copy them all to your main PC, into the same folder that you created earlier.

          Now it is time to look for your pictures on the Internet. Log into your email account and search for all emails with image attachments. Extract whatever you can find and save them to the same location. Next, go to all social media sites that you participate in (Facebook, My Space, Twitter, etc) and look for other pictures there. You might find your pictures in your friends’ albums too. Request your friends to send the high-resolution versions of the photos to you. Try to remember if any of your friends took your photos on their cameras and if they did, give them a call or email them and request them to send the high-resolution versions of your photographs. Save all new photos to the same temporary folder that you created on your desktop.
          1) تحديد موقع كافة الصور الخاصة بك

          ابدأ بجهاز الكمبيوتر الخاص بك وحاول تحديد موقع كل صورة على حدة. الأماكن الشائعة للبحث عن الصور الفوتوغرافية موجودة في مجلدات "المستندات" أو "الصور"، ولكن قد تكون لديك صور في مجلدات أخرى أيضًا. ما عليك سوى البحث في جهاز الكمبيوتر الخاص بك عن جميع الملفات ذات الامتداد "JPG" ومعرفة ما يجده. قم بإنشاء مجلد محلي على سطح المكتب الخاص بك وانقل جميع صورك إليه. إذا كان لديك أجهزة كمبيوتر/أجهزة كمبيوتر محمولة أخرى في المنزل، فقم بإجراء نفس البحث وحاول العثور على كل صورة على حدة. بعد ذلك، انتقل إلى أجهزتك المحمولة (iPhone وiPod وZune وما إلى ذلك) ومعرفة ما إذا كان لديك أي صور مخزنة هناك أيضًا. انسخها جميعًا إلى جهاز الكمبيوتر الرئيسي لديك، في نفس المجلد الذي قمت بإنشائه مسبقًا.

          حان الوقت الآن للبحث عن صورك على الإنترنت. قم بتسجيل الدخول إلى حساب بريدك الإلكتروني وابحث عن جميع رسائل البريد الإلكتروني التي تحتوي على مرفقات صور. قم باستخراج كل ما يمكنك العثور عليه وحفظه في نفس الموقع. بعد ذلك، انتقل إلى جميع مواقع التواصل الاجتماعي التي تشارك فيها (Facebook، My Space، Twitter، إلخ) وابحث عن صور أخرى هناك. قد تجد صورك في ألبومات أصدقائك أيضًا. اطلب من أصدقائك إرسال نسخ عالية الدقة من الصور إليك. حاول أن تتذكر ما إذا كان أي من أصدقائك قد التقط صورك بكاميراته، وإذا فعلوا ذلك، فاتصل بهم أو أرسل لهم بريدًا إلكترونيًا واطلب منهم إرسال نسخ عالية الدقة من صورك الفوتوغرافية. احفظ جميع الصور الجديدة في نفس المجلد المؤقت الذي قمت بإنشائه على سطح المكتب.

          تعليق


          • #6

            2) Storage and Backup


            Before thinking about how to organize your images, think about where you will be storing your images and how you will be backing them up.
            2.1) Where to Store Your Photos


            Some people like to store pictures on external drives and other storage media, but I store all of my photographs in my computer’s second internal drive (the first one is for the operating system). Internal hard drives are very inexpensive nowadays and you can buy a very large drive of 1 Terabytes or more for less than $100. If you have a laptop, it is probably better to store your pictures on an external drive instead, because the internal drives on laptops are typically small and slow. If you have a small number of pictures (less than 1,000), you can easily store them on your computer’s main drive. On the other hand, if you have a large collection of photos, then I would recommend to put them on a separate hard drive.

            2) التخزين والنسخ الاحتياطي

            قبل التفكير في كيفية تنظيم صورك، فكر في المكان الذي ستخزن فيه صورك وكيف ستقوم بنسخها احتياطيًا.

            2.1) مكان تخزين الصور الخاصة بك

            يحب بعض الأشخاص تخزين الصور على محركات أقراص خارجية ووسائط تخزين أخرى، لكني أقوم بتخزين جميع الصور الفوتوغرافية في محرك الأقراص الداخلي الثاني لجهاز الكمبيوتر الخاص بي (الأول مخصص لنظام التشغيل). تعد محركات الأقراص الثابتة الداخلية غير مكلفة للغاية في الوقت الحاضر ويمكنك شراء محرك أقراص كبير جدًا بسعة 1 تيرابايت أو أكثر بأقل من 100 دولار. إذا كان لديك جهاز كمبيوتر محمول، فمن الأفضل تخزين صورك على محرك أقراص خارجي بدلاً من ذلك، لأن محركات الأقراص الداخلية على أجهزة الكمبيوتر المحمولة عادةً ما تكون صغيرة وبطيئة. إذا كان لديك عدد قليل من الصور (أقل من 1000)، فيمكنك تخزينها بسهولة على محرك الأقراص الرئيسي لجهاز الكمبيوتر الخاص بك. من ناحية أخرى، إذا كان لديك مجموعة كبيرة من الصور، فإنني أوصي بوضعها على محرك أقراص ثابت منفصل.

            تعليق


            • #7
              2.2) Where to Backup Your Photos


              No matter where you store your pictures, the first thing you need to think about is how you will be backing up your images. NEVER fully rely on a single storage space, whether a hard drive, a CD/DVD or a memory stick. All electronic equipment fails at some point of time and leaving your precious data in one place is like putting all of your eggs in one basket. So, no matter where you decide to store your pictures, decide where you will be backing them up at the same time. Do NOT make the mistake of backing up your data into the same medium. The backup must be on a different physical device, otherwise, it is not a real backup.

              For backup purposes, I use a dedicated external drive that has exactly the same folder structure as my internal drive – it is basically a “Mirror” of my internal drive.
              2.2) مكان عمل نسخة احتياطية لصورك

              بغض النظر عن مكان تخزين صورك، فإن أول شيء يجب أن تفكر فيه هو كيفية عمل نسخة احتياطية لصورك. لا تعتمد أبدًا بشكل كامل على مساحة تخزين واحدة، سواء كانت محرك أقراص ثابت أو قرص مضغوط/أقراص DVD أو شريحة ذاكرة. تتعطل جميع المعدات الإلكترونية في وقت ما، كما أن ترك بياناتك الثمينة في مكان واحد يشبه وضع كل بيضك في سلة واحدة. لذا، بغض النظر عن المكان الذي قررت تخزين صورك فيه، قرر المكان الذي ستقوم بنسخه احتياطيًا في نفس الوقت. لا ترتكب خطأ النسخ الاحتياطي لبياناتك في نفس الوسيط. يجب أن تكون النسخة الاحتياطية على جهاز فعلي مختلف، وإلا فلن تكون نسخة احتياطية حقيقية.

              لأغراض النسخ الاحتياطي، أستخدم محرك أقراص خارجيًا مخصصًا له نفس بنية المجلد تمامًا مثل محرك الأقراص الداخلي الخاص بي - وهو في الأساس "مرآة" لمحرك الأقراص الداخلي الخاص بي.

              تعليق


              • #8

                3) Create Main Folder Structure


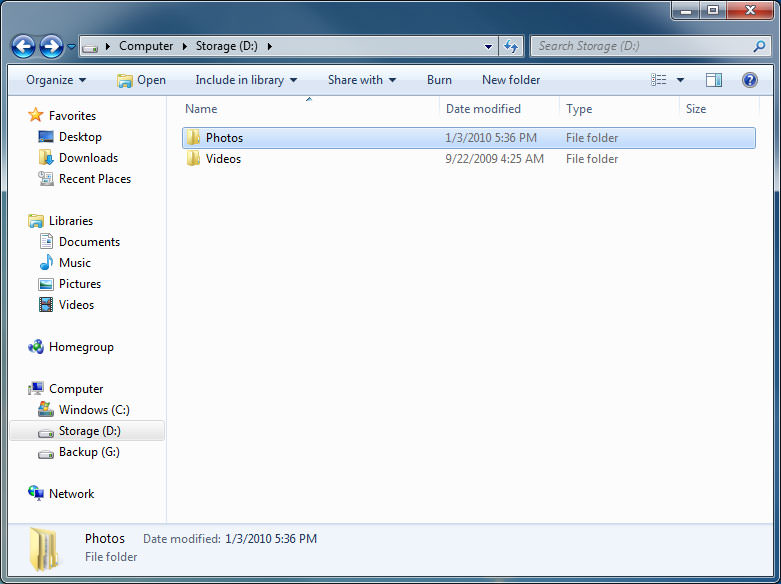
                Now that you know where to store your images and backups, it is time to think about your folder structure strategy, i.e. how you will be storing your pictures. There are many ways to do this and everyone can give different suggestions. Let me show you the way I do it and I will leave it up to you to decide if it works for you or not. I first start with the root folder and create a folder called “Pictures”:

                As you can see, I have another folder for “Videos” as well

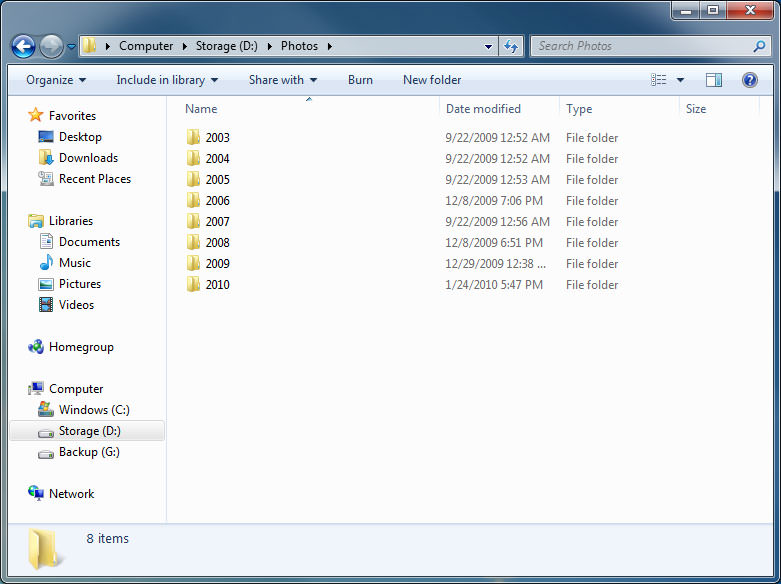
                Next, I create folders for each year, one by one:

                تعليق


                • #9
                  3) إنشاء هيكل المجلد الرئيسي

                  الآن بعد أن عرفت مكان تخزين الصور والنسخ الاحتياطية، فقد حان الوقت للتفكير في استراتيجية بنية المجلدات الخاصة بك، أي كيف ستخزن صورك. هناك العديد من الطرق للقيام بذلك ويمكن للجميع تقديم اقتراحات مختلفة. دعني أوضح لك الطريقة التي أفعل بها ذلك وسأترك الأمر لك لتقرر ما إذا كان يناسبك أم لا. أبدأ أولاً بالمجلد الجذر وأنشئ مجلدًا يسمى "الصور":


                  كما ترون، لدي مجلد آخر لـ "مقاطع الفيديو" أيضًا

                  بعد ذلك، أقوم بإنشاء مجلدات لكل عام، واحدًا تلو الآخر:

                  تعليق


                  • #10
                    4) Create One Folder Per Event and Move Photos


                    Then under each folder, I create one folder per event:

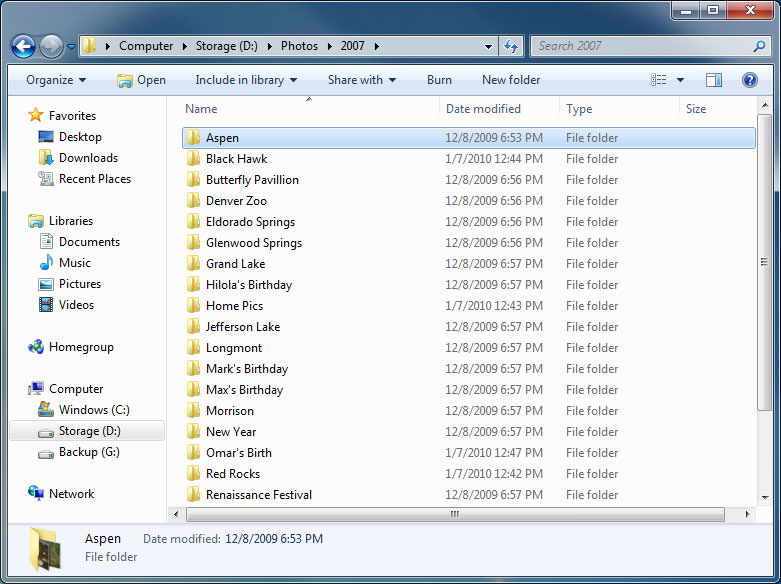
                    Examples of events are: “Mom’s Birthday Party”, “Christmas Celebration”, etc. – whatever fits the description of an event. If you have one large event that has smaller sub-events, then create one main folder and smaller subfolders underneath. For example, if you have something like “California Vacation”, it could have several subfolders inside such as “Disneyland”, “Universal Studios”, etc. Go ahead and create events for one year based on what you have.

                    I used to store each folder name by “Date Event”, such as “01-01-2007 Aspen”, but I chose to abandon this idea because I now use dates on my pictures instead:

                    تعليق


                    • #11
                      4) إنشاء مجلد واحد لكل حدث ونقل الصور

                      ثم، أسفل كل مجلد، أقوم بإنشاء مجلد واحد لكل حدث:


                      من أمثلة الأحداث: "حفلة عيد ميلاد أمي"، "الاحتفال بعيد الميلاد"، وما إلى ذلك - أيًا كان ما يناسب وصف الحدث. إذا كان لديك حدث كبير يحتوي على أحداث فرعية أصغر، فقم بإنشاء مجلد رئيسي واحد ومجلدات فرعية أصغر أسفله. على سبيل المثال، إذا كان لديك شيء مثل "California Vacation"، فمن الممكن أن يحتوي على عدة مجلدات فرعية بداخله مثل "Disneyland" و"Universal Studios" وما إلى ذلك. تابع وأنشئ أحداثًا لمدة عام واحد بناءً على ما لديك.

                      كنت أخزن اسم كل مجلد حسب "تاريخ الحدث"، مثل "01-01-2007 Aspen"، لكنني اخترت التخلي عن هذه الفكرة لأنني الآن أستخدم التواريخ في صوري بدلاً من ذلك:


                      تعليق


                      • #12
                        Examples of events are: “Mom’s Birthday Party”, “Christmas Celebration”, etc. – whatever fits the description of an event. If you have one large event that has smaller sub-events, then create one main folder and smaller subfolders underneath. For example, if you have something like “California Vacation”, it could have several subfolders inside such as “Disneyland”, “Universal Studios”, etc. Go ahead and create events for one year based on what you have.

                        I used to store each folder name by “Date Event”, such as “01-01-2007 Aspen”, but I chose to abandon this idea because I now use dates on my pictures instead:

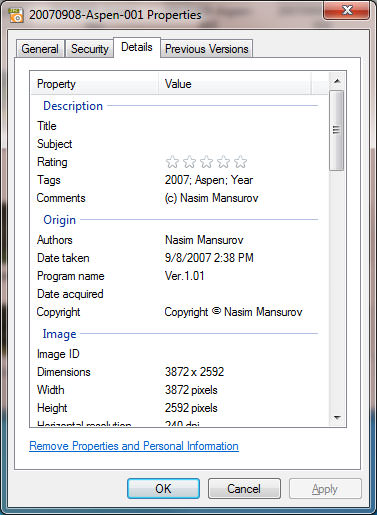
                        Now upload your photos into appropriate folders. This is the hard part, because you will have to go through all of your photos one by one and sort them through. Just looking at the picture by itself is not easy, as you might not remember when it was taken and where. What I suggest, is looking at the information that is stored inside the picture. Almost every digital camera today stores vital information such as Camera Type, Date and Time right into the picture when it saves it. This information is called “EXIF” and you can read my article “What is EXIF” to find out more about EXIF and how you can read this data from each picture. Anyway, on most modern operating systems such as Windows Vista or Windows 7, you can easily access this information by simply right-clicking the image, clicking “Properties”, then clicking on the “Details” tab:

                        Look at the “Origin->Date” field for the date when the picture was taken. Other information such as “Camera” might be useful to determine who took the picture (whether it was your camera or somebody else’s). Move all of your photos into appropriate event folders and make sure that nothing is left in your original temporary folder that you created in your desktop.

                        تعليق


                        • #13
                          من أمثلة الأحداث: "حفلة عيد ميلاد أمي"، "الاحتفال بعيد الميلاد"، وما إلى ذلك - أيًا كان ما يناسب وصف الحدث. إذا كان لديك حدث كبير يحتوي على أحداث فرعية أصغر، فقم بإنشاء مجلد رئيسي واحد ومجلدات فرعية أصغر أسفله. على سبيل المثال، إذا كان لديك شيء مثل "California Vacation"، فمن الممكن أن يحتوي على عدة مجلدات فرعية بداخله مثل "Disneyland" و"Universal Studios" وما إلى ذلك. تابع وأنشئ أحداثًا لمدة عام واحد بناءً على ما لديك.

                          كنت أخزن اسم كل مجلد حسب "تاريخ الحدث"، مثل "01-01-2007 Aspen"، لكنني اخترت التخلي عن هذه الفكرة لأنني الآن أستخدم التواريخ في صوري بدلاً من ذلك:


                          الآن قم بتحميل صورك إلى المجلدات المناسبة. هذا هو الجزء الصعب، لأنه سيتعين عليك مراجعة جميع صورك واحدة تلو الأخرى وفرزها. إن مجرد النظر إلى الصورة بمفردها ليس بالأمر السهل، لأنك قد لا تتذكر متى وأين تم التقاطها. ما أقترحه هو النظر إلى المعلومات المخزنة داخل الصورة. تقوم كل كاميرا رقمية تقريبًا اليوم بتخزين المعلومات الحيوية مثل نوع الكاميرا والتاريخ والوقت مباشرةً في الصورة عند حفظها. تسمى هذه المعلومات "EXIF" ويمكنك قراءة مقالتي "ما هو EXIF" لمعرفة المزيد عن EXIF ​​وكيف يمكنك قراءة هذه البيانات من كل صورة. على أي حال، في معظم أنظمة التشغيل الحديثة مثل Windows Vista أو Windows 7، يمكنك الوصول بسهولة إلى هذه المعلومات بمجرد النقر بزر الماوس الأيمن على الصورة، والنقر فوق "خصائص"، ثم النقر فوق علامة التبويب "التفاصيل":


                          انظر إلى حقل "Origin->Date" لمعرفة تاريخ التقاط الصورة. قد تكون المعلومات الأخرى مثل "الكاميرا" مفيدة لتحديد من التقط الصورة (سواء كانت الكاميرا الخاصة بك أو كاميرا شخص آخر). انقل جميع صورك إلى مجلدات الأحداث المناسبة وتأكد من عدم ترك أي شيء في المجلد المؤقت الأصلي الذي قمت بإنشائه على سطح المكتب.

                          تعليق


                          • #14

                            5) Rename Your Photographs


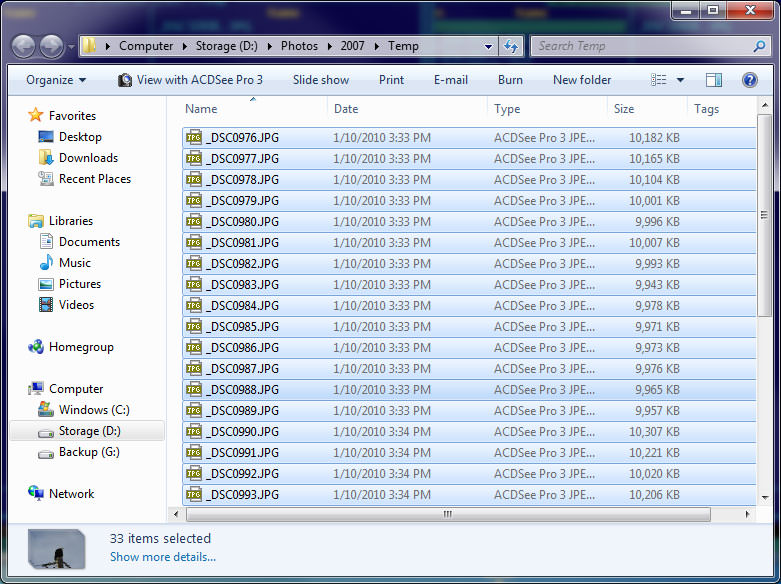
                            Unfortunately, many cameras produce images with weird filenames like “DSC1005.JPG” that do not make any sense. I highly recommend to rename all of your images to make it easier for you to locate them by searching for the file names in the future. Again, you can do this in many different ways, but I will show you the easiest method.

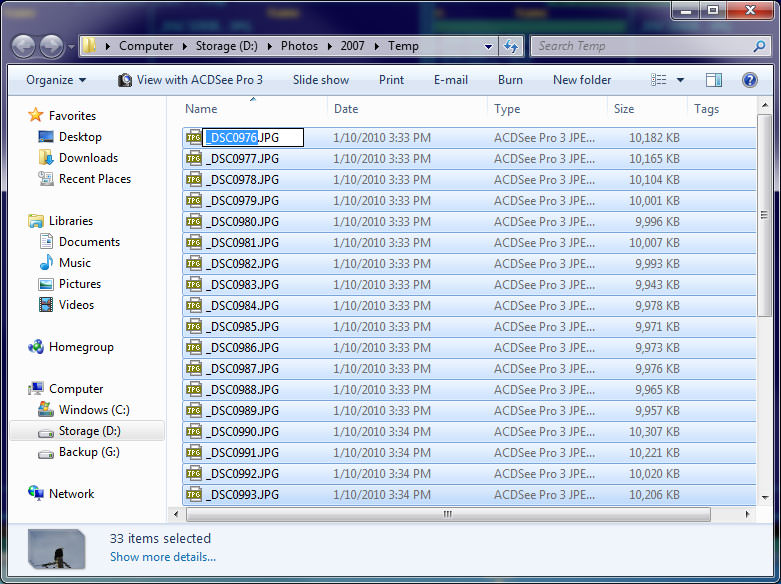
                            Go to one of the folders that contains your pictures. It is a good idea to start with a small folder, so pick one with only a few pictures. First, sort all your images by date by clicking the “Date” column (you should be in a “Detail” view for this to work). Then select all pictures by clicking on the first one and then pressing CTRL+A (select all):

                            Then right-click on the first image and click “Rename”:

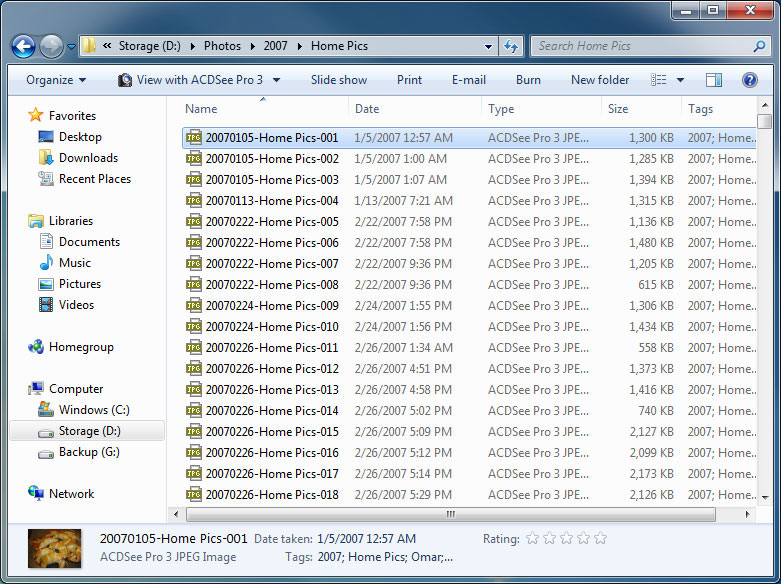
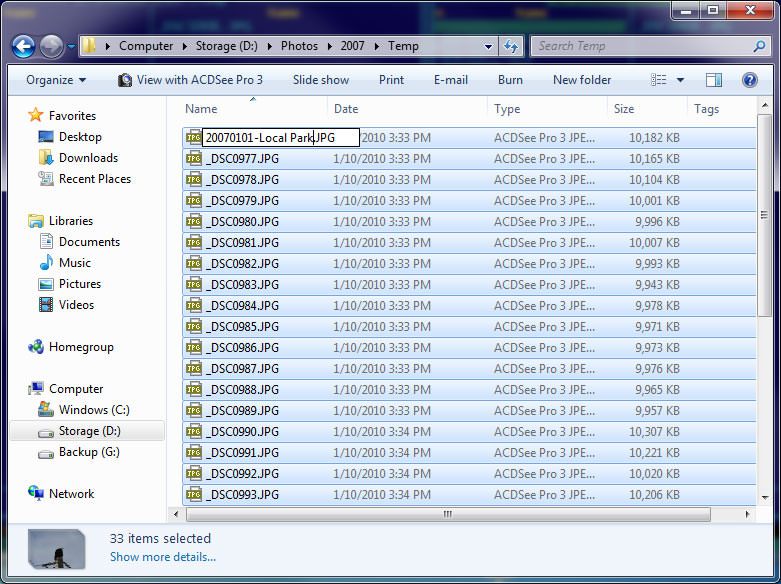
                            Then type the date, dash, event name and press “Enter” (for example: “20070101-Local Park”). I prefer to use the year first, then month, then day; because if your files are somehow mixed up in one folder, it will be easier to differentiate them by year, then month then day. If you start with a month, it will all get mixed up, because the months are repeated every year:

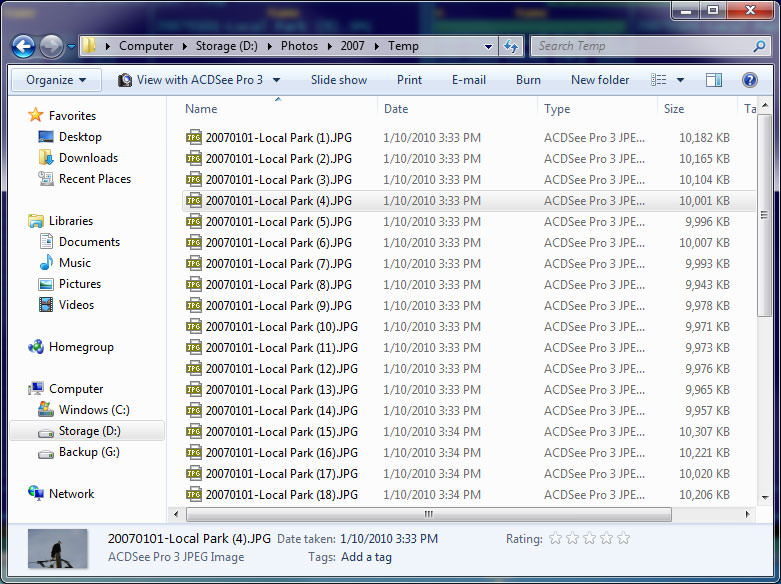
                            You should now see that all your files got properly renamed. The system will automatically add a number in brackets at the end of the file, which represents the file sequence number:

                            Do not worry if something got messed up. You can go back to what it was by simply by going to “Edit”->”Undo Rename” or hitting “CTRL+Z”. You can also rename the files multiple times, if needed. Repeat this process as many times as you have folders and make sure that everything is properly renamed.

                            تعليق


                            • #15
                              5) إعادة تسمية الصور الخاصة بك

                              لسوء الحظ، تنتج العديد من الكاميرات صورًا بأسماء ملفات غريبة مثل "DSC1005.JPG" والتي لا معنى لها على الإطلاق. أوصي بشدة بإعادة تسمية جميع صورك لتسهيل تحديد موقعها من خلال البحث عن أسماء الملفات في المستقبل. مرة أخرى، يمكنك القيام بذلك بعدة طرق مختلفة، لكنني سأعرض لك الطريقة الأسهل.

                              انتقل إلى أحد المجلدات التي تحتوي على صورك. إنها فكرة جيدة أن تبدأ بمجلد صغير، لذا اختر واحدًا يحتوي على عدد قليل من الصور فقط. أولاً، قم بفرز جميع صورك حسب التاريخ بالنقر فوق عمود "التاريخ" (يجب أن تكون في عرض "التفاصيل" حتى يعمل هذا). ثم حدد جميع الصور من خلال النقر على الصورة الأولى ثم الضغط على CTRL+A (تحديد الكل):


                              ثم انقر بزر الماوس الأيمن على الصورة الأولى وانقر على "إعادة التسمية":


                              ثم اكتب التاريخ والشرطة واسم الحدث واضغط على "إدخال" (على سبيل المثال: "20070101-Local Park"). أفضل استخدام السنة أولاً، ثم الشهر، ثم اليوم؛ لأنه إذا تم خلط ملفاتك بطريقة أو بأخرى في مجلد واحد، فسيكون من الأسهل التمييز بينها حسب السنة، ثم الشهر ثم اليوم. فإذا بدأت بشهر اختلط الأمر، لأن الأشهر تتكرر في كل عام:


                              يجب أن ترى الآن أنه تمت إعادة تسمية جميع ملفاتك بشكل صحيح. سيقوم النظام تلقائيًا بإضافة رقم بين قوسين في نهاية الملف، والذي يمثل الرقم التسلسلي للملف:


                              لا تقلق إذا حدث خطأ ما. يمكنك العودة إلى ما كان عليه ببساطة عن طريق الانتقال إلى "تحرير" -> "تراجع عن إعادة التسمية" أو الضغط على "CTRL + Z". يمكنك أيضًا إعادة تسمية الملفات عدة مرات، إذا لزم الأمر. كرر هذه العملية عدة مرات حسب المجلدات لديك وتأكد من إعادة تسمية كل شيء بشكل صحيح.

                              تعليق

                              يعمل...
                              X