كيفية معايرة شاشة كمبيوتر آبل How to Calibrate Your Apple Mac Monitor

تقليص
X
 
  • تصفية - فلترة
  • الوقت
  • عرض
إلغاء تحديد الكل
مشاركات جديدة

  • كيفية معايرة شاشة كمبيوتر آبل How to Calibrate Your Apple Mac Monitor

    How to Calibrate Your Apple Mac Monitor
    In this article, I will go over the process of calibrating Apple’s iMac and MacBook monitors. I will be using a hardware colorimeter along with DisplayCAL software, and demonstrate why properly calibrating your Apple display is extremely important.
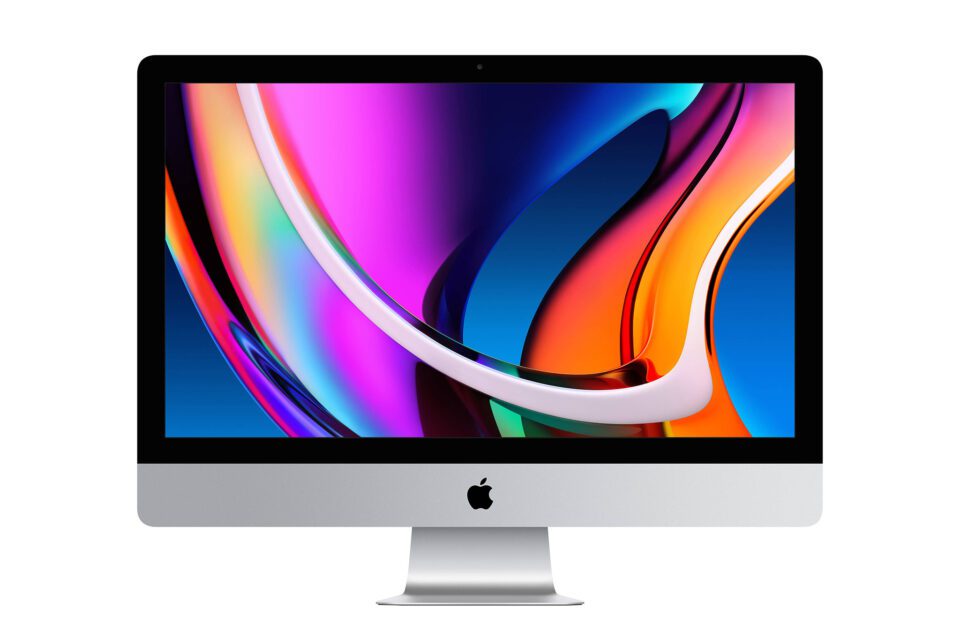
    Apple’s iMac and iMac Pro displays should be properly calibrated for use in photography

    كيفية معايرة شاشة Apple Mac الخاصة بك
    في هذه المقالة، سأتناول عملية معايرة شاشات iMac وMacBook من Apple. سأستخدم مقياس ألوان الأجهزة مع برنامج DisplayCAL، وسأوضح سبب أهمية معايرة شاشة Apple بشكل صحيح.
    ​يجب معايرة شاشات iMac وiMac Pro من Apple بشكل صحيح للاستخدام في التصوير الفوتوغرافي
    ​​​​​​​


  • #2
    As photographers, it is important for us to establish a consistent and accurate editing environment, which means that ideally, we should be looking at an accurate representation of colors in photographs in order to properly post-process them. Because of this, our output devices such as monitors and printers should always be properly calibrated to reproduce accurate colors consistently.

    With Apple being a key player in the photography industry with its iMac, MacBook, and Mac Pro hardware, specifically tailoring products for enthusiast and professional needs, there seems to be a great deal of misunderstanding and confusion about these products, their factory calibration / out-of-the-box accuracy and the proper process of calibrating them. Unfortunately, many photographers seem to think that they don’t need to worry about calibration at all with Apple products, which is certainly not the case.

    In this article, I am not going to go into details about color management and calibration, as these topics have been explained in detail by someone who is far more knowledgeable than me. I would recommend getting started with the Basics of Monitor Calibration, where you will find plenty of valuable information on monitor calibration. Instead, I will provide step-by-step instructions on how you can quickly and accurately calibrate your Apple Mac display for photography needs.
    كمصورين، من المهم بالنسبة لنا إنشاء بيئة تحرير متسقة ودقيقة، مما يعني أنه من الناحية المثالية، يجب أن ننظر إلى تمثيل دقيق للألوان في الصور الفوتوغرافية من أجل معالجتها بشكل صحيح بعد ذلك. ولهذا السبب، يجب دائمًا معايرة أجهزة الإخراج مثل الشاشات والطابعات بشكل صحيح لإنتاج ألوان دقيقة بشكل متسق.

    نظرًا لكون شركة Apple لاعبًا رئيسيًا في صناعة التصوير الفوتوغرافي من خلال أجهزة iMac وMacBook وMac Pro، التي تصمم المنتجات خصيصًا لتلبية الاحتياجات المتحمسة والمهنية، يبدو أن هناك قدرًا كبيرًا من سوء الفهم والارتباك حول هذه المنتجات ومعايرتها / خارجها في المصنع. - دقة الصندوق والعملية الصحيحة لمعايرتها. لسوء الحظ، يبدو أن العديد من المصورين يعتقدون أنه لا داعي للقلق بشأن المعايرة على الإطلاق مع منتجات Apple، وهذا ليس هو الحال بالتأكيد.

    في هذه المقالة، لن أخوض في تفاصيل حول إدارة الألوان ومعايرتها، حيث تم شرح هذه المواضيع بالتفصيل من قبل شخص أكثر معرفة مني بكثير. أوصي بالبدء في أساسيات معايرة الشاشة، حيث ستجد الكثير من المعلومات القيمة حول معايرة الشاشة. وبدلاً من ذلك، سأقدم إرشادات خطوة بخطوة حول كيفية معايرة شاشة Apple Mac الخاصة بك بسرعة ودقة لتلبية احتياجات التصوير الفوتوغرافي.

    تعليق


    • #3
      Table of Contents
      جدول المحتويات

      شاشة Apple - دقة الألوان المبتكرة مقاييس ألوان الأجهزة مقابل معايرة البرامج اختيار مقياس الألوان: X-Rite مقابل Datacolorبرنامج X-Rite مقابل DisplayCAL / ArgyllCMSDisplayCAL معايرة التحقق من صحة نتائج المعايرة اختبار التوحيد

      تعليق


      • #4
        Apple Display – Out-of-the-box Color Accuracy


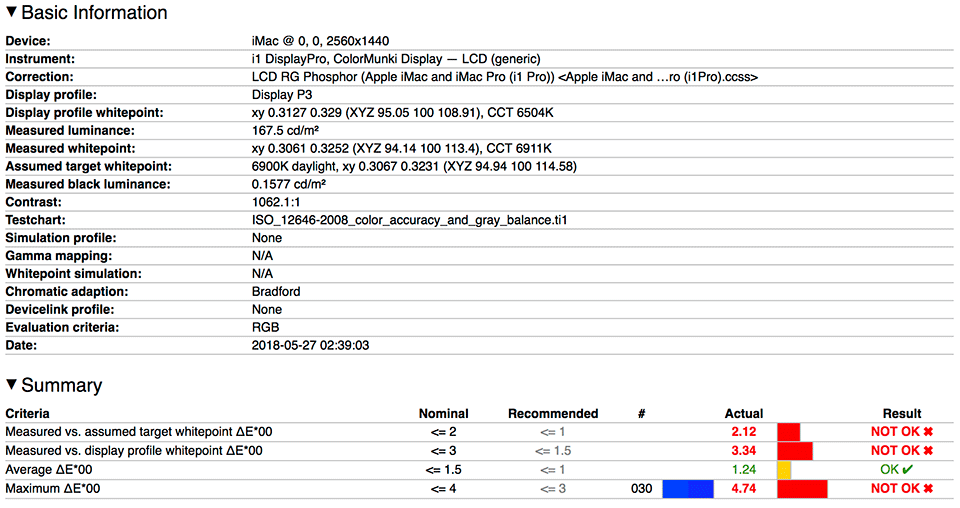
        First, let’s take a look at a brand new, uncalibrated iMac screen and see how color accurate it is straight out of the factory. This is important to see for those who think that they can safely edit their images without ever doing any kind of display calibration. I went ahead and used the i1Display Pro colorimeter, along with DisplayCAL / ArgyllCMS software to verify its accuracy (more on that further down below). Let’s take a look at the below measurement report:

        As you can see, this simple test reveals that the iMac screen is far from being color-accurate out of the box. With brightness levels being too high for proper editing and automatic brightness adjustment turned on, I knew that the default settings just wouldn’t work. My blues were out of whack and the reds were also oversaturated, so this monitor definitely needed calibration. In fact, I can run the same test for most similar monitors out there and they will all reveal similar results, which shows that proper screen calibration with a good colorimeter and understanding of color calibration software is very important.
        شاشة Apple – دقة الألوان المبتكرة

        أولاً، دعونا نلقي نظرة على شاشة iMac جديدة تمامًا وغير معيرة ونرى مدى دقة الألوان عند إخراجها من المصنع مباشرة. من المهم ملاحظة ذلك لأولئك الذين يعتقدون أنه يمكنهم تحرير صورهم بأمان دون إجراء أي نوع من معايرة العرض. لقد تقدمت واستخدمت مقياس الألوان i1Display Pro، جنبًا إلى جنب مع برنامج DisplayCAL / ArgyllCMS للتحقق من دقته (المزيد حول ذلك أدناه). دعونا نلقي نظرة على تقرير القياس أدناه:


        كما ترون، يكشف هذا الاختبار البسيط أن شاشة iMac بعيدة كل البعد عن دقة الألوان خارج الصندوق. نظرًا لأن مستويات السطوع مرتفعة جدًا بحيث لا يمكن التحرير المناسب وتشغيل ضبط السطوع التلقائي، فقد علمت أن الإعدادات الافتراضية لن تعمل. كان اللون الأزرق الخاص بي خارج نطاق السيطرة وكان اللون الأحمر أيضًا مشبعًا بشكل مفرط، لذلك كانت هذه الشاشة بحاجة بالتأكيد إلى المعايرة. في الواقع، يمكنني إجراء نفس الاختبار على معظم الشاشات المشابهة وسوف تكشف جميعها عن نتائج مماثلة، مما يوضح أن المعايرة المناسبة للشاشة باستخدام مقياس ألوان جيد وفهم برنامج معايرة الألوان أمر مهم للغاية.

        تعليق


        • #5
          Hardware Colorimeters vs Software Calibration


          Now let’s get one thing straight – as a photographer, you do not want to even try to self-calibrate a monitor without proper hardware and software. Your eyes and your brain’s perception of colors is pretty horrible, so trying to use software tools to calibrate a monitor will potentially make your monitor even worse than what you started with. So despite those built-in OS calibration tools and other third-party software that seemingly help make your colors more accurate, you should avoid using those at all costs!

          In addition, while it might be tempting to try out different built-in display profiles within your operating system, those don’t help in achieving proper calibration either, and they can also make things look much worse than the defaults. Lastly, don’t attempt to use a monitor profile from someone who calibrated their screen, even if both screens are identical. This doesn’t work due to things like differences in brightness levels, tolerances, age of display, etc. This is why each display has to be calibrated individually! So when it comes to being able to properly calibrate a screen, a proper hardware colorimeter is a must-have tool and unfortunately, there are no shortcuts here.

          It is also important to note that there is a distinction between what is commonly referred to as “hardware calibration”, where a wide-gamut monitor that has a built-in LUT (Look-Up Table) can be hardware-calibrated, and software calibration, where the video card changes color output to match the calibration profile. Since none of the current Apple monitors come with LUT and cannot be hardware-calibrated, only the software calibration method will work. And even for the latter, you will need to use a good quality colorimeter with the right kind of software to achieve the desired results.
          مقاييس ألوان الأجهزة مقابل معايرة البرامج

          الآن دعونا نوضح شيئًا واحدًا - باعتبارك مصورًا فوتوغرافيًا، فأنت لا ترغب حتى في محاولة معايرة الشاشة ذاتيًا بدون الأجهزة والبرامج المناسبة. إن إدراك عينيك وعقلك للألوان أمر فظيع جدًا، لذا فإن محاولة استخدام أدوات برمجية لمعايرة الشاشة من المحتمل أن تجعل شاشتك أسوأ مما بدأت به. لذا، على الرغم من أدوات معايرة نظام التشغيل المضمنة وبرامج الطرف الثالث الأخرى التي يبدو أنها تساعد في جعل الألوان أكثر دقة، يجب عليك تجنب استخدامها بأي ثمن!

          بالإضافة إلى ذلك، على الرغم من أنه قد يكون من المغري تجربة ملفات تعريف عرض مدمجة مختلفة داخل نظام التشغيل الخاص بك، إلا أن هذه الملفات لا تساعد في تحقيق المعايرة المناسبة أيضًا، ويمكنها أيضًا جعل الأمور تبدو أسوأ بكثير من الإعدادات الافتراضية. وأخيرًا، لا تحاول استخدام ملف تعريف الشاشة من شخص قام بمعايرة شاشته، حتى لو كانت كلتا الشاشتين متطابقتين. هذا لا يعمل بسبب أشياء مثل الاختلافات في مستويات السطوع، والتفاوتات، وعمر العرض، وما إلى ذلك. ولهذا السبب يجب معايرة كل شاشة على حدة! لذا، عندما يتعلق الأمر بالقدرة على معايرة الشاشة بشكل صحيح، فإن مقياس الألوان المناسب للأجهزة يعد أداة لا بد منها، ولسوء الحظ، لا توجد اختصارات هنا.

          من المهم أيضًا ملاحظة أن هناك فرقًا بين ما يشار إليه عادةً باسم "معايرة الأجهزة"، حيث يمكن معايرة شاشة واسعة النطاق تحتوي على جدول بحث (LUT) مدمج، وبين البرامج المعايرة، حيث تقوم بطاقة الفيديو بتغيير لون الإخراج ليتوافق مع ملف تعريف المعايرة. نظرًا لأن أيًا من شاشات Apple الحالية لا تأتي مزودة بـ LUT ولا يمكن معايرتها بالأجهزة، فلن تعمل سوى طريقة معايرة البرنامج. وحتى بالنسبة للأخيرة، ستحتاج إلى استخدام مقياس ألوان عالي الجودة مع النوع المناسب من البرامج لتحقيق النتائج المرجوة.

          تعليق


          • #6
            Colorimeter Choice: X-Rite vs Datacolor


            Speaking of colorimeters, while there are a few manufactures that make hardware colorimeters on the market, the two biggest players that make consumer-grade colorimeters are without a doubt, X-Rite and Datacolor. X-Rite has a number of different colorimeters, with the i1Display Pro being the most popular, while Datacolor’s top choice is the “Spyder” colorimeter that comes with different software options. For example, the SpyderX can be bought in “Pro” and “Elite” packages, which have the same underlying hardware.
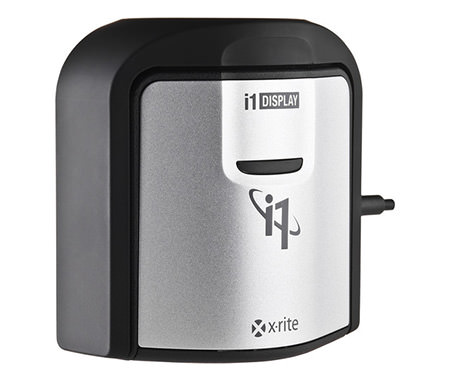
            X-Rite i1Display Pro Colorimeter
            Personally, I have used colorimeters from both companies. My prior experience with Datacolor colorimeters wasn’t particularly great, especially when calibrating multiple screens and assessing darker tones. I could never achieve consistent calibration on a dual monitor setup, which was a big problem for me. It turned out that Datacolor used to make colorimeters with gelatin filters that fade and deteriorate over time. When I found out that X-Rite uses high-quality dichroic glass filters, I switched to i1Display Pro and never looked back. To be fair, the newer SpyderX model by Datacolor supposedly uses much better glass filters, but I have not had a chance to test it out yet, so I cannot speak for its quality.

            With my X-Rite i1Display Pro, I was finally able to make a dual monitor setup work where things looked identical, and both calibration and verification yielded very consistent results.

            I know everyone’s experience is different, but if you ask the right people who are well-versed in calibration, they will all point to i1Display Pro being the industry standard. It makes sense – after-all, most high-end monitors from NEC and EIZO are calibrated with i1Display Pro hardware, and for good reasons, accuracy and consistency being the most important ones.

            As you will see further down in this review, I used X-Rite’s i1Display Pro colorimeter to calibrate my Mac screens. I will not be providing instructions for calibrating monitors using Datacolor Spyder hardware and software, but if that’s what you currently own, you should be able to calibrate your monitor using the same steps below.
            اختيار مقياس الألوان: X-Rite مقابل Datacolor

            عند الحديث عن مقاييس الألوان، في حين أن هناك عددًا قليلاً من الشركات المصنعة التي تصنع أجهزة قياس الألوان في السوق، فإن أكبر لاعبين يصنعان مقاييس الألوان المخصصة للمستهلك هما بلا شك X-Rite وDatacolor. يحتوي X-Rite على عدد من مقاييس الألوان المختلفة، مع كون i1Display Pro هو الأكثر شيوعًا، في حين أن الخيار الأفضل لـ Datacolor هو مقياس الألوان "Spyder" الذي يأتي مع خيارات برامج مختلفة. على سبيل المثال، يمكن شراء SpyderX في حزمتي "Pro" و"Elite"، اللتين تحتويان على نفس الأجهزة الأساسية.

            مقياس الألوان X-Rite i1Display Pro

            أنا شخصياً استخدمت أجهزة قياس الألوان من كلا الشركتين. لم تكن تجربتي السابقة مع أجهزة قياس الألوان Datacolor رائعة بشكل خاص، خاصة عند معايرة شاشات متعددة وتقييم درجات الألوان الداكنة. لم أتمكن مطلقًا من تحقيق معايرة متسقة لإعداد الشاشة المزدوجة، الأمر الذي كان يمثل مشكلة كبيرة بالنسبة لي. اتضح أن Datacolor يستخدم في صنع مقاييس الألوان باستخدام مرشحات الجيلاتين التي تتلاشى وتتدهور بمرور الوقت. عندما اكتشفت أن X-Rite يستخدم مرشحات زجاجية ثنائية اللون عالية الجودة، قمت بالتبديل إلى i1Display Pro ولم أنظر إلى الوراء أبدًا. لكي نكون منصفين، من المفترض أن نموذج SpyderX الأحدث من Datacolor يستخدم مرشحات زجاجية أفضل بكثير، لكن لم تتح لي الفرصة لاختباره بعد، لذلك لا أستطيع التحدث عن جودته.

            باستخدام X-Rite i1Display Pro، تمكنت أخيرًا من إجراء عملية إعداد الشاشة المزدوجة حيث تبدو الأشياء متطابقة، وأسفرت كل من المعايرة والتحقق عن نتائج متسقة للغاية.

            أعلم أن تجربة كل شخص مختلفة، ولكن إذا سألت الأشخاص المناسبين الذين لديهم خبرة جيدة في المعايرة، فسوف يشيرون جميعًا إلى أن i1Display Pro هو المعيار الصناعي. إنه أمر منطقي - ففي نهاية المطاف، تتم معايرة معظم الشاشات المتطورة من NEC وEIZO باستخدام أجهزة i1Display Pro، ولأسباب وجيهة، تعد الدقة والاتساق هي الأكثر أهمية.

            كما سترون في هذه المراجعة، فقد استخدمت مقياس الألوان i1Display Pro من X-Rite لمعايرة شاشات Mac الخاصة بي. لن أقدم تعليمات لمعايرة الشاشات باستخدام أجهزة وبرامج Datacolor Spyder، ولكن إذا كان هذا هو ما تمتلكه حاليًا، فمن المفترض أن تكون قادرًا على معايرة شاشتك باستخدام نفس الخطوات أدناه.

            تعليق


            • #7

              X-Rite Software vs DisplayCAL / ArgyllCMS


              X-Rite products are shipped with i1Profiler software, which can be used for calibrating your Apple Mac screen. While you can achieve pretty good results with this software and it is very easy to use, I personally prefer the combination of ArgyllCMS and DisplayCAL instead, which can be used to software-calibrate any monitor with a lot of different options.

              With ArgyllCMS + DisplayCAL you can do much lengthier calibration of the screen involving many more color patterns than what is found on X-Rite’s i1Profiler, so that you can end up with more accurate results. In addition, ArgyllCMS + DisplayCAL can be used to assess the quality of the Apple Mac screen and measure things like uniformity, where you are able to assess the brightness levels of different areas of the screen. In fact, if you have just purchased a Mac, I would highly recommend using these tools to see if your sample is worth keeping. Apple’s quality control is generally very good, but it doesn’t mean that you should just skip testing the screen. If the display panel is defective, you will end up with a lot of problems over time.
              برنامج X-Rite مقابل DisplayCAL / ArgyllCMS

              يتم شحن منتجات X-Rite مع برنامج i1Profiler، والذي يمكن استخدامه لمعايرة شاشة Apple Mac. على الرغم من أنه يمكنك تحقيق نتائج جيدة جدًا باستخدام هذا البرنامج وسهولة استخدامه، فأنا شخصيًا أفضل الجمع بين ArgyllCMS وDisplayCAL بدلاً من ذلك، والذي يمكن استخدامه لمعايرة أي شاشة باستخدام الكثير من الخيارات المختلفة.

              باستخدام ArgyllCMS + DisplayCAL، يمكنك إجراء معايرة أطول بكثير للشاشة تتضمن العديد من أنماط الألوان أكثر مما هو موجود في i1Profiler الخاص بـ X-Rite، بحيث يمكنك الحصول في النهاية على نتائج أكثر دقة. بالإضافة إلى ذلك، يمكن استخدام ArgyllCMS + DisplayCAL لتقييم جودة شاشة Apple Mac وقياس أشياء مثل التوحيد، حيث يمكنك تقييم مستويات السطوع لمناطق مختلفة من الشاشة. في الواقع، إذا كنت قد اشتريت جهاز Mac للتو، فإنني أوصي بشدة باستخدام هذه الأدوات لمعرفة ما إذا كانت العينة الخاصة بك تستحق الاحتفاظ بها. تعد مراقبة الجودة لدى Apple جيدة جدًا بشكل عام، لكن هذا لا يعني أنه يجب عليك تخطي اختبار الشاشة. إذا كانت لوحة العرض معيبة، فسوف ينتهي بك الأمر إلى مواجهة الكثير من المشكلات مع مرور الوقت.

              تعليق


              • #8
                DisplayCAL Calibration


                Now that we have all that behind us, let’s start the process of calibrating your Mac monitor. The first step will be to download and install DisplayCAL. The process of installing the software is pretty simple. Once you download the package and open it, simply drag the DisplayCAL icon into your Applications folder and you are good to go.

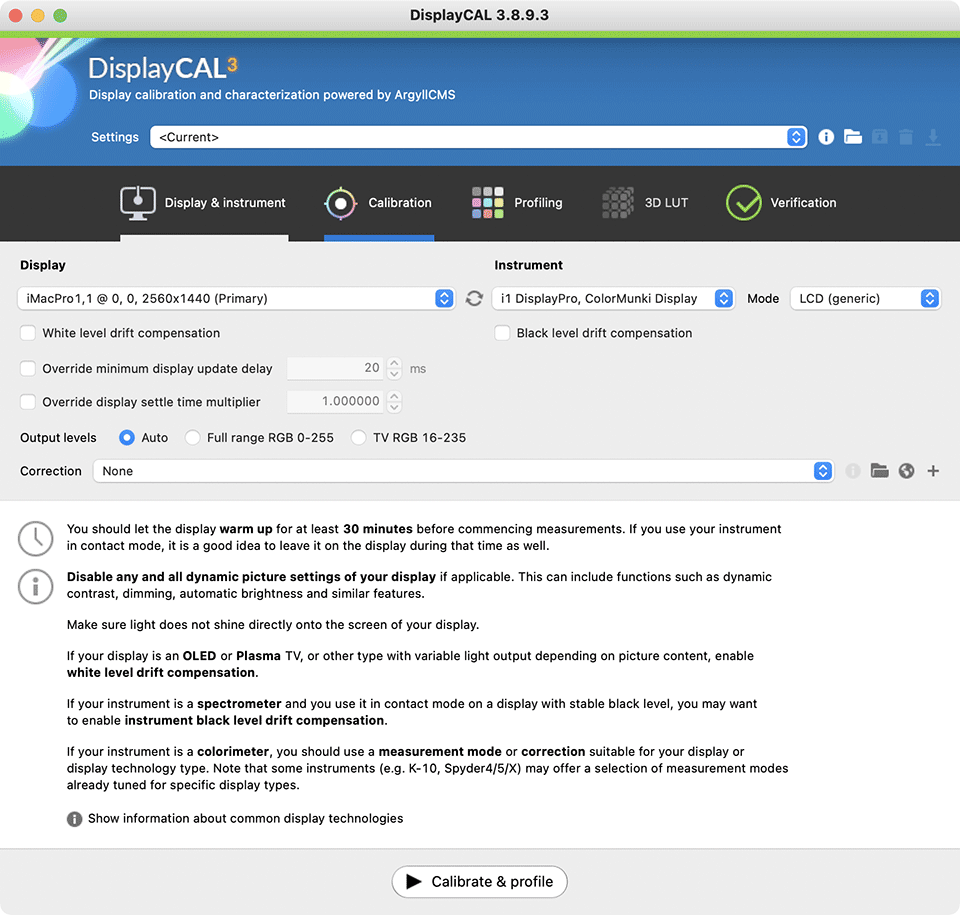
                Upon launching the tool, you will be asked to download ArgyllCMS, which you will also need to install afterward. From there, fire up DisplayCAL and you will be presented with a screen that looks like this:

                Go ahead and connect your colorimeter (in this case the X-Rite i1Display Pro) to one of the USB ports on the back of the Mac – you do not want to use any external tools or USB hubs, since they might not provide sufficient power or have other issues that might impact the performance of the colorimeter. Once connected, you should be able to see it under the “Instrument” dropdown of the software, as shown above.

                DisplayCAL has a ton of different options and I am not going to go over them all – I will only reveal the essentials. As you can see from the above screenshot, the software has 5 different tabs available. The first three tabs are used for calibration and those are the ones we will focus on the most.

                Let’s start with the first tab called “Display & instrument”. This is perhaps the most important tab of them all because it relates to your monitor’s technology – if you choose the wrong monitor type, you might end up with pretty screwed up results. This is found in the “Corrections” drop-down. When you click the drop-down, you will see a number of different options from “Auto” to “WOLED” screens.

                معايرة DisplayCAL

                والآن بعد أن أصبح لدينا كل ذلك وراءنا، فلنبدأ عملية معايرة شاشة Mac الخاصة بك. ستكون الخطوة الأولى هي تنزيل DisplayCAL وتثبيته. عملية تثبيت البرنامج بسيطة جدًا. بمجرد تنزيل الحزمة وفتحها، ما عليك سوى سحب رمز DisplayCAL إلى مجلد التطبيقات الخاص بك وستكون جاهزًا للبدء.

                عند تشغيل الأداة، سيُطلب منك تنزيل ArgyllCMS، والذي ستحتاج أيضًا إلى تثبيته بعد ذلك. من هناك، قم بتشغيل DisplayCAL وستظهر لك شاشة تبدو كما يلي:


                تابع وقم بتوصيل مقياس الألوان الخاص بك (في هذه الحالة X-Rite i1Display Pro) بأحد منافذ USB الموجودة في الجزء الخلفي من جهاز Mac - لا تريد استخدام أي أدوات خارجية أو لوحات وصل USB، لأنها قد لا توفر طاقة كافية أو لديك مشكلات أخرى قد تؤثر على أداء مقياس الألوان. بمجرد الاتصال، من المفترض أن تكون قادرًا على رؤيته ضمن القائمة المنسدلة "الأداة" الخاصة بالبرنامج، كما هو موضح أعلاه.

                لدى DisplayCAL الكثير من الخيارات المختلفة ولن أتطرق إليها جميعًا - سأكشف فقط عن الأساسيات. كما ترون من لقطة الشاشة أعلاه، يحتوي البرنامج على 5 علامات تبويب مختلفة متاحة. يتم استخدام علامات التبويب الثلاث الأولى للمعايرة، وهي تلك التي سنركز عليها أكثر من غيرها.

                لنبدأ بعلامة التبويب الأولى التي تسمى "العرض والأداة". ربما تكون هذه هي علامة التبويب الأكثر أهمية على الإطلاق لأنها تتعلق بتكنولوجيا شاشتك - إذا اخترت نوع الشاشة الخاطئ، فقد ينتهي بك الأمر إلى نتائج سيئة للغاية. يمكنك العثور على هذا في القائمة المنسدلة "التصحيحات". عندما تنقر على القائمة المنسدلة، سترى عددًا من الخيارات المختلفة من شاشات "تلقائي" إلى شاشات "WOLED".

                تعليق


                • #9
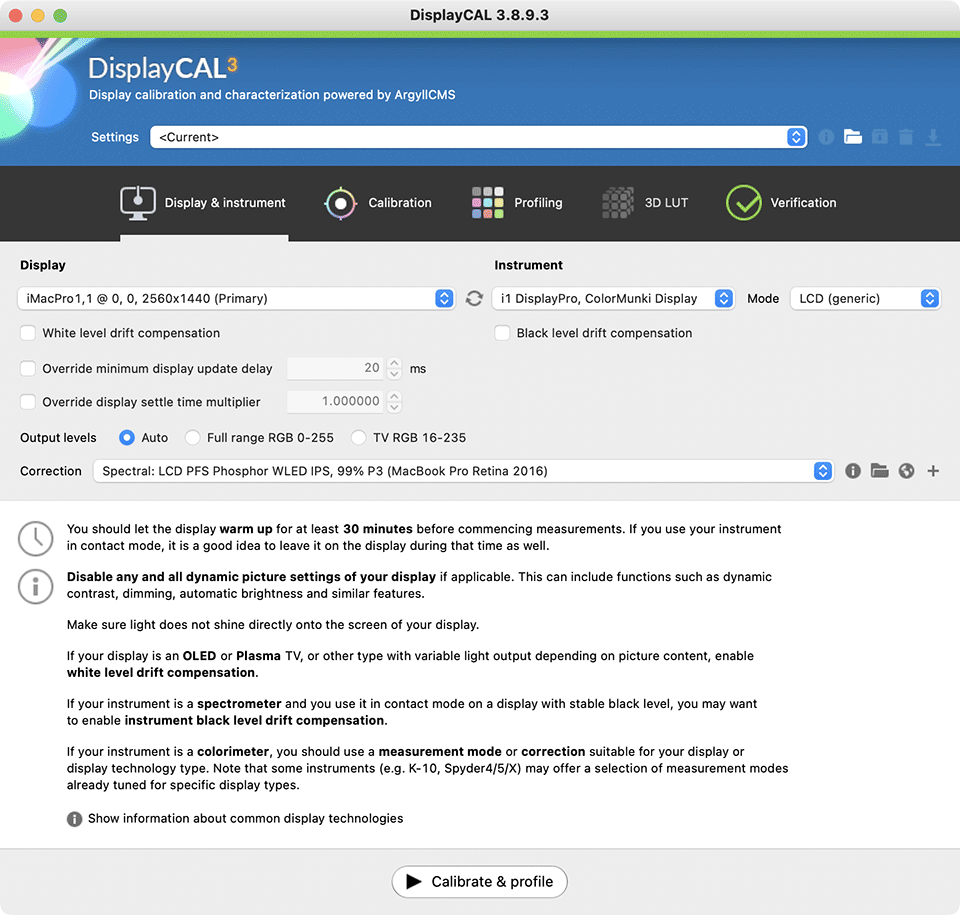
                  Apple’s iMac and MacBook screens are best calibrated with the “LCD PFS Phosphor WLED IPS” correction, and there is now one provided with the DisplayCAL software that you can use to calibrate any iMac, iMac Pro, MacBook Air or MacBook Pro screens with P3 color gamut. Technically, it is named “LCD PFS Phosphor WLED IPS, 99% P3 (MacBook Pro Retina 2016)”, but it works on other Apple P3 displays as well (I successfully tested it on the iMac Pro, MacBook Pro 2016, and MacBook Air M1).

                  Once you select that profile, the Display & instrument page should look like this:

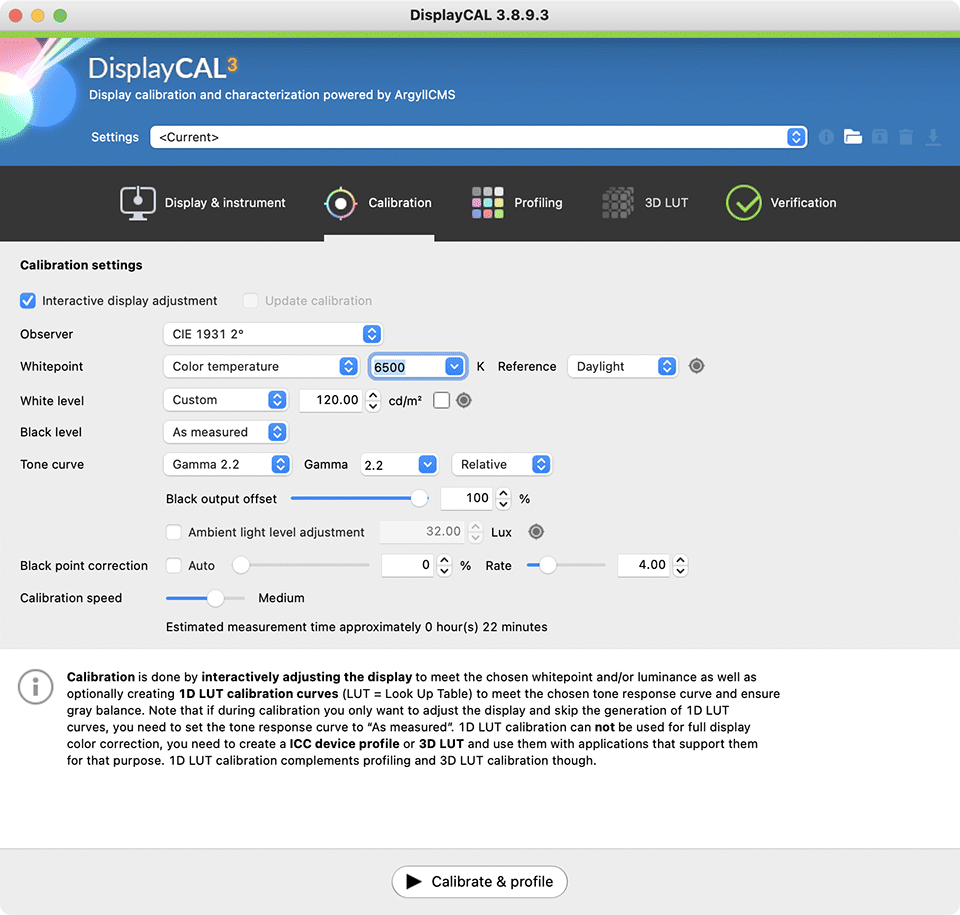
                  Next, click the “Calibration” tab and set the options as shown below:

                  Here, we are setting the White Point to 6500K (D65), White level to 120 cd/m2 and Gamma to 2.2 – recommended settings for editing photographs. If you want better accuracy, set the Calibration speed to High or preferably Medium, as shown above.

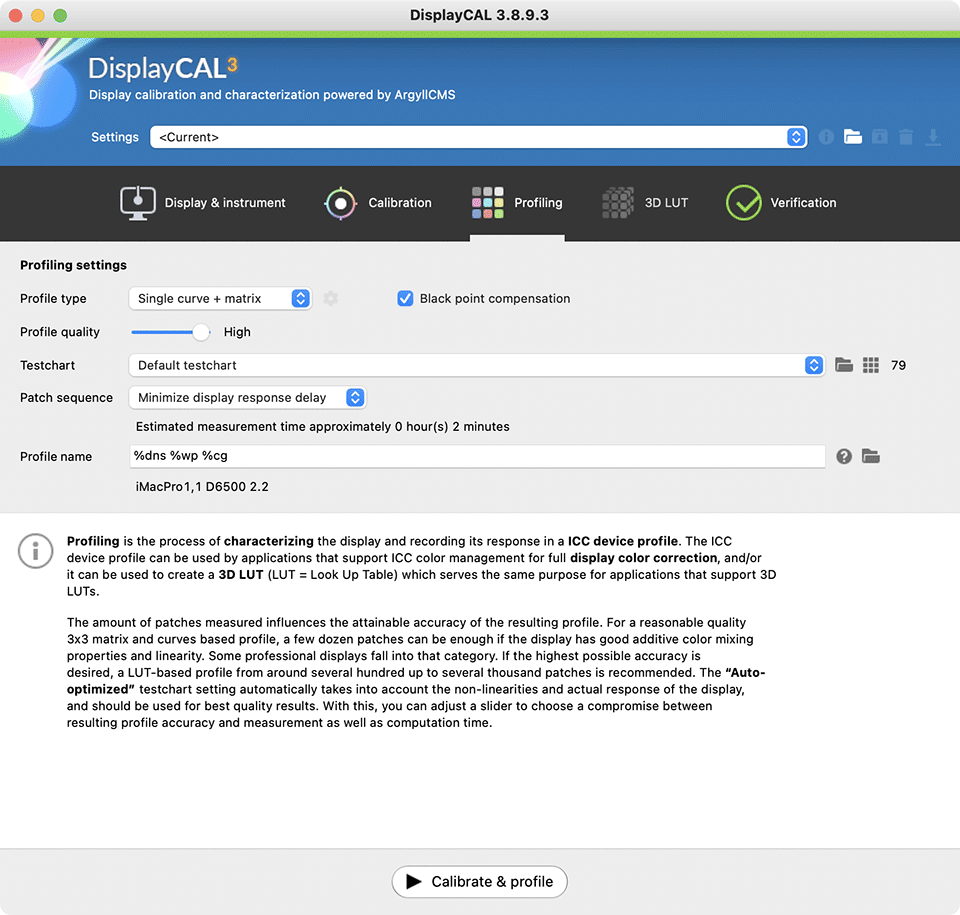
                  The last tab we need to visit is “Profiling”. Go ahead and set the options to the ones below:


                  تتم معايرة شاشات iMac وMacBook من Apple بشكل أفضل من خلال التصحيح "LCD PFS Phosphor WLED IPS"، وتوجد الآن واحدة مزودة ببرنامج DisplayCAL الذي يمكنك استخدامه لمعايرة أي شاشات iMac أو iMac Pro أو MacBook Air أو MacBook Pro بألوان P3 سلسلة كاملة. من الناحية الفنية، يُسمى "LCD PFS Phosphor WLED IPS, 99% P3 (MacBook Pro Retina 2016)"، ولكنه يعمل على شاشات Apple P3 الأخرى أيضًا (لقد نجحت في اختباره على iMac Pro، وMacBook Pro 2016، وMacBook Air). م1).

                  بمجرد تحديد ملف التعريف هذا، يجب أن تبدو صفحة العرض والأداة كما يلي:


                  بعد ذلك، انقر فوق علامة التبويب "المعايرة" وقم بضبط الخيارات كما هو موضح أدناه:


                  هنا، نقوم بضبط النقطة البيضاء على 6500K (D65)، ومستوى اللون الأبيض على 120 شمعة/م2، وغاما على 2.2 - الإعدادات الموصى بها لتحرير الصور الفوتوغرافية. إذا كنت تريد دقة أفضل، فاضبط سرعة المعايرة على عالية أو متوسطة كما هو موضح أعلاه.

                  علامة التبويب الأخيرة التي نحتاج إلى زيارتها هي "التنميط". المضي قدمًا وضبط الخيارات على الخيارات أدناه:

                  تعليق


                  • #10
                    The key setting here is to choose “Single curve + matrix” as the Profile type. We will pick “Default testchart” as the test chart, which should be sufficient, as it will run 79 different colors for calibration. I like to keep my profile names simple, but if you have other preferences, you can set them under “Profile name”.

                    It is now time to calibrate – go ahead and click the “Calibrate & profile” button on the bottom of the screen to get started.

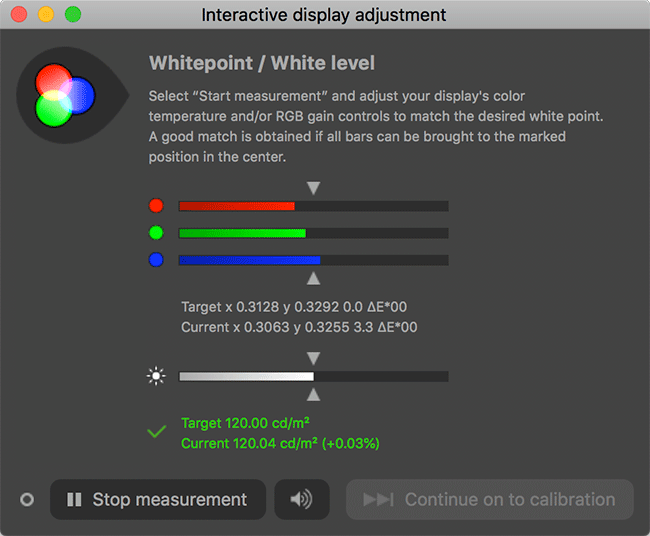
                    The software will show a “Measurement area” screen in the middle of the screen, with a blue “Start measurement” button. Go ahead and open up the colorimeter, then place it flush on the screen, right in the dead center. Click the “Start measurement” button to kick off the initial process. It will flash a few colors, then you will be presented with another screen called “Interactive display adjustment”. The software needs to measure the brightness of your screen and set it to 120 cd/m2 as we previously picked, so this is where you will be doing it from.

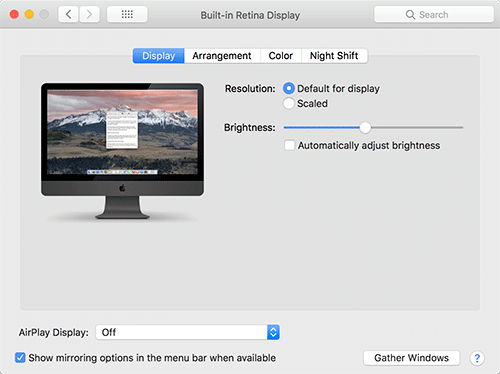
                    Since the Apple Mac screens generally do not have Automatic Display Correction, you will need to adjust the brightness of your screen manually using the “Displays” icon within your MacOS “System Preferences”. Go ahead and click the “Start measurement” button, then wait until the software starts actively measuring the brightness. While it is doing so, go ahead and open up System Preferences -> Displays, then after you uncheck “Automatically adjust brightness” option, start moving the “Brightness” slider:

                    Move it very slightly with your mouse until you see a green checkmark in DisplayCAL, as shown below:

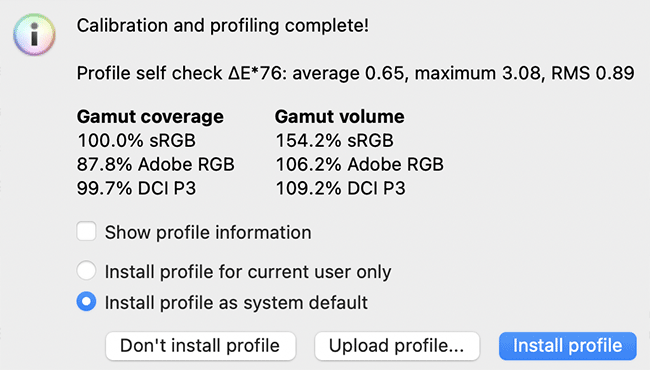
                    This means that the desired brightness level has been achieved. Click the “Stop measurement” button – we are finally ready to calibrate the screen! Go ahead and click the “Continue on to calibration” button to get the process started. With the “Medium” calibration option we selected earlier, it should take about 10-15 minutes to run through the calibration process. Once it is complete, you will be asked to install a profile, as shown below:

                    It looks like I was able to get to 100% of sRGB and very close to 100% of DCI P3 coverage, while hitting 87.8% of Adobe RGB, which is pretty good for an Mac screen. Go ahead and select “Install profile” to install the newly-created profile on your macOS
                    الإعداد الرئيسي هنا هو اختيار "منحنى مفرد + مصفوفة" كنوع ملف التعريف. سوف نختار "مخطط الاختبار الافتراضي" كمخطط اختبار، والذي يجب أن يكون كافيًا، حيث سيتم تشغيل 79 لونًا مختلفًا للمعايرة. أحب أن أبقي أسماء ملفي الشخصي بسيطة، ولكن إذا كانت لديك تفضيلات أخرى، فيمكنك تعيينها ضمن "اسم الملف الشخصي".

                    حان الوقت الآن للمعايرة - تابع وانقر على زر "المعايرة والملف الشخصي" الموجود أسفل الشاشة للبدء.

                    سيعرض البرنامج شاشة "منطقة القياس" في منتصف الشاشة، مع زر "بدء القياس" باللون الأزرق. تابع وافتح مقياس الألوان، ثم ضعه على الشاشة، في المركز الميت مباشرةً. انقر فوق الزر "بدء القياس" لبدء العملية الأولية. سيومض بعدة ألوان، ثم ستظهر لك شاشة أخرى تسمى "ضبط العرض التفاعلي". يحتاج البرنامج إلى قياس سطوع شاشتك وضبطها على 120 شمعة/م2 كما اخترنا سابقًا، لذلك هذا هو المكان الذي ستفعل منه ذلك.

                    نظرًا لأن شاشات Apple Mac بشكل عام لا تحتوي على تصحيح العرض التلقائي، فستحتاج إلى ضبط سطوع شاشتك يدويًا باستخدام أيقونة "شاشات العرض" ضمن "تفضيلات النظام" الخاصة بنظام MacOS. تابع وانقر على زر "بدء القياس"، ثم انتظر حتى يبدأ البرنامج في قياس السطوع بشكل فعال. أثناء القيام بذلك، تابع وافتح تفضيلات النظام -> شاشات العرض، ثم بعد إلغاء تحديد خيار "ضبط السطوع تلقائيًا"، ابدأ في تحريك شريط تمرير "السطوع":


                    حركه قليلاً بالماوس حتى ترى علامة اختيار خضراء في DisplayCAL، كما هو موضح أدناه:


                    وهذا يعني أنه تم تحقيق مستوى السطوع المطلوب. انقر فوق الزر "إيقاف القياس" - أخيرًا أصبحنا جاهزين لمعايرة الشاشة! تابع وانقر على زر "متابعة المعايرة" لبدء العملية. مع خيار المعايرة "المتوسطة" الذي حددناه سابقًا، من المفترض أن يستغرق الأمر حوالي 10 إلى 15 دقيقة حتى تتم عملية المعايرة. بمجرد اكتماله، سيُطلب منك تثبيت ملف تعريف، كما هو موضح أدناه:


                    يبدو أنني تمكنت من الوصول إلى 100% من sRGB وما يقرب من 100% من تغطية DCI P3، في حين وصلت إلى 87.8% من Adobe RGB، وهو أمر جيد جدًا لشاشة Mac. تابع وحدد "تثبيت ملف التعريف" لتثبيت ملف التعريف الذي تم إنشاؤه حديثًا على جهاز macOS الخاص بك

                    تعليق


                    • #11
                      Validating Calibration Results


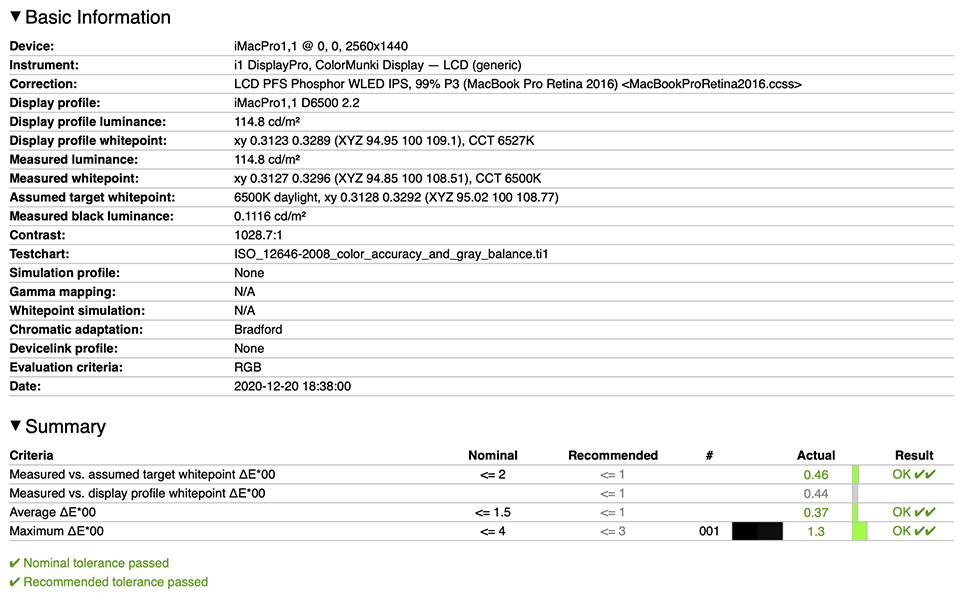
                      Now that the monitor is calibrated, I would recommend running calibration verification to make sure that the results are good. This is what the last “Verification” tab within DisplayCAL is for! Go ahead and click the tab, pick “ISO 12646:2008 color accuracy and gray balance” from the drop-down, then click the “Measurement report” button on the bottom of the screen. It will ask you to save the report, so just pick a location where you want to save the report, then click “Save”.

                      From there, the software will go through similar steps as above, except this time it will flash through a bunch of colors while measuring them with the colorimeter. After the process is complete (which should only take a couple of minutes), your browser will open up the report, which looks very similar to the one I showed you at the beginning of this article:

                      As you can see, the results are much better in comparison to the first test, with whitepoint deltas very low and maximum delta staying around 1, which is pretty good! As you scroll down the report, you will be able to see deltas broken down by color, along with a few nice graphs on the bottom. Just scroll through these and make sure that nothing stands out – you want all the bars to look green, which is an indication of good color calibration.

                      التحقق من صحة نتائج المعايرة

                      الآن بعد أن تمت معايرة الشاشة، أوصي بإجراء التحقق من المعايرة للتأكد من أن النتائج جيدة. هذا هو الغرض من علامة التبويب "التحقق" الأخيرة داخل DisplayCAL! تابع وانقر على علامة التبويب، واختر "دقة الألوان ISO 12646:2008 وتوازن اللون الرمادي" من القائمة المنسدلة، ثم انقر فوق الزر "تقرير القياس" في الجزء السفلي من الشاشة. سيطلب منك حفظ التقرير، لذا ما عليك سوى اختيار الموقع الذي تريد حفظ التقرير فيه، ثم النقر على "حفظ".

                      من هناك، سيمر البرنامج بخطوات مماثلة كما هو مذكور أعلاه، باستثناء أنه هذه المرة سوف يومض عبر مجموعة من الألوان أثناء قياسها باستخدام مقياس الألوان. بعد اكتمال العملية (والتي من المفترض أن تستغرق بضع دقائق فقط)، سيفتح متصفحك التقرير، والذي يبدو مشابهًا جدًا للتقرير الذي عرضته لك في بداية هذه المقالة:


                      كما ترون، فإن النتائج أفضل بكثير مقارنة بالاختبار الأول، حيث تكون دلتا النقطة البيضاء منخفضة جدًا ويبقى الحد الأقصى للدلتا عند 1، وهو أمر جيد جدًا! أثناء قيامك بالتمرير إلى أسفل التقرير، ستتمكن من رؤية الدلتا مقسمة حسب اللون، بالإضافة إلى بعض الرسوم البيانية الرائعة في الأسفل. ما عليك سوى التمرير خلال هذه العناصر والتأكد من عدم ظهور أي شيء - فأنت تريد أن تبدو جميع الأشرطة باللون الأخضر، وهو مؤشر على معايرة الألوان الجيدة.

                      تعليق


                      • #12
                        Uniformity Test


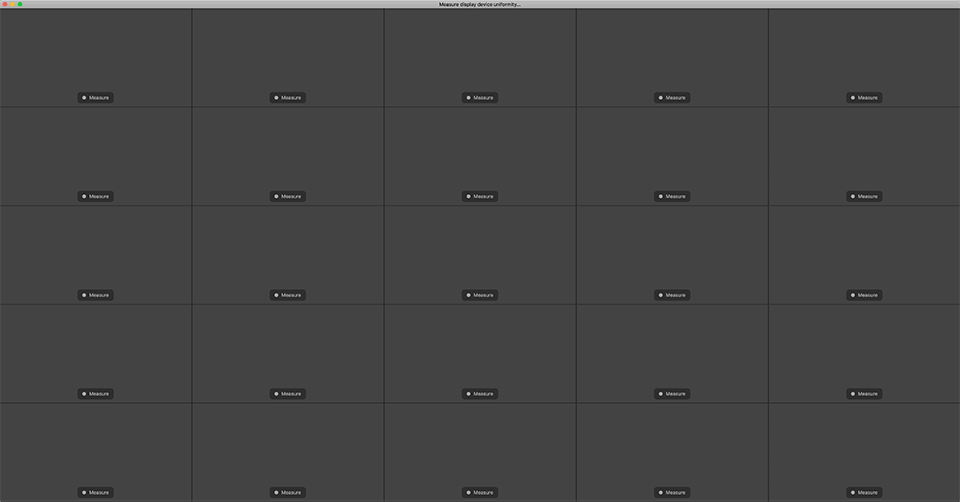
                        The last test I would recommend to run to make sure that your iMac screen is lit evenly, is the Uniformity test. It is not in the main area of the DisplayCAL software, so you will need to go to the menu, then go to Tools -> Report -> Measure display device uniformity… Go with the standard grid of 5×5 and click OK to bring up the uniformity test screen:

                        As you can see, there is a small “Measure” button in each grid, which means that you will need to place the colorimeter within each rectangle, then click this button. What this will do, is flash white colors in each rectangle, then measure the brightness. At the end of the process, you will be presented with a similar HTML report, which will show how bright each area is. Look for any areas that show up in red, which could mean that those areas are darker than they should be. This should be a pretty good test to see if your screen has any uniformity problems.

                        That’s all there is to it. Once again, big thanks to my friend who goes by the nickname “Color Consultant” for guiding me with the settings. I couldn’t do it without him. If you have any questions about any of the above, please let me know in the comments section below. And as always, check out the comments section of this article for some helpful feedback from Color Consultant, as well as some of our readers!

                        اختبار التوحيد

                        الاختبار الأخير الذي أوصي بإجراءه للتأكد من أن شاشة iMac مضاءة بشكل متساوٍ، هو اختبار التماثل. إنه ليس في المنطقة الرئيسية لبرنامج DisplayCAL، لذا ستحتاج إلى الانتقال إلى القائمة، ثم الانتقال إلى الأدوات -> التقرير -> قياس تجانس جهاز العرض... استخدم الشبكة القياسية 5 × 5 وانقر فوق "موافق" لإحضارها أعلى شاشة اختبار التوحيد:


                        كما ترون، يوجد زر "قياس" صغير في كل شبكة، مما يعني أنك ستحتاج إلى وضع مقياس الألوان داخل كل مستطيل، ثم انقر فوق هذا الزر. ما سيفعله هذا هو وميض الألوان البيضاء في كل مستطيل، ثم قياس السطوع. في نهاية العملية، سيُعرض عليك تقرير HTML مشابه، والذي سيُظهر مدى سطوع كل منطقة. ابحث عن أي مناطق تظهر باللون الأحمر، مما قد يعني أن تلك المناطق أغمق مما ينبغي. يجب أن يكون هذا اختبارًا جيدًا لمعرفة ما إذا كانت شاشتك بها أي مشكلات في التوحيد.

                        هذا كل ما في الامر. مرة أخرى، شكرًا جزيلاً لصديقي الذي يطلق عليه لقب "مستشار الألوان" لإرشادي في الإعدادات. لم أستطع أن أفعل ذلك بدونه. إذا كان لديك أي أسئلة حول أي مما سبق، فيرجى إبلاغي بها في قسم التعليقات أدناه. وكما هو الحال دائمًا، قم بمراجعة قسم التعليقات في هذه المقالة للحصول على بعض التعليقات المفيدة من مستشار الألوان، بالإضافة إلى بعض قرائنا!

                        تعليق

                        يعمل...
                        X