كيف تم تصور الصورة؟ ١ How Was This Picture Made #01?

تقليص
X
 
  • تصفية - فلترة
  • الوقت
  • عرض
إلغاء تحديد الكل
مشاركات جديدة

  • كيف تم تصور الصورة؟ ١ How Was This Picture Made #01?

    How Was This Picture Made #01?

    Going forward, we will be featuring the new “how was this picture taken” series articles, asking our readers to look at an image, analyze it and provide information on how they think the image was captured. When guessing, information could include such data as: approximate exposure variables (shutter speed, aperture and ISO), focal length, camera to subject distance, camera and lens used, what the gear was mounted on, post-processing techniques, composition, cropping, etc. This could be a fun exercise for our readers to practice with and we see it leading to all kinds of fun discussions.


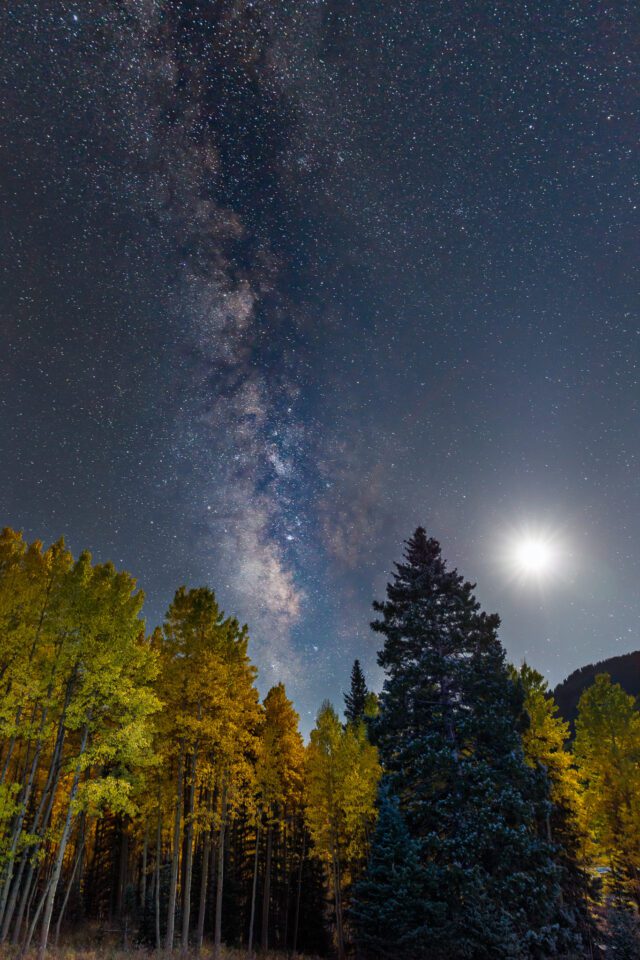
    To start off the series, I am presenting this photo of the Milky Way, which I photographed a couple of days ago in San Juan Mountains of Colorado:
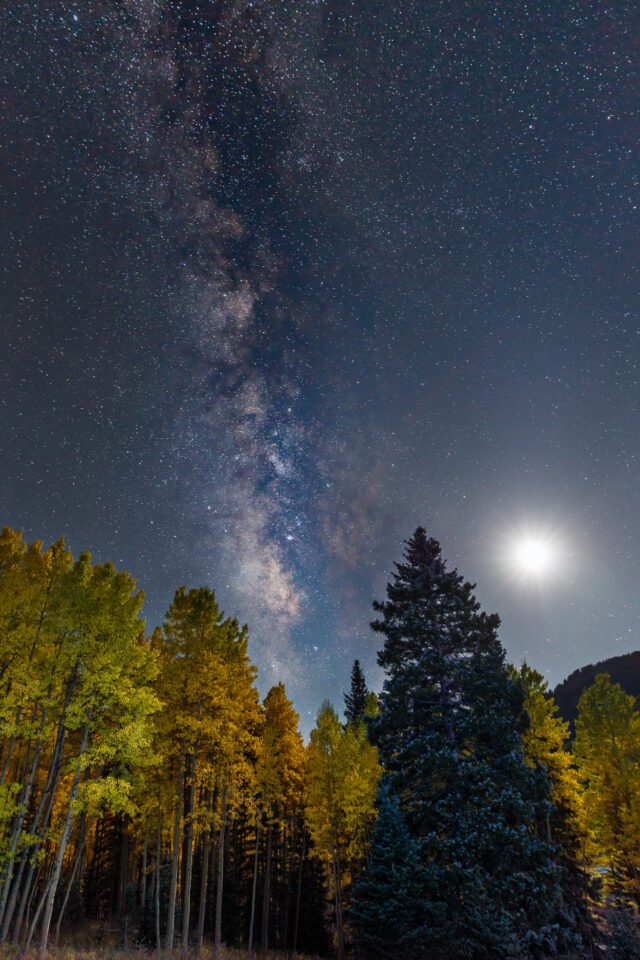

    The bright object to the right of the Milky Way is the Moon. How did I take this shot? What specific techniques did I use to capture the image? What is the approximate exposure time, aperture and ISO? What gear was I using and why? Did the choice of gear matter at all for such a shot? How did I expose for the trees in the foreground? How did I post-process the image?

    كيف تم صنع هذه الصورة رقم 01؟

    من الآن فصاعدًا، سنعرض سلسلة المقالات الجديدة "كيف تم التقاط هذه الصورة"، ونطلب من قرائنا النظر إلى الصورة وتحليلها وتقديم معلومات حول الطريقة التي يعتقدون أنها تم التقاطها بها. عند التخمين، يمكن أن تتضمن المعلومات بيانات مثل: متغيرات التعريض التقريبية (سرعة الغالق وفتحة العدسة وISO)، والبعد البؤري، والمسافة بين الكاميرا والهدف، والكاميرا والعدسة المستخدمة، والجهاز الذي تم تركيب الترس عليه، وتقنيات ما بعد المعالجة، والتركيب، والاقتصاص وما إلى ذلك. قد يكون هذا تمرينًا ممتعًا لقرائنا للتدرب عليه ونراه يؤدي إلى جميع أنواع المناقشات الممتعة.


    في بداية السلسلة، أقدم هذه الصورة لمجرة درب التبانة، والتي قمت بتصويرها قبل يومين في جبال سان خوان في كولورادو:

    ​
    الجسم اللامع الموجود على يمين مجرة ​​درب التبانة هو القمر. كيف التقطت هذه اللقطة؟ ما هي التقنيات المحددة التي استخدمتها لالتقاط الصورة؟ ما هو وقت التعرض التقريبي وفتحة العدسة وISO؟ ما هو العتاد الذي كنت أستخدمه ولماذا؟ هل كان اختيار الترس مهمًا على الإطلاق لمثل هذه اللقطة؟ كيف عرضت للأشجار في المقدمة؟ كيف قمت بمعالجة الصورة بعد ذلك؟

  • #2
    The answer
    It seems like many of our readers really loved our new idea (big thanks to John Bosley for suggesting it!) with the “how was this picture taken” series, since we had huge feedback and lots of interesting discussions. I must apologize for not being able to provide the answer to our first exercise sooner, as I have been swamped with the workshops I am conducting in the mountains. We will try to post answers sooner to such series in the future! Let’s take another look at the image in question and this time I will start off by revealing some useful EXIF data on the same image to kick off the answer:


    Canon EOS 5DS R + EF24-70mm f/2.8L II USM @ 24mm, ISO 3200, 20/1, f/2.8

    يبدو أن العديد من قرائنا أحبوا فكرتنا الجديدة حقًا (شكرًا جزيلاً لجون بوسلي لاقتراحها!) مع سلسلة "كيف تم التقاط هذه الصورة"، حيث تلقينا تعليقات ضخمة والعديد من المناقشات المثيرة للاهتمام. يجب أن أعتذر لعدم تمكني من تقديم الإجابة على تمريننا الأول عاجلاً، حيث إنني غارق في ورش العمل التي أديرها في الجبال. سنحاول نشر الإجابات عاجلاً لمثل هذه السلسلة في المستقبل! دعونا نلقي نظرة أخرى على الصورة المعنية وهذه المرة سأبدأ بالكشف عن بعض بيانات EXIF ​​المفيدة على نفس الصورة لبدء الإجابة:

    كاميرا Canon EOS 5DS R + EF24-70mm f/2.8L II USM @ 24 مم، ISO 3200، 20/1، f/2.8

    تعليق


    • #3
      Although many thought that the image was captured with either a Nikon DSLR or a Sony A7-series mirrorless camera, you can see that it was certainly not the case – I captured it with the Canon 5DS R. Lens and focal length info was also quite a bit off, with a lot of readers thinking that I used a super wide angle lens at 14mm focal length or so – I used the 24-70mm f/2.8L II USM at the widest focal length of 24mm. You would be surprised to see how wide 24mm really looks, particularly in a vertical image like this. A number of our readers, particularly well-versed in astrophotography, were pretty close in guessing the exposure – as you can see, the image was shot wide open at f/2.8, ISO 3200. Although I was not specifically aiming to stay within the “500 rule”, I ended up with a 20 second exposure, which worked out pretty well. If you don’t know what the 500 rule is, it is fairly simple: you divide the number 500 by the focal length you are shooting at to yield the longest shutter speed you should use before stars become star trails. So in the above case when I was shooting at 24mm, the longest shutter speed / exposure time I should have used was roughly 20 seconds, which is pretty much what I ended up doing. Anything longer than 20 seconds would have resulted in more noticeable star trails.

      The next big question is the moon and that’s where most people got it wrong. A lot of readers thought the shot was a composite image, saying that it would be impossible to yield a single exposure with both the moon and the Milky Way in the same shot. Certainly not the case – it is a single exposure! I don’t blame them, as that’s what I used to think as well. Turns out that it all depends on the moon phase. If the moon is full, it is often too bright to make anything visible in the sky, let alone capture it. But if one looked at the time I posted the article and the clue I left there, saying that I captured it “a couple of days ago”, they would have found out that the moon could not have been possibly full in mid-September. And if one previously photographed bright objects appearing in the frame, they would know that the smaller the light source, the higher is the chance to get a nice-looking “burst” in the image. In some cases, it even works when using wide apertures! The final image would not reveal the size or shape of the bright light source – it would appear just as a blob. That’s what happened in this shot. I photographed the moon wide open at f/2.8 and since the moon was relatively small both in terms of its relative size in the frame for the focal length of 24mm and in terms of the smaller area of the light side of the moon, it appeared as a bright source of light photographed at a small aperture like f/16. But can you imagine trying to capture a night scene like this at f/16? I was at f/2.8, only wishing that I had something faster with me for the Canon 5DS R! Four stops is a huge number – that’s ISO 3,200 vs ISO 51,200 – impossible to handle in terms of noise for practically any modern digital camera. It would have looked bad even resized to a much smaller version!

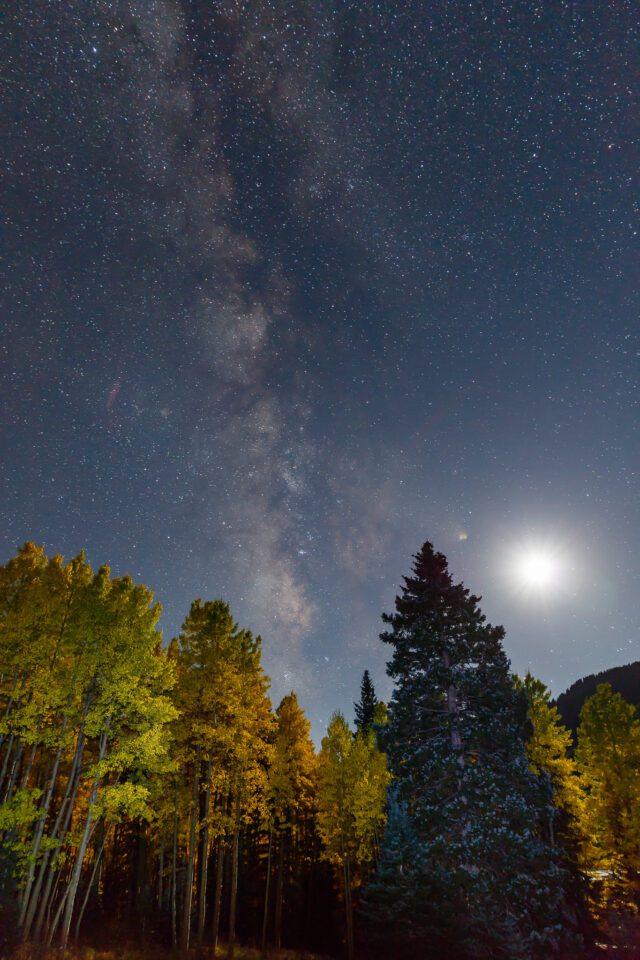
      From there, the next question was the trees. They looked pretty bright for a night shot, which is impossible to achieve, unless there was some sort of light reaching the trees directly. Lots of different options were presented by the readers, including using car headlights to illuminate the trees. Unfortunately, that was not the case – the trees were definitely light-painted, but with nothing more than a single flashlight in my hand. Take a look at the original RAW image with a few adjustments:
      Canon EOS 5DS R + EF24-70mm f/2.8L II USM @ 24mm, ISO 3200, 20/1, f/2.8
      على الرغم من أن الكثيرين اعتقدوا أن الصورة تم التقاطها إما بكاميرا Nikon DSLR أو كاميرا بدون مرآة من سلسلة A7 من سوني، يمكنك أن ترى أن الأمر لم يكن كذلك بالتأكيد - لقد التقطتها بكاميرا Canon 5DS R. كانت معلومات العدسة والبعد البؤري رائعة أيضًا بعيدًا بعض الشيء، حيث يعتقد الكثير من القراء أنني استخدمت عدسة بزاوية فائقة الاتساع بطول بؤري 14 مم أو نحو ذلك - استخدمت عدسة f/2.8L II USM مقاس 24-70 مم بأوسع طول بؤري يبلغ 24 مم. ستندهش عندما ترى مدى عرض 24 مم، خاصة في صورة رأسية مثل هذه. كان عدد من قرائنا، وخاصة المتمرسين في التصوير الفلكي، قريبين جدًا من تخمين التعريض الضوئي - كما ترون، تم التقاط الصورة بفتحة واسعة عند f/2.8، ISO 3200. على الرغم من أنني لم أكن أهدف على وجه التحديد إلى البقاء ضمن النطاق "قاعدة 500"، انتهى بي الأمر بالتعريض الضوئي لمدة 20 ثانية، والذي كان جيدًا جدًا. إذا كنت لا تعرف ما هي قاعدة 500، فهي بسيطة إلى حد ما: قم بتقسيم الرقم 500 على البعد البؤري الذي تقوم بالتصوير به للحصول على أطول سرعة غالق يجب عليك استخدامها قبل أن تصبح النجوم مسارات للنجوم. لذا، في الحالة المذكورة أعلاه عندما كنت أقوم بالتصوير بمعدل 24 مم، كانت أطول سرعة غالق / وقت تعريض كان يجب أن أستخدمه حوالي 20 ثانية، وهو ما انتهى بي الأمر إلى فعله تقريبًا. أي شيء أطول من 20 ثانية كان سينتج عنه مسارات نجمية أكثر وضوحًا.

      السؤال الكبير التالي هو القمر، وهو المكان الذي أخطأ فيه معظم الناس. اعتقد الكثير من القراء أن اللقطة كانت صورة مركبة، قائلين إنه سيكون من المستحيل الحصول على تعريض ضوئي واحد لكل من القمر ودرب التبانة في نفس اللقطة. بالتأكيد ليس الأمر كذلك – إنه تعرض واحد! أنا لا ألومهم، فهذا ما كنت أعتقده أيضًا. اتضح أن كل هذا يتوقف على مرحلة القمر. إذا كان القمر بدرًا، فغالبًا ما يكون ساطعًا جدًا بحيث لا يمكن رؤية أي شيء في السماء، ناهيك عن التقاطه. لكن إذا نظر المرء إلى الوقت الذي نشرت فيه المقال والدليل الذي تركته هناك، قائلاً إنني التقطته "منذ يومين"، فسيكتشف أن القمر لا يمكن أن يكون بدرا في منتصف سبتمبر/أيلول. وإذا قام أحد الأشخاص بتصوير كائنات ساطعة تظهر في الإطار مسبقًا، فسيعلمون أنه كلما كان مصدر الضوء أصغر، زادت فرصة الحصول على "تفجر" جميل المظهر في الصورة. وفي بعض الحالات، يعمل حتى عند استخدام فتحات واسعة! لن تكشف الصورة النهائية عن حجم أو شكل مصدر الضوء الساطع، بل ستبدو على شكل نقطة. وهذا ما حدث في هذه اللقطة. لقد قمت بتصوير القمر مفتوحًا على مصراعيه بفتحة f/2.8 وبما أن القمر كان صغيرًا نسبيًا سواء من حيث حجمه النسبي في الإطار للبعد البؤري 24 مم أو من حيث المساحة الأصغر للجانب المضيء من القمر، فقد ظهر كمصدر ساطع للضوء تم تصويره بفتحة صغيرة مثل f/16. لكن هل يمكنك أن تتخيل محاولة التقاط مشهد ليلي كهذا بفتحة f/16؟ كنت عند f/2.8، وكنت أتمنى لو كان لدي شيء أسرع معي لكاميرا Canon 5DS R! إن أربع نقاط توقف يعد رقمًا ضخمًا – أي ISO 3,200 مقابل ISO 51,200 – ومن المستحيل التعامل معه فيما يتعلق بالضوضاء لأي كاميرا رقمية حديثة تقريبًا. كان سيبدو سيئًا حتى لو تم تغيير حجمه إلى إصدار أصغر بكثير!

      ومن هناك، كان السؤال التالي هو الأشجار. لقد بدت مشرقة جدًا في لقطة ليلية، وهو أمر مستحيل تحقيقه، إلا إذا كان هناك نوع من الضوء يصل إلى الأشجار مباشرة. وقد قدم القراء الكثير من الخيارات المختلفة، بما في ذلك استخدام المصابيح الأمامية للسيارة لإضاءة الأشجار. لسوء الحظ، لم يكن الأمر كذلك، فالأشجار كانت بالتأكيد مطلية بالضوء، ولكن لم يكن لدي سوى مصباح يدوي واحد في يدي. ألقِ نظرة على صورة RAW الأصلية مع بعض التعديلات:

      كاميرا Canon EOS 5DS R + EF24-70mm f/2.8L II USM @ 24 مم، ISO 3200، 20/1، f/2.8

      تعليق


      • #4
        As you can see, the original RAW file looked pretty good already. I did make a few changes in Lightroom before taking the file into Photoshop, but most of those settings were not trivial. Highlights were reduced by -40, shadow recovery pushed to +75 and a bit of clarity was added for the “pop”.

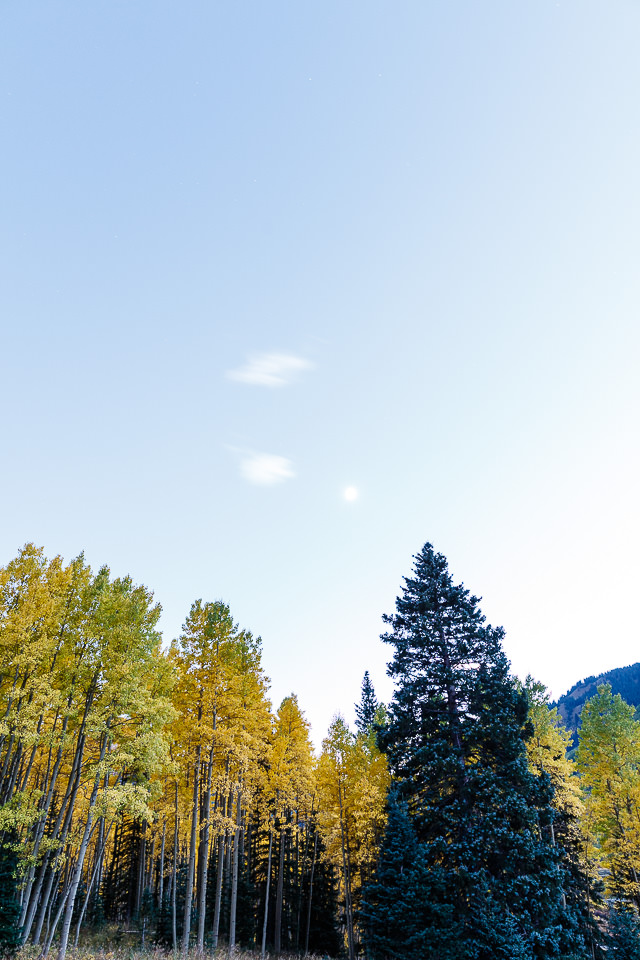
        But doing so introduced a pretty nasty issue – lots of noise in the shadows. Canon’s dynamic range had a hard time handling the extra noise that came with a long exposure shot like this. So I had to resort to adding a couple of noise-free areas from the earlier shot, which was taken before it got pretty dark:
        Canon EOS 5DS R + EF24-70mm f/2.8L II USM @ 24mm, ISO 400, 30/1, f/5.6

        كما ترون، يبدو ملف RAW الأصلي جيدًا بالفعل. لقد أجريت بعض التغييرات في Lightroom قبل نقل الملف إلى Photoshop، لكن معظم هذه الإعدادات لم تكن تافهة. تم تقليل الإبرازات بمقدار -40، وتم دفع استعادة الظل إلى +75 وتمت إضافة القليل من الوضوح لـ "البوب".

        لكن القيام بذلك قدم مشكلة سيئة جدًا – الكثير من الضوضاء في الظل. واجه النطاق الديناميكي لـ Canon صعوبة في التعامل مع الضوضاء الإضافية التي تأتي مع لقطة تعريض ضوئي طويلة مثل هذه. لذا اضطررت إلى اللجوء إلى إضافة منطقتين خاليتين من الضوضاء من اللقطة السابقة، والتي تم التقاطها قبل أن تصبح مظلمة تمامًا:

        كاميرا Canon EOS 5DS R + EF24-70mm f/2.8L II USM @ 24 مم، ISO 400، 30/1، f/5.6

        تعليق


        • #5
          Now you can probably tell that this image was not just a random shot at night – it was certainly planned. Having gone out without much luck the previous night, some of the guys from our team really wanted to get back with some nice images of the Milky Way the next day. So we used a couple of apps like Star Walk and The Photographer’s Ephemeris to find out where the Milky Way would show up from and where the moon would be in the sky. The idea was to combine the fall colors with the beautiful night sky, so after we settled on a nice area, the next step was to find a good “V” spot where we could place the Milky Way. Kudos to Spencer Cox for finding a nice spot, because that’s where we ended up setting up our tripods. From there, it was a matter of capturing a shot before it got too dark as a potential foreground replacement, and leaving the tripods in place without touching them, until it got really dark. I ended up not using the full image above, because it looked pretty flat, since the light was all over the place. Instead, I chose to primarily use the original light-painted foreground, as it had two light sources – rim light from the moon on the top of the branches, and the primary light from the flashlight I was using to illuminate the trees.

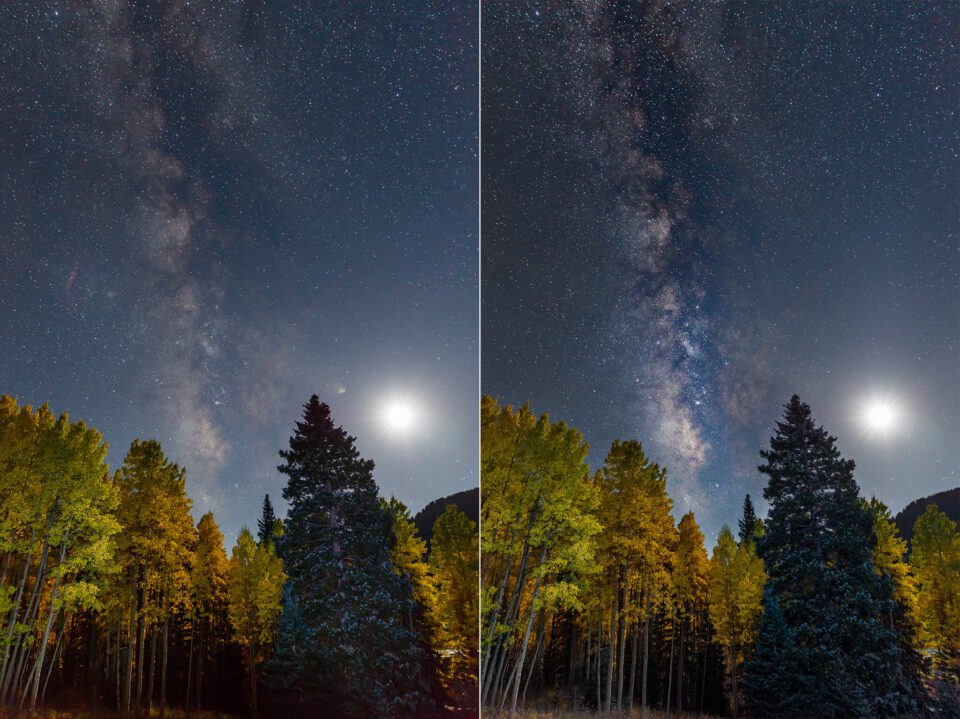
          From there, I fired up Photoshop and worked a little bit on the Milky Way. I masked out the Milky Way area and applied curves and sharpening to bring out those details and nebula clouds. I then slightly cropped, removed the visible flare from the moon and cleaned up the rest of the image. Here are the before and after shots:


          الآن ربما يمكنك معرفة أن هذه الصورة لم تكن مجرد لقطة عشوائية في الليل، بل كان مخططًا لها بالتأكيد. بعد أن خرجوا دون حظ كبير في الليلة السابقة، أراد بعض أعضاء فريقنا العودة ببعض الصور الجميلة لمجرة درب التبانة في اليوم التالي. لذلك استخدمنا بعض التطبيقات مثل Star Walk وThe Photography Ephemeris لمعرفة المكان الذي ستظهر منه مجرة ​​درب التبانة وأين سيكون القمر في السماء. كانت الفكرة هي الجمع بين ألوان الخريف وسماء الليل الجميلة، لذلك بعد أن استقرنا في منطقة جميلة، كانت الخطوة التالية هي العثور على مكان جيد على شكل حرف "V" حيث يمكننا وضع مجرة ​​درب التبانة. نتقدم بالشكر إلى Spencer Cox على العثور على مكان جميل، حيث انتهينا من إعداد حواملنا ثلاثية القوائم. من هناك، كان الأمر يتعلق بالتقاط لقطة قبل أن تصبح مظلمة جدًا كبديل محتمل للمقدمة، وترك الحوامل الثلاثية في مكانها دون لمسها، حتى أصبح الظلام حقًا. انتهى بي الأمر بعدم استخدام الصورة الكاملة أعلاه، لأنها بدت مسطحة جدًا، حيث كان الضوء منتشرًا في كل مكان. بدلاً من ذلك، اخترت استخدام المقدمة الأصلية المطلية بالضوء بشكل أساسي، حيث أنها تحتوي على مصدرين للضوء - ضوء الحافة من القمر الموجود أعلى الفروع، والضوء الأساسي من المصباح اليدوي الذي كنت أستخدمه لإضاءة الأشجار.

          ومن هناك، قمت بتشغيل برنامج Photoshop وعملت قليلاً على مجرة ​​درب التبانة. لقد قمت بإخفاء منطقة درب التبانة وقمت بتطبيق المنحنيات والشحذ لإبراز تلك التفاصيل وسحب السديم. قمت بعد ذلك بقص الصورة قليلًا، وأزلت التوهج المرئي من القمر وقمت بتنظيف بقية الصورة. وإليكم اللقطات قبل وبعد:


          تعليق


          • #6
            As you can see, the result is a bit nicer in comparison. The foreground looked more complete and brighter too, which is what I was trying to achieve.

            Hope this was useful. We will post more content like this for our readers to learn from soon! Looking forward to more “how this photograph was taken” articles, hopefully from other team members at PL
            كما ترون، والنتيجة هي أجمل قليلا في المقارنة. بدت المقدمة أكثر اكتمالًا وأكثر سطوعًا أيضًا، وهو ما كنت أحاول تحقيقه.

            نأمل أن يكون هذا مفيدا. سننشر المزيد من المحتوى مثل هذا ليتعلم منه قراؤنا قريبًا! نتطلع إلى المزيد من المقالات حول "كيف تم التقاط هذه الصورة"، ونأمل أن تكون من أعضاء الفريق الآخرين في PL

            تعليق

            يعمل...
            X