التحويل إلى الأبيض والأسود باستخدام الفوتوشوب A Guide to Black and White Conversion

تقليص
X
 
  • تصفية - فلترة
  • الوقت
  • عرض
إلغاء تحديد الكل
مشاركات جديدة

  • التحويل إلى الأبيض والأسود باستخدام الفوتوشوب A Guide to Black and White Conversion

    A Guide to Black and White Conversion Using Photoshop

    In this Guide to Black and White Conversion using Photoshop, we will look into the pros and cons of different options Photoshop offers to turn an image into monochrome. Practically, there is not one single method that suits everyone or more precisely, not one method that suits every single image shot by the same photographer. But certainly, some methods are more powerful than the others and give us more control over the output. Before you go through this article, please take a look at my article on Low-Key Monochrome Photography. You may wonder, by converting a picture into grey-scale, we are just removing the colors, then how does one method differ from the other. Let us look at these one-by-one and at the end of this article, you will know how each one is different from the other and hence decide on the ones to avoid and the ones to use. But before we get to the conversion itself, there are a few important steps.
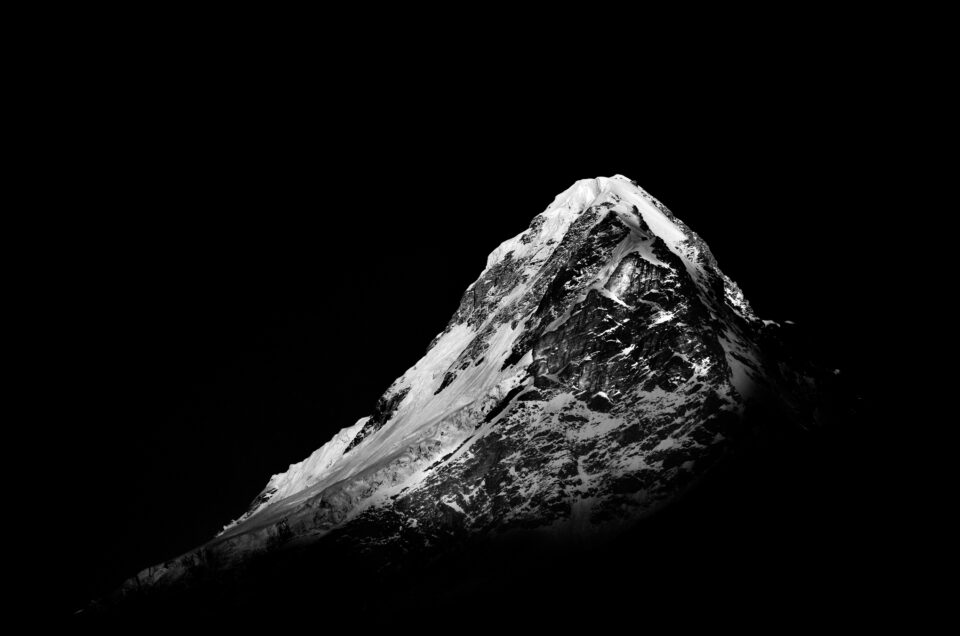

    NIKON D7000 @ 62mm, ISO 100, 1/400, f/5.6
    The first step in black and white conversion should be color correction. You may wonder why one should color correct an image that is going to end up without colors anyway? Take a look at the illustration below. Image #1 is straight out of the camera and you can see that it has a color cast and the one right below is a black and white version. On the other hand, Image #2 is color-corrected and the one below that one is a black and white version.
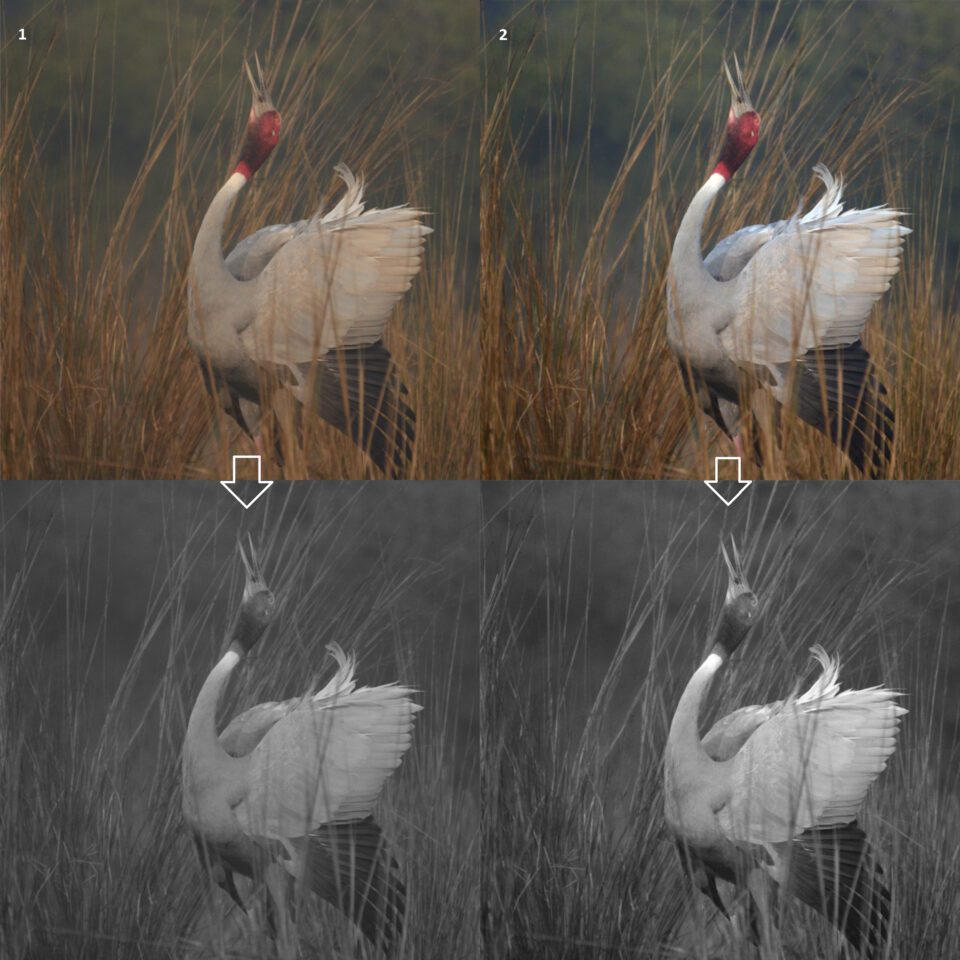


    Taking a look at both black and white images, you can clearly see their differences. The first one has noticeably less contrast than the second because of color cast. You can bring out the same contrast later on by using curves or any other contrast enhancing tool, but with a color-corrected image, you start working on a picture with more contrast at step one. Since color gets converted into tones in a black and white picture, having accurate colors helps in making its B&W version show more contrast.

    Let us understand the difference between color contrast and tonal contrast. In the picture below, you can see that the black and white version looks flatter than its colored counterpart. That is primarily because this particular picture has more color contrast (contrast in color ie., between blue and the red/orange and less tonal contrast, contrast in luminosity).
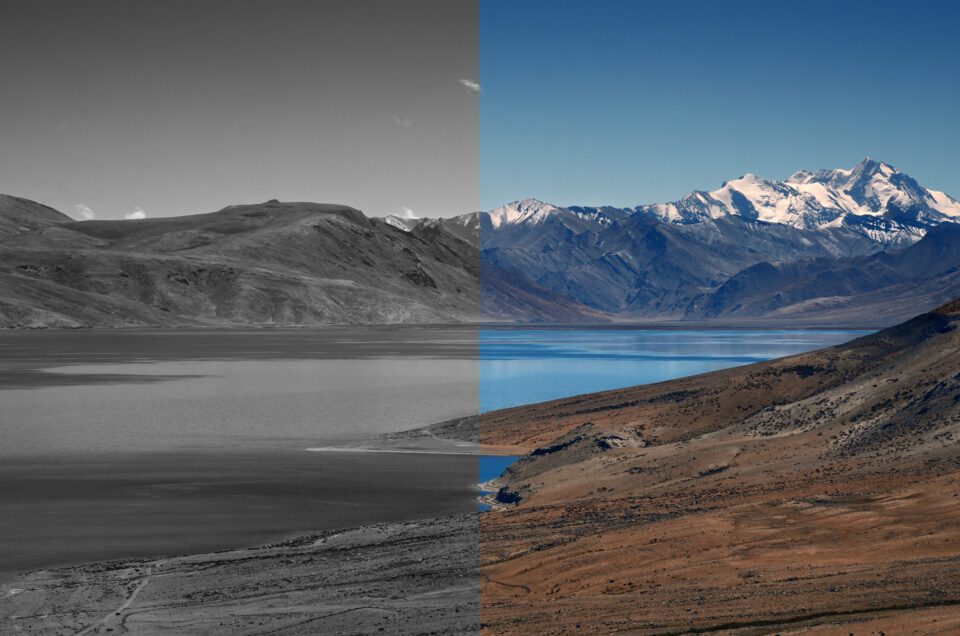
    NIKON D7000 @ 85mm, ISO 100, 1/800, f/8.0
    Most of us might have assumed a picture to be much better in its grey scale form, but when the conversion is done, we only feel disappointed as the picture looks way worse than what was expected. In a black and white picture, color contrast becomes literally insignificant. I have an article on Photoshop curves that has a simple “one-click” solution for color correction. Now let us take a look at the different ways in which we can convert our pictures to B&W starting from the simplest, leading to more complicated ones. The simpler ways will have the most constraints while the more advanced ways would give us increased control over our images.
    في دليل التحويل إلى الأبيض والأسود باستخدام Photoshop، سننظر في إيجابيات وسلبيات الخيارات المختلفة التي يقدمها Photoshop لتحويل الصورة إلى أحادية اللون. عمليا، لا توجد طريقة واحدة تناسب الجميع، أو بشكل أكثر دقة، لا توجد طريقة واحدة تناسب كل صورة يلتقطها نفس المصور. لكن من المؤكد أن بعض الأساليب أقوى من غيرها وتمنحنا المزيد من التحكم في المخرجات. قبل متابعة هذه المقالة، يرجى إلقاء نظرة على مقالتي حول التصوير الفوتوغرافي أحادي اللون البسيط. قد تتساءل، بتحويل الصورة إلى تدرج رمادي، نقوم فقط بإزالة الألوان، فكيف تختلف إحدى الطرق عن الأخرى. دعونا نلقي نظرة على هذه الأشياء واحدة تلو الأخرى، وفي نهاية هذه المقالة، ستعرف كيف يختلف كل واحد عن الآخر، وبالتالي تقرر ما يجب تجنبه وتلك التي يجب استخدامها. ولكن قبل أن نصل إلى التحويل نفسه، هناك بعض الخطوات المهمة.

    كاميرا نيكون D7000 عند 62 مم، ISO 100، 1/400، f/5.6

    يجب أن تكون الخطوة الأولى في التحويل بالأبيض والأسود هي تصحيح الألوان. قد تتساءل لماذا يجب على المرء تصحيح الألوان لصورة ستنتهي بدون ألوان على أي حال؟ ألق نظرة على الرسم التوضيحي أدناه. الصورة رقم 1 خرجت مباشرة من الكاميرا ويمكنك أن ترى أنها تحتوي على مجموعة ألوان والصورة الموجودة أدناه هي نسخة بالأبيض والأسود. من ناحية أخرى، الصورة رقم 2 مصححة الألوان والصورة الموجودة أسفلها هي نسخة بالأبيض والأسود.


    من خلال إلقاء نظرة على الصور بالأبيض والأسود، يمكنك رؤية الاختلافات بينهما بوضوح. الأول لديه تباين أقل بشكل ملحوظ من الثاني بسبب اللون المصبوب. يمكنك إبراز نفس التباين لاحقًا باستخدام المنحنيات أو أي أداة أخرى لتحسين التباين، ولكن باستخدام صورة تم تصحيح ألوانها، يمكنك البدء في العمل على صورة ذات تباين أكبر في الخطوة الأولى. نظرًا لأن اللون يتم تحويله إلى نغمات في صورة بالأبيض والأسود، فإن الحصول على ألوان دقيقة يساعد في جعل إصدار B&W يظهر المزيد من التباين.

    دعونا نفهم الفرق بين تباين الألوان والتباين اللوني. في الصورة أدناه، يمكنك أن ترى أن النسخة بالأبيض والأسود تبدو مسطحة أكثر من نظيرتها الملونة. ويرجع ذلك في المقام الأول إلى أن هذه الصورة بالذات تحتوي على تباين ألوان أكبر (تباين في اللون، أي بين الأزرق والأحمر/البرتقالي وتباين أقل في الدرجات اللونية، وتباين في السطوع).

    كاميرا نيكون D7000 عند 85 ملم، ISO 100، 1/800، f/8.0

    ربما افترض معظمنا أن الصورة أفضل بكثير في شكلها ذي التدرج الرمادي، ولكن عندما يتم التحويل، نشعر بخيبة الأمل لأن الصورة تبدو أسوأ بكثير مما كان متوقعًا. في الصورة بالأبيض والأسود، يصبح تباين الألوان ضئيلًا بالمعنى الحرفي للكلمة. لدي مقالة عن منحنيات Photoshop تحتوي على حل بسيط "بنقرة واحدة" لتصحيح الألوان. الآن دعونا نلقي نظرة على الطرق المختلفة التي يمكننا من خلالها تحويل صورنا إلى الأبيض والأسود بدءًا من أبسطها، وصولاً إلى الصور الأكثر تعقيدًا. ستحتوي الطرق الأبسط على معظم القيود بينما ستمنحنا الطرق الأكثر تقدمًا تحكمًا أكبر في صورنا.

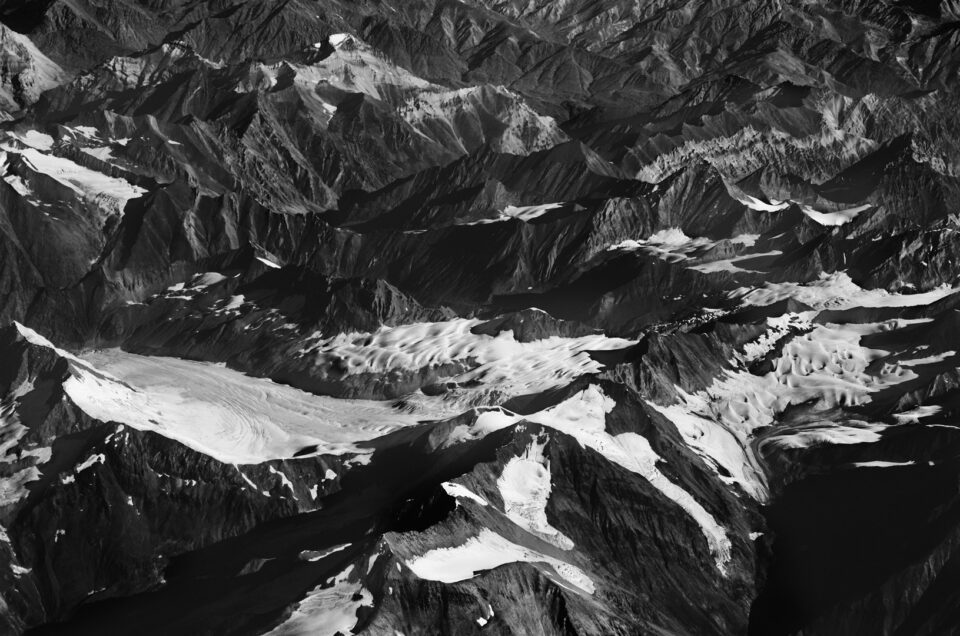
  • #2
    Table of Contentsجدول المحتويات

    تحويل اللون الأبيض والأسود في وضع تدرج الرمادي في الكاميرا (HSL/Saturation) | VibranceChannel Mixer أداة الضبط بالأبيض والأسود تحويل B&W باستخدام الحسابات والاستنتاج

    تعليق


    • #3

      B&W Conversion in Camera


      Even basic DSLR and mirrorless cameras today have built-in options to shoot in B&W, or have simple tools to convert color images to black and white. I have seen a lot of photographers do this as they want to have a preview of how their composition looks in greyscale on the field. It appears to be pretty simple and useful on the field. But this method of conversion is to be avoided. The photography workflow in making any photograph starts before clicking the shutter button and goes all the way to post-processing and publishing. The most desirable practice should be to get the maximum possible image quality in the camera and then process it to what we pre-visualized before clicking it. When we convert a picture to B&W in-camera, depending upon the make of the camera, we either throw away information, or the camera puts a B&W filter on top of your image. In the former case, you are throwing away valuable information and in the latter case, you would need the camera brand’s proprietary software should you need to revert it back to color. You might take a few test shots and convert it into black and white to see how it looks, but for the actual picture itself, shoot it without any filter and do the rest in post-production.


      تحويل الأبيض والأسود في الكاميرا

      حتى الكاميرات الرقمية ذات العدسة الأحادية العاكسة (DSLR) الأساسية والكاميرات غير المزودة بمرآة تحتوي اليوم على خيارات مدمجة للتصوير باللونين الأبيض والأسود، أو تحتوي على أدوات بسيطة لتحويل الصور الملونة إلى أبيض وأسود. لقد رأيت الكثير من المصورين يفعلون ذلك لأنهم يريدون الحصول على معاينة لكيفية ظهور تكوينهم بالتدرج الرمادي في الميدان. يبدو أنها بسيطة جدًا ومفيدة على أرض الملعب. ولكن يجب تجنب طريقة التحويل هذه. يبدأ سير عمل التصوير الفوتوغرافي في التقاط أي صورة قبل النقر على زر الغالق ويستمر حتى مرحلة ما بعد المعالجة والنشر. يجب أن تكون الممارسة المرغوبة هي الحصول على أقصى جودة ممكنة للصورة في الكاميرا ثم معالجتها إلى ما تصورناه مسبقًا قبل النقر عليه. عندما نقوم بتحويل صورة إلى أبيض وأسود داخل الكاميرا، اعتمادًا على نوع الكاميرا، فإننا إما نتخلص من المعلومات، أو تضع الكاميرا مرشح أبيض وأسود أعلى صورتك. في الحالة الأولى، أنت تتخلص من معلومات قيمة، وفي الحالة الأخيرة، ستحتاج إلى البرنامج الخاص بالعلامة التجارية للكاميرا إذا كنت بحاجة إلى إعادتها إلى اللون. يمكنك التقاط بعض اللقطات الاختبارية وتحويلها إلى الأسود والأبيض لترى كيف تبدو، ولكن بالنسبة للصورة الفعلية نفسها، قم بالتقاطها بدون أي مرشح وقم بالباقي في مرحلة ما بعد الإنتاج.

      تعليق


      • #4
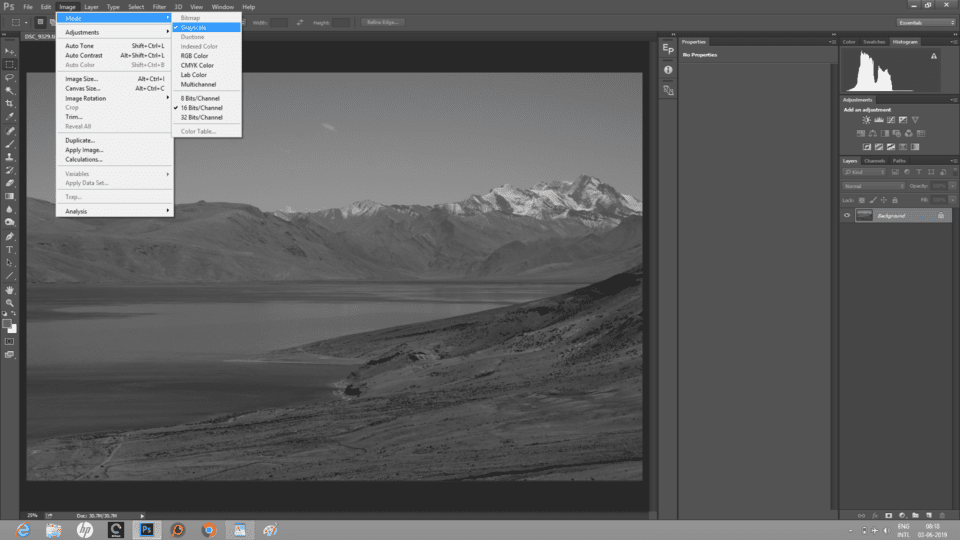
        Grayscale Mode


        Once we have the image opened in Photoshop, we have a “one-click” option for black and white conversion. Go to Image->Mode->Grayscale menu. Just like the previous method, this too is destructive. Photoshop asks you if you are ready to discard the color information. As an effective practice, till the last step of our post-production, we do not want to throw away any information. In fact, one of the primary reasons to shoot RAW is to have maximum information which translates into maximum image quality. Even though Grayscale Mode is a simple option, it is to be avoided. Later on, you might add more tonal contrast using curves or other tools, but the workflow gets a lot easier if you get a better picture to work with during the conversion itself.


        وضع التدرج الرمادي

        بمجرد فتح الصورة في Photoshop، لدينا خيار "نقرة واحدة" للتحويل إلى الأبيض والأسود. انتقل إلى الصورة->الوضع->قائمة التدرج الرمادي. تماما مثل الطريقة السابقة، وهذا أيضا مدمر. يسألك Photoshop عما إذا كنت مستعدًا لتجاهل معلومات اللون. كممارسة فعالة، حتى الخطوة الأخيرة من مرحلة ما بعد الإنتاج، لا نريد التخلص من أي معلومات. في الواقع، أحد الأسباب الرئيسية لالتقاط صور RAW هو الحصول على الحد الأقصى من المعلومات الذي يترجم إلى أقصى جودة للصورة. على الرغم من أن وضع Grayscale هو خيار بسيط، إلا أنه يجب تجنبه. لاحقًا، يمكنك إضافة المزيد من التباين اللوني باستخدام منحنيات أو أدوات أخرى، لكن سير العمل يصبح أسهل كثيرًا إذا حصلت على صورة أفضل للعمل عليها أثناء التحويل نفسه.


        تعليق


        • #5
          HSL/Saturation | Vibrance


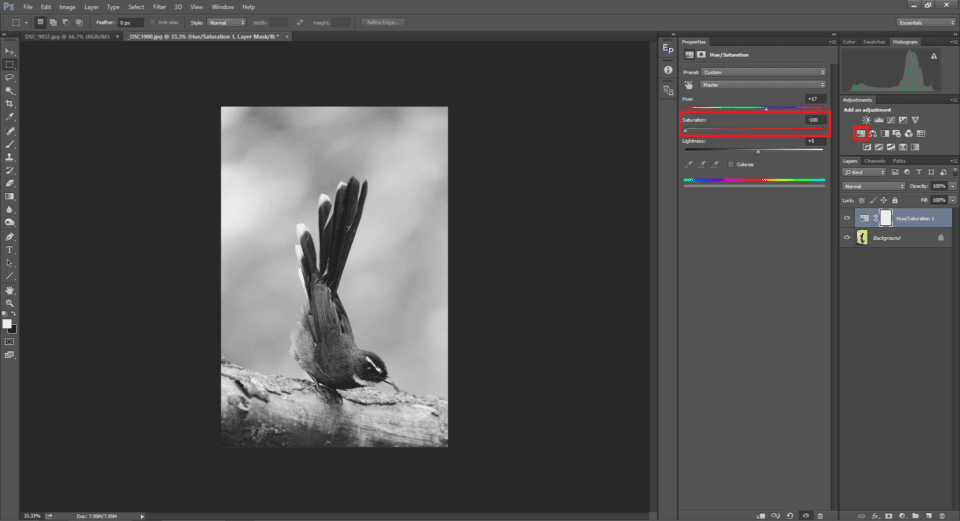
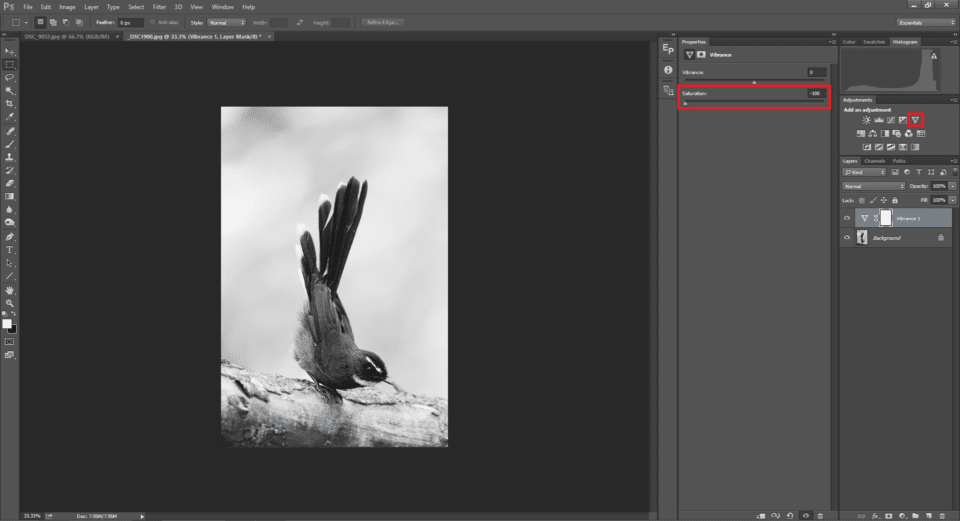
          Yet another simple way is to add an HSL/Saturation or a Vibrance layer on top of your image and then drag the saturation slider all the way to the left (-100). Both adjustment layers yield the same results when used for B&W conversion. The difference between the above two methods and this, is that by using it as an adjustment layer, we are not throwing away any information, instead we just hide the color information hence making it a non-destructive approach to editing.


          HSL/التشبع | حيوية

          هناك طريقة أخرى بسيطة تتمثل في إضافة طبقة HSL/Saturation أو Vibrance أعلى الصورة ثم سحب شريط تمرير التشبع إلى أقصى اليسار (-100). تنتج طبقتا الضبط نفس النتائج عند استخدامها لتحويل اللون الأبيض والأسود. الفرق بين الطريقتين المذكورتين أعلاه هو أنه باستخدامها كطبقة ضبط، فإننا لا نتخلص من أي معلومات، وبدلاً من ذلك نقوم فقط بإخفاء معلومات اللون وبالتالي جعلها أسلوبًا غير مدمر للتحرير.


          تعليق


          • #6
            Channel Mixer


            Before we proceed to Black and White conversion with the Channel Mixer, let us understand channels. You probably already know the fact that RAW images are color blind and that Bayer algorithm demosaicing process is what converts black and white images to color. During this process, three colors in the filter array are worked with, and as most of you have guessed right, they are Red, Green and Blue – the same three colors that are featured in Photoshop’s Channel Mixer. Let us see how different each channel is for a given image.


            The monochrome image is a plain Grayscale version of its color version. Let us take a look at how the three different channels look.


            خلاط القناة

            قبل أن ننتقل إلى التحويل بالأبيض والأسود باستخدام Channel Mixer، دعنا نفهم القنوات. من المحتمل أنك تعرف بالفعل حقيقة أن صور RAW مصابة بعمى الألوان وأن عملية عرض الصور باستخدام خوارزمية Bayer هي ما يحول الصور بالأبيض والأسود إلى ألوان. خلال هذه العملية، يتم التعامل مع ثلاثة ألوان في مصفوفة المرشحات، وكما خمن معظمكم بشكل صحيح، فهي الأحمر والأخضر والأزرق - نفس الألوان الثلاثة الموجودة في Channel Mixer في Photoshop. دعونا نرى مدى اختلاف كل قناة عن صورة معينة.


            الصورة أحادية اللون هي نسخة عادية بتدرج الرمادي من نسختها الملونة. دعونا نلقي نظرة على كيف تبدو القنوات الثلاث المختلفة.

            تعليق


            • #7
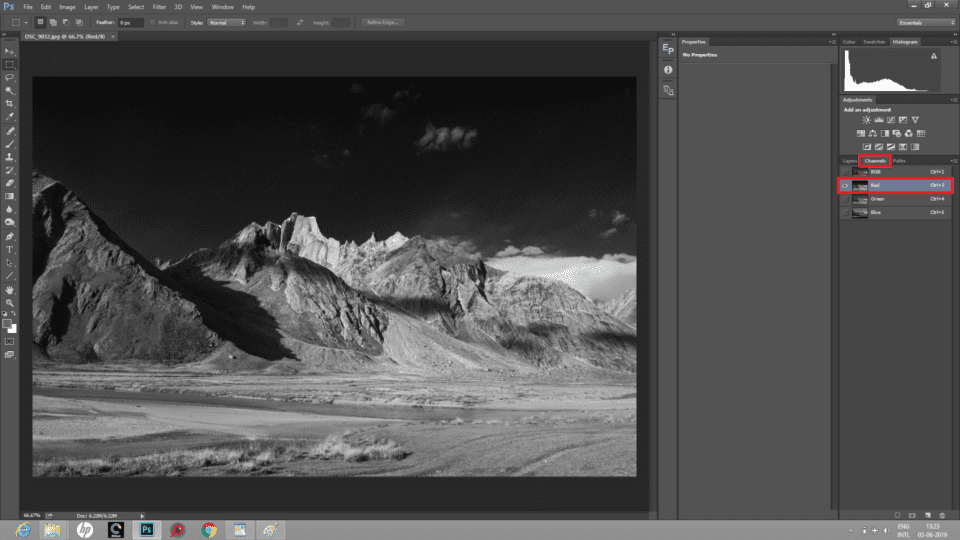
              Red Channel:


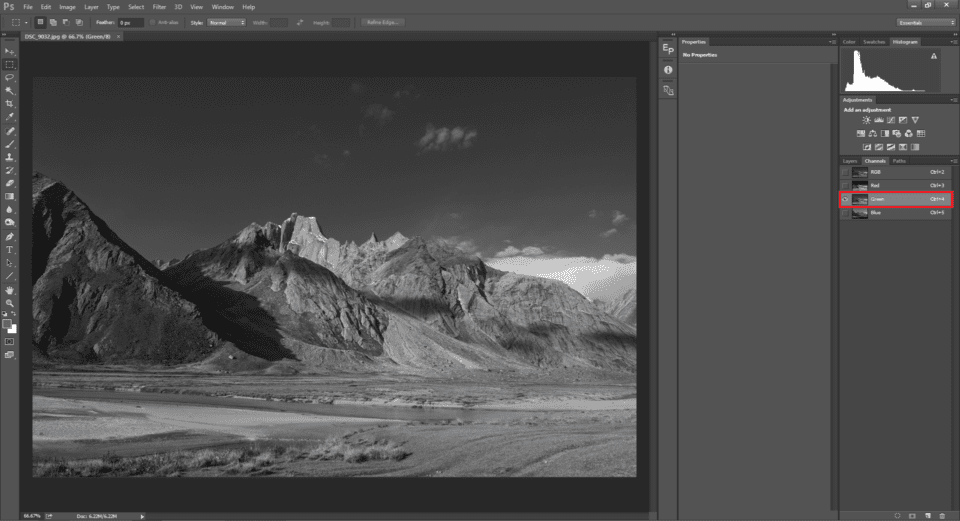
              Green Channel:


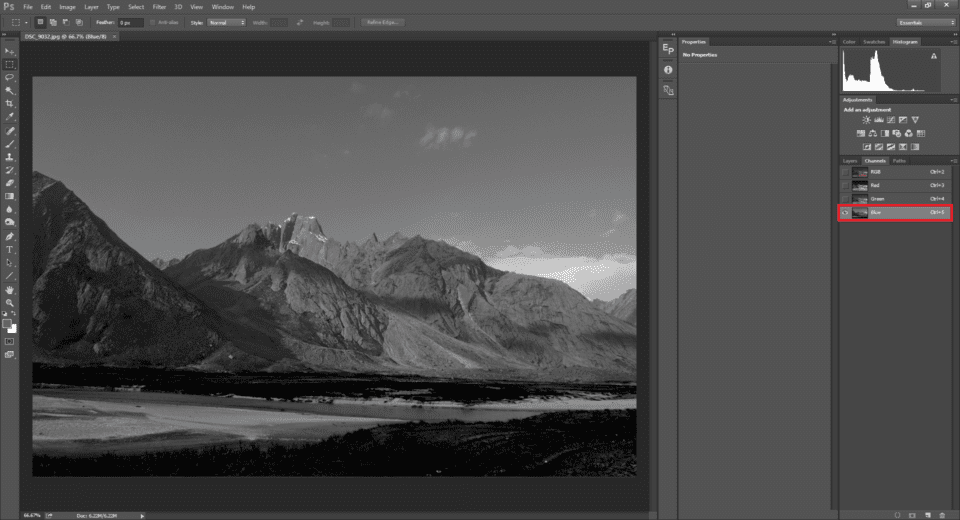
              Blue Channel:


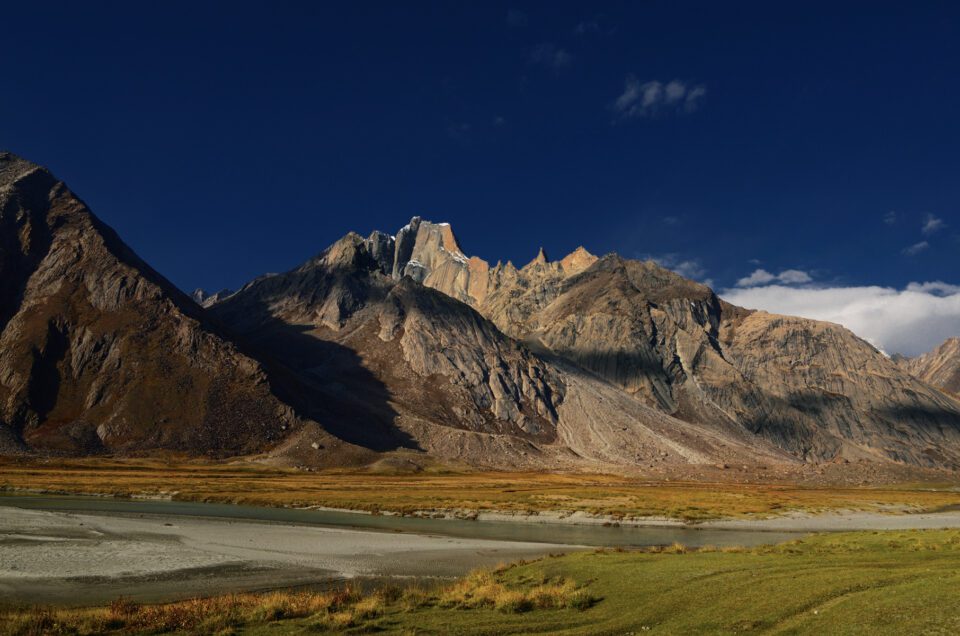
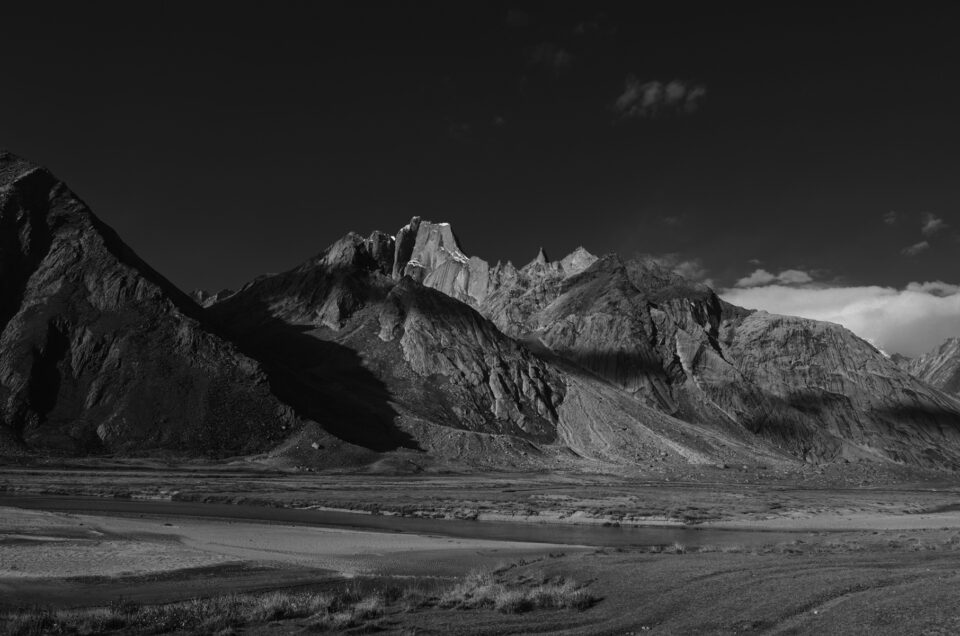
              As you can see, the sky looks darker in the Red channel whereas the part of the mountains that contain yellows/reds appear bright. The opposite happens in the blue channel. The mountains appear dull while the sky appears much brighter than it did in the red channel. Also take a look at the grass in the foreground (green). It is almost underexposed in the blue channel. Taking a look at the green channel, the grass is properly exposed, while the sky gets darker again. What you see above is similar to having Red, Green & Blue filters on top of your lens and shooting it as a monochrome image. Red absorbs most of the other wavelengths allowing only reds to pass through, hence making the reds alone brighter. The same holds true for green and blue.


              القناة الحمراء:


              القناة الخضراء:


              القناة الزرقاء:


              كما ترون، تبدو السماء أكثر قتامة في القناة الحمراء بينما الجزء الذي يحتوي على اللون الأصفر/الأحمر من الجبال يبدو مشرقًا. ويحدث العكس في القناة الزرقاء. تبدو الجبال باهتة بينما تبدو السماء أكثر سطوعًا مما كانت عليه في القناة الحمراء. ألقِ نظرة أيضًا على العشب الموجود في المقدمة (الأخضر). يتم تعريضه بشكل خافت تقريبًا في القناة الزرقاء. عند إلقاء نظرة على القناة الخضراء، يتبين لك أن العشب مكشوف بشكل صحيح، بينما تصبح السماء أكثر قتامة مرة أخرى. ما تراه أعلاه يشبه وجود مرشحات الأحمر والأخضر والأزرق أعلى العدسة والتقاطها كصورة أحادية اللون. يمتص اللون الأحمر معظم الأطوال الموجية الأخرى مما يسمح فقط بمرور اللون الأحمر، مما يجعل اللون الأحمر وحده أكثر سطوعًا. وينطبق الشيء نفسه على اللون الأخضر والأزرق.

              تعليق


              • #8


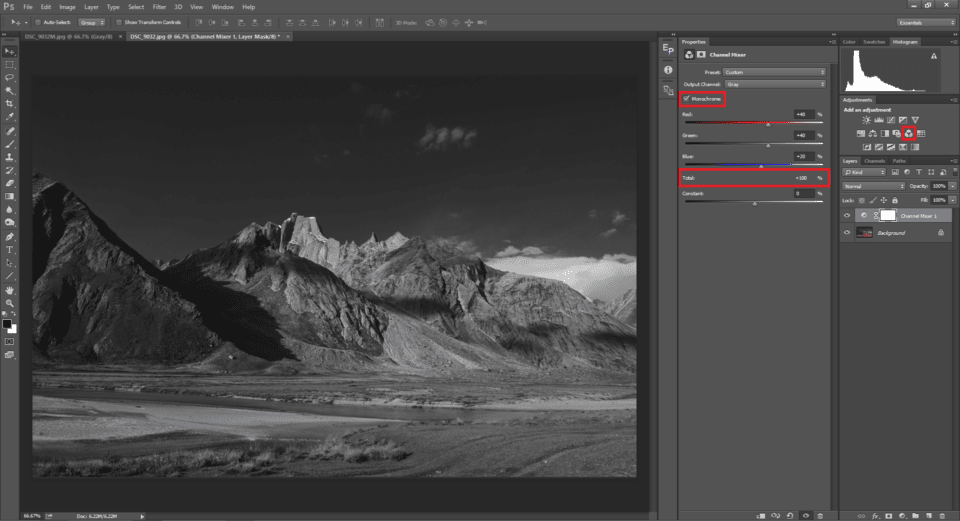
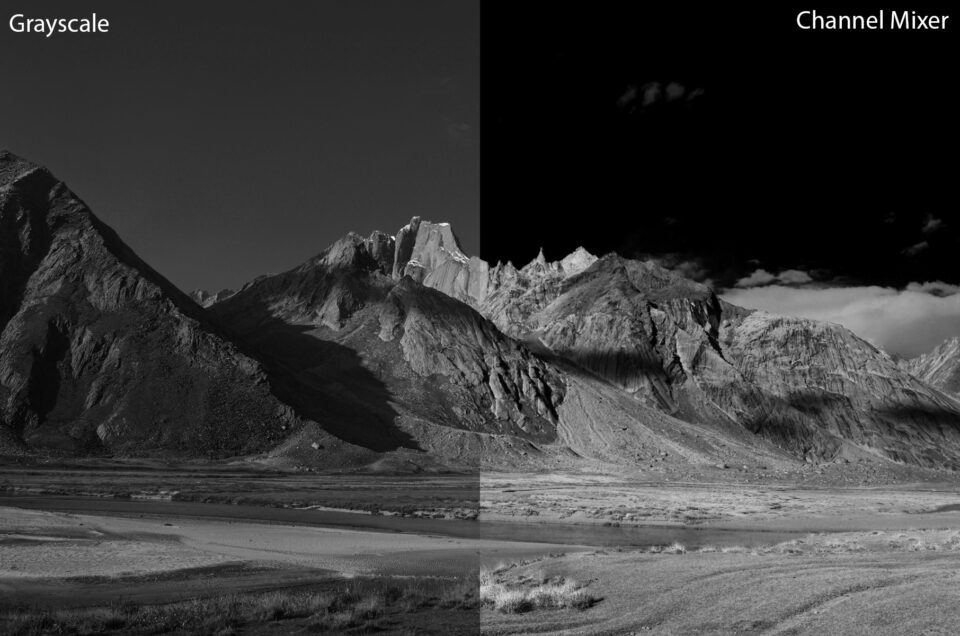
                The channel mixer adjustment tool allows you to control the tonal ranges of red, green and blue individually. For example, if I seek to make it a low-key monochrome image, I might want to darken the sky making the foreground pop-out. You can add a new channel mixer layer by clicking on the Channel mixer tool in your adjustments tool palette. It is basically a tool mostly used for color correction which we can also use for B&W conversion. You can do it by clicking on the Monochrome checkbox. There are a few presets as well that the tool offers. By reducing or increasing one of the three primary colors (RGB) we can create contrast with this method of B&W conversion. With the above picture, I have darkened the sky to make the foregrounds pop, pulling the blues down while increasing the reds and greens up. Below the RGB channels, you will see “Total”. Whenever you adjust the channels, make sure this Total value does not get over 100% which will end up over-exposing certain pixels. Below Total, you will see another slider called “Constant”. It will increase or decrease the overall brightness of the image. The picture below shows the difference between a mere grayscale conversion using HSL/Saturation and conversion using the channel mixer adjustment tool. Due to the fact that the channel mixer tool can also be used to color correct an image, you can use it to remove color cast in an image which converts into haze when you use the same for B&W conversion.


                تتيح لك أداة ضبط مزج القنوات التحكم في نطاقات الدرجات اللونية للأحمر والأخضر والأزرق بشكل فردي. على سبيل المثال، إذا كنت أسعى إلى جعلها صورة أحادية اللون، فقد أرغب في جعل السماء داكنة مما يجعل المقدمة منبثقة. يمكنك إضافة طبقة مزج قنوات جديدة من خلال النقر على أداة مزج القنوات في لوحة أدوات الضبط الخاصة بك. إنها في الأساس أداة تستخدم في الغالب لتصحيح الألوان والتي يمكننا استخدامها أيضًا لتحويل اللون الأبيض والأسود. يمكنك القيام بذلك عن طريق النقر على مربع الاختيار Monochrome. هناك عدد قليل من الإعدادات المسبقة التي توفرها الأداة. من خلال تقليل أو زيادة أحد الألوان الأساسية الثلاثة (RGB)، يمكننا إنشاء تباين مع طريقة التحويل هذه إلى اللون الأبيض والأسود. في الصورة أعلاه، قمت بتعتيم السماء لجعل المقدمة بارزة، وسحب اللون الأزرق إلى الأسفل مع زيادة اللون الأحمر والأخضر إلى الأعلى. أسفل قنوات RGB، سترى "الإجمالي". عندما تقوم بضبط القنوات، تأكد من أن القيمة الإجمالية هذه لا تتجاوز 100% مما سيؤدي في النهاية إلى الإفراط في تعريض وحدات بكسل معينة. أسفل الإجمالي، سترى شريط تمرير آخر يسمى "الثابت". سيؤدي ذلك إلى زيادة أو تقليل السطوع الكلي للصورة. توضح الصورة أدناه الفرق بين مجرد تحويل التدرج الرمادي باستخدام HSL/Saturation والتحويل باستخدام أداة ضبط مزج القنوات. نظرًا لأنه يمكن أيضًا استخدام أداة مزج القنوات لتصحيح ألوان الصورة، يمكنك استخدامها لإزالة اللون غير المتغير في الصورة والذي يتحول إلى ضباب عند استخدام نفس الشيء لتحويل الأبيض والأسود.

                تعليق


                • #9
                  Black & White Adjustment Tool


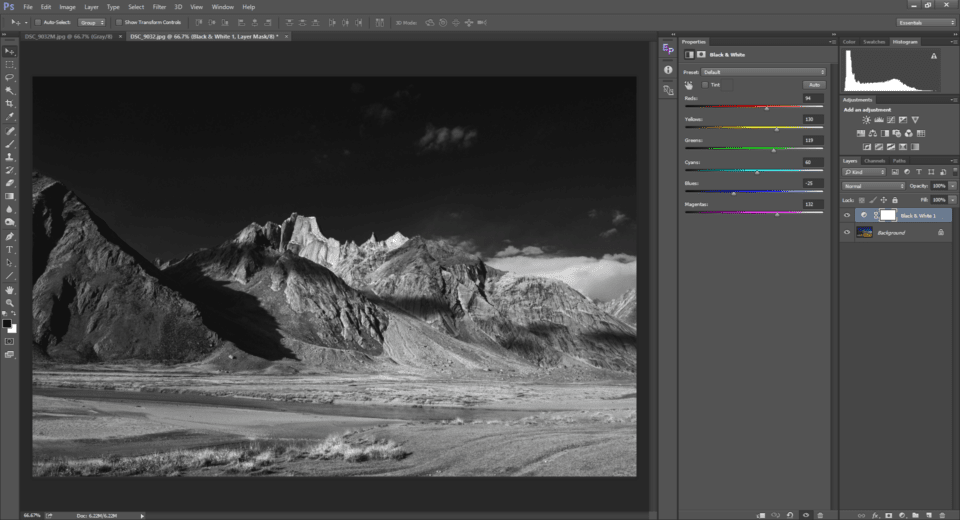
                  This is the tool I prefer to use most of the time. It gives more control over the conversion than the channel mixer. With the Channel mixer tool, we have control over which of the three channels show up by how much. The black and white layer allows us to increase or decrease the tonal range of all six colors viz., RGBCMY (Red, Green, Blue, Cyan, Magenta, Yellow), the primary colors and their opposites. Unlike the channel mixer tool, the Black & White adjustment tool does not have a Total column. There is one important point to note though while using either the Channel mixer or Black & White adjustment tool. Reducing a tone too much is likely to add noise to the photograph. As with most other editing techniques, being subtle is the best way to go about.


                  أداة ضبط أبيض وأسود

                  هذه هي الأداة التي أفضّل استخدامها في معظم الأوقات. إنه يوفر تحكمًا أكبر في التحويل مقارنة بخلاط القنوات. باستخدام أداة مزج القنوات، يمكننا التحكم في أي من القنوات الثلاث التي سيتم عرضها وبأي مقدار. تتيح لنا الطبقة السوداء والبيضاء زيادة أو تقليل النطاق اللوني لجميع الألوان الستة، أي RGBCMY (الأحمر والأخضر والأزرق والسماوي والأرجواني والأصفر)، والألوان الأساسية وأضدادها. على عكس أداة مزج القنوات، لا تحتوي أداة الضبط Black & White على عمود الإجمالي. هناك نقطة مهمة يجب ملاحظتها أثناء استخدام أداة مزج القنوات أو أداة الضبط بالأبيض والأسود. من المحتمل أن يؤدي تقليل النغمة أكثر من اللازم إلى إضافة ضوضاء إلى الصورة. كما هو الحال مع معظم تقنيات التحرير الأخرى، فإن كونك دقيقًا هو أفضل طريقة للقيام بذلك.

                  تعليق


                  • #10
                    B&W Conversion using Calculations


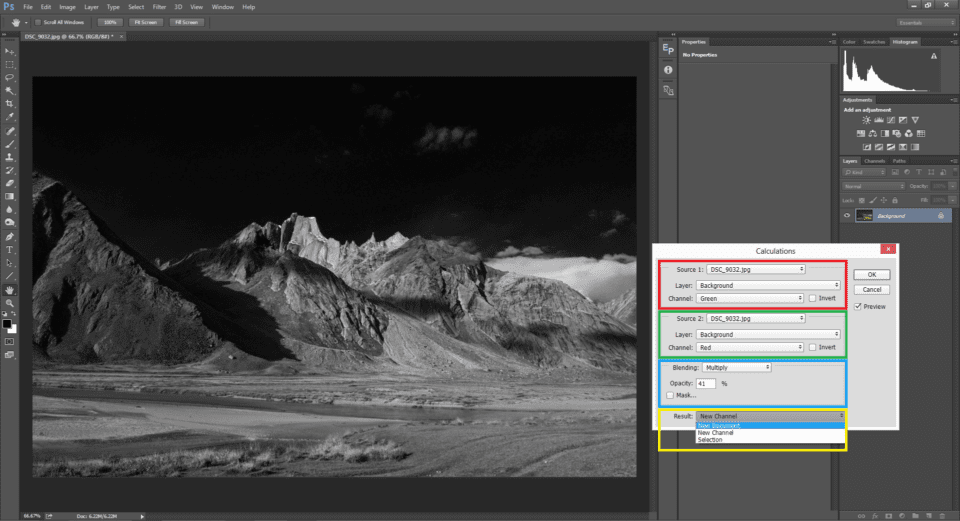
                    This is one of the most powerful tools for B&W conversion. If I end up with an image that does not give the desired result with B&W adjustment tool, this method is my last resort. You have to be familiar with blend modes in Photoshop to work with Calculations. What Calculations does is, it takes any two channels among the three (RGB) and masks one with the other using the selected blend mode. You can choose it by clicking on the Image->Calculations menu.


                    The illustrative image above will make us understand Calculations better. It takes the Green channel from Source 1 file (DSC_9032.jpg) and then masks it under the Red channel from Source 2 (same image) and blends it using the multiply mode. In a nutshell, the multiply blend mode makes the whites transparent and the darks opaque with all shades of gray in-between. The green channel of this image had the green, yellow and red tones exposed more and the blue tones under-exposed. The blues were under-exposed in the red channel as well. So it blended both and the result was a high contrast image with a darkened blue sky. If you feel that the conversion is too strong, you can decrease the opacity to the desired value. It can be done either by directly punching in the numeric value or by dragging the mouse over the Opacity label (the mouse pointer turns into a hand with two arrows on either side icon).
                    NIKON D7000 @ 24mm, ISO 100, 1/250, f/11.0

                    تحويل الأبيض والأسود باستخدام العمليات الحسابية

                    هذه واحدة من أقوى الأدوات لتحويل اللون الأبيض والأسود. إذا انتهى بي الأمر إلى صورة لا تعطي النتيجة المطلوبة باستخدام أداة ضبط B&W، فهذه الطريقة هي الملاذ الأخير. يجب أن تكون على دراية بأوضاع المزج في Photoshop للعمل مع العمليات الحسابية. ما تفعله الحسابات هو أنها تأخذ أي قناتين من بين القنوات الثلاثة (RGB) وتخفي إحداهما مع الأخرى باستخدام وضع المزج المحدد. يمكنك اختياره من خلال النقر على قائمة الصورة->الحسابات.


                    الصورة التوضيحية أعلاه ستساعدنا على فهم العمليات الحسابية بشكل أفضل. يأخذ القناة الخضراء من ملف المصدر 1 (DSC_9032.jpg) ثم يخفيها تحت القناة الحمراء من المصدر 2 (نفس الصورة) ويمزجها باستخدام وضع الضرب. باختصار، يجعل وضع المزج المضاعف اللون الأبيض شفافًا واللون الداكن معتمًا مع وجود كل ظلال اللون الرمادي بينهما. كانت القناة الخضراء لهذه الصورة تحتوي على درجات اللون الأخضر والأصفر والأحمر مكشوفة بشكل أكبر والدرجات الزرقاء مكشوفة بشكل أقل. كانت موسيقى البلوز غير مكشوفة بشكل كافٍ في القناة الحمراء أيضًا. لذا فقد مزجت كليهما وكانت النتيجة صورة عالية التباين مع سماء زرقاء داكنة. إذا شعرت أن التحويل قوي جدًا، فيمكنك تقليل العتامة إلى القيمة المطلوبة. يمكن القيام بذلك إما عن طريق إدخال القيمة الرقمية مباشرة أو عن طريق سحب الماوس فوق علامة العتامة (يتحول مؤشر الماوس إلى يد بها سهمين على أيقونة الجانب).

                    تعليق


                    • #11
                      Conclusion


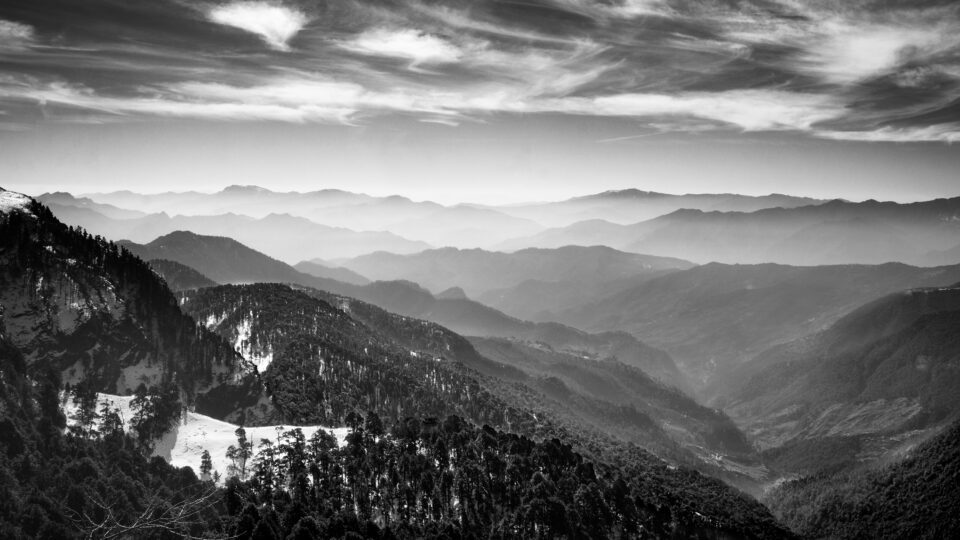
                      In this article, we looked at the different methods of black and white conversion using different tools. B&W images hold the key to certain emotions that colors can never replicate. The elimination of colors other than gray takes us to a whole new dimension and doing so requires more care than dealing with vibrant colors. I have kept the most important tip for the last. Excluding color correction, black and white conversion should be your first step of post-processing. In-fact your pre-visualization that a given photograph will end up as a B&W should happen even before clicking the shutter release. I have seen quite a lot of people doing it as the last step which is to be avoided.
                      خاتمة

                      في هذه المقالة، نظرنا إلى الطرق المختلفة للتحويل بالأبيض والأسود باستخدام أدوات مختلفة. تحتوي الصور بالأبيض والأسود على مفتاح بعض المشاعر التي لا يمكن للألوان تكرارها أبدًا. يأخذنا التخلص من الألوان غير الرمادي إلى بُعد جديد تمامًا، ويتطلب القيام بذلك عناية أكبر من التعامل مع الألوان النابضة بالحياة. لقد احتفظت بالنصيحة الأكثر أهمية للأخير. باستثناء تصحيح الألوان، يجب أن يكون التحويل بالأبيض والأسود هو خطوتك الأولى في مرحلة ما بعد المعالجة. في الواقع، يجب أن يحدث تصورك المسبق بأن صورة معينة ستنتهي باللون الأبيض والأسود حتى قبل النقر فوق زر تحرير الغالق. لقد رأيت الكثير من الأشخاص يقومون بذلك كخطوة أخيرة يجب تجنبها.

                      تعليق

                      يعمل...
                      X