دليل المبتدئين إلى الفوتوشوب A Beginner’s Guide to Adobe Photoshop

تقليص
X
 
  • تصفية - فلترة
  • الوقت
  • عرض
إلغاء تحديد الكل
مشاركات جديدة

  • #31
    For example, let us say I have increased the overall exposure. I open the same file a few days later only to see that I have overdone it and want to pull it down a bit. This is where non-destructive editing options like layers come into play.

    Let us see the difference between a destructive and a non-destructive approach to editing. Let us say I select the eraser tool and remove a part of the image. When I re-open the image after a few days there is no way I can get back those lost pixels provided I did not make multiple copies of the image. This is a destructive approach to editing. Everything we saw so far is in a way destructive editing.

    Let’s say we open an image document, then increase the exposure, then add contrast and then saturate it. Instead of dumping all the edits on the image directly, how convenient would it be if I layer them all one-by-one on top of each other. So the original will be the base layer and all the edits that we do will be stacked on top of it and on top of each other. The base will remain untouched

    على سبيل المثال، لنفترض أنني قمت بزيادة التعرض الإجمالي. أفتح الملف نفسه بعد بضعة أيام فقط لأرى أنني قد تجاوزت فيه وأريد سحبه قليلاً. هذا هو المكان الذي يتم فيه تفعيل خيارات التحرير غير المدمرة مثل الطبقات.

    دعونا نرى الفرق بين النهج المدمر وغير المدمر للتحرير. لنفترض أنني حددت أداة الممحاة وأزلت جزءًا من الصورة. عندما أعيد فتح الصورة بعد بضعة أيام، لا توجد طريقة يمكنني من خلالها استعادة وحدات البكسل المفقودة بشرط ألا أقوم بعمل نسخ متعددة من الصورة. هذا هو النهج المدمر للتحرير. كل ما رأيناه حتى الآن هو تحرير مدمر بطريقة ما.

    لنفترض أننا فتحنا مستند صورة، ثم قمنا بزيادة التعريض الضوئي، ثم أضفنا التباين ثم قمنا بتشبعه. بدلاً من إلقاء جميع التعديلات على الصورة مباشرةً، كم سيكون من الملائم أن أقوم بوضعها جميعًا واحدًا تلو الآخر فوق بعضها البعض. وبالتالي فإن النسخة الأصلية ستكون هي الطبقة الأساسية وسيتم تكديس جميع التعديلات التي نقوم بها فوقها وفوق بعضها البعض. ستبقى القاعدة دون تغيير

    تعليق


    • #32
      On top of it, let us say I add exposure. Then I add contrast which sits on top of both the original and the exposure. And finally, the saturation gets above all of it. Now at any point of time, I can remove the exposure alone. Still, we will have the original, which obviously will be untouched but with contrast and saturation applied onto it. Think of it as a facial make up. We can add any make up and the face will be shown with the effect. But the face remains the same. Whenever we do not want any ‘layer’ of make up, we just have to remove it.

      What I have done above is, I have opened an image and you can see it as the background layer. I have made a copy of the layer and placed it above the layer. You can copy a layer by simply selecting the layer, right click on it and click on ‘Duplicate Layer’ or use the keyboard shortcut Control / Command + J.


      علاوة على ذلك، لنفترض أنني أضفت التعرض. ثم أقوم بإضافة التباين الذي يقع فوق كل من الأصل والتعرض. وأخيرًا، يصبح التشبع فوق كل ذلك. الآن، في أي وقت، يمكنني إزالة التعريض الضوئي بمفردي. ومع ذلك، سيكون لدينا النسخة الأصلية، والتي من الواضح أنها لن تمس ولكن مع تطبيق التباين والتشبع عليها. فكر في الأمر كمكياج للوجه. يمكننا إضافة أي مكياج وسيظهر الوجه بالتأثير. لكن الوجه يبقى كما هو. عندما لا نريد أي "طبقة" من المكياج، علينا فقط إزالتها.


      ما فعلته أعلاه هو أنني فتحت صورة ويمكنك رؤيتها كطبقة الخلفية. لقد قمت بعمل نسخة من الطبقة ووضعتها فوق الطبقة. يمكنك نسخ طبقة ببساطة عن طريق تحديد الطبقة، والنقر بزر الماوس الأيمن عليها والنقر على "طبقة مكررة" أو استخدام اختصار لوحة المفاتيح Control / Command + J.

      تعليق


      • #33
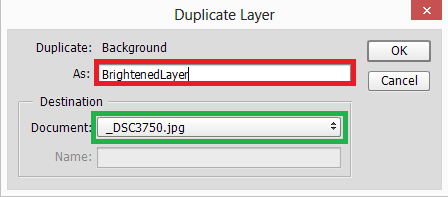
        You get a dialog asking you to choose a name for the new layer. You can also duplicate a layer from one image and place it on another image document by selecting it from the Destination. We already saw that we can open a number of images as tabs in Photoshop. All the currently opened tabs will be displayed in the Documents.

        The layer that is displayed at the top always acts like the foreground. The layers displayed at the bottom are considered backgrounds. What does a foreground do to a background in photography? It hides a part or the entire background corresponding to its placement with respect to the background.
        سيظهر لك مربع حوار يطلب منك اختيار اسم للطبقة الجديدة. يمكنك أيضًا تكرار طبقة من صورة واحدة ووضعها في مستند صورة آخر عن طريق تحديدها من الوجهة. لقد رأينا بالفعل أنه يمكننا فتح عدد من الصور كعلامات تبويب في Photoshop. سيتم عرض جميع علامات التبويب المفتوحة حاليًا في المستندات.


        الطبقة التي يتم عرضها في الأعلى تعمل دائمًا مثل المقدمة. تعتبر الطبقات المعروضة في الأسفل خلفيات. ماذا تفعل المقدمة بالخلفية في التصوير الفوتوغرافي؟ يقوم بإخفاء جزء أو الخلفية بأكملها المقابلة لوضعها بالنسبة للخلفية.

        تعليق


        • #34
          That is exactly what foregrounds do in layers. The layers are literally placed on top of each other, hiding the ones below. We can choose to have a part of the background layers that we will be covering in layer masks.

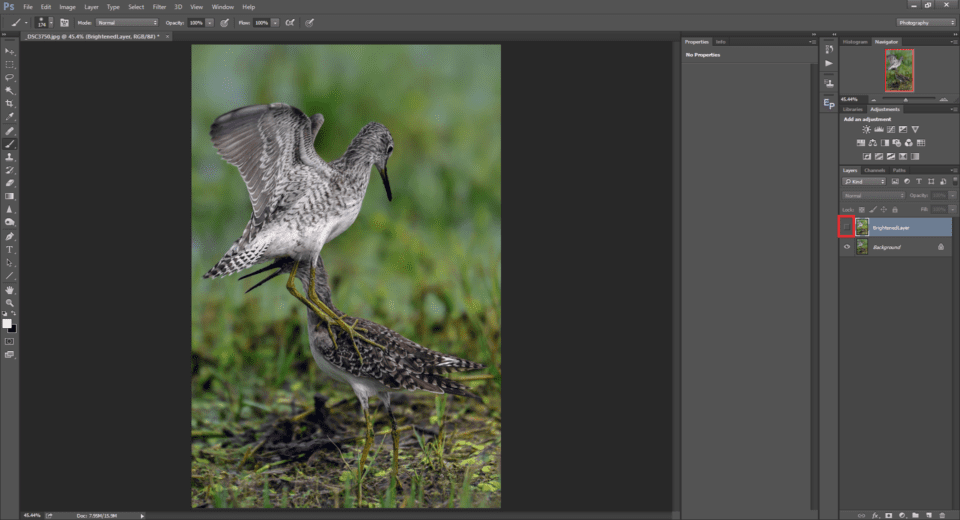
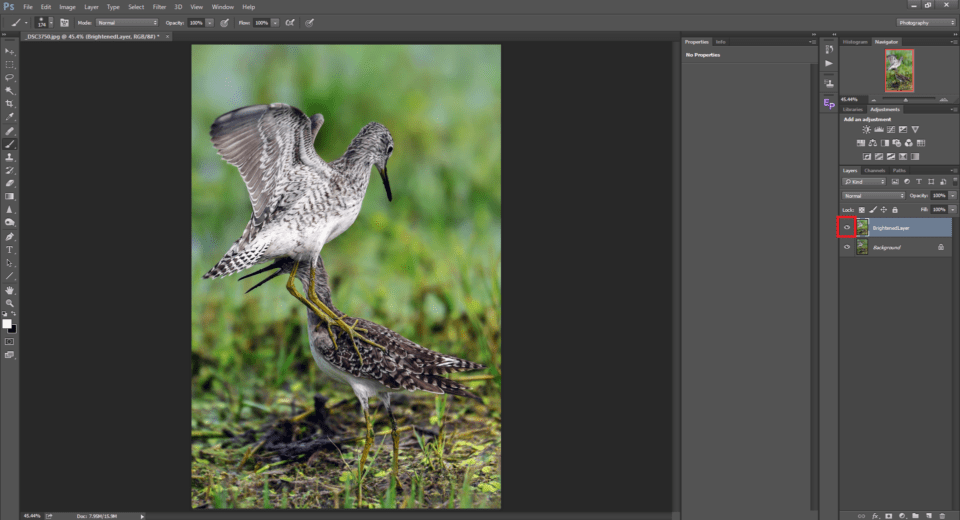
          As we saw before, the eye-icon in front of a layer can be used to toggle between Show / Hide of the selected layer. When we select it, we make it visible. Now we have two layers. The background layer, which is the original and the layer called BrightenedLayer which sits on top of it. Now we select the BrightenedLayer and then go to the menu Image -> Adjustments -> Brightness / Contrast and pull the brightness slider to about +10.

          Now you can see that the brightness has been applied to the BrightenedLayer alone, leaving the Background layer below untouched. If you turn off the eye icon, you can see the layer below, turn it on you can see the one with the added brightness.

          Hopefully this gives you some basic information about layers and how they work. You will understand layers better when we proceed to Opacity and layer masks.


          هذا هو بالضبط ما تفعله المقدمات في الطبقات. يتم وضع الطبقات حرفيًا فوق بعضها البعض، مما يؤدي إلى إخفاء الطبقات الموجودة أدناه. يمكننا اختيار الحصول على جزء من طبقات الخلفية التي سنغطيها بأقنعة الطبقة.


          كما رأينا من قبل، يمكن استخدام أيقونة العين الموجودة أمام الطبقة للتبديل بين إظهار/إخفاء الطبقة المحددة. عندما نختاره، نجعله مرئيًا. الآن لدينا طبقتان. طبقة الخلفية، وهي الطبقة الأصلية والطبقة التي تسمى BrightenedLayer والتي تقع فوقها. الآن نختار BrightenedLayer ثم نذهب إلى القائمة Image -> Adjustments -> Brightness / Contrast واسحب شريط تمرير السطوع إلى حوالي +10.

          الآن يمكنك أن ترى أنه تم تطبيق السطوع على BrightenedLayer وحدها، مع ترك طبقة الخلفية أدناه دون تغيير. إذا قمت بإيقاف تشغيل أيقونة العين، يمكنك رؤية الطبقة أدناه، قم بتشغيلها ويمكنك رؤية الطبقة ذات السطوع الإضافي.

          نأمل أن يوفر لك هذا بعض المعلومات الأساسية حول الطبقات وكيفية عملها. سوف تفهم الطبقات بشكل أفضل عندما ننتقل إلى العتامة وأقنعة الطبقة.

          تعليق


          • #35
            Opacity


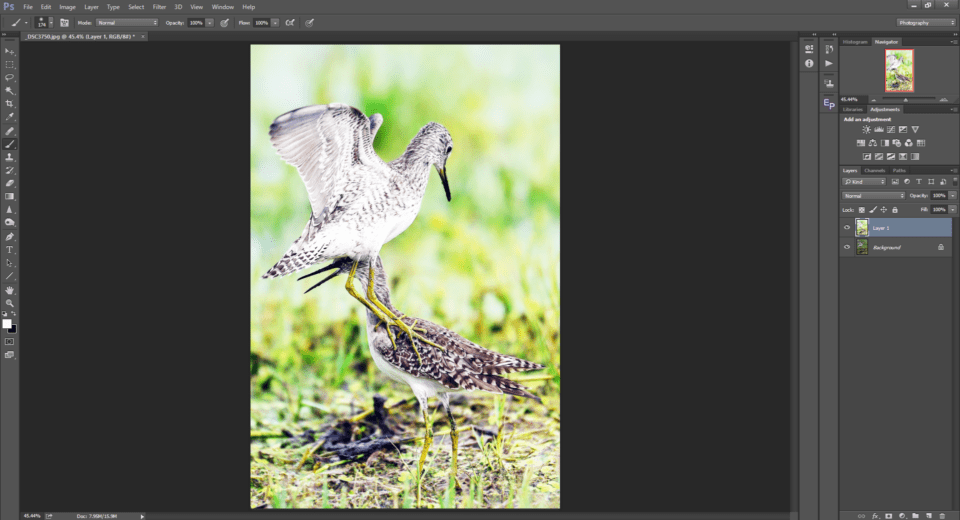
            Let us consider another example of overdoing something, since that’s a common thing to do for beginners. Take a look at the image below. I have deliberately pushed the brightness all the way to the maximum, overexposing it. Obviously it is overdone. Now, I either have to undo it or delete the layer. As I have mentioned before, there are multiple ways in which we can get a specific result with Photoshop.

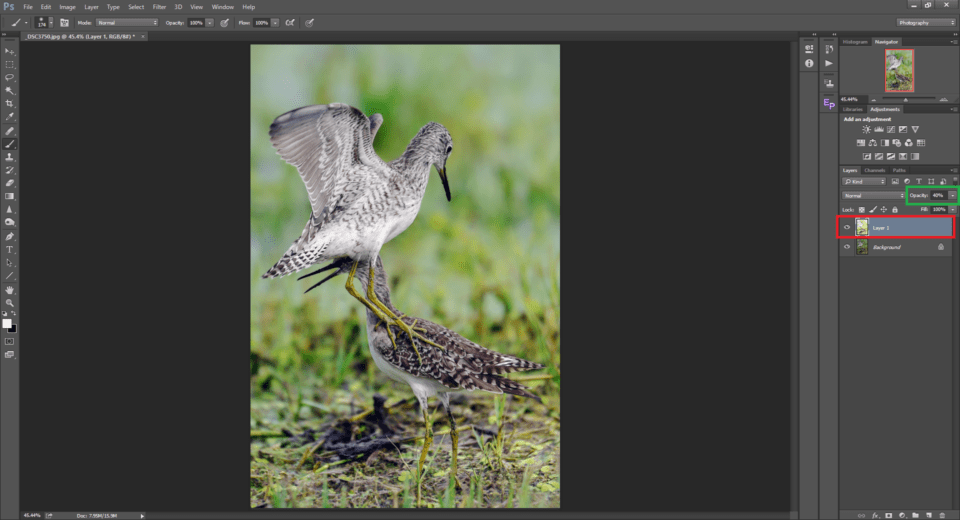
            Using the opacity slider, we can control the percentage by which the top layer is visible over the layers below it. By default, opacity stays at 100% for all layers. When we bring the opacity down to 40%, what Ps does is, it shows 40% of the top layer and shows 60% of the layers below it. The most beautiful aspect of it is, Photoshop does it so seamlessly, without making it look artificial.

            So the bottom-line being, when we feel we have overdone anything, the simplest way is to drag down the Opacity slider until when we feel it is just about right. In addition to opacity, there is another option called Fill. For most cases, opacity and fill behave the same, except for situations when we use it with one of the Special blend modes.


            العتامة

            دعونا نفكر في مثال آخر للمبالغة في شيء ما، حيث أن هذا أمر شائع بالنسبة للمبتدئين. ألق نظرة على الصورة أدناه. لقد قمت عمدا بدفع السطوع إلى أقصى حد، مما أدى إلى تعريضه بشكل مفرط. من الواضح أن الأمر مبالغ فيه. الآن، لا بد لي من التراجع عن ذلك أو حذف الطبقة. كما ذكرت من قبل، هناك طرق متعددة يمكننا من خلالها الحصول على نتيجة محددة باستخدام Photoshop.


            باستخدام شريط تمرير العتامة، يمكننا التحكم في النسبة المئوية التي تظهر بها الطبقة العليا فوق الطبقات الموجودة أسفلها. افتراضيًا، تظل العتامة عند 100% لجميع الطبقات. عندما نخفض العتامة إلى 40%، فإن ما يفعله Ps هو أنه يظهر 40% من الطبقة العليا ويظهر 60% من الطبقات التي تحتها. أجمل ما في الأمر هو أن Photoshop يفعل ذلك بسلاسة، دون أن يجعله يبدو مصطنعًا.


            لذا فإن خلاصة القول هي أنه عندما نشعر أننا بالغنا في أي شيء، فإن أبسط طريقة هي سحب شريط تمرير العتامة لأسفل حتى نشعر أن الأمر صحيح تمامًا. بالإضافة إلى العتامة، هناك خيار آخر يسمى التعبئة. في معظم الحالات، يتصرف العتامة والتعبئة بنفس الطريقة، باستثناء المواقف التي نستخدمها فيها مع أحد أوضاع المزج الخاصة.

            تعليق


            • #36
              Adjustment Layers


              In the previous section, we saw how to apply an adjustment to a layer. But that method seemed to have a problem. We were able to use the opacity slider to reduce the effect of the edit. We also copied the layer and placed it on top of the original. The real problem comes when we had to go back and adjust the values in the slider again.

              While working with adjustments in the previous method, we either have to delete it and redo it all over again should we make any changes or use the History tool. Let us say we increased the brightness by +25. Should we increase it more, we have to add another brightness layer. It makes the process sort of destructive again.

              Instead, just imagine what if Photoshop does it all for us and we can re-edit the values whenever we want, without even touching the opacity slider. This is why Photoshop has the concept of Adjustment layers.

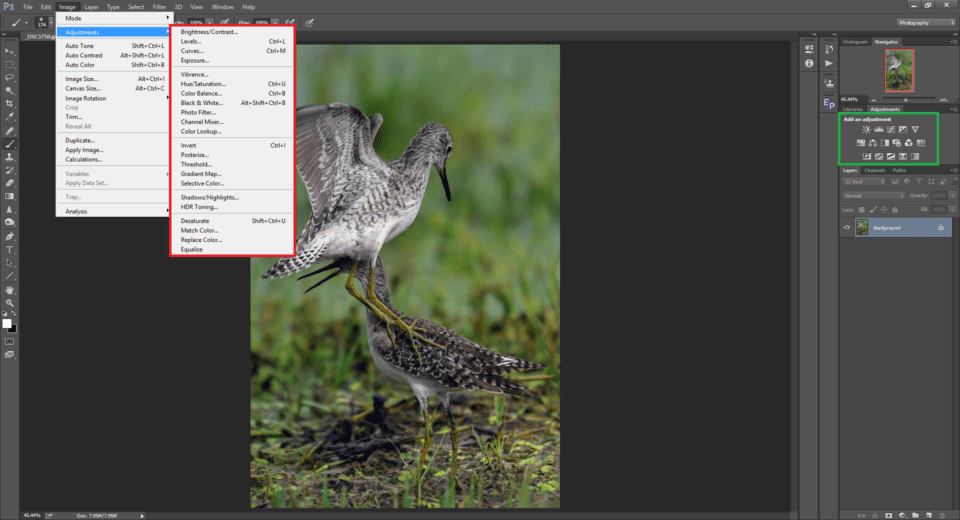
              If you compare the menu options in the Image -> Adjustments menu (marked red) and the Add an adjustment (marked green), they do pretty much the same thing. There is one difference though.

              Instead of choosing adjustments from the menu, when you click on the equivalent icon from the Add an adjustment palette, a new adjustment layer is added on top of your existing layer.

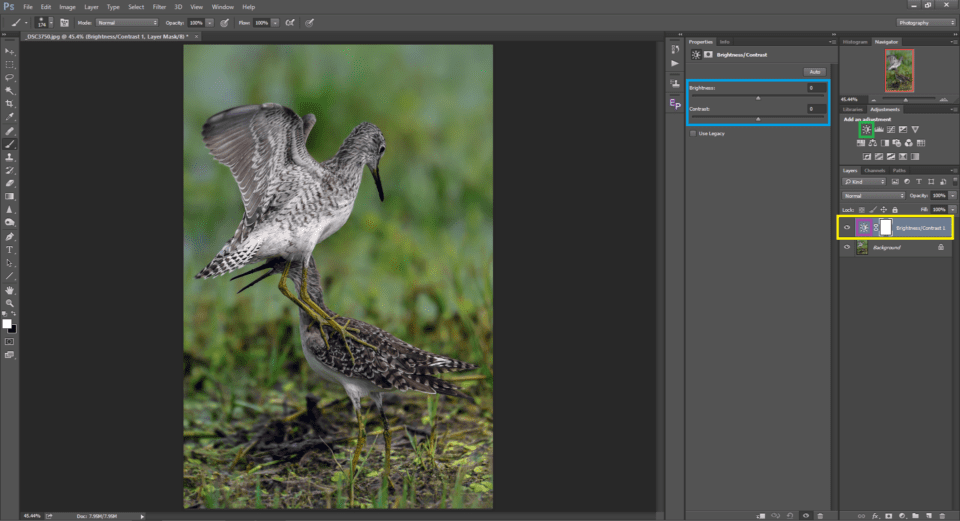
              Click on the Brightness / Contrast icon (marked green). You can see a new layer (marked yellow). When we did the same using the menu, we had a dialog box and the brightness was applied directly on the selected layer.

              The advantage with the adjustment layer is, even after you save and close the document, you can re-open it and when you double click on the layer icon (marked purple), you can see the value you set on the brightness slider and at any point of time you can change it. This makes it completely non-destructive.

              There is a basic difference between any other layer and an adjustment layer. In our previous example, when we copied the base layer, and with 100% opacity we saw that the bottom layer was totally hidden. Contrary to that, an adjustment layer applies the specified adjustment onto the layers below.

              Photography Life has comprehensive articles about Levels adjustment layer, the Curves Adjustment layers and an article about Saturation which are the most commonly used and some of the most powerful adjustments


              طبقات التعديل

              في القسم السابق، رأينا كيفية تطبيق التعديل على الطبقة. لكن يبدو أن هذه الطريقة بها مشكلة. تمكنا من استخدام شريط تمرير العتامة لتقليل تأثير التحرير. لقد قمنا أيضًا بنسخ الطبقة ووضعها فوق الطبقة الأصلية. المشكلة الحقيقية تأتي عندما كان علينا العودة وضبط القيم في شريط التمرير مرة أخرى.

              أثناء العمل مع التعديلات في الطريقة السابقة، يتعين علينا إما حذفها وإعادة تنفيذها مرة أخرى في حالة إجراء أي تغييرات أو استخدام أداة المحفوظات. لنفترض أننا قمنا بزيادة السطوع بمقدار +25. إذا قمنا بزيادتها أكثر، علينا إضافة طبقة سطوع أخرى. يجعل العملية مدمرة نوعًا ما مرة أخرى.

              بدلاً من ذلك، فقط تخيل ماذا لو أن Photoshop يفعل كل شيء لنا ويمكننا إعادة تحرير القيم وقتما نريد، حتى دون لمس شريط تمرير العتامة. هذا هو السبب في أن Photoshop لديه مفهوم طبقات الضبط.


              إذا قارنت خيارات القائمة في قائمة الصورة -> التعديلات (باللون الأحمر) وقائمة إضافة تعديل (باللون الأخضر)، فإنها تفعل نفس الشيء تقريبًا. هناك فرق واحد رغم ذلك.


              بدلاً من اختيار التعديلات من القائمة، عند النقر فوق الرمز المكافئ من لوحة إضافة ضبط، تتم إضافة طبقة ضبط جديدة أعلى الطبقة الحالية.

              انقر على أيقونة السطوع / التباين (باللون الأخضر). يمكنك رؤية طبقة جديدة (باللون الأصفر). عندما فعلنا الشيء نفسه باستخدام القائمة، كان لدينا مربع حوار وتم تطبيق السطوع مباشرة على الطبقة المحددة.

              ميزة طبقة الضبط هي أنه حتى بعد حفظ المستند وإغلاقه، يمكنك إعادة فتحه وعندما تنقر نقرًا مزدوجًا على أيقونة الطبقة (المميزة باللون الأرجواني)، يمكنك رؤية القيمة التي قمت بتعيينها على شريط تمرير السطوع وفي في أي وقت يمكنك تغييره. وهذا يجعلها غير مدمرة تماما.

              هناك فرق أساسي بين أي طبقة أخرى وطبقة الضبط. في مثالنا السابق، عندما قمنا بنسخ الطبقة الأساسية، وبعتامة بنسبة 100%، رأينا أن الطبقة السفلية كانت مخفية تمامًا. وعلى النقيض من ذلك، تطبق طبقة الضبط الضبط المحدد على الطبقات الموجودة أدناه.

              يحتوي موقع Photography Life على مقالات شاملة حول طبقة ضبط المستويات، وطبقات ضبط المنحنيات، ومقالة عن التشبع، وهي الأكثر استخدامًا ومن أقوى التعديلات

              تعليق


              • #37
                Layer Masks


                We now have a basic understanding about layers. Layer masks make them even more powerful. So what is a layer mask? We already saw that we can control how the foreground comes on top of the background. There could be situations where we need a part of the foreground (top) layer and a part of the background (bottom) layer to be visible.

                In other words, we might want a part of the foreground to be opaque and a part of it to be transparent. In the areas of the layer where it is transparent, the layers below are visible. Layer masks as the name suggest are used to ‘mask out’ certain areas of the selected layers.

                There is one important aspect of layer masks that we need to have in mind. White shows, black hides & 50% grey is 50% opaque.

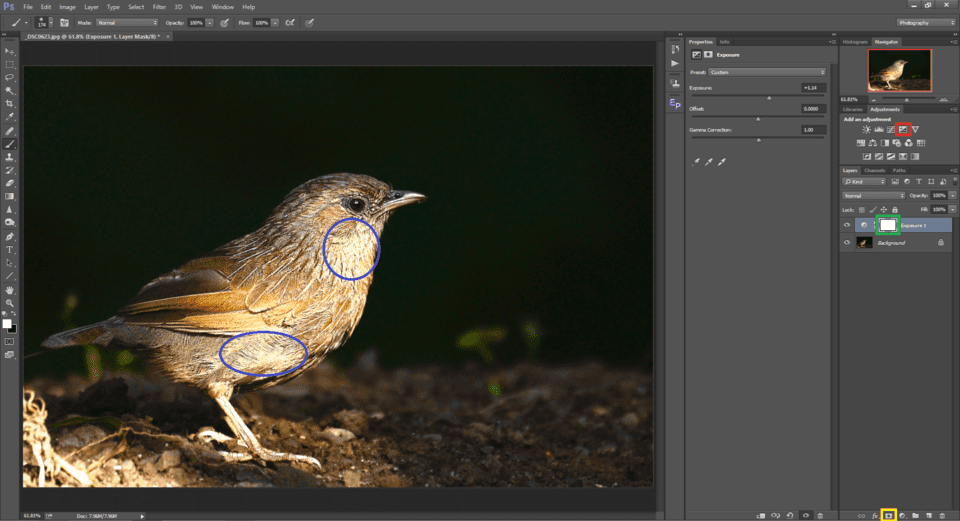
                Let us take an example so that we can understand it better. In the illustrative image above, I have added an Exposure adjustment layer by clicking on the respective icon (marked red) and in the properties, I have increased the exposure by one stop. Take a look at the icon marked green. That is the layer mask icon.

                By default, every adjustment layer comes linked with a layer mask in the recent versions of Photoshop. We already saw that an adjustment layer applies the adjustment onto the layers below it. It does so, as it applies the adjustment as a mask. You can add a layer mask to any layer by selecting the add new layer mask icon (marked yellow). Now the default is white. It means that the layer on top shows is fully visible, because we now know that white shows, whereas black hides. This also means that the exposure is applied entirely on top of the original image below.

                Unfortunately, since the exposure was applied to the overall layer evenly, certain areas of the subject turned overexposed (marked blue). So we are going to mask out everything and paint the mask in white only at the areas where we need to increase the exposure. To do this, let us first select the layer mask and invert it by pressing Ctrl / Command+I. Now you can see the color of the layer mask turn black which means that the current layer has become transparent (because black hides). This, in turn, makes the below layers visible.
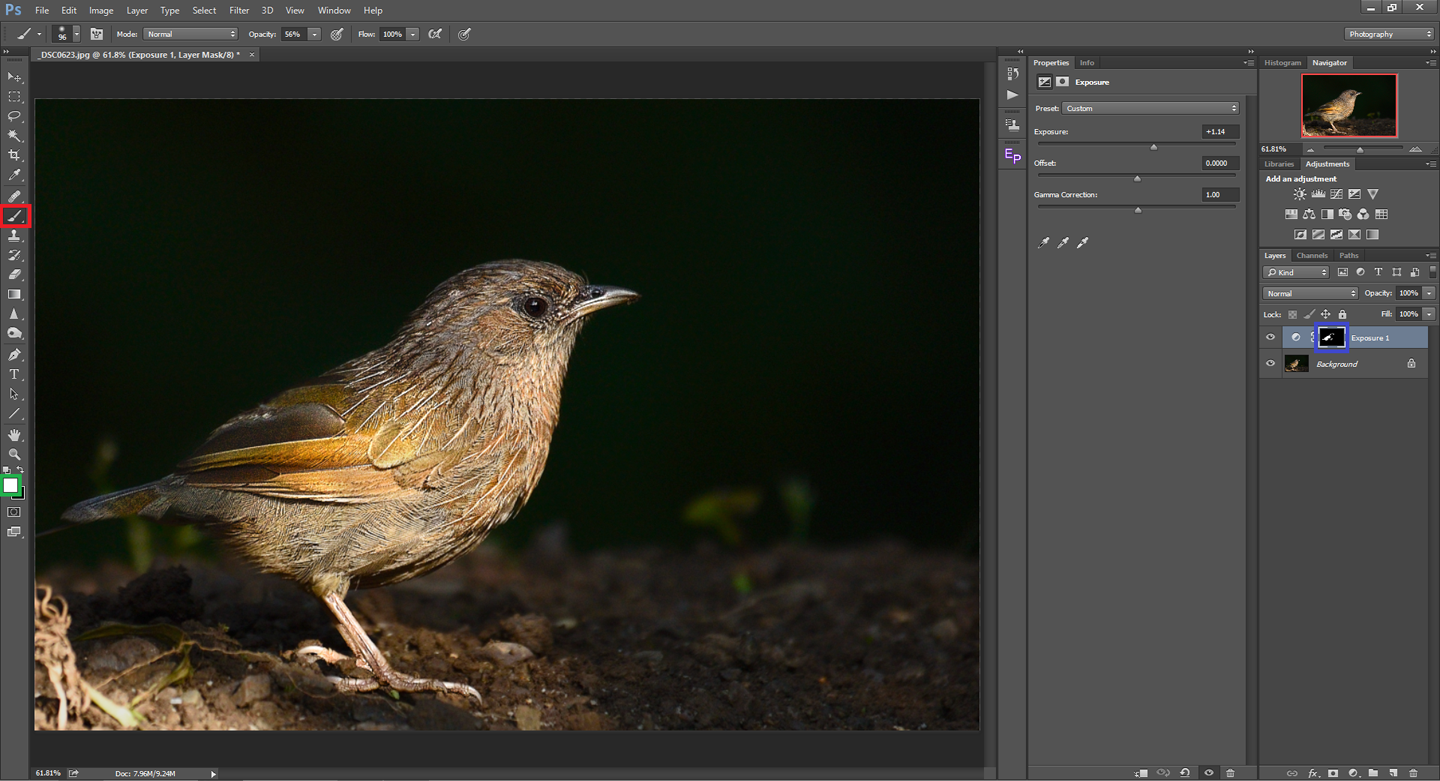
                What we are going to do is select the brush (marked red), dial in the needed diameter, make it soft by bringing the hardness of the brush close to zero and paint over the dark areas on the image. There are two things we need to make sure of. First, we need to ensure the foreground is white (marked green). Second, we need to ensure the layer mask is selected and not the adjustment layer itself (marked blue).

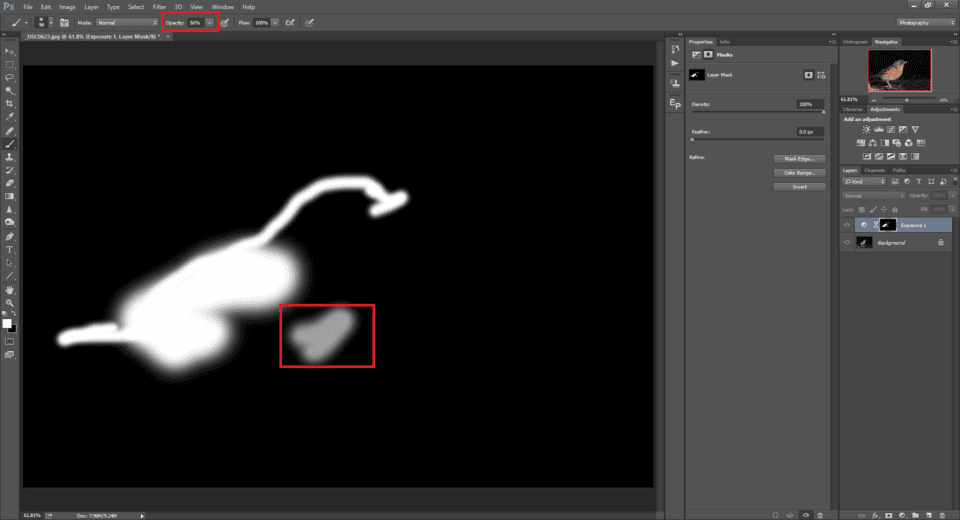
                Check out the layer mask linked to the Exposure layer. You can see that only the spots where we have painted white on the layer mask are visible, whereas in the areas that are left black, the exposure adjustment does not apply. You can toggle the mask view by clicking on the layer mask while pressing Alt / Option button.


                Check out the area marked red. Instead of either going 100% white or 100% black, I have selected an opacity of 56% to control how much it shows. You can see it reflected as grey in the layer mask view.
                NIKON D7000 @ 11mm, ISO 100, 1/8, f/8.0
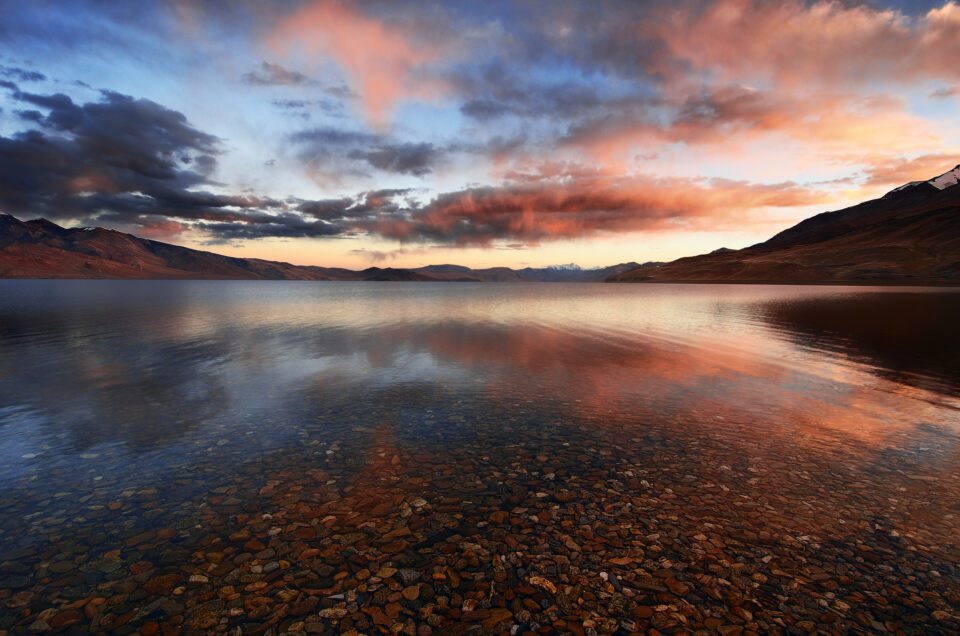
                Let us look at another case where layer masks might be very useful. With the picture above, we see that the sky is a tad too bright. Seamlessly darkening it a bit would make it look better.

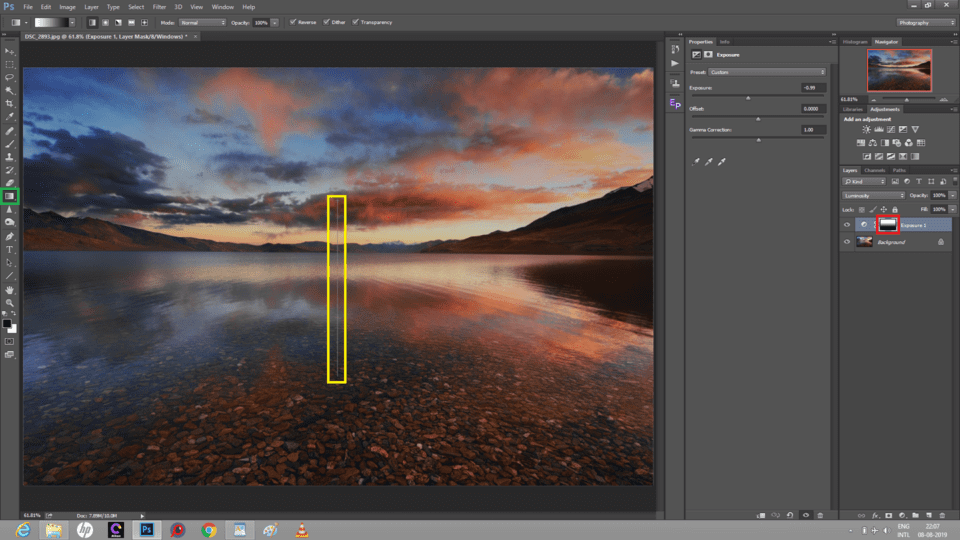
                We add a new Exposure adjustment layer named Exposure 1. Make sure that the layer mask of the exposure adjustment layer is selected. Then select the gradient map tool (marked green) and place the mouse in the middle of the image and drag it down (marked yellow).

                You can see that there is a gradient from white on top to black at the bottom on the layer mask. This gives you a similar effect that a graduated neutral density filter would give you. There are multiple ways to selecting an area of the image like Blend-if and Luminosity masks. There are practically unlimited ways to use layer masks.

                أقنعة الطبقة


                لدينا الآن فهم أساسي حول الطبقات. أقنعة الطبقة تجعلها أكثر قوة. إذن ما هو قناع الطبقة؟ لقد رأينا بالفعل أنه يمكننا التحكم في كيفية ظهور المقدمة فوق الخلفية. قد تكون هناك مواقف نحتاج فيها إلى رؤية جزء من الطبقة الأمامية (العلوية) وجزء من الطبقة الخلفية (السفلية).

                بمعنى آخر، قد نرغب في أن يكون جزء من المقدمة معتمًا وجزءًا منها شفافًا. في مناطق الطبقة التي تكون فيها شفافة، تكون الطبقات الموجودة أدناه مرئية. تُستخدم أقنعة الطبقة كما يوحي الاسم "لإخفاء" مناطق معينة من الطبقات المحددة.

                هناك جانب واحد مهم من أقنعة الطبقة التي يجب أن نأخذها في الاعتبار. يظهر الأبيض، والجلود السوداء، و50% رمادي معتم بنسبة 50%.
                ​
                دعونا نأخذ مثالا حتى نتمكن من فهمه بشكل أفضل. في الصورة التوضيحية أعلاه، قمت بإضافة طبقة ضبط التعريض من خلال النقر على الأيقونة المعنية (باللون الأحمر) وفي الخصائص، قمت بزيادة التعريض بمقدار توقف واحد. ألقِ نظرة على الأيقونة المميزة باللون الأخضر. هذا هو رمز قناع الطبقة.

                افتراضيًا، تأتي كل طبقة ضبط مرتبطة بقناع طبقة في الإصدارات الأخيرة من Photoshop. لقد رأينا بالفعل أن طبقة الضبط تطبق الضبط على الطبقات الموجودة أسفلها. وهو يفعل ذلك، لأنه يطبق التعديل كقناع. يمكنك إضافة قناع طبقة إلى أي طبقة عن طريق تحديد أيقونة إضافة قناع طبقة جديدة (باللون الأصفر). الآن الافتراضي هو الأبيض. وهذا يعني أن الطبقة الموجودة في الأعلى تظهر بشكل كامل، لأننا نعرف الآن أن اللون الأبيض يظهر، بينما اللون الأسود يختفي. وهذا يعني أيضًا أن التعريض الضوئي يتم تطبيقه بالكامل أعلى الصورة الأصلية أدناه.

                لسوء الحظ، نظرًا لأنه تم تطبيق التعريض الضوئي على الطبقة الإجمالية بالتساوي، فقد تحولت مناطق معينة من الموضوع إلى تعريض مفرط (مميز باللون الأزرق). لذلك سنقوم بإخفاء كل شيء ورسم القناع باللون الأبيض فقط في المناطق التي نحتاج فيها إلى زيادة التعريض الضوئي. للقيام بذلك، دعونا أولاً نحدد قناع الطبقة ونقوم بعكسه بالضغط على Ctrl / Command+I. يمكنك الآن رؤية لون قناع الطبقة يتحول إلى اللون الأسود مما يعني أن الطبقة الحالية أصبحت شفافة (بسبب الجلود السوداء). وهذا بدوره يجعل الطبقات أدناه مرئية.
                ما سنفعله هو تحديد الفرشاة (المميزة باللون الأحمر)، وتحديد القطر المطلوب، وجعلها ناعمة عن طريق تقريب صلابة الفرشاة من الصفر، ثم طلاء المناطق الداكنة في الصورة. هناك شيئان نحتاج للتأكد منهما. أولاً، نحتاج إلى التأكد من أن المقدمة بيضاء (مميزة باللون الأخضر). ثانيًا، نحتاج إلى التأكد من تحديد قناع الطبقة وليس طبقة الضبط نفسها (باللون الأزرق).
                ​
                تحقق من قناع الطبقة المرتبط بطبقة التعريض. يمكنك أن ترى أن البقع التي قمنا بطلائها باللون الأبيض على قناع الطبقة هي فقط المرئية، بينما في المناطق التي تركت باللون الأسود، لا يتم تطبيق تعديل التعريض الضوئي. يمكنك تبديل عرض القناع من خلال النقر على قناع الطبقة أثناء الضغط على زر Alt / Option.
                ​

                تحقق من المنطقة المميزة باللون الأحمر. بدلاً من التحول إلى اللون الأبيض بنسبة 100% أو اللون الأسود بنسبة 100%، قمت بتحديد درجة عتامة بنسبة 56% للتحكم في مقدار العتامة. يمكنك رؤيته ينعكس باللون الرمادي في عرض قناع الطبقة.
                ​نيكون D7000 بمقاس 11 ملم، ISO 100، 1/8، f/8.0
                دعونا نلقي نظرة على حالة أخرى حيث قد تكون أقنعة الطبقة مفيدة جدًا. من خلال الصورة أعلاه، نرى أن السماء مشرقة جدًا. إن تغميقها بسلاسة قليلاً سيجعلها تبدو أفضل.
                ​
                نضيف طبقة ضبط تعريض جديدة تسمى التعريض 1. تأكد من تحديد قناع الطبقة لطبقة ضبط التعريض. ثم حدد أداة خريطة التدرج (المميزة باللون الأخضر) ثم ضع الماوس في منتصف الصورة واسحبها لأسفل (المميزة باللون الأصفر).

                يمكنك أن ترى أن هناك تدرجًا من الأبيض في الأعلى إلى الأسود في الأسفل على قناع الطبقة. يمنحك هذا تأثيرًا مشابهًا لما يمنحك إياه مرشح الكثافة المحايدة المتدرج. هناك طرق متعددة لتحديد منطقة من الصورة مثل Blend-if وأقنعة Luminosity. هناك طرق غير محدودة عمليًا لاستخدام أقنعة الطبقة.

                ​​​​​​​

                تعليق


                • #38
                  Blend Modes


                  In the previous sections, we understood what layers are and how powerful they are in Photoshop when combined with layer masks. In addition to that, we can also control how a layer blends with the layers below.

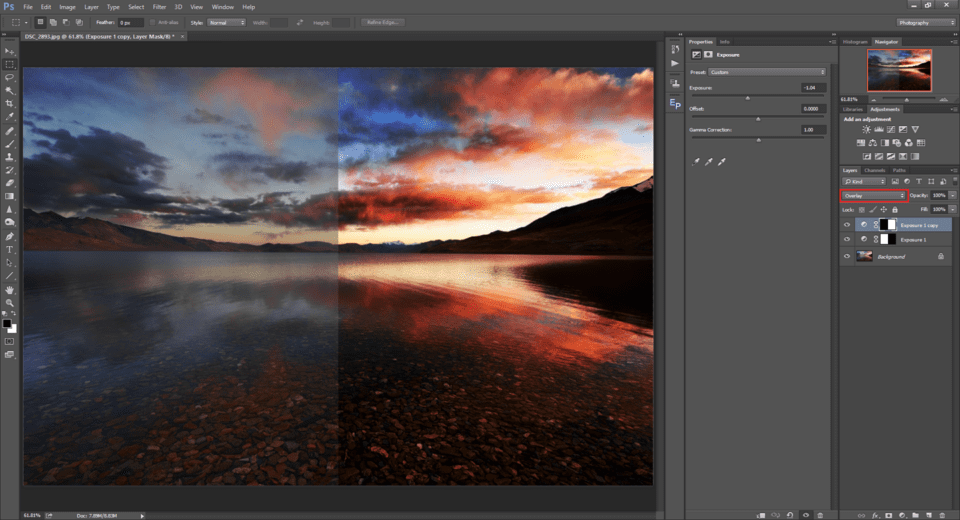
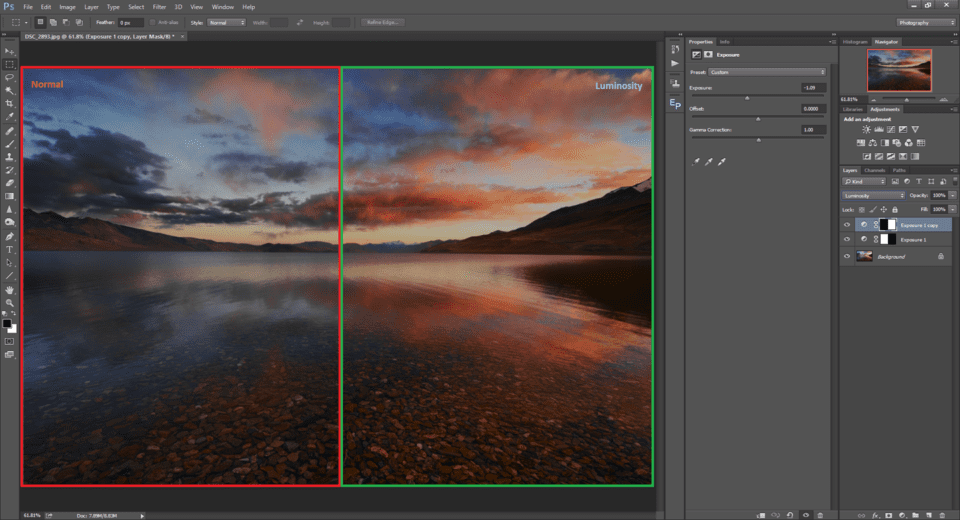
                  Take a look at the picture above. I added an Exposure adjustment tool, reduced it by a stop (-1) and masked out the right half of the image. So the exposure adjustment layer will be visible only on the left side. Then I created a copy of the Exposure adjustment layer which obviously has the same -1 setting. For this, I masked out the left half. Obviously, both sides should be the same. In the blend mode drop down of the ‘Exposure 1 copy’ layer, I changed the blend mode from “Normal”, which is the default blend mode to “Overlay” (marked red).

                  You can see that the difference is drastic. Even though the adjustment layer and the value we punched into it is the same, two different blend modes give us completely different results.

                  A blend mode dictates the way in which a layer shows over the layers below it. In the above example, the normal blend mode just reduces the exposure by a stop, whereas the overlay blend mode adds contrast.

                  Let’s use another example of the picture above. Similar to the previous one, I underexposed the left by a stop and blended it with “Normal”. I did the same with the right half, except I blended it with “Luminosity”. While the left half is underexposed, you can see that it reduced the saturation as well.

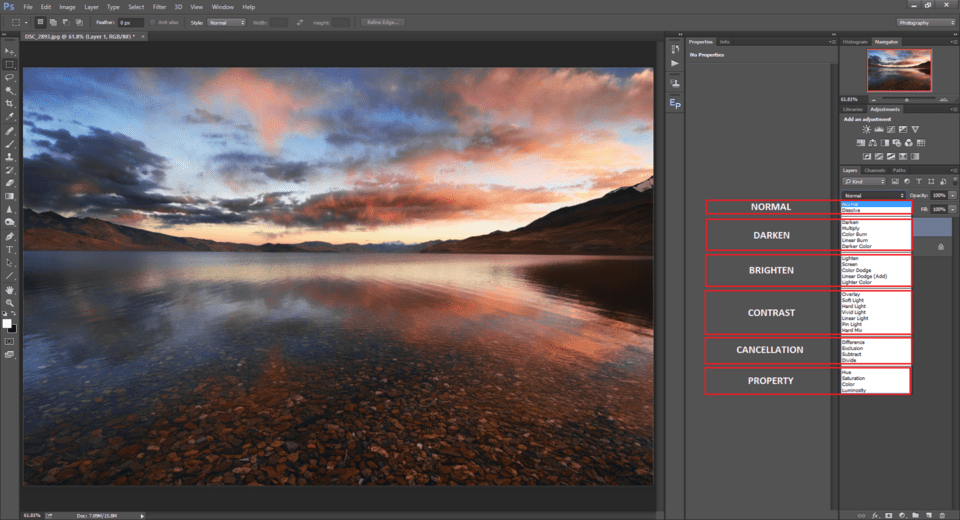
                  For the right half, since I selected the “Luminosity” blend mode, it affects only the exposure attribute, leaving the other attributes of the image like saturation untouched. Photoshop has segregated blend modes according to their types as shown in the illustrative picture below:

                  Understanding all the Blend modes requires a comprehensive article for itself, which I will write in the future.


                  أوضاع المزج

                  في الأقسام السابقة، فهمنا ماهية الطبقات ومدى قوتها في Photoshop عند دمجها مع أقنعة الطبقة. بالإضافة إلى ذلك، يمكننا أيضًا التحكم في كيفية مزج الطبقة مع الطبقات الموجودة أسفلها.


                  الق نظرة على الصورة بالاعلى. أضفت أداة ضبط التعريض، وقمت بتقليلها بمقدار نقطة توقف (-1) وقمت بإخفاء النصف الأيمن من الصورة. وبالتالي فإن طبقة ضبط التعريض ستكون مرئية فقط على الجانب الأيسر. ثم قمت بإنشاء نسخة من طبقة ضبط التعريض والتي من الواضح أنها تحتوي على نفس الإعداد -1. لهذا، قمت بإخفاء النصف الأيسر. ومن الواضح أن كلا الجانبين يجب أن يكون هو نفسه. في القائمة المنسدلة لوضع المزج لطبقة "التعرض 1"، قمت بتغيير وضع المزج من "عادي"، وهو وضع المزج الافتراضي إلى "تراكب" (باللون الأحمر).

                  يمكنك أن ترى أن الفرق جذري. على الرغم من أن طبقة الضبط والقيمة التي أدخلناها عليها هي نفسها، إلا أن وضعي المزج المختلفين يمنحاننا نتائج مختلفة تمامًا.

                  يحدد وضع المزج الطريقة التي تظهر بها الطبقة فوق الطبقات الموجودة أسفلها. في المثال أعلاه، يعمل وضع المزج العادي على تقليل التعرض بمقدار توقف، بينما يضيف وضع المزج المتراكب التباين.


                  دعونا نستخدم مثالاً آخر للصورة أعلاه. على غرار الصورة السابقة، قمت بتعريض الجانب الأيسر بمقدار توقف ومزجته مع "عادي". فعلت نفس الشيء مع النصف الأيمن، إلا أنني مزجته مع "اللمعان". في حين أن النصف الأيسر منخفض التعرض للضوء، يمكنك أن ترى أنه قلل من التشبع أيضًا.

                  بالنسبة للنصف الأيمن، منذ أن قمت بتحديد وضع المزج "Luminosity"، فإنه يؤثر فقط على سمة التعريض، مع ترك السمات الأخرى للصورة مثل التشبع دون تغيير. لقد قام Photoshop بفصل أوضاع المزج حسب أنواعها كما هو موضح في الصورة التوضيحية أدناه:


                  إن فهم جميع أوضاع المزج يتطلب مقالة شاملة لنفسها، والتي سأكتبها في المستقبل.

                  تعليق


                  • #39
                    Filters


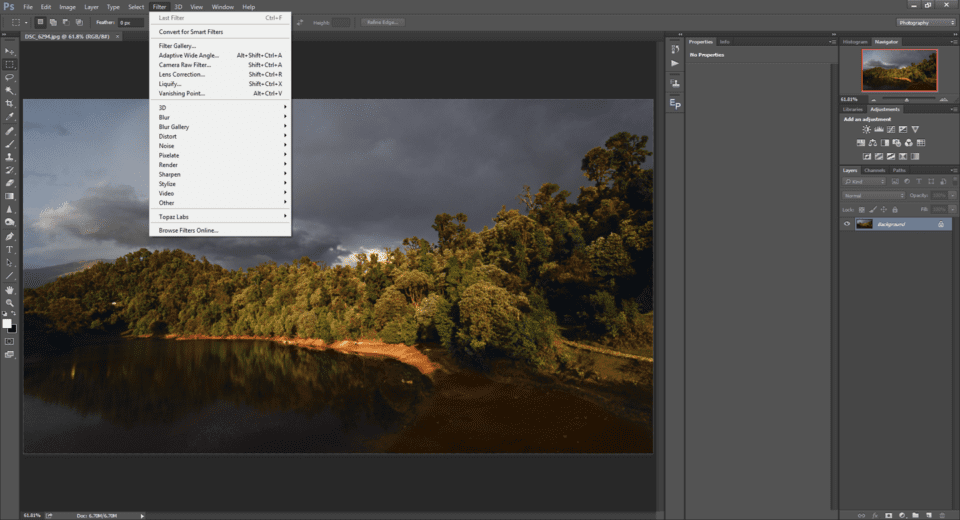
                    What happens when we add a filter like a CPL or an ND filter on top of our lens? Filters in Photoshop work similarly. By default, when you go to the Filters menu, there are a handful of filters for sharpening, blurring, adding / removing noise, etc. In addition, there are tons of Plug-ins by third party vendors, most of which go into the filters menu. Remember that whatever filter you choose, it will get directly applied to the selected layer. Some menus might not work when an adjustment layer is selected. So make sure that you select the layer that you want to apply the filter to. As a general practice, it is wise to copy the layer that you want to apply the filter to.

                    Note that Adobe Camera Raw that we previously saw can be applied to a layer just like any other filter.


                    المرشحات

                    ماذا يحدث عندما نضيف مرشحًا مثل مرشح CPL أو مرشح ND أعلى العدسة؟ تعمل المرشحات في Photoshop بالمثل. بشكل افتراضي، عندما تذهب إلى قائمة المرشحات، هناك عدد قليل من المرشحات للتوضيح، والتشويش، وإضافة / إزالة الضوضاء، وما إلى ذلك. بالإضافة إلى ذلك، هناك الكثير من المكونات الإضافية التي يقدمها بائعو الطرف الثالث، ومعظمها يذهب إلى قائمة المرشحات. تذكر أنه مهما كان الفلتر الذي تختاره، فسيتم تطبيقه مباشرة على الطبقة المحددة. قد لا تعمل بعض القوائم عند تحديد طبقة ضبط. لذا تأكد من تحديد الطبقة التي تريد تطبيق الفلتر عليها. كممارسة عامة، من الحكمة نسخ الطبقة التي تريد تطبيق الفلتر عليها.


                    لاحظ أن Adobe Camera Raw الذي رأيناه سابقًا يمكن تطبيقه على الطبقة تمامًا مثل أي مرشح آخر.

                    تعليق


                    • #40
                      Smart Objects


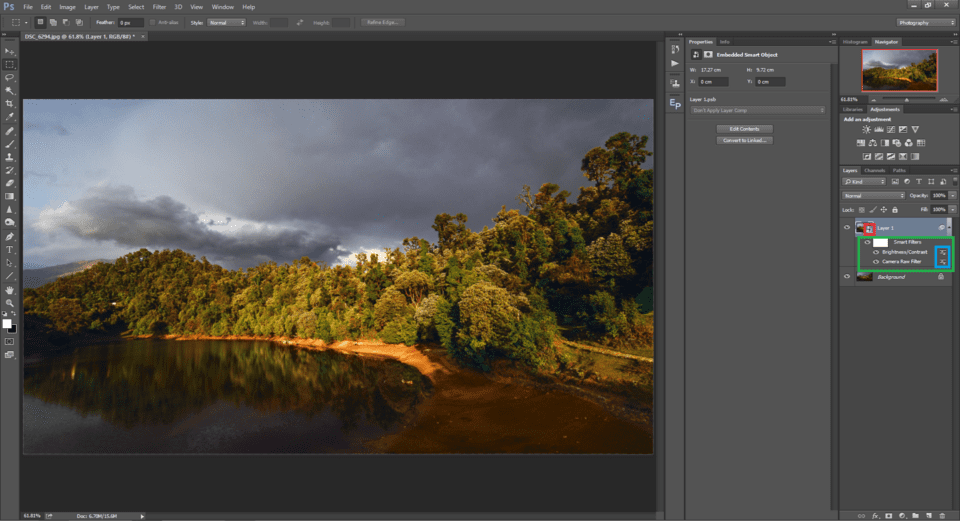
                      Just like layers and masks, smart objects are some of the most used features of Photoshop. We saw that filters and other adjustments can be destructive when applied to a layer, and we often cannot tweak the settings again. Smart objects, on the other hand, provide a solution to that. When we convert a layer into a smart object, Photoshop applies all the adjustments / filters as smart filters, as shown in the picture below:

                      You can convert any layer into a smart object by first selecting the layer and then right-clicking on that layer and choosing the “Convert to Smart Object” option. Once you do that, the smart object icon appears on the layer (marked red).

                      In the above example, I made two adjustments. First, I used the Camera RAW filter. Next, I increased brightness using the Brightness / Contrast adjustment. You can see that both have been applied as smart filters on the same layer.

                      Now should I need to change the values of any of the smart filters, all I need to do is double click on the filter. Just like the adjustment layers, the corresponding dialog box opens up, in which the values I selected are already displayed. I can then tweak them as desired. In fact, I can also change the blend mode of that particular filter by double-clicking on the icon marked blue.

                      The applications of smart objects go way beyond what is mentioned above, which we will cover in future articles

                      الكائنات الذكية

                      تمامًا مثل الطبقات والأقنعة، تعد الكائنات الذكية من أكثر ميزات Photoshop استخدامًا. لقد رأينا أن المرشحات وعمليات الضبط الأخرى يمكن أن تكون مدمرة عند تطبيقها على الطبقة، وغالبًا ما لا نتمكن من تعديل الإعدادات مرة أخرى. ومن ناحية أخرى، توفر الكائنات الذكية حلاً لذلك. عندما نقوم بتحويل طبقة إلى كائن ذكي، يقوم Photoshop بتطبيق كافة التعديلات/المرشحات كمرشحات ذكية، كما هو موضح في الصورة أدناه:


                      يمكنك تحويل أي طبقة إلى كائن ذكي عن طريق تحديد الطبقة أولاً ثم النقر بزر الماوس الأيمن على تلك الطبقة واختيار خيار "التحويل إلى كائن ذكي". بمجرد القيام بذلك، تظهر أيقونة الكائن الذكي على الطبقة (باللون الأحمر).

                      في المثال أعلاه، قمت بإجراء تعديلين. أولاً، استخدمت مرشح Camera RAW. بعد ذلك، قمت بزيادة السطوع باستخدام تعديل السطوع / التباين. يمكنك أن ترى أنه تم تطبيق كلاهما كمرشحات ذكية على نفس الطبقة.

                      الآن، إذا كنت بحاجة إلى تغيير قيم أي من المرشحات الذكية، كل ما علي فعله هو النقر مرتين على المرشح. تمامًا مثل طبقات الضبط، يتم فتح مربع الحوار المقابل، حيث يتم عرض القيم التي حددتها بالفعل. ويمكنني بعد ذلك تعديلها حسب الرغبة. في الواقع، يمكنني أيضًا تغيير وضع المزج لهذا الفلتر بالنقر المزدوج على الأيقونة المميزة باللون الأزرق.

                      وتتجاوز تطبيقات الكائنات الذكية ما هو مذكور أعلاه، وهو ما سنغطيه في المقالات القادمة
                      التعديل الأخير تم بواسطة غدير معروف; الساعة 10-28-2023, 02:47 PM. سبب آخر: اضافة ترجمة

                      تعليق


                      • #41
                        Conclusion


                        In this article, we covered all the basic functionality and tools related to post-processing photographs for beginners who want to explore Photoshop. The article was intended to only lay out the foundation, which is important to have for all the upcoming Photoshop articles that we are planning to publish at Photography Life.
                        خاتمة

                        في هذه المقالة، قمنا بتغطية جميع الوظائف والأدوات الأساسية المتعلقة بالصور الفوتوغرافية بعد المعالجة للمبتدئين الذين يرغبون في استكشاف Photoshop. كان الهدف من المقالة هو وضع الأساس فقط، وهو أمر مهم لجميع مقالات Photoshop القادمة التي نخطط لنشرها في Photography Life.

                        تعليق

                        يعمل...
                        X