دليل المبتدئين إلى الفوتوشوب A Beginner’s Guide to Adobe Photoshop

تقليص
X
 
  • تصفية - فلترة
  • الوقت
  • عرض
إلغاء تحديد الكل
مشاركات جديدة

  • #16
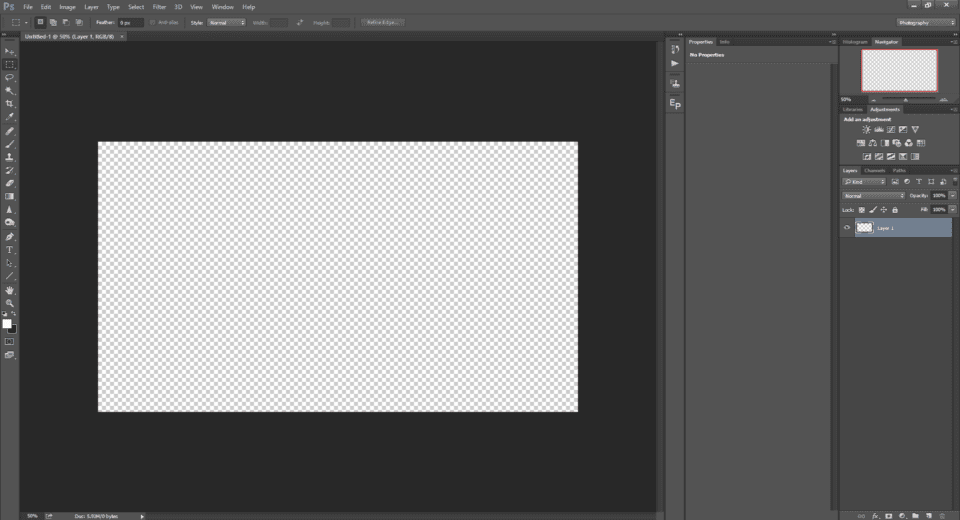
    Always remember that whenever you see an image or a layer that is checkered, it means it is transparent.
    If you opened an image from Lightroom by right-clicking and choosing “Edit in Photoshop”, then instead of choosing the “Save as” option, just save the file normally. Once you do that, you will see that the image will be automatically imported into Lightroom from Photoshop.


    تذكر دائمًا أنه عندما ترى صورة أو طبقة مربعة الشكل، فهذا يعني أنها شفافة.


    إذا قمت بفتح صورة من Lightroom بالنقر بزر الماوس الأيمن واختيار "تحرير في Photoshop"، فبدلاً من اختيار خيار "حفظ باسم"، ما عليك سوى حفظ الملف بشكل طبيعي. بمجرد القيام بذلك، سترى أنه سيتم استيراد الصورة تلقائيًا إلى Lightroom من Photoshop.

    تعليق


    • #17
      Photoshop Toolbox


      When you open Photoshop, after you bypass the last opened file list, the illustration screen below is what you will see. Before we proceed to anything else, let us set up your work space. The applications of Photoshop goes beyond editing pictures. So the first step is to tell Photoshop that we are going to use it to edit pictures.

      Go to the menu Window -> Workspace -> Photography. This will display a workspace with the tools specific to photography.

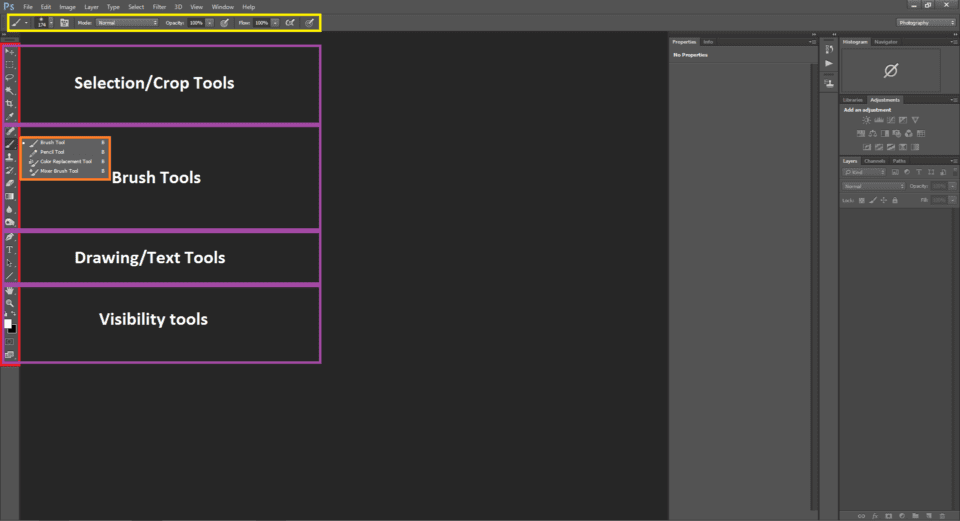
      Now you will see the toolbar on the left (marked with red).


      صندوق أدوات الفوتوشوب

      عند فتح Photoshop، بعد تجاوز قائمة الملفات المفتوحة الأخيرة، فإن الشاشة التوضيحية أدناه هي ما ستشاهده. قبل أن ننتقل إلى أي شيء آخر، دعونا نقوم بإعداد مساحة العمل الخاصة بك. تتجاوز تطبيقات Photoshop تحرير الصور. لذا فإن الخطوة الأولى هي إخبار Photoshop بأننا سنستخدمه لتحرير الصور.

      انتقل إلى نافذة القائمة -> مساحة العمل -> التصوير الفوتوغرافي. سيعرض هذا مساحة عمل تحتوي على الأدوات الخاصة بالتصوير الفوتوغرافي.

      الآن سترى شريط الأدوات على اليسار (مميز باللون الأحمر).


      تعليق


      • #18
        The majority of the tools that you see on the toolbar contain a number of different tools. It generally is denoted by a small arrow at the bottom right corner. This simply means that the tool has a group of tools that pop-up when you right-click it (marked orange) which perform different operations.

        When you select a tool from the toolbar, the properties or available options for the corresponding tool get displayed on the top, just below the menu bar (marked yellow).

        For example, in the illustration above, we have selected the “brush” tool. So the properties of the brush tool like brush size, blend mode, opacity and other properties related to the brush tool are displayed above. Remember, the tools and pallets can be re-arranged to suit your requirement. Let’s take a look at four of the most frequently used tools.


        تحتوي غالبية الأدوات التي تراها على شريط الأدوات على عدد من الأدوات المختلفة. يتم الإشارة إليه بشكل عام بواسطة سهم صغير في الزاوية اليمنى السفلية. هذا يعني ببساطة أن الأداة تحتوي على مجموعة من الأدوات التي تظهر عند النقر بزر الماوس الأيمن فوقها (باللون البرتقالي) والتي تؤدي عمليات مختلفة.

        عند تحديد أداة من شريط الأدوات، يتم عرض الخصائص أو الخيارات المتاحة للأداة المقابلة في الأعلى، أسفل شريط القائمة مباشرةً (باللون الأصفر).

        على سبيل المثال، في الرسم التوضيحي أعلاه، اخترنا أداة "الفرشاة". لذلك يتم عرض خصائص أداة الفرشاة مثل حجم الفرشاة ووضع المزج والعتامة والخصائص الأخرى المتعلقة بأداة الفرشاة أعلاه. تذكر أنه يمكن إعادة ترتيب الأدوات والمنصات لتناسب متطلباتك. دعونا نلقي نظرة على أربع من الأدوات الأكثر استخدامًا.

        تعليق


        • #19
          Crop Tool


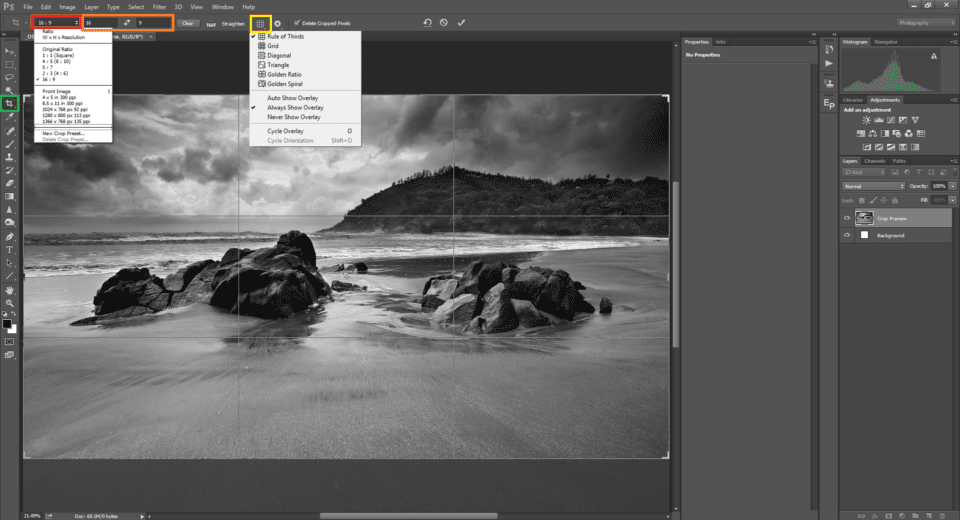
          Cropping an image is typically one of the first steps of post-processing. You can bring in the crop rulers by clicking on the crop tool (marked green in the picture below) in the tool palette. You can then resize by dragging the eight corner placeholders. You can also rotate the image by dragging any of the four extreme corners. When you move the mouse exactly to the extreme corner (top left, top right, bottom left & bottom right), the mouse pointer turns into the resize symbol. When you move it a bit out of the image nearer to the corners, the rotate mouse icon appears and you can tilt the image clockwise or anti-clockwise.

          أداة المحاصيل

          يعد اقتصاص الصورة عادةً إحدى الخطوات الأولى لمرحلة ما بعد المعالجة. يمكنك إحضار مساطر الاقتصاص من خلال النقر على أداة الاقتصاص (المميزة باللون الأخضر في الصورة أدناه) في لوحة الأدوات. يمكنك بعد ذلك تغيير الحجم عن طريق سحب العناصر النائبة للزاوية الثمانية. يمكنك أيضًا تدوير الصورة عن طريق سحب أي من الزوايا الأربع القصوى. عند تحريك الماوس تمامًا إلى الزاوية القصوى (أعلى اليسار، وأعلى اليمين، وأسفل اليسار، وأسفل اليمين)، يتحول مؤشر الماوس إلى رمز تغيير الحجم. عند تحريكها قليلاً خارج الصورة بالقرب من الزوايا، تظهر أيقونة تدوير الماوس ويمكنك إمالة الصورة في اتجاه عقارب الساعة أو عكس اتجاه عقارب الساعة.


          تعليق


          • #20
            While cropping, you can change its aspect ratio. It is the ratio between the length and the height of an image. By default, Photoshop tends to retain the original ratio of the image. You can change the aspect ratio by selecting one of the ratios from the drop down (marked red). You can also change it by directly entering the length and the breadth in the columns next to the drop down menu (marked orange). If you don’t want to stick to any pre-defined ratio, you can click on the clear button and Ps will allow you to get a custom ratio.

            The next option to choose while cropping is the Overlay (marked yellow). Most of us are familiar with rules like the rule of thirds or the golden ratio. There are other complex overlays as well. You can choose one of the overlay and with overlays like the Golden spiral you can change the orientation by pressing ‘O’ to rotate the orientation. Once done, click on the checkbox and Photoshop will discard all pixels outside the crop.


            أثناء الاقتصاص، يمكنك تغيير نسبة العرض إلى الارتفاع. وهي النسبة بين طول الصورة وارتفاعها. بشكل افتراضي، يميل Photoshop إلى الاحتفاظ بنسبة الصورة الأصلية. يمكنك تغيير نسبة العرض إلى الارتفاع عن طريق تحديد إحدى النسب من القائمة المنسدلة (باللون الأحمر). يمكنك أيضًا تغييره عن طريق إدخال الطول والعرض مباشرة في الأعمدة المجاورة للقائمة المنسدلة (باللون البرتقالي). إذا كنت لا تريد الالتزام بأي نسبة محددة مسبقًا، فيمكنك النقر فوق زر المسح وسيسمح لك Ps بالحصول على نسبة مخصصة.

            الخيار التالي الذي يمكنك اختياره أثناء الاقتصاص هو التراكب (باللون الأصفر). معظمنا على دراية بقواعد مثل قاعدة الأثلاث أو النسبة الذهبية. هناك تراكبات معقدة أخرى أيضًا. يمكنك اختيار أحد التراكبات ومع التراكبات مثل الحلزون الذهبي يمكنك تغيير الاتجاه بالضغط على "O" لتدوير الاتجاه. بمجرد الانتهاء من ذلك، انقر فوق مربع الاختيار وسيقوم Photoshop بتجاهل جميع وحدات البكسل الموجودة خارج المقتص.

            تعليق


            • #21
              Spot Healing Tool


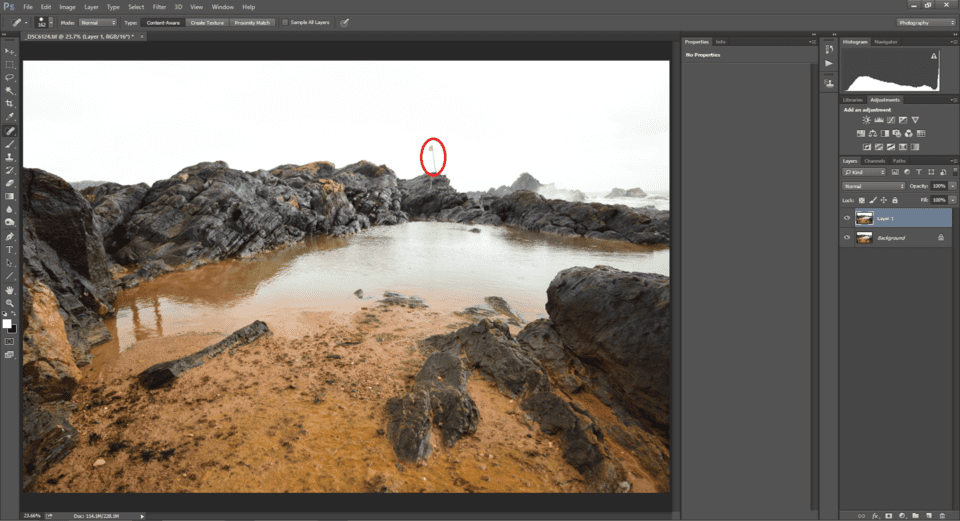
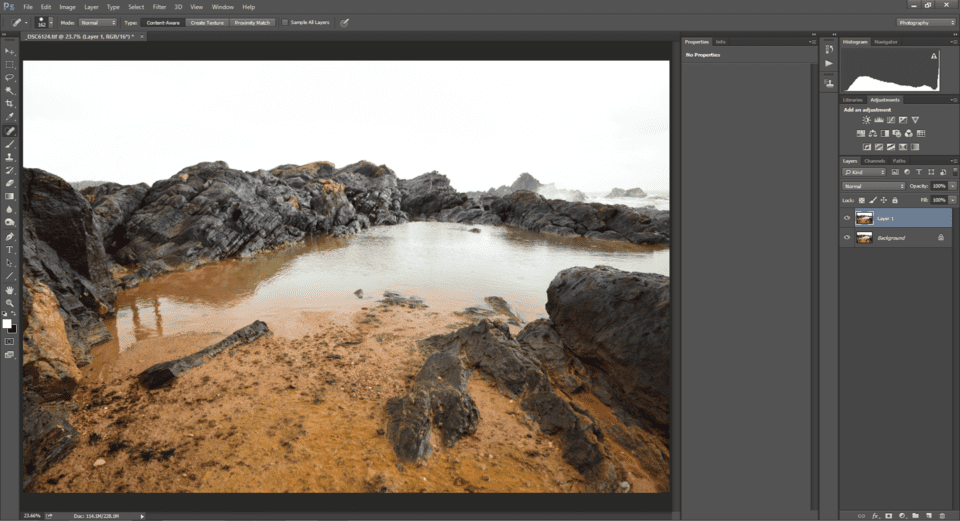
              There are times where we have dust settled on our camera sensors. If it lands in a spot where there are details, it generally does not show up much. But when it lands on a detail-less spot like the sky or a bright background, it shows up as a dark spot. There are other times where we want to remove distracting objects from the frame. The spot healing brush comes to aid to handle such problems.

              In the image above, the red warning flag is a major distraction and it can’t and shouldn’t be physically removed. This is where the spot healing brush does the job almost effortlessly.


              أداة شفاء البقع

              هناك أوقات يستقر فيها الغبار على مستشعرات الكاميرا. إذا هبطت في مكان توجد به تفاصيل، فإنها لا تظهر كثيرًا بشكل عام. ولكن عندما تهبط على بقعة خالية من التفاصيل مثل السماء أو خلفية مشرقة، فإنها تظهر كنقطة مظلمة. هناك أوقات أخرى نريد فيها إزالة الكائنات المشتتة للانتباه من الإطار. تأتي فرشاة علاج البقع للمساعدة في التعامل مع مثل هذه المشكلات.


              في الصورة أعلاه، تعتبر علامة التحذير الحمراء مصدر إلهاء كبير ولا يمكن ولا ينبغي إزالتها فعليًا. هذا هو المكان الذي تقوم فيه فرشاة معالجة البقع بالمهمة دون عناء تقريبًا.


              تعليق


              • #22
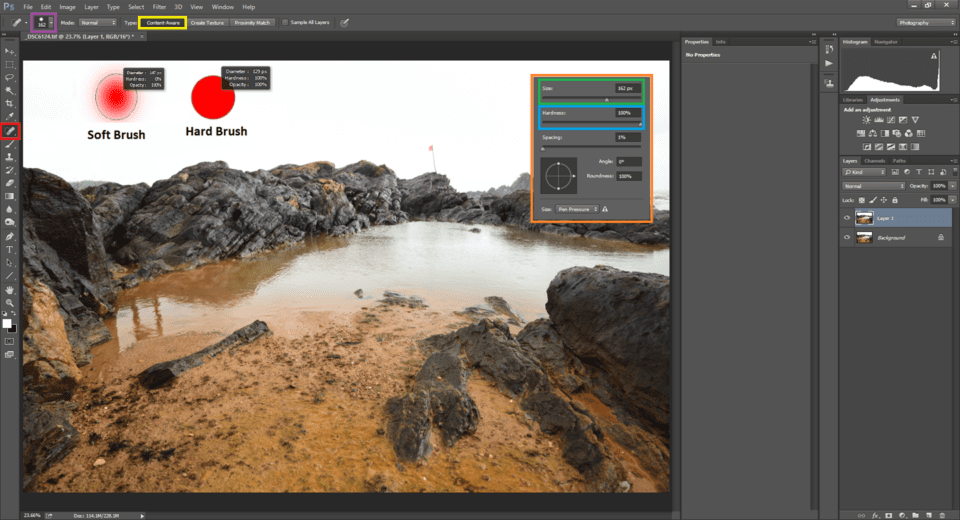
                To use it, click on the spot removal tool (marked red). Then in the properties, make sure Content Aware (marked yellow) is selected. This works for almost 90% of cases. By right clicking anywhere on the image or by clicking on the size drop down (marked purple), you get the size/hardness properties pallet (marked orange).

                Select the size (diameter in pixels) of the brush you want to use. Then increase or decrease the hardness of the brush. A hard brush will have sharp corners whereas a soft brush has smoothed out corners as shown in the image. Now once the necessary options are selected, drag the mouse over the patch that you want to remove.

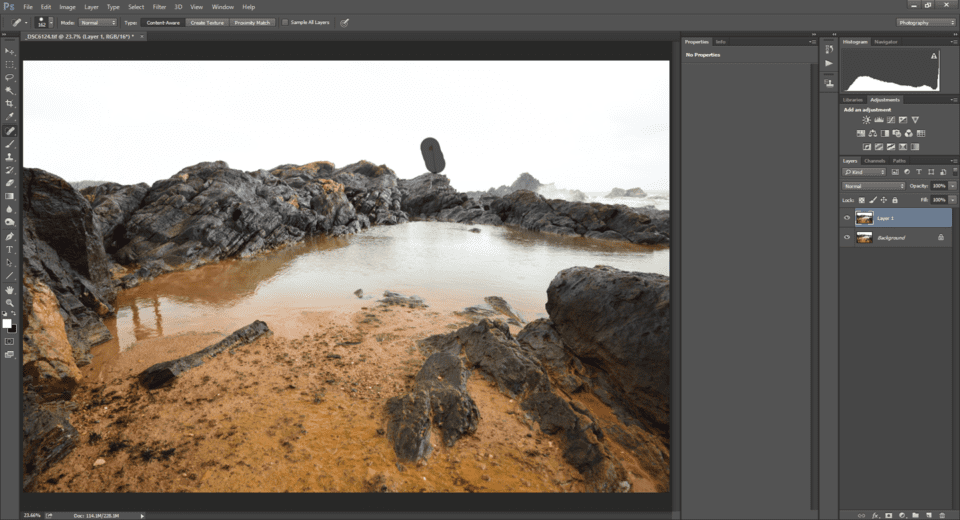
                Now you have your image without a trace of the flag in it. In this example, since the background is even, I have selected a hard brush. If it is an uneven patch, then a soft brush works best.

                Each photograph is unique and it dictates the hardness or the softness of the brush. A soft brush is likely to leave blurry corners when it touches a detailed part of the image. So make sure to adjust the brush size and the hardness that suits that particular part of the image.

                لاستخدامها، انقر على أداة إزالة البقع (باللون الأحمر). ثم في الخصائص، تأكد من تحديد Content Aware (المميز باللون الأصفر). وهذا ينجح في حوالي 90% من الحالات. من خلال النقر بزر الماوس الأيمن في أي مكان على الصورة أو من خلال النقر على القائمة المنسدلة للحجم (المميزة باللون الأرجواني)، تحصل على لوحة خصائص الحجم/الصلابة (المميزة باللون البرتقالي).

                حدد الحجم (القطر بالبكسل) للفرشاة التي تريد استخدامها. ثم قم بزيادة أو تقليل صلابة الفرشاة. سيكون للفرشاة الصلبة زوايا حادة بينما الفرشاة الناعمة تنعم الزوايا كما هو موضح في الصورة. الآن بمجرد تحديد الخيارات الضرورية، اسحب الماوس فوق التصحيح الذي تريد إزالته.


                الآن لديك صورتك بدون أثر للعلم فيها. في هذا المثال، نظرًا لأن الخلفية متساوية، فقد قمت باختيار فرشاة صلبة. إذا كانت البقعة غير مستوية، فإن الفرشاة الناعمة هي الأفضل.

                كل صورة فريدة من نوعها وتحدد صلابة أو نعومة الفرشاة. من المرجح أن تترك الفرشاة الناعمة زوايا ضبابية عندما تلامس جزءًا مفصلاً من الصورة. لذا تأكد من ضبط حجم الفرشاة والصلابة التي تناسب هذا الجزء المعين من الصورة.

                تعليق


                • #23
                  Clone Stamp Tool


                  This is an advanced version of the spot healing tool. The spot healing tool automatically heals the odd pixels by scanning the surrounding pixels. It works great when we have an even backdrop. But the Spot heal tool might not work all the time when we have distracting objects against complex backgrounds.

                  Instead of taking the reference context automatically, the clone tool lets us sample the source and replaces the target. By clicking on a source Spot while pressing the Alt / Option key lets you select a sample. Then all you have to do is paint it over the target. What Photoshop does is, it replaces the target pixels with the sample pixels. Most of the time a soft brush works for the clone stamp tool.
                  أداة ختم استنساخ

                  هذه نسخة متقدمة من أداة الشفاء الموضعي. تعمل أداة معالجة البقع على معالجة وحدات البكسل الفردية تلقائيًا عن طريق مسح وحدات البكسل المحيطة. إنه يعمل بشكل رائع عندما يكون لدينا خلفية متساوية. لكن أداة Spot Heal قد لا تعمل طوال الوقت عندما يكون لدينا كائنات مشتتة للانتباه على خلفيات معقدة.

                  بدلاً من أخذ السياق المرجعي تلقائيًا، تتيح لنا أداة الاستنساخ أخذ عينات من المصدر واستبدال الهدف. من خلال النقر على مصدر Spot أثناء الضغط على مفتاح Alt / Option يتيح لك تحديد عينة. ثم كل ما عليك فعله هو رسمه على الهدف. ما يفعله Photoshop هو أنه يستبدل وحدات البكسل المستهدفة بوحدات بكسل العينة. في معظم الأحيان، تعمل الفرشاة الناعمة مع أداة ختم النسخ.

                  تعليق


                  • #24
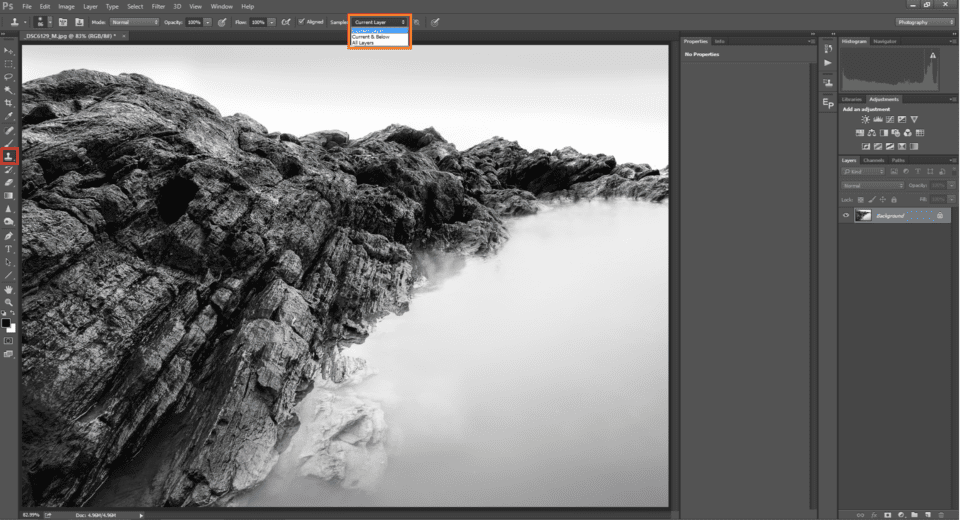
                    Most of the options in the properties window in the clone tool are similar to the spot healing tool. There is an extra option that we can choose called Sample (marked orange). You can tell Photoshop which layer to consider while taking samples . The default is the current layer.

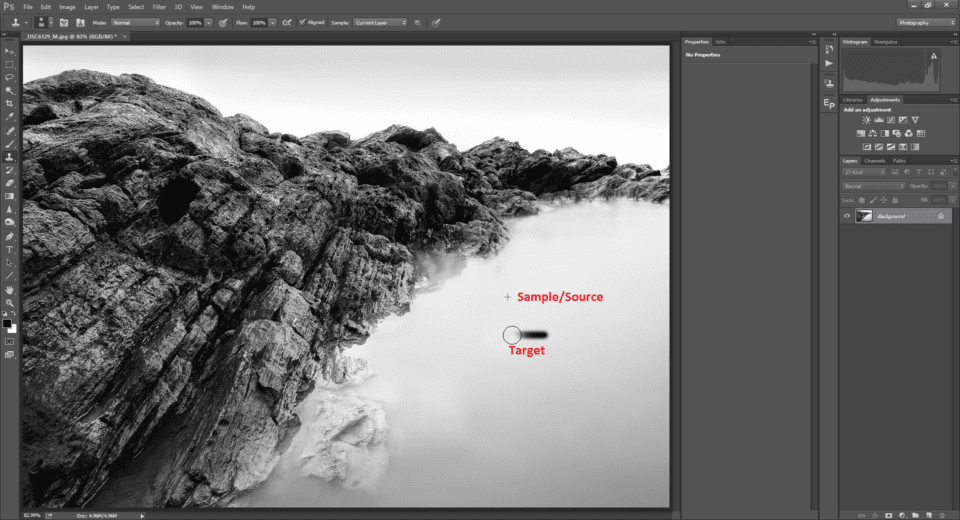
                    In the example above you can see that the tool copies the sample from the source and replaces the target with it. To choose a sample, click on the area that you want to sample while holding the Alt / Option key. As you move and paint the target, you can see that the sample moves parallel to the movement of the brush over the target. So usually taking multiple samples to get a seamless clone stamp works.
                    تشبه معظم الخيارات الموجودة في نافذة الخصائص في أداة الاستنساخ أداة المعالجة الموضعية. هناك خيار إضافي يمكننا اختياره يسمى العينة (باللون البرتقالي). يمكنك إخبار Photoshop بالطبقة التي يجب مراعاتها أثناء أخذ العينات. الافتراضي هو الطبقة الحالية.


                    في المثال أعلاه، يمكنك أن ترى أن الأداة تقوم بنسخ العينة من المصدر واستبدال الهدف بها. لاختيار عينة، انقر فوق المنطقة التي تريد أخذ عينة منها أثناء الضغط على مفتاح Alt / Option. أثناء قيامك بتحريك الهدف ورسمه، يمكنك أن ترى أن العينة تتحرك بالتوازي مع حركة الفرشاة فوق الهدف. لذلك عادةً ما يتم أخذ عينات متعددة للحصول على ختم استنساخ سلس.

                    تعليق


                    • #25
                      Brush Tool


                      The brush tool is one of the most useful tools in the tool palette. In a nutshell, the brush tool does exactly what a brush is supposed to do in the real world.

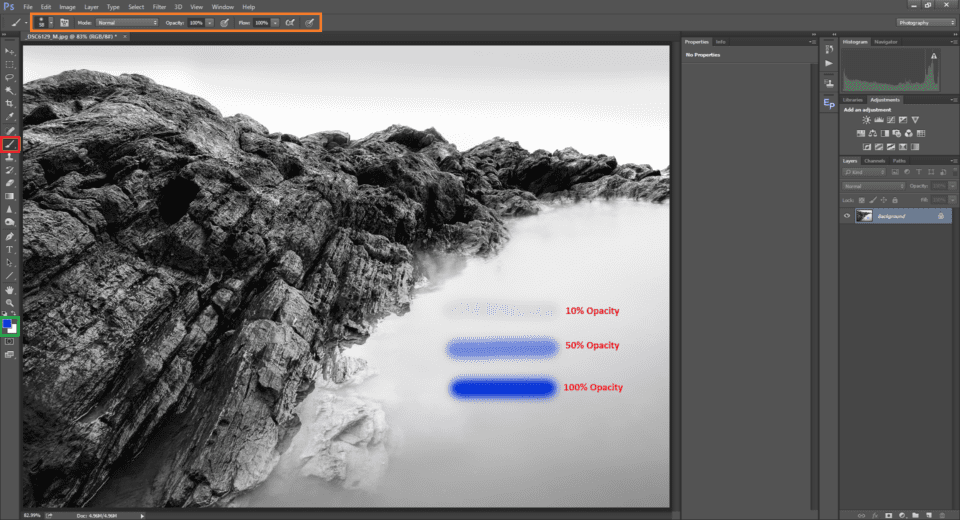
                      Select the brush tool (marked red in the image below), then select a foreground color (marked green) and then choose the brush size as we did with the Spot healing tool and choose the opacity. Opacity is the equivalent of hardness in the spot healing tool. The difference being, opacity signifies the strength of the brush. It simply paints the foreground color, for that particular opacity on your image.

                      Now why would anyone want to paint a solid color on a photograph? The application of brush tool goes beyond painting a solid color on a picture. We will revisit in a bit when we go through layer masks as that is where it gets all more useful for editing photographs.


                      أداة الفرشاة

                      تعد أداة الفرشاة واحدة من أكثر الأدوات المفيدة في لوحة الأدوات. باختصار، تقوم أداة الفرشاة بالضبط بما يفترض أن تفعله الفرشاة في العالم الحقيقي.

                      حدد أداة الفرشاة (المميزة باللون الأحمر في الصورة أدناه)، ثم حدد لون المقدمة (المميز باللون الأخضر) ثم اختر حجم الفرشاة كما فعلنا مع أداة Spot Healing واختر العتامة. العتامة تعادل الصلابة في أداة معالجة البقع. الفرق هو أن العتامة تشير إلى قوة الفرشاة. إنه ببساطة يرسم اللون الأمامي، لذلك التعتيم الخاص على صورتك.

                      الآن لماذا يريد أي شخص رسم لون خالص على صورة فوتوغرافية؟ يتجاوز تطبيق أداة الفرشاة مجرد رسم لون خالص على الصورة. سنعود مرة أخرى قليلًا عندما نستعرض أقنعة الطبقات حيث يصبح هذا مفيدًا أكثر لتحرير الصور الفوتوغرافية.


                      تعليق


                      • #26

                        Dodge and Burn Tool


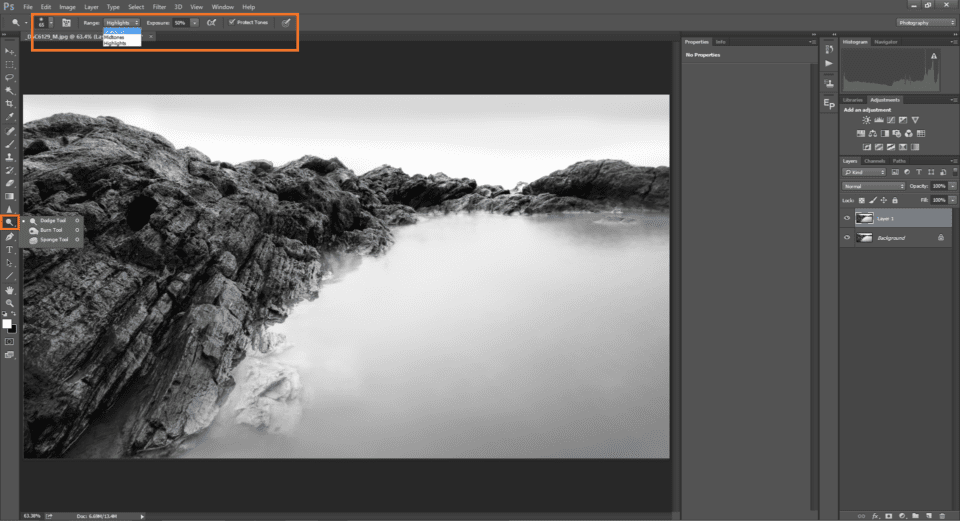
                        Dodging and burning is something most of us want to do for most of our images. What exactly is dodge and burn? To put it simply, dodge brightens whereas burn darkens.

                        In addition to dodge and burn, there is another sub-menu, sponge. The sponge tool, instead of brightening or darkening the pixels, changes the saturation. Once you select any of Dodge / burn / sponge tools, in the properties, you can select the range where you can specify which areas of your image will get affected (Highlights / Mid-tones / Shadows). The rest (brush size & opacity) is similar to what we did with the brush tool.


                        أداة دودج وحرق

                        يعد المراوغة والحرق أمرًا يرغب معظمنا في القيام به لمعظم صورنا. ما هو بالضبط دودج وحرق؟ بكل بساطة، دودج يضيء بينما يظلم الحرق.

                        بالإضافة إلى دودج وحرق، هناك قائمة فرعية أخرى، الإسفنج. تعمل أداة الإسفنج، بدلاً من تفتيح وحدات البكسل أو تغميقها، على تغيير التشبع. بمجرد تحديد أي من أدوات المراوغة / الحرق / الإسفنج، في الخصائص، يمكنك تحديد النطاق الذي يمكنك من خلاله تحديد مناطق صورتك التي ستتأثر (الإضاءات / الدرجات اللونية المتوسطة / الظلال). الباقي (حجم الفرشاة والتعتيم) مشابه لما فعلناه باستخدام أداة الفرشاة.

                        تعليق


                        • #27
                          Next, all we need to do is, just brush it over the areas where we want to dodge/burn. For example, if we select the burn tool and select Highlights in the Range, it will burn only the highlights in the areas that is brushed upon. The mid-tones and the shadows will be left untouched.

                          Similarly, if we use the dodge tool and select Shadows from the Range, only the shadows will be brightened. The mid-tones and highlights will be unaffected. When sponge tool is selected, instead of the range drop-down we get the Saturate / Desaturate option.


                          بعد ذلك، كل ما يتعين علينا القيام به هو فقط مسحه على المناطق التي نريد مراوغتها/حرقها. على سبيل المثال، إذا حددنا أداة الحرق وحددنا Highlights in the Range، فسوف يتم نسخ الإبرازات فقط في المناطق التي تم مسحها بالفرشاة. سيتم ترك النغمات المتوسطة والظلال دون تغيير.

                          وبالمثل، إذا استخدمنا أداة المراوغة وقمنا بتحديد الظلال من النطاق، فسيتم سطوع الظلال فقط. لن تتأثر النغمات المتوسطة والإبرازات. عند تحديد أداة الإسفنج، بدلاً من القائمة المنسدلة للنطاق نحصل على خيار Saturate / Desaturate.

                          تعليق


                          • #28
                            Global vs Local Adjustments


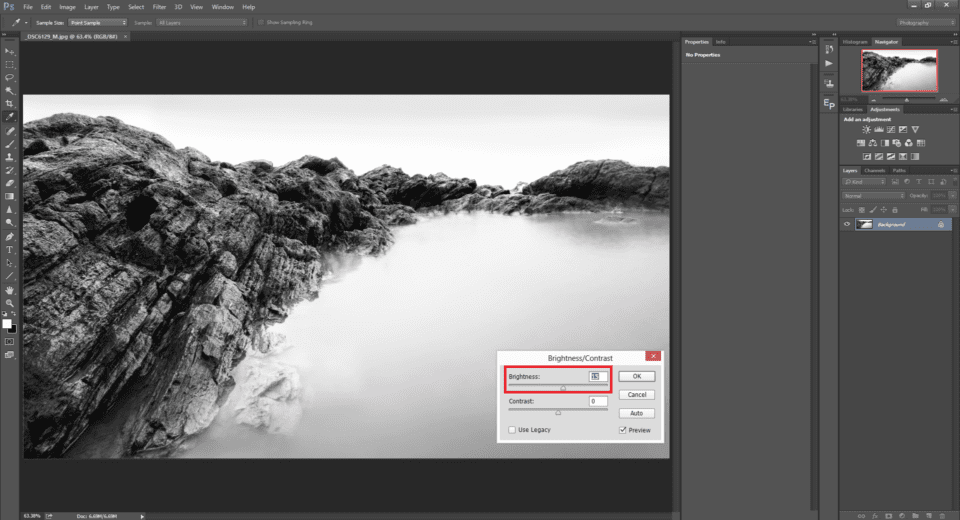
                            Let us say we need to increase the brightness of an image. Out of the many ways to do it is to go to the menu Image -> Adjustments -> Brightness / Contrast. You get a window with two sliders where you can increase or decrease the brightness or the contrast.

                            When you increase the brightness using this method, you can see that the brightness is applied to the entire image. This makes it a global adjustment. Compare this to dodging that we saw in the previous paragraph. Instead of dodging the entire image, we brush it over only selected areas of the image. Besides that, we applied it only to a specific range of the image namely Highlights, mid-tones or shadows. This approach of selectively applying an effect to a specific area of the is called local adjustment.


                            التعديلات العالمية مقابل التعديلات المحلية

                            لنفترض أننا بحاجة إلى زيادة سطوع الصورة. من بين الطرق العديدة للقيام بذلك، يمكنك الانتقال إلى القائمة Image -> Adjustments -> Brightness / Contrast. تحصل على نافذة تحتوي على شريطين تمرير حيث يمكنك زيادة أو تقليل السطوع أو التباين.

                            عند زيادة السطوع باستخدام هذه الطريقة، يمكنك أن ترى أن السطوع مطبق على الصورة بأكملها. وهذا يجعل من التكيف العالمي. قارن هذا بالتهرب الذي رأيناه في الفقرة السابقة. بدلاً من تفادي الصورة بأكملها، نقوم بتمشيطها على مناطق محددة فقط من الصورة. بالإضافة إلى ذلك، قمنا بتطبيقه فقط على نطاق معين من الصورة، أي الإبرازات أو الدرجات اللونية المتوسطة أو الظلال. يُطلق على هذا النهج المتمثل في تطبيق التأثير بشكل انتقائي على منطقة معينة اسم التعديل المحلي.

                            تعليق


                            • #29
                              There is another criteria that we might want to use where local adjustments work better than global adjustments. Let us say there are areas of the image where we need a stronger opacity and some areas where we need it subdued. In such situations, local adjustments are the way to go. To put it short, trying to recover shadow details in an image is a local adjustment whereas trying to add exposure to an entirely under-exposed image is global adjustment.


                              هناك معيار آخر قد نرغب في استخدامه عندما تكون التعديلات المحلية أفضل من التعديلات العالمية. لنفترض أن هناك مناطق في الصورة نحتاج فيها إلى عتامة أقوى وبعض المناطق التي نحتاج فيها إلى إخضاعها. في مثل هذه الحالات، التعديلات المحلية هي الحل الأمثل. باختصار، تعتبر محاولة استعادة تفاصيل الظل في صورة ما بمثابة تعديل محلي، في حين أن محاولة إضافة تعريض ضوئي إلى صورة قليلة التعرض للضوء تمامًا يعد تعديلًا عامًا.


                              تعليق


                              • #30
                                Layers

                                Layers are one of the primary reasons why many people stick to Photoshop. Most of you have probably heard about them and tried to understand what the fuss is all about. Let us recollect what we did with all the editing above. We selected a tool and applied it directly on the image, be it global or local.

                                But what if we did something wrong and we want to undo it? Yes we do have the history tool to do that. But unfortunately, all the editing we did after a particular undo point is wiped off. Above that, the history tool works as a temporary buffer.

                                Once you close Photoshop, the history is erased unless you save it as an action. If it is a long workflow, it really becomes painful. In another scenario, what if I feel I have to increase or decrease the effect of a previous edit.

                                طبقات

                                تعد الطبقات أحد الأسباب الرئيسية التي تجعل الكثير من الأشخاص يلتزمون ببرنامج Photoshop. ربما سمع معظمكم عنهم وحاولوا فهم سبب هذه الضجة. دعونا نتذكر ما فعلناه بكل التعديلات المذكورة أعلاه. لقد اخترنا أداة وطبقناها مباشرة على الصورة، سواء كانت عالمية أو محلية.

                                ولكن ماذا لو فعلنا شيئًا خاطئًا وأردنا التراجع عنه؟ نعم لدينا أداة التاريخ للقيام بذلك. لكن لسوء الحظ، يتم مسح كل التعديلات التي قمنا بها بعد نقطة تراجع معينة. علاوة على ذلك، تعمل أداة السجل كمخزن مؤقت.

                                بمجرد إغلاق Photoshop، يتم مسح السجل ما لم تقم بحفظه كإجراء. إذا كان سير العمل طويلاً، فإنه يصبح مؤلماً حقاً. في سيناريو آخر، ماذا لو شعرت أنه يتعين علي زيادة تأثير التعديل السابق أو تقليله.

                                تعليق

                                يعمل...
                                X