دليل المبتدئين إلى الفوتوشوب A Beginner’s Guide to Adobe Photoshop

تقليص
X
 
  • تصفية - فلترة
  • الوقت
  • عرض
إلغاء تحديد الكل
مشاركات جديدة

  • دليل المبتدئين إلى الفوتوشوب A Beginner’s Guide to Adobe Photoshop

    A Beginner’s Guide to Adobe Photoshop

    If you are new to Photoshop, this guide will help you get started

    Adobe Photoshop can be overwhelming to use for many beginner photographers. We decided to put together a detailed guide that goes over the basics of the most popular, and arguably most powerful post-processing tool on the market.
    Many of us have heard others say something like “This image is photoshopped” at least once. Even non-photographers use this phrase all the time when referring to digitally-manipulated images. In other words, Photoshop has become synonymous with post processing.


    دليل المبتدئين إلى أدوبي فوتوشوب

    إذا كنت مستخدمًا جديدًا لبرنامج Photoshop، فسيساعدك هذا الدليل على البدء

    يمكن أن يكون استخدام Adobe Photoshop مرهقًا للعديد من المصورين المبتدئين. قررنا أن نجمع دليلًا تفصيليًا يتناول أساسيات أداة ما بعد المعالجة الأكثر شيوعًا والأقوى في السوق.

    لقد سمع الكثير منا الآخرين يقولون شيئًا مثل "هذه الصورة تم تعديلها باستخدام برنامج Photoshop" مرة واحدة على الأقل. حتى غير المصورين يستخدمون هذه العبارة طوال الوقت عند الإشارة إلى الصور التي يتم التلاعب بها رقميًا. بمعنى آخر، أصبح Photoshop مرادفًا للمعالجة اللاحقة.

  • #2
    Table of Contentsجدول المحتويات

    تعقيد Photoshop Lightroom و Photoshop فتح صورة في Photoshop فتح ملف RAW توصيات الحفظ وتنسيق الملف أداة Photoshop Toolbox أداة القطع أداة شفاء البقع أداة ختم الاستنساخ أداة الفرشاة أداة المراوغة والحرق العالمية مقابل التعديلات المحلية الطبقات التعتيم طبقات الضبط أقنعة الطبقة أوضاع المزج المرشحات الكائنات الذكية الاستنتاج

    تعليق


    • #3
      The Complexity of Photoshop


      Even though there are many tools for processing an image, very few have come close to Photoshop in terms of features and functionality. Without a doubt, Photoshop is a vast and complex piece of software, and there are so many built-in and third party tools available for it, that it would be impossible to try to learn it all. In fact, Photoshop’s tools evolved so much over the years, that one could get similar results using very different tools.

      If you search online for a way how to get something done in Photoshop, you might be overwhelmed by what you find. In many cases, photographers end up showing a number of different techniques to get to the end result, which can be very confusing, especially for those who are starting out.

      تعقيد الفوتوشوب

      على الرغم من وجود العديد من الأدوات لمعالجة الصور، إلا أن القليل منها قد اقترب من Photoshop من حيث الميزات والوظائف. لا شك أن Photoshop عبارة عن برنامج ضخم ومعقد، وهناك العديد من الأدوات المضمنة وأدوات الطرف الثالث المتاحة له، بحيث يكون من المستحيل محاولة تعلمه بالكامل. في الواقع، تطورت أدوات Photoshop كثيرًا على مر السنين، بحيث يمكن للمرء الحصول على نتائج مماثلة باستخدام أدوات مختلفة تمامًا.

      إذا كنت تبحث عبر الإنترنت عن طريقة لإنجاز شيء ما في Photoshop، فقد يذهلك ما تجده. في كثير من الحالات، ينتهي الأمر بالمصورين إلى عرض عدد من التقنيات المختلفة للوصول إلى النتيجة النهائية، الأمر الذي قد يكون مربكًا للغاية، خاصة بالنسبة لأولئك الذين بدأوا مشوارهم.

      تعليق


      • #4
        This very nature of Photoshop demands a steep learning curve. I haven’t come across anyone who can say “I know everything in Photoshop”. Instead of trying to learn everything about the software, many of us choose to only learn the particular tools that we actually need on a day-to-day basis. This is the right way to learn Photoshop.

        Once we learn a particular tool in Photoshop, it does take time and practice to put it to use. It might be a slow process, but once you get used to it, the results are highly rewarding.

        So please keep in mind that this article is not meant to be a complete guide to Photoshop. Instead, I wrote this article as a foundation that hopefully makes it easier for our readers to understand some of the basics.

        تتطلب طبيعة Photoshop نفسها منحنى تعليميًا حادًا. لم أقابل أي شخص يمكنه أن يقول "أعرف كل شيء في Photoshop". بدلاً من محاولة تعلم كل شيء عن البرنامج، يختار الكثير منا تعلم الأدوات المحددة التي نحتاجها فعليًا على أساس يومي فقط. هذه هي الطريقة الصحيحة لتعلم الفوتوشوب.

        بمجرد أن نتعلم أداة معينة في Photoshop، يستغرق الأمر وقتًا وتدريبًا لاستخدامها. قد تكون عملية بطيئة، ولكن بمجرد أن تعتاد عليها، ستكون النتائج مجزية للغاية.

        لذا يرجى أن تضع في اعتبارك أن هذه المقالة لا تهدف إلى أن تكون دليلاً كاملاً لبرنامج Photoshop. بدلاً من ذلك، كتبت هذا المقال كأساس آمل أن يسهل على قرائنا فهم بعض الأساسيات.

        تعليق


        • #5
          Lightroom vs Photoshop


          Serious photographers rarely ever publish images straight out of their cameras, so the journey is usually started with basic post-processing tools like Lightroom. It is important to note that there is a huge difference between Lightroom and Photoshop when we open the software for the first time. With Lightroom, everything seems relatively easy to understand. With a bit of exploration, we can soon get familiar with the software.

          On the other hand, when we open Photoshop for the first time, we feel like we are in the middle of nowhere. All we see are unfamiliar tools, tabs and windows. Now most of us would have asked ourselves “When I have Lightroom why would I ever need Photoshop?”

          The answer is, almost everything that is in Lightroom is available in Photoshop. But Lightroom cannot even do 10% of what Photoshop is capable of. The difference between Lightroom and Photoshop is similar to the difference between riding a bike vs driving a race car. It is vast. However, most photographer’s won’t care for the features that are not relevant to them, such as inserting 3D graphics, editing videos or running specialized filters.

          لايت روم مقابل فوتوشوب

          نادرًا ما ينشر المصورون الجادون الصور مباشرة من كاميراتهم، لذلك تبدأ الرحلة عادةً باستخدام أدوات ما بعد المعالجة الأساسية مثل Lightroom. من المهم ملاحظة أن هناك فرقًا كبيرًا بين Lightroom وPhotoshop عندما نفتح البرنامج لأول مرة. مع Lightroom، يبدو كل شيء سهل الفهم نسبيًا. مع القليل من الاستكشاف، يمكننا قريبًا التعرف على البرنامج.

          من ناحية أخرى، عندما نفتح Photoshop لأول مرة، نشعر وكأننا في مكان مجهول. كل ما نراه هو أدوات وعلامات تبويب ونوافذ غير مألوفة. الآن قد يسأل معظمنا أنفسنا "عندما أستخدم Lightroom، لماذا سأحتاج إلى Photoshop؟"

          الإجابة هي أن كل ما هو موجود في Lightroom تقريبًا متاح في Photoshop. لكن Lightroom لا يمكنه حتى تنفيذ 10% مما يستطيع Photoshop القيام به. الفرق بين Lightroom و Photoshop يشبه الفرق بين ركوب الدراجة وقيادة سيارة السباق. إنها واسعة. ومع ذلك، فإن معظم المصورين لا يهتمون بالميزات التي لا تتعلق بهم، مثل إدراج رسومات ثلاثية الأبعاد أو تحرير مقاطع الفيديو أو تشغيل المرشحات المتخصصة.

          تعليق


          • #6
            Lightroom is pretty simple and has most of the functionality that is relevant to photographers. It has built-in functionality for image editing, but it is also a pretty powerful photo organizing tool, which Photoshop is not.

            Also, Lightroom is “non-destructive” by nature, which means that all the changes you make to images do not get written on the image itself, but rather into the Lightroom database. Whether you shoot in RAW or JPEG, the original image is always intact. In contrast, whenever you open an image in Photoshop, it has already been demosaiced and flattened, so if you make a change to it and save the document, it will either overwrite the original image (in case of JPEG), or create a new file.

            The bottom-line is, if you are going to make simple edits like adding or removing a few stops of light, adding contrast or saturation, sharpening or basic blurring, Lightroom does the job. If you want to take your editing skills to a new level and gain access to a whole suite of superb tools, then you have to get into Photoshop.

            If you subscribe to Adobe’s Creative Cloud Photography plan, you get both Photoshop and Lightroom. They are meant to coexist in harmony, so that you can jump between the two when needed. For example, if you make some basic edits in Lightroom, then open it in Photoshop through Lightroom, you will see all the changes you made in Lightroom within Photoshop. Once you save your changes in Photoshop, it will automatically import the adjusted image into Lightroom.

            To find out more about the differences between the two, check out our Lightroom vs Photoshop article.
            Lightroom بسيط جدًا ويحتوي على معظم الوظائف ذات الصلة بالمصورين. يحتوي على وظائف مدمجة لتحرير الصور، ولكنه أيضًا أداة قوية جدًا لتنظيم الصور، وهو ليس كذلك في Photoshop.

            كما أن Lightroom هو "غير مدمر" بطبيعته، مما يعني أن جميع التغييرات التي تجريها على الصور لا تتم كتابتها على الصورة نفسها، بل في قاعدة بيانات Lightroom. سواء قمت بالتصوير بصيغة RAW أو JPEG، تظل الصورة الأصلية سليمة دائمًا. في المقابل، عندما تفتح صورة في Photoshop، تكون قد تم بالفعل تفكيكها وتسويتها، لذلك إذا قمت بإجراء تغيير عليها وحفظت المستند، فسوف تقوم إما بالكتابة فوق الصورة الأصلية (في حالة JPEG)، أو إنشاء صورة جديدة ملف.

            خلاصة القول هي، إذا كنت ستقوم بإجراء تعديلات بسيطة مثل إضافة أو إزالة بضع توقفات من الضوء، أو إضافة التباين أو التشبع، أو الوضوح أو التمويه الأساسي، فإن Lightroom يقوم بهذه المهمة. إذا كنت تريد الارتقاء بمهاراتك في التحرير إلى مستوى جديد والوصول إلى مجموعة كاملة من الأدوات الرائعة، فعليك الدخول إلى برنامج Photoshop.

            إذا اشتركت في خطة Creative Cloud Photography من Adobe، فستحصل على كل من Photoshop وLightroom. من المفترض أن يتعايشا في وئام، بحيث يمكنك القفز بينهما عند الحاجة. على سبيل المثال، إذا قمت بإجراء بعض التعديلات الأساسية في Lightroom، ثم قمت بفتحه في Photoshop من خلال Lightroom، فسترى جميع التغييرات التي أجريتها في Lightroom داخل Photoshop. بمجرد حفظ التغييرات في Photoshop، سيتم استيراد الصورة المعدلة تلقائيًا إلى Lightroom.

            لمعرفة المزيد حول الاختلافات بين الاثنين، راجع مقالتنا عن Lightroom وPhotoshop.

            تعليق


            • #7
              Opening an Image in Photoshop


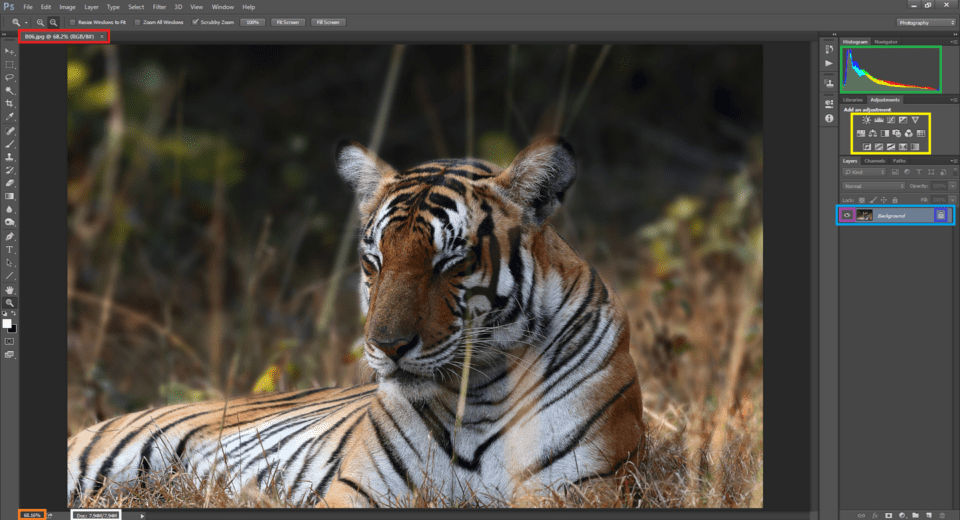
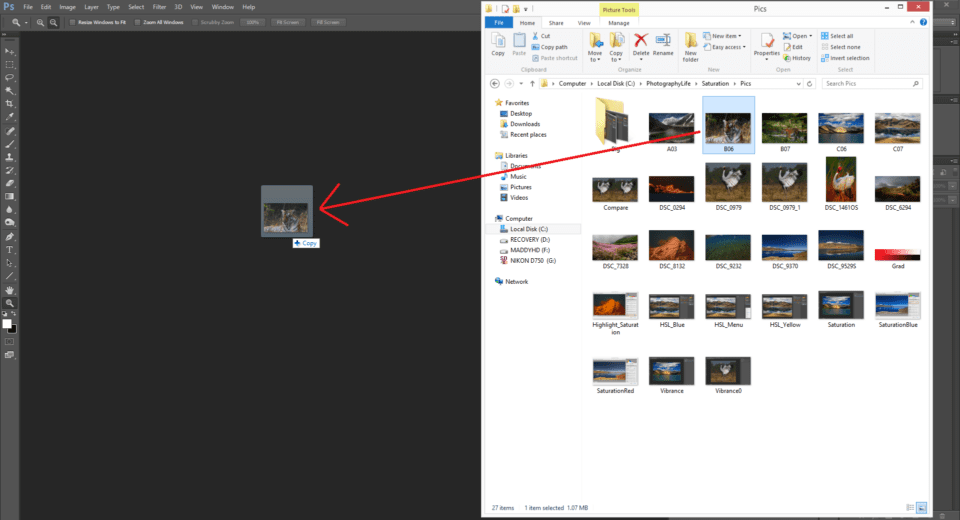
              As mentioned above, you can either open an image from Lightroom with all the tweaks that you made visible in Photoshop, or you can open an image directly in Photoshop. As I have mentioned earlier, there is more than one way to do a single task in Photoshop. I am going to explain only the one which is the simplest one I personally use. The most widely used way of opening an image in Photoshop is just dragging the image from into the Photoshop window, as shown below:

              Once you open a picture in Photoshop, you see a tab on the upper left (marked in red) with the name of the image. You can also open multiple image documents which will be opened as tabs. On the bottom left, you see the crop percentage (marked in orange). You can zoom in (by pressing Control/Command and +) or zoom out (by pressing the Control/Command and -) to either see the entire picture, or to pixel peep at 100% crop ratio.

              فتح صورة في برنامج فوتوشوب

              كما ذكرنا أعلاه، يمكنك إما فتح صورة من Lightroom مع كل التعديلات التي جعلتها مرئية في Photoshop، أو يمكنك فتح الصورة مباشرة في Photoshop. كما ذكرت سابقًا، هناك أكثر من طريقة للقيام بمهمة واحدة في Photoshop. سأشرح فقط الطريقة الأبسط التي أستخدمها شخصيًا. الطريقة الأكثر استخدامًا لفتح صورة في Photoshop هي فقط سحب الصورة من نافذة Photoshop، كما هو موضح أدناه:


              بمجرد فتح صورة في Photoshop، ترى علامة تبويب في الجزء العلوي الأيسر (مميزة باللون الأحمر) تحمل اسم الصورة. يمكنك أيضًا فتح مستندات صور متعددة سيتم فتحها كعلامات تبويب. في أسفل اليسار، ترى نسبة الاقتصاص (باللون البرتقالي). يمكنك التكبير (بالضغط على Control/Command و+) أو التصغير (بالضغط على Control/Command و-) إما لرؤية الصورة بأكملها، أو لرؤية الصورة بالبكسل بنسبة اقتصاص 100%.

              تعليق


              • #8
                Pressing Control/Command + 0 fits the image to the workspace while pressing Control/Command + 1 gets it to 100% crop. While using Ps try to memorize the keyboard shortcuts as they help make things easier and faster.

                Next to it is the file size display (marked white). Depending on the type of file you are working with, the size of the file increases substantially. For example, the size of a 24MP full frame RAW file would approximately be 30 MB. The same file can go up to 1 GB if you add a dozen layers added to it. We will get to layers in just a bit.

                When you convert it into a JPEG of the same resolution, you might end up with a 8-12 MB file. For every layer you add to a Photoshop document, the size of the file increases in multiples of the size of the base layer.


                يؤدي الضغط على Control/Command + 0 إلى ملاءمة الصورة لمساحة العمل بينما يؤدي الضغط على Control/Command + 1 إلى اقتصاصها بنسبة 100%. أثناء استخدام Ps، حاول حفظ اختصارات لوحة المفاتيح لأنها تساعد في جعل الأمور أسهل وأسرع.


                بجانبه يوجد عرض حجم الملف (باللون الأبيض). اعتمادًا على نوع الملف الذي تعمل به، يزداد حجم الملف بشكل كبير. على سبيل المثال، سيكون حجم ملف RAW كامل الإطار بدقة 24 ميجابكسل حوالي 30 ميجابايت. يمكن أن يصل حجم الملف نفسه إلى 1 غيغابايت إذا أضفت إليه عشرات الطبقات. سنصل إلى الطبقات بعد قليل.

                عند تحويله إلى ملف JPEG بنفس الدقة، قد ينتهي بك الأمر بملف يتراوح حجمه بين 8 و12 ميغابايت. لكل طبقة تضيفها إلى مستند Photoshop، يزداد حجم الملف بمضاعفات حجم الطبقة الأساسية.

                تعليق


                • #9
                  On the right upper corner, you see an RGB Histogram (marked with green). Right below it, is the Adjustment toolbox (marked yellow). Below it, marked with blue, is your current layer selected inside the Layers tab. On the left you can see an eye icon (marked purple) which can be toggled. Once you click, the eye symbol appears, which means the corresponding layer is visible.

                  When you click it again, the eye symbol disappears which means the corresponding layer becomes invisible. On the other end, marked with indigo is a lock symbol meaning the layer is locked. It means, certain tweaks cannot be applied directly to the layer.


                  في الزاوية العلوية اليمنى، ترى الرسم البياني RGB (مميز باللون الأخضر). يوجد أسفله مباشرة صندوق أدوات التعديل (باللون الأصفر). أسفلها، باللون الأزرق، توجد الطبقة الحالية المحددة داخل علامة التبويب "الطبقات". على اليسار يمكنك رؤية أيقونة العين (المميزة باللون الأرجواني) والتي يمكن تبديلها. بمجرد النقر، يظهر رمز العين، مما يعني أن الطبقة المقابلة مرئية.

                  عند النقر عليها مرة أخرى، يختفي رمز العين مما يعني أن الطبقة المقابلة تصبح غير مرئية. على الجانب الآخر، تم وضع علامة باللون النيلي وهو رمز قفل يعني أن الطبقة مقفلة. وهذا يعني أنه لا يمكن تطبيق بعض التعديلات مباشرة على الطبقة.

                  تعليق


                  • #10
                    Opening a RAW file


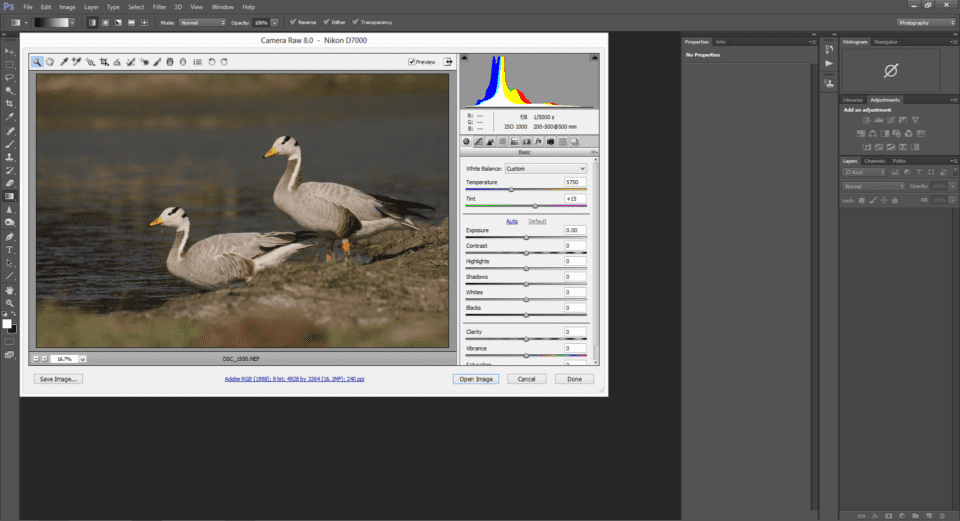
                    The above holds true if we are opening a .psd, .tiff, .jpg or any other image format that Photoshop can read. But that is not what we often want to open in Photoshop. Most of us shoot RAW and once we decide an image has to be edited to some extent, we have to shoot RAW. When we try to open a RAW file in Photoshop, instead of just opening the file directly as it does with a TIFF or a JPEG, Photoshop does something extra.

                    Once you drag a RAW file into Photoshop, you see a new window with the title “Camera Raw”. This is Adobe’s specialized tool for reading and editing RAW files. If you are already familiar with Lightroom, ACR’s (Adobe Camera Raw) layout will not look alien.

                    ACR gives you some basic functionality that is pretty similar to what you find in Lightroom. But do note that, if you have the latest camera but you do not have the ACR update that includes that camera model, you will not be able to open the RAW files from that camera.
                    فتح ملف RAW

                    ينطبق ما ورد أعلاه إذا كنا نفتح تنسيق .psd أو .tiff أو .jpg أو أي تنسيق صورة آخر يمكن لبرنامج Photoshop قراءته. ولكن هذا ليس ما نريد غالبًا فتحه في Photoshop. يقوم معظمنا بتصوير RAW وبمجرد أن نقرر أنه يجب تحرير الصورة إلى حد ما، يتعين علينا تصوير RAW. عندما نحاول فتح ملف RAW في Photoshop، بدلاً من مجرد فتح الملف مباشرةً كما هو الحال مع ملف TIFF أو JPEG، يقوم Photoshop بشيء إضافي.


                    بمجرد سحب ملف RAW إلى Photoshop، ستظهر لك نافذة جديدة بعنوان "Camera Raw". هذه هي أداة Adobe المتخصصة لقراءة ملفات RAW وتحريرها. إذا كنت معتادًا على استخدام Lightroom، فلن يبدو تخطيط ACR (Adobe Camera Raw) غريبًا.

                    يمنحك ACR بعض الوظائف الأساسية التي تشبه إلى حد كبير ما تجده في Lightroom. لكن لاحظ أنه إذا كان لديك أحدث كاميرا ولكن ليس لديك تحديث ACR الذي يتضمن طراز الكاميرا هذا، فلن تتمكن من فتح ملفات RAW من تلك الكاميرا.

                    تعليق


                    • #11
                      In such cases, you have two options. The first option is to use Adobe’s RAW to DNG converter, which is available for free. Once you convert images to DNG format, you will be able to open them even in older versions of Adobe Camera RAW.

                      If Adobe has not yet provided support for your camera, you will need to resort to the second option, which is to use the proprietary software that came with your camera in order to convert the RAW file to something Photoshop can read, such as TIFF.

                      Also note that while editing an image, you will need maximum possible data to work with. That is one of the primary reasons why we shoot in RAW, isn’t it? If you convert it to a JPEG, you are left with 8-bits of data to work with. But if you choose TIFF or preferably a format like DNG, you can work with all the original data without losing anything.


                      في مثل هذه الحالات، لديك خياران. الخيار الأول هو استخدام محول Adobe RAW إلى DNG، وهو متاح مجانًا. بمجرد تحويل الصور إلى تنسيق DNG، ستتمكن من فتحها حتى في الإصدارات الأقدم من Adobe Camera RAW.

                      إذا لم تقدم Adobe الدعم للكاميرا الخاصة بك بعد، فستحتاج إلى اللجوء إلى الخيار الثاني، وهو استخدام البرنامج الاحتكاري المرفق مع الكاميرا الخاصة بك لتحويل ملف RAW إلى شيء يمكن لـ Photoshop قراءته، مثل TIFF.

                      لاحظ أيضًا أنه أثناء تحرير الصورة، ستحتاج إلى أقصى قدر ممكن من البيانات للعمل معها. هذا هو أحد الأسباب الرئيسية التي تجعلنا نصور بصيغة RAW، أليس كذلك؟ إذا قمت بتحويله إلى تنسيق JPEG، فسيتبقى لديك 8 بتات من البيانات للعمل عليها. ولكن إذا اخترت TIFF أو تفضل تنسيقًا مثل DNG، فيمكنك العمل مع جميع البيانات الأصلية دون فقدان أي شيء.


                      تعليق


                      • #12
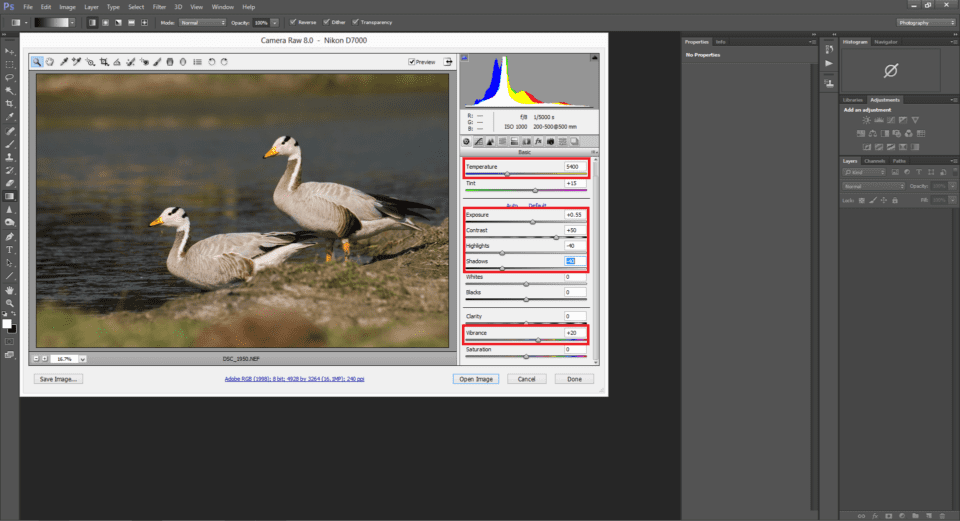
                        For the above opened image, I made some basic tweaks in ACR. In addition to adding a bit of exposure, contrast and saturation, there is another important fix that is advised to be made in ACR, Lens Correction.

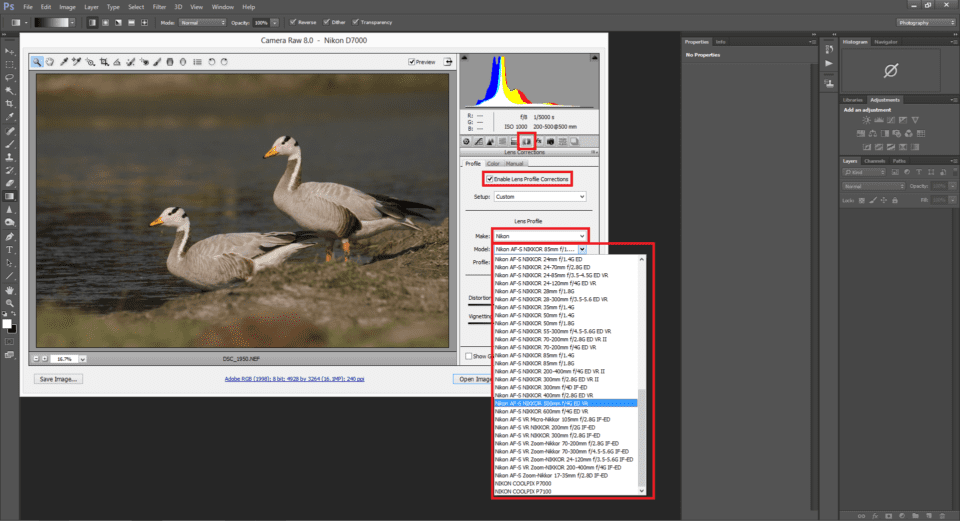
                        ACR provides built-in profiles for correcting lens specific issues like distortion, chromatic aberration and vignetting. Again, a corresponding ACR profile has to be available for that particular lens. Outdated ACRs cannot do this and you have to try making adjustments manually. Once you find your lens profile in ACR, select the camera model & the lens, and ACR will apply that particular profile to your image.

                        Once done, click on “Open image” and the RAW file will be opened in Photoshop with the adjustments in ACR applied to it.


                        بالنسبة للصورة المفتوحة أعلاه، قمت بإجراء بعض التعديلات الأساسية في ACR. بالإضافة إلى إضافة القليل من التعريض والتباين والتشبع، هناك إصلاح مهم آخر ينصح بإجرائه في ACR، وهو تصحيح العدسة.

                        يوفر ACR ملفات تعريف مدمجة لتصحيح المشكلات الخاصة بالعدسة مثل التشويه والانحراف اللوني والتظليل. مرة أخرى، يجب أن يكون ملف تعريف ACR المطابق متاحًا لتلك العدسة المحددة. لا تستطيع أجهزة ACR القديمة القيام بذلك وعليك محاولة إجراء التعديلات يدويًا. بمجرد العثور على ملف تعريف العدسة الخاص بك في ACR، حدد طراز الكاميرا والعدسة، وسيقوم ACR بتطبيق ملف التعريف هذا على صورتك.


                        بمجرد الانتهاء من ذلك، انقر فوق "فتح الصورة" وسيتم فتح ملف RAW في Photoshop مع تطبيق التعديلات في ACR عليه.

                        تعليق


                        • #13
                          Saving & File Format Recommendations


                          Once you are done with your editing, as with most other software, to save a file for the first time, or as a new copy, go to File -> Save As. This lets you choose the type of file which you want your work to be saved as.

                          I would recommend one of the two file types: Photoshop (*.PSD, *.PDD) or TIFF (*.TIF, *.TIFF). Photoshop PSD files can only be opened in Photoshop, whereas TIFF is a format that most image viewing and editing software recognize.


                          توصيات بشأن الحفظ وتنسيق الملف

                          بمجرد الانتهاء من عملية التحرير، كما هو الحال مع معظم البرامج الأخرى، لحفظ ملف لأول مرة، أو كنسخة جديدة، انتقل إلى ملف -> حفظ باسم. يتيح لك ذلك اختيار نوع الملف الذي تريد حفظ عملك به.

                          أوصي بأحد نوعي الملفات: Photoshop (*.PSD، *.PDD) أو TIFF (*.TIF، *.TIFF). لا يمكن فتح ملفات Photoshop PSD إلا في Photoshop، في حين أن TIFF هو تنسيق تتعرف عليه معظم برامج عرض الصور وتحريرها.

                          تعليق


                          • #14
                            Certainly they will lead to considerable increase in file size, but both formats hold maximum possible data. I personally prefer TIFF as I use Nikon’s Capture NX-D instead of ACR. I export RAW files as 16-bit full resolution TIFF in NX-D and open that TIFF file in Photoshop. If you are not going to print and you are planning to use the image primarily for the web, 8-bit TIFF should be sufficient.

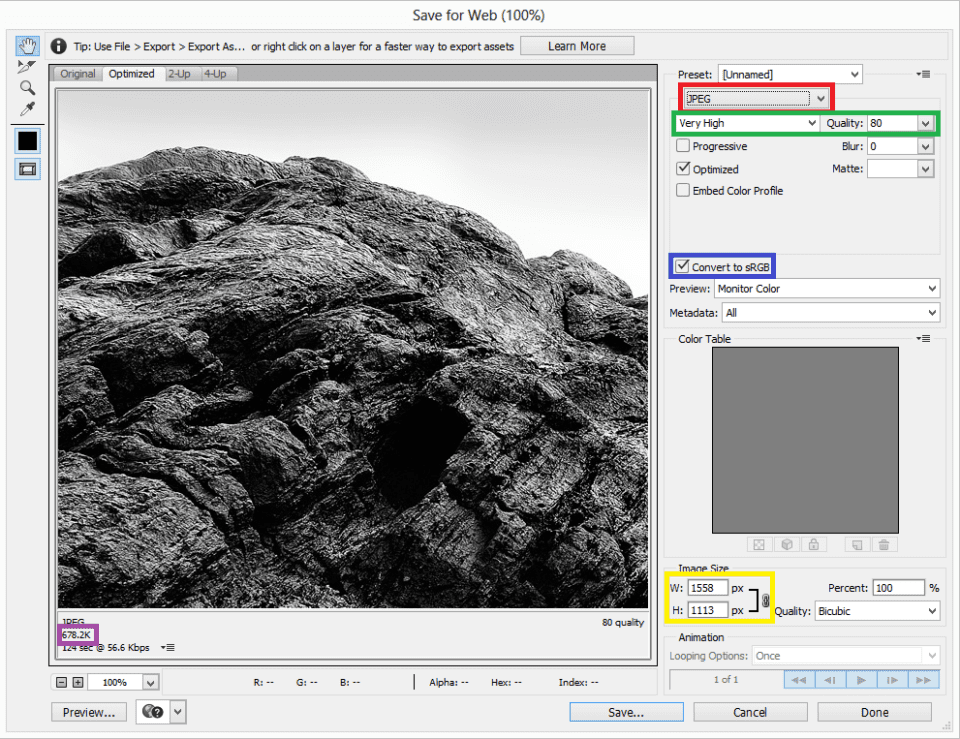
                            Generally, you will be saving two copies of every image. One as a PSD or as TIFF that has all the data, and one more as JPEG for web use. If you are using a version of Photoshop above CC 2015, you can save as JPEG using File -> Export -> Save for Web (legacy). A new window pops up. Make sure the image format selected is JPEG (marked red).
                            من المؤكد أنها ستؤدي إلى زيادة كبيرة في حجم الملف، لكن كلا التنسيقين يحتفظان بأقصى قدر ممكن من البيانات. أنا شخصيًا أفضل TIFF لأنني أستخدم Capture NX-D من Nikon بدلاً من ACR. أقوم بتصدير ملفات RAW بتنسيق TIFF بدقة كاملة 16 بت في NX-D وفتح ملف TIFF هذا في Photoshop. إذا كنت لن تقوم بالطباعة وكنت تخطط لاستخدام الصورة بشكل أساسي للويب، فيجب أن يكون TIFF 8 بت كافيًا.


                            بشكل عام، سوف تقوم بحفظ نسختين من كل صورة. واحد كملف PSD أو TIFF يحتوي على جميع البيانات، وواحد آخر بتنسيق JPEG لاستخدام الويب. إذا كنت تستخدم إصدارًا من Photoshop أعلى من CC 2015، فيمكنك حفظه بتنسيق JPEG باستخدام ملف -> تصدير -> حفظ للويب (قديم). نافذة جديدة تنبثق. تأكد من أن تنسيق الصورة المحدد هو JPEG (باللون الأحمر).

                            تعليق


                            • #15
                              Next, you can choose the image quality (marked green), from Low to Maximum, depending on how much data you want to preserve in the resulting JPEG image. Basically, the higher the image quality, the larger the file size due to different lossy compression levels. You can see the corresponding file size on the bottom left corner (marked purple).

                              Once you choose the quality, make sure “Convert to sRGB” is checked. Then you can type in the desired resolution (marked yellow). Generally, a resolution of 2048 on the longer side of the image is sufficient. Make sure the link icon is checked, as it automatically adjusts the other side of the image corresponding to the set aspect ratio. Then click on “Save…” to save a JPEG copy of the edited image.

                              In addition to PSD, TIFF and JPEG, there is another format that is worth knowing, namely PNG. The primary difference between PNG and JPEG is the ability to preserve transparency. PNG can do that, but JPEG cannot. For example, if you are planning to make a transparent logo that can be inserted on top of other images, it is best to save it in PNG format rather than JPEG.


                              بعد ذلك، يمكنك اختيار جودة الصورة (المميزة باللون الأخضر)، من منخفضة إلى الحد الأقصى، اعتمادًا على مقدار البيانات التي تريد الاحتفاظ بها في صورة JPEG الناتجة. في الأساس، كلما ارتفعت جودة الصورة، زاد حجم الملف بسبب اختلاف مستويات الضغط المفقودة. يمكنك رؤية حجم الملف المقابل في الزاوية اليسرى السفلية (باللون الأرجواني).

                              بمجرد اختيار الجودة، تأكد من تحديد خيار "التحويل إلى sRGB". ثم يمكنك كتابة الدقة المطلوبة (باللون الأصفر). بشكل عام، دقة 2048 على الجانب الأطول من الصورة تكون كافية. تأكد من تحديد رمز الرابط، لأنه يقوم تلقائيًا بضبط الجانب الآخر من الصورة بما يتوافق مع نسبة العرض إلى الارتفاع المحددة. ثم انقر فوق "حفظ..." لحفظ نسخة JPEG من الصورة المعدلة.

                              بالإضافة إلى PSD وTIFF وJPEG، هناك تنسيق آخر يستحق المعرفة، وهو PNG. الفرق الأساسي بين PNG وJPEG هو القدرة على الحفاظ على الشفافية. يمكن لـ PNG القيام بذلك، لكن JPEG لا يمكنه ذلك. على سبيل المثال، إذا كنت تخطط لإنشاء شعار شفاف يمكن إدراجه فوق الصور الأخرى، فمن الأفضل حفظه بتنسيق PNG بدلاً من JPEG.

                              تعليق

                              يعمل...
                              X