ما هو ISO؟ الدليل الكامل للمبتدئين What is ISO? The Complete Guide for Beginners

تقليص
X
 
  • تصفية - فلترة
  • الوقت
  • عرض
إلغاء تحديد الكل
مشاركات جديدة

  • #16
    رؤية منخفضة مقابل ضوضاء iso عالية

    لإعطاء مثال على صورتين تم التقاطهما بقيم iso مختلفة، قم بإلقاء نظرة على المقارنة أدناه. انتبه إلى مستوى الضوضاء (التحبب والألوان المبقعة) في الصور:

    [ATTACH=JSON]n170677[/ATTACH]
    الفرق واضح - الصورة عند iso 3200 بها ضوضاء أكثر بكثير من تلك الموجودة عند iso 200 (والتي قمت بتفتيحها باستخدام سرعة غالق طويلة بدلاً من ذلك). ولهذا السبب يجب عليك تجنب قيم iso العالية كلما أمكن ذلك، إلا إذا تطلبت الظروف استخدامها.

    تعليق


    • #17
      How to Change ISO


      Changing ISO varies from camera to camera. Here are some common ways to change ISO:
      • To start, enter a mode that lets you select the ISO yourself. Get out of Auto mode, and go to Manual, Shutter Priority, Aperture Priority, or Program (we tend to prefer Aperture Priority or Manual).
      • For entry-level DSLRs and mirrorless cameras, you probably need to open a menu (possibly the “quick menu”) and find the section for ISO. Select the value you want, or set it to Auto.
      • For higher-end cameras, there may be a dedicated “ISO” button on the camera. Press it while spinning one of the wheels to change your ISO setting. If you don’t see a button labeled “ISO”, it is still possible that your camera will let you program one to perform this task.
      • Other cameras may have a dedicated wheel that already has various ISO settings marked. This makes things even easier.

      Check your camera manual if you still aren’t sure. However, it is worth being very familiar with how to change your ISO setting quickly, since it’s something you will likely be adjusting quite often, especially if you shoot in low light conditions without a tripod or flash.

      تعليق


      • #18
        كيفية تغيير iso

        يختلف تغيير iso من كاميرا إلى أخرى. فيما يلي بعض الطرق الشائعة لتغيير iso:

        للبدء، أدخل الوضع الذي يتيح لك تحديد iso بنفسك. اخرج من الوضع التلقائي، وانتقل إلى يدوي، أو أولوية الغالق، أو أولوية فتحة العدسة، أو البرنامج (نميل إلى تفضيل أولوية فتحة العدسة أو يدوي). بالنسبة إلى كاميرات dslr للمبتدئين والكاميرات التي لا تحتوي على مرايا، ربما تحتاج إلى فتح قائمة (ربما " القائمة السريعة") وابحث عن القسم الخاص بـ iso. حدد القيمة التي تريدها، أو اضبطها على تلقائي. بالنسبة للكاميرات المتطورة، قد يكون هناك زر "iso" مخصص على الكاميرا. اضغط عليه أثناء تدوير إحدى العجلات لتغيير إعداد iso الخاص بك. إذا كنت لا ترى الزر المسمى "iso"، فلا يزال من الممكن أن تسمح لك الكاميرا الخاصة بك ببرمجة زر للقيام بهذه المهمة. قد تحتوي الكاميرات الأخرى على عجلة مخصصة تحتوي بالفعل على إعدادات iso مختلفة تم وضع علامة عليها. وهذا يجعل الأمور أسهل.

        تحقق من دليل الكاميرا إذا كنت لا تزال غير متأكد. ومع ذلك، من المفيد أن تكون على دراية بكيفية تغيير إعداد iso بسرعة، لأنه شيء من المحتمل أن تقوم بتعديله كثيرًا، خاصة إذا كنت تقوم بالتصوير في ظروف الإضاءة المنخفضة بدون حامل ثلاثي القوائم أو فلاش.

        تعليق


        • #19
          What Camera ISO Should You Use?


          Many photographers understand the basics of ISO, but they aren’t sure which ISO value to actually pick in the field. In practice, there’s a reason why your camera allows such a wide range of ISO settings: Different situations call for different ISOs. Below, we will cover some of the common scenarios you may come across

          تعليق


          • #20
            ما هي الكاميرا iso التي يجب عليك استخدامها؟

            يفهم العديد من المصورين أساسيات iso، لكنهم غير متأكدين من قيمة iso التي يجب اختيارها فعليًا في هذا المجال. من الناحية العملية، هناك سبب وراء سماح الكاميرا بنطاق واسع من إعدادات iso: المواقف المختلفة تتطلب قيم iso مختلفة. أدناه، سنغطي بعض السيناريوهات الشائعة التي قد تصادفك

            تعليق


            • #21
              When to Use Low ISO


              As discussed above, you should always try to stick to the lowest ISO (base ISO) of your camera, which is typically ISO 100 or 200, whenever you can. If there is plenty of light, you are free to use a low ISO and minimize the appearance of noise as much as possible.

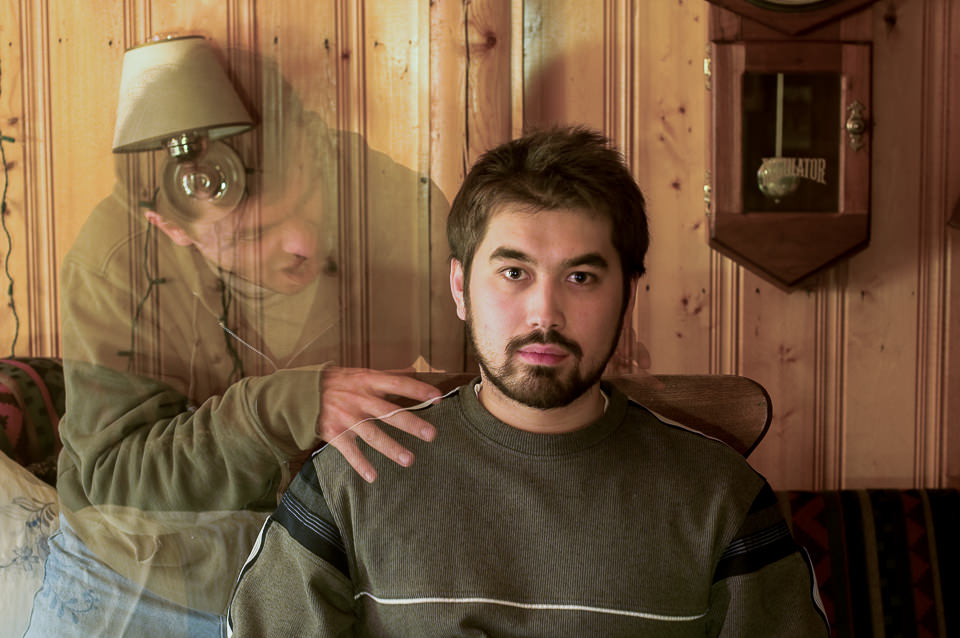
              Even in dim or dark environments, you still might be able to use a low ISO. For example, if you have your camera mounted on a tripod or sitting completely still on a table. In that case, you can safely use a low ISO and brighten your photo via a long shutter speed instead, since you won’t introduce camera shake. However, keep in mind that if your camera does use a long shutter speed, anything that is moving will look like a ghost:
              Oh No! It’s a GHOST ATTACK!
              Just kidding, of course! That’s my lovely nephew being the subject of my long exposure test. I set the camera to the lowest ISO to retain the detail, which required a long shutter speed of five seconds in order to capture a bright enough photo. My nephew sat still, while my friend stepped in for a brief moment to introduce the ghost.

              تعليق


              • #22
                متى تستخدم iso منخفض

                كما تمت مناقشته أعلاه، يجب عليك دائمًا محاولة الالتزام بأدنى مستوى iso (iso الأساسي) لكاميرتك، والذي عادةً ما يكون iso 100 أو 200، كلما استطعت. إذا كان هناك الكثير من الضوء، فلديك الحرية في استخدام حساسية iso منخفضة وتقليل ظهور الضوضاء قدر الإمكان.

                حتى في البيئات المعتمة أو المظلمة، لا يزال بإمكانك استخدام حساسية iso منخفضة. على سبيل المثال، إذا كانت الكاميرا مثبتة على حامل ثلاثي الأرجل أو جالسة بشكل ثابت تمامًا على الطاولة. في هذه الحالة، يمكنك استخدام حساسية iso منخفضة بأمان وزيادة سطوع صورتك عبر سرعة غالق طويلة بدلاً من ذلك، نظرًا لأنك لن تؤدي إلى اهتزاز الكاميرا. ومع ذلك، ضع في اعتبارك أنه إذا كانت الكاميرا تستخدم سرعة غالق طويلة، فإن أي شيء يتحرك سيبدو كالشبح:

                اضغط على الصورة لعرض أكبر. 

الإسم:	1697474983733.jpg 
مشاهدات:	56 
الحجم:	87.1 كيلوبايت 
الهوية:	170700
                أوه لا! إنه هجوم شبح!

                مجرد مزاح، بالطبع! هذا هو ابن أخي الجميل الذي كان موضوع اختبار التعرض الطويل. لقد قمت بضبط الكاميرا على أدنى مستوى iso للاحتفاظ بالتفاصيل، الأمر الذي يتطلب سرعة غالق طويلة تبلغ خمس ثوانٍ لالتقاط صورة مشرقة بدرجة كافية. جلس ابن أخي ساكنًا، بينما تدخل صديقي للحظة قصيرة لتقديم الشبح.

                تعليق


                • #23
                  When to Use High ISO


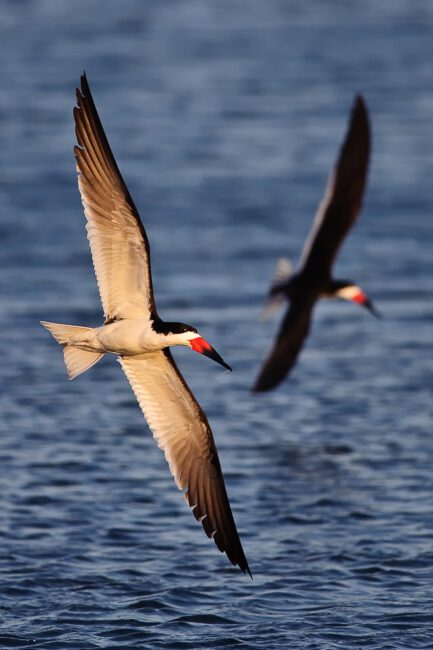
                  Even though it is ideal to use low ISOs, there will be plenty of times when a high ISO is necessary in order to take a good photo in the first place. The simple reason is that you are often fighting against motion blur, and you will need to pick between a sharp photo at a high ISO, or a blurry photo at a low ISO. Take a look at the image below:
                  An image of Black Skimmers captured at ISO 800 and 1/2000 shutter speed
                  I captured these Black Skimmers at 1/2000th of a second and ISO 800. Here, my camera needed 1/2000th of a second to fully freeze the birds while they were in flight. What would have happened if I had set ISO 100 on my camera instead? I would have needed a shutter speed of 1/250th of a second to capture a bright photo. At that setting, there would have been a lot of unwanted motion blur in the picture, since the birds were moving so fast. In short, I would have ruined the picture.

                  The bottom line is that you should increase the ISO when there is not enough light for the camera to capture a sharp, bright photo any other way. When I shoot handheld photos indoors without a flash, I always set my ISO to a higher number to capture the moment without introducing blur. Or, when photographing ultra-fast action like in the bird picture above, raising your ISO is often necessary.

                  On most cameras, there is a setting for Auto ISO, which works great in low-light environments. The beauty of this setting is that you input the maximum ISO you are willing to use, so that the camera does not cross that limit. Personally, if I want to limit the amount of noise in a photo, I will set my maximum ISO to something like ISO 800, 1600, or 3200. The downside is that the camera will start using progressively longer shutter speeds if it reaches these ISO limits, which leads to more motion blur. Everything is a trade-off!

                  تعليق


                  • #24
                    متى تستخدم حساسية iso العالية؟

                    على الرغم من أنه من المثالي استخدام حساسية iso منخفضة، سيكون هناك الكثير من الأوقات التي تكون فيها حساسية iso العالية ضرورية لالتقاط صورة جيدة في المقام الأول. السبب البسيط هو أنك غالبًا ما تواجه مشكلة ضبابية الحركة، وسيتعين عليك الاختيار بين صورة واضحة عند حساسية iso عالية، أو صورة ضبابية عند حساسية iso منخفضة. ألق نظرة على الصورة أدناه:
                    اضغط على الصورة لعرض أكبر. 

الإسم:	1697475237710.jpg 
مشاهدات:	118 
الحجم:	58.7 كيلوبايت 
الهوية:	170703 اضغط على الصورة لعرض أكبر. 

الإسم:	1697475237710.jpg 
مشاهدات:	118 
الحجم:	58.7 كيلوبايت 
الهوية:	170703
                    صورة للكاشطات السوداء تم التقاطها عند سرعة غالق iso 800 و1/2000

                    لقد التقطت هذه الكاشطات السوداء بسرعة 1/2000 من الثانية وiso 800. هنا، احتاجت الكاميرا إلى 1/2000 من الثانية لتجميد الطيور بالكامل أثناء طيرانها. ماذا كان سيحدث لو قمت بضبط iso 100 على الكاميرا بدلاً من ذلك؟ كنت سأحتاج إلى سرعة غالق تبلغ 1/250 من الثانية لالتقاط صورة مشرقة. في هذا الإعداد، كان من الممكن أن يكون هناك الكثير من التشويش غير المرغوب فيه في الصورة، نظرًا لأن الطيور كانت تتحرك بسرعة كبيرة. باختصار، كنت قد أفسدت الصورة.

                    خلاصة القول هي أنه يجب عليك زيادة iso عندما لا يكون هناك ما يكفي من الضوء للكاميرا لالتقاط صورة حادة ومشرقة بأي طريقة أخرى. عندما ألتقط صورًا داخل المنزل بدون فلاش، أقوم دائمًا بضبط iso الخاص بي على رقم أعلى لالتقاط اللحظة دون حدوث أي ضبابية. أو، عند تصوير حركة فائقة السرعة كما في صورة الطيور أعلاه، غالبًا ما يكون رفع مستوى iso ضروريًا.

                    يوجد في معظم الكاميرات إعداد iso تلقائي، والذي يعمل بشكل رائع في البيئات منخفضة الإضاءة. يكمن جمال هذا الإعداد في أنك تقوم بإدخال الحد الأقصى لحساسية iso الذي ترغب في استخدامه، بحيث لا تتجاوز الكاميرا هذا الحد. شخصيًا، إذا كنت أرغب في الحد من مقدار الضوضاء في الصورة، فسأقوم بتعيين الحد الأقصى لـ iso الخاص بي إلى شيء مثل iso 800 أو 1600 أو 3200. الجانب السلبي هو أن الكاميرا ستبدأ في استخدام سرعات غالق أطول تدريجيًا إذا وصلت إلى iso هذه الحدود، الأمر الذي يؤدي إلى مزيد من ضبابية الحركة. كل شيء هو مقايضة!

                    تعليق


                    • #25
                      Minimizing Noise and Maximizing Image Quality


                      Some photographers think that the best way to capture high-quality images is to use Base ISO 100% of the time. However, as demonstrated above, that simply is not true. Sometimes, you’ll be in dark environments when you have no choice but to use a higher ISO.

                      You should only use base ISO when there is enough light to do so. Don’t try to force ISO 100 in a dark environment, or your photos will come out way too dark. Similarly, if you’re using a fast shutter speed to capture action, it’s essentially the same as taking pictures in a dark environment (since you strictly limit the amount of time your camera sensor is able to capture light). So, for certain types of sports and action photography, a high ISO might be your only option.

                      To maximize your image quality, here are the four steps you need to follow:
                      1. Select the aperture setting that will provide your desired depth of field.
                      2. Set your ISO to its base value, and put your shutter speed to whatever setting provides a proper exposure.
                      3. If your subject is blurry, progressively raise your ISO and use a faster shutter speed until motion blur disappears.
                      4. If your ISO is getting too high and you still have the ability to use a wider aperture, open it up until the ISO gets to a more manageable level, even if it means sacrificing some of your desired depth of field.

                      That’s all it takes! If you follow these steps, you’ll capture the maximum image quality each time. You’ll find the ideal balance between noise, motion blur, and depth of field.

                      تعليق


                      • #26
                        تقليل الضوضاء وزيادة جودة الصورة

                        يعتقد بعض المصورين أن أفضل طريقة لالتقاط صور عالية الجودة هي استخدام Base ISO بنسبة 100% من الوقت. ومع ذلك، كما هو موضح أعلاه، هذا ببساطة ليس صحيحا. في بعض الأحيان، ستكون في بيئات مظلمة عندما لا يكون لديك خيار سوى استخدام ISO أعلى.

                        يجب عليك استخدام ISO الأساسي فقط عندما يكون هناك ما يكفي من الضوء للقيام بذلك. لا تحاول فرض ISO 100 في بيئة مظلمة، وإلا ستظهر صورك مظلمة جدًا. وبالمثل، إذا كنت تستخدم سرعة غالق سريعة لالتقاط الأحداث، فهذا يماثل في الأساس التقاط الصور في بيئة مظلمة (نظرًا لأنك تحدد بشكل صارم مقدار الوقت الذي يستطيع فيه مستشعر الكاميرا التقاط الضوء). لذلك، بالنسبة لأنواع معينة من التصوير الفوتوغرافي للرياضة والحركة، قد تكون حساسية ISO العالية هي خيارك الوحيد.

                        لتحقيق أقصى قدر من جودة الصورة، إليك الخطوات الأربع التي يتعين عليك اتباعها:

                        حدد إعداد الفتحة الذي سيوفر عمق المجال المطلوب. اضبط ISO على قيمته الأساسية، واضبط سرعة الغالق على أي إعداد يوفر تعريضًا ضوئيًا مناسبًا. إذا كان هدفك ضبابيًا، فارفع ISO تدريجيًا واستخدم سرعة غالق أسرع. حتى يختفي ضبابية الحركة. إذا كان ISO الخاص بك مرتفعًا جدًا ولا يزال لديك القدرة على استخدام فتحة أوسع، فافتحه حتى يصل ISO إلى مستوى أكثر قابلية للإدارة، حتى لو كان ذلك يعني التضحية ببعض عمق المجال المطلوب.

                        هذا كل ما يتطلبه الأمر! إذا اتبعت هذه الخطوات، فستحصل على أقصى جودة للصورة في كل مرة. ستجد التوازن المثالي بين الضوضاء وضبابية الحركة وعمق المجال.

                        تعليق


                        • #27
                          Common ISO Myths and Misconceptions


                          ISO has a lot of myths surrounding it, including some that are quite common to hear. In this section, we will quickly address some of those concerns so that you are not misled about this topic in the future.
                          Is ISO “Sensor Sensitivity”?
                          This is the most common myth related to ISO. It is something you will see all over the web (and in print). However, although it may help you to think of ISO as “acting like” camera sensor sensitivity, that’s not what it actually does. Instead, digital sensors only have a single sensitivity, regardless of your ISO. It is more accurate to say that ISO is like a mapping to tell your camera how bright the output photo should be, given a particular input exposure.

                          Is ISO Part of Exposure?
                          No, ISO is not part of exposure. Shutter Speed and Aperture brighten your photo by physically capturing more light. ISO doesn’t do that; instead, it essentially brightens the photo you already captured. So, photographers don’t consider it to be a component of exposure.

                          Is Raising ISO Just Like Brightening Your Photo on a Computer?
                          This is a clever question, but, again, it is simply a misconception. Brightening a photo on your computer can act in many ways like raising your ISO, since it does make noise more visible (and it leads to a brighter image). But the simple difference is that raising your ISO in the camera nearly always provides better image quality than brightening a photo on your computer. In other words, it is better to use ISO 800 when necessary, rather than brightening an ISO 100 photo to a huge degree in post-processing software like Lightroom!

                          How Does ISO Affect a Photo?
                          ISO increases or decreases the brightness of a photograph, but also affects both grain / noise levels and dynamic range. At the lowest (base) ISO setting, your images will have the least amount of noise and the highest dynamic range, giving you the most flexibility in post-processing. As ISO is increased, noise levels increase and dynamic range typically decreases as well.

                          What is the Best ISO Setting for Low-Light?
                          When shooting in low-light conditions, your shutter speed will typically decrease, resulting in camera shake or motion blur. To avoid such issues, you should increase ISO setting to a higher value, such as ISO 1600. Depending on your aperture and light conditions, you might need to increase ISO even more.

                          What is the Best ISO Setting for Landscape Photography?
                          When photographing landscapes, you should use a tripod and set your ISO to your camera’s base ISO, which is typically 100.
                          Conclusion


                          If you have any questions, comments or feedback, please post them in the comments section below.

                          تعليق


                          • #28
                            الخرافات والمفاهيم الخاطئة الشائعة عن ISO

                            لدى ISO الكثير من الخرافات المحيطة بها، بما في ذلك بعض الخرافات الشائعة جدًا. في هذا القسم، سنتناول بسرعة بعض هذه المخاوف حتى لا يتم تضليلك بشأن هذا الموضوع في المستقبل.

                            هل ISO "حساسية الاستشعار"؟

                            هذه هي الأسطورة الأكثر شيوعًا المتعلقة بـ ISO. إنه شيء ستراه في جميع أنحاء الويب (وفي المطبوعات). ومع ذلك، على الرغم من أنه قد يساعدك على التفكير في ISO على أنه "يشبه" حساسية مستشعر الكاميرا، إلا أن هذا ليس ما يفعله بالفعل. وبدلاً من ذلك، تتمتع المستشعرات الرقمية بحساسية واحدة فقط، بغض النظر عن ISO الخاص بك. من الأكثر دقة أن نقول إن ISO يشبه رسم خريطة لإخبار الكاميرا عن مدى سطوع الصورة الناتجة، في ضوء تعرض مدخلات معين.

                            هل ISO جزء من التعرض؟

                            لا، ISO ليس جزءًا من التعريض الضوئي. تعمل سرعة الغالق وفتحة العدسة على زيادة سطوع صورتك من خلال التقاط المزيد من الضوء فعليًا. ISO لا يفعل ذلك؛ بدلاً من ذلك، فإنه يؤدي بشكل أساسي إلى سطوع الصورة التي التقطتها بالفعل. لذا، لا يعتبره المصورون أحد مكونات التعرض.

                            هل رفع ISO يشبه تمامًا تفتيح صورتك على جهاز الكمبيوتر؟

                            هذا سؤال ذكي، لكنه مرة أخرى مجرد فكرة خاطئة. يمكن أن يؤدي تفتيح الصورة على جهاز الكمبيوتر الخاص بك بعدة طرق مثل رفع ISO، لأنه يجعل الضوضاء أكثر وضوحًا (ويؤدي إلى صورة أكثر سطوعًا). لكن الاختلاف البسيط هو أن رفع ISO في الكاميرا يوفر دائمًا جودة صورة أفضل من زيادة سطوع الصورة على جهاز الكمبيوتر الخاص بك. بمعنى آخر، من الأفضل استخدام ISO 800 عند الضرورة، بدلاً من تفتيح صورة ISO 100 بدرجة كبيرة في برامج ما بعد المعالجة مثل Lightroom!

                            كيف يؤثر ISO على الصورة؟

                            تعمل حساسية ISO على زيادة أو تقليل سطوع الصورة الفوتوغرافية، ولكنها تؤثر أيضًا على مستويات الحبوب / الضوضاء والنطاق الديناميكي. عند إعداد ISO (الأساسي) الأدنى، ستحتوي صورك على أقل قدر من التشويش وأعلى نطاق ديناميكي، مما يمنحك أكبر قدر من المرونة في المعالجة اللاحقة. مع زيادة ISO، تزيد مستويات الضوضاء وينخفض ​​النطاق الديناميكي أيضًا.

                            ما هو أفضل إعداد ISO للإضاءة المنخفضة؟

                            عند التصوير في ظروف الإضاءة المنخفضة، ستنخفض سرعة الغالق عادةً، مما يؤدي إلى اهتزاز الكاميرا أو ضبابية الحركة. لتجنب مثل هذه المشكلات، يجب عليك زيادة إعداد ISO إلى قيمة أعلى، مثل ISO 1600. اعتمادًا على فتحة العدسة وظروف الإضاءة لديك، قد تحتاج إلى زيادة ISO أكثر.

                            ما هو أفضل إعداد ISO لتصوير المناظر الطبيعية؟

                            عند تصوير المناظر الطبيعية، يجب عليك استخدام حامل ثلاثي القوائم وضبط ISO على ISO الأساسي للكاميرا، والذي يكون عادةً 100.

                            خاتمة

                            إذا كان لديك أي أسئلة أو تعليقات أو تعليقات، يرجى نشرها في قسم التعليقات أدناه.

                            تعليق

                            يعمل...
                            X