Understanding Aperture in Photographyفهم الفتحة في التصوير الفوتوغرافي

تقليص
X
 
  • تصفية - فلترة
  • الوقت
  • عرض
إلغاء تحديد الكل
مشاركات جديدة

  • #46
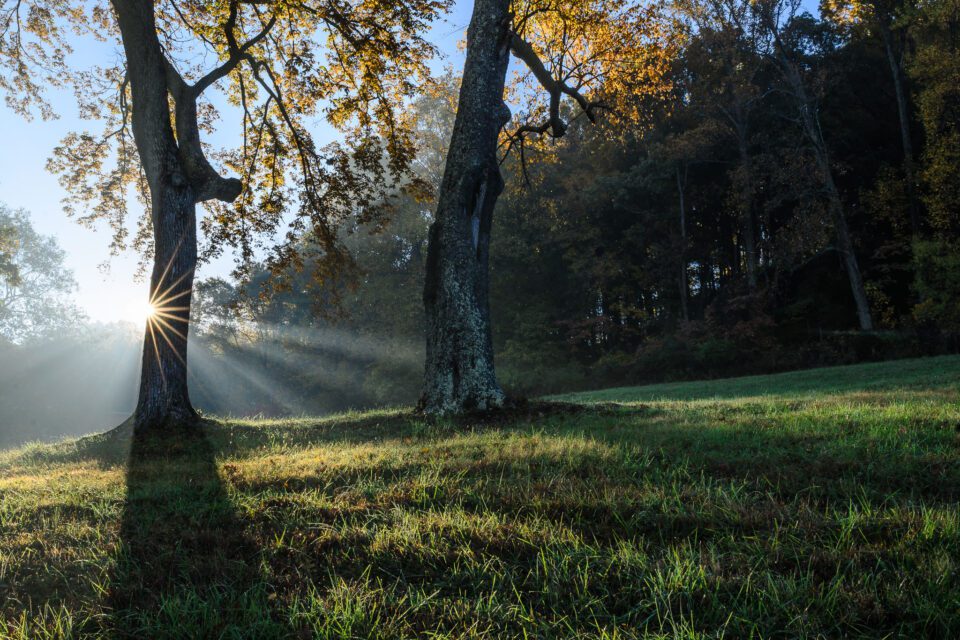
    Also, the starburst effect looks different from lens to lens. It all depends upon your aperture blades. If your lens has six aperture blades, you’ll get six sunbeams. If your lens has eight aperture blades, you’ll get eight sunbeams. And, if your lens has nine aperture blades, you’ll get eighteen sunbeams.

    Wait, what?

    That’s no typo. You always end up with an even number of sunbeams. If your lens has an odd number of aperture blades, you’ll get double the number of sunbeams.

    It sounds strange, but the reason is actually quite simple. In lenses with an even number of aperture blades (and a fully symmetrical design), half of the sunbeams will overlap the other half. So, you don’t see all of them in your final photo.

    Here’s a diagram to show what I mean:
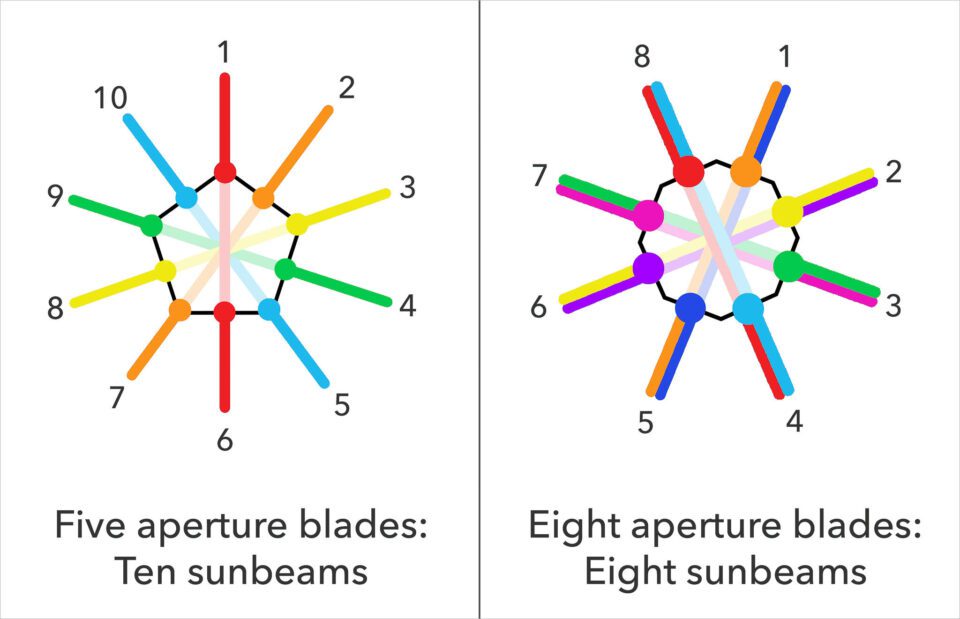
    When you have an even number of aperture blades, the sunbeams will overlap.

    تعليق


    • #47
      كما أن تأثير الانفجار النجمي يبدو مختلفًا من عدسة إلى أخرى. كل هذا يتوقف على شفرات الفتحة الخاصة بك. إذا كانت عدستك تحتوي على ستة شفرات فتحة، فستحصل على ستة أشعة شمس. إذا كانت عدستك تحتوي على ثماني شفرات للفتحة، فستحصل على ثمانية أشعة شمس. وإذا كانت عدستك تحتوي على تسع شفرات للفتحة، فستحصل على ثمانية عشر شعاعًا من أشعة الشمس.

      انتظر ماذا؟

      هذا ليس خطأ مطبعي. ينتهي بك الأمر دائمًا بعدد زوجي من أشعة الشمس. إذا كانت عدستك تحتوي على عدد فردي من شفرات الفتحة، فستحصل على ضعف عدد أشعة الشمس.

      يبدو الأمر غريبا، ولكن السبب في الواقع بسيط للغاية. في العدسات ذات العدد الزوجي من شفرات الفتحة (والتصميم المتماثل بالكامل)، سوف يتداخل نصف أشعة الشمس مع النصف الآخر. لذلك، لا ترى كل منهم في صورتك النهائية.

      وفيما يلي رسم تخطيطي لإظهار ما أعنيه:
      اضغط على الصورة لعرض أكبر. 

الإسم:	1697438091908.jpg 
مشاهدات:	66 
الحجم:	37.6 كيلوبايت 
الهوية:	170234
      عندما يكون لديك عدد زوجي من شفرات الفتحة، ستتداخل أشعة الشمس.

      تعليق


      • #48
        Most Nikon lenses have seven or nine aperture blades, resulting in 14 and 18 sunbeams respectively. Most Canon lenses have eight aperture blades, resulting in eight sunbeams. I took the photo above using the Nikon 20mm f/1.8G lens, which has 7 aperture blades. That’s why the image has 14 sunbeams.

        It’s not just the number of blades that matters, though — their shape is also important. Some aperture blades are rounded (which results in a more pleasant out-of-focus background blur), and others are straight. If your goal is to capture good starbursts, straight aperture blades typically produce more defined rays of light.

        Again, some lenses are better than others in this regard. For the best results, find a lens that’s known to have good starbursts, and then set it to a small aperture like f/16. That’s going to give you the strongest definition in your starbursts.
        Another image with a starburst using a 24mm f/1.4 lens
        NIKON D7000 + 24mm f/1.4 @ 24mm, ISO 100, 1/50, f/16.0


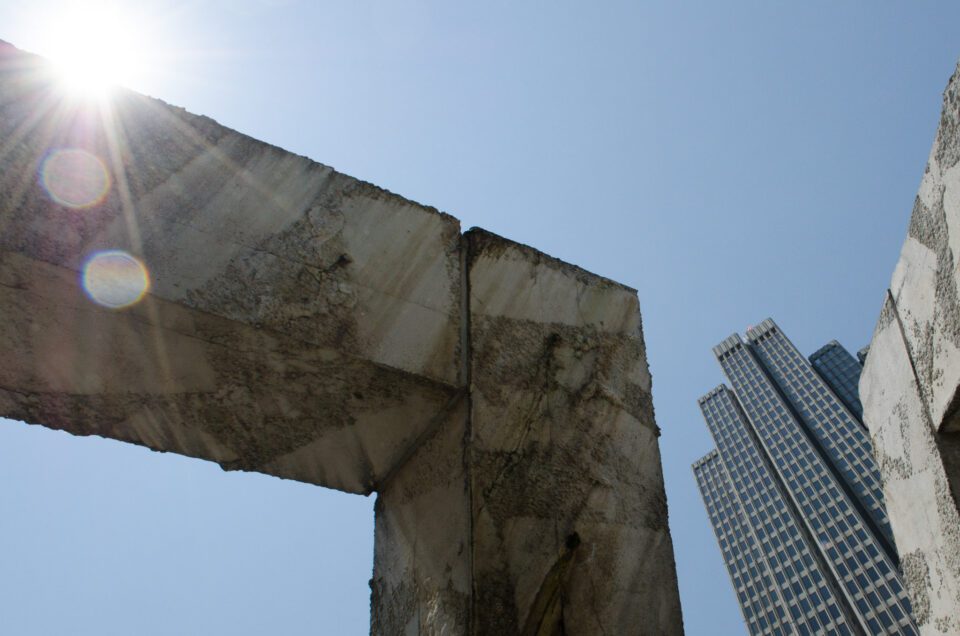
        Finally, there’s one last related effect that I wanted to mention briefly. When you shoot into the sun, you might end up with flare in your photographs, as shown below. Depending upon your chosen aperture, the size and shape of this lens flare may change slightly. This isn’t a big deal, but it still exists.
        The flare in this photo is shaped like my lens aperture blades.
        التعديل الأخير تم بواسطة غدير معروف; الساعة 10-16-2023, 09:40 AM.

        تعليق


        • #49
          تحتوي معظم عدسات نيكون على سبع أو تسع شفرات للفتحة، مما ينتج عنه 14 و18 شعاعًا شمسيًا على التوالي. تحتوي معظم عدسات Canon على ثماني شفرات للفتحة، مما ينتج عنه ثمانية أشعة شمس. لقد التقطت الصورة أعلاه باستخدام عدسة Nikon مقاس 20 مم f/1.8G، والتي تحتوي على 7 شفرات فتحة. ولهذا السبب تحتوي الصورة على 14 شعاع شمس.

          لا يقتصر الأمر على عدد الشفرات فحسب، بل إن شكلها مهم أيضًا. يتم تقريب بعض شفرات الفتحة (مما يؤدي إلى ضبابية خلفية أكثر متعة خارج نطاق التركيز)، والبعض الآخر مستقيم. إذا كان هدفك هو التقاط انفجارات نجمية جيدة، فعادةً ما تنتج الشفرات ذات الفتحة المستقيمة أشعة ضوئية أكثر تحديدًا.

          مرة أخرى، بعض العدسات أفضل من غيرها في هذا الصدد. للحصول على أفضل النتائج، ابحث عن عدسة معروفة بأنها تحتوي على انفجارات نجمية جيدة، ثم اضبطها على فتحة صغيرة مثل f/16. سيعطيك هذا التعريف الأقوى للانفجارات النجمية.

          اضغط على الصورة لعرض أكبر.   الإسم:	1697438259911.jpg  مشاهدات:	0  الحجم:	303.2 كيلوبايت  الهوية:	170237
          صورة أخرى للانفجار النجمي باستخدام عدسة مقاس 24 مم f/1.4
          نيكون D7000 + 24 مم f/1.4 @ 24 مم، ISO 100، 1/50، f/16.0


          أخيرًا، هناك تأثير أخير ذو صلة أردت أن أذكره باختصار. عند التصوير في الشمس، قد ينتهي بك الأمر إلى ظهور توهج في صورك، كما هو موضح أدناه. اعتمادًا على الفتحة التي اخترتها، قد يتغير حجم وشكل توهج العدسة قليلاً. هذه ليست مشكلة كبيرة، لكنها لا تزال موجودة.
          اضغط على الصورة لعرض أكبر. 

الإسم:	1697438406168.jpg 
مشاهدات:	65 
الحجم:	112.2 كيلوبايت 
الهوية:	170238
          التوهج في هذه الصورة على شكل شفرات فتحة العدسة.
          التعديل الأخير تم بواسطة غدير معروف; الساعة 10-16-2023, 09:44 AM.

          تعليق


          • #50

            4. Small Aperture and Unwanted Elements


            When you shoot through things such as fences, dirty windows, plants, and even water droplets on your lens, you’ll probably be disappointed by photos taken with a small aperture.

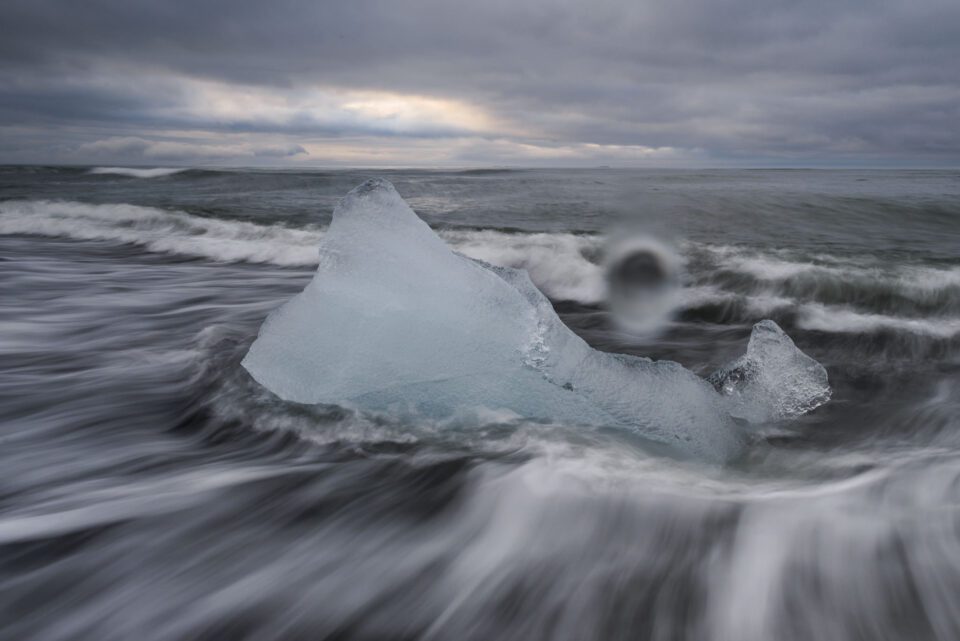
            Small apertures like f/11 and f/16 give you such a large depth of field that you may accidentally include elements that you don’t want to be in focus! For example, if you’re shooting at a waterfall or by the ocean, an aperture of f/16 could render a tiny water droplet on your lens into a distinct, ugly blob:
            A water droplet landed on my lens while taking this picture. My aperture was f/16, which means that it’s particularly visible.
            In cases like that, it’s better just to use a wider aperture – something like f/5.6, perhaps – in order to capture the water droplet so out-of-focus that it doesn’t even appear in your image. In this particular case, you could simply wipe the droplet off, but that’s not possible if you’re shooting through something like a dirty window.

            تعليق


            • #51
              4. فتحة العدسة الصغيرة والعناصر غير المرغوب فيها

              عند التصوير عبر أشياء مثل الأسوار والنوافذ المتسخة والنباتات وحتى قطرات الماء الموجودة على عدستك، فمن المحتمل أن تشعر بخيبة أمل بسبب الصور الملتقطة بفتحة عدسة صغيرة.

              تمنحك الفتحات الصغيرة مثل f/11 وf/16 عمقًا كبيرًا للمجال لدرجة أنك قد تقوم عن طريق الخطأ بتضمين عناصر لا تريد التركيز عليها! على سبيل المثال، إذا كنت تقوم بالتصوير عند شلال أو بالقرب من المحيط، فإن فتحة f/16 يمكن أن تحول قطرة ماء صغيرة على عدستك إلى نقطة قبيحة مميزة:
              اضغط على الصورة لعرض أكبر. 

الإسم:	1697438737538.jpg 
مشاهدات:	66 
الحجم:	93.2 كيلوبايت 
الهوية:	170241
              سقطت قطرة ماء على عدستي أثناء التقاط هذه الصورة. كانت فتحة العدسة f/16، مما يعني أنها مرئية بشكل خاص.

              في مثل هذه الحالات، من الأفضل استخدام فتحة أوسع - ربما مثل f/5.6 - لالتقاط قطرة الماء خارج نطاق التركيز بحيث لا تظهر حتى في صورتك. في هذه الحالة بالذات، يمكنك ببساطة مسح القطرة، لكن هذا غير ممكن إذا كنت تقوم بالتصوير عبر شيء مثل نافذة متسخة.

              تعليق


              • #52
                Side Note


                You might have realized that this section is really just an extension of depth of field, and that’s true! However, it’s a bit of a special case, so I decided to mention it specifically.
                ملاحظة جانبية

                ربما تكون قد أدركت أن هذا القسم هو في الحقيقة مجرد امتداد لعمق المجال، وهذا صحيح! ومع ذلك، فهي حالة خاصة بعض الشيء، لذلك قررت أن أذكرها على وجه التحديد.

                تعليق


                • #53
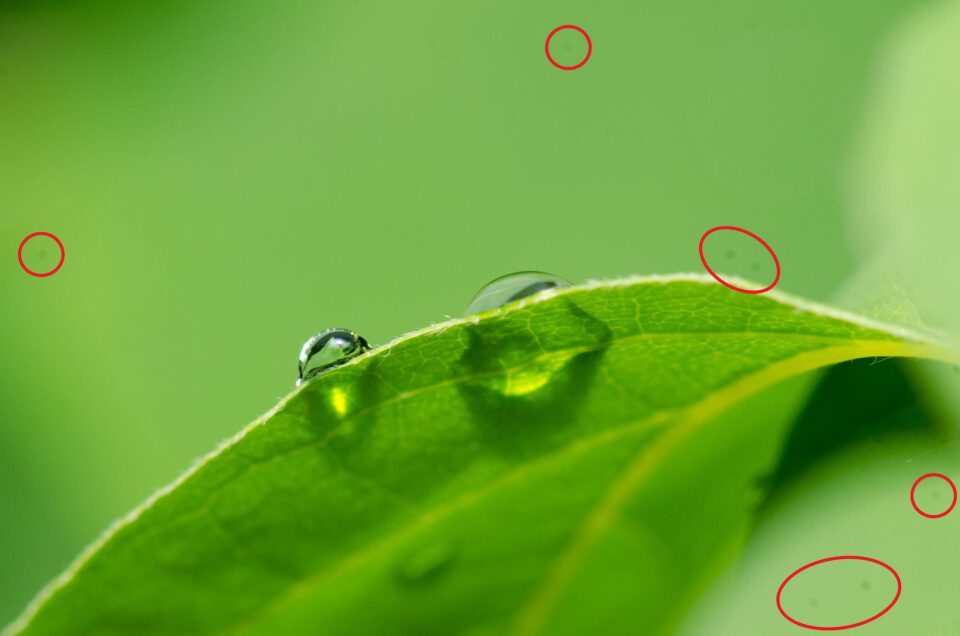
                  Another example of shooting through things is when a piece of dust lands on your camera sensor. Unfortunately, as you change lenses, this is very common. Dust specks on your camera sensor will show up very clearly at small apertures like f/16, even if they’re invisible at something larger, like f/4.

                  Luckily, they are very easy to remove in post-production software like Photoshop or Lightroom, though it can be annoying if you have to remove dozens of them from a single photo. That’s why you should always keep your camera sensor clean.
                  Dust specks on my camera sensor, taken at f/11 (a fairly small aperture). I circled some of the most visible spots in red.

                  تعليق


                  • #54
                    مثال آخر على التصوير عبر الأشياء هو عندما تسقط قطعة من الغبار على مستشعر الكاميرا. لسوء الحظ، عندما تقوم بتغيير العدسات، فهذا أمر شائع جدًا. ستظهر بقع الغبار الموجودة على مستشعر الكاميرا بوضوح شديد عند الفتحات الصغيرة مثل f/16، حتى لو كانت غير مرئية عند شيء أكبر، مثل f/4.

                    لحسن الحظ، من السهل جدًا إزالتها في برامج ما بعد الإنتاج مثل Photoshop أو Lightroom، على الرغم من أن الأمر قد يكون مزعجًا إذا كان عليك إزالة العشرات منها من صورة واحدة. لهذا السبب يجب عليك دائمًا الحفاظ على نظافة مستشعر الكاميرا.
                    اضغط على الصورة لعرض أكبر. 

الإسم:	1697438925032.jpg 
مشاهدات:	63 
الحجم:	58.0 كيلوبايت 
الهوية:	170246
                    بقع غبار على مستشعر الكاميرا، تم التقاطها بفتحة f/11 (فتحة صغيرة إلى حد ما). لقد قمت بوضع دائرة حول بعض النقاط الأكثر وضوحًا باللون الأحمر.

                    تعليق


                    • #55

                      5. Changes to Your Bokeh


                      What is bokeh? It’s simply the quality of your background blur. If you take a lot of portraits, macro photos, or wildlife photos, you’ll end up with out-of-focus backgrounds in most of your images. Naturally, you want them to look as good as possible! Different aperture settings will change the shape of your background blur.

                      Why is that? It’s because the background blur of your photographs always takes on the shape of your aperture blades. So, if your aperture blades are shaped like a heart, you’ll end up with heart-shaped background blur. Most of the time, that would qualify as distracting bokeh, although it’s kind of cute in this photo of two fake tortoises:
                      Heart-shaped background blur, due to a heart-shaped aperture. I didn’t take this photo, unfortunately. Downloaded as Creative Commons.

                      تعليق


                      • #56
                        5. تغييرات على البوكيه الخاص بك

                        ما هو البوكيه؟ إنها ببساطة جودة الخلفية الضبابية. إذا كنت تلتقط الكثير من الصور الشخصية أو صور الماكرو أو صور الحياة البرية، فسينتهي بك الأمر بخلفيات خارج نطاق التركيز في معظم صورك. وبطبيعة الحال، تريد لهم أن تبدو جيدة قدر الإمكان! ستؤدي إعدادات الفتحة المختلفة إلى تغيير شكل ضبابية الخلفية.

                        لماذا هذا؟ وذلك لأن ضبابية الخلفية في صورك الفوتوغرافية تأخذ دائمًا شكل شفرات فتحة العدسة. لذلك، إذا كانت شفرات فتحة العدسة على شكل قلب، فسوف ينتهي بك الأمر إلى خلفية ضبابية على شكل قلب. في معظم الأحيان، قد يكون ذلك بمثابة تأثير بوكيه مشتت للانتباه، على الرغم من أنه لطيف نوعًا ما في هذه الصورة لسلحفاتين مزيفتين:

                        اضغط على الصورة لعرض أكبر. 

الإسم:	1697439132708.jpg 
مشاهدات:	65 
الحجم:	103.1 كيلوبايت 
الهوية:	170249

                        خلفية ضبابية على شكل قلب، بسبب فتحة على شكل قلب. لم ألتقط هذه الصورة للأسف. تم تنزيله بصيغة Creative Commons.

                        تعليق


                        • #57
                          On some lenses, aperture blades change shape a bit as they open and close. Large aperture settings (such as f/1.8) often have rounder background blur compared to smaller aperture settings. You’ll also get more background blur at large apertures, since your depth of field is thinner.

                          If bokeh is something that matters to you, you’ll want to test this on your particular lenses. Take some out-of-focus photos of a busy scene, each using a different aperture setting, and see which one looks the best. Most of the time, it will be the lens’s widest aperture, but not always.
                          Background blur sample from the top-left corner of the Nikon 24mm f/1.4G. In my opinion, the blur is best at f/1.4 and f/1.8, where it appears the roundest. However, this is inherently subjective.

                          تعليق


                          • #58
                            في بعض العدسات، يتغير شكل شفرات الفتحة قليلاً عند فتحها وإغلاقها. غالبًا ما تحتوي إعدادات الفتحة الكبيرة (مثل f/1.8) على خلفية ضبابية مستديرة مقارنةً بإعدادات الفتحة الأصغر. ستحصل أيضًا على المزيد من ضبابية الخلفية عند الفتحات الكبيرة، نظرًا لأن عمق المجال لديك أقل.

                            إذا كان تأثير البوكيه أمرًا مهمًا بالنسبة لك، فستحتاج إلى اختبار ذلك على عدساتك الخاصة. التقط بعض الصور خارج نطاق التركيز البؤري لمشهد مزدحم، كل منها باستخدام إعداد فتحة مختلف، واعرف أيها يبدو الأفضل. في معظم الأحيان، ستكون الفتحة الأوسع للعدسة، ولكن ليس دائمًا.
                            اضغط على الصورة لعرض أكبر. 

الإسم:	1697439234912.jpg 
مشاهدات:	73 
الحجم:	38.0 كيلوبايت 
الهوية:	170252
                            نموذج تمويه الخلفية من الزاوية العلوية اليسرى لكاميرا Nikon مقاس 24 مم f/1.4G. في رأيي، يكون التمويه أفضل عند f/1.4 وf/1.8، حيث يبدو مستديرًا. ومع ذلك، هذا أمر ذاتي بطبيعته.

                            تعليق


                            • #59

                              6. Focus Shift Issues


                              With certain lenses – even if you’re in manual focus, and you don’t move your focus ring – your point of focus may shift as you use smaller and smaller apertures.

                              Obviously, this isn’t ideal. How do you tell if your lens has problematic focus shift? It’s pretty easy. Here are the steps:
                              1. Put your camera on a tripod, and set your lens to manual focus.
                              2. Find an object with small details that extends backwards, and focus at the center of it. A table with a tablecloth works well.
                              3. Double check: When take a test photo and magnify it, you should see pixel-level details, as well as portions of the photo that are clearly out of focus.
                              4. Take a photo at your lens’s widest aperture, and then at progressively smaller apertures. Be sure not to move your focus ring, and double check that you are using manual focus.
                              5. On your computer, zoom into 100% on these photos and see if the sharpest point of focus moves continuously farther back as you stop down. The more it moves, the worse your focus shift issue is.

                              You’re done!

                              If your lens has extreme levels of focus shift, you’ll want to compensate for it:
                              • With your widest aperture, just focus like normal.
                              • As you stop down the aperture, make sure to set your aperture first, then focus second (rather than focusing first). On DSLRs, we recommend focusing in live view at these apertures, because the viewfinder always focuses at the widest aperture. Mirrorless camera users don’t need to worry about that.
                              • With small apertures like f/8 and beyond, your depth of field will be large enough to hide any focus shift problems, so just focus like normal.

                              تعليق


                              • #60
                                6. قضايا تحول التركيز

                                مع عدسات معينة - حتى لو كنت في وضع التركيز البؤري اليدوي، ولم تقم بتحريك حلقة التركيز البؤري - قد تتغير نقطة التركيز البؤري أثناء استخدام فتحات أصغر فأصغر.

                                من الواضح أن هذا ليس مثاليًا. كيف يمكنك معرفة ما إذا كانت عدستك تواجه مشكلة في إزاحة التركيز البؤري؟ إنه سهل جدًا. فيما يلي الخطوات:

                                ضع الكاميرا على حامل ثلاثي الأرجل، واضبط العدسة على التركيز اليدوي. ابحث عن كائن بتفاصيل صغيرة تمتد إلى الخلف، وقم بالتركيز في منتصفه. طاولة بها مفرش طاولة تعمل بشكل جيد. تحقق مرة أخرى: عند التقاط صورة اختبارية وتكبيرها، يجب أن ترى تفاصيل على مستوى البكسل، بالإضافة إلى أجزاء من الصورة التي تكون خارج نطاق التركيز بشكل واضح. التقط صورة بأوسع فتحة للعدسة. ، ثم بفتحات أصغر تدريجيًا. تأكد من عدم تحريك حلقة التركيز البؤري، وتأكد مرة أخرى من أنك تستخدم التركيز البؤري اليدوي. على جهاز الكمبيوتر الخاص بك، قم بتكبير هذه الصور بنسبة 100% ومعرفة ما إذا كانت نقطة التركيز الأكثر وضوحًا تتحرك بشكل مستمر إلى الخلف عند التوقف. كلما تحركت أكثر، كلما كانت مشكلة تحول التركيز لديك أسوأ.

                                انت انتهيت!

                                إذا كانت عدستك تتمتع بمستويات شديدة من تحول التركيز البؤري، فستحتاج إلى التعويض عنها:

                                مع الفتحة الأوسع، ما عليك سوى التركيز كالمعتاد. عند إيقاف فتحة العدسة، تأكد من ضبط فتحة العدسة أولاً، ثم التركيز ثانيًا (بدلاً من التركيز أولاً). في كاميرات DSLR، نوصي بالتركيز في المنظر المباشر على هذه الفتحات، لأن محدد المنظر يركز دائمًا على الفتحة الأوسع. لا داعي للقلق بشأن ذلك بالنسبة لمستخدمي الكاميرات عديمة المرآة. مع الفتحات الصغيرة مثل f/8 وما بعدها، سيكون عمق المجال كبيرًا بما يكفي لإخفاء أي مشاكل في تحويل التركيز البؤري، لذا ركز فقط كالمعتاد.

                                تعليق

                                يعمل...