Understanding Aperture in Photographyفهم الفتحة في التصوير الفوتوغرافي

تقليص
X
 
  • تصفية - فلترة
  • الوقت
  • عرض
إلغاء تحديد الكل
مشاركات جديدة

  • #16
    This photograph has a thin depth of field – a “shallow focus” effect.
    In the image above, you can see that the girl is in focus and appears sharp, while the background is completely out of focus. My choice of aperture played a big role here. I specifically used a large aperture in order to create a shallow focus effect (yes, the larger your aperture, the bigger this effect). This helped me bring the attention of the viewer to the subject, rather than busy background. Had I used a narrower aperture, the subject would not be separated from the background as effectively.

    One trick to remember this relationship: a large aperture results in a large amount of both foreground and background blur. This is often desirable for portraits, or general photos of objects where you want to isolate the subject. Sometimes you can frame your subject with foreground objects, which will also look blurred relative to the subject, as shown in the example below:
    Taken with a portrait lens using a very large aperture of f/1.4

    تعليق


    • #17
      اضغط على الصورة لعرض أكبر. 

الإسم:	1697351849264.jpg 
مشاهدات:	60 
الحجم:	132.0 كيلوبايت 
الهوية:	169896 تحتوي هذه الصورة على عمق مجال رفيع - تأثير "التركيز الضحل".

      في الصورة أعلاه، يمكنك أن ترى أن الفتاة في بؤرة التركيز وتظهر بشكل حاد، في حين أن الخلفية خارج نطاق التركيز تمامًا. لعب اختياري للفتحة دورًا كبيرًا هنا. لقد استخدمت فتحة كبيرة على وجه التحديد لإنشاء تأثير تركيز بؤري سطحي (نعم، كلما كانت فتحة العدسة أكبر، كان هذا التأثير أكبر). وقد ساعدني هذا في جذب انتباه المشاهد إلى الموضوع بدلاً من الخلفية المزدحمة. لو استخدمت فتحة أضيق، فلن يتم فصل الموضوع عن الخلفية بشكل فعال.

      هناك خدعة واحدة لتذكر هذه العلاقة: تؤدي الفتحة الكبيرة إلى قدر كبير من ضبابية المقدمة والخلفية. غالبًا ما يكون هذا أمرًا مرغوبًا فيه للصور الشخصية أو الصور العامة للأشياء التي تريد عزل الموضوع فيها. في بعض الأحيان، يمكنك تأطير موضوعك باستخدام كائنات في المقدمة، والتي ستبدو أيضًا غير واضحة بالنسبة للموضوع، كما هو موضح في المثال أدناه:
      اضغط على الصورة لعرض أكبر. 

الإسم:	1697352164461.jpg 
مشاهدات:	60 
الحجم:	44.4 كيلوبايت 
الهوية:	169897
      تم التقاطها بعدسة بورتريه باستخدام فتحة كبيرة جدًا تبلغ f/1.4
      الملفات المرفقة

      تعليق


      • #18
        Quick Note: The appearance of the out-of-focus areas (AKA whether it looks good or not) is often referred to as “bokeh“. Bokeh is the property of the lens, and some lenses have better bokeh than others. This article explains how to get better bokeh as a photographer. Even though some lenses are better than others, almost all lenses are capable of a nice shallow focus effect if you use a large aperture and get close enough to your subject.

        تعليق


        • #19
          ملاحظة سريعة: غالبًا ما يُشار إلى مظهر المناطق خارج نطاق التركيز (المعروفة أيضًا سواء كانت تبدو جيدة أم لا) باسم "bokeh". البوكيه هو ملك للعدسة، وبعض العدسات تتمتع ببوكيه أفضل من غيرها. تشرح هذه المقالة كيفية تحسين تأثير البوكيه كمصور فوتوغرافي. على الرغم من أن بعض العدسات أفضل من غيرها، إلا أن جميع العدسات تقريبًا قادرة على إحداث تأثير تركيز سطحي لطيف إذا كنت تستخدم فتحة كبيرة واقتربت بدرجة كافية من هدفك.

          تعليق


          • #20
            On the other hand, a small aperture results in a small amount of background blur, which is typically ideal for some types of photography such as landscape and architecture. In the landscape photo below, I used a small aperture to ensure that both my foreground and background were as sharp as possible from front to back:
            Taken using a very small aperture of f/16 in order to remove background blur and achieve sufficient depth of field

            تعليق


            • #21
              من ناحية أخرى، تؤدي الفتحة الصغيرة إلى قدر صغير من ضبابية الخلفية، وهو ما يعد مثاليًا عادةً لبعض أنواع التصوير الفوتوغرافي مثل المناظر الطبيعية والهندسة المعمارية. في صورة المناظر الطبيعية أدناه، استخدمت فتحة صغيرة للتأكد من أن المقدمة والخلفية حادة قدر الإمكان من الأمام إلى الخلف:
              اضغط على الصورة لعرض أكبر. 

الإسم:	1697387022012.jpg 
مشاهدات:	58 
الحجم:	90.5 كيلوبايت 
الهوية:	170016
              تم التقاطها باستخدام فتحة صغيرة جدًا تبلغ f/16 لإزالة ضبابية الخلفية وتحقيق عمق مجال كافٍ

              تعليق


              • #22
                Here is a quick comparison that shows the difference between using a large vs a small aperture and what it does to your depth of field:
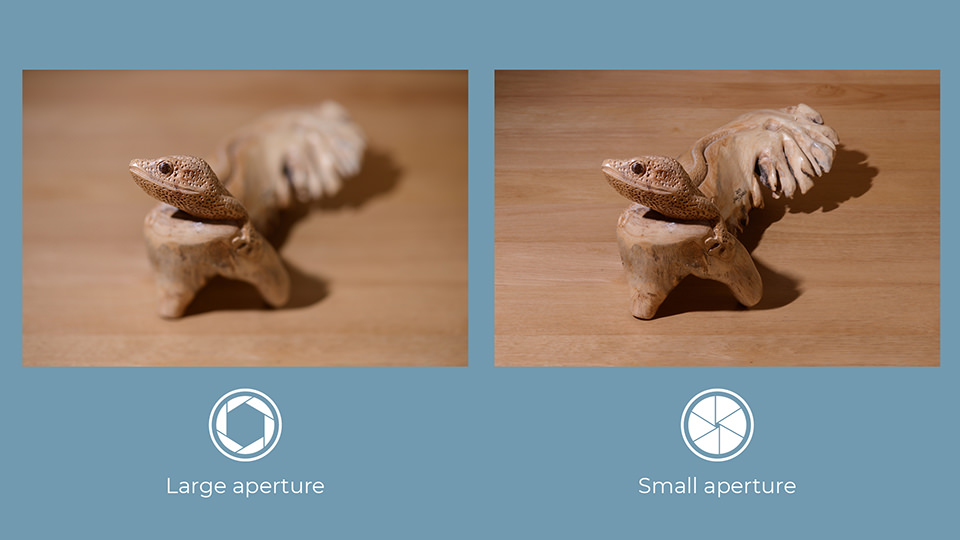
                A comparison of two images shot using large vs small apertures. (Normally the photo on the left would be brighter, but I equalized the exposure by using different shutter speeds in each shot.)
                As you can see, in the photograph on the left, only the head of the lizard appears in focus and sharp, while the background and foreground are both transitioning into blur. Meanwhile, the photo on the right has everything from front to back appearing in focus. This is what using large vs small aperture does to photographs.

                تعليق


                • #23
                  فيما يلي مقارنة سريعة توضح الفرق بين استخدام فتحة كبيرة مقابل فتحة صغيرة وما يفعله بعمق المجال لديك:
                  اضغط على الصورة لعرض أكبر. 

الإسم:	1697387186086.jpg 
مشاهدات:	58 
الحجم:	21.5 كيلوبايت 
الهوية:	170022

                  مقارنة بين صورتين تم التقاطهما باستخدام فتحات عدسة كبيرة مقابل فتحات عدسة صغيرة. (عادةً ما تكون الصورة على اليسار أكثر سطوعًا، ولكنني قمت بمساواة التعريض الضوئي باستخدام سرعات غالق مختلفة في كل لقطة.)

                  كما ترون، في الصورة على اليسار، يظهر رأس السحلية فقط في التركيز والوضوح، بينما تتحول الخلفية والمقدمة إلى ضبابية. وفي الوقت نفسه، تظهر الصورة الموجودة على اليمين كل شيء من الأمام إلى الخلف ضمن نطاق التركيز. هذا ما يفعله استخدام الفتحة الكبيرة مقابل الفتحة الصغيرة في الصور الفوتوغرافية.
                  التعديل الأخير تم بواسطة غدير معروف; الساعة 10-15-2023, 07:30 PM.

                  تعليق


                  • #24
                    What Are F-Stop and F-Number?


                    So far, we have only discussed aperture in general terms like large and small. However, it can also be expressed as a number known as “f-number” or “f-stop”, with the letter “f” appearing before the number, such as f/8.

                    Most likely, you have noticed aperture written this way on your camera before. On your LCD screen or viewfinder, your aperture will usually look something like this: f/2, f/3.5, f/8, and so on. Some cameras omit the slash and write f-stops like this: f2, f3.5, f8, and so on. For example, the Nikon camera below is set to an aperture of f/8:
                    Aperture is labeled in f-numbers, and in this case, I’m using f/8.
                    So, f-stops are a way of describing the size of the aperture for a particular photo.
                    التعديل الأخير تم بواسطة غدير معروف; الساعة 10-15-2023, 07:37 PM.

                    تعليق


                    • #25
                      ما هو F-Stop وF-Number؟

                      حتى الآن، ناقشنا الفتحة فقط بعبارات عامة مثل الكبيرة والصغيرة. ومع ذلك، يمكن أيضًا التعبير عنه برقم يُعرف باسم "f-number" أو "f-stop"، مع ظهور الحرف "f" قبل الرقم، مثل f/8.

                      على الأرجح أنك لاحظت أن فتحة العدسة مكتوبة بهذه الطريقة على الكاميرا من قبل. على شاشة LCD أو عدسة الكاميرا، ستبدو فتحة العدسة عادةً على النحو التالي: f/2، f/3.5، f/8، وما إلى ذلك. بعض الكاميرات تحذف الشرطة المائلة وتكتب f-stop مثل هذا: f2، f3.5، f8، وهكذا. على سبيل المثال، تم ضبط كاميرا Nikon أدناه على فتحة f/8:
                      اضغط على الصورة لعرض أكبر. 

الإسم:	1697387644117.jpg 
مشاهدات:	54 
الحجم:	95.0 كيلوبايت 
الهوية:	170025
                      يتم تصنيف فتحة العدسة بالأرقام البؤرية، وفي هذه الحالة، أستخدم f/8.

                      لذلك، فإن f-stop هي طريقة لوصف حجم فتحة العدسة في صورة معينة

                      تعليق


                      • #26
                        Minimum and Maximum Aperture of Lenses


                        Every lens has a limit on how large or how small the aperture can get. If you take a look at the specifications of your lens, it should say what the maximum and minimum apertures are. For almost everyone, the maximum aperture will be more important, because it tells you how much light the lens can gather at its maximum (basically, how dark of an environment you can take photos – and how much of a shallow focus effect you can achieve).

                        A lens that has a maximum aperture of f/1.4 or f/1.8 is considered to be a “fast” lens, because it can pass through more light than, for example, a lens with a “slow” maximum aperture of f/4.0. That’s why lenses with large apertures usually cost more.

                        By comparison, the minimum aperture is not that important, because almost all modern lenses can provide at least f/16 at the minimum. You will rarely need anything smaller than that for day-to-day photography.

                        With some zoom lenses, the maximum aperture will change as you zoom in and out. For example, with the Nikon 18-55mm f/3.5-5.6 AF-P lens, the largest aperture shifts gradually from f/3.5 at the wide end to just f/5.6 at the longer focal lengths. More expensive zooms tend to maintain a constant maximum aperture throughout their zoom range, like the Nikon 24-70mm f/2.8. Prime lenses also tend to have larger maximum apertures than zoom lenses, which is one of their major benefits.

                        The maximum aperture of a lens is so important that it’s included in the name of the lens itself. Sometimes, it will be written with a colon rather than a slash, but it means the same thing (like the Nikon 50mm 1:1.4G below).

                        تعليق


                        • #27
                          الحد الأدنى والحد الأقصى لفتحة العدسات

                          كل عدسة لها حد معين لمدى كبر أو صغر فتحة العدسة. إذا ألقيت نظرة على مواصفات العدسة الخاصة بك، فيجب أن تحدد الحد الأقصى والحد الأدنى للفتحات. بالنسبة للجميع تقريبًا، ستكون الفتحة القصوى أكثر أهمية، لأنها تخبرك بمقدار الضوء الذي يمكن للعدسة جمعه عند الحد الأقصى (أساسًا، مدى ظلمة البيئة التي يمكنك التقاط الصور بها - ومقدار تأثير التركيز البؤري الضحل الذي يمكنك تحقيقه ).

                          تعتبر العدسة التي تحتوي على فتحة قصوى تبلغ f/1.4 أو f/1.8 عدسة "سريعة"، لأنها يمكن أن تمر عبر ضوء أكثر من، على سبيل المثال، عدسة ذات فتحة قصوى "بطيئة" تبلغ f/4.0. . ولهذا السبب عادةً ما تكون تكلفة العدسات ذات الفتحات الكبيرة أعلى.

                          وبالمقارنة، فإن الحد الأدنى للفتحة ليس بهذه الأهمية، لأن جميع العدسات الحديثة تقريبًا يمكن أن توفر فتحة f/16 على الأقل كحد أدنى. نادرًا ما تحتاج إلى أي شيء أصغر من ذلك للتصوير الفوتوغرافي اليومي.

                          مع بعض عدسات التكبير/التصغير، يتغير الحد الأقصى للفتحة أثناء التكبير والتصغير. على سبيل المثال، مع عدسة Nikon مقاس 18-55 مم f/3.5-5.6 AF-P، تتغير الفتحة الأكبر تدريجيًا من f/3.5 عند الطرف العريض إلى f/5.6 فقط عند الأطوال البؤرية الأطول. تميل أدوات التكبير/التصغير الأكثر تكلفة إلى الحفاظ على الحد الأقصى للفتحة الثابتة عبر نطاق التكبير/التصغير، مثل عدسة Nikon مقاس 24-70 مم وبفتحة f/2.8. تميل العدسات الأولية أيضًا إلى أن تحتوي على فتحات قصوى أكبر من عدسات التكبير/التصغير، وهي إحدى فوائدها الرئيسية.

                          تعد الفتحة القصوى للعدسة مهمة جدًا بحيث يتم تضمينها في اسم العدسة نفسها. في بعض الأحيان، سيتم كتابته بنقطتين بدلاً من شرطة مائلة، ولكنه يعني نفس الشيء (مثل Nikon 50mm 1:1.4G أدناه).

                          اضغط على الصورة لعرض أكبر. 

الإسم:	1697435610151.jpg 
مشاهدات:	57 
الحجم:	30.1 كيلوبايت 
الهوية:	170197

                          تعليق


                          • #28
                            Examples of Which Aperture to Use


                            Now that we have gone through a thorough explanation of how aperture works and how it affects your images, let’s take a look at the situations where you’d want to use various f-stops.
                            • f/0.95 – f/1.4 – Such “fast” maximum apertures are only available on premium prime lenses, allowing them to gather as much light as possible. This makes them ideal for any kind of low-light photography (such as photographing the night sky, wedding receptions, portraits in dimly-lit rooms, corporate events, etc). With such wide f-stops, you will get very shallow depth of field at close distances, where the subject will appear separated from the background.
                            • f/1.8 – f/2.0 – Some enthusiast-grade prime lenses are limited to f/1.8, which still has very good low-light capabilities. Also, if your purpose is to yield aesthetically-pleasing images with shallow focus, these lenses be of tremendous value. Shooting between f/1.8 and f/2 typically turns your backgrounds nice and creamy for portraiture and other similar types of photography.
                            • f/2.8 – f/4 – Most zoom lenses are limited to a maximum aperture of f/2.8 to f/4 at best. While they are not as capable as f/1.4 lenses in terms of light-gathering capabilities, they are still enough to shoot in reasonably low light conditions, especially if the lens or camera has image stabilization. You’ll get some subject separation at these apertures, but usually not enough to make the background completely fuzzy. Such apertures are great for travel, sports, and wildlife photography.
                            • f/5.6 – f/8 – This is the right starting point for most landscape and architectural photography. It’s also ideal for documentary and portrait photography where you don’t want a blurry background. Also, most lenses are sharpest around f/5.6, which doesn’t matter as much as getting the right depth of field, but is still nice.
                            • f/11 – f/16 – Typically used for photographing scenes where as much depth of field as possible is needed, like macro photography or landscape photography with a nearby foreground. Even though these apertures offer more depth of field, they do lose some low-level sharpness due to the effect of lens diffraction.
                            • f/22 and smaller – Only shoot at such small apertures if you know what you are doing. Sharpness suffers greatly at f/22 and smaller apertures because of diffraction, so you should avoid using them when possible. If you need to get more depth of field, it is usually best to move away from your subject or use a focus stacking technique instead.

                            You’ve made it this far, but are you willing to learn more about aperture? So far we have only touched the basics, but aperture does so much more to your photographs. Let’s take a closer look.

                            تعليق


                            • #29
                              أمثلة على الفتحة التي يجب استخدامها

                              الآن بعد أن تناولنا شرحًا شاملاً لكيفية عمل فتحة العدسة وكيفية تأثيرها على صورك، دعنا نلقي نظرة على المواقف التي تريد فيها استخدام نقاط توقف مختلفة.

                              f/0.95 - f/1.4 - تتوفر هذه الفتحات القصوى "السريعة" فقط في العدسات الأولية المتميزة، مما يسمح لها بجمع أكبر قدر ممكن من الضوء. وهذا يجعلها مثالية لأي نوع من التصوير الفوتوغرافي في الإضاءة المنخفضة (مثل تصوير السماء ليلاً، وحفلات الزفاف، والصور الشخصية في الغرف ذات الإضاءة الخافتة، وأحداث الشركات، وما إلى ذلك). مع هذه التوقفات الواسعة، ستحصل على عمق مجال ضحل جدًا على مسافات قريبة، حيث سيظهر الهدف منفصلاً عن الخلفية. f/1.8 - f/2.0 - تقتصر بعض العدسات الأولية المخصصة للمتحمسين على f/1.8، والتي لا تزال تتمتع بقدرات جيدة جدًا في الإضاءة المنخفضة. وأيضًا، إذا كان هدفك هو إنتاج صور مبهجة من الناحية الجمالية مع تركيز سطحي، فإن هذه العدسات تكون ذات قيمة هائلة. يؤدي التصوير بين f/1.8 وf/2 عادةً إلى تحويل خلفياتك إلى جميلة وكريمية للصور الشخصية وأنواع أخرى مماثلة من التصوير الفوتوغرافي. f/2.8 - f/4 - تقتصر معظم عدسات التكبير/التصغير على فتحة قصوى تتراوح من f/2.8 إلى f/4 في أحسن الأحوال. على الرغم من أنها ليست بنفس قدرة العدسات f/1.4 من حيث قدرات جمع الضوء، إلا أنها لا تزال كافية للتصوير في ظروف الإضاءة المنخفضة بشكل معقول، خاصة إذا كانت العدسة أو الكاميرا مزودة بتثبيت الصورة. ستحصل على بعض الفصل بين الهدف عند هذه الفتحات، ولكن عادةً لا يكون ذلك كافيًا لجعل الخلفية غامضة تمامًا. تعتبر هذه الفتحات رائعة لتصوير السفر والرياضة والحياة البرية.f/5.6 – f/8 – هذه هي نقطة البداية الصحيحة لمعظم تصوير المناظر الطبيعية والمعمارية. كما أنه مثالي للتصوير الفوتوغرافي الوثائقي والصور الشخصية حيث لا تريد خلفية ضبابية. أيضًا، تكون معظم العدسات أكثر وضوحًا عند f/5.6، وهو أمر لا يهم بقدر الحصول على عمق المجال الصحيح، ولكنه لا يزال رائعًا. f/11 – f/16 - يُستخدم عادةً لتصوير المشاهد التي يكون فيها عمق المجال كبيرًا قدر الإمكان، مثل تصوير الماكرو أو تصوير المناظر الطبيعية مع مقدمة قريبة. على الرغم من أن هذه الفتحات توفر عمقًا أكبر للمجال، إلا أنها تفقد بعض الحدة منخفضة المستوى بسبب تأثير حيود العدسة.f/22 والأصغر - لا تلتقط هذه الفتحات الصغيرة إلا إذا كنت تعرف ما تفعله. تتأثر الحدة بشكل كبير عند استخدام f/22 وفتحات أصغر بسبب الحيود، لذا يجب عليك تجنب استخدامها عندما يكون ذلك ممكنًا. إذا كنت تريد الحصول على عمق أكبر للمجال، فمن الأفضل عادةً الابتعاد عن الهدف أو استخدام تقنية تكديس التركيز البؤري بدلاً من ذلك.

                              لقد وصلت إلى هذا الحد، ولكن هل أنت على استعداد لمعرفة المزيد عن فتحة العدسة؟ لقد تطرقنا حتى الآن إلى الأساسيات فقط، لكن فتحة العدسة تفعل الكثير في صورك الفوتوغرافية. دعونا نلقي نظرة فاحصة.

                              تعليق


                              • #30
                                Everything Aperture Does to Your Photos


                                Ever wondered how else aperture affects your photographs aside from brightness and depth of field? In this part of the article, we will go through all other ways aperture impacts your images, from sharpness to sunstars, and tell you exactly why each matters.
                                A landscape image captured at f/16 to bring everything from foreground to background into focus. Diffraction can be a problem at such small apertures, as explained below.
                                Before diving into too many specifics, here’s a quick list of everything aperture affects in photography:
                                • The brightness / exposure of your photos and depth of field, as discussed so far
                                • Sharpness loss due to diffraction
                                • Sharpness loss due to lens quality
                                • Starburst effects on bright lights
                                • Visibility of camera sensor dust specks
                                • The quality of background highlights (bokeh)
                                • Focus shift on some lenses
                                • Ability to focus in low light (under some conditions)
                                • Controlling the amount of light from the flash

                                تعليق

                                يعمل...
                                X